
Chapter 2. Getting Ready to Edit
Now that you’re familiar with the Adobe® Premiere Elements® interface, you’ll learn how to create a project, set relevant user preferences, and configure the interface to your liking. For those tempted to skip this chapter, understand that although Premiere Elements is a wonderfully flexible and customizable program, once you choose a project setting and start editing, you can’t change the setting.
Although you can often work around this issue, in some instances you may have to abandon the initial project and start again using a different setting to achieve the desired results. Invest a little time here to understand how Premiere Elements works with project settings so you can get your project done right the first time.
In this lesson, you’ll learn to do the following:
• Create a new project
• Choose the optimal setting for your project
• Set preferences for Auto Save, Scratch Disks, and the user interface
• Customize window sizes and locations in the workspace
• Restore the workspace to its default configuration
![]()
This lesson will take approximately one hour.
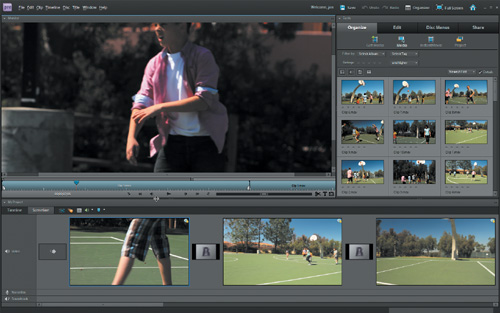
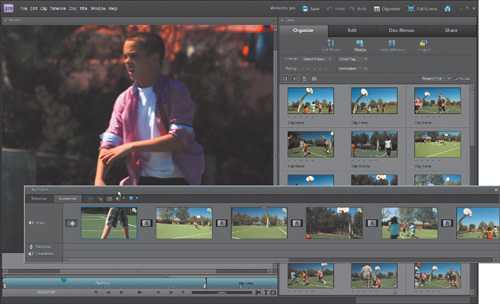
Customizing Premiere Elements’ interface in Storyboard mode.
Setting Up a New Project
Premiere Elements can work with video from any source, from DV camcorders shooting 4:3 or 16:9 (widescreen) standard-definition (SD) video to the latest AVCHD and HDV high-definition (HD) camcorders. For the best results, you should choose a project setting that matches your source footage, following the procedure described here.
After you choose a setting, Premiere Elements automatically uses the same setting for all future projects, which should work well if you use the same source video format for all subsequent projects. Should you change the format, however—for example, from DV to HDV—remember to change your project setting as well.
- Launch Premiere Elements and click the New Project button in the Welcome screen. If Premiere Elements is already open, choose File > New > Project.
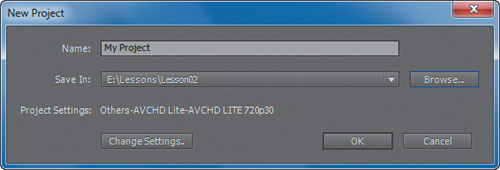
- Check the Project Settings in the lower-left corner of the New Project screen. If the Project Settings match your source footage, proceed to step 4. If not, click the Change Settings button to open the Setup screen.
Note
For more information on a Preset, click the setting, and Premiere Elements will display technical details in the Description field.
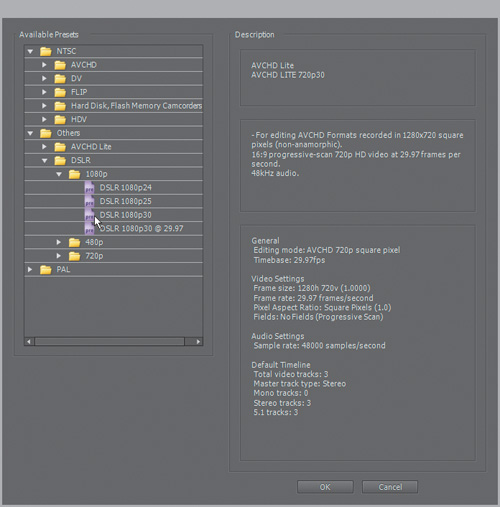
- Click the Preset that matches your source footage (note that this isn’t the right Preset for the source footage provided on the DVD. For that, use the AVCHD LITE 720p30 preset found in the AVCHD Lite folder [Others > AVCHD Lite]).
- After choosing a Preset, click OK to close the Setup screen.
- In the New Project panel, choose a name and storage location for the new project. Then click OK to save the new project file.
Diagnosing Settings-related Issues
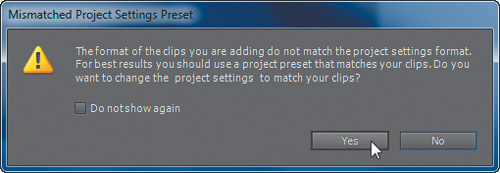
As mentioned, choosing the right preset is critical to a successful editing experience. To help ensure that you choose the right preset, Premiere Elements alerts you with the Mismatched Project Settings Preset dialog when the first video clip that you add to the project doesn’t match the Preset.
Note
This is a descriptive section—don’t try to follow along in your program, just learn through the screens shown in the book.
Typically, you should click Yes and change the project settings to match the clip. Exceptions might be when the first clip that you add to the project comes from a source other than the main footage you’ll be using for the project. Unless you have a reason to choose otherwise, click Yes when you see the Mismatched Project Settings Preset dialog.
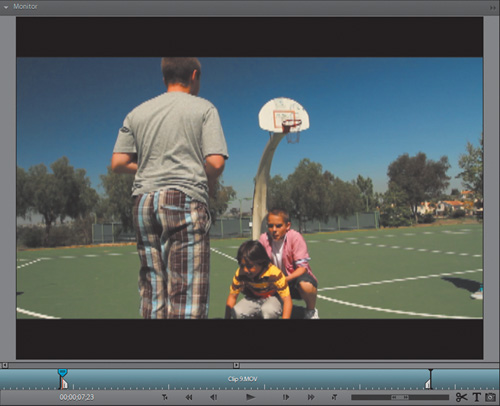
If you’ve chosen the wrong project setting, the most common problem you’ll encounter concerns differences in the aspect ratio of your video. This is evidenced by black bars across the sides or top and bottom of the video in the Monitor panel, which is a display technique called letterboxing. Premiere Elements will letterbox a 16:9 video displayed in a 4:3 window, producing the black bars on the top and bottom of the video in the Monitor panel, as shown in the next figure.
Note
In some projects, particularly those that include both 16:9 and 4:3 footage, letterboxing is inevitable, at least when you initially insert the file into the My Project panel. Note that you can use Motion controls to eliminate the letterboxing as detailed in “Reframing a Clip Using Motion Controls” in Lesson 6.
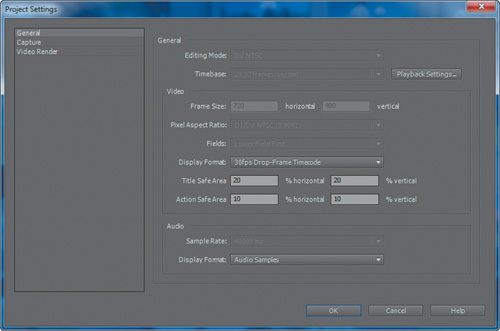
- Letterboxing typically means a mismatch between your project settings and source video. To view the current project setting, choose Edit > Project Settings > General. In this project with the letterboxing issue, as you can see in the Project Settings screen (shown on the following page), the Editing Mode is DV NTSC (rather than AVCHD) and the Pixel Aspect Ratio is D1/DV NTSC (0.9091), which is 4:3 video.
- Since you’re editing HD video footage, your project Pixel Aspect Ratio should be Square Pixel (1.0). Both fields are grayed out and inactive, indicating that you can’t change their values. Click OK to close the Project Settings screen.
In addition to these two issues, the Project Settings have the wrong timebase, which should be 30, not 29.97. Also, the source video on the DVD is progressive, not interlaced, so the Fields box should display No Fields (Progressive Scan). These latter two discrepancies could cause problems down the line, but the most obvious issue is the letterboxing, which is caused by the difference between the 4:3 preset and 16:9 source footage.
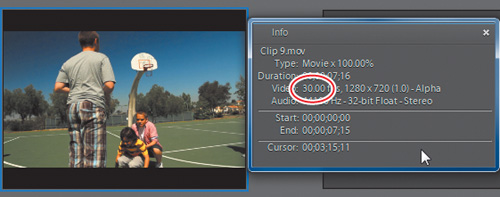
- To view aspect ratio-related information about clips in the My Project panel, choose Window > Info. If you don’t have any clips in the My Project panel, drag one down from the Media view into the Sceneline or Timeline in the My Projects panel.
- Click any clip in the Timeline or Sceneline. In the Video description line in the Info panel, you can see that the video has a frame rate of 30 frames per second (fps) and a resolution of 1280×720, which is widescreen 16:9, with a pixel aspect ratio of (1.0). Note that you may have to grab the Info dialog on the right and make the window wider to see the complete description.
To display the 16:9 video in a 4:3 project, Premiere Elements inserts letterboxes on the sides of the 4:3 video. You can eliminate the letterboxes using the controls discussed in “Reframing a Clip with Motion Controls” in Lesson 6, which is a good solution when including one 4:3 clip in a 16:9 movie. If all your clips are 4:3, however, you should restart the project using a 4:3 setting.
Choosing the Correct Setting
Premiere Elements offers 29 different presets for ingesting source footage. By far the easiest way to choose the right preset is to make sure that the first clip you import into your new project is from your primary camcorder. If so, and there’s a mismatch between your preset and source footage, Premiere Elements will open the Mismatched Project Settings Preset dialog and ask if you want to change the preset to match your clips. Click Yes, and you should be set.
If you’re the curious, hands-on type, you may want to understand the factors that you should consider when choosing a preset, such as the following:
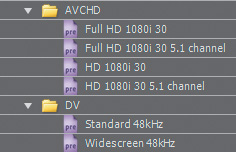
Source:Consider the source. Premiere Elements has presets for AVCHD, DV, Flip, Hard disk and Flash Memory Camcorders, HDV camcorders, and video shot with HD video-capable DSLR camcorders such as the Canon EOS family. So the first step is to find the presets that relate to your source.
Resolution:Consider the resolution of the video next, which is typically either 1080i or 1080p (1920 horizontal, 1080 vertical); 720i or 720p (1280h, 720v); 720h, 480v resolution for DV; and sometimes 480p, which is 640h, 480v resolution. Find a preset that matches your source.
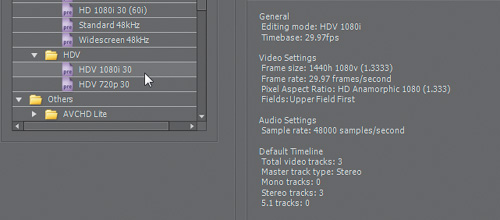
Complicating this resolution selection, however, is the pixel aspect ratio issue, which affects AVCHD and HDV camcorders, as well as DV. Specifically, all HDV camcorders that shoot in 1080i or 1080p actually capture video at 1440×1080 resolution and then stretch the video to 1920×1080 during display. That’s why the HDV 1080i 30 HDV preset shows a frame size of 1440×1080 and a pixel aspect ratio of 1.333. This tells Premiere Elements to stretch the 1440 horizontal resolution by 1.333 to display it correctly on the Timeline. Although this is perhaps confusing, this distinction never causes any problems, because all HDV 1080 video is stored in this manner.
On the other hand, when shooting 1080i or 1080p video, all AVCHD camcorders display the video at 1920×1080 resolution. However, like HDV, “HD” AVCHD video is stored by the camcorder at a resolution of 1440×1080, and each horizontal pixel must be stretched by a factor of 1.33 during display to achieve full resolution. In contrast, “Full HD” AVCHD video is captured at 1920×1080 resolution, so no stretching is required to produce the full 1920×1080 display. If you’re shooting in AVCHD, check the specs of your camcorder to determine if you’re shooting in Full HD or just HD.
Finally, all DV video is shot at 720×480 resolution, but 4:3 video has a pixel aspect ratio of .9091, which means that the pixels are shrunk about 10 percent during display, achieving the 4:3 aspect ratio. Widescreen DV video has a pixel aspect ratio of 1.2121, so the video is stretched during display, achieving the 16:9 aspect ratio. This is seldom confusing, however, since you’ll probably know whether you shot in 4:3 or widescreen, and you can choose the preset accordingly.
Progressive or interlaced:After you identify the right resolution and aspect ratio, you must choose whether the video is interlaced or progressive. Technically, interlaced video presents each frame in two fields—one consisting of the odd lines, the other of the even lines. Progressive video displays all lines simultaneously. TV is almost always interlaced, whereas film-based movies are always progressive. Most modern camcorders shoot in both modes (or at least simulate both modes effectively); just check the settings on your camcorder to see if you shot in progressive or interlaced, and then choose your preset accordingly.
Frames per second:Most camcorders can shoot at multiple speeds, including 23.976 fps, 24 fps, 29.97 fps, 30 fps, 59.94 fps, and 60 fps. Again, check the settings on your camcorder to see which frame rate you used, and then choose your preset accordingly.
Once you understand and incorporate all these factors into your preset selection, you should be able to choose the right preset, if it’s available. What do you do if you can’t find a preset that matches the precise specs that you shot in? Let Premiere Elements decide. Choose the closest preset that you can find, drag a clip in, and click Yes if Premiere Elements opens the Mismatched Project Settings Preset dialog.
Working with Project Preferences
For the most part, once you have the right project setting selected, you can jump in and begin editing with Premiere Elements. However, at some point you may want to adjust several program preferences that impact your editing experience. Here are the preferences that will prove relevant to most video editors.
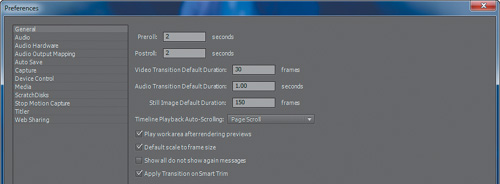
- To open the General Preferences panel, choose Edit > Preferences > General (Windows) or Adobe Premiere Elements 9 > Preferences > General (Mac OS). Multiple preferences are in this panel; most important are the Video and Audio Transition Default Durations and the Still Image Default Duration. The latter controls the duration of all still images added to your project.
Note
Adjusting these default durations will impact only edits made after the adjustment. For example, if you change the Still Image Default Duration to 120 frames, Premiere Elements will assign this duration to all still images added to the project thereafter but won’t change the duration of still images already inserted into the project.
- Click Auto Save to view Auto Save preferences.

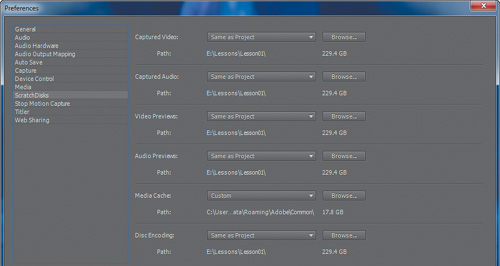
- Click Scratch Disks to view the ScratchDisks preferences. These preferences identify the folders used to store audio and video clips that Premiere Elements creates while producing your project. This includes clips captured from your camcorder, video and audio previews, and media encoded for recording onto DVD or Blu-ray Disc. By default, Premiere Elements stores this content in the same folder as the project file. If you run short of disk space, you can change the location of the scratch disk by clicking the Browse button next to each category of content and choosing a different location on a separate disk. Close the Preferences dialog.
The preceding preferences are the most critical to consider before starting your first project. With these configured, let’s explore other options for customizing your workspace.
Customizing the Workspace
Premiere Elements uses a docking system to fit all the panels into the available space of the application window. However, panels can be moved and resized so that you can create a workspace that best fits your needs.
With Premiere Elements open, notice that the Monitor panel, the Tasks panel, and the My Project panel are separated by solid vertical and horizontal dividing lines. These dividers can be quickly repositioned to give you more space to work in one of the panels when you need it.
- To increase the height of the My Project panel, hover your pointer over the dividing line between the My Project and Monitor panels until it converts to a two-headed cursor, and then drag it up toward the Monitor panel.

You can use a similar technique to expand the size of the Monitor panel by dragging it to the right, or expand the Tasks panel by dragging it to the left.
- To reset the panels to their default layout, choose Window > Restore Workspace. Notice how everything snaps back to its original position. Consider restoring your workspace if you find that your screen becomes cluttered.
To save some space on your screen, the docking headers of the panels, which contain title and sometimes panel menu and Close buttons, are hidden by default in Premiere Elements.
- To show the docking headers, choose Window > Show Docking Headers. To hide them again, choose Window > Hide Docking Headers.
Although the default workspace layout has every panel docked into a specific position, you may find it helpful from time to time to have a more flexible environment. To do this, you can undock, or float, your panels.
- If the docking headers are not currently visible, choose Window > Show Docking Headers. Then click the docking header of the My Project panel and drag it a short distance in any direction. As you drag the header, the panel becomes translucent. When you release the pointer, the My Project panel becomes a floating window, allowing the Monitor panel and the Tasks panel to expand toward the bottom of the main window.
- Close the My Project panel by clicking its Close button (
 ) in the upper-right corner.
- Reopen the panel by choosing Window > My Project. Notice that the panel opens where you previously placed it. This is because Premiere Elements remembers the locations of the panels and retains them as part of the customized workspace.
- Choose Window > Restore Workspace to return to the default workspace layout.
Review questions
1. What’s the most important factor to consider when choosing a project setting?
2. Why is it so important to choose the right setting at the start of the project?
3. In most instances, what’s the right answer when Premiere Elements displays the Mismatched Projects Settings Preset dialog?
4. What is letterboxing, and what’s a common cause for having letterboxes appear in your project?
5. What is Auto Save, and where do you adjust the Auto Save defaults in Premiere Elements?
6. What command do you use for restoring your workspace to the default panel configuration?
Review answers
1. Choose a setting that matches the primary video that you will use in the project. For example, if you’re shooting in widescreen DV, you should use a Widescreen DV project setting.
2. It’s critical to choose the right setting when starting a project because unlike most Premiere Elements configuration items, you can’t change the Project Setting after you create the project. In some instances, you may have to start the project over using the correct setting to produce optimal results.
3. In most instances, the correct answer is Yes.
4. Letterboxing is a display technique characterized by black bars on the sides or on the top and bottom of video in the Monitor panel. One of the most common causes of letterboxing is a discrepancy between the display aspect ratio of the project setting and the display aspect ratio of a video file imported into the project. For example, if you import 4:3 video into a 16:9 project, Premiere Elements will display letterboxes on both sides of the video in the Monitor panel.
5. The Auto Save function in Premiere Elements automatically saves a copy of the project file at specified intervals, guarding against loss of work due to power outages or other random crashes. You can adjust the Auto Save defaults in the Preferences panel by choosing Edit > Preferences.