Chapter 11. Creating Menus
In this lesson, you’ll create a menu for a movie to be recorded on a DVD or Blu-ray Disc. You can follow along with most of this lesson even if your system does not have a DVD or Blu-ray Disc burner, although it will be helpful if it does. You’ll learn how to add menu markers that allow your viewers direct access to scenes in your movies and how to create and customize disc menus. You’ll also learn how to preview a menu and then burn a DVD or Blu-ray Disc for playback on a standard DVD or Blu-ray Disc player. Specifically, you’ll learn how to do the following:
• Add menu markers to your movie
• Create an auto-play disc
• Use templates to create disc menus
• Customize the look of the menus
• Preview a disc menu
• Record a DVD or Blu-ray Disc
• Create a Web DVD
![]()
This lesson will take approximately two hours.

Creating a DVD with menus.
Getting Started
To begin, you’ll launch Adobe Premiere Elements, open the Lesson11 project, and review a final version of that project.
Note
On some computers, we’ve experienced errors loading the play_by_play and SmartSound wav files in the Lesson11_End and Lesson11_Start projects on the Windows platform. If you experience this issue, you’ll see a File Import Failure error message for one or both WAV files. If you see this error, click OK to close the dialog and then load both audio files from the Lesson09 folder using the “Where is the” dialog that will open next. These files are identical to the same files in the Lesson11 folder, but will load into the program and let you continue with the lesson. Sorry for any inconvenience.
- Before you begin, make sure that you have correctly copied the Lesson11 folder from the DVD in the back of this book onto your computer’s hard disk. See “Copying the Classroom in a Book Files” in the Getting Started section at the beginning of this book.
- Launch Adobe Premiere Elements.
- In the Welcome screen, click the Open Project button and then click Open in the pop-up menu. In the Open Project dialog, navigate to the Lesson11 folder, select the file Lesson11_End_Win.prel (Windows) or Lesson11_End_Mac.prel (Mac OS), and then click Open. If a dialog appears asking for the location of rendered files, click the Skip Previews button.
A finished version of the project file you will create in this lesson opens with the Monitor, Tasks, and My Project panels open. You may review it now or at any point during the lesson to get a sense of what your project should look like.
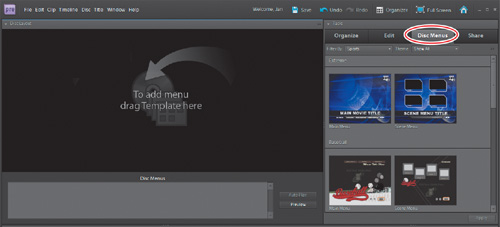
- Select Disc Menus in the Tasks panel to switch to the Disc Menus workspace. In the Disc Layout panel, click Preview to open the Preview Disc window.
The Preview Disc window allows you to view and test your menus as they will appear when played on a DVD or Blu-ray player.
- In the Preview Disc window, click the Scene Selection button in the main menu to switch to the Scene Selection menu. Click the Videos button to begin playing this selection.
- Press the spacebar to stop the playback, and then close the Preview Disc window by clicking the Close button (
 ) in the upper-right corner of the window.
 - After reviewing the finished file, choose File > Close. In the dialog, click No so that you do not save any changes made to the project. Then click the Open Project button, click Open, select the file Lesson11_Start_Win.prel (Windows) or Lesson11_Start_Mac.prel (Mac OS) and click Open. If a dialog appears asking for the location of rendered files, click the Skip Previews button.
- Choose Window > Restore Workspace to ensure that you start the lesson with the default panel layout.
Understanding DVDs and Blu-ray Discs
DVD is a generic term that encompasses a few different formats. The format you will work with in Premiere Elements is commonly referred to as DVD-Video. In terms of disc content and playability, this is the same type of DVD that you can purchase or rent and play on a DVD player connected to your TV set or on a computer fitted with the appropriate drive.
A Blu-ray Disc—often abbreviated as BD—is an optical disc format that can store 25 gigabytes (GB) on a single-layer disc or 50 GB on a dual-layer disc. It gets its name from the blue-violet laser a Blu-ray player uses to read it (as opposed to the red laser used by CD and DVD players and drives).
To make a DVD or Blu-ray Disc in Premiere Elements, you must have a compatible DVD or Blu-ray Disc burner. It’s important to note that although your system may have a DVD or Blu-ray Disc player, it may not be a recordable drive, also known as a DVD or Blu-ray Disc writer or burner. A computer drive that’s described as DVD-ROM or BD-ROM will only play DVDs or Blu-ray Discs, not record them. (But a BD-ROM/DVD-R/CD-R drive will play Blu-ray Discs, play and record DVDs, and play and record CDs.) Check the system specifications of your computer to see which drive (if any) you have. Drives capable of recording DVDs and Blu-ray Discs are also available as external hardware. Often, such external recordable drives are connected through your system’s IEEE 1394 port, although some drives connect through the USB port.
Note that the process of authoring your projects, or creating menus and menu markers, is identical for Blu-ray Discs and DVDs. You’ll designate which type of disc to record just before you burn the disc in the final exercise of this lesson.
Physical Media
The type of disc onto which you’ll record your video is important. You should be aware of two basic formats: Recordable (DVD-R and DVD+R for DVDs, BD-R for Blu-ray Discs) and Rewritable (DVD-RW and DVD+RW for DVDs, BD-RE for Blu-ray Discs). Recordable discs are single-use discs; once you record data onto a recordable disc, you cannot erase the data. Rewritable discs can be used multiple times, much like the floppy disks of old.
Also available are dual-layer DVD-Recordable discs (DVD-R DL and DVD+R DL) that offer 8.5 GB of storage space instead of the 4.7 GB of standard DVD-R, DVD+R, DVD-RW, and DVD+RW discs. Dual-layer BD-R discs, featuring 50 GB of storage space, will come to market soon, but you don’t need to be concerned with them at this point.
So which format should you choose? The first thing to note is that DVD-R and DVD+R discs are 100 percent interchangeable. Any drive that records one will record the other, and the same players and drives that play one will almost certainly play the other, at least with single-layer media. It’s the same with DVD-RW and DVD+RW. In the very early days of DVD, there was a meaningful distinction between the – and + formats, but it’s been irrelevant for close to a decade now.
Compatibility is one of the major issues with recordable disc formats. On the DVD side, there are many older DVD players that may not recognize some rewritable discs created on a newer DVD burner, for example. Compatibility is also more of a concern with dual-layer media than with single-layer discs. Another issue is that, as of this writing, the media for recordable discs is less expensive than the media for rewritable discs (usually much less than $1 per disc). However, if you make a mistake with a recordable disc, you must use another disc, whereas with a rewritable disc you can erase the content and use the disc again. For this reason, I suggest using rewritable discs for making your test discs, and then using recordable discs for final or extra copies.
On the Blu-ray Disc side, the technology is still fairly new and playback compatibility is at least a minor issue with all media. But because the BD-R and BD-RE formats were developed at the same time, BD-RE discs are just as likely to play in a given player as their BD-R counterparts. That said, BD-R discs have come down to the $1.50–$2 range in quantities of 15–25, whereas BD-RE discs remain quite a bit more expensive, so you’ll probably find BD-R discs more cost-effective, even though they can’t be erased and reused.
Manually Adding Scene Markers
When watching a DVD or Blu-ray Disc movie, you normally have the option to jump to the beginning of the next chapter by clicking a button on the remote control. To specify the start of chapters or sections in your project, you must add scene markers.
Note
This project is only about two minutes long due to necessary limitations on the file size. Most projects would likely be longer, but the basic principles remain the same.
- Scroll through the entire movie in the Timeline of the My Project panel.
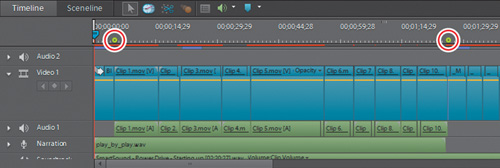
This project consists of two main sections, the videos and the slide show. You will place scene markers at the beginning of each section so your viewers can access these sections more easily during playback. You’ll start by adding the marker for the videos.
- Press the Home key to move the current-time indicator to the start of the movie. Then press the Page Down key to move to the start of Clip 1.mov.
- On the top left of the My Project panel, click the Markers drop-down list box (
 ), and choose Menu Marker > Set Menu Marker. The Menu Marker panel opens.

- You’ll work more with this panel later in this lesson; for now, just click OK to close the panel.
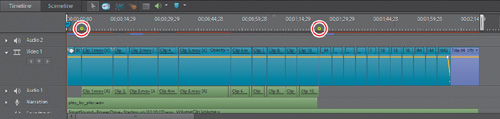
- Notice the green scene marker icon added just below the previous marker on the time ruler.
- In the My Project panel, click the Sceneline button to switch to Sceneline. If necessary, scroll to the right to view Clip 1.mov. Notice the faint scene marker icon added to the upper-right corner of the clip in the Sceneline.
- Click the Timeline button in the My Project panel to return to the Timeline.
- Drag the current-time indicator to the start of the slide show, which should be around 00;01;26;08.
- Right-click the time ruler at the current-time indicator and choose Set Menu Marker. Click OK to close the Menu Marker panel.

- You should now have two markers in your project, one for each section of this short movie.
Creating an Auto-play Disc
Most professional DVDs and Blu-ray Discs have menus to help viewers navigate through the disc content. You will work with menus shortly, but there is a quick and easy way to produce a disc without menus: creating an auto-play disc. An auto-play disc is similar to videotape: When you place the disc into a player, it will begin playing automatically. There is no navigation, although viewers can jump from scene to scene—defined by the markers you just added—using a remote control.
Auto-play discs are convenient for short projects that don’t require a menu or as a mechanism to share unfinished projects for review. For most longer or finished projects, you’ll probably prefer to create a menu.
Note
The Auto-Play button should be dimmed and no template selected. Click the Auto-Play button if your Disc Layout panel looks different from the one shown here.
- Select Disc Menus in the Tasks panel to switch to the Disc Menus workspace. The Disc Layout panel replaces the Monitor panel, and Templates view opens in the Disc Menus tab of the Tasks panel. If you want to see the panel names, choose Window > Show Docking Headers.
- In the Disc Layout panel, click the Preview button to open the Preview Disc window. The Preview Disc window allows you to view and test your disc as it will appear when viewed on a DVD or Blu-ray Disc player.
- In the Preview Disc window, click the Play button (
 ) to begin playing your project. Once the first video clip begins playing, click the Next Scene button (
 ), and the video will jump to the next scene. The scenes are defined by the scene markers you added to your project. When viewing this disc on a TV set, viewers can use a remote control to advance through the scenes.
 - Click the Exit button (
 ) on the bottom right of the Preview Disc window, or the Close button () in the upper-right corner of the Preview Disc window to close it.

- Choose File > Save As and save this project file into your Lesson11 folder as Lesson11_Work.prel.
Automatically Generating Scene Markers
Manually placing markers in the Timeline gives you ultimate control over the placement of your markers. For long videos, however, you may not want to place all the markers by hand. To make the process of placing markers easy, Premiere Elements can create markers automatically based on several configurable parameters.
- Choose File > Save As and save this project file into your Lesson11 folder as Lesson11_Markers.prel. You’ll return to the original project file after you finish exploring the automatic generation of scene markers.
- Right-click in the preview area of the Disc Layout panel, and then choose Auto-Generate Menu Markers.
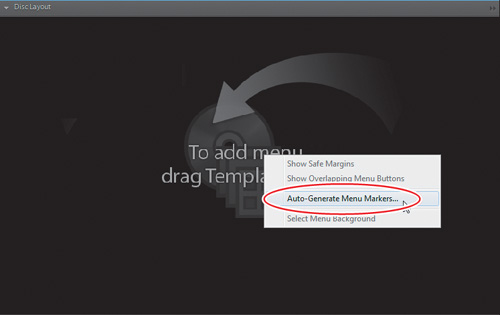
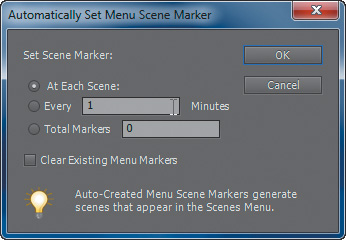
- The Automatically Set Menu Scene Marker dialog appears. Keep the default option selected to set a scene marker At Each Scene, or to be more specific, at the beginning of every clip on the Video 1 track. The Clear Existing Menu Markers check box should remain deselected unless you want to erase existing markers. Click OK to close the dialog. Scene markers appear at the beginning of every clip.
- If you’re not in the Timeline already, switch to the Timeline in the My Project panel to review the position of all the markers in your project.
- Click the Preview button in the Disc Layout panel.
- In the Preview Disc window, click the Play button () to begin playing your project. Once the first video clip begins playing, click the Next Scene button () repeatedly and notice how the video jumps from scene to scene.
- Click the Exit button () on the bottom right of the Preview Disc window to close it.
- Right-click in the preview area of the Disc Layout panel, and then choose Auto-Generate Menu Markers to again open the Automatically Set Menu Scene Marker dialog.
- Select the Clear Existing Menu Markers check box. Choose the Total Markers option, type 4 into the number field, and then click OK.
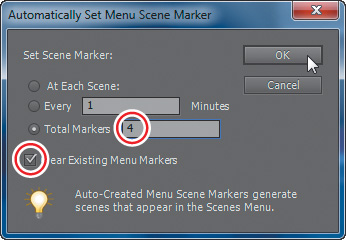
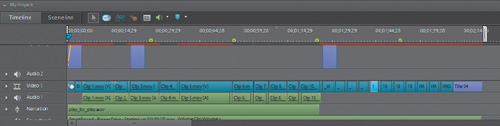
Four markers are now evenly spread out across the Timeline.
Using the Total Markers option may be preferable to creating a marker for every clip to reduce the number of scenes in your movie. As you’ll see in the next exercise, when creating a disc with menus, Premiere Elements automatically creates buttons and menus based on the markers in your project. Too many markers might result in too many navigation buttons and screens for your movie.
- Choose File > Save. Then choose File > Open Recent Project > Lesson11_Work.prel to return to the project file from the previous exercise.
Creating a Disc with Menus
Building an auto-play disc as you did in the previous exercise is the quickest way to go from a Premiere Elements project to an optical disc you can watch in your living room. However, auto-play discs lack the ability to jump directly to different scenes, as well as other navigational features that most users expect when watching a DVD or Blu-ray Disc. You can quickly create such navigation menus in Premiere Elements using a variety of templates designed for this purpose.
- If you are not currently in the Disc Menus workspace, select Disc Menus in the Tasks panel to switch to it now.
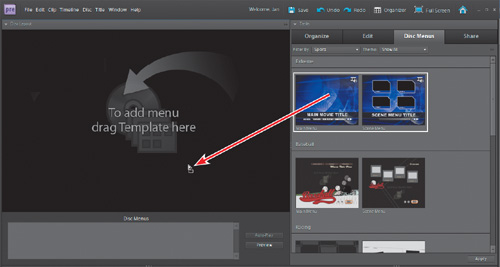
- Premiere Elements ships with many distinctive menu templates—predesigned and customizable menus that come in a variety of themes and styles. Select Sports from the category menu, and then select the template called Extreme from the menu next to it. If you don’t have this category or template, choose another.
- To apply the Extreme template to your project, click to select the template in Templates view, and then click the Apply button (
 ) in the lower-right corner of Templates view. Or, drop the template from Templates view onto the Disc Layout panel.
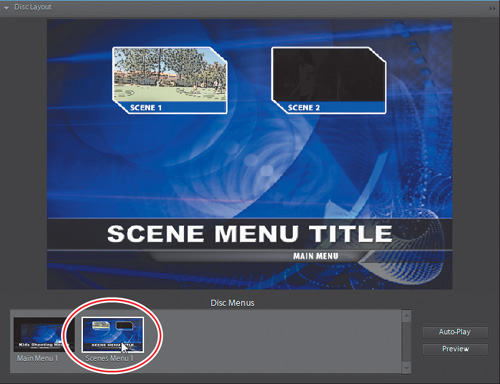
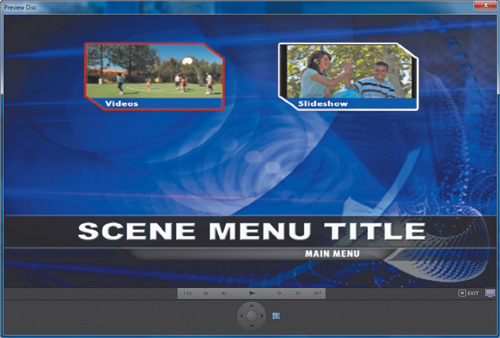
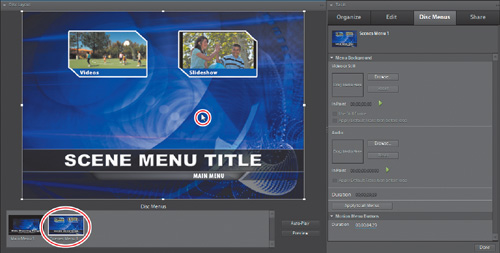
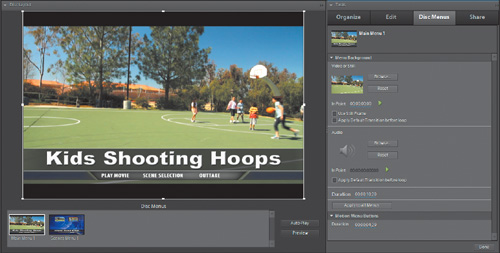
Each template contains a Main menu and a Scenes menu. The Main menu is the first screen that the viewer sees when the disc is played. The Scenes menu is a secondary panel accessed when the viewer clicks the Scene Selection button in the Main menu.
- Under Disc Menus at the bottom of the Disc Layout panel, click to select Main Menu 1.
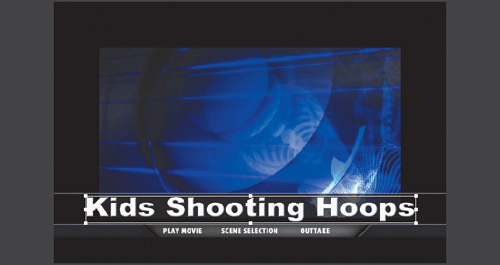
Two text links are currently visible in this menu: Play Movie and Scene Selection. Additionally, there is a generic text box called Movie Title Here. You’ll now change the text of this generic button to something more appropriate for your project.
- In the preview area of the Disc Layout panel, click the Movie Title Here text once. A thin, white rectangle appears around the button indicating that it is selected.
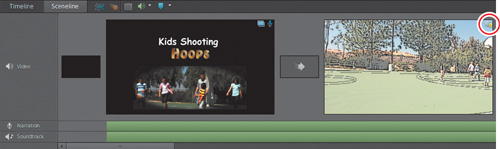
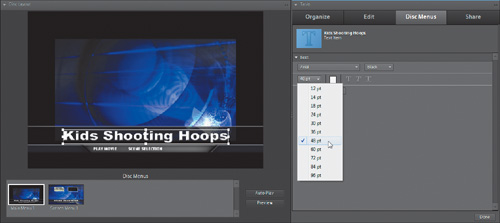
- Double-click the Movie Title Here text to open the Change Text dialog. If the text under Change Text is not already highlighted, select it now, and then type Kids Shooting Hoops. Click the OK button to close the Change Text dialog and to commit the change.
- Let’s make the text Kids Shooting Hoops stand out a bit more. Click the text to make it active, and then on the right in the Properties view, click the Font drop-down list box and choose 48 pt. Note that you could also change the font and font size, and unbold, italicize, or underline the text.
- Click the Preview button to preview the main menu. Place your pointer over the Play Movie and Scenes Selection buttons, but don’t click them yet. Notice the red triangle that appears in the text box when the pointer passes over the text. This rollover effect is part of the menu template and shows viewers which button they’re selecting. Click the Play Movie button and the movie begins to play.
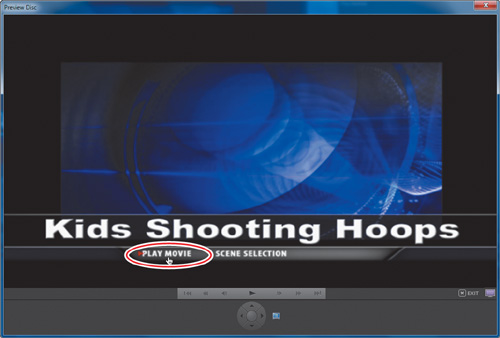
The preview feature shows how your DVD will look after recording the project to disc. Note, however, that the quality of the previewed video may not be indicative of the final video. Because of the differences between computer monitors and TV sets, you may see noticeable horizontal lines as the video is playing on the computer monitor. These lines are referred to as interlacing and will not be visible in the final movie when played on a TV.
- As the movie is playing, click the Main Menu button (
 ) at the bottom of the Preview Disc window. Clicking this button at any point during playback returns you to the main menu, so you don’t have to watch the entire movie if you’re just testing your menus.
 - Click the Exit button () on the bottom right of the Preview Disc window to close it.
- Choose File > Save to save your project file.
Modifying Scene Marker Buttons
One of the benefits of DVDs and Blu-ray Discs is the ability to jump quickly to specific scenes in a movie. For each scene marker you add in the Timeline, Premiere Elements automatically generates a Scene Marker button on the Scenes menu. If the template has image thumbnails on the Scenes menu, as the menu you’re working with does, Premiere Elements automatically assigns an image thumbnail to it. You can customize the appearance of a Scene Marker button by providing a name for the label and changing the image thumbnail used to identify the scene.
Note that if you have more scene markers than scenes on a Scene menu, Premiere Elements creates additional Scenes menu pages and navigational buttons to jump back and forth between the pages.
Changing Button Labels and Image Thumbnails
Let’s begin by opening the Scenes menu.
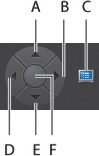
A. Up. B. Right. C. Main Menu button. D. Left. E. Down. F. Enter.
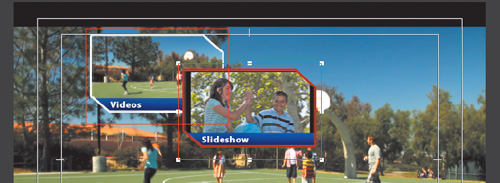
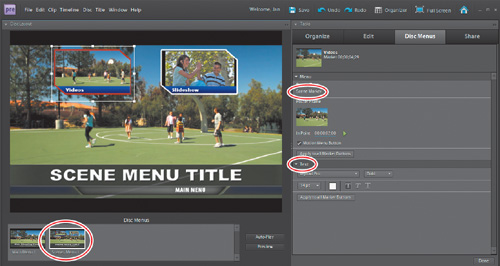
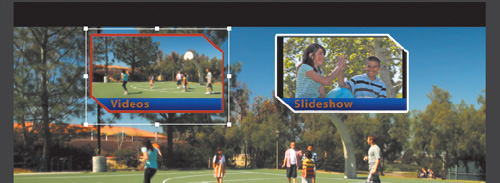
- Click the Scenes Menu 1 thumbnail under Disc Menus in the Disc Layout panel to view the Scenes menu.
Premiere Elements has generated the two Scene Marker buttons and their image thumbnails based on the scene markers you added in the first exercise. By default, Premiere Elements named the Scene Marker buttons Scene 1 and Scene 2. You’ll customize these for your content shortly.
In addition, by default, the thumbnail in the Scene Marker button is the first frame of the clip the button links to. This doesn’t work well in this case because the thumbnail is obscured either by the animated pastel sketch effect or in the midst of a Fade to Black transition, so viewers can’t easily discern the content of the scene. Let’s change these thumbnails to more appropriate frames.
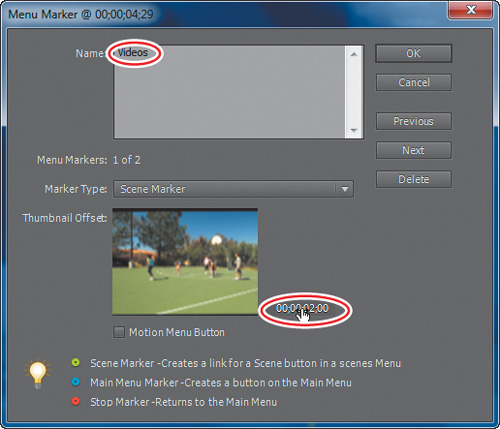
- Double-click the first marker to open the Menu Marker panel for the first marker. In the Name field, type Videos.
- In the Thumbnail Offset section, notice that the time counter is set to 00:00;00;00. Place your pointer over the time counter, drag to the right about 00;00;02;00, and then release the pointer to freeze the movie at that location. Or, click the time counter and enter the timecode directly. Click OK, and Premiere Elements updates the button name and image thumbnail in the Scenes menu.
Next, you’ll change the name of the remaining button and its image thumbnail.
- Double-click the second marker, type Slideshow into the name field, and drag the time counter to about 00;00;04;00. Click OK. Premiere Elements updates the button name and image thumbnail in the Scenes menu.
- When you’re finished, click the Preview button to open the Preview Disc window. Click the Scene Selection button to navigate to the Scene menu. Notice that Premiere Elements has updated button names and thumbnails.
- At the bottom of the Preview Disc window you can see a group of navigation buttons, which simulate the controls on a DVD remote control. Click any of the arrows to advance through the Scene Menu buttons, and click the center circle (the Enter button) to play that scene. Premiere Elements automatically controls the navigation of all menu buttons, so you should preview all scenes on the disc to ensure that you placed your markers logically. When you’re done, close the Preview Disc window.
- Choose File > Save to save your project file.
Working with Submenus
Before you start customizing menu appearance, there are some other navigation and button placement options that you should be aware of. For example, many Hollywood movies have a link on the main menu to bonus or deleted clips sections. Premiere Elements lets you create a submenu button on your main menu by adding a special menu marker.
In addition, by default, once a viewer starts watching any portion of the movie, the video will continue on to the end, even if there are intervening scene markers. In the project you’ve been working on, this isn’t a problem, but with other projects, you may want to stop playback after a scene completes and return the viewer to the menu. You can accomplish this by using the stop marker discussed here.
In this exercise, you will add a button on the main menu linking to a bonus video clip.
- Under Disc Menus in the Disc Layout panel, click to select Main Menu 1. Currently, two buttons are in this menu: the Play Movie and Scenes Selection buttons. The template design leaves space for more buttons below these two buttons, if needed.
- Select the Timeline in the My Project panel. Press the End key to move the current-time indicator to the end of the last clip.
You will now add a special marker to the end of your movie.
- Right-click the time ruler at the current-time indicator and choose Set Menu Marker. The Menu Marker panel opens.
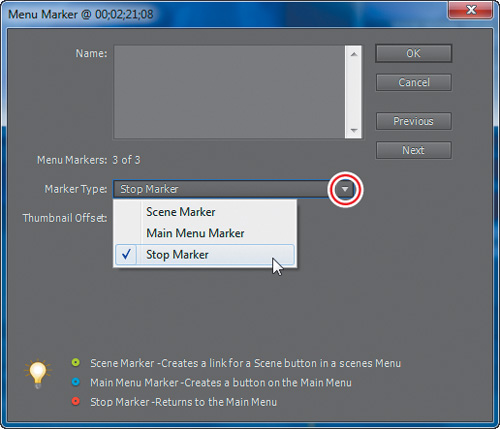
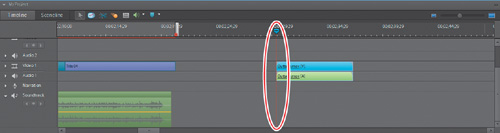
- Choose Stop Marker from the Marker Type menu. When a stop marker is reached during playback, the viewer will return to the main menu.
- Click OK to add the stop marker. In the Timeline, stop markers are colored red to help you differentiate them from the green scene markers and the blue main menu markers. You will learn more about main menu markers later in this lesson.
Next, you’ll add an additional clip named Outtake.mov to the end of the Timeline. This clip will be a bonus clip that users can access from the main menu but is not part of the main movie.
- Select the Organize tab of the Tasks panel, and then click Project. In Project view, drag the Outtake.mov clip into the Video 1 track after the credit title sequence at the end of your Timeline. Be sure to place the clip a few seconds from the last clip, leaving a gap between the clips.

- Press the Page Down key to advance the current-time indicator to the beginning of the added Outtake.mov clip, and then right-click and choose Set Menu Marker to open the Menu Marker dialog.
- In the Menu Marker dialog, choose Main Menu Marker from the Marker Type menu. In the name field, type OUTTAKE, and then click OK to close the Menu Marker dialog.
Note
You don’t have to add a stop marker at the end of the Outtake.mov clip. When Premiere Elements reaches the end of the Timeline, it will automatically return the viewer to the main menu.
Premiere Elements adds a button named OUTTAKE to the Main Menu 1 in the Disc Layout panel.
- Click the Disc Menus tab and then the Preview button, and then click the OUTTAKE button to play the video associated with it. When the clip has finished playing, the main menu appears. If you play the main movie from start to finish, you will not see the Outtake.mov clip because of the stop marker you added at the end of the last clip in the main movie.
- Close the Preview Disc window.
- Choose File > Save to save your project file.
Three Types of Menu Markers
Scene markers (![]() ):Adding a scene marker to your Timeline automatically adds a scene button to the scene menu of your disc. Scenes menus are secondary to the main menu, and there should be a Scenes button on the main menu that links to the Scenes menu.
):Adding a scene marker to your Timeline automatically adds a scene button to the scene menu of your disc. Scenes menus are secondary to the main menu, and there should be a Scenes button on the main menu that links to the Scenes menu.
Main menu markers (![]() ):Adding a main menu marker to your Timeline automatically adds a button to the main menu of your disc. Most templates have space for either three or four buttons on the first menu page. The Play Movie button and the Scenes button are present by default. This will leave you with space for one or two more buttons, depending on the template you have chosen. If you add additional main menu markers to your movie, Premiere Elements will create a secondary main menu.
):Adding a main menu marker to your Timeline automatically adds a button to the main menu of your disc. Most templates have space for either three or four buttons on the first menu page. The Play Movie button and the Scenes button are present by default. This will leave you with space for one or two more buttons, depending on the template you have chosen. If you add additional main menu markers to your movie, Premiere Elements will create a secondary main menu.
Stop markers (![]() ):Adding a stop marker to your Timeline forces Premiere Elements to stop the playback of your Timeline and return the viewer to the main menu. Use stop markers to control the viewer’s flow through the movie. For example, if you want the viewer to return to the main menu after each scene, insert a stop marker at the end of each scene. You can also use stop markers to add bonus or deleted scenes after the main movie, linking to this content using either scene or main menu markers.
):Adding a stop marker to your Timeline forces Premiere Elements to stop the playback of your Timeline and return the viewer to the main menu. Use stop markers to control the viewer’s flow through the movie. For example, if you want the viewer to return to the main menu after each scene, insert a stop marker at the end of each scene. You can also use stop markers to add bonus or deleted scenes after the main movie, linking to this content using either scene or main menu markers.
Customizing Menus in Properties View
When you produce a disc in Premiere Elements, you have multiple customization options for your menu, including the ability to change fonts and font colors, to add a still image or video background, to add background music to the menu, and to animate the button thumbnails on your menus. You accomplish all these tasks in Properties view, which displays different options depending on the object you select. Let’s take a quick tour.
- Make sure you are in the Disc Menus workspace, and then choose Window > Restore Workspace to reset the location of your panels. If necessary, click Disc Menus to reenter that workspace.
- Under Disc Menus in the Disc Layout panel, click the Scenes Menu 1 thumbnail to make sure the Scenes Menu 1 menu is loaded.
- Click in the Scenes Menu 1 menu near the bottom of the menu, being careful not to select any navigational or thumbnail buttons.
Properties view displays two sections: Menu Background and Motion Menu Buttons. You can expand and collapse these two sections by clicking the arrows to the left of the section title. In the Menu Background section are subsections for Video or Still backgrounds and Audio backgrounds.
- In the disc layout panel, click the Slideshow marker button. Premiere Elements displays a rectangle, referred to as the bounding box, around the button. There are eight selection points around the box that you’ll work with in a moment.
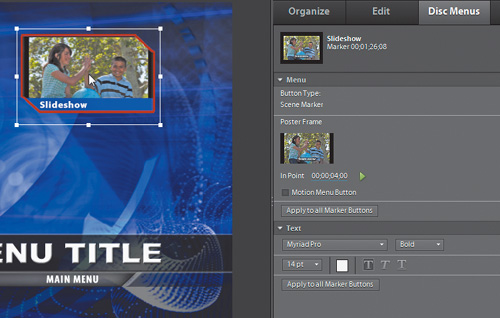
Note that Properties view now displays two sections: Menu options on top and Text options on the bottom. The Menu options are very similar to those selected in the Menu Marker panel. Some, such as the Poster Frame In Point, you can change directly in Properties view; others, such as the Button Type, you have to return to the Menu Marker panel to modify.
- Click the Scene Selection title in Scenes Menu 1. Premiere Elements displays a bounding box around the title and displays only the Text options in Properties view.
Note
As always, in addition to clicking the menu to open Properties view, you can also choose Window > Properties from the Premiere Elements main menu to open Properties view.
Those are the different control sets of Properties view. Fortunately, you don’t have to remember what they are and what they do. Just click the menu component you’d like to edit, and Premiere Elements automatically opens the necessary controls.
Customizing Menus with Video, Still Images, and Audio
You can customize your menus in Premiere Elements by adding a still image, video, or audio to the menu. You can also combine multiple items, such as a still photo and an audio clip. Alternatively, you can add a video clip and replace the audio track with a separate audio clip.
Note that your customization options differ based on the menu template you select. If the menu has a drop zone, still images or video inserted into the menu will display in the drop zone. Otherwise, with templates that don’t have drop zones, like the template you’re working with in this lesson, the inserted still image or video will appear full screen in the menu background.
Although Premiere Elements allows you to customize a disc menu, keep in mind that changes made will not be saved back to the template; they apply only to the current project. If you’d like to create custom templates to be used in multiple projects, you can create one in Adobe Photoshop Elements, and then add the template to Premiere Elements.
Adding a Still Image or Video Clip to Your Menu
You’ll use the same procedure to add a still image or video clip to a menu. In this exercise, you’ll insert a video clip into a menu. By default, when you insert a video, the audio plays with the video as well, although you can change this by inserting a separate audio file, as you will do later.
Follow this procedure to add a video clip to your menu.
- Under Disc Menus in the Disc Layout panel, click to select Main Menu 1. Click in the main menu, being careful not to click one of the active buttons.
- In Properties view, in the Menu Background box, click the Browse button, navigate to the Lesson11 folder, and choose Clip 1.mov. Click Open to close the dialog and insert the clip into the menu.

- Note the options available in the Menu Background box in Properties view. Specifically, you can do the following:
• Play the video by clicking the green play triangle (
 ).
).• Choose an In point for the video to start, either by dragging the time counter or by typing in the timecode for the desired starting point.
• After choosing an In point, you can select the Use Still Frame check box to use the current frame as the background or within the drop zone.
• Apply the default transition to the video clip before the menu starts to loop by selecting the Apply Default Transition before loop check box. Note that the maximum duration for video menus is 30 seconds, and that the menu will loop indefinitely after that time.
For this exercise, leave the options at their default settings, and click Preview to preview the menu. When you’re finished, close the Preview window and return to the Disc Layout panel.
- Choose File > Save to save your project file.
As mentioned, when you add a video to a menu with a drop zone, the video plays within that drop zone. When you add a video to a menu without a drop zone, the video plays in the background of the menu.
Accordingly, to create a menu with your own full-screen still image or video in the background, choose a template without a drop zone. If you opt to customize a menu with a full-screen background image or video, you’ll have to manually insert it into each menu created by Premiere Elements. Note that you can insert a different still image or video clip as a background in each menu, or use the background image that came with the menu template.
Adding an Audio Clip to the Background
Let’s substitute a separate audio clip for the audio included with the Clip 1.mov video clip. Use this same procedure to add audio to any menu template, whether modified with a still image background or used as is.
- Click Main Menu 1 in the Disc Layout panel to open its Properties view. If necessary, scroll down the Properties view to locate the Audio section.
- Click the Browse button, select the SmartSound - Power Drive – Starting up [02;20;27].wav clip in the Lesson11 folder, and then click Open.
- If you’d like to add a fade-out so the audio loops nicely, select the Apply Default Transition before loop check box.
- In the Disc Layout panel, click the Preview button. You can see the video or video frame and hear the audio track you selected for the main menu background.
- Close the Preview window.
- If you’d like to remove the audio portion from the menu background, click the Reset button next to the speaker icon in the Audio section of Properties view (but don’t actually do this).
- To insert the same video and audio file combination as background for your other menu, click the Apply to All Menus button in the Properties view.
- Save your project.
Animating Buttons
If the menu template that you select uses thumbnail scene buttons, you can elect to animate the buttons. With an animated button, a designated duration of video from the linked scene will play within the thumbnail while the menu displays. The main menu for this project does not include any buttons with image thumbnails. However, the Scene menu does have image thumbnails. Let’s animate these thumbnails.
- Select the Scenes Menu 1 thumbnail under Disc Menus in the Disc Layout panel.
- Click the Videos button to select it. Currently, this button displays a still frame extracted from the video clip at the 00;00;02;00 mark.
- In Properties view, in the Menu box, scroll down if necessary to see all of the Poster Frame section, and then select the Motion Menu Button check box. To animate all Marker buttons, click the Apply to all Marker Buttons button.
- If you’d like to change the In point of the video clip and play a different segment in the animated thumbnail, drag the time counter (which currently reads the 00;00;02;00) to the desired spot.
- Click an empty area of your background menu. This deselects the current scene button, and Properties view switches to the Menu Background properties. Scroll down to the bottom of Properties view, if necessary, to locate the Motion Menu Buttons box.
- Note that the default duration for the Motion Menu Buttons is 00;00;04;29, which is the length of Clip 1.mov, the first clip after the scene marker. You can shorten this duration but not lengthen it. Note that the default duration will be as long as the first clip after the scene marker, up to 00;00;29;29, or just under 30 seconds.
- Click the Preview button in the Disc Layout panel. In the main menu, click the Scene Selection button to access the Scenes menu. All the buttons should now be animated.
- Close the Preview Disc window.
- If you’d like to pick a different In point for your thumbnail video, select the Motion Menu Button option and choose suitable In points for the two other scene buttons. If you didn’t click the Apply to all Marker Buttons button in step 3, you must individually activate scene buttons to animate them. All animated buttons share the same duration.
- Save your project.
Customizing Button Size, Location, and Text Attributes
Beyond adding still images, video, and audio to your menu, you can also change the size, appearance, and location of buttons and text on your menus. In this exercise, you will make changes to your menu appearance and buttons.
- Make sure you are in the Disc Menus workspace, and then choose Window > Restore Workspace to reset the location of your panels.
- Under Disc Menus in the Disc Layout panel, click the Main Menu 1 thumbnail to make sure the main menu is loaded.
- Click the Kids Shooting Hoops title text to select it. The eight-point bounding box opens. Place your pointer on the upper-right corner, and then drag upward and outward to enlarge the text box.
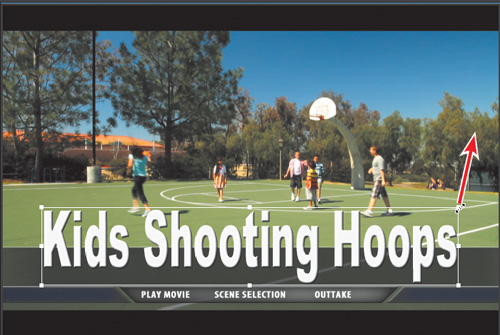
Scaling text boxes in this manner can be tricky because the width and height do not scale proportionally. Text can easily become distorted.
- Press Ctrl+Z to undo the changes. Premiere Elements allows you to undo multiple steps, so you can backtrack through your changes.
- With the Kids Shooting Hoops title text still selected, press the equals sign (=) on your keyboard and the text box size increases proportionally. Press the minus sign (-) on your keyboard to reduce the size of your text box proportionally. Using the keyboard commands to change the size avoids the risk of distorting the text.
- Click the Scenes Selection button in the Disc Layout panel to select it, and then press the Left Arrow key on your keyboard to move it. Pressing the arrow keys allows you to move a button one pixel at a time in the direction of the arrow. Press the Right Arrow key to move the button back to its original location.
Overlapping Buttons
Buttons on a disc menu should not overlap each other. If two or more buttons overlap, there is a potential for confusion. Someone who is using a pointer to navigate and click the menu may not be able to access the correct button if another one is overlapping it. This can easily happen if button text is too long or if two buttons are placed too close to each other.
Overlapping buttons can sometimes be fixed by shortening the button name or simply by moving the buttons so that there’s more space between them. By default, overlapping buttons in Premiere Elements are outlined in red in the Disc Layout panel. This feature can be turned off or on by choosing Show Overlapping Menu Buttons from the Disc Layout panel menu at the right side of the docking header.
- Save your project.
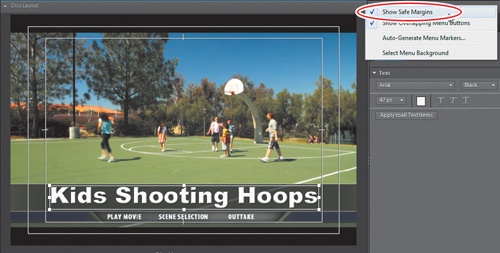
Note
All buttons and titles within Premiere Elements templates are within the title-safe zone. If you plan to resize or move buttons or text on the menu, you should enable Show Safe Margins in the Disc Layout panel menu at the right side of the docking header menu, as shown in the following figure, and make sure that all content is within the title-safe zone before recording your disc.
Changing Menu Button Text Properties
Properties view lets you modify the font, size, color, and style of your menu buttons, and you can automatically apply changes made to one button to similar buttons.
You can modify the text attributes of five types of objects: Menu Titles, which are text-only objects that aren’t linked to clips or movies; Play buttons, which link to the beginning of your main movie; Scene Marker buttons, which link to the Scenes menu; Marker buttons, which directly link to a menu marker on the Timeline; and Navigational buttons, such as the link back to the main menu in the Scenes menu.
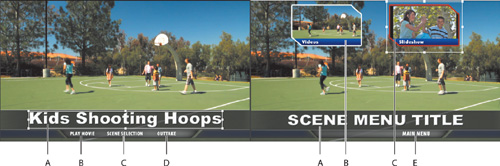
A. Menu title. B. Play button. C. Scene button. D. Marker button. E. Navigational button.
- Under Disc Menus in the Disc Layout panel, click the Scenes Menu 1 thumbnail.
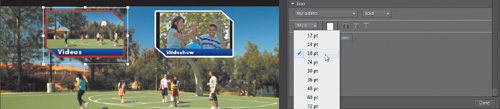
- Click the Videos marker button. Properties view updates automatically and shows that this is a marker button—specifically, a Scene Marker button. The Text subsection allows you to change the properties of the text. If necessary, scroll down in Properties view to see all of the Text subsection.
- In the Text subsection, click the font menu, and note that you can change the font of this or any text in the menu. The MyriadPro font looks best here, so let’s leave that selected.
- The next menu, the Text Size menu, allows you to change the text size to any of the preset sizes. Change the text size to 18 pt.
- Next, let’s change the color of the text to orange, to match the color of a basketball. To begin, click the white color swatch next to the Text Size menu to open the Color Picker dialog. Click once in the vertical color spectrum in the general range of red. Then click in the lower-right corner of the large color field to choose a bright red. The parameters of the color I selected are R: 173, G: 103, and B: 37. Click OK to apply the color.
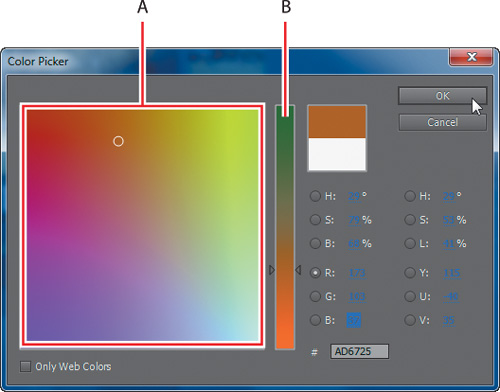
A. Click here to pick the specific shade within the selected range of colors. B. Click here to change the general range of colors.
Notice that the other Scene Marker buttons have retained their original formatting. Normally, changes affect only the selected object. But Premiere Elements also gives you the option to change the text attributes of all buttons of the same type simultaneously.
- In the Text subsection of Properties view, click the Apply to all Marker Buttons button. This applies the same text attributes to both Scene Marker buttons.
- Under Disc Menus in the Disc Layout panel, click the Main Menu 1 thumbnail. Notice that the OUTTAKES marker has also changed its appearance. This is because the Marker Button category encompasses both Scene Marker and Main Menu Marker buttons. To fix this, you could change the OUTTAKE button back to 14 point white, or change the Play and Scene buttons to match the look. I’ll do the former to restore symmetry to Main Menu 1.
- Choose File > Save As and save this project file to your Lesson11 folder as Lesson11_Final.prel.
Creating Web DVDs
Web DVDs create the DVD experience within a web page, complete with menus, links, and very high-quality video. If you have your own website, you can create files to upload and present from there. If you don’t, you can upload your presentations to Photoshop.com and invite friends and family to watch it from there. This lesson will take you through the second workflow.
- Select the Share workspace by clicking the Share tab in the Tasks panel.
- Save your current project. It’s always a good idea to save your Premiere Elements project file before rendering your project.
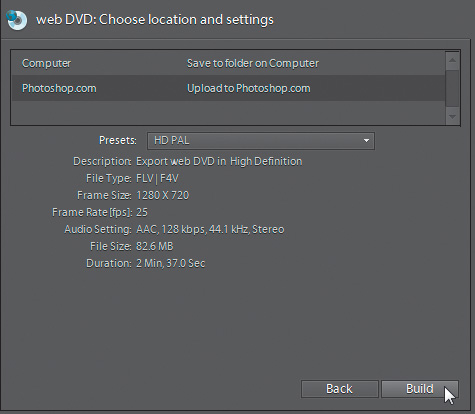
- Click the Web DVD Disc button (
 ) in the Start a new share: box to open the Web DVD: Choose location and settings view. Choose Upload to Photoshop.com from the list at the top of the view. To create files to upload yourself, choose Save to folder on Computer.
 - Choose the appropriate preset in the Presets: list box, choosing first the video standard (NTSC for the United States and Japan; PAL otherwise) and then the quality level. When choosing, try to select the quality level that best matches the connection speed of your intended viewers. Although HD provides the best overall quality, only viewers with very fast connections speeds will be able to play the videos without stopping. SD High Quality is the best-quality, highest-bandwidth option in SD mode, and SD Medium Quality will create an experience that can be viewed most smoothly by the broadest range of viewers. Click Build to continue.
Note
You can create SD Web DVDs from HD content, but you shouldn’t create HD Web DVDs from SD content, because the video will likely look pixilated and/or blurry.
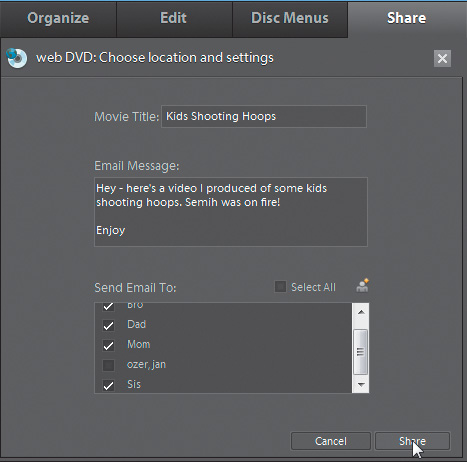
- Complete the information on the next screen, including the Movie Title and Email Message, and identify the invitees you want to email about the video. Click Share to continue.
- Premiere Elements will render and upload your project to Photoshop.com with status messages informing you of its progress. Once complete, you’ll see the following screen.

- You can click the “Click here to view your web DVD online” text to watch the Web DVD, and your invitees will receive emails with similar links. As shown in the next figure, the experience is identical to a DVD except that you don’t have to burn and send one to your friends and family for them to enjoy the movie.

- Click Done to close the Web DVD window and return to Premiere Elements.
Burning DVDs or Blu-ray Discs
After you’ve previewed your disc and have checked the menus and button names, you’re ready to record the project to a DVD or Blu-ray Disc. As noted at the beginning of the chapter, you must have either a DVD or a Blu-ray Disc writer to record a disc in that format.
When making a DVD or Blu-ray Disc, Premiere Elements converts your video and audio files into a compressed format. Briefly, compression shrinks your original video and audio files to fit them on a disc. For example, a 60-minute video in DV or HDV format requires approximately 13 GB of hard disk space. However, a DVD-Video holds only 4.7 GB of space. So how do you fit a 13 GB video onto a 4.7 GB disc? Through compression!
The process of compression can be quite lengthy. In essence, Premiere Elements evaluates every frame of video in your project and attempts to reduce the file size without sacrificing the image quality. You should allow quite a bit of time for this process. For example, 60 minutes of video may take four to six hours to compress and record onto a DVD, and compressing and recording HD video onto a Blu-ray Disc can take even longer. For this reason, it may be a good idea to initiate the disc-burning process (which begins with compressing the video) at a time when you will not need your computer.
To maintain maximum quality, Premiere Elements compresses the movie only as much as is necessary to fit it on the disc. The shorter your movie, the less compression required and the higher the quality of the video on the disc.
- Select the Share workspace by clicking the Share tab in the Tasks panel.
- Save your current project. It’s always a good idea to save your Premiere Elements project file before burning a disc.
- Click the Disc button (
 ) in the Start a new share: box to open the Disc: Choose location and settings view. Choose DVD from the list at the top of the view. To burn a Blu-ray Disc, select Blu-ray from that list.
 - Make sure Disc is selected in the “Burn to” menu. Select the option to burn to a folder on your hard disk if you prefer to use an alternative program to burn your discs.
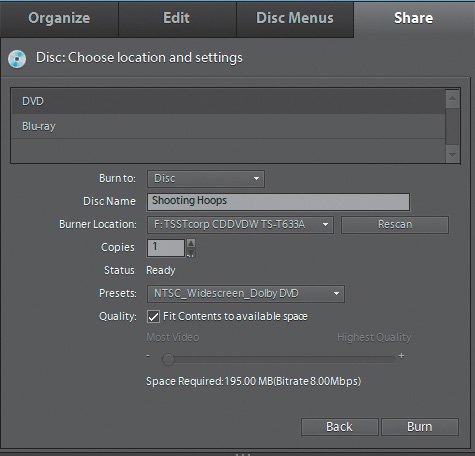
- In the Disc Name field, type Shooting Hoops. Software playing DVDs or Blu-ray Discs on a personal computer may display this disc name.
Note
This exercise ends with the burning of a DVD. If you don’t want to create a DVD, follow the steps of the exercise only up to the point of writing the disc. If you will be creating a DVD, I suggest using a DVD-RW (Rewritable) disc, if you have one available, so that you can reuse the disc later.
- Select the desired DVD or Blu-ray Disc burner from the Burner Location menu. If you don’t have a compatible disc burner connected to your computer, the Burner Location menu is disabled and the Status line reads “No burner detected.”
- If you want to create a DVD or Blu-ray Disc, ensure that you’ve inserted a compatible blank disc in the disc burner. If you insert a disc after you start this process, click Rescan to have Premiere Elements recheck all connected burners for valid media.
- Next to Copies, select the number of discs you want to burn during this session. For this exercise, choose 1. When you select multiple copies, Premiere Elements asks you to insert another disc after the writing of each disc is completed, until all the discs you specified have been burned.
- Select the “Fit Contents to available space” check box to ensure that Premiere Elements maximizes the quality of your video based on disc capacity.
- From the Presets menu, select the NTSC_Widescreen_Dolby DVD option. Premiere Elements is also capable of burning a project to the PAL standard (used in Europe, parts of Africa, South America, the Middle East, Australia, New Zealand, some Pacific Islands, and certain Asian countries) in both normal or widescreen format.
- If you want to burn a disc at this point, click the Burn button. If you don’t want to burn a disc, click the Back button.
Congratulations! You’ve successfully completed this lesson. You learned how to manually and automatically add scene markers to your movie, create an auto-play disc, and—by applying a menu template—create a disc with menus. You added a submenu for an outtake clip and learned about stop and main menu makers. You customized the disc menus by changing text attributes, background images, button labels, and image thumbnails. You added sound and video clips to the menu background, and activated motion menu buttons. You created and uploaded a Web DVD to Photoshop.com to share with the world, and you learned how to burn your movie onto a DVD or Blu-ray Disc.
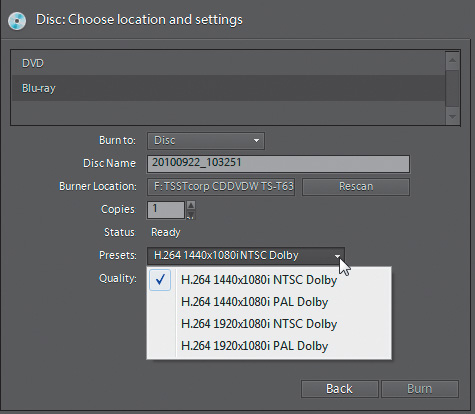
Choosing Blu-ray Disc Quality Options
When burning to a Blu-ray Disc, you have multiple resolution and video standard options. If you’re producing your video for playback in the United States or Japan, choose NTSC; otherwise, choose PAL.
When choosing a target resolution, use the native resolution of your source footage. For example, HDV has a native resolution of 1440×1080, so if you recorded in HDV, you should produce your disc at that resolution. If you’re shooting in AVCHD, you may be recording in native 1920×1080, so use that resolution for your Blu-ray Disc. If you’re not sure what resolution you’re recording in, check the documentation that came with your camcorder. Ditto if you’re shooting with a DSLR or other recording device.
Review questions
1. What is an auto-play disc? What are the advantage and disadvantage of creating one?
2. How do you identify separate scenes for use in your disc menu?
3. What is a submenu, and how would you add one to your disc menu?
4. Which menu button text properties can you change, and how are these properties modified?
5. Which type of menu template should you choose if you want to insert a still image or video file as a full-screen background for your disc menus?
6. What is a Web DVD, and when should you use one?
Review answers
1. An auto-play disc allows you to create a DVD or Blu-ray Disc quickly from the main movie of your project. The advantage of an auto-play disc is that it can be quickly and easily created; the disadvantage is that it doesn’t have a menu for navigation during playback.
2. Separate scenes can be defined by placing a scene marker on a specific frame in the Timeline. Scene markers are set in the Timeline using the Add Menu Marker button.
3. A submenu is a button on your main disc menu that points to a specific section of your project, such as a credit sequence or a bonus clip. Submenus are created by adding a main menu marker to your Timeline.
4. You can change the font, size, color, and style of your text buttons. Changing the properties of your text is done in Properties view for objects selected in the Disc Layout panel.
5. You should choose a template that does not include a drop zone. If you insert a still image or video into a menu template with a drop zone, Premiere Elements will display that content within the drop zone.
6. A Web DVD presents a DVD-like experience on the web, complete with menus, themes, and high-quality video. Use Web DVDs to share your productions with friends and family without having to burn and send them a physical DVD.