Chapter 1. The World of Digital Video
This lesson describes how you’ll use Adobe Premiere Elements 9 to produce movies and introduces you to the key panels, workspaces, and views within the application. You’ll also learn the benefits of subscribing to Adobe Photoshop.com.
This lesson will introduce the following concepts:
• Navigating the Adobe Premiere Elements workspaces
• Importing and tagging media
• Uploading and sharing content with Photoshop.com
![]()
This lesson will take approximately 45 minutes.
The Adobe Premiere Elements workspace.
How Adobe Premiere Elements Fits into Video Production
Video producers are diverse, and each uses Adobe Premiere Elements differently. At a high level, however, all producers will use Adobe Premiere Elements to import and organize footage (video, stills, and audio)—whether from a camcorder, digital camera, or other source—and then edit the clips into a cohesive movie. If you have Adobe Premiere Elements and Adobe Photoshop Elements, you have an extraordinarily flexible and well-featured platform for projects combining still images and video. Now, Adobe Premiere Elements 9 is a cross-platform solution that runs on the Mac and Windows operating systems.
From a video perspective, such editing will include trimming away unwanted sections of your source clips, correcting exposure and adjusting color as needed, and then applying transitions and special effects as well as adding titles. On the audio front, perhaps you’ll add narration to your productions or a background music track. When your movie is complete, you might create menus for recording to DVD and/or Blu-ray Discs, and then output the movie for sharing with others via disc (such as DVD or Blu-ray) and/or web or file-based output.
Adobe Premiere Elements facilitates this workflow using a simple three-panel interface with custom workspaces for each of the four production steps: clip acquisition and organization, editing, disc menu creation, and sharing. This chapter introduces you to the Adobe Premiere Elements interface and these four workspaces.
You undoubtedly purchased Adobe Premiere Elements to start producing movies as soon as possible. Taking a few moments now to read through this overview will not only get you up and running in Adobe Premiere Elements more quickly, but it will also help you understand how this book is organized and where to find the content that details the operations you’ll be performing in future projects.
The Adobe Premiere Elements Workspace
When you launch Adobe Premiere Elements, a Welcome screen appears. From here, you can open the Organizer, start a new project, or open a project. The bottom of the Welcome screen displays the status of your Photoshop.com membership and provides access to your Account Details, your Shared Gallery, and Adobe Premiere Elements Tutorials. After you make some selections the first time you run Adobe Premiere Elements, the large center screen will also contain information about tutorials available to Plus members on Photoshop.com.
Note
Sometimes when you run Premiere Elements, you will be asked to log in to Photoshop.com. If you have an account and wish to log in, please do so. Otherwise, click skip this step to avoid logging in.
Note
The screen that you see may be slightly different than this if you haven’t run Adobe Premiere Elements before, but the major buttons and operations will be identical.
In addition to launching Adobe Premiere Elements on the Mac, one of the most significant enhancements to this version of Adobe Premiere Elements is that Adobe now includes a complete version of the Elements Organizer on the Mac and Windows platforms. The Organizer is a great place to start many projects. It offers excellent tagging and search tools, the ability to view all your media in one place irrespective of its actual location on your hard drive, and the ability to easily share and archive your collections of video and still images. If you also own Photoshop Elements, you’ll share the same Organizer, so you can access all your content from either Adobe Premiere Elements or Adobe Photoshop Elements, and you can launch a range of activities and workflows from either application from within one common content database.
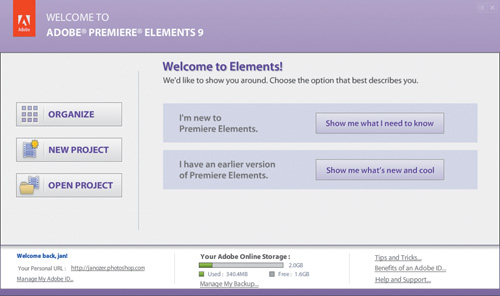
Let’s load some video files to see how starting projects in the Organizer works. Specifically, let’s load only the video files from the Lesson04 and 05 folder that you copied to your hard drive from the DVD.
- Start Adobe Premiere Elements and click the Organize button in the Welcome screen. The Organizer opens. If this is the first time you’ve worked with Adobe Premiere Elements or the Organizer, it will be empty and may ask you to identify folders where your media is located. If you’ve worked with it previously, it will contain other content that you’ve used before.
- In the Organizer, choose File > Get Photos and Videos > From Files and Folders. The Get Photos and Videos from Files and Folders dialog opens.
- Navigate to your Lesson04 and 05 folder.
- Select all video files (those with a .mov extension).
- On the bottom right of the Get Photos and Videos from Files and Folders dialog, click Get Media. The Organizer loads the video into the Browser pane. If this is the first time you’ve used the Organizer, you may get a status message stating that the only items in the main window are those you just imported. Click OK to close the message; do not click Show All which displays the entire Catalog.
Note
The Organizer can input video footage directly from all camcorders except for tape-based camcorders, like DV and HDV, and analog camcorders. Footage from these devices must be captured before importing the video into the Organizer. For this reason, if your project involves video from DV, HDV, or analog camcorders that you previously haven’t captured to hard drive, you should start your projects by clicking New Projects in the Welcome screen, as shown in “Setting Up a New Project” in Chapter 2. Otherwise, if you’re working with footage from any camcorder or digital camera that stores video onto a hard drive, DVD, SD media, or similar nontape-based storage, you can input that footage directly from the Organizer.
Working in the Organizer
In the Organizer workspace, the main work area is the Browser pane where you can find, sort, and organize your video, audio, photos, and other media files. On the right is the Task pane, which includes four tabs that open the Organize, Fix, Create, and Share panels. You’ll learn the operation of all four panels in Chapter 4; for now, here are a couple of highlights.
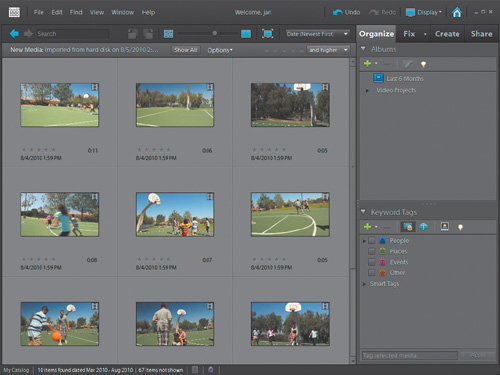
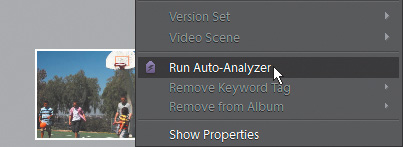
In the Organize panel, shown on the right, you can apply tags to your videos to help organize them, or run the Auto Analyzer, which applies Smart Tags to the clips. Smart Tags assist in multiple activities, including creating InstantMovies (Chapter 4) and directing Smart Trimming (Chapter 5) and SmartFix (Chapter 6). To run the Auto Analyzer function, select a clip or clips, right-click, and choose Run Auto Analyzer.
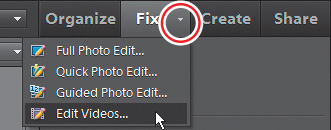
In addition, in the Create panel, you can start a number of projects, including InstantMovies and DVDs with menus, as well as a host of photo-related projects. In the Share panel, you can launch Adobe Premiere Elements to upload video to YouTube or to a mobile phone. And in the Fix panel, you can send all selected videos to Adobe Premiere Elements for editing. Let’s do that to start your tour of the Adobe Premiere Elements workspace.
- In the Organizer, click the Fix tab to open the Fix panel.
- Press Ctrl-A (Windows) or Command-A (Mac OS) to select all videos currently in the Organizer (only those videos that you just imported should be displayed).
- In the Fix panel, click the down triangle on the top right of the Fix tab, and choose Edit Videos.
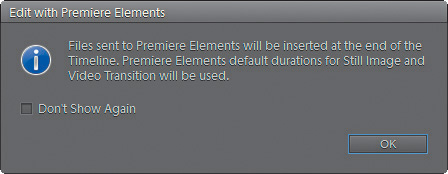
- If this is the first time you’ve used this function, you’ll see the status message in the next figure. Click OK to close the message.
- Adobe Premiere Elements opens the New Project panel. Type Lesson01 in the Name field (Adobe Premiere Elements will add the necessary extension), and click the Browse button to change the location of the project, if desired.
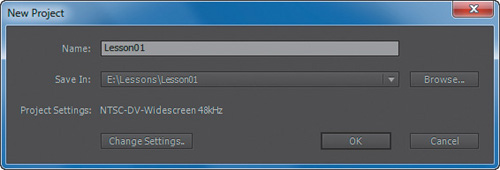
- Check the Project Settings in the lower-left corner of the New Project panel. If the Project Settings field shows AVCHD LITE720p30, proceed to step 9. If not, click the Change Settings button to open the Setup screen.
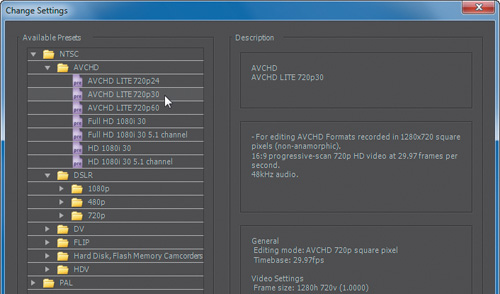
- In the Change Settings window, in the Available Presets box, click the triangle next to Others to open that category. Then click the triangle next to AVCHD Lite, and choose the AVCHD LITE 720p30 preset.
- Click OK to close the Setup dialog.
- In the New Project dialog, click OK to save the new project file. Adobe Premiere Elements opens the newly created project. Click Yes if the SmartFix dialog asks if you want to Fix quality problems in clips.
- In the Adobe Premiere Elements menu, choose Window > Show Docking Headers. This will display the panel headers shown in some of the following screen shots. If you’ve used Premiere Elements previously, choose Window > Restore Workspace to restore the program to its default configuration. Note that the author dragged the current-time indicator to about 15 seconds into the first clip to produce a screen shot that is a little more compelling than the pant leg actually shown on the first frame of that clip.
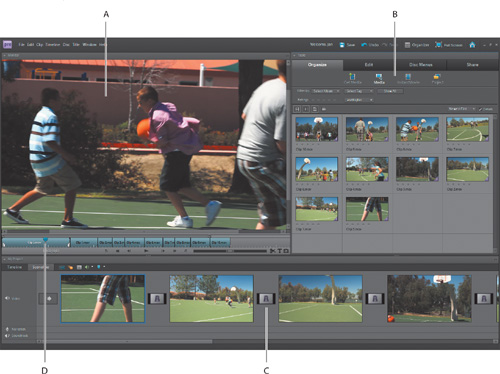
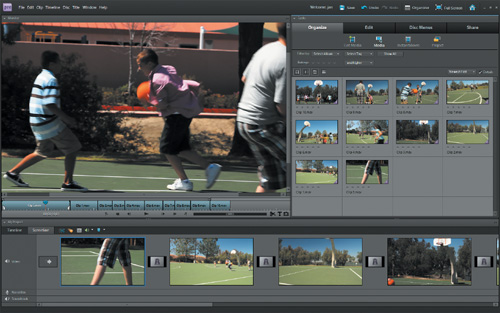
A. Monitor panel. B. Tasks panel (The Organize workspace is selected. Note that your Organize workspace may contain different items. C. My Project panel (Sceneline selected). D. Current-time indicator.
The Adobe Premiere Elements workspace is arranged in three main panels: the Monitor panel, the Tasks panel, and the My Project panel. The following sections provide an overview of these panels and the role they play when you are working on a movie project.
Monitor Panel
The Monitor panel serves multiple purposes. It enables you to edit, as well as to view your movie in one convenient place. You can navigate to any position in the movie and preview a section or the entire movie. In this role, the Monitor panel previews the movie that you are building in the My Project panel using the VCR-like controls beneath the playback window. Other chapters will detail the Monitor panel’s controls and operation; here you can experiment with the playback controls to get a feel for how to use them.
In other roles, the Monitor panel also offers tools to trim unwanted footage and split clips. You can drag one scene onto another to create picture-in-picture effects and add titles and other text directly in the Monitor panel. The Monitor panel adjusts its appearance for some editing tasks. When creating menus, the Monitor panel switches to become the Disk Layout panel; in title-editing mode, the Monitor panel displays additional tools to create and edit text.
My Project Panel
The My Project panel lets you assemble your media into the desired order and edit clips. This panel has two different views:
• Sceneline:In the My Project panel’s Sceneline, the initial frame represents each clip. This display makes it easy to arrange clips into a coherent series without regard to clip length. This technique is referred to as storyboard-style editing. The Sceneline is useful when you first start editing a movie because it allows you to quickly arrange your media into the desired order; to trim unwanted frames from the beginning and ends of each clip; and to add titles, transitions, and effects.

• Timeline:In the upper left of the My Project panel, click Timeline to change to the Timeline view. The My Project panel’s Timeline presents all movie components in separate horizontal tracks beneath a timescale. Clips earlier in time appear to the left, and clips later in time appear to the right, with clip length on the Timeline representing a clip’s duration. The Timeline is useful later in the project and for more advanced editing, because it lets you better visualize content on different tracks, such as picture-in-picture effects and titles or narration and background music.

Tasks Panel
The Tasks panel is the central location for adding and organizing media; finding, applying, and adjusting effects and transitions; creating DVD and Blu-ray Disc menus; and sharing your finished projects. It’s organized into four main task workspaces: Organize, Edit, Disc Menus, and Share. Within each workspace are all the tools you need to accomplish your tasks.
Organize workspace
The Organize workspace is divided into four views to input media (Get Media), view the content available in the Elements Organizer (Media), create an InstantMovie (InstantMovie), and view the content included in your project (Project). If you don’t start your projects in the Organizer, you’ll typically start by clicking Get Media in the Organize workspace.

The Organize workspace (Media view selected)
• Get Media:This view shows buttons to access all the different methods for acquiring media for your movie. These include getting videos from a DV Camcorder, HDV Camcorder, DVD Camcorder or PC DVD Drive, a Flip, AVCHD, Cameras and Phones, and a Webcam or WDM Device; getting photos from a Digital Still Camera & Phone; and getting videos, photos, and audio from Files and Folders, which you’ll use to retrieve files already existing on your hard drive.
• Media:This icon displays the current contents of the Organizer with simple tools for filtering and searching.
• InstantMovie:This view automatically and quickly steps you through the selection and editing portion of movie creation, as well as adding theme-based effects, title, transitions, and audio. If you click InstantMovie, click Cancel on the lower right of the Organize panel to return to that workspace.
• Project:In this view you can view, sort, and select media you have captured or imported into your project. Media can be presented in List view or Icon view, which you can select by using the buttons at the lower-left corner of Project view.
Tip
In previous versions of Adobe Premiere Elements, you could open the Elements Organizer by clicking Organizer in the Organize workspace. In this version, you can open the Organizer in all workspaces by clicking the Organizer button on the top toolbar.
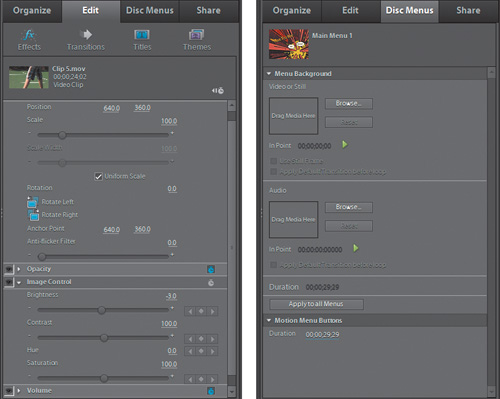
Edit workspace
If you were working on a real project, after importing and tagging your media, you’d be ready to edit. Click Edit to enter the Edit workspace, which is divided into five views for accessing effects and transitions, creating movie titles from templates, selecting and applying movie themes, and choosing from available clip art libraries.
• Effects:This view shows video and audio effects and presets you can use in your movie. You can search for effects by typing all or part of the name into the search box, browse through all available effects, or filter the view by type and category. You can apply video effects to adjust exposure or color problems, apply perspective or pixelate, or add other special effects. Audio effects help you improve the sound quality, add special effects like delay and reverb, and alter volume or balance.
• Transitions:This view shows video and audio transitions you can use in your movie. You can search for transitions by typing all or part of the name into the search box, browse through all available transitions, or filter the view by type and category. Transitions between clips can be as subtle as a cross-dissolve or quite emphatic, such as a page turn or spinning pinwheel.
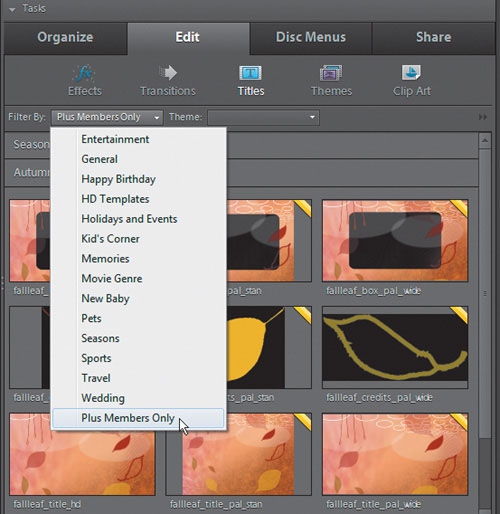
• Titles:This view shows groups of preformatted title templates you can use in your movie. You can browse all available templates or filter the view by categories such as Entertainment, Travel, and Wedding. Title templates include graphic images and placeholder text that you can modify freely, delete from, or add to without affecting the actual templates.
• Themes:This view displays movie themes that you can use to instantly and dramatically enhance your movies. Using Themes enables you to create professional-looking movies quickly and easily. Themes come preconfigured with effects, transitions, overlays, title and closing credit sequences, intros, sound effects, and more. You can choose to simply apply all the available options in a theme or select just the options you want.
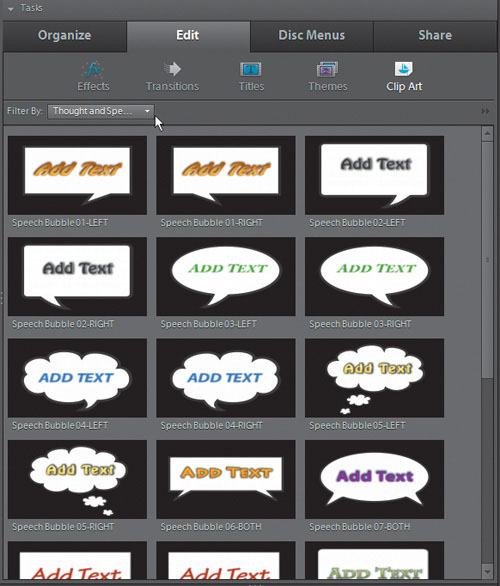
• Clip Art:This view displays clip art libraries that you can drag and drop into your projects. Clip art libraries include Animated Objects, Costumes, Baby-oriented clip art, and the thought bubbles and similar text-oriented clip art shown in the next figure, which were selected by clicking the Filter By list box and choosing Thoughts and Speech Bubbles.
Disc Menus workspace
Use the Disc Menus workspace to add menus to your movies before burning them onto DVDs or Blu-ray Discs, or creating web DVDs. The Disc Menus workspace lets you preview and choose preformatted menu templates you can use for your movie. You can browse the available templates by categories such as Entertainment, Happy Birthday, Kid’s Corner, and New Baby.

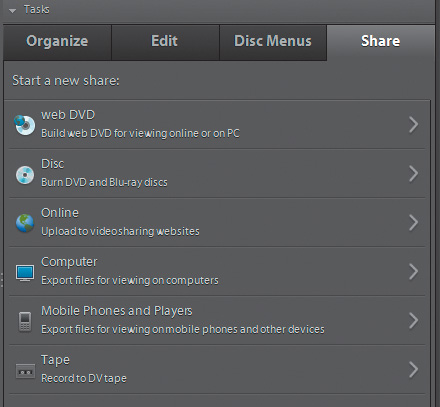
Share workspace
After you’ve finished editing your movie and you’re ready to create a web DVD, burn a disc, or save your movie for viewing online or on a mobile phone, PC, tape, or other device, click Share. The Share workspace shows buttons for accessing all the different methods for exporting and sharing your movie: web DVD, Disc, Online, Computer, Mobile Phones and Players, and Tape. Quick Share lets you create and reuse sharing options.
Properties View
Often during editing or when producing disc menus, you’ll need to customize effect parameters or menu components after applying or selecting them. Properties view (Window > Properties) lets you view and adjust parameters of items—such as video or audio clips, transitions, effects, or menus—when an item is selected in the Monitor or My Project panel.
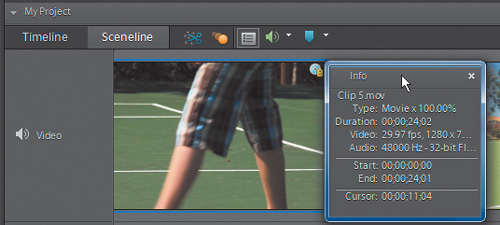
Info and History Panels
The Info panel displays information about a selected clip in the My Project panel. Among other things, the Info panel can be helpful in identifying the duration of a clip.
Tip
In addition to the History panel, Adobe Premiere Elements supports multiple undos by choosing Edit > Undo or by pressing Ctrl+Z/Command+Z. Each time you press Ctrl+Z/Command+Z, you are undoing another step and working back through your edits in order, starting with the most recent. You can also redo a step by choosing Edit > Redo or pressing Ctrl+Shift+Z/Command+Shift+Z.
- To open the Info panel, choose Window > Info. You can then drag the Info panel by its title bar to reposition it on the screen, if necessary.
- Click to select a clip in Project view or the My Project panel. The Info panel displays the clip’s name, type, start and end points, duration, video and audio attributes, the location in the Timeline/Sceneline, and the position of the Cursor.
The History panel (Window > History) keeps a running list of every step you take during a project and adds each action to the bottom of its list. To undo an editing step, click it in the History panel. To undo multiple steps, click the earliest step that you’d like to undo, and Adobe Premiere Elements will also undo all editing steps after that point.
These are the most prominent panels and workspaces within Adobe Premiere Elements. Now let’s take a brief look at Photoshop.com, which is where you’ll back up and share your photos and movies.
Working with Photoshop.com
Photoshop.com is an online photo and video hosting, editing, and sharing site. If you’re using Adobe Premiere Elements in the United States, you can register for a free Basic Membership or opt for the Plus Membership (check www.photoshop.com for pricing). All members can back up images and movies on the site. Basic members are allocated 2 gigabytes (GB) of storage space, and Plus members have access to 20 GB of storage, or about four hours of DVD-quality video, with the option to purchase more online storage.
![]()
If you’re already a member of Photoshop.com, you can log in from Adobe Premiere Elements by clicking Sign In on the toolbar on the upper right. If not, you can click Create New Adobe ID to register for the service.
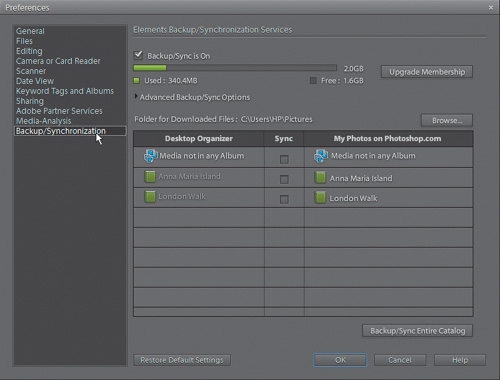
All members control the content that is uploaded to their Photoshop.com accounts with this Preferences panel, which you access in the Elements Organizer by choosing Edit > Preferences > Backup/Synchronization (Windows) or Adobe Elements 9 Organizer > Preferences Backup/Synchronization (Mac OS).

Photoshop.com Plus members also receive free access to online moviemaking ideas and tutorials. If you have a Plus Membership, Adobe Premiere Elements will display these tutorials in the Welcome screen that opens when you first run the program and, from time to time, on the lower right of the My Project panel.
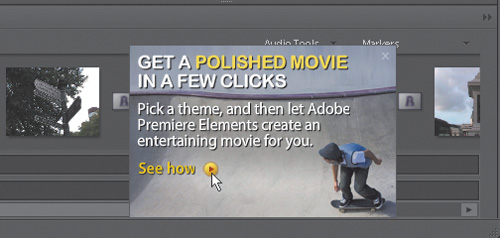
Click the tutorial title to display a short description of the tutorial, and then click “See how” to view the tutorial in the Adobe Elements Inspiration Browser.
Plus members receive free content from Photoshop.com, such as the titles shown in the previous figure. Note that Adobe Premiere Elements will download these files automatically once they’re available and will display them in the Photoshop.com folder.
Review questions
1. What are the three main panels in Adobe Premiere Elements, and what function does each serve?
2. What types of projects should you consider starting from the Organizer, and why?
3. What are the two views of the My Project panel, and what are their respective strengths?
4. What are the three major benefits of Photoshop.com’s Plus Membership?
Review answers
1. The three main panels are the Monitor, Tasks, and My Project panels. You build your movies by adding clips to the My Project panel. The Monitor panel serves multiple roles, allowing you to preview your movies and create titles and other effects. The Tasks panel has four workspaces that allow you to organize your clips, create InstantMovies, and render your movies for sharing with others. It also contains content like effects, transitions, themes, titles, and disc menus.
2. Any project that doesn’t involve capture from tape should start from the Organizer. Starting work in the Organizer provides faster access to tagging and sort tools, and direct access to production activities like creating an InstantMovie or uploading a video to Photoshop.com.
3. Adobe Premiere Elements offers two views in the My Project panel: Sceneline and Timeline. The Sceneline shows only the first frame of the clip and is ideal for quickly arranging the order of your clips and performing basic edits. The Timeline displays clips on separate tracks and is superior for advanced edits like picture-in-picture and other overlay effects, and for adding background music or narration to your productions.
4. Plus members receive up to 20 GB of storage space (compared to 2 GB for the Basic Membership), access to tutorials, and additional content when released by Adobe.