
10 Sharing Your Designs
Lesson overview
In this lesson, you’ll learn how to do the following:
Understand the different methods of sharing.
Share your cloud documents.
Share your prototype for review.
Update a shared prototype.
Comment on a shared prototype.
Share design specs.
Update design specs.
Manage shared links.
This lesson will take about 60 minutes to complete. To get the lesson files used in this chapter, download them from the web page for this book at www.adobepress.com/XDCIB2020. For more information, see “Accessing the lesson files and Web Edition” in the Getting Started section at the beginning of this book.

Sharing your projects with others is an important part of the design cycle because it allows for collaborative editing, gathering feedback through comments, sharing design specifications, and more. In this lesson, you’ll learn how to share your documents in different ways, depending on your needs.
Starting the lesson
In this lesson, you’ll learn about different methods for sharing your prototype, learn how to work with comments, and manage your shared prototypes.
Start Adobe XD, if it’s not already open.
On macOS, choose File > Open From Your Computer. On Windows, click the menu icon (
 ) in the upper-left corner of the application window and choose Open From Your Computer. Open the non-cloud document from Lesson 9, Travel_Design.xd, in the Lessons folder (or where you saved it).
 Note
NoteIf you have not already downloaded the project files for this lesson to your computer from your Account page, make sure to do so now. See the “Getting Started” section at the beginning of the book.
NoteFor either macOS or Windows, if the Home screen is showing with no files open, click Your Computer in the Home screen. Open the non-cloud document Travel_Design.xd in the Lessons folder (or where you saved it).
If the Assets panel opens on the left and you see a Missing Fonts message, close the panel by clicking Assets panel icon (
 ) in the lower left. Note
If you are starting from scratch using the jumpstart method described in the section “Getting Started,” open L10_start.xd from the Lessons > Lesson10 folder.
NoteThe screen shots for this lesson were taken on macOS. On Windows, the menus can be accessed by clicking the hamburger menu.
Press Command+0 (macOS) or Ctrl+0 (Windows) to see all of the design content. Leave the file open.
Methods of sharing
If you need to share designs and prototypes with others—to invite collaborators to edit a cloud document, gather feedback on a design or prototype, create a presentation, or share design specifications with a developer—you can use Share mode from within the desktop version of Adobe XD. You may choose to share at any point during the design process, from an in-progress design with no interactivity to a fully interactive prototype.
Adobe XD has several default sharing presets that you can use, including:
Design Review: Get feedback on your design or prototype. By default, when viewing in-browser, commenting is enabled and the prototype is not in fullscreen mode.
Development: Share your design or prototype with developers. By default, when viewing in-browser, commenting is enabled and the prototype is not in fullscreen mode. Specs mode is also available in browser for viewing project specifications.
Presentation: Optimized for presenting your design.
User Testing: Ideal for testing your prototype. By default, when viewing in-browser, commenting is NOT enabled and the prototype is in fullscreen mode.
Custom: Customize the viewing experience.
The following table represents the features available in each of the presets:
Design Review
|
Development
|
Presentation
|
User Testing
|
Custom
|
As a designer, you can share your designs or prototypes using any of the available sample presets. As a reviewer, you can access the review invite from the Creative Cloud application or email and comment on shared designs or prototypes. A final method for sharing is called sharing a cloud document, which you’ll explore first.
Sharing a cloud document
In Lesson 2, “Setting Up a Project,” you learned what cloud documents are. In Lesson 9, “Previewing a Prototype,” you learned how to save an XD document as a cloud document. In this section, you’ll save another document as a cloud document and share it with a user. In order to follow along in this section, you will need to have another XD user that you can send the file to. That way, they can make edits and you will see how the process works. If you don’t, you can simply read along.
Cloud documents are XD’s cloud-native document type, providing users with a fast and convenient method to manage, share, and retain up-to-date documents. You can save your XD designs as cloud documents to ensure that they are up to date and accessible even when you’re offline. You can then share them with other Creative Cloud users and invite those users to collaborate. To share the Travel_Design document with someone else so that they can make edits, the document must first be saved as a cloud document.
Click the Invite To Document icon (
 ) in the upper-right corner of the application window.
 Note
NoteTo access the sharing window, it doesn’t matter which mode is showing, Design, Prototype, or Share. Design mode appears in the figures.
In the window that appears, you will most likely see a message that tells you that the document needs to be saved to the cloud first.
Click Continue in the window.
In the Save options window that opens, change the name to Travel_Design_share. With the Cloud Documents option selected, click Save.
 Note
NoteOn Windows, the Save options window will appear in the center of the document window.
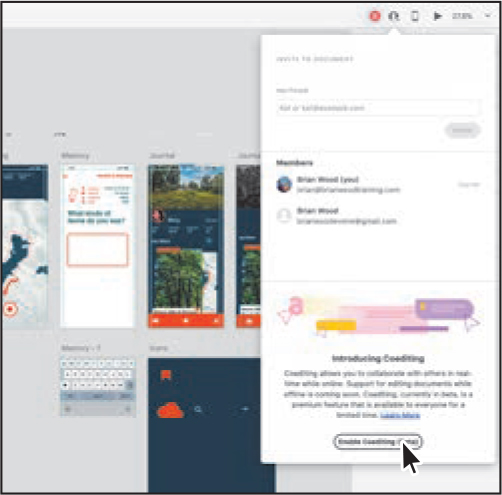
After the document is saved to Creative Cloud, you can share it with others. In the Share window, after the document has been saved, you will see a place where you can add people to share it with. Type an email address for each person you would like to share the document with. Add a comma (,) between each email address if you want to send it to more than one person.
Enter an email address in the field.
If you enter an email address that you’ve previously entered, you may see it appear below the field. You may not see it now since it may be the first time you are sharing a document.
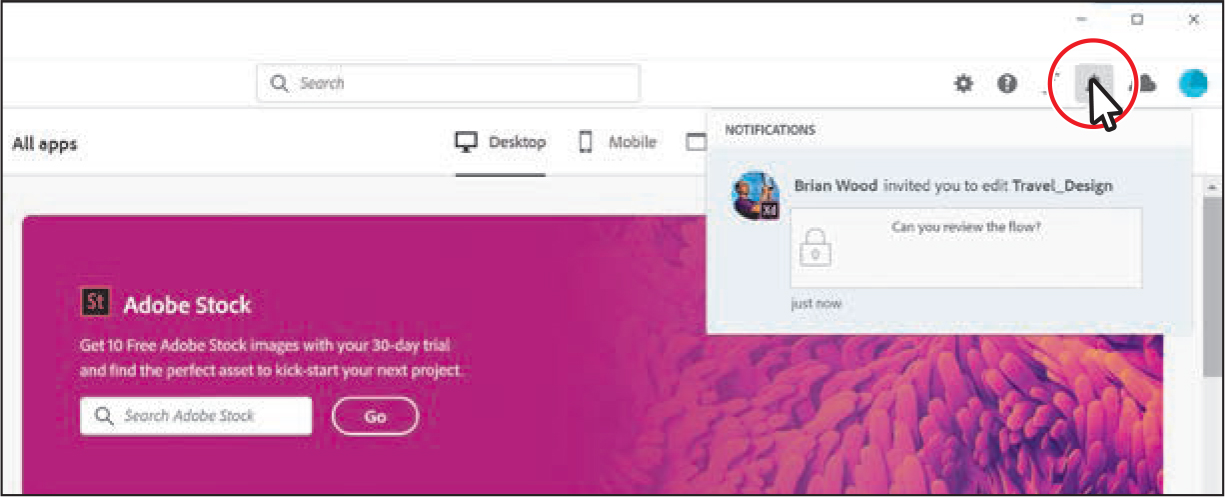
Once you share a document, collaborators receive a notification from the Creative Cloud desktop application as well as via email. Your recipient will only receive a notification in the Creative Cloud desktop application if you enter the email address that serves as their username for their Creative Cloud membership.
Add a message in the Message field.
The message is optional, and the user will see the message in an email that he or she receives.

Click Invite.
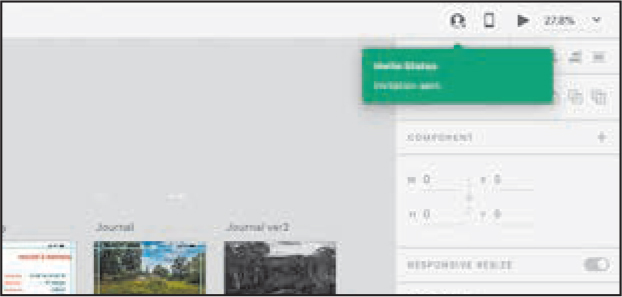
After XD sends the invite, you, as the initiator, will see a message indicating that it has sent.
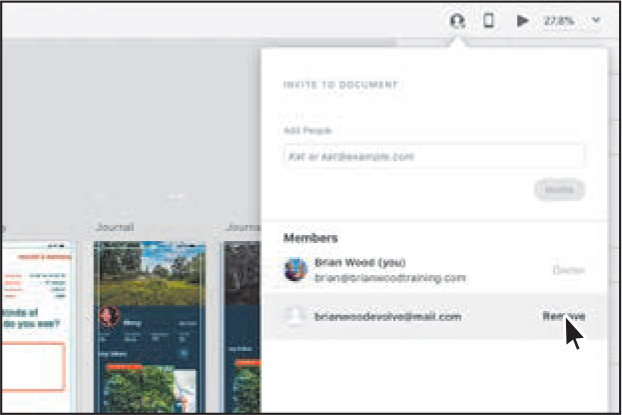
Click the Invite To Document icon (
) in the upper-right corner of the application window again. In the window, you’ll now see a listing of users you’ve shared the cloud document with, including the owner (most likely you).
This is one place where you can track who has access to the document. You can also remove invited collaborators from the shared cloud document. To do so, you would move the pointer over an email address in the list (not the owner) and click Remove. You would then need to click Save to remove them.
 Note
NoteWhen you remove a user from sharing, that user will no longer be able to edit the file.
Press the Esc key to hide the window.
If an invited collaborator opens the Creative Cloud desktop app, that user will see a notification and can click to open the file. That collaborator can also open the cloud document from the email he or she receives.
In the upper-right corner, near the Invite To Document icon (
), if another user has the document open at the same time, you will see an icon. If you move the pointer over the icon, you will see the name of that user.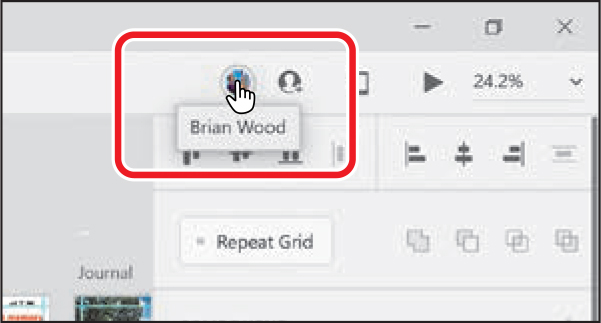
All invited collaborators can edit your document and save changes to the original file. If a collaborator makes a change to the shared document and the file is saved, the owner will receive a message indicating that there’s a newer version of the document available, and vice versa.

If more than one collaborator has simultaneously opened the document, the changes, made by the first collaborator are updated to the cloud document, and the second collaborator is given an option to save as a separate document.
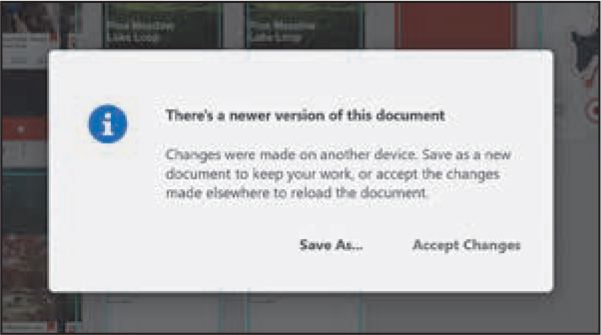
The changes can be accepted to reload the document with the new changes or a copy of the document with their changes can be saved.
Choose File > Close (macOS) or click the X in the upper-right corner (Windows) to close the Travel_Design_share document and open to the Travel_Design.xd file again.
Coediting (beta)
Coediting allows multiple users to work on a single project file at the same time without worrying about duplicating work or maintaining redundant documents. As of this writing, the feature is in beta, which means it may not be feature complete.
Coediting is available when working on cloud documents in XD. With coediting enabled for a document, you can invite others to edit the document.
You can see when other users are active in the document and which artboards and objects they’re currently editing.
Coediting 
To see how coediting works in Adobe XD, check out the video “Coediting,” which is a part of the Web Edition of this book. For more information, see the “Web Edition” section of “Getting Started” at the beginning of the book.
Sharing a prototype or design for review
In this section, you’ll share the Travel_Design.xd prototype to gather feedback about the design and user experience. You can share a document that is either a cloud document or saved locally. To share a prototype that is local, you will enter Share mode. Share mode in XD consolidates different sharing capabilities into the Property Inspector on the right. There are a few things to consider before sharing your document:
First, set the Home artboard in Prototype mode if you want only artboards with direct or indirect connections to the Home artboard shared.
Wire the artboards in the order that you want users to navigate them. Artboards that are wired and not connected to the Home artboard will be dimmed in Share mode.
![]() Note
Note
For artboards that aren’t wired, the navigation sequence defaults from left to right or top to bottom. If you want to change the navigation sequence, go back to Prototype mode and wire them again.
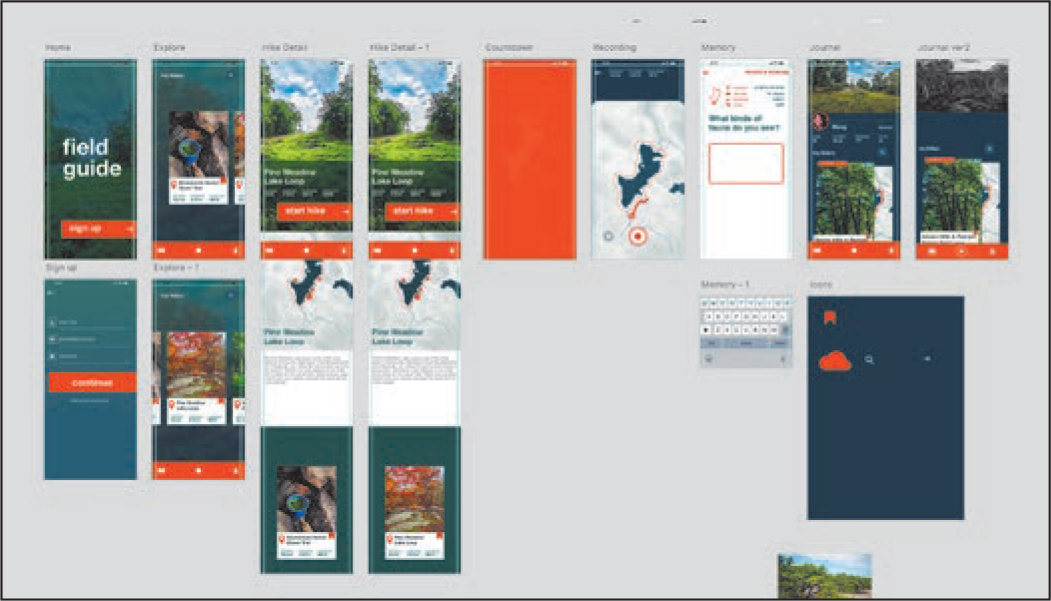
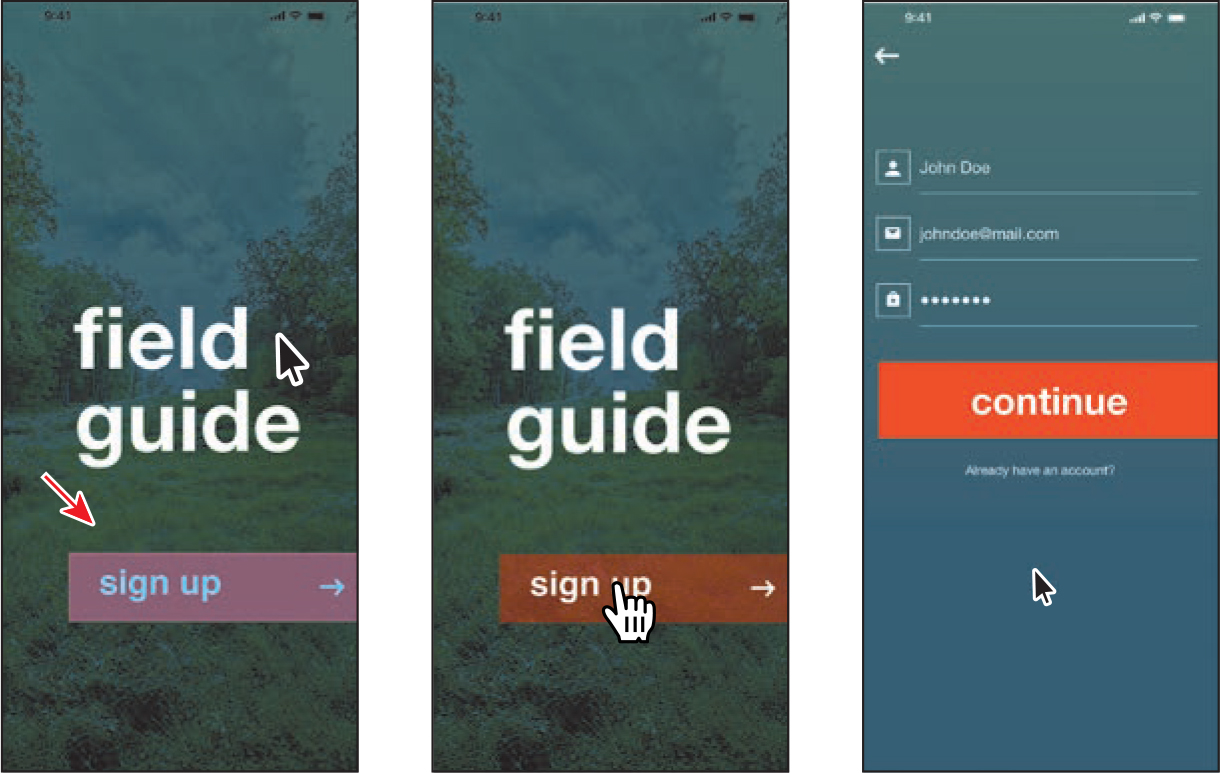
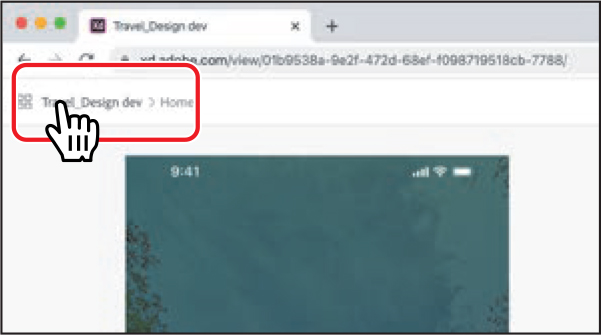
With the Travel_Design.xd document open, click Share in the upper-left corner of the application window to show Share mode.
 Note
NoteTo share prototypes using the Adobe XD Share feature, you must be signed in with an Adobe account to the Adobe Creative Cloud app or any other Adobe application.
For the Travel_Design.xd document, there are a series of connections (wires) between the artboards, but there is currently only one artboard, the Sign up artboard, that is connected to the Home artboard. That is why the artboards besides the Home and Sign up are dimmed. They will not be shared. Any artboards that have direct or indirect connections to the artboard set as Home are a part of the shared prototype and can be viewed in the browser. Next, you’ll make a connection from the Sign up artboard to the Explore artboard.

 Tip
TipIf you don’t set the Home artboard, all artboards will be shared.
Click Prototype in the upper-left corner to enter Prototype mode.
Click the continue button on the Sign up artboard. Drag the connecting handle (
 ) to the Explore artboard and release.
In the Property Inspector, ensure that the following are set:
Trigger: Tap (the default setting)
Action: Transition
Preserve Scroll Position: unselected
Destination: Explore
Animation: Slide Left
Easing: Ease Out
Duration: 0.3
Fix Position When Scrolling: unselected

With the Sign up artboard connected to the Explore artboard, more artboards should be available for sharing now.
Click Share in the upper-left corner of the application window to enter Share mode.

You should now see more artboards that are not dimmed since the Explore artboard was already connected to the Explore – 1 artboard, which was connected to the Hike Detail artboard, and so on.
In the Property Inspector on the right, set the following options:
Choose Design Review from the View Setting menu since the main reason for sharing in this example is to gather design feedback. The options in the menu are those that were discussed at the beginning of this lesson. See the introductory paragraphs of the section “Methods of sharing.”

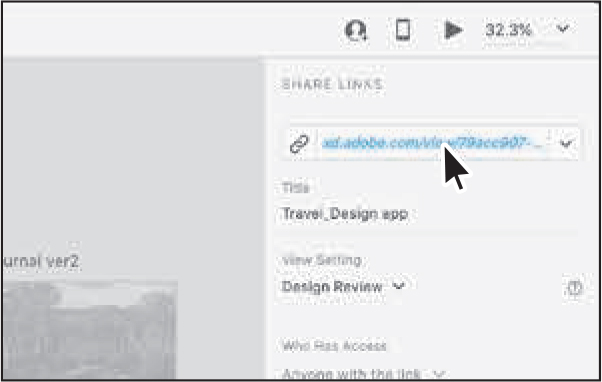
Ensure that Anyone With The Link is chosen from the Who Has Access menu. You can make the shared prototype accessible by anyone who has a browser and Internet connection, or you can choose Only Invited People from the same menu to send an email invite to certain people.
Title: Travel_Design app (The title appears when viewing the shared prototype in a browser as well as when managing your shared links. Naming can be a useful way to distinguish between versions of a shared project, for instance.)
Require Password: unselected (You can restrict access to your prototypes and design specs by adding password protection. You can password-protect new prototypes or design specs only.)
Click Create Link to create a shared project.
 Note
NoteThe prototype might take a little while to publish, depending on your Internet speed.
Once the prototype is created and saved to Creative Cloud, the Create Link button turns into the Update Link button.
To view the prototype in the default browser on your system, you could click the blue link.
To share a link to the prototype with others, you could click the Copy Link icon (
 ). With the link copied, you can paste it into an email, for instance, to share with others.
Click the link toward the top of the window to open the prototype in the default browser on your machine.
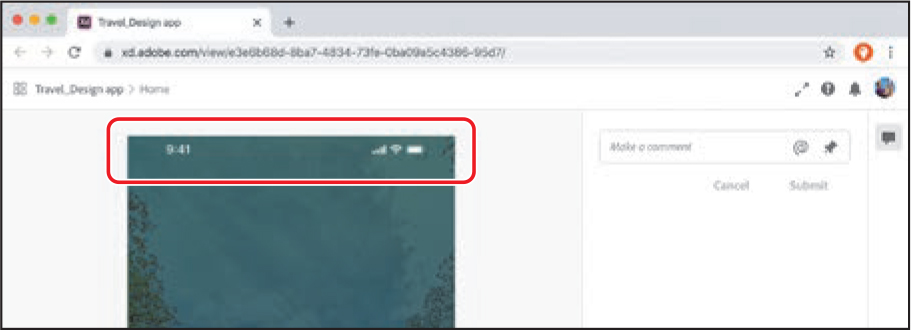
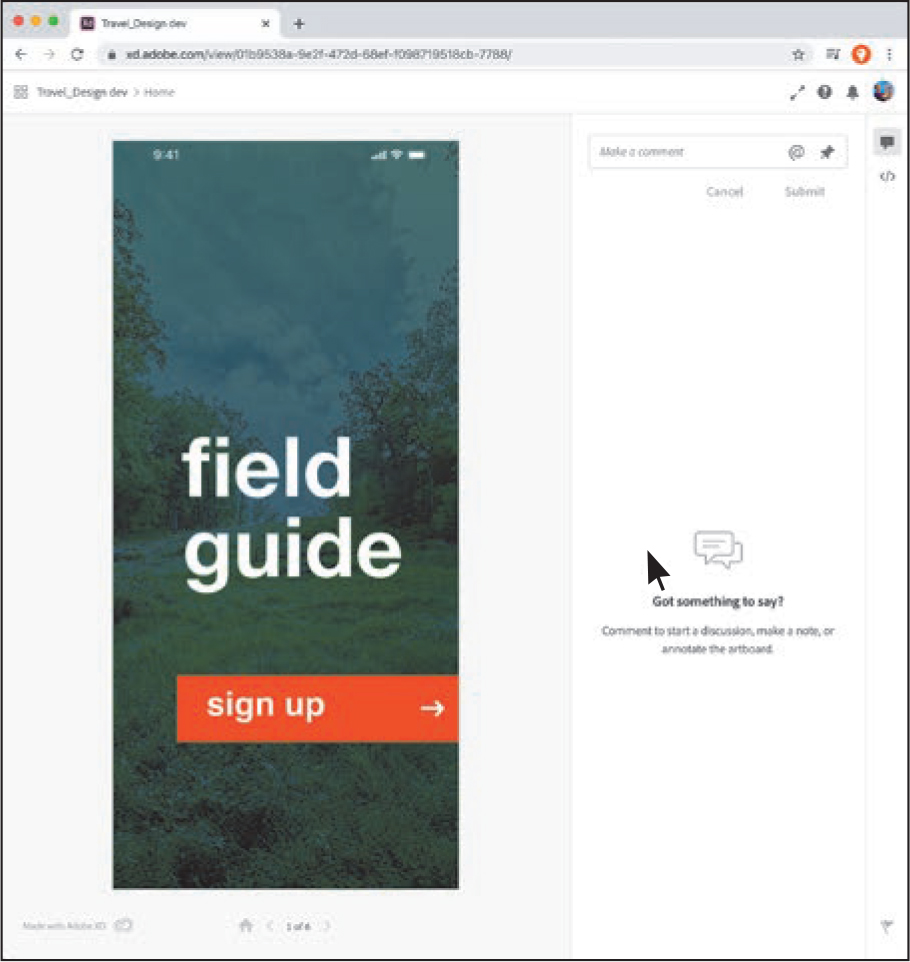
The prototype opens in the default browser on your machine. The prototype home screen will be centered in the browser window and will be the size of the artboard named “Home” in Adobe XD (in this case).
For a list of supported browsers, visit helpx.adobe.com/xd/system-requirements.html.

In the upper-right corner of the web page, you’ll see a way to make the preview fullscreen (
 ). Fullscreen hides all UI elements in the browser window (to exit fullscreen mode, press the Esc key), a help and feedback icon (
 ), a notifications icon (
 ), and a place to sign in (or sign out if you’re already signed in).
Below the home screen, you’ll see left and right arrows for navigating between artboards, a home icon (
 ) to return to the home screen, and an artboard counter, which currently shows 6 (or so). If your design includes connections, only those artboards connected directly or indirectly (through other artboards) to the home artboard are uploaded and shared.
To view this shared project, you don’t need to be signed in with an Adobe ID. Anyone with access to the link can view the prototype in a desktop browser or in a browser on their device.
Interact with the prototype by clicking anywhere in the home screen to see the hotspot hints available. Click the "sign up" button on the home screen to navigate to the next artboard.
Click the home icon (
) below the artboard to return to the prototype Home screen.
Close the browser window and return to Adobe XD.
Updating a shared prototype
After sharing a prototype, you may decide that you want to make changes to the content or change the home screen to share only a portion of the prototype. After making changes to your project, you can share the project again. You will then be able to either create a new shared prototype or update the existing prototype. Creating a new shared prototype can be a great way to create versions of your prototypes.
Next, you’ll update the Travel_Design prototype by changing the dark status bars on the Home and Explore artboards to white status bars so they are more readable.
Back in Adobe XD, click Design in the upper-left corner of the application window so you can edit the content.
Zoom in to the Home and Explore artboards.
With the Assets panel showing (Command+Shift+Y [macOS] or Ctrl+Shift+Y [Windows]), find the white status Bar component in the panel—you may need to scroll. Drag the white status Bar onto the black status bar at the top of the Home artboard. When the status bar highlights, release to replace it.
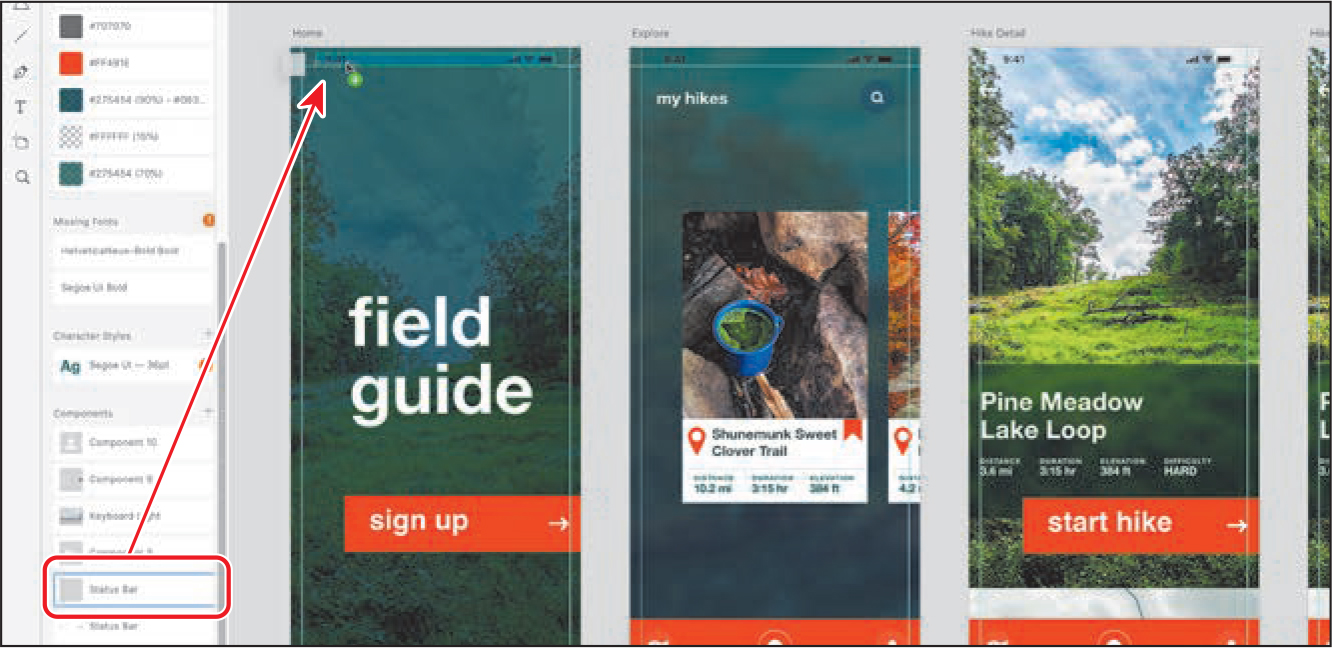
Replace the status bar at the top of the Explore artboard using the same process.
Press Command+S (macOS) or Ctrl+S (Windows) to save the file.
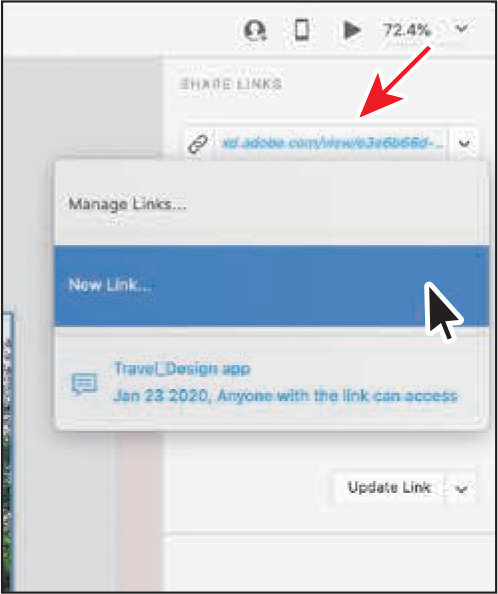
Now that changes have been made, you’ll update the link to the prototype.
Click Share in the upper-left corner of the application window to return to Share mode.
In the Property Inspector on the right, ensure that the title is Travel_Design app and leave the rest of the settings at default. Click the Update Link button.
 Note
NoteThe prototype might take a little while to publish, depending on your Internet speed.
The shared prototype has now been updated to reflect the changes. Users you already shared the link with can simply refresh the prototype in the browser.
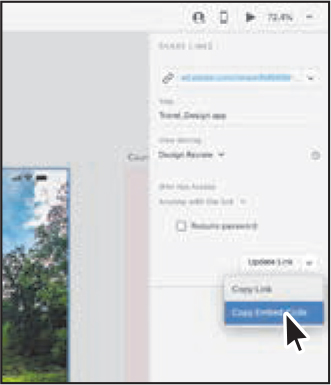
Click the arrow to the right of the Update Link button to show some options.
In the menu that appears, you can choose either Copy Link to copy the link or Copy Embed code. To learn more about embed code, see the sidebar, “Embedding a shared prototype in a web page.”

Click the arrow to the right of the URL link toward the top of the window.
In the menu that appears, you can manage your links, create a new link—which would create a new prototype link with a different title that you could also share with others—and see a list of prototype links already created that you could click to visit in the browser.
Press the Esc key to hide the menu and click the link toward the top of the Property Inspector to view the prototype in your default browser. An arrow is pointing to it in the previous figure.
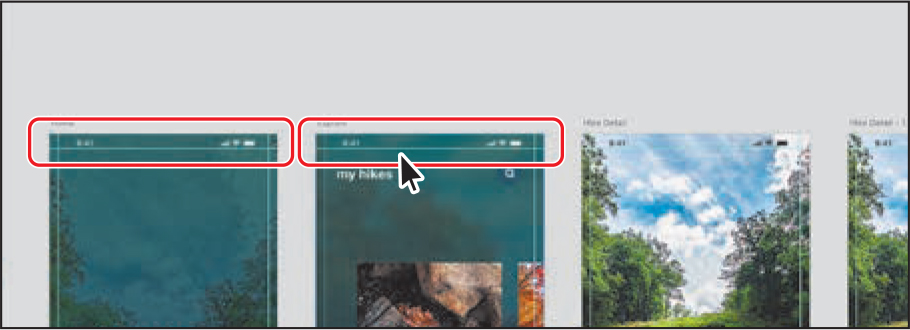
When the prototype opens in the browser, the first screen you’ll see is the Home artboard with the new status bar.
Close the browser window and return to Adobe XD.
Embedding a shared prototype in a web page
Prototypes you share in Adobe XD can be embedded in any web page that supports inline frames (iframes). This can be useful if you want to showcase work you’ve done in Adobe XD in a web portfolio, for instance.
Here’s how you copy embed code for a previously shared prototype from an open Adobe XD file:
In Adobe XD, with Share mode showing, click the arrow to the right of the Update Link button. Choose Copy Embed Code from the menu.
When the code for embedding is copied to the clipboard, a message, “Code Copied,” appears below the button.
With the code copied, you can paste it in the code of a web page or send it to someone else. Below is an example of embed code:
<iframe width=”414” height=”896” src=”https://xd.adobe.com/embed/e3e6b68d-8ba7-4834-73fe-0ba09a5c4386-95d7/” frameborder=”0” allowfullscreen></iframe>
Commenting on a shared prototype
When you share a project in Adobe XD using the Design Review, Development, or Custom settings, the shared prototype is set to allow for commenting. Commenting is done in-browser when the shared prototype is viewed, and guest commenting is allowed, which means anyone can comment because they don’t need to be signed in with an Adobe ID. After you receive comments, you can go back to Adobe XD and update your prototype, based on those comments. After making changes to the prototype, you can share it again by updating the existing prototype or creating a new version. In this section, you’ll view the shared Travel_Design app prototype in the browser, this time focusing on working with commenting.
In Adobe XD, with the Travel_Design app document open and Share mode showing, in the Property Inspector, click the link toward the top to open the prototype in your default browser again.

In the browser you should see a comment icon (
 ) in the upper-right corner of the browser window.
If the Comments panel isn’t already showing, click the comment icon (
) on the right to open the Comments panel. Note
NoteIf you are not signed in when the page opens, click Sign In and sign in with your Adobe ID. To learn more about guest commenting, see the “Guest commenting” sidebar.
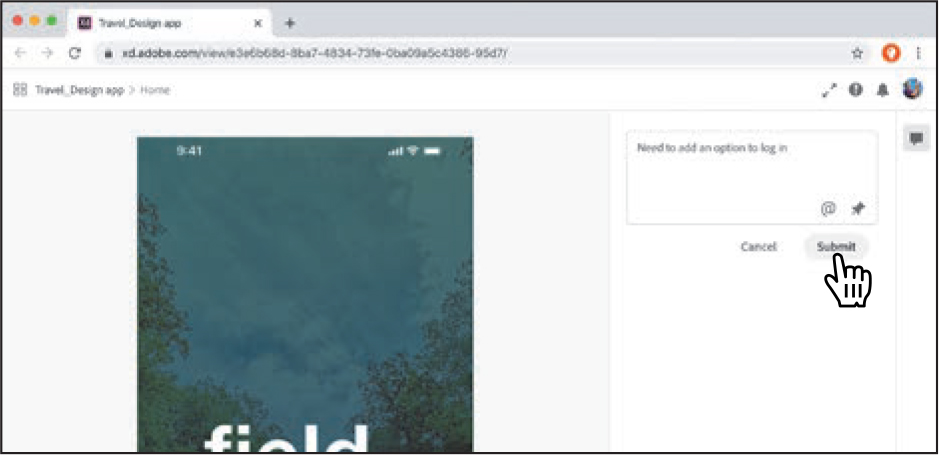
Click in the field that shows the text “Make a comment,” and type Need to add an option to log in and either click the Submit button or press Return or Enter to add the comment. Leave the prototype open in the browser for the next section.
The comment will appear in the Comments panel. If you are signed in with your Adobe ID and you initiated the review, you will see “Owner” next to your name. As the owner, you can add, reply to, delete, and resolve your comments or guest comments.
 Note
NoteAny users who are currently viewing the prototype will see the comments added without having to refresh the page. If you find that new comments from other users are not showing, you can refresh the web page and show the Comments panel again.
Guest commenting
When viewing a shared prototype in a browser, with the comments showing, reviewers can either sign in using their Adobe ID or sign in as a guest when commenting on a shared project.
To sign in as a guest, reviewers click Comment As A Guest at the bottom of the Comments panel. They supply a name and select I’m Not A Robot for the Captcha. They can then click Submit.

If, after commenting as a guest, a user ends the session by closing or refreshing the browser, he or she will have no control over the previous guest comments they made. On the other hand, if reviewers sign in using their Adobe ID, they can edit their previous comments.
Pinning comments
Pinning comments is a great way to visually associate a comment with a specific area of an artboard. When you pin a comment, Adobe XD assigns a number to that comment. The comments in the Comments panel show these numbers, so you can easily identify which comment is associated with which number on the artboard. Generic comments, like the first comment you added, are not pinned and do not show a number. Next, you’ll add another comment and pin it to an artboard.
With the shared prototype still showing in the browser, click the “sign up” button on the prototype Home screen to show the next screen.
TipIf you click a name, such as Home, in a comment, that screen will show in the browser.
The comments from the previous artboard are still showing in the Comments panel because the All Screen Comments option in the Comments panel is selected. The comments are organized by screen, and you can see the name of the screen in the Comments panel list. If you only wanted to see the unique comments for a specific artboard, you could deselect All Screen Comments— but do not do so right now.
Click in the field that shows the text “Make a comment,” and type add keyboard here when you tap a field.
Click the Pin icon (
 ) that appears below the comment.
 Tip
TipWhile pinning a comment, you can press the Esc key to cancel pinning.
Move the pointer over the Sign up screen, and click at the bottom to set a comment pin. You can drag the number where you want it on the screen.
Click Submit in the Comments panel to accept the comment.

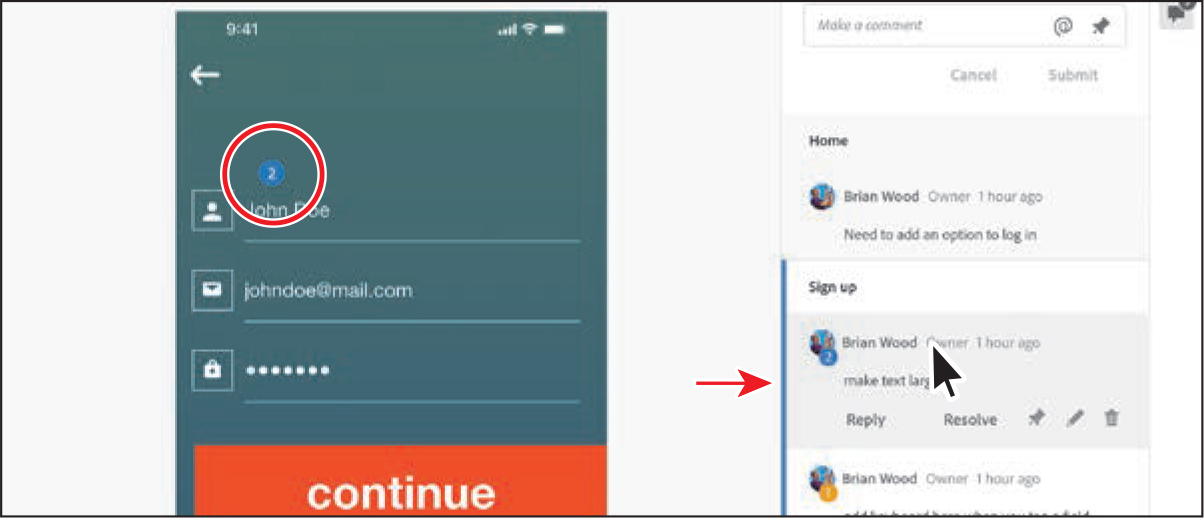
The number associated with the comment is a visual way to locate the comment in the Comments panel and in the shared project.
Click the Pin icon (
) in the Comments panel, move the pointer onto the screen, and click just above the “John Doe” text to set the comment pin.
Type make text larger in the comment field of the Comments panel. Click Submit in the Comments panel.
Move the pointer over the first comment marker (1) at the bottom of the screen to subtly highlight the associated comment in the Comments panel.
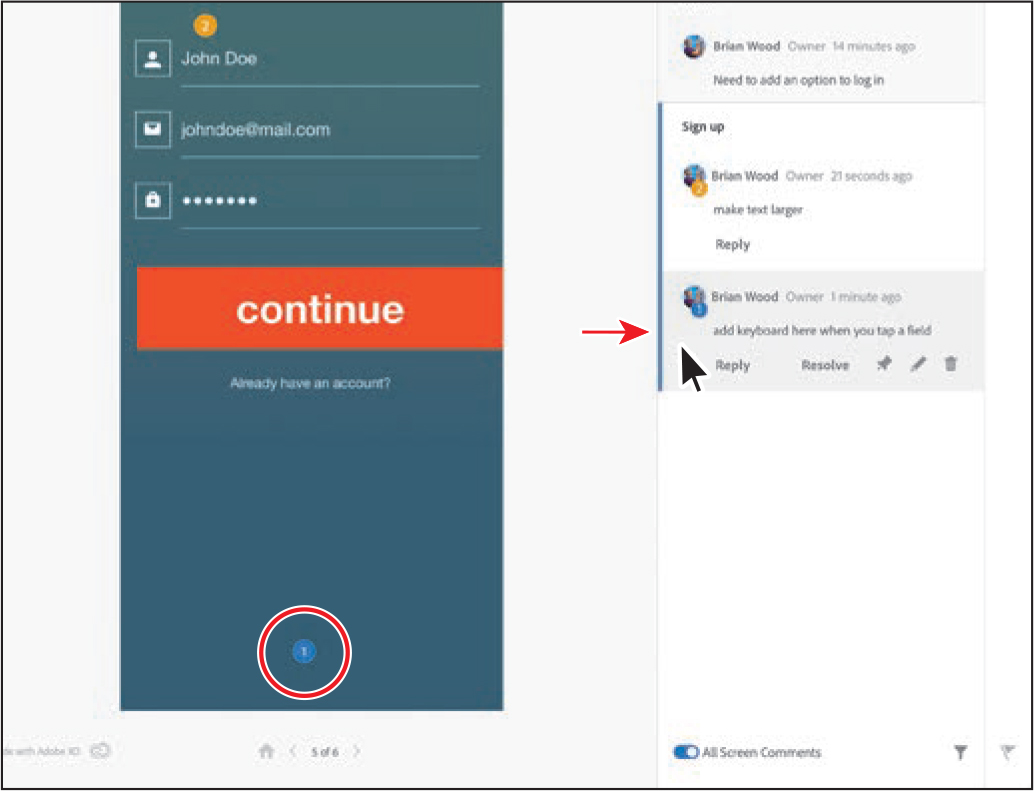
When there are a number of pinned comments, this can help you find the comment associated with a comment pin in the Comments panel.
Leave the prototype open in the browser.
Working with comments
With comments added to the artboards in your shared prototype, in this section you’ll explore replying to comments and deleting comments in that same prototype.
With the prototype still open in the browser and the Comments panel showing, move the pointer over the comment marked “2” in the comments list on the right to see the corresponding pin highlighted in the prototype.
 Tip
TipTo view the prototype in the browser without comment pins on the artboards, hide the Comments panel by clicking the comment icon (
 ).
).Comments in your shared prototype can be edited, deleted, replied to, and marked as resolved.
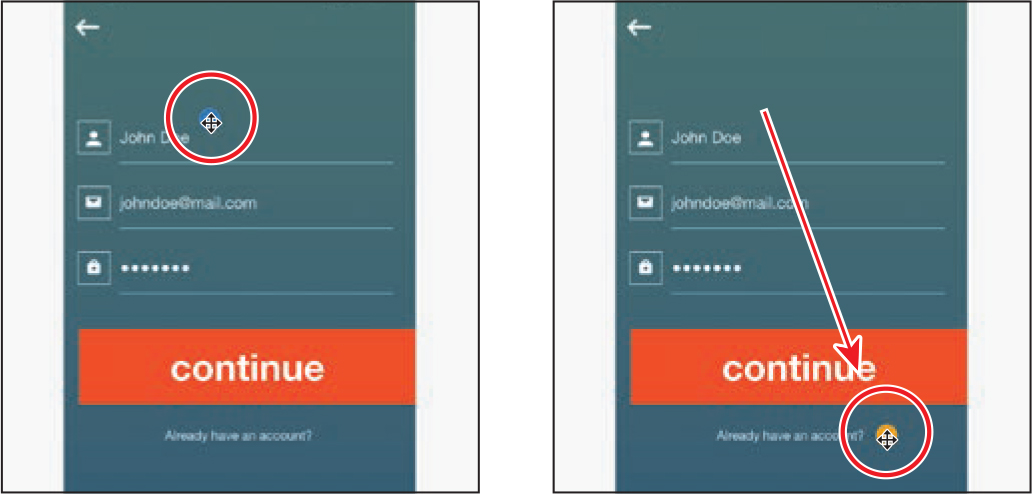
Move the pointer over the pin icon for comment 2 (next to the John Doe text) and drag it down to the right of the “Already have an account?” text.
This is an easy way to edit the location of a comment pin.
Move the pointer over the same comment in the comments list. Click the Edit Comment icon (
 ) below the comment to change it. Change the comment from “make text larger” to “Make text larger and bold.” Click Save.
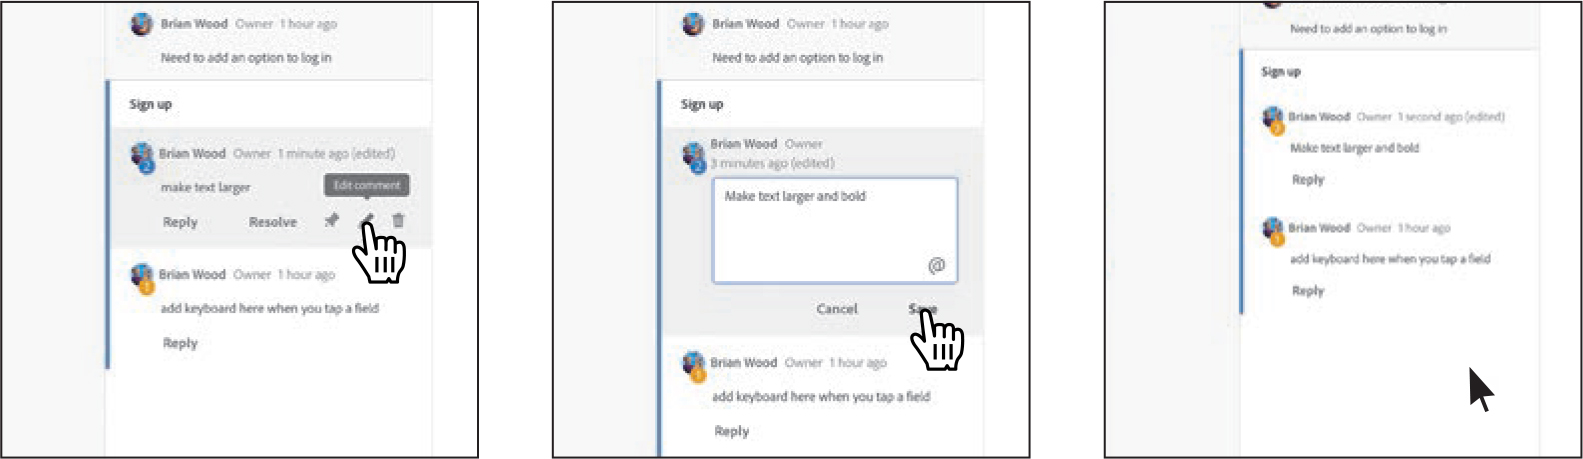
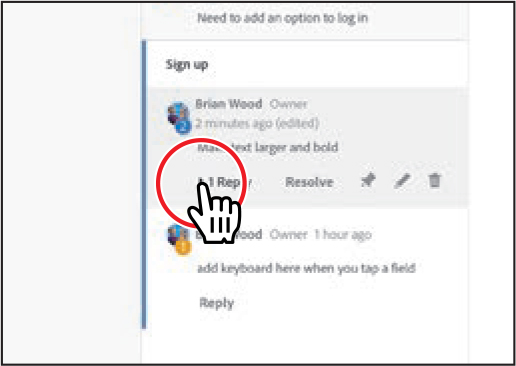
Not only can you edit comments, but you and others can reply to comments. Next, you’ll add a reply to the same comment, marked “2.”
TipIf you want to delete a comment, you can click the trash can icon (
 ) and verify you want to delete the comment.
Move the pointer over the comment marked “2” in the comments list. Click Reply to add a reply to the original comment. Type How about changing the text color instead? and press Return or Enter to add the reply.

Click the small arrow to the left of the “1 Reply” text to collapse the comment reply.
 Note
NoteYou can’t edit other reviewers’ comments. The owner can delete guest comments, but guests cannot delete or edit comments by others.
Replies to comments appear under initial comments. Comment replies will be collapsed when viewed by other commentators and will need to be expanded to be viewable.
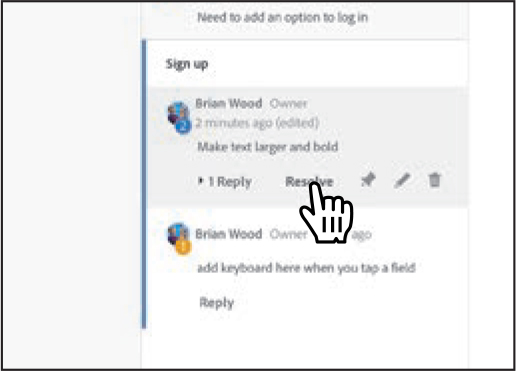
Move the pointer over the comment labeled “2” and click Resolve.
Marking a comment as resolved removes it from the list of comments. This method can be used as a way to mark comments as “done,” for example. Resolved comments can still be viewed by filtering the comments list, which is what you’ll do next.
Click the Filter icon (
 ) toward the bottom of the Comments panel to see a window with filtering options. Click Resolved in the Status section of the window to see any comments that have been marked as resolved.
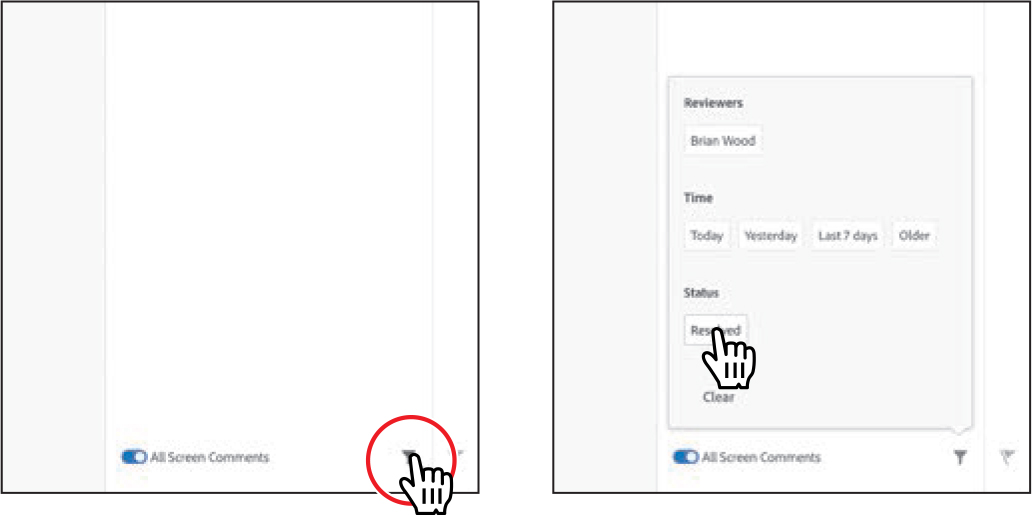 Tip
TipWhen viewing resolved comments, you can also unresolve a resolved comment by moving the pointer over the comment and clicking the Move To Unresolved button in the Comments panel.
There are several useful filtering options in the window that is showing, including filtering by reviewer and time. Notice that the filter icon (
 ) now has an indicator that one or more filters have been applied.
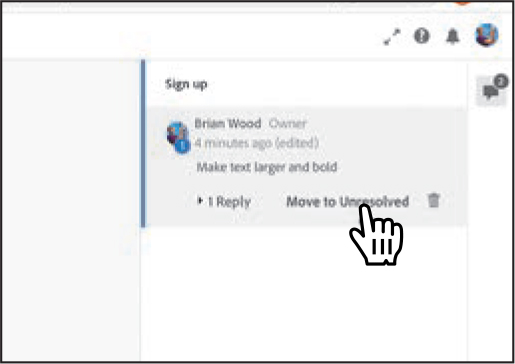
Click in a blank area of the browser to close the filter window. Move the pointer over the comment in the Comments panel and click Move To Unresolved when it appears.
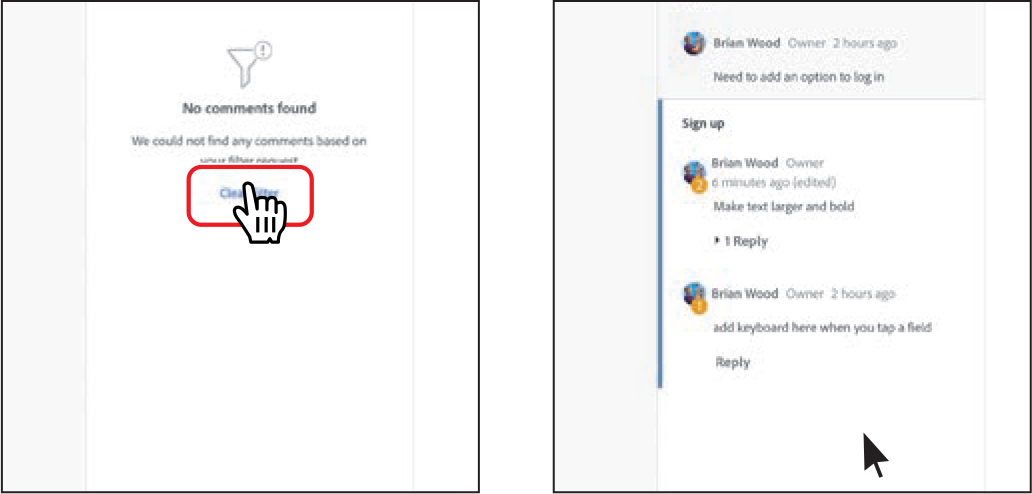
The comment should now be back in the main comments list. To see those comments, you’ll clear the Resolved filter.
To clear the Resolved comment filter so you can see other comments, click Clear Filter in the Comments panel.
Comments added by users are stored with the shared prototype. To see comments from a previous version of a shared project, you would need to manage your shared links, which you’ll do next.
Close the browser window and return to Adobe XD.
Sharing designs or prototypes with developers
As you near the end of the design process and get ready to move to development outside of Adobe XD, you can share the design or prototype by publishing design specs. This creates a public URL that you can share with others. These specs can improve communication by allowing developers to view the sequence and flow of artboards, as well as detailed specs for each artboard, complete with measurements, colors, character styles, relative spacing between elements, and more.
In this section, you’ll share design specs and explore the design specs in your default browser. A part of sharing design specs with others is to allow assets to be downloaded with the design specs open in the browser. To allow users to download assets, you need to mark assets for export in the Layers panel, which is what you’ll do first. You do not need to mark assets for export to share design specs.
Click Design in the upper-left corner of the application window to show Design mode, if it isn’t already showing.
Open the Layers panel by pressing Command+Y (macOS) or Ctrl+Y (Windows), if it isn’t already showing.
With the Select tool selected, on the Home artboard, click the gradient-filled rectangle behind the “field guide” text. You should now see the edges of the image behind it. Click the image area outside of the artboard or click the image in the Layers panel list.

In the Layers panel, move the pointer over the selected image in the list of layers. You should see that the Mark For Export icon (
 ) is toggled on.
By default, objects will automatically be marked for export when you import images from Photoshop and Illustrator. You can also select an object on your artboard and mark it for export in the Property Inspector. This particular image, because it is marked for export, is available for download to anyone who views the design specs. With assets marked for export, now you’ll share the design specs.

Click Share in the upper-left corner to enter Share mode.
 Tip
TipAs with shared prototypes, whichever artboard is set as the home screen will be the first artboard users see in the design specs. Any artboard with a direct or indirect connection to that home screen artboard will be published.
NoteTo share prototypes or design specs using the Adobe XD Share feature, you must be signed in with an Adobe ID to either the Adobe Creative Cloud app or any other Adobe application.
In the Property Inspector, click the arrow to the right of the URL link toward the top of the window and choose New Link.
Choosing New Link will create a new prototype link with a different title that you could also share with others.
In the Property Inspector, now change the following:

Title: Travel Design dev (The title appears when viewing the shared prototype in a browser as well as when managing your shared links.)
Choose Development from the View Setting menu.
NoteThe default unit for iOS is pt, the default unit for the web is px, the default unit for Android is dp, and the default unit for custom-sized artboards is px. These default units are not editable.
Export For: iOS (the default setting) (The units for the shared prototype are based on the artboard size of the home screen. The home screen in this file was set to the iPhone XR/XS Max/11 preset size. Adobe XD recognizes the default artboard for the home screen as being sized for an iPhone [iOS] and sets the units accordingly. The units are important when viewing the design specs in the browser because you can copy and paste the number value along with the unit of measurement—px, dp, or pt—that you need.)
Downloadable Assets: selected (This setting is available because assets were automatically marked for export. If there were no assets marked for export, this option would be dimmed.)
Require Password: Unselected. As with sharing prototypes, when sharing design specs you can make the shared prototype accessible to anyone who has a browser and Internet connection, or you can make it so users must enter a password to see the design specs.
Click Create Link.
The design specs are published and saved in Creative Cloud.
Click the URL toward the top of the Property Inspector to open the specs in your default browser.
 Note
NoteWith a Home artboard set, unlinked artboards are not published in the design specs. The position of the artboards in the browser when viewing the design specs is identical to the position of the artboards in the design file.
NoteMobile browsers are not supported or recommended for viewing design specs.
The view initially looks very much like the previous share you did, with the home screen showing and comments on the right. But when you share using the Development preset, there are some specific features useful to developers.
Inspecting design specs
Browser-based design specs allow everyone involved on a project to view the sequence and flow of artboards in what’s called the UX Flow view. This view of all the artboards (screens) in the design specs shows the number of artboards that need to be developed (useful for planning the scope of development work), the sequence and flow in the design specs (useful for understanding the end-user workflow), the date when the design specs were last updated, and more.
In order to view design specs, whomever you share the design specs link with will need the following:
A link to the design specs (In the previous section, you saw the Copy Link option to copy the link to the design specs in the Property Inspector in Adobe XD. You can paste that link in an email or other method of communication.)
A supported desktop browser and Internet connection
![]() Note
Note
For a list of supported browsers, visit helpx.adobe.com/xd/system-requirements.html.
Next, you’ll explore the design specs currently open in the browser.
In the upper-left corner of the page in your browser, click the Travel_Design dev name to show different views.
There are two main ways you can view the artboards: Grid view and Flow view. Grid view is the default, and is where you’ll see thumbnails of each artboard along with their names.
If you click one of the thumbnails (don’t), the artboard opens in the window. Click the Linked Screens icon (
 ) in the lower-right corner of the Hike Detail artboard, and you can see the artboards that are linked to it.
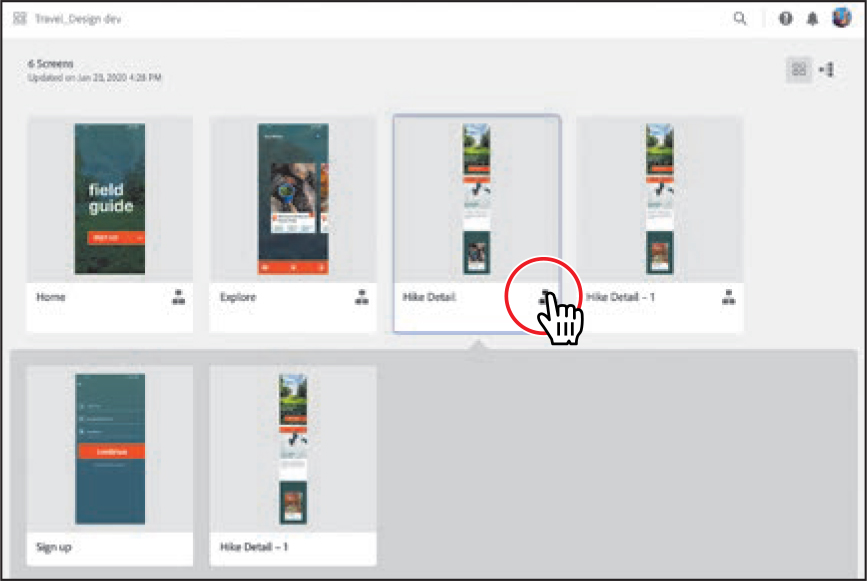
In the Upper-right corner, click the Flow View icon (
 ) to show the artboards.
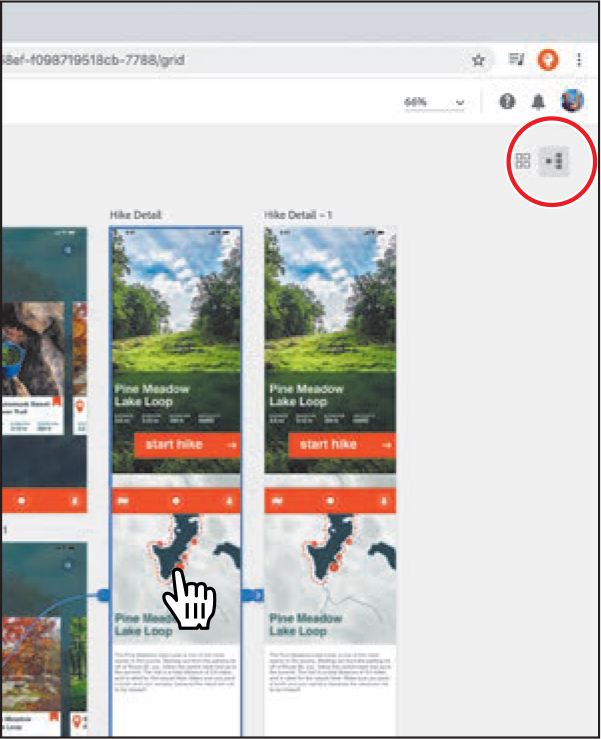
In Flow view, you can communicate the design and layout hierarchy, as well as see any linked artboards when you move the pointer over artboards.
Click in the Home artboard to return to the same view you saw when you first opened the design specs in the browser.
In order to see detailed information about content in the prototype, you can view the specs, which is what you’ll do next.
Click the View Specs button (
 ) on the right side of the browser window.
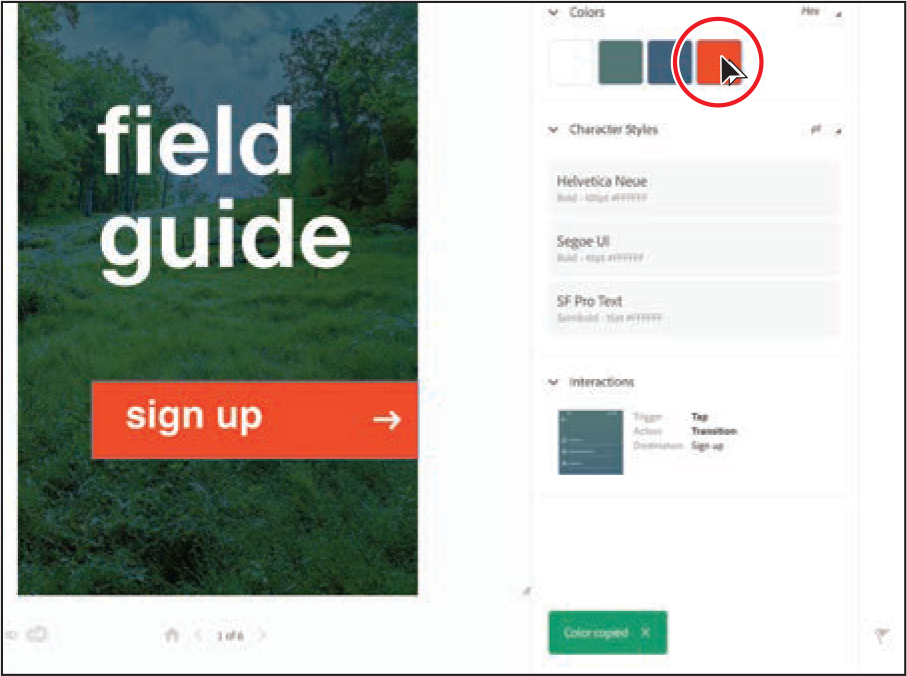
To the right of the artboard in the browser window, you can now see all the unique screen details, colors, character styles, and interactions used on that artboard. The colors and character styles you see when viewing an individual artboard in the browser may differ from those found in the Assets panel when the original project file is open in Adobe XD. The design specs show all formatting applied to the content, whether it’s been saved in the Assets panel or not.
Move the pointer over the white color in the Colors section on the right. Objects that have the white fill or border color are highlighted on the artboard.

Click the orange color in the Colors section on the right side of the page.
 Tip
TipYou can change the color format by clicking Hex above the color swatches and choosing another format, such as HSLA. You can also change the unit that appears in the character styles by clicking the menu to the far right of “Character Styles” (the figure shows “pt”; you may see something different) and choosing another unit, such as px or dp. This change is persistent across the entire session—the same color formats and measurement units are used when you view other screens.
Clicking a color or a character style will copy the formatting to the clipboard. For instance, copying a color will copy the Hex value of #FF491E (in this case). If you click to copy a character style, only the name of the font is copied. You can then paste the value into your code or into an email, for example.
Now you’ll navigate to the next artboard.
Scroll down in the area on the right to see the Interactions section, if you don’t already see it.
Interactions for a screen are the connections created in Prototype mode. You can see the options set for the connection, and if you click the interaction listed, the connected artboard will appear in the browser window.
Move the pointer over the interaction to see the “sign up” button highlight. You may need to scroll in the browser window to see the bottom of the screen. Click the interaction you see to go to the Sign up artboard.

Selecting objects that have a connection set in Prototype mode shows a thumbnail of the target screen (artboard) on the right in the browser. In most cases, you could click the target screen to navigate to it. For some connections, like those set to previous artboard, the target for the selected content won’t work if you click it.
On the Sign up artboard, click the johndoe@mail text on the artboard.

After you select an element on the artboard, you can view its height and width coordinates, as well as the properties of the selected content, on the right side of the page. You can also copy the character styles, color values, and content from the design specs.
TipWith text formatting showing, you can click certain properties, like the font name (Helvetica Neue, on macOS), to copy them to the clipboard.
Adobe XD focuses on the relationships between elements. So for example, if you design an iPhone X/XS artboard at 375x812 units and it uses type with a 10-unit font size, that relationship remains the same, no matter what physical size your design is scaled to.
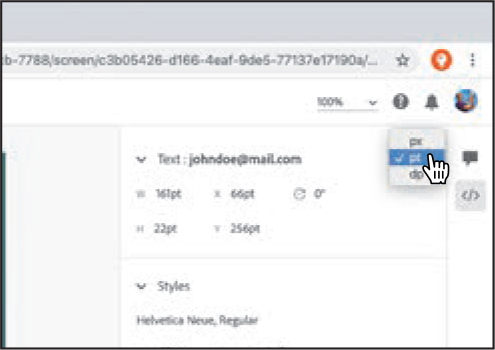
However, in the design specs in the browser, height and width measurements and X and Y coordinates are displayed in px, pt, or dp. When viewing design specs in a browser, the unit of measurements can be changed from one unit to another. This feature allows you to copy and paste the number value along with the unit of measurement (px, pt, or dp) that you need.
Click the Next arrow (>) below the artboard to navigate to the Explore – 1 artboard.
Click the text “Pine Meadow Lake Loop.” You may need to scroll to see it.
In the Content section on the right side of the page, click the text in the Content area to copy it.
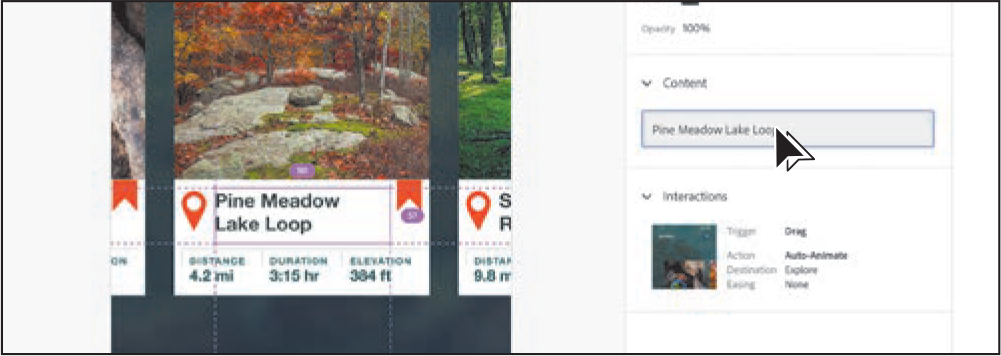
The text is copied to the clipboard and can now be pasted wherever you need it. This is great for developers who need content, such as text, to develop the app.
Click the image in the middle of the screen, then move the pointer over the image to the right to see the relative distance between the objects.

If you’re a developer, this can be useful information as you build the app elsewhere.
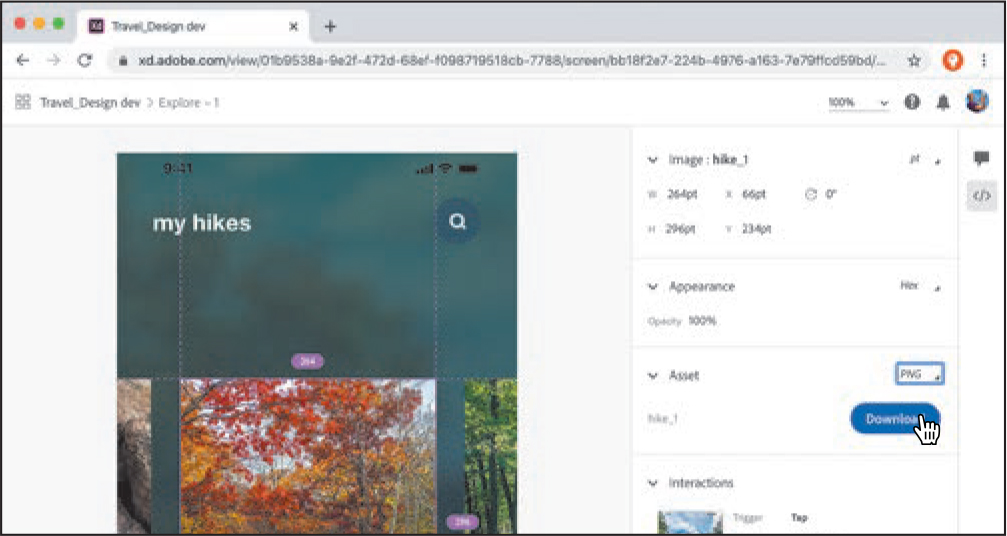
Lastly, if images have been marked for export, they can be downloaded from here as well. You can choose a format from the menu above the Download button.
Click Travel_Design dev in the upper-left corner to return to Flow view.

Close the browser window and return to Adobe XD.
Review answers
1. You can use the Invite To Document option to share a cloud document with others. All invited collaborators can edit your document and save changes to the original file.
2. Shared prototypes are associated with the Adobe ID that is associated with Adobe XD, and the prototype is stored in the Creative Cloud account associated with the Adobe ID.
3. To embed a previously shared prototype in a web page, with an Adobe XD file open in Share mode, in the Property Inspector, click the arrow to the right of the Update Link button. Choose Copy Embed Code from the menu and either paste the code into any web page that supports it or share it with others so they may embed the shared prototype in their web page.
4. Commenting is done in a browser by users signed in with an Adobe ID as well as by guests (users without an Adobe ID).
5. When viewing a shared prototype in your default browser, you can pin a comment to a location in an artboard. When a comment is pinned, it is assigned a number. The comments in the Comments panel show these numbers, allowing you to easily identify the context of the pinned comment. Comments that aren’t pinned do not show a number.
6. When viewing a shared prototype in your default browser, marking a comment as resolved removes it from the list of comments and can be used as a way to mark comments as “done,” for example. Resolved comments can be viewed by clicking the Filter icon (![]() ) toward the bottom of the Comments panel to see a window with filtering options. Click Resolved in the Status section of the window to see any comments that have been marked as resolved.
) toward the bottom of the Comments panel to see a window with filtering options. Click Resolved in the Status section of the window to see any comments that have been marked as resolved.