
Scripting
Jeff Almasol
Scully: Homer, we’re going to ask you a few simple yes or no questions. Do you understand?
Homer: Yes. (lie detector blows up)
—The Simpsons
Via scripting, After Effects enables you to automate many operations. You can reorder the selected layers of a composition based on their Z-axis positions, import text from a file to create keyframed text layers, apply effects, create masks, and add several compositions to the render queue, then change their render settings and output modules, to name a few actions. Just as expressions provide powerful control over a property’s value, scripting enables a similar level of control over the After Effects application and contents of your projects. Procedures that otherwise would be complex or time-consuming to perform manually can be simplified to just a few mouse clicks or even fewer.
This appendix covers some basic concepts of After Effects scripting you might encounter while using or examining other users’ scripts. If you’re intrigued enough, you might even feel comfortable tweaking or writing scripts that address your own production issues. The topics covered here are meant more as an introduction than as a comprehensive reference, but useful resources are listed to help fill in the blanks and direct further exploration.
Basic Concepts
Before getting too deep into scripting for After Effects CS5, there are a few concepts that you should be familiar with to help ease the learning curve.
Capabilities
Scripting in After Effects is about automating common, redundant, or complex tasks that you would normally do manually. If you find yourself often deleting layer markers outside of a layer’s duration or moving footage and compositions from several imported projects into the same shared folders, for example, a script is a viable solution.
Automation of operations also allows you to work around current limitations in After Effects. For example, although you can create, set, and unset proxy footage, you can do so only for a single footage item at a time. A script easily can loop through multiple items, performing the same operation each time.
Not everything within After Effects can be controlled via scripting; for example, you cannot open a composition, edit render settings or output module templates, or resize a docked panel. A lot of basic functionality is scriptable, however, and each newer version of the application exposes more functionality to scripting.
For a taste of what is possible via scripting, check out the following sites:
• http://aescripts.com Here Lloyd Alvarez and others offer an amazing set of scripts, such as BG Renderer, Magnum-The Edit Detector, Zorro-The Layer Tagger, and Load Project or Template at Startup.
• http://aenhancers.com Founded by Alex Czetwertynski, this is the most active expressions and scripting community site. There are lots of useful scripts and discussions from several contributors, including Paul Tuersley’s SSA Karaoke Animator and AE to C4D.
• http://nabscripts.com This is Nab’s (Charles Bordenave’s) growing set of useful scripts, such as TrackerViz.
• http://adobe.com/go/learn_ae_exchange The Adobe Exchange is another place where you can find interesting scripts (such as KeyEd Up and Swatch You Want), upload your own scripts, and rate and comment on scripts from the community.
• www.redefinery.com My personal site, with such faves as rd: Render Layers, rd: Scooter, rd: Statesman, rd: Script Launcher, and rd: Gimme Prop Path (for script authors).
All of these sites provide their scripts as free downloads and include links to other scripting sites. Even better, he people in the After Effects scripting community are willing to share their knowledge and help others with scripting issues.
Install and Run Scripts
When downloading or creating scripts, where you store the files depends on how you intend to use the scripts. Your choices are as follows:
• For quick access to a script, place it in the Scripts folder within the After Effects application folder, then access it from the File > Scripts submenu the next time you launch After Effects.
Notes
![]()
Some scripts have associated files, so follow the instructions that came with them for specific installation requirements.
• For a script that you want to run automatically when After Effects starts or exits, place it in either the Scripts/Startup or Scripts/Shutdown folder. For example, you can place Load Project or Template at Startup (loadProject.jsx on aescripts.com) in the Startup folder to open a template project automatically at the start of each session.
• For quick access to a script written to show its controls in a dockable panel, place it in the Scripts/ScriptUI Panels folder and then access it from the Window menu. Because this type of script appears in a panel, it can exist in any workspace.
• For flexibility in organizing scripts and running them from different versions of After Effects or across multiple workstations on a network, place them in an easy-to-access folder outside of the After Effects application folder (for example, on a network drive that can be accessed from multiple machines), then run them from the File > Scripts > Run Script File menu command.
Notes
![]()
A startup script runs after the After Effects user interface appears but before a project is opened (if launching After Effects by double-clicking a project). A shutdown script runs after the current project is closed.
Although scripts placed in the Scripts folder are easily accessible from within After Effects, if you install a different version or additional copy of After Effects, it will not have access to them. You will need to copy or move scripts into the appropriate folders for this other version (assuming they are compatible). If access from multiple versions is important, place the scripts outside of the After Effects folder, and use either the File > Scripts > Run Script File menu command or a script that can launch other scripts (such as rd: Script Launcher from my redefinery.com site or Launch Pad from the Adobe Exchange site).
Structure of a Script
An After Effects script is a text file with a .jsx filename extension that contains instructions for performing specific operations. These instructions are in the ExtendScript language, an extended Adobe version of the JavaScript language. A script can be as simple as a few lines of code that are performed sequentially or as complex as hundreds of lines grouped into blocks of code that can be performed conditionally based on certain criteria.
In general, the lines in a script are performed in successive order. Along the way you can assign values to variables (such as specifying a value of 10 for x) that are later modified or used in a different way. For example, you could calculate the value of a variable named y by adding 5 to the current value of x. Other lines can perform conditional evaluations that perform one set of instructions when true, or a different set when false. For a sequence of steps that you want to repeat, you can define a loop of those lines. The intent of these different constructs is to follow some procedure that you would perform manually. Certain blocks of code, called functions, are an encapsulated sequence of lines that you can perform multiple times just by calling the function’s name. These functions are skipped during the initial pass through the script, so you can think of them as being one level down from the main part of the code. Within each function, the lines are processed in succession.
Well-written scripts also include inline comments, which are notes or reminders that do not get evaluated as part of a script, but can help the script author and others understand the purpose of some code. Comments can either appear on a single line (beginning with two slashes, //) or span multiple lines (contained between /* and */ characters), as in
/* ComplexScript1.jsx
* This script does some complicated stuff,
* but I'm sure it's cool.
*/
var coolnessFactor = 2; // How cool
is this?
Notice that the single-line comment does not need to be at the start of a line. Anything after the two slashes is ignored.
In general, comments are good. Your memory a year from now, and anyone trying to learn from your scripts, will thank you.
The case studies later in this chapter break down real-world scripts to illustrate various scripting concepts. Each successive example builds on the knowledge gained from the previous ones and provides a sense of how operations that you perform manually might be automated.
Close-up: Development Environment
![]()
Scripts are just text files. You can view and edit them in any text editor, such as TextEdit (Mac) or Notepad (Windows), or you can try ExtendScript Toolkit (ESTK), which enables you to view and edit multiple scripts in the same session and provides an integrated debugger for diagnosing problems. In addition, ESTK can export in .jsxbin format, a binary version of a .jsx file that hides your code from prying eyes. (You cannot convert the binary file back, however, so be sure to retain a .jsx file for further editing.)
ESTK is installed with After Effects CS5. To launch it, choose File > Scripts > Open Script Editor from within After Effects. Alternately, you can double-click the Adobe ExtendScript Toolkit CS5 application icon, but you might need to set it manually to communicate with After Effects. (Starting ESTK from within After Effects handles communication settings for you.)
Because ESTK is used by all ExtendScript-supported applications in the Creative Suite, you need to make sure your script is targeting the correct application to run it as intended. Set After Effects as the target application using the drop-down menu in the upper-left corner of the script window, so that when you click the Run icon to start a script, ESTK will send the script to After Effects.
For more information on the ExtendScript Toolkit, consult its Help menu or the sources mentioned in the sidebar “Recommended Reading.”
Comparisons to Expressions
Both expressions and scripting in After Effects are based on the ExtendScript language, but the major differences between the two are in where they can be used and what they can access. Expressions are applied to individual properties (such as Opacity or Source Text) and modify the properties’ current values based on some calculation. You can query values of other properties at the same or different times, but the expression is evaluated when a specific frame is rendered. In that sense, it’s dynamic, and the expression code does not need to be written to loop through all frames. Scripting, on the other hand, can query and modify almost any object within After Effects (project, composition, layer, property, keyframe, render queue items, and so on), but scripts are evaluated only when you run them, not when some change occurs, such as the selection of a different layer. So, changing the value of a property at each frame or keyframe, or modifying all compositions in a project or all layers in a comp, requires code to loop through those items.
Also, with the “lifetime” of an expression being the frame at which it is evaluated, it is not ideal for sharing a value on one frame that gets used or modified on another frame. Scripting, on the other hand, does not have this restriction, so you can use information from one point in time to affect values elsewhere.
The syntax of expressions and scripting code is very similar. You can create variables, use conditional statements, and perform arithmetic operations. Expressions, however, include some specific functions (such as loopIn(), loopOut(), smooth(), and wiggle(), to name a few) that are not available in scripting, and vice versa. Both support the “compact English” syntax for referencing properties: English name formatted with no spaces and starting with a lowercase letter and uppercase letters for each successive “word,” such as sourceText for the Source Text property. The difference here is that expressions often default to using compact English, whereas not all users know that it’s supported in scripting. Referencing properties by their displayed names or internal “match names” is also supported in both scripting and expressions.
Object Hierarchy
Think of After Effects as a hierarchy of objects: an application containing a project, a project containing footage and compositions, each composition containing layers, each layer containing properties (effects, masks, motion trackers, layer styles, and so on), and each property containing keyframes or expressions. Each object provides ways of modifying or querying values within it. By referring to these objects and their methods (functions that perform an operation on the object or return a value from it) and attributes (values that you can query or set), you can automate After Effects through scripts.
Close-up: Recommended Reading
![]()
To supplement the Appendix’s scripting discussion, you may wish to consult
• Adobe Intro to Scripting—covers basic scripting topics and how they pertain to Adobe products in general; open this document from ExtendScript Toolkit’s Help menu
• JavaScript Tools Guide CS5—covers ExtendScript, ExtendScript Toolkit, File and Folder objects for dealing with files and folders on disk, user interface controls, and other general scripting topics; open this document from ExtendScript Toolkit’s Help menu
• After Effects CS5 Scripting Guide—provides reference information about specific objects, methods, and properties exposed by After Effects scripting; download the latest version of this document from http://www.adobe.com/go/learn_ae_devcenter
• JavaScript-specific books or web pages (optional)—provide reference information about general JavaScript objects, methods, and properties, such as for strings and arrays
The object hierarchy is illustrated in Figure A.1.
Figure A.1. This diagram shows the relationships among After Effects objects, how to access one object from another, and how some objects are based on other objects.
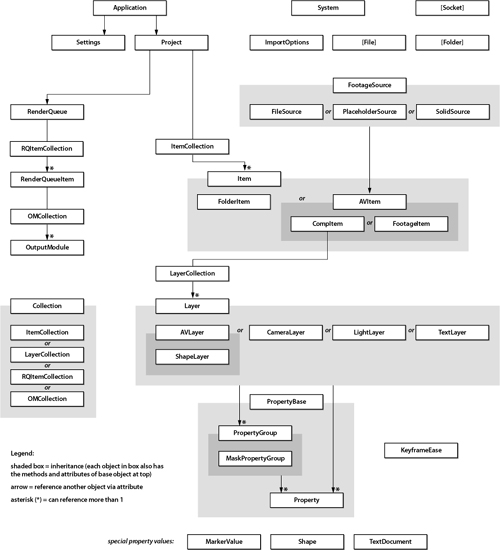
You Can Get There from Here
When you want to access the contents of a composition or layer or other object, you need to “follow the path” from the top-level application object down to that specific object. By referencing these connections between objects—such as referring to a related family member as your wife’s cousin’s uncle’s second son—you can access the information you need.
A script can reference the Application object by its app variable name, which your script does not need to define beforehand. From this top-level variable, you can access the current project (app.project) or the render queue’s contents (app.project.renderQueue). Notice the use of a period to access more specific information for an object. When you’re working on some object deep in the object hierarchy, you can assign that object path to a variable, as in
var rq = app.project.renderQueue;
// now you can reference the RenderQueue object by
using rq
alert("Your render queue contains " +
rq.numItems + " item(s) ");
Think of a variable as a shorthand way of referring to another object, so instead of referencing a related family member as your wife’s cousin’s uncle’s second son, you can just use the shorthand of “Alan” or possibly even “freeloader.”
Common attributes your scripts might use include
• app.project: accesses the current Project object
• app.project.activeItem: accesses the current composition (if the Composition or Timeline panel has focus) or the current selection (if the Project panel has focus)
• app.project.items: accesses all of the objects (comps, footage, and folders) in the Project panel
• app.project.activeItem.layers: accesses all layers of the current comp (assuming activeItem is a CompItem object)
• app.project.activeItem.layer(i).name: accesses the name of a specific layer of the current comp; it uses the layer() method to retrieve a specific layer by its index number (i)
• app.project.activeItem.selectedLayers: accesses the selected layers of the current comp
• app.project.renderQueue: accesses the render queue
Similarly, common methods your scripts might call include
• app.open(file): opens a specific project file (file is a File object)
• app.project.item(i): retrieves a specific object in the Project panel, using an index number (i)
• app.project.activeItem.layer(i): retrieves a specific layer of the current comp, using an index number (i)
• app.project.activeItem.layers.addSolid(parameters): creates a new solid layer in the current composition; parameters is a comma-separated list of settings
• app.project.save(): saves the current project
The best way to approach how you can access what you need is to start at the top (app), review the method and attributes available for an object at a given level of the hierarchy, pick the best one that gets you closer to what you need, then repeat the process for the next object.
User Interface
When you want to provide control over the behavior of a script, some form of a user interface is needed. It can be a floating panel with settings to customize, or simply a prompt dialog with OK and Cancel buttons. This section gives an overview of ScriptUI, the module that provides user interface controls and functionality for a script. Detailed information about creating user interfaces is available in the JavaScript Tools Guide CS5 document.
Pause in Effect
The simplest types of user interfaces are those that display messages or ask the user for a single piece of information at a time. For example
• alert(): displays a simple message with an OK button
• confirm(): displays a simple message (usually a question) with Yes and No buttons
• prompt(): displays an input field for entering information with OK and Cancel buttons
• File.openDialog(): displays a file browser dialog to select an existing filename
• File.saveDialog(): displays a file browser dialog to specify a new or existing filename
• Folder.selectDialog(): displays a folder browser dialog to select a folder on disk
In addition, After Effects has methods for selecting a project to open (app.open()), saving a project with a specific filename (app.project.saveWithDialog()), and importing a user-selectable file (app.project.importFileWithDialog()).
Dialogs, Palettes, and Panels
When you have multiple questions or settings that you want to show to the user, you can consolidate them onto a single surface (container) in the form of a dialog, palette, window, or dockable panel. The type you use depends on how you intend or expect users to interact with its functionality:
• dialog: Use this Window type for modal interaction in which you want input from the user before continuing operation of the script. An advantage of this type is that a script does not need to revalidate the active comp or layer selection, for example, because the modal dialog would prevent access to After Effects while the dialog is open. A disadvantage is that the user has to run the script each time it needs to be used.
• palette: Use this for a floating palette, which can stay open as the user works in the application—a big advantage. Be careful, however; while the palette stays open the active composition or selected layers could change, requiring revalidation that a composition is available or layers are still selected. Also, this type of floating window cannot be docked with other panels in a workspace, and it hides when After Effects does not have focus (Mac) or is minimized (Windows).
• window: Use this for opening a window that is independent of the After Effects window and can stay open even when After Effects is minimized. Although this type is available, most scripts use one of the other types.
• Dockable panel: Use this when you want the behavior of a palette or window, but with a native panel that can be docked in any workspace. This option is especially useful in that your user interface can be opened (and docked) when After Effects starts.
Sometimes, you might want to have a script that can be used as both a dockable panel and a floating palette, depending on how it was launched. Refer to the rd_Duplink.jsx or rd_MergeProjects.jsx script on disk for an example of how to set up the code.
Knobs and Doodads
The user interface of a script can include various types of controls, including checkboxes, buttons, edit fields, and drop-down menus, to name a few. After Effects CS5 provides even more controls than previous versions. The supported controls include
• button: clickable button, often used for performing an action
• checkbox: toggle button showing a Boolean enable/ disable or on/off state
• dropdownlist: list of options that shows a single selection at a time
• edittext: input field for typing some data; variations include single-line, multiple-line, read-only, and no echo (for password fields)
• flashplayer: container for displaying a SWF file; not supported in CS4 or earlier
• iconbutton: clickable button with image; variations include a tool button style (without border) and a toggled (pushed-in) style; button can also include a title (label) positioned relative to the icon
• image: icon or image
• listbox: list of options that can show multiple selections at a time; variations include single-selected, or multiple-selected, multiple columns, and column headings
• progressbar: horizontal bar that can show the progression of an operation
• radiobutton: mutually exclusive toggle button (when multiple radio button controls are in the same group) showing one enabled option out of many choices
• scrollbar: horizontal or vertical scroll knob and “track” along which it can move; buttons for moving the knob in steps are also included
• slider: horizontal knob representing the current value along a range of possible values (“track” along which the knob can slide)
• statictext: noneditable displayed text
• treeview: hierarchical list of items, levels of which can be expanded or collapsed
The listed controls can exist within the following types of container objects:
• group: generic container; no border or label
• panel: group box container (border with label); different border styles are available
• tabbedpanel/tab: deck of tabs, with only one tab frontmost at a time
For more information about all of these controls, as well as the layout and alignment controls for placing them within a window or container, see the “User Interface Tools” chapter of the JavaScript Tools Guide CS5 document.
Wake Me When You’re Ready to Go
Controls are pretty to look at but useless unless they’re hooked up to the functional parts of a script. The way a script knows when the user has modified a control (typed a new value into an edittext field, clicked a button, selected an item from a drop-down menu, and so on) is via callback events. When an event such as a mouse click or text or selection change occurs, a defined function gets called to possibly query the current settings of controls, and then perform the intended operation.
For example, to display an alert box when a button control is clicked, you would define it as
myWindow.grp.myButton.onClick = doClickOperation; //
function name
function doClickOperation()
{
alert("Hello");
}
or with an inline-defined function, such as
myWindow.grp.myButton.onClick =
function () { alert("Hello"); }
To retrieve the value of a control, the callback function could reference the control by using the this reference (“this object”), as in the following example that displays a greeting based on the entered name in an edittext control:
myWindow.grp.nameField.onChange = function ()
{
// The edittext's content is in its text attribute
var enteredName = this.text;
alert("Hello, " + enteredName);
}
For more information about callback events, see the “Control Event-Handling Callbacks” section of the JavaScript Tools Guide CS5 document.
Case Study: Trim Zero Opacity
Scripting has access to different parts of After Effects, including application settings, the current project’s items, a composition’s layers, and the properties, keyframes, and expressions on those layers, to name a few.
Nothing to See Here
To better understand how a script can access different parts of a project, examine a script that trims a layer to the first and last Opacity keyframes that have a zero value (that is, not including the parts of a layer that start or end transparently). This is useful for skipping the parts of a layer that do not need to be processed, possibly saving some rendering time.
Approach the problem by determining the parts of a layer that will be modified. For this example, it is a layer of a composition, so the first thing to do is get the current composition:
var comp = app.project.activeItem;
(This operation can be made to work on all compositions in a project, but the example focuses on a single composition.)
The content of an object, such as the After Effects application (app), is accessed by appending the object name with a dot and then the name of that content. For example, app.project references the current project of the application; project is called an attribute of the Application (app) object. Think of it as drilling down to the specific object in the hierarchy that you want to access. So, app.project.activeItem retrieves the current or active Item object in the project; an Item object represents an entry in the Project panel (composition, footage, or folder).
Notes
![]()
The active composition is either the composition in the frontmost Composition panel (or Timeline panel, if different, and not also open in its own Composition panel), or the selected composition if the Project panel has focus. If there is no open composition or if the Project panel has focus but has either no or more than one item (composition) selected, the activeItem attribute has a value of null.
This first line of code defines a variable called comp and points it at the active composition.
var layer = comp.selectedLayers[0];
Using the comp variable, you next access the selectedLayers attribute, whose value is an array of Layer objects (think of an array as a numbered list of objects, with numbering starting at 0). By referencing the first element of the array ([0]), you can access the first layer you selected in the composition. This reference to the selected layer is stored in the layer variable for easier access.
Now, to determine if a layer can be trimmed at its head, its first keyframe must have an Opacity value of 0. Similarly, to identify if it can be trimmed at its tail, its last keyframe must have a similar Opacity value:
var opac = layer.property("Opacity");
Because the Opacity property will be examined several times, you can store a reference to it in a variable for reuse in later code and to avoid mistyping it. Here, the Opacity property is referenced from the layer variable:
if (opac.keyValue(1) == 0)
layer.inPoint = opac.keyTime(1);
This statement, which spans two lines, is a conditional statement that determines if some condition is true or false, and if true performs the statement (clause) after the condition (the second line in this example). Essentially, if a condition is true, perform some operation; if it’s false don’t do anything. If you needed to perform a different operation when the condition is false, you would use a variation that has an else clause.
The condition here checks the layer’s Opacity property (which was previously stored in the opac variable) and that property’s value at the first keyframe (keyValue(1)). If it’s equal to 0, then it sets the layer’s In point to the time of the first Opacity keyframe. If it’s not equal to 0, the In point is not changed. For more information on why the keyValue() method was used, see the “Object Hierarchy” section.
if (opac.keyValue(opac.numKeys) == 0)
layer.outPoint = opac.keyTime(opac.
numKeys);
Similar to the previous conditional statement, this one trims the layer’s Out point if its last Opacity keyframe is 0. Notice that the keyValue() method uses opac.numKeys, which is the same keyframe index number for the last keyframe.
Making Assumptions
You can run this script, and it’ll work fine—as long as there is a composition open, with at least one layer selected, the layer has an Opacity property, and that property has at least two keyframes. If you can remember these prerequisites every time you need to run this script, no problem. If you want to make the script more robust, however, it’s best to think of ways in which the script can fail and include detection for them so it doesn’t. Of course, you will learn to spot these types of assumptions over time as you become more comfortable with scripting, but here are some common cases.
Tip

Since After Effects 7.0, a project always exists (even if nothing is in it), so you don’t have to check if app.project is valid. However, it’s more bulletproof (and futureproof, in case this assumption changes in the future) to do so.
Assumption 1
A single composition is open.
Notice how the line for accessing app.project.activeItem is assumed to be a composition. In fact, it can be anything in the Project panel, including a footage or folder item, or it can be multiple or no selected compositions (in which case the value is null). The best way to detect that a valid single composition is currently open or active is to use the following conditional statement after setting the comp variable:
if ((comp != null) && (comp instanceof CompItem))
{
// trimming code goes here
}
The condition here is actually two subconditions. The first checks that comp is not null (which handles the cases when there are multiple or no compositions selected in the Project panel). The second condition checks that the activeItem is actually a composition (CompItem is the object name for a composition) and not footage (FootageItem) or folder (FolderItem); the use of instanceof is somewhat like a == equality check, but checks against the type of object for the comp variable. Joining both of these conditions (each of which evaluates to either true or false) is the AND logical operator (&&), which means that both sides of the operator must be true for the if condition to be true; if at least one side is false, the if statement’s true clause won’t be invoked.
Assumption 2
At least one layer is selected, and that layer has an Opacity property.
Notice how the script refers to the first (0) index into the selectedLayers array. But what if there are no layers or multiple layers selected? Either an error will occur or only the first selected layer will be trimmed. This script’s operation can work on multiple layers, so why not extend the script to work that way? Similarly, just because a layer is selected doesn’t mean that the layer has an editable Opacity property (for example, a camera layer doesn’t make sense here).
Because selectedLayers is an array, you can iterate over the entries in the array by using a for loop:
for (var i=0; i<comp.selectedLayers.length; i++)
{
var layer = comp.selectedLayers[i];
var opac = layer.property("ADBE Opacity");
if (opac == null)
continue;
// insert Opacity keyframe checking code here
}
The for loop starts with three parts:
• initial value
• condition that must evaluate to true to perform each iteration (including the initial one)
• statement that changes the value after each iteration
The above code uses the variable named i with a starting value of 0 (0 being the index of the first entry in the selectedLayers array). While the current i value is less than the number of entries in the selectedLayers array (comp.selectedLayers.length), the script performs the statements within the loop’s brackets. At the end of those statements, it increments the i value by one (i++). Now, you can use this i value as the index for the selectedLayers array, so each time it goes through the loop, it’ll get the next selected layer.
Notes
![]()
The selectedLayers array references the currently selected layers, so if your code changes the selection, using a loop in this way won’t work as expected.
Now that the currently selected layer is stored in the layer variable, check that it has an Opacity property by seeing if a reference to it returns a null value. If so, use the continue statement to skip the following statements within the for loop and continue with the next iteration.
Notes
![]()
The Opacity property is referenced by its match name, ADBE Opacity. A match name is an internal name for a property or property group that is consistent regardless of the displayed name for a property or property group, which might be localized.
Assumption 3
The layer has at least two Opacity keyframes.
At this point, the script needs to make sure there are at least two keyframes because it doesn’t make sense to trim a layer with less than that. This condition can be checked with another if statement or as a second condition:
if (opac.numKeys < 2)
continue;
Or, it can be checked as an additional condition on the previous one:
if ((opac == null) || (opac.numKeys < 2))
continue;
In this second version of the conditional statement, notice that it uses the logical OR (||) operator, which requires only one of the conditions to be true for the combined condition to be true. Also, because conditions are evaluated from left to right, the check for a null value must come before the check for numKeys because numKeys exists only for a valid Opacity property.
Unassuming Script
By checking the three assumptions, the script is more bulletproof for different scenarios:
var comp = app.project.activeItem;
if ((comp != null) && (comp instanceof CompItem))
{
for (var i=0; i<comp.selectedLayers.length; i++)
{
var layer = comp.selectedLayers[i];
var opac = layer.property("Opacity");
if ((opac == null) || (opac.numKeys < 2))
continue;
if (opac.keyValue(1) == 0)
layer.inPoint = opac.keyTime(1);
if (opac.keyValue(opac.numKeys) == 0)
layer.outPoint = opac.keyTime(opac.numKeys);
}
}
You can find this script as rd_TrimToZeroOpacityKeys.jsx on the book’s disc. It contains the previous code within a function and also includes comments at the top of the file.
A Better Way
The technique used in this example is just one way to trim layers. If your layers also use expressions, this technique won’t work. Also, if you have multiple keyframes at the head or tail with the same 0 Opacity value, this script will not do additional trimming. For a version that handles both cases—by checking one frame at a time and trimming to the first and last frames that don’t have zero Opacity—see the rd_TrimZeroOpacity.jsx script on the book’s disc.
Case Study: Slated
This script shows how you can render multiple slates from a template comp based on external data. You’ll see how to read data from a text file, insert it into various text layers, render variations of a comp to the render queue, and then render the variations as stills.
First, try the script:
- Choose File > Scripts > Run Script File, then select the rd_Slated.jsx script on the book’s disc.
- Select the rd_Slated.aep project when asked for the template to use.
- Select the rd_Slated_data.txt file when asked for the data to use.
- Watch as slates based on the contents of the text file are rendered.
Now that you know what the script can do, take a look at the interesting concepts behind it.
Getting Carded
If your script uses functionality available in a specific version of After Effects, it’s good to ensure that the minimum supported version is being used. You want to perform this check early in the execution of the script to avoid giving the user a false sense that an operation might work:
if (parseFloat(app.version) < 9.0)
alert("This script requires Adobe
After Effects CS4 or later.", "rd:
Slated");
The Application object (app) contains a version attribute whose value represents the numerical version of After Effects (CS5 is version 10.0, CS4 was 9.0, CS3 was 8.0, 8.0.1, or 8.0.2). By interpreting the value as a floating-point number using the parseFloat() function, you can quickly determine the major version number (the number before the first decimal point), and skip the rest of the script if it’s less than what your script needs.
What’cha Want?
One way that a script can interact with the user is by asking for more information to customize the way it works. For example, this script needs to open a previously created project file:
var projFile = File.openDialog("Select the template
project");
if ((projFile == null) || !projFile.exists)
return;
The File class’ openDialog() method opens a file selection dialog with a custom “Select the template project” prompt. Notice that, in addition to checking that the dialog wasn’t canceled (projFile would be null if so), projFile is checked if it exists on disk. projFile.exists returns a Boolean true or false value, so negating the value with the exclamation point before it allows you to check if the file does not exist. This additional check is done in case the user typed in a name of a file that doesn’t actually exist.
Now that a file has been selected, the next step is to actually open the project file:
var proj = app.open(projFile);
if (proj == null)
return;
// do something with the project
The projFile (a File object) is passed into the app.open() method, and returns a Project object. The conditional check afterward makes sure the project was loaded, although as previously mentioned, it should never return a null value because a project always exists. At this point, the template project is open.
The actual template comp to use is named template, so the script needs to ensure that there is a composition of that name in the project. There is no direct way to retrieve a composition (CompItem object) by name, so a loop is needed to iterate across all project items looking for a comp with a name of template:
var comp = null;
for (var i=1; i<=proj.numItems; i++)
{
if ((proj.item(i) instanceof CompItem) && (proj.
item(i).name == "template"))
{
comp = proj.item(i);
break;
}
}
if (comp == null)
{
alert("Could not find a comp named 'template'.",
"rd: Slated");
return;
}
In this part of the script, the comp variable is initialized to be null. This is done so that when looping through the items in the project, if it finds the matching composition, it’ll set comp to it. Otherwise, it’ll be null after all items are checked, so it can determine if a match was found.
This loop checks each item in the Project panel by using the Project object’s item() method. Items in the Project panel are numbered from 1 for the top item, and incremented for each successive item. Items within folders are numbered as if the folders were fully expanded, so you can think of item numbering as the row number within the Project panel.
Notes
![]()
Item names might not be unique, so a script can either look for a specific matching one (such as the first one from the top) or all matches. It depends on the intended use.
In addition to checking if an item is a composition (CompItem object), the script also checks its name against the template comp name (template, here stored in a variable). When a match is found, the comp variable is set to it, and then the break statement is used to halt further looping.
After the loop block, there’s a check to see if the comp variable is still null, which can happen if the loop was never done (if the number of items in the project is 0) or the loop finished without finding a match. If so, execution of the script stops.
The script also requests a folder for placing rendered files by using the Folder.selectDialog() function. Notice how the outFolder variable is set in the script for an example of its use.
Working Locally but Thinking Globally
When working on a script that uses text strings for message dialogs, it is often helpful to consolidate all of those strings in the same location near the start of your script so that they’re easier to find and update. By using variables for these strings, you can update them in one place, and all uses elsewhere in the script get the latest text. You can use either separate variables or a single variable with separate attributes, as in
var rd_SlatedData = new Object();
rd_SlatedData.scriptName = "rd: Slated";
rd_SlatedData.scriptTitle = rd_
SlatedData.scriptName + " v1.0";
Here, a generic object is created, and a scriptName attribute is associated with it and assigned the value of rd: Slated. You can even reuse previously assigned attributes, as shown in the scriptTitle attribute taking the current scriptName value and appending v1.0.
In addition to centralizing text strings, consider providing support for translated strings (assuming you can get them) so that more users around the world can use your scripts. The ExtendScript language supports the automatic selection of translated text strings based on the current locale for the system, by defining strings in the following way, and then using the localize() function:
rd_SlatedData.strErrNoTplComp =
{en: "Could not find a comp named
'template'.", fr: " La composition
nommée 'Template' n'a pu être trouvée
", de: "konnte nicht gefunden werden
eine Komposition namens 'template'"};
Instead of using a text string, you would use an object (the content enclosed in braces) with each translated string prefixed by the locale identifier: en for English, fr for French, de for German, and so on. (Locale names are ISO-standard language and region specifiers; see the JavaScript Tools Guide for more information.) So, instead of hard-coding the string in the code, as such
alert("Could not find a comp named
'template'.", "rd: Slated");
you would use
alert(localize(rd_SlatedData.
strErrNoTplComp), rd_SlatedData.
scriptName);
The above statement doesn’t use the localize() function for the script name, as it should not be translated.
Notes
![]()
The localize() method uses the current locale of the system, not the language that After Effects might be using (for example, if you are running After Effects in English on a German version of the operating system). Also, if a translated string isn’t available, it’ll use the English (en) string. If an English string isn’t available, it won’t display the correct string, so be sure that at least an English translation is available.
Layers of Compatibility
The slates script replaces text layers with text strings and footage layers with footage file paths from the data file. All other types of layers will be ignored in the comp template:
var layer = comp.layer(i);
if ((layer instanceof TextLayer) || (layer instanceof
AVLayer))
{
// layer's type is supported
}
Text layers are TextLayer objects and footage layers are AVLayer objects. To determine if a layer (stored in the layer variable in this code) is one of these types, check it using the instanceof operator, which evaluates to a Boolean value.
Coming in from the Outside
Not only can a script retrieve and set values for objects within After Effects, it can also do so for data outside of the application, such as using comma-separated values from a spreadsheet or exporting keyframe data for use in another application.
The slates script uses a tab-separated text file containing field/value information that you can export from a spreadsheet. The first row of the spreadsheet has field names that should match the layer names used in the comp template. Subsequent rows have the corresponding values for those fields; each of these rows represents a separate slate that you want the script to generate. An example of sample data is shown in Figure A.2.
Figure A.2. The columns of data used by the slates script are shown here in a spreadsheet before being saved as a tab-separated text file. The script opens the template project, feeds in the data from the text file, then renders separate slates from this data.

By exporting the spreadsheet data as a tab-separated text file, you can now parse the text file for use in the slates. The process of retrieving the contents of a file involves opening it for read access, reading chunks of the file, and then closing it when done:
dataFile.open("r");
var fields = dataFile.readln();
if (!dataFile.eof)
{
var fieldNames = fields.split(" ");
var dataLine, dataValues, layersToUpdate,
layerData, currLayer;
while (!dataFile.eof)
{
dataLine = dataFile.readln();
dataValues = dataLine.split(" ");
// Process the fields of data here
}
}
The dataFile variable points to the File object representing the tab-separated text file. By using the File object’s open() method with a parameter of r, you are opening the file for reading. Because the first line of the data file is supposed to contain the field names, it is retrieved separately from the rest of the file. Reading a line is done with the File object’s readln() method. (If you think of file reading like the scanning of a document in a paper scanner, after the first row is read, the “scanner head” moves to the next row.) To ensure that there are more lines available, a check is done to see if the position within the file is not at the end of the file (!dataFile.eof).
If there is more data in the file, the field names (a text string previously stored in the fields variable) is parsed or separated into its components. By using the String object’s split() method, which takes the separator character as a parameter, you can quickly split the fields string at tab characters ( ) and place the separate pieces as entries in an array (stored in the fieldNames variable).
Next, subsequent lines of the text file are read in using a while loop. Unlike a for loop that iterates a specific number of times, a while loop can continue until a specific condition is no longer true. For this script, that condition is when there are no more lines to read.
As each line of data is read and stored in the dataLine variable, its content is similarly split at tab characters and the results stored in the dataValues variable for further processing.
Changing Values
The slates script analyzes text and footage layers in the template comp and changes the text values and footage files being used based on the text from the data file.
Changing a text layer’s text value involves changing the Source Text property, as follows:
currLayer.sourceText.setValue(new
TextDocument(layerData));
In the above code, currLayer is the variable representing the text layer, and layerData contains the new text string to use. The value for the Source Text property is a TextDocument object, so to provide a new text string, you need to create a new TextDocument object as shown.
Note that the Source Text property is referenced as .sourceText instead of .property("Source Text"). The former uses the compact English syntax that is equivalent to that used in expressions if the “Expression Pick Whip Writes Compact English” option in the General Preferences dialog is enabled, and will work in After Effects running in any supported language.
Changing a footage layer’s source footage involves importing the new footage into the project (if not already available), and then changing the footage layer’s source Item object’s file reference, as follows:
var fItem = proj.importFile(new ImportOptions(File(la
yerData)));
if (fItem != null)
{
fItem.parentFolder = slatesFolder;
currLayer.replaceSource(fItem, true);
}
In the above code, layerData contains the filename for the footage file to use. To import the file, the Project object’s importFile() method is used; importFile() uses an ImportOptions object to define import settings. Because layerData is just a string, it needs to be represented as a File object, used in the creation of a new ImportOptions object, and then passed into the importFile() method. The returned FootageItem object is stored in the fItem variable, and checked if a null value was returned in case the import was not successful.
If the new footage file was imported, it is moved into the previously created folder for storing the slates files (represented by the slatesFolder variable) by setting the FootageItem object’s parentFolder attribute. To actually redirect currLayer to it—similar to holding down Alt or Opt while dragging a footage item to a selected footage layer—the replaceSource() method is used. The first parameter is the FootageItem to use, and the second is a Boolean value specifying if expressions referring to the old source footage’s name should be updated to refer to the new source footage.
Capturing Moments in Time
A separate comp is created for each slate. Rendering that slate involves adding its comp to the render queue, setting the appropriate single-image output format, and setting the output filename to use:
var rqItem = proj.renderQueue.items.add(slateComp);
rqItem.outputModule(1).applyTemplate("Photoshop");
rqItem.outputModule(1).file = new
File(outFolder.fsName + "/" +
slateComp.name + "_[#####].psd");
Adding a comp (slateComp variable) to the render queue is done by using the add() method for the ItemCollection object representing the render queue’s contents (renderQueue.items). The slates are rendered to Photoshop format using the existing Photoshop render settings template, which is applied to the first (default) output module for the render queue item (second line above). To set the location for the rendered file (outFolder variable specifies the folder on disk), set the OutputModule object’s file attribute to a File object representing the filename. To assemble the output filename, start with the file system name for the output folder (outFolder.fsName), append a forward slash, then the comp’s name, then a suffix containing a five-digit frame number (_[#####]) and filename extension for Photoshop files (.psd).
Once all comps have been added to the render queue, rendering can be started by using the RenderQueue object’s render() method.
Be sure to examine the entire script in ExtendScript Toolkit or your preferred script editor, and read the various comments, to get a better sense of the logic used to create the slates.
Case Study: Light Wrap
Scripting not only allows you to automate repetitive tasks, it can also simplify creating looks that are complex to set up manually or that might require third-party plug-ins to produce. One of these looks is the light wrap technique described in Chapter 12.
Open a composition containing a foreground element layer (such as a masked headshot) above a background layer, select only the foreground layer, then run the rd_LightWrap.jsx script from the book’s disc. Notice how it creates a Light Wrap precomp and adds it as a layer above the foreground layer. The precomp layer also contains custom effect controls for changing the look of the light wrap.
The script behind the look mixes familiar statements and some new concepts; take a closer look.
Staying Flat and Keeping It Together
One of the prerequisites of this script is that both the foreground and background layer are 2D layers, and that their Position properties do not have separate X, Y, and Z values. All of these preconditions can be checked in a single if statement:
if (fgLayer.threeDLayer || bgLayer.threeDLayer ||
fgLayer.position.dimensionsSeparated || bgLayer.
position.dimensionsSeparated)
{
alert(rd_localize(rd_LightWrapData.
strErrNeed2DLayers), rd_LightWrapData.scriptName);
return;
}
You can determine if a layer is not 2D by checking if the Layer object’s threeDLayer attribute is true. Similarly, you can determine if the layer’s Position property is separated by checking the (dimensionsSeparated attribute of the Position property’s Property object). Notice that the Position property is referenced by the shortcut .position, as opposed to .property("Position"). Both can work, but in general using the displayed name for a property might not work when After Effects is running in a different language.
Making Copies
Step 1 of the light wrap procedure describes creating a new composition that contains the foreground and background layers. The script requires the selection of the foreground layer and assumes the background is the next numbered layer. If the comp contained only these two layers, the easier way to perform this step would be to duplicate the comp. To support comps with multiple layers, however, it’s best to create a new comp with similar settings, and then add the two layers to it:
var lightWrapComp = app.project.items.addComp(rd_
localize(rd_LightWrapData.strLightWrapCompNamePrefix)
+ fgLayer.name, comp.width, comp.height, comp.
pixelAspect, comp.duration, comp.frameRate);
bgLayer.copyToComp(lightWrapComp);
fgLayer.copyToComp(lightWrapComp);
The addComp() method’s first parameter is the new comp’s name, which here is made by combining Light Wrap with the foreground layer’s name. All other parameters use the same settings as the current comp. The resulting comp is stored in the lightWrapComp variable. The Layer object’s copyToComp() method is used to copy a layer to another comp. The background layer is copied first because it gets added to the top of the target comp (lightWrapComp), allowing the copy of the foreground layer to be placed at the top.
Adjusted Value
Step 3 requires the creation of an adjustment layer. There is no method to create an adjustment layer, as there is to create a solid (addSolid()) or other layer types, just an adjustmentLayer attribute for a Layer object:
var adjLayer = lightWrapComp.layers.addSolid([1,1,1],
rd_localize(rd_LightWrapData.strAdjLayerName),
lightWrapComp.width, lightWrapComp.height,
lightWrapComp.pixelAspect, lightWrapComp.duration);
adjLayer.adjustmentLayer = true;
Here, a white solid ([1,1,1] is an RGB array representing a white color) of the same dimensions, pixel aspect, and duration as the current comp is created. The adjustmentLayer attribute is set to true to make the layer an adjustment layer.
They Want Effects...and Blending Modes, Too
Step 3 of the procedure describes the application of the Fast Blur effect to the adjustment layer in the nested comp, and then step 4 changes a couple of the effect’s settings. In the script, an effect is applied to a layer by adding the effect’s property to the layer’s “effect parade” (list of effects):
var fastBlurFX = adjLayer.property("ADBE Effect
Parade").addProperty("ADBE Fast Blur");
fastBlurFX.property("ADBE Fast Blur-0003").
setValue(true);
fastBlurFX.property("ADBE Fast Blur-
0001").setValue(50);
The first line above uses the addProperty() method of the effect parade PropertyGroup object (accessed via .property("ADBE Effect Parade")) to add the Fast Blur effect (whose match name is ADBE Fast Blur), returning an effect (PropertyGroup object). The second line references the Repeat Edge Pixels checkbox (ADBE Fast Blur-0003) and uses setValue(true) to select the checkbox. Similarly, Blurriness (ADBE Fast Blur-0001) is changed to a value of 50.
The Fast Blur is applied to the layer in the precomp, but to make it easier to adjust, you want to expose certain knobs in the downstream comp to control the look. Two such knobs for the light wrap effect are a control over the contamination or strength along the edges of the foreground and a control over the offset of the light wrap. When you want to expose these values, you need to create new slider and point expression controls (described here) that will have expressions tied to them (described in the next section).
var slider = lightWrapPrecompLayer.property("ADBE
Effect Parade").addProperty("ADBE Slider Control");
slider.name = rd_localize(rd_LightWrapData.
strContamination);
slider.property("ADBE Slider
Control-0001").setValue(50);
The Contamination control is for Fast Blur’s Blurriness value. Because that property is a single numerical value, you can use a Slider Control effect to adjust it. Just as the Fast Blur effect was applied, you use the addProperty() method to add the slider (ADBE Slider Control match name). The name of the slider control is changed to Contamination and its default value set to 50.
var offset = lightWrapPrecompLayer.property("ADBE
Effect Parade").addProperty("ADBE Point Control");
offset.name = rd_localize(rd_LightWrapData.
strWrapOffset);
offset.property("ADBE Point
Control-0001").setValue([0,0]);
For exposing the light wrap offset (separate horizontal and vertical values), you can either use two slider controls or, as is done in the script, a single Point Control effect for convenience. Similar to the Contamination slider, the wrap offset adds the effect (ADBE Point Control in this case) and renames it. Because a Point Control effect’s Point property has two values, you need to use an array of two values for the setValue() method.
Also, the blending mode for a layer is set in a few different steps. This operation is scripted by setting the blendingMode attribute to an enumerated value (one of a specific number of named constant values) matching the blending mode to use, as in
stencilAlphaLayer.blendingMode = BlendingMode.
STENCIL_ALPHA;
lightWrapPrecompLayer.blendingMode =
BlendingMode.ADD;
The BlendingMode enumerated values are listed in the After Effects scripting reference document.
Creative Expressions
With the Contamination (slider) control added to the precomp layer, the next step is to tie the Blurriness property to the slider as if you had manually pick whipped it. In the script, set the property’s expression attribute to the same text you would type in the expression editor field:
adjLayer.property("ADBE Effect
Parade").property("ADBE Fast
Blur").property("ADBE Fast Blur-
0001").expression = "comp(""
+ comp.name + "").layer("" +
lightWrapPrecompLayer.name + "").
effect("" + rd_localize(rd_
LightWrapData.strContamination) + "").
("ADBE Slider Control-0001");";
The expression value is a text string that consists of the downstream comp’s name, the precomp layer’s name, the Contamination effect slider’s name, and the Slider property of it. The wrap offset expression is set up in a slightly different way because its value is included as part of another expression; review the script for more details.
Notes
![]()
The backslash () character before the double-quote (") characters in the expression is an escaped character, which is needed because you want to use a double-quote character inside the text string that’s enclosed by double quotes.
Another use of expressions in the script is to synchronize the position, scale, and rotation transforms of the background layer in the precomp to the original background layer in the downstream comp. These expressions are set up in a similar way:
lWbgLayer.position.expression = "comp("" + comp.name
+ "").layer("" + bgLayer.name + "").transform.
position;";
lWbgLayer.scale.expression = "comp("" + comp.name
+ "").layer("" + bgLayer.name + "").transform.
scale;";
lWbgLayer.rotation.expression =
"comp("" + comp.name + "").layer(""
+ bgLayer.name + "").transform.
rotation;";
Making Your Mark
The final part of the script is the creation of a layer marker on the precomp layer that gives some instruction about how to adjust the light wrap settings. Each layer has a Marker property for modifying layer markers. A layer marker is just a keyframe on this property. Creating a keyframe at a specific time is done using the Property object’s setValueAtTime() method:
lightWrapPrecompLayer.
property("Marker").setValueAtTim
e(lightWrapPrecompLayer.inPoint,
new MarkerValue(rd_localize(rd_
LightWrapData.strMarkerText)));
The first parameter is the time at which to set the value. For this script, the marker needs to be at the layer’s In point (Layer object’s inPoint attribute). The second parameter is the value to set at that time. For the Marker property, that is a MarkerValue object, which has different attributes corresponding to the different fields you can set in the Marker dialog. If all you want to do is set the marker comment, you just need to create a new MarkerValue object with the comment text as its sole parameter.
To better understand how the steps described in Chapter 12 were converted to code, check out the entire rd_LightWrap.jsx script in ExtendScript Toolkit or your preferred editor. The script contains comments that separate the sections by steps to make it easier to follow along.
Best Practices
As you get more comfortable writing or modifying scripts, consider the following tips to make your scripts more robust, helpful, and a good experience for your users, as well as easier for you to manage and troubleshoot.
Code
When writing the actual script code:
• Include sufficient comments. What is sufficient? Enough to help you or the people who might read your code understand how it works, especially if the technique you use might not be obvious if examined several months or years later.
• Enclose the main operation of the script in an undo group. Normally, multiple instructions in a script produce separate events in the undo history. If you are combining several steps into one operation, you might want to expose it as a single undoable event. To do this, you would enclose the instructions with an undo group:
app.beginUndoGroup("Name of Your Operation Here");
// your existing code goes here
app.endUndoGroup();
The parameter for the beginUndoGroup() method is a string that describes the operation and will be used in the Edit > Undo operation and Edit > Redo operation menu commands.
• Use match names or compact English names when referencing properties. Although a script can reference a property’s displayed name, the name might not be the same in all languages supported by After Effects. If you intend to distribute your scripts worldwide, consider using a property’s match name. Use a script like rd: Gimme Prop Path (on the redefinery.com site) to determine this internal name for a property. You can also determine compact English names by enabling the default expression for a property when the “Expression Pick Whip Writes Compact English” option is enabled in the General Preferences dialog.
• Consider placing all of your variables within a single global object. If you use the ExtendScript Toolkit’s Data Browser to determine the current values for an object, having most of your script’s variables within the same section of the Data Browser can mean less scrolling while writing or debugging a script.
User Interface Layout
When defining the user interface for your scripts:
• Use a resource string to describe your user interface controls. Unlike in earlier versions of After Effects that required controls to be defined separately, in CS5 and CS4 a resource string can contain multiple definitions of controls. Although there is a different set of issues with this technique (for example, some alignments might require a little more code), the ease of defining controls, along with automatic layout that adapts to different font and control sizes, can make the effort worth it. See the JavaScript Tools Guide for more information.
Tip
For long, multiline strings, such as those used by resource strings, you can enclose the string with triple quotes ("""your string here""") to avoid needing backslashes at the end of each line. This capability was added in After Effects CS4.
• If using a palette or window user interface, consider providing dockable panel support. See the scripts available on the DVD for coding examples.
• Use a resizable palette/window/panel and content, if appropriate. If your user interface includes wide controls, such as text fields (statictext, edittext), lists (dropdownlist, listbox, treeview), or containers (panel, group), you might want to support resizing so that the user can view more or less content, with nicely aligned controls. Although the scripts on the DVD provide basic resizing, consider also looking at the scripts on the aescripts.com and redefinery.com sites for more complex examples.
Help
To provide assistance to the users of your scripts:
• Include a Help/About button that, when clicked, displays information about your script (name, version number, copyright notice, attributions) and its intended use. The resource string might look like
helpBtn: Button { text:'?', preferredSize:[25,-1] }
with the callback function similar to
pal.grp.helpBtn.onClick = function ()
{alert("Merge Projects
Copyright (c) 2007-2008
redefinery. All rights reserved.
This script
does something cool.", "Merge Projects"); }
• Include the script name in alert boxes. When using the alert() function, use the script’s name as the second parameter. That way, when the alert box appears, you will know the script that displayed it. The previous bullet shows an example of this with Merge Projects as the script name.
• Use the helpTip attribute for controls to provide in-context assistance. When the user hovers the mouse over the control, this helpTip text appears as a tool tip.
pctSlider: Slider { minValue:0, maxValue:100,
helpTip:'Adjusts opacity of the selected layer' }
Use a helpTip only when the purpose of a control might not be immediately understandable or when you want to provide additional information.