
Chapter 6. Color Keying

Color keying was devised in the 1950s as a clever means to combine live-action foreground footage with backgrounds that could come from virtually anywhere. What was once a fragile and expensive proposition is now fully mainstream; whole films have come to rely on this technique, while The Colbert Report invites anyone with a computer—and more than likely, a copy of After Effects—to try the “Greenscreen Challenge” (and it runs entries from none less than John Knoll).
The process goes by many names: color keying, bluescreening, greenscreening, pulling a matte, color differencing, and even chroma keying—a term from analog color television, the medium defined by chroma and heavily populated with weather forecasters.
Notes
![]()
Example footage and comps for this chapter are all gathered together in the 06_keying folder on the disc.
The purpose of this chapter is to help you not only with color keying of bluescreen and greenscreen footage, but with all cases in which pixel values (hue, saturation, and brightness) stand in for transparency, allowing compositors to effectively separate the foreground from the background based on color data.
All of these methods extract luminance information that is then applied to the alpha channel of a layer (or layers). The black areas become transparent, the white areas opaque, and the gray areas gradations of semi-opacity. Here’s an overall tip: It’s the gray areas that matter.
Notes
![]()
For those reading nonlinearly, this chapter extends logically from fundamental concepts about mattes and selections in Chapter 3.
Procedural Mattes
A procedural matte is generated by making adjustments to controls, instead of rotoscoping it by hand. You could say that the selection is generated mathematically rather than manually. Each artist has a threshold of tolerance to continue to solve a matte procedurally or rotoscope it. My own threshold is high—I tend to avoid roto at all costs—so I have learned many methods to make the procedural approach work, and share as many as possible here.
Following is some top-level advice to remember when creating any kind of matte.
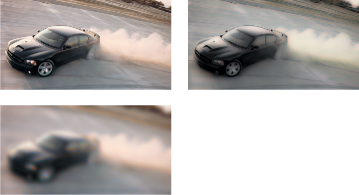
• Create contrast for clarity. Use a bright, saturated, contrasting background (Ctrl+Shift+B/Cmd+Shift+B) such as yellow, red, orange, or purple (Figure 6.1). If the foreground is to be added to a dark scene, a dark shade is OK, but in most cases bright colors better reveal matte problems. Solo the foreground over the background you choose.
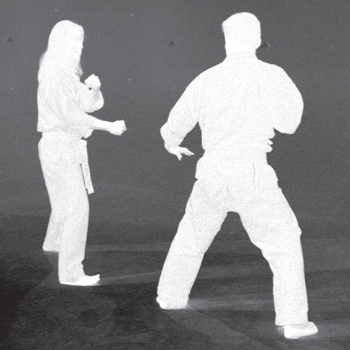
Figure 6.1. The background influences what you see. Against black, almost no detail is visible (left). Checkerboard reveals shadows (middle), but flaws in the matte are clearest with a bright, solid, contrasting background (right).

(Source footage courtesy of Pixel Corps.)
• Protect edges at all costs. This is the name of the game (and the focus of much of this chapter); the key to winning is to isolate the edges as much as possible and focus just on them to avoid crunchy, chewy mattes (Figure 6.2).
Figure 6.2. A “chewy” matte like this is typically the result of clamping the foreground or background (or both) too far.

• Keep adjustments as simple as possible, even starting over if necessary to simplify. Artists spend hours on keys that could be done more effectively in minutes, simply by beginning in the right place. There are many complex and interdependent steps involved with creating a key; if you’re hung up on one, it may be time to try a different approach.
• Keep dancing: Check adjacent frames and zoom into detail. When possible, start with the trickiest area of a difficult frame; look for motion blur, fine detail, excessive color spill, and so on, and keep looking around with a critical eye for what needs improvement (Figure 6.3).
Figure 6.3. A glimpse of the alpha channel can reveal even more problems, such as faint holes in the foreground, which should be solid white.
• Break it down. This is the single most important concept novices miss. Most mattes will benefit from separate garbage, core, and edge passes—a process detailed later in this chapter—and in many cases it helps to create a separate pass just for delicate edges: hair, a translucent costume, motion blur, and so on.
I encourage you to review this list again once you’ve explored the rest of the chapter.
Linear Keyers and Hi-Con Mattes
There are cases in which edge detail is less of a factor because the matte is used to adjust, not simply composite, an element; for example, you could hold out the highlight areas of an image for adjustment using a high-contrast (hicon) matte. You might create this matte with a linear keyer.
Linear keyers are relatively simple and define a selection range based only on a single channel. This could be red, green, or blue, or just overall luminance. They’re useful in a wide variety of cases outside the scope of bluescreen and greenscreen shots, although similar principles apply with Keylight. (Keylight is covered later in this chapter.)
The most useful linear keyers, Extract and Linear Color Key, are unfortunately less intuitively named than the keyers to avoid at all costs—Luma Key and Color Key. The latter two are limited to a bitmap (black and white) selection; only by choking and blurring the result with Edge Thin and Edge Feather controls can you add threshold adjustment. It’s a little unfortunate that Adobe hasn’t let these ancient effects go into the bin marked “obsolete” since the other, less intuitively named effects supersede them (and yet those not in the know naturally reach for the ones with the obvious titles).
Close-up: Linear Color Key vs. Roto Brush
![]()
In Chapter 7 we’ll take a look at Roto Brush, which goes beyond what can be done with a simple linear key by combining many criteria (beyond luminance) for what makes up a selection. It is powerful enough that it may seem to supersede linear keying, but keep in mind that Roto Brush is always more expensive (in terms of processing power and setup). Sometimes a luminance key is all you need.
Extract and Linear Color Key
The Extract effect is useful for luminance (luma) keying, because it uses the black-and-white points of an image or any of its individual channels. Linear Color Key is a more appropriate tool to use to isolate a particular color (or color range).
Extract
If you’re comfortable with the Levels effect, then Extract is no problem. It includes a histogram and sliders over a gradient. Try working with the chimp clip. Before adjusting the effect, take a look at all three color channels (Alt+1, 2, 3/Opt+1, 2, 3). One of the three typically has the best initial contrast, while the default luminance channel is merely an average of the three and not as strong a choice. In this case, the blue channel has the most uniformly dark subject area, so in the Channel menu of Extract, choose that (Figure 6.4).
Figure 6.4. Extract the luminance channel and you get all three channels blended together—but first examine those channels and it’s easy to see that the foreground figure is most consistently dark in the blue channel. A gentle slope with Softness set to 75 (bottom) retains some of the softness and fine detail of the hair, and it certainly helps to comp over a light background.

The Extract histogram gives you a strong clue as to the likely white or black thresholds on each channel. To set these, drag the upper right pair of square controls at the white end of the gradient, below the histogram. Watch the image itself and the histogram; just like with Levels, you’re bracketing the area where the foreground image data is held but stopping short of clipping—which in this case causes holes in the foreground.
The only way to decide how far to go is to add the target background. If you’re removing a white set wall, the hope is that whatever is replacing it is also quite bright. If not, you may have to choke the edges more than is ideal to avoid white fringing. A bright sky behind this subject is much simpler than trying to make this matte work against black.
Once you’ve found the lowest white point setting that yields a nice edge (and if there are small holes in the foreground, don’t worry too much about them yet), soften it by dragging the lower box in that pair of square controls to the right, raising White Softness. This adds threshold pixels to the matte naturally, by tapering between the fully opaque values at the white point and the transparent background.
Close-up: All Channels Are Not Created Equal
![]()
If you set an RGB image as a luma matte, the red, green, and blue channels are averaged together to determine the luminance of the overall image. However, they are not weighted evenly, because that’s not how the eye sees them. Details about how to work with this fact can be found in Chapter 12.
If you find yourself wanting to use a particular channel as a luma matte, use Effect > Channel > Shift Channels; set Take Alpha From as Full On and the other three channels to whichever channel—red, green, or blue—is most effective.
If there are holes in the matte, duplicate the layer, and then in the duplicate, raise the White Point value so that the holes disappear. Now protect the edge by adding a Simple Choker effect on that duplicate layer and raising the Choke Matte value until you can toggle this layer on and off without seeing any effect on the edge. This is a core matte, and it will be essential with color keying, ahead.
Linear Color Key
The Linear Color Key offers direct selection of a key color using an eyedropper tool. It’s useful in cases where Keylight won’t work, because the color being selected is not one of the digital primaries (red, green, or blue) that Keylight relies on for its fundamental operations. You may never come up with a situation in which you need to key out a background made of up some secondary color, so this key can also be useful to select a certain range of color in an image for adjustment. The default 10% Matching Softness setting is arbitrary and defines a rather loose range. I often end up setting it closer to 1%.
Note that there are, in fact, three eyedropper tools in the Linear Color Key effect. The top one defines Key Color, and the other two add and subtract Matching Tolerance. I tend not to use these eyedroppers because they don’t work in the Comp viewer; the main Key Color eyedropper and the Matching sliders work for me (Figure 6.5).
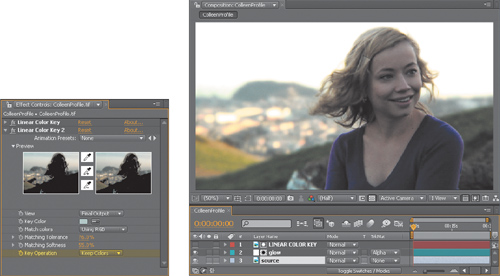
Figure 6.5. Suppose you want to make a change to the distant, out-of-focus area of this shot. By selecting a prominent object in the foreground, the sweater, and adjusting the selection (bottom), you can create a matte that separates the foreground and background.

(Image courtesy of Eric Escobar.)
There’s a hidden trick to getting better results with Linear Color Key. Because it is linear, it will pick up hues that seem unrelated. To reduce the effect of these, you can add a second instance of Linear Color Key. Under Key Operation, changing the default Key Colors setting to Keep Colors does nothing if it’s the first instance except annul the effect. On the second instance, Keep Colors is unaffected by the first instance and can bring back hues that were already keyed. The one-two punch will often deliver the best result (Figure 6.6).
Figure 6.6. By using Linear Color Key set to Keep Colors again (left), I’m able to get rid of the extra selection areas in the background, apply the matte, and add a glow effect to just the background.
Close-up: Difference Mattes
![]()
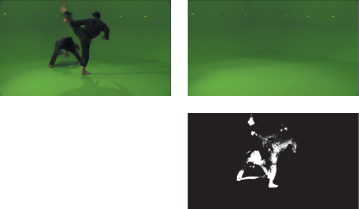
The difference matte is a little like Santa Claus. It would be nice to believe in it because it would give so much if it really existed, but it is mostly just a fantasy that a computer can compare two images, one with a foreground figure, one without, and extract that figure cleanly. It sounds like the kind of thing computers were made to do. But not only does this require a completely locked-off shot, you’d be shocked at how much one pixel of one frame that should be identical can vary due to compression grain and subtle variations of light. Low-lit areas, in particular, tend to gray out in a way that foils this technique, which works best with saturated, differentiated color. Figure 6.7 amply demonstrates the problem and shows that Difference keying may be useful for the crudest type of isolation, but not much more.
Figure 6.7. I was hoping to grab just the shadows on the floor with a difference matte applied to the image on the left using the middle image as a Difference layer. Unfortunately, subtle stuff like that tends to be indistinguishable from noise, even with clean, low-grain source.
Color Keying: Greenscreen, Bluescreen
And now, ladies and gentlemen, the main event. Past editions of this book have taken a high-level approach to explaining the art of keying along with specific advice about Keylight, the powerful keyer from the Foundry included with After Effects, but this time around, the two are combined in a practical example of a challenging key.
Keylight is useful in keying situations beyond studio-created bluescreen or greenscreen shots. For example, you can use Keylight for removal of a blue sky (Figure 6.8). You wouldn’t use Keylight to pull a luminance key, however, or when you’re simply trying to isolate a certain color range within the shot; it really is only effective at making one of the three primary colors transparent.
Figure 6.8. Can a bright blue sky serve as an effective bluescreen? On the right day, why yes, it certainly can.

Keylight is most typically used on footage shot against a uniform, saturated, primary color background, where preservation of edge detail is of utmost importance.
To get started, make a new comp containing the blueScrn_mcu_HD clip. At first glance this does not look like it will be a difficult shot to key: The background is a uniform, well-lit, and fully saturated blue, and the talent is well lit, with some nice warm edge lighting. The hair is edge-lit in a contrasting color from the left, contains wispy details to preserve, and the hands move quickly, creating motion blur (Figure 6.9).
Figure 6.9. The plate is well-shot and contains the kind of challenges that are fun to work with: nice hair details and beautiful motion blur.
Nowadays it has become somewhat unusual to see bluescreen shots, which had their heyday in the pre-digital optical compositing era. Green is favored for digital shoots for several reasons, predominantly that it is the dominant color in the visual spectrum and therefore most cameras are able to resolve it with far more image data than is found in the blue channel, which typically has less luminance and more noise.
Oddly enough, I’ve always preferred blue to green. For one thing, a nicely lit blue background is soothing to the eye, whereas digital green—the hue that is pure, luminant green, a specialty color not found at any ordinary paint store—is actually the most jarring color in the spectrum, one that has become a favorite of emergency services crews and warning signs around the world. The phenomenon known as “greenscreen psychosis,” in which talented actors and directors struggle on a greenscreen set, has to partly do with it being such an empty environment, but I’m willing to bet it also has something to do with the vibe of that awful color.
The following steps apply to virtually any key, with specifics about this shot:
- Garbage matte any areas of the background that can easily be masked out. “Easily” means you do not have an articulated matte (you don’t animate individual mask points). As a rule of thumb, limit this to what you can accomplish in about 20 minutes or less (Figure 6.10).
Figure 6.10. Even a quick-and-dirty garbage matte as simple as this isolates the action and eliminates the darker blue values in the corners.

This shot doesn’t seem to need a garbage matte, but notice that the talent’s action of raising her arms does not cover all areas of the frame, including at about 100 pixels from the left edge of the frame, 200 pixels from the right edge, and 100 pixels at the top. Notice also the slight vignette effect at the edges of the frame; move your cursor to the upper-right corner, for example, and take a look at the Info panel as you do so—you’ll notice values are 10% to 15% lower in luminance than those along the edge of the talent.
If you didn’t bother with a simple garbage matte in this case, you’ve already compromised the matte. The game is to key only the essential pixels, and those are the ones along the edge of the moving figure. Lazily keying the full frame compromises those edges by overweighting background pixels that don’t matter, even on a shot as clean as this one. Draw a rectangular mask around the area containing the action as in Figure 6.10 and step through all frames of the clip to make sure no elbows are clipped out.
- Use a side-by-side Composition and Layer view to create the first pass of the key with no extra adjustments.
This is a slightly new approach to this most essential step in Keylight—sampling the Screen Colour (that “u” gives away its British heritage). Before you even apply the effect, create a new workspace as follows: choose Minimal from View > Workspace (resetting it if necessary to get back to just a Timeline and a Composition viewer), and double-click the bluescreen clip in the timeline to open it in Layer view. Drag the Layer tab to one side or the other of the panel to create a new panel, so that you have two views of the clip side-by-side. Add an Effect Controls panel next to the timeline (Figure 6.11).
Figure 6.11. This layout looks redundant right now, but just wait.
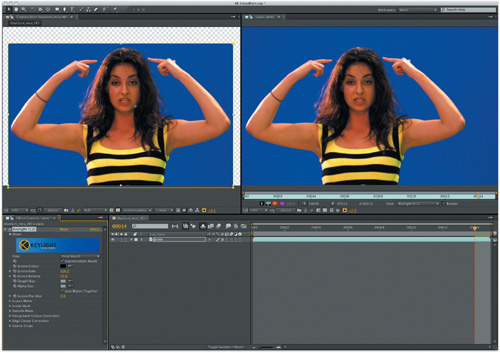
Go to a frame with some clear motion blur as well as hair detail in it, such as frame 5. Now try this. In Keylight, choose Status from the View menu. Both images will turn white, showing a solid alpha channel. In the Layer panel, toggle off the Render check box to bring back the source image. Now click the Screen Colour eyedropper and, holding down the Alt (Opt) key, drag around the blue background in the Layer view and notice what happens in the other viewer.
Status view is an exaggerated view of the alpha channel matte. Opaque pixels are displayed as white, transparent pixels are black, and those containing any amount of transparency are gray (Figure 6.12). It’s an easy way to see how well the background is keying (turning black) on the first pass and whether any significant holes (in gray) appear in the foreground subject.
Figure 6.12. You can’t see it in a still figure, but by Alt-dragging (Opt-dragging) around the blue area of Layer view on the right, which is set to not render, a real-time update of Status view on the left allows you to discover the optimum background color.

It’s suddenly apparent that what looked like a straightforward shot will be a challenging key. Although it is possible, with a little patience, to find a spot in the background that turns most of the background pixels black as in Figure 6.12, the dark areas of the shirt and the hair are nowhere near solid white. Still, having carefully chosen the best Screen Colour, you are free to move on and refine this matte.
- Gently refine the matte and preview the result at full resolution, in full motion, against a contrasting color.
In previous editions of this book, I dutifully explained and made recommendations about the controls below Screen Colour: Screen Gain and Balance, Despill and Alpha Bias, and Screen Pre-blur. There’s more information about these later in the chapter, but on the whole my advice is, don’t touch these. They all have one thing in common—they change the way the matte itself is calculated—and I have come to believe that manipulating them does more harm than good.
Skip down to Screen Matte and twirl down those controls. From here down, all of the Keylight controls are working with the matte after it has already been generated. In other words, adjusting these controls is no different than applying a separate effect after Keylight to refine its matte, and that’s a good thing in this case.
Raise Clip Black by dragging to the right across the value to bring it upward. Stop when you see all of the gray pixels in the background turn black in Status view. (Even though you’ll also see some of the gray pixels around the hair—the ones you want to keep gray—turn black as well. We’ll deal with those next.) In my attempt, I ended up with a value of 26.0, and as a rule of thumb, anything above 20 is a bit high—another reason to take more care with this matte than just pulling the key in one pass.
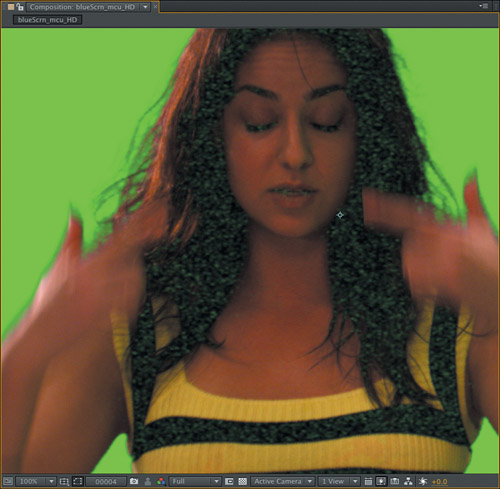
Now lower Clip White by dragging to the left across that value to bring it downward. Here you may find that you have to go pretty far—like down into the 50s—in order to see all of the gray or green pixels in the torso become white. I ended up with a value of 57.0. You’ll also see some green pixels remaining around the edges of the figure, particularly around the wisps of hair.
The green pixels in Status view are Keylight’s signal that the color values of those pixels have changed in the keying process. Focus on the wisps of hair on the light side, and switch between Final Result and Intermediate Result in the View menu. The former suppresses that blue spill that you see in the latter to the natural hair color as part of the keying process.
Intermediate Result shows the source footage with the matte applied as an alpha channel but no alteration to the RGB pixels at all, while Final Result adds color suppression as a natural by-product of Keylight’s method of removing the background color. Final Result seems to be the one you want, but there’s an unfortunate side effect to watch out for: It can dramatically enhance graininess in the result. Figure 6.13 shows a before and after in which the suppression process clearly pushes pixels to a much contrastier shade even though the source is well lit footage from the RED camera. For this reason, don’t let Keylight do your spill suppression for you.
Figure 6.13. Flashing the image with the exposure control at the lower right reveals a horrific amount of grain in Final Result view of this Keylight operation (left). Intermediate Result (right) omits any alteration to the source color, revealing that the original image, even flashed like this, is nicely shot, with smooth, tolerable grain.

Spill suppression will have to wait until after we’re done with this key, and at this point, we’re not even close. Getting that shirt to key has ruined the detail in the hair and motion of the hands. Had the talent been wearing a different costume and not moved around as much, the steps taken to this point might have resulted in a completed key, but with anything more complicated—and most effects shots seem to be much more complicated—it’s now necessary to break this operation into component parts (or be painted into a corner.) Neither holes in the matte nor crunchy edges on the hair are acceptable, and right now the two are fighting one another (Figure 6.14).
Figure 6.14. Closing all those little gaps in the foreground will mean destroying that hair detail if this matte is attempted in one pass.
- This is the moment to separate the plate for multiple passes. In every case there are two basic ways to do this.
• Separate one part of the foreground from the rest with a mask or other selection. For example, in this case you could rotoscope a mask around the hair, and possibly another one around the moving hands.
• Create multiple passes of the same matte: one as a garbage matte (or gmatte), one as a core matte (or cmatte), and the final one featuring only the isolated edge.
In this case, we know that there are prominent holes in the foreground, so the latter approach—to create at least a core matte so that the interior areas are isolated from the all-important edge—is the way to go.
This method of breaking down the shot would work with any software keyer, but we’re sticking with Keylight, as it is the most powerful keyer included with After Effects and this maximizes what it can do.
a. Duplicate the layer to be keyed.
At this point, our bluescreen shot has a garbage mask and an instance of Keylight applied to it. Leave these on the upper of the two layers, rename that layer “edge matte,” and turn off its visibility—we’ll deal with it later.
b. Rename the lower layer “cmatte” and refine the core matte (Figure 6.15).
Figure 6.15. A heavily choked source matte, turning all areas of the alpha channel either white or black, makes a good core matte to sit behind the edge matte.

To begin, reset Clip Black by right-clicking on that property in the Effect controls and choosing Reset.
We’re keeping our Screen Colour selection, but will now crush the matte. Switch back to Status view and lower Clip White until the torso and hair are completely filled in with white (around 66.0 may work). Now raise Clip Black all the way to one unit below the Clip White value (65.0 if the previous value was as specified).
You now have the worst matte possible, with no edge subtlety whatsoever. What possible good is this?
Switch to Intermediate Result. Yep, horrible matte. Now close the Keylight controls and apply the Simple Choker effect. Toggle Alpha Channel view in the Composition viewer (Alt+4/Opt+4) and take a snapshot (Shift+F5 or F6, F7, or F8 all work).
Tip

Switch a RAM preview to Alpha Channel view (Alt+4/Opt+4) and the cache is preserved; you can watch a real-time preview of the alpha channel without re-rendering the preview.
Raise the Choke Matte value into the low double digits—say, around 15.00. The matte shrinks. Press F5 to toggle back and forth with the un-choked matte, and make sure that all of the choked matte’s edges are several pixels inside that of the unchoked matte. This is important: There must be no edge pixels in the core matte that overlap with those of the edge matte.
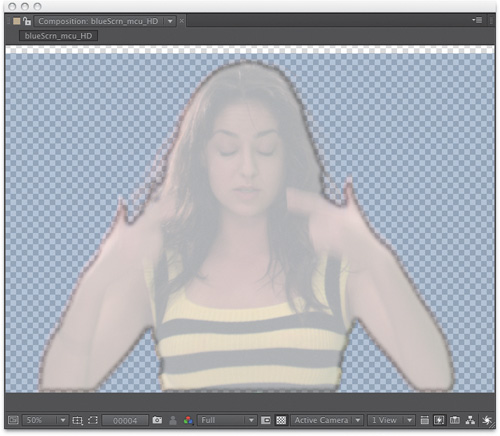
This matte may behave better if it’s softer—for now, you can take my word for that, since we’re not yet putting it into use. As an extra precaution, apply Channel Blur and raise Alpha Blurriness to 15.0. This provides an extra threshold between the chunky core and the fine edge (Figure 6.16).
Figure 6.16. This isn’t how the actual comp looks; it’s showing the core matte as the white center with the plate translucently revealing that nicely isolated edge, where all efforts are to be focused.
c. Kill the spill.
Leaving the View on Intermediate Result is great for avoiding side effects such as enhanced graininess, but the layer almost always then requires some sort of spill suppression. More often than not, you have to do this anyway.
There’s a Spill Suppressor effect in After Effects; how great it would be if all you had to do was sample the color, change Color Accuracy from Faster to Better, leave Suppression at 100, and be done. But heck, you can crank Suppression up to 200 if you want (who knew?) and still see your talent looking green (or in this case, blue) around the gills (Figure 6.17).
Figure 6.17. Blue matte line around the edges.

You could also use the Edge Colour Correction in Keylight, but it has no effect other than in Final Result mode, and—gotcha—that’s likely to mess with your footage too much, remember?
Spill suppression is a big enough deal that it merits its own section below. The key (please excuse the pun) is not to simply suppress or desaturate it but in fact to bring it back around to its natural hue. For that you need an effect a lot like Hue/Saturation and the skills to use it (coming up).
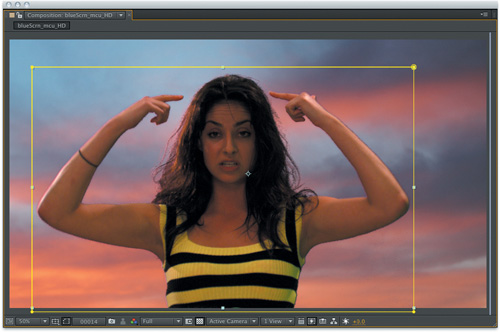
- Evaluate the shot in full motion.
How are the details holding up? And how does the foreground look in the actual composite? It’s easy to get so wrapped up in creating the perfect matte that you forget that some problems are harder to spot against some backgrounds. If she’s headed for a bluish environment, why trouble yourself too much with spill suppression? Would more blending of the background into the foreground (later in this chapter in the “Edge Selection” section) or even light wrap help sell this composite (Figure 6.18)?
Figure 6.18. At this stage, prior to any color matching, the detail is well preserved but the matte lines along the torso and arms, in particular, remain.
- Isolate and refine further.
Do you need to isolate the hair for its own keying pass? How about those motion-blurred hands? Are there holes in the matte, or problems with the core pass? Does the talent, heaven forbid, make direct contact with the background, for example lying down on the colored floor?
For these types of issues, create holdout mattes.
Close-up: Holdout Matte
![]()
A holdout matte isolates an area of an image for separate treatment. I recommend that you think of a color key as an isolated edge matte surrounded by two holdout mattes: one for the core, one for the background. Details on creating these can be found ahead in the “Fine Tuning and Problem Solving” section.
Keylight for Color Keying
The core of Keylight is screen matte generation, and as mentioned, the most essential step is choosing the exact color to key. From that, Keylight makes weighted comparisons between its saturation and hue and that of each pixel, as detailed in Table 6.1. From this, you see that the ideal background is distinct and saturated.
Table 6.1. How Keylight Makes Its Key Decisions
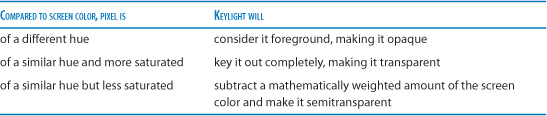
My current advice is to leave all other top controls in Keylight alone, but in case you’re curious about them, following is a bit of extra information on how each works.
Notes
![]()
The controls atop Keylight (from Screen Colour down to Screen Pre-blur) alter the actual generation of the matte. Everything from Screen Matte down adjusts the result of that first step.
Screen Gain
The ideal Screen Gain setting is 100, no change from the default. This adjustment is compensation for a poorly lit matte or a foreground contaminated with background color. While raising it may make the matte channel look better, you are also likely to see increased color grain and lost edge detail with values above the default. The alternative with fewer side effects is to raise Clip Black.
Screen Gain boosts (or reduces) the saturation of each pixel before comparing it to the screen color. This effectively adds more desaturated background pixels into the keyed color range.
Screen Balance
Keylight relies on one of the three RGB color values being the dominant background color. It is even more effective when it knows whether one of the two remaining colors is more prevalent in the background, and which one. Screen Balance makes use of a dominant secondary background color.
The software automatically sets a balance of 95% with bluescreens (which typically contain a good deal of green) and leaves it at 50% for greenscreens (which tend to be more monochromatic). If you want to try adjusting it yourself, try alternate settings of either 5.0 or 95.0 to take it close to one or the other secondary color.
Notes
![]()
A Rosco Ultimatte Blue screen contains quite a bit of green—much more than red, unless improperly lit. Ultimatte Green screens, meanwhile, are nearly pure green (Figure 6.19).
Figure 6.19. The Rosco colors: Ultimatte Blue, Ultimatte Green, and Ultimatte Super Blue. Blue is not pure blue but double the amount of green, which in turn is double the amount of red. Ultimatte Green is more pure, with only a quarter the amount of red and no blue whatsoever. Lighting can change their hue (as does converting them for print in this book).

Bias
The Bias settings color-correct the image by scaling the primary color component up or down (enhancing or reducing its difference from the other two components). The Foundry recommends that in most cases you leave Alpha Bias at the default and that you click the Despill Bias eyedropper on a well-lit skin tone to be preserved; despill pivots around this value.
Bias has the unpleasant side effect of significantly increasing graininess. If this happens to your footage, try other despill methods discussed later in this chapter.
Refinement
When you spot an area that looks like a candidate for refinement, save (to hold an undo point should you need to use File > Revert), zoom in, and create a region of interest around the area in question.
Now take a look at the tools provided by Keylight to address some common problems.
Clip White, Black, Rollback
The double-matte method (core and edge) eliminates a lot of the tug of war that otherwise exists between a solid foreground and subtle edges. Even with this advantage, both mattes may require adjustments to the Clip White or Clip Black controls.
Keep the largest possible difference (or delta, if you prefer) between these two settings, as this is where all of the gray, semitransparent alpha pixels live. The closer the two numbers get, the closer you are to a bitmap alpha channel, in which each pixel is pure black or white—a very bad thing indeed (Figure 6.20).
Figure 6.20. Here’s how the hair looks without a separated edge matte. Not nice.

If you push too far, restore back toward the initial matte with Clip Rollback. Its value is the number of pixels from the edge that are rolled back relative to the original, unclipped screen matte. So if your edges were subtle but sizzling on the first pass, and removing noise from the matte hardened them, then this tool may restore subtlety.
Close-up: Chroma Subsampling: The 411 on 4:1:1, 4:2:2, and 4:2:0
![]()
Video images are RGB on your computer, but video devices themselves use Y’CrCb, the digital equivalent of YUV. Y’ is the luminance or brightness signal (or “luma”); Cr and Cb are color-difference signals (roughly corresponding to red-cyan and blue-yellow)—you could call them chrominance or “chroma.”
It turns out that the human eye is much more particular about gradations in luma than chroma, as is amply demonstrated in Figure 6.21.
Figure 6.21. The source (top left) can be converted to YUV with Channel Combiner and the UV (chroma) or Y (luminance) blurred individually, then round-tripped back to RGB with Channel Combiner again. With heavy blur to the color data (top right) the image is still clear, albeit stylized, if the luminance is untouched, but blur the luminance and leave the color and the result is far less recognizable (lower left).
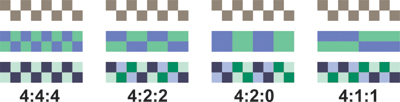
The standard types of digital video compression take advantage of this fact. Figure 6.22 shows the difference between straight RGB and 4:2:2 compression, which is common to popular formats including DVCPRO HD and DVCPRO50, ProRes 422 and cameras such as the Sony F900, as well as 4:1:1, which is used by DVCPRO and NTSC DV. Almost as bad for keying purposes is 4:2:0, the MPEG-2 (DVD), HDV, and PAL DV format.
Figure 6.22. 4:4:4 is just pixels, no chroma subsampling, where 4:2:2 and 4:1:1 group the nearest neighboring pixels, giving them identical luminance according to the patterns shown here.
As you might imagine, chromatic compression is far less than ideal for color keying (Figure 6.23), hence the workarounds in this section.
Figure 6.23. Key a 4:1:1 image (left) and Keylight’s Status view (right) clearly shows the horizontal blocks associated with that type of chroma subsampling (images are shown at 400%).

Noise Suppression
For seriously sizzling mattes, Keylight includes a Screen Pre-blur option that I would reserve for footage with a clearly evident noise problem, such as heavy compression. Blurring source footage before keying adds inaccuracy and is something of a desperation move. The footage itself does not appear blurred, but the matte does.
A better alternative for a fundamentally sound matte is Screen Softness, under the Screen Matte controls. This control blurs the screen matte itself, so it has a much better chance of retaining detail than a pre-blur approach. As shown in Chapter 3, edges in nature are slightly soft, and a modest amount of softness is appropriate even with a perfectly healthy matte.
The Despot cleanup tools are meant to fill matte holes, but at high levels they add blobbiness, so they are rarely useful. An alternative approach, particularly with DV formats (which, by the way, are guaranteed to add compression noise and are not recommended for bluescreen and greenscreen work), is to do as follows:
- Convert the footage to YUV using Channel Combiner (the From pop-up menu). This will make the clip look very strange, because your monitor displays images as RGB. Do not be alarmed (Figure 6.24).
Figure 6.24. This is how an image converted to YUV should look on an RGB monitor—weird. The point is not how YUV looks, but what you can do to adjust it before using Channel Combiner to round-trip it back to RGB.

- Apply Channel Blur to the green and blue channels only, at modest amounts. To gauge this, examine each channel as you work—press Alt+2 (Opt+2) or Alt+3 (Opt+3) while zoomed in on a noisy area. Make sure Repeat Edge Pixels is checked.
- Round-trip back from YUV to RGB, using a second instance of Channel Combiner.
- Apply Keylight.
Notes
![]()
YUV is the digital version of the broadcast video color space. It is used in component PAL television and is functionally similar to YIQ, the NTSC variant. In After Effects YUV, the red channel displays the luminance value (Y) of the shot, while the green and blue channels display blue and red weighted against green (U and V).
Matte Choke
Besides mismatched lighting, fringing (excess edge opacity) and choking (lost edge detail) are the most common tells of a greenscreen comp. Screen Grow/Shrink deals with this issue directly. Don’t be afraid to use it, gently (a setting of around 1.0, or one pixel, won’t do your matte much harm, especially if combined with a bit of matte softness).
This is not the last resort for choking and spreading a matte; alternatives follow in “Fine Tuning and Problem Solving.”
Spill Suppression
Keylight suppresses color spill (foreground pixels contaminated by reflected color from the background) as part of the keying operation when displaying the final result. Thus spill-kill can be practically automatic if you pull a good initial key.
There are a surprising number of cases in which Keylight’s spill suppression is not what you want, for the following reasons:
• Dramatic hue shifts occur to items whose colors are anywhere near green (for example, cyan) or opposite green (for example, magenta). It’s challenging enough to keep green off of a green set, let alone its neighboring and opposite hues.
• These hue shifts can also add graininess, even to footage that was shot uncompressed and has little or no source grain.
In Figure 6.25, notice how the whole shape of the girl’s face seems to change due to the removal of highlights via spill suppression.
Figure 6.25. Her face doesn’t even look the same without the highlights reflected with the green. Even worse, at this magnification, it’s easy to see that the amount of grain noise has increased significantly (right). It’s a definite case for pulling the matte on one pass and applying spill suppression separately.

Should Keylight’s spill suppression become unwieldy or otherwise useless for the preceding reasons, there is an easy out: Ordinarily, the View is set to Final Result, but set it to Intermediate Result for the matte applied to the alpha without any change to RGB. The CC Composite effect does the same thing, eliminating all RGB changes from preceding effects but keeping the alpha.
Keylight itself also includes spill suppression tools, under Edge Colour Correction, that influence only the edge pixels. Enable its check box and adjust the controls below, softening or growing the edge as needed to increase the area of influence. Sometimes adjusting Luminance or Saturation of edges is a quick fix.
The next section, which goes beyond this tool, describes better ways to kill spill.
Fine Tuning and Problem Solving
The key here is to break it down. The above steps apply to most ordinary keying situations, but extraordinary ones happen all the time. The trick is to find the areas that are closer to ordinary, deal with those, and isolate the extraordinary stuff separately. In this section we focus on how to break apart a key with various types of holdout mattes and keep procedural keys effective.
Although each shot is different, there are really only a few challenges that consistently come up with a color matte:
• Lighting: If the shot was not lit properly, everything that follows will be much more difficult.
• Image quality: Bluescreen and greenscreen keys put footage quality to the test, and the worst cameras are those that lose the most data right at the time of capture. Mini DV cameras used to be the main culprits, but nowadays it is sadly the mighty DSLR that is most often inappropriately used to shoot effects plates.
These two points are determined at the shoot itself; for more about that, see the next section, “Shoot for the Perfect Matte.”
• Fine detail such as hair, motion, or lens blur (Figure 6.26, top row).
Figure 6.26. Fun challenges you may encounter when pulling a color key include wispy hair (top left), motion blur (top right), contamination of foreground elements by the background color (bottom left), and shadows (bottom right).
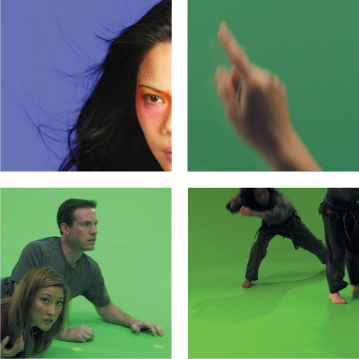
• Costume contamination: shiny, reflective, or transparent subjects, or those simply containing colors close to that of the background, can present a fun keying challenge but can also turn out to be more of a nightmare (Figure 6.26, bottom left).
• Set contact is always a huge challenge, whether simply a full-body shot including feet or talent interacting with objects painted green, sitting on a green stool, or lying on the green floor.
• Shadows are typically all or nothing—one either carefully lights to keep them or needs to be prepared to remove them, despite that they are by their very nature areas of low contrast and difficult to key (Figure 6.26, bottom right).
These require separate holdout passes in order to be keyed, and the really stubborn situations may even require roto (Chapter 7).
Holdout Matte
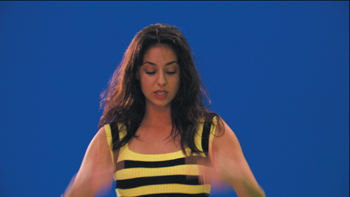
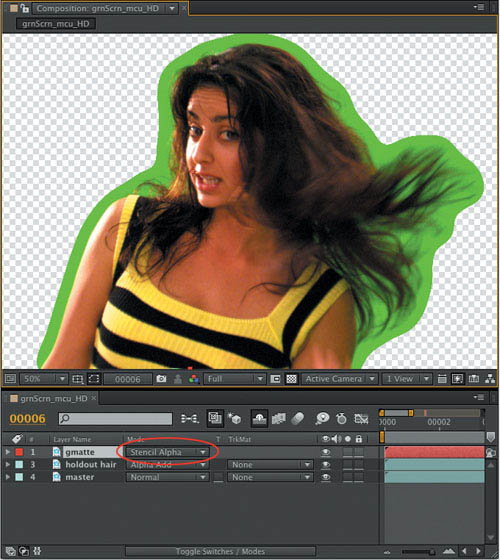
Check out grnScrn_mcu_HD on the book’s disc—this time it’s the yellow stripes in the shirt that wreak havoc due to their similarity to green. There’s no way to get a good key of the hair without pulling that key on a separate pass—so how exactly is that done?
Create a garbage matte—a mask—around all the hair edges only, carefully animating it so that they are fully isolated and nothing is missed. This layer then gets its own key using the same criteria and steps as you would use to derive the main matte. The Clip White and Black settings are much more mild than for the overall matte, allowing more detail.
That’s clear enough—the place where artists sometimes get confused is then combining this with the main matte. Once this matte is complete, copy its mask and all keyframes and paste them on the main matte layers, but choose Subtract so that they hold out the inverse area. Now—and this is the step that’s easily missed—switch the hair matte layer’s blending mode to Alpha Add. This causes the mask and its inverse to blend together seamlessly without leaving a gap along the semitransparent edges (Figure 6.27).
Figure 6.27. The mask is applied to the top layer to hold out the hair for a separate pass (top left), and the master layer has the same mask, inverted (or in Subtract mode). A telltale hairline appears where the two mattes overlap (top right) until the upper layer is set to Alpha Add mode (lower left).

Tip
If a key requires several holdout mattes, this can become a bit heavy to manage. You do have the option to link Mask Shape properties with an expression (Chapter 10) so that if you change the mask animation in the holdout matte you don’t have to remember to recopy the keyframes.
Procedural Garbage Matte
Often the background is anything but uniform and the action is fast, so making a garbage matte to isolate the edge is quite a chore. In such cases, the same process that was used to create the core matte above can also be used to create a garbage matte, or gmatte, without drawing more than an elementary mask.
The clip from Figure 6.27 can be garbage matted procedurally in this manner. Just as with the cmatte, create a hard, chewy matte that pushes all of the background pixels to black and the foreground to white. Now spread that matte using one of the following methods.
Simple Choker allows you to spread the alpha channel using a negative number. You can push it hard and even use more than one instance if the 100-pixel limit gets in your way, as it can with garbage mattes.
Minimax is the choice if Simple Choker isn’t effective enough. It provides a quick way to spread or choke pixel data, even without alpha channel information, and it has a powerful effect. It can also operate on individual channels of luminance.
Matte Choker sounds more pro than Simple Choker but it’s really just unnecessarily complicated.
Now comes the part you won’t like: Create three duplicates of the plate and label them, top to bottom as gmatte, edgematte and cmatte, then precomp them. The reason for this is that the next step requires it.
Set the blending mode of that gmatte you just spread, the top layer, to Stencil Alpha. The layer disappears but its alpha channel cuts all the way through the comp, like—a stencil! Figure 6.28 shows why it’s necessary to precomp; otherwise, the stencil operates on the background as well.
Figure 6.28. This is a great way to isolate an edge without hand-animating the garbage matte. The top layer is another crushed dirty matte that has been spread with Simple Choker with a value of –100.00. If it’s not enough you can use two instances of Simple Choker or Minimax. Stencil Alpha blend mode then applies the result to the layers below.
Now once you refine the core matte according to the Color Keying section above, the edge matte pass is truly as isolated as it can be, leading to a much more effective result or your money back. Actually, if you’re not done at that point, it must mean you need holdout passes for specific areas of frame. Keep breaking it down.
Close Holes
Suppose you can’t close a hole in the core matte using just Keylight. You can close them by choking, then spreading the matte as follows:
- Choke (garbage matte) or Spread (core matte) the holes until they disappear.
- Spread or Choke (the opposite of the previous step) an equivalent or greater amount.
This will of course destroy any edge subtlety, which is why it only works well on a core or garbage matte. It will also cause small gaps near an outside edge to close (Figure 6.29), in which case you have to rotoscope. It can help to use the Roto Brush (Chapter 7) or track in a paint stroke (Chapter 8).
Figure 6.29. Mind the gaps; choking and spreading a matte, or using tools to do so automatically, such as the third-party Key Correct tools, is likely to close small gaps.

Edge Selection
Sometimes it’s simpler to just select the edge and subtly blur the blend between foreground and background using that selection. Figure 6.30 shows a comp in which it would be simpler to soften matte lines rather than choke the matte, and add subtle light wrap.
Figure 6.30. An edge matte can be used to blur background and foreground together, or to match the intensity and saturation to the background. The matte can itself be softened with a blur, Minimax, set to Maximum and Color, can be used to grow the matte by increasing the Radius setting.

Here’s how it’s done:
- Apply Shift Channels. Set Take Alpha From to Full On and all three color channels to Alpha.
- Apply Find Edges (often mistaken for a useless psychedelic effect because, as with Photoshop, it appears in the Stylize menu and many goofy artists of the early 1990s thought it would be cool to apply it to an entire color image). Check the Invert box for an edge highlighted in white.
Tip
A useful third-party alternative to Minimax is Erodilation from ObviousFX (www.obviousfx.com). It can help do heavier choking (eroding) and hole filling (dilating), and its controls are simple and intuitive (choose Erode or Dilate from the Operation menu and the channel—typically Alpha).
Minimax can help choke or spread this edge matte since it’s luminance data, not an alpha channel. The default setting under Operation in this effect is Maximum, which spreads the white edge pixels by the amount specified in the Radius setting. Minimum chokes the edge in the same manner. If the result appears a little crude, an additional Fast Blur will soften it (Figure 6.30).
- Apply the result via a luma matte to an adjustment layer. You should not need to precomp before doing so.
You can then use Fast Blur to soften the blend area between the foreground and background, which often works better than simply softening a chewy matte. A Levels adjustment will darken or brighten the composited edge to better blend it. Hue/Saturation can be used to desaturate the edge, similar to using a gray edge replacement color in Keylight.
Color Spill
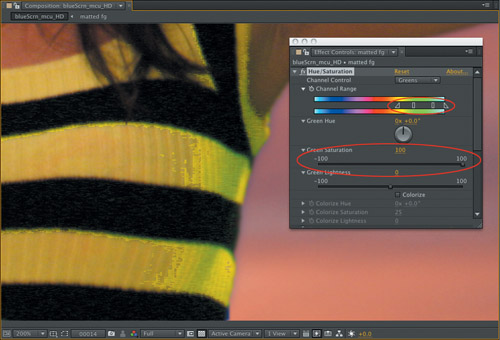
I promised earlier to share an alternative to the tools that simply suppress color spill to gray, using the Hue/Saturation effect as follows.
- Apply Effect > Color > Hue/Saturation.
- Under Channel Control, choose the background primary (Greens or Blues).
- This will sound odd, but raise the Saturation value for that channel to 100.0.
- Adjust the Channel Range sliders until all spill is pushed to 100.0 saturation (Figure 6.31).
Figure 6.31. By maxing saturation in the Greens, it’s easier to adjust the range to encompass the green spill on the side of the shirt but leave out most of the yellow stripes.
- Now try some mixture of the following to eliminate spill:
• Lower the Saturation (still on the individual color channel) somewhere from –40.0 to –80.0.
• Shift the Hue between about 30 and 50 degrees in the warmer direction of skin tones. Positive values (clockwise) produce a bluescreen; negative values (counter-clockwise) produce a greenscreen.
This combination of desaturation and hue shift with a carefully targeted range should do the trick once you get the hang of using the Channel Range, which is why it helps to crank Saturation at first. The inside rectangular sliders are the core range, the outside, triangular sliders determine the threshold area between the two sliders on each end. It’s usually a good idea to give the selection range a good bit of thresholding (Figure 6.32).
Figure 6.32. The actual adjustment brings Saturation back down to 0, and instead of suppressing that, shifts the green hues back toward their true, warmer hues.

There will be cases where it is impossible not to contaminate some part of the costume or set with spill suppression; for example, a cyan-colored shirt will change color when the actor is corrected for green. The above method is a better work-around than most of the automated tools (especially Keylight itself), but there are cases where you might have to add some loose roto to isolate the contaminated bits and adjust them separately.
Shoot for the Perfect Matte
Here are a few steps to take to ensure a good matte if you happen to be on set or, even better, involved in preproduction.
The Camera
Not all digital cameras are ideal for shooting a greenscreen or bluescreen, and with the recent advent of the DSLR, we have a prime example of a camera that can shoot a lovely looking image that does not hold up so well for effects work. Since the last version of this book, hundreds of thousands of DSLR cameras have entered the world, and they are capable of shooting high-definition video that can look incredibly cinematic and gorgeous, if well shot.
The reason DSLR footage looks so good has mostly to do with the optics. Pair this camera with a high-quality lens and the lens resolves an excellent image, which the sensor is able to capture at full HD—but not without throwing away every other line of data, trashing data that is essential to a clean edge. While a still photo from a DSLR such as the Canon 5D or 7D is a dream to key, the sensor is not capable of streaming video at 24 or more fps without drastically reducing the amount of data being produced before it ever leaves the sensor.
Someday, a camera like this will be available that won’t simply melt down when shooting a lightly compressed HD clip. Meanwhile, there are other video cameras that produce much better effects footage if it’s well lit and shot. RED and the new (as of this writing) Arri Alexa are two cameras that create effects plates you would use on a movie of any budget. You can rent these cameras inexpensively.
After Effects CS5 even has the means to work natively with RED .r3d files so you can key them in their full source color space at full 4K (or more) resolution. The previous version of After Effects could import an .r3d, but any attempt to key it natively would inevitably run into the memory limit that is no longer applicable in a 64-bit application. By keying an .r3d file natively at full resolution, you get the best possible matte even in the likely case that you will scale the plate down to a more reasonable HD size later on.
Notes
![]()
If you end up being handed DSLR footage for effects usage, don’t despair. The image quality is still far above Mini DV, which was as ubiquitous just a few short years ago.
The bottom line about cameras is to choose the least compressed recording format possible and to work with someone (or be someone) who has created effects footage on that camera before and knows how to light for it.
On Set
If you have the opportunity to supervise on set, I highly recommend it. Be careful to bring a good bedside manner and refrain from disrupting the proceedings, develop the best possible relationship with the director of photography, and discreetly take as many reference images and clips with your DSLR as you can. It’s pretty great to get out from behind the desk and have an adventure.
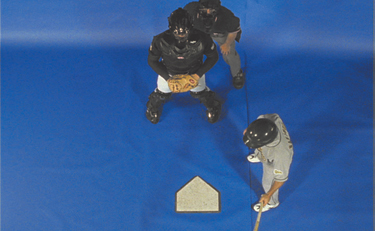
A hard cyclorama, or cyc (rhymes with “like”) is far preferable to soft materials such as paper or cloth, especially if the floor is in shot. If you can’t rent a stage that has one, the next best thing might be to invest in a roll of floor covering and paint it, to get the smooth transition from floor to wall, as in Figure 6.33 (assuming the floor is in shot).
Figure 6.33. On a set with no hard cyclorama, you can create the effect of one—the curve where the wall meets the floor—using a soft bluescreen instead. It doesn’t behave as well (note the hotspot on the curve), but it will certainly do in a pinch and is preferable to removing the seam caused by the corner between the wall and floor.
Regarding the floor, don’t let anyone walk across it in street shoes, which will quickly contaminate it with very visible dust. There are white shoe-cover booties often used specifically to avoid this, and you can also lay down big pieces of cardboard for the crew to use setting up. Be pedantic about this if you’re planning to key shadows.
Lighting is, of course, best left to an experienced director of photography (DP) and gaffer (bonus points if they’ve shot effects before and understand the process even a little), and any kind of recommendations for a physical lighting setup are beyond the scope of this book. Because you’ll spend more time examining this footage than anyone else, here are a few things to watch for on set:
• Light levels on the foreground and background must have matching intensity, within a stop or so of one another. A spot light meter tells you if they do.
• Diffuse lights are great for the background (often a set of large 1K, 2K, or 5K lights with a silk sock covering them, Figure 6.34), but fluorescent Kino Flo lights have become increasingly popular as they’ve become more flexible and powerful. With fluorescents you may need more instruments to light the same space, but they consume relatively low power and generate very little heat.
Figure 6.34. The larger the set, the more diffuse white lights you’ll see in the grid, to eliminate hotspots in the background.

• Maintain space, along with separate lighting setups, between the foreground and background. Ten feet as a minimum is a good rule of thumb.
• Avoid unintentional shadows, but by all means light for shadows if you can get them and the floor is clean. Note that this works only when the final shot also has a flat floor. Fill lights typically mess up floor shadows by creating extras.
• Where possible, avoid having talent sit, kneel, or lie down directly on the floor or any other keyable surface; not only does an astonishing wash of shadow and reflection result, but there is no realistic interaction with the surface, which is especially noticeable if they are to end up on carpet, grass, or the beach. If possible, use real sets and furniture in these cases.
• Here’s a novel idea: Shoot exteriors outside where possible, forgoing the set and controlled lighting environment for chromatic tarps and the sun, which is a hard lighting source to fake.
• Record as close to uncompressed as possible. Even “prosumer” HD cameras such as the Sony EX-3 often have an HDMI port that outputs live, uncompressed signal; pair this with a workstation or laptop containing a video capture card and high-speed storage and you can get 4:2:2 or better practically for free.
• Shoot clean plate: a few frames of the set only, particularly on a locked-off shot and each time a new setup occurs.
Close-up: The Right Color?
![]()
The digital age lets shooters play fast and loose with what they consider a keyable background. You will likely be asked (or attempt) to pull mattes from a blue sky, from a blue swimming pool (like I did for Pirates of the Caribbean), or from other monochrome backgrounds. However, you’re probably asking for trouble if you paint your blue or green background with a can of paint from the hardware store; they’re generally designed to be more neutral—grayer and less saturated. Rosco and Composite Components designs paints specifically for the purpose of color keying, and those are the ones to go with if when painting a set.
How different must the background color be from the foreground? The answer is, not as much as you probably think. I have had little trouble keying a girl in a light blue dress or a soldier in a dress blue uniform. This is where it can be hugely helpful to have any type of capture device on set—even a point-and-shoot camera—to pull a test matte.
In this day and age of quick camera to laptop transfer, it’s great to have the means on the set to pull test comps; they not only help ensure that the result will key properly, they give the Director of Photography (DP) and talent a better idea of where they are, and where they can lead to more motivated light from the DP and more motivated action from the talent, who otherwise must work in a void.
Notes
![]()
Shoot a lot of reference of the set, including anything and everything you can think of. If you plan to recreate the lighting, it’s also a great idea to take HDR images using bracketed exposures—the same image shot at various f-stops. Photoshop includes the File > Automate > Merge to HDR function to combine these into a 32 bpc linear light image.
Conclusion
Not even mentioned in this chapter is Red Giant’s Primatte Keyer, most certainly my favorite Keylight alternative. Particularly for cases where the matte is uneven or of a non-standard color, Primatte (demo on the disc) is worth a look.
The next chapter offers hands-on advice for situations where procedural matte generation must be abandoned in favor of hand matte generation, also known as rotoscoping. There are also situations where rotoscope techniques, and in particular the Roto Brush tool, can be used to augment a difficult key.