


Usage patterns for isolating applications
Isolation is a key feature of cloud computing. Through it, applications that are deployed into the cloud environment can run independently from each other. This configuration separates application traffic through the network and prevents the cross application impact that is caused by resource contention.
IBM PureApplication Systems provide several functions to implement application and virtual systems isolation.
The following topics are covered in this chapter:
3.1 Cloud computing overview
An application development lifecycle normally requires separate runtime environments for development, testing, and production. These environments often are isolated from one another so that activities in each environment do not interfere with each other. There can be further requirements within companies to isolate critical applications or applications from different departments and lines of businesses.
IBM PureApplication System supports the deployment of applications (known as pattern instances) into runtime environments. Such runtime environments consist of cloud groups and environment profiles. These cloud groups and environment profiles give IBM PureApplication System the means to create separations or the necessary levels of isolation that are required for applications in different environments or lines of businesses.
To determine the best ways to setup cloud groups and environment profiles, you must first understand their concepts in cloud computing. It also requires an understanding of how they play a key role in hardware resources virtualization and how these features are used in IBM PureApplication System. Finally, you must also understand the best strategies for making the best use of these features.
3.1.1 Cloud computing concepts
Cloud computing provides shared computing resources to application workloads in a controlled way, thus allowing these workloads to successfully run in parallel. There are three types of computing resources: computational (CPU and memory), storage, and networking. Cloud computing enables workloads to share all three.
The following main definitions in cloud computing handle workload and provide resources to applications:
•Resource isolation
Prevents problems within applications that are deployed into the cloud environment from impacting other applications in the cloud with issues of resource contention. This prevention is done by creating virtual barriers between cloud resources, which allows them to operate independently. Therefore, problems in one isolated application that is deployed into the cloud does not affect other isolated systems.
The following main isolation aspects are available:
– Computational isolation
Groups of CPU and memory capacity are separated from each other. This type of isolation can be physical or virtual and include the following aspects:
• Physical computational isolation provides dedicated hardware resources.
• Virtual computational isolation, or virtualized resources, creates groups of separate resources that might actually share hardware.
– Network isolation
Communication flows between computational resources by separate connections. The isolation can be physical or logical and include the following aspects:
• Physical network isolation provides the resources to allow data to travel in parallel sets of network equipment, such as switches.
• Logical network isolation shares network equipment and bandwidth, but the data is routed separately by a different virtual local area network (VLAN).
•Resource sharing
Common pools of resources, such as IP addresses, CPU, and memory are made available to systems that are deployed in the cloud. Each workload can acquire a different amount of resources, depending on its requirements. Resource sharing is dynamic; workloads acquire shared resources dynamically. However, it requires care and attention because sharing resources can trigger workloads to use excessive resources from any pool, which starves the other workloads in the cloud environment.
•Resource allocation
Resource allocation, or logical isolation, enables resource sharing, but requires setting boundaries on a workload by putting lower and upper limits on resource sharing. Allocation balances isolation and sharing, which ensures that a workload gets at least the minimum resources it must run properly. Moreover, it prohibits workloads from using excessive amounts of a pooled resource. You can set allocation limits on any shared resource, such as CPU, memory, storage, bandwidth, and even software licenses.
3.1.2 IBM PureApplication System features for cloud computing
IBM PureApplication System provides the following features that allow the product capacity to provide resource sharing and isolation of workloads:
•Compute nodes
Compute nodes contain components such as microprocessors, memory, network adapters, and storage adapters.
•IP groups
IP Groups are logical groupings of one or more IP addresses and networking information, such as DNS, subnet, VLAN.
IP Groups, and by association its IP addresses, are assigned to cloud groups. Cloud groups can be contained by more than one IP group.
A virtual machine (VM) that is deployed into the IBM PureApplication System infrastructure is assigned its IP address. The addresses are assigned from the available pool of addresses that are defined in the IP group that is associated with the cloud group that is used by the VM.
•Cloud groups
A cloud group is a logical grouping of computing resources (compute nodes) to target your deployments in IBM PureApplication System. It requires one or more compute nodes and one or more IP groups. A pattern is deployed to a cloud group (by using an environment profile). The pattern instance is composed of VMs.
|
Important: Compute nodes cannot be shared across multiple cloud groups.
|
To deploy virtual machines into the IBM PureApplication System environment, you must associate these VMs to cloud groups.
Virtual machines are deployed on the compute nodes that are part of the chosen cloud group.
•Environment profile
Environment profiles are policies for deploying patterns into cloud groups. They group related deployment configurations, such as virtual machine names, IP address assignment, and cloud groups. Environment profiles also associate users and user groups with cloud groups. These profiles specify the cloud groups to which each user or user groups can deploy patterns. Finally, Environment profiles create the logical isolation of resources by allocating these resources.
•User group
A list of users in the same role. By using environment profiles, IBM PureApplication System associates one or more user groups with cloud groups, which give permission to users in the chosen user groups to deploy patterns into specific cloud groups.
Finally, you also can create and attach more storage volumes to deployed VMs.
Figure 3-1 shows the relationship between the multiple cloud resources within IBM PureApplication System.
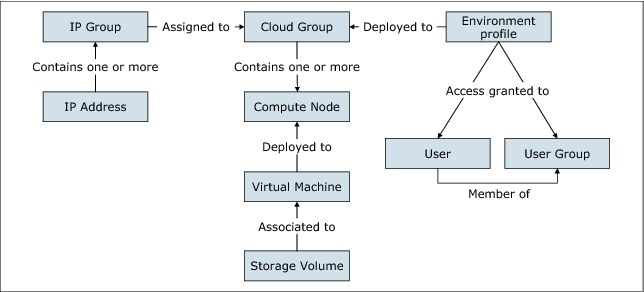
Figure 3-1 Relationship of PureApplication System resources
The focus of the next topics in this chapter is on how to manage and administer the cloud functions that are provided by IBM PureApplication System. This chapter also describes how to use the cloud management functions, and create isolation between environments, lines of businesses, and applications.
3.2 Managing compute nodes
A compute node is a computer that contains microprocessors, memory, Ethernet controllers, and hard disk drives (HDD). As such, each compute node runs exactly one hypervisor.
Each IBM PureApplication System model W1500 compute node consists of the following components:
•Intel CPUs that contain 16 physical (32 logical) cores
•256 GB of RAM memory
Additionally, the compute nodes have access (as SAN) to two IBM Storwize® V7000 storage units with 6.4-TB solid-state drive (SSD) and 48-TB HDD that comes in the PureApplication System rack. The rack also includes two BLADE Network Technologies 64-port Ethernet switches that are used for internal networking and connectivity to the enterprise's network.
For more information, see 1.3, “IBM PureApplication System overview” on page 14.
When a pattern is deployed into a cloud group, IBM PureApplication System ensures that the required amount of RAM memory and CPU resources are available for each virtual machine in that pattern.
Finally, the following states and actions can be taken against a compute node in IBM PureApplication System:
•Power on
Power on the compute node.
•Power off
Power off the compute node.
•Start
Start the compute node to accept workloads.
•Quiesce
No new load is given to this compute node.
•Existing Node continues to run
Locks the workload that is running on this node.
•Maintain:
– Readies compute node for maintenance.
– Moves existing VMs to other compute nodes (in the same cloud group) based on priorities. Also warns users if there is not enough capacity on other nodes to move the VM.
•Report
View the compute node usage report.
In the next sections of this book, we describe how to run some of the possible actions on the compute node.
3.2.1 Starting compute nodes
To start a compute node, you must be assigned the hardware administration role with permission to manage hardware resources (full permission). Complete the following steps to use the system console pane to start a compute node:
1. Access the console pane.
2. Click System Console → Hardware → Compute Nodes.
3. Select the compute node that you want to start.
4. Click the Start icon on the toolbar.
3.2.2 Suspending compute nodes
To suspend a compute node, you must be assigned the hardware administration role with permission to manage hardware resources (full permission). Use the system console pane to put a compute node into quiesce state. When set to this state, the compute node is suspended and cannot accept system deployments.
Complete the following steps to put a compute node into quiesce state:
1. Access the console pane.
2. Click System Console → Hardware → Compute Nodes.
3. Select the compute node that you want to suspend.
4. Click the Quiesce icon on the toolbar.
3.2.3 Putting compute nodes in maintenance mode
To place a compute node in maintenance mode, you must be assigned the hardware administration role with permission to manage hardware resources (full permission). Use the system console pane to put a compute node into maintenance mode. However, before a compute node is put into maintenance mode, you must first suspend the compute node by putting it into a quiesce state.
Complete the following steps to put a compute node into maintenance mode:
1. Access the console pane.
2. Click System Console → Hardware → Compute Nodes.
3. Select the compute node and click the Maintain icon on the toolbar.
3.2.4 Viewing compute node reports
To view compute node reports, you must be assigned the hardware administration role with permission to view all hardware resources (read-only). Through the IBM PureApplication System console, you can access, view, and print reports for each compute node.
Complete the following steps to view compute node reports:
1. Access the console pane.
2. Click System Console → Hardware → Compute Nodes.
3. Select the compute node for which you want to run a report.
4. Click the Report icon on the toolbar.
Figure 3-2 shows how to access a compute node report.
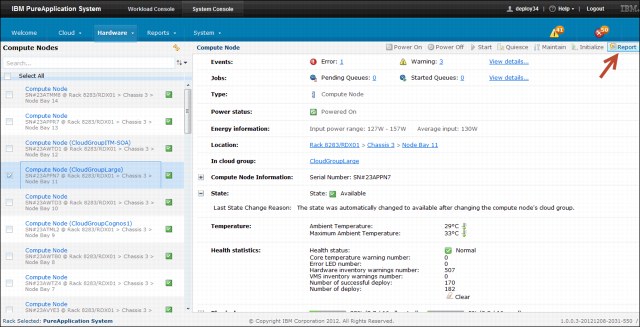
Figure 3-2 Accessing a compute node report
You also can access this information by browsing to the reports. Click Reports → Machine Activity and select Allocation by Compute Node.
Figure 3-3 shows an example of a compute node report.
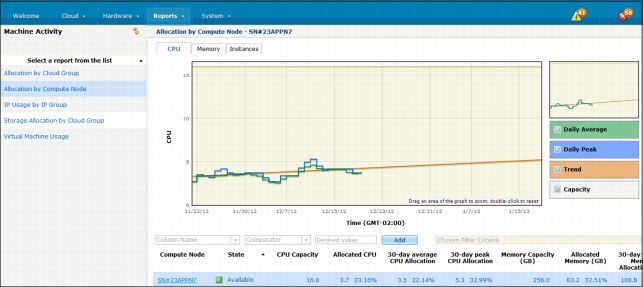
Figure 3-3 Compute node report view
For more information about compute node report options, see the IBM PureApplication Systems Information Center at this website:
3.3 Managing IP groups
When IBM PureApplication System needs an IP address, it obtains the address from an IP group. An IP group is a collection of IP addresses that it assigns to virtual machines as it deploys them. An IP address can belong to only one group. It also has settings for the ID of the VLAN they belong to, and settings for how to connect to the external network the VLAN is part of.
IP groups perform the following functions:
•Dynamic IP addresses sharing
An IP group forms a shared pool of IP addresses that are used when pattern instances are deployed.
•IP address pool isolation
IP groups enable system administrators to partition subnets. Therefore, blocks of IP addresses from a subnet can be assigned to a hypervisor, department, or other entity. This configuration helps ensure that each team, environment, or line of business has independent IP pools; therefore, they do not affect other areas.
•Logical network isolation
The VLAN ID that is specified for each IP group enables the group's pattern instances to communicate on isolated logical networks. This ability is helpful to isolate the network traffic of unrelated applications, such as development and production.
To create an IP group, you must provide the following information:
•A network address, a netmask, gateway, and DNS information.
•A pool of IP addresses within the subnet that are available to the PureApplication System.
•The ID of the VLAN that is used to connect to the external network.
By default, PureApplication System uses all available IP addresses from the IP group. When a pattern instance is deployed, a VM is deployed for each part and each VM needs a unique address. When the instance is deleted, so is each of its VMs, and each address is added back to the pool. So, to determine how many IP addresses you need, you must consider how many parts there are in your patterns and how many instances you want to deploy.
|
Important: If you do not enter any IP addresses in an IP group, you cannot deploy patterns to hypervisors by using that IP group. Messages alert you to possible errors.
|
3.3.1 Adding IP groups
IP groups cannot be randomly created. To create an IP group and apply valid network configurations in it, you must obtain these network settings from a network administrator. The administrator must make sure that the settings are valid for the current network configuration.
To create IP groups in IBM PureApplication System, the cloud group administration role is required. Access the administration console and complete the following steps:
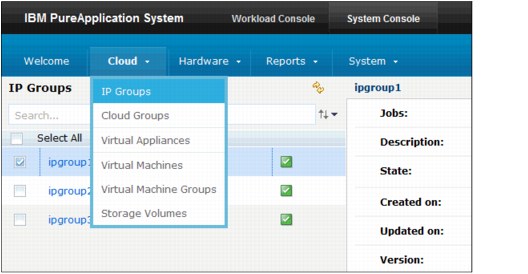
Figure 3-4 Accessing IP Groups configuration
2. Click the New icon in the toolbar.
3. Complete the following fields in the window to describe the IP group that you want to add:
– Name
Enter a unique IP group name to represent and identify the IP group.
– Version
Select IPv4 or IPv6 from the list to specify the version.
– Network address
Enter a valid network address. This address is associated with the IP group.
|
Important: Workloads that require IP caching must be deployed to cloud groups with IPv4 IP groups only.
|
– Netmask
Enter a value for the netmask. This network mask is associated with the network address of the IP group.
|
Important: This field applies only to IPv4.
|
– Gateway
Enter a gateway name. This default gateway is associated with the IP group.
– Primary DNS
Provide the primary Domain Name System (DNS) value for the IP group. This DNS server is used for the IP group.
– Secondary DNS
You can add an optional secondary DNS value for the IP group.
– VLAN
Specifies the virtual local area network.
– In cloud group
Specifies the cloud group for which you want to add this IP group.
The system includes three default cloud groups. You can select one of these cloud groups, or you can create your own. For more information about creating a cloud group, see 3.4.1, “Adding cloud groups” on page 75.
– Click OK.
Figure 3-5 shows the initial panel for creating an IP group.
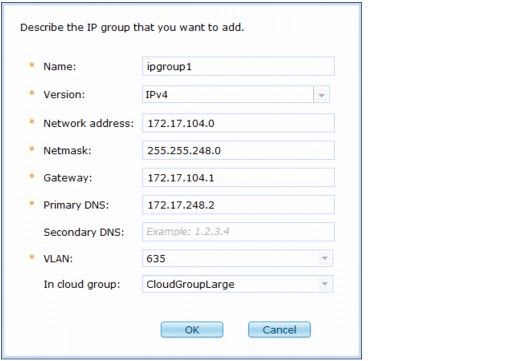
Figure 3-5 Creating an IP group
After the IP group is created, complete the following configurations:
1. In the IP addresses section, complete the following steps to add the range of IP addresses:
a. Select IP Range in the Add by menu.
This selection determines how your IP addresses are listed when they are added.
b. Enter the starting IP address in the start ip field.
c. Enter the ending IP address in the end ip field.
d. Use the two entry fields to specify the first and last IP addresses in the range of IP addresses to include in the IP group.
e. Click Add.
Figure 3-6 shows the configuration of a created IP group.
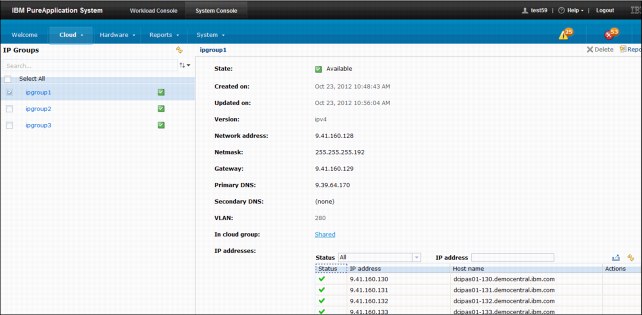
Figure 3-6 IP group configuration
3.3.2 Administering IP groups
IP addresses are only accessible to the system when they are included in IP groups. Edit an IP group to add the pools of IP addresses within the IP group that are available to the deployment process. These addresses are assigned to virtual machines as they are deployed.
To administer IP groups and IP addresses, the cloud group administration role is required. Use the IBM PureApplication System console to complete the following steps:
1. Access the console pane.
2. Click System Console → Cloud → IP Groups.
3. Select the IP group that you want to edit.
4. Click the value that is adjacent to each entry.
Settings that can be changed display either edit or remove links, or are underlined with a dashed line.
3.3.3 Viewing IP group reports
To view IP Group reports, you must be assigned the cloud group administration role with permission to View all cloud groups (read-only). Complete the following steps to use the console to view and print reports for IP groups:
1. Access the console pane and click System Console → Reports → Machine Activity.
2. Select the IP group for which you want to view reports.
3. Click the Report icon on the toolbar.
You also can access this view from the system console by selecting Reports → Machine Activity, choosing the IP Usage by IP Group report.
Figure 3-7 shows an example of an IP Group report.
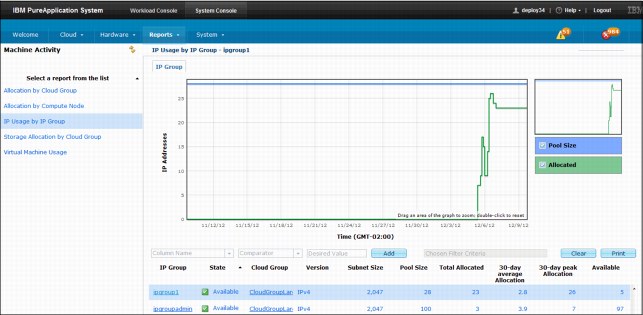
Figure 3-7 Sample of an IP group report
The report provides the following graphics:
•Pool Size
•Allocated
Optionally, you can customize these reports by choosing the individual data sets that can be displayed on each graphic:
•Daily average
•Daily peak
•Trend
•Capacity
A data table also is shown in the report. By clicking the column headers, you can sort the data in the chosen column. From the table, by right-clicking any of the table column headings you can add or remove data from the table. The following column headers are available:
•IP Group
•State
•Cloud Group
•Version
•Subnet Size
•Pool Size
•Total Allocated
•30-day average Allocation
•30-day peak Allocation
•Available
For more information about IP group monitoring, see the IBM PureApplication System Information Center website at this website:
3.3.4 Deleting IP groups and addresses
To delete IP addresses from IP groups or delete the entire IP group, the cloud group administration role with permission to manage all cloud groups (full permission) is required. When an IP group is deleted, the pool of IP addresses within the IP group also is removed from the system.
Therefore, you should proceed with caution when you consider removing an IP group because it should not be deleted while it is assigned to any virtual machines. Rather, delete only when the IP groups addresses are all unassigned.
When an IP group is chosen for removal, you must also delete the pattern instance whose virtual machines are using those IP addresses. Also, make sure that you delete the wanted IP group before any of those addresses are assigned to another virtual machine.
Complete the following steps to use the console to delete IP addresses from an IP group or delete the IP group:
1. Access the console pane.
2. Click System Console → Cloud → IP Groups.
3. Complete the following steps to delete an IP address:
a. Select the IP group that you want to edit.
b. Locate the IP address that you want to delete from the IP group.
c. Click the [remove] link that is next to the IP address.
4. Complete the following steps to delete an IP group:
a. Select the IP group that you want to delete.
b. Click the Delete icon in the row.
Figure 3-8 shows the process of deleting an IP group.
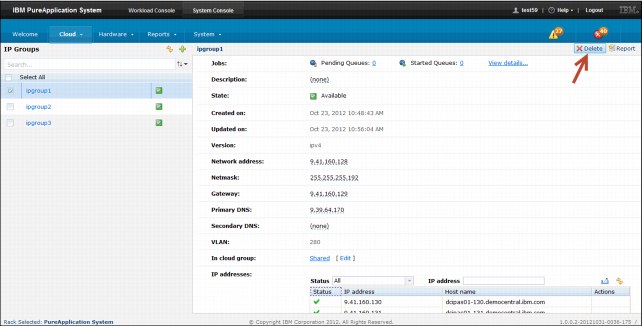
Figure 3-8 Deleting an IP Group
3.4 Managing cloud groups
A cloud group aggregates compute nodes with at least one IP group into a logical computer.
Each cloud group has their own computer equipment (compute nodes), which isolate runtime environments. This configuration ensures that processes that are running in one group are not affected by processes that are running in another group.
Each running virtual machine is run in a compute node that is a member of a cloud group. Each VM uses an IP address from the IP groups that are assigned to the cloud group.
Ultimately, a cloud group is used as the deployment target when patterns are deployed to create workloads, such as virtual systems or virtual application patterns.
To manage cloud groups in IBM PureApplication System, you must be assigned the Cloud group administration role with permission to manage all cloud groups (full permission).
3.4.1 Adding cloud groups
To create a cloud group, you need at least one assigned compute node (one that is not assigned to any pre-existing cloud group). In the IBM PureApplication System administration console pane, complete the following steps to create a cloud group:
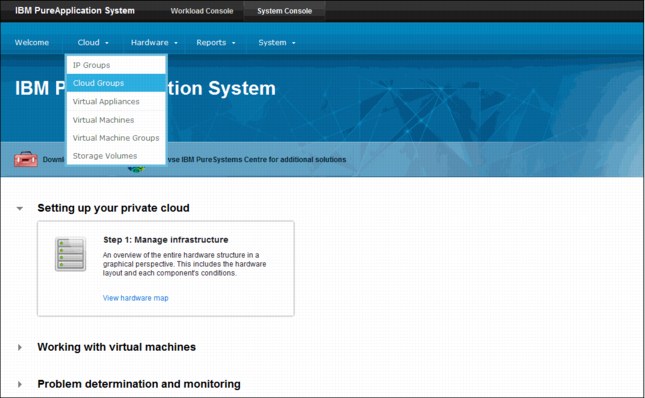
Figure 3-9 Accessing the cloud groups configuration from the system console
2. Click the New icon on the toolbar.
3. Define the cloud group by providing the following information:
– Name
The cloud group name. Each cloud group must have a unique name.
Example: DEV, TEST, or PROD.
– Description
Detailed description of the cloud group.
– Type
Defines how resources, specifically CPUs, are allocated to virtual machines (VMs) during pattern deployment. Select one of the following types:
• Dedicated
Best suited for applications with high loads. Allocates the 16 cores on an Intel compute node as 16 CPUs.
• Average
Best suited for applications with low loads. Each of the 16 cores on an Intel compute node are allocated as 4 CPUs, which results in 64 logical CPUs.
– Management VLAN ID
An integer value 1 - 4094. The specified integer value cannot be in use in your data center. The VLANs that already are in use are listed in this field.
4. Click OK.
Figure 3-10 shows an example of creating a cloud group.
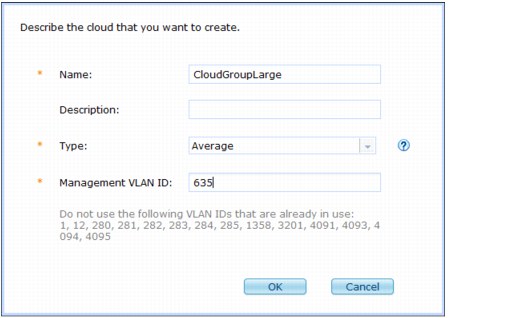
Figure 3-10 Creating a cloud group
The cloud group that is created cannot be started yet. To make it usable, you must add at least one compute node and one IP group. Then, it can be started and patterns can be deployed to it.
3.4.2 Administering cloud groups
To edit an existing cloud group in the IBM PureApplication System, you must be assigned the cloud group administration role with permission to manage all cloud groups (full permission). Complete the following steps to administer a cloud group:
1. Access the console pane.
2. Click System Console → Cloud → Cloud Groups
3. Select a cloud group to edit, as seen in Figure 3-11.
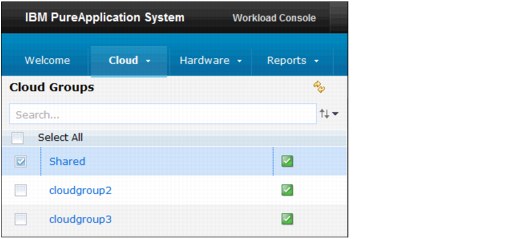
Figure 3-11 Select the Cloud Group to be edited
4. You can update the following cloud group settings:
– Description
– Type
– Cloud group policy
Specifies that the availability policy is enabled.
– High Availability
Specifies whether high availability is active.
– Management VLAN ID
– Access granted to:
• Select user IDs from the Add more menu.
• To remove a user, click remove.
– IP groups:
• To add an IP group to the cloud group, click Add more in the menu and select an IP group to add.
• To remove an IP group, click remove in the Action column.
• Click the IP group to review the IP group details in the IP Groups pane.
– Compute nodes:
• Click Add more to select a compute node to add.
• To delete a compute node, click the Delete icon in the Action column.
– Volume configurations:
• To create a volume for the chosen cloud group, click Create a new configuration.
Enter the new volume configuration, defining the name, description, and size in megabytes.
• Click OK.
– Hardware information
Specifies the usage and allocation of CPU resources and physical memory.
– Hosts
Specifies the memory and CPU usage by host name.
3.4.3 Deleting cloud groups
To remove a cloud group, no virtual machines can be a part of it. If there are virtual machines in the cloud, you cannot delete the cloud group (even if the VMs are not running).
To remove a Cloud group, use the IBM PureApplication System console. You must have the cloud group administration role with permission to manage all cloud groups (full permission). To remove a Clould group, complete the following steps:
1. Click System Console → Cloud → Cloud Groups.
2. Select the cloud group that you want to delete.
Ensure that there are no virtual machines in the cloud. Otherwise, you must first stop the VMs and remove them before you can delete the cloud group.
To see whether there are VMs in this cloud group, expand the virtualization statistics in the cloud group details.
3. Click the Delete icon on the toolbar.
4. Click OK to confirm that you want to delete the cloud group.
Figure 3-12 shows an example of how to delete a cloud group.
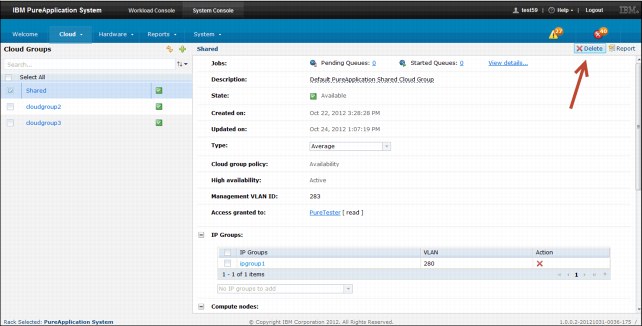
Figure 3-12 Deleting a cloud group
3.4.4 Viewing cloud group reports
The following procedures can be used to generate and view cloud group reports:
•Procedure 1:
a. Click System Console → Reports → Machine Activity.
b. Click Allocation by Cloud Group and the reports are shown in the right pane.
•Procedure 2:
a. Click System Console → Cloud → Cloud Groups.
b. Select the target cloud group from the list of available cloud groups.
c. Click the Report icon in the upper right pane to generate the Allocation by Cloud Group report.
Figure 3-13 shows an example of a cloud group report.
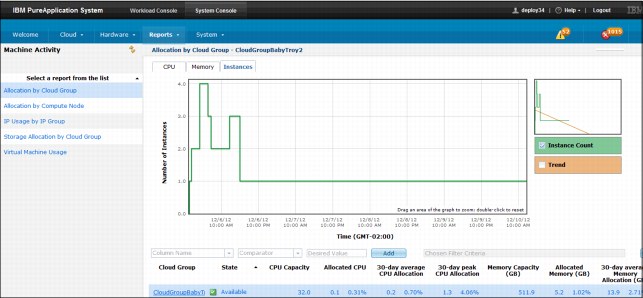
Figure 3-13 Sample of an Allocation by Cloud Group report
Customizing the report
The report provides three different graphics, which can be changed by clicking one of the following tabs that is provided in the console:
•CPU
•Memory
•Instances
Each graphic provides the following data sets:
•Daily average
•Daily peak
•Trend
•Capacity
•Instance count (Instances graph only)
The graphics are accompanied by a table with reference values. By clicking the column headers in the table, you sort the data that is shown in the graphic by the chosen column. You also can right-click any of the table column headings to add or remove a column heading from the table.
The following columns can be added or removed from the Column Name menu:
•Cloud Group
•State
•CPU Capacity
•Allocated CPU
•30-day average CPU Allocation
•30-day peak CPU Allocation
•Memory Capacity (GB)
•Allocated Memory (GB)
•30-day average Memory Allocation (GB)
•30-day peak Memory Allocation (GB)
•Instances
For more information about cloud group monitoring, see the IBM PureApplication System Information Center at this website:
3.4.5 Managing storage volumes in cloud groups
A storage volume is created through the IBM PureApplication System console to provide more storage for a virtual machine. Storage volumes are objects that exist outside of the virtual machine, though they are attached to the virtual machines. Therefore, its management is dissociated from the virtual machine administration.
Deleting a virtual machine does not automatically delete the storage volumes that are attached to that machine. The management, creation, and removal of storage volumes are self-contained administrative tasks that must be explicitly completed to achieve the result.
Adding a storage volume
A storage volume is created through the console and attached to a virtual machine for more storage. This process might be required when enterprise applications that are running on IBM WebSphere Application Server or IBM DB2 require more storage. It also might be required when you want to install packages and the operating system does not have enough space.
You must have the cloud group administration role with permission to manage all cloud groups (full permission) to create storage volumes.
Complete the following steps to add a storage volume:
1. Access the console pane and click System Console → Cloud → Storage Volumes.
2. Click the New icon on the toolbar.
3. Enter a name in the Name field.
4. Select a cloud group in the In cloud group field.
5. In the Volume configuration field, select one of the following options:
a. Existing settings to use the existing size settings.
b. Custom settings to create your own size settings for the storage volume.
|
Important: The largest volume allocation that you can set for a virtual machine is a 1.8-TB raw disk.
|
6. Click OK.
Figure 3-14 shows the process of creating a storage volume.

Figure 3-14 Creating a storage volume
A storage volume is now added to the cloud group.
Adding a storage volume to a virtual machine
After you add a storage volume to a cloud group, you can then add this volume to virtual machines.
To add this volume to virtual machines, complete the following steps from the System console:
1. Access the console pane and click System Console → Cloud → Virtual Machines.
2. Select a virtual machine from the list of available virtual machines.
3. Under the Storage Volume section in the Virtual Machine configuration panel, click the drop-down menu to select a volume, as shown in Figure 3-15.
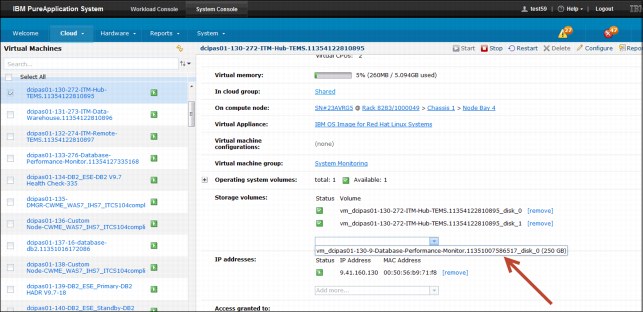
Figure 3-15 Adding more storage volumes to virtual machines
Administering a storage volume
By using the system console, you can manage existing storage volumes in the system. You must have the cloud group administration role with permission to manage all cloud groups (full permission).
Complete the following steps to manage storage volumes:
1. From the console pane, click System Console → Cloud → Storage Volumes.
2. Modify the following configurations as necessary:
– Description
– Storage Controller
Deleting a storage volume
Although they are associated with virtual machines, storage volumes are first-level objects that exist outside of virtual machines. Therefore, they must be explicitly deleted because deleting a virtual machine does not automatically delete the storage volumes that are associated with the virtual machine.
A storage volume can be removed by using the system console by an administrator that is assigned the cloud group administration role with permission to manage all cloud groups (full permission).
Complete the following steps to remove a storage volume:
1. Click System Console → Cloud → Storage Volumes.
2. Select the storage volume that you want to delete.
3. Click the Delete icon on the toolbar.
4. Click Delete to confirm that you want to delete the storage volume.
The storage volume configuration panel provides the information about the virtual machine that is using the target storage that is being deleted, as shown in Figure 3-16.
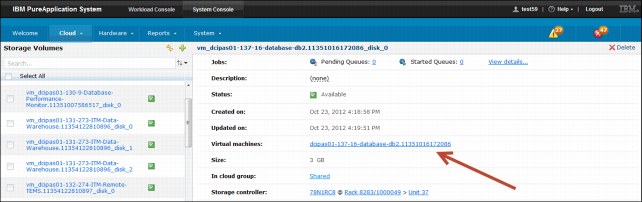
Figure 3-16 Virtual machine that is using the chosen storage volume
3.4.6 Managing virtual machines in cloud groups
You can manage virtual machines in a cloud group two ways: by having the cloud group administration role, with permission to manage all cloud groups (full permission) or by having permission for workloads that you deployed to a pattern instance. You can manage the virtual machines that are associated with the pattern instance because this permission is part of the access control list (ACL) for the pattern instance. The deployer is automatically added to the ACL.
From the virtual machines section in the IBM PureApplication System console, you can view the details of the virtual machines in the group. You can view information, including status, virtual memory usage, and virtual CPU usage.
This section describes the following processes that can be run against virtual machines in the system:
•Starting a virtual machine:
a. From the console pane, click System Console → Cloud → Virtual Machines.
b. Select the virtual machine that you want to start.
c. Click the Start icon on the toolbar.
•Stopping a virtual machine:
a. From the console pane, click System Console → Cloud → Virtual Machines.
b. Select the virtual machine that you want to stop.
c. Click the Stop icon on the toolbar.
d. Click OK to confirm that you want to stop the virtual machine.
•Deleting a virtual machine:
To delete a virtual machine, the target virtual machine must be stopped already; otherwise, the delete icon is disabled.
a. From the console pane, click System Console → Cloud → Virtual Machines.
b. Select the virtual machine that you want to remove.
c. Click the Delete icon on the toolbar.
d. Click OK to confirm that you want to delete the virtual machine.
Figure 3-17 shows a sample of the management options for a virtual machine.
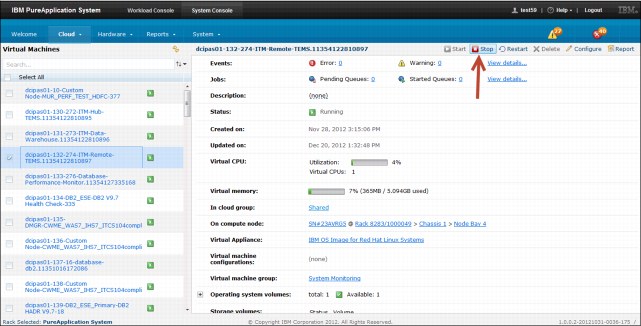
Figure 3-17 Managing virtual machines in a cloud group
•Viewing virtual machine reports:
a. From the console pane, click System Console → Cloud → Virtual Machines.
b. Select the virtual machine for which you want to review reports.
c. Click the Report icon on the toolbar.
d. From the Machine Activity pane, select the Virtual Machine report.
e. Data in the monitoring graphics can be filtered by using the following options:
• CPU usage, such as average CPU usage.
• Memory usage, in megabytes (MB), including daily average memory allocation.
f. Column headers in the monitoring reports provide information about the following specifics:
• Virtual Machine
• State
• Application
• Allocated CPU
• CPU in use
• 30-day average CPU Utilization
• Allocated Memory (GB)
• Allocated Disk (GB)
• Memory in use (GB)
• 30-day average Memory Utilization (GB)
• Allocated Disk
Figure 3-18 shows a sample report for a virtual machine.
Figure 3-18 Virtual machine report
•Configuring virtual machine memory and CPU
Each virtual machine, in deployed patterns, include resource requirements settings. The following settings specify the resources that the VM requires to run properly:
– CPU count: This count is the number of virtual CPUs assigned to this VM.
– Virtual memory (MB): This value is the amount of virtual memory that is assigned to that VM.
The accounting for the CPU count depends on the type setting of the cloud group in which the VM runs. For example, if the VM requires four virtual CPUs, the following actions occur:
– A dedicated cloud group assigns the VM four physical CPUs.
– An average cloud group assigns the VM one physical CPU.
The numbers for these resource requirement settings should be higher for a VM that is expected to support a significant user load. If a VM's numbers are lower and it experiences high user load, this VM's users experience degraded performance (assuming the pattern instance does not load balance to other VMs). The degraded performance is related to not having enough resources to serve all of the requests with the customary response times.
Complete the following steps to configure CPU count and virtual memory settings:
1. From the console pane, click System Console → Cloud → Virtual Machines.
2. Select the virtual machine that you want to edit.
3. Click the Configure icon on the toolbar.
4. Complete the following fields:
– CPU count: Number of virtual CPUs assigned to this virtual machine.
– Virtual memory (MB): Memory currently being used by the virtual machine.
5. Click OK.
Figure 3-19 shows the configuration pane for a virtual machine CPU and memory.
Figure 3-19 Configuring CPU and memory for a virtual machine
For more information about virtual machines management in IBM PureApplication System, see the Information Center at this website:
3.5 Managing shared services
Shared services provide virtual application patterns that can be deployed and shared by multiple virtual applications, virtual systems, and virtual appliances in the cloud.
Shared services provide the following features:
•A plug-in design service that provides full lifecycle management capabilities in the same way as a virtual application.
•Specific runtime services to multiple applications, or services to users on behalf of multiple applications.
•A simplified consumer (users or application deployments) and provider (implementation and Shared Service deployment) model.
•Viewed as a multi-tenant service.
Shared services are used in the following ways:
•Directly exposed by a resource in the Virtual Application Modeler (routing policy).
•Indirectly exposed though a setting that implies the usage of a shared service (HTTP session caching inside scaling policy).
•Injected though transformation process (injecting the logging service client).
Only one instance of a type of shared service can be deployed in a cloud group, which is a physical group of hardware that defines a cloud. This shared service can be used by all application deployments in the cloud group.
To view and manage shared services, you must be assigned the workload resources administration with full permissions or the cloud administrator role. With the correct access permissions, you can use the IBM PureApplication System administration console to manage shared services, such as caching, monitoring, and the elastic load balancing (ELB) proxy.
Section 4.6.5, “Shared services” on page 172 shows practical examples of shared services patterns deployment.
3.5.1 Existing shared services
IBM PureApplication System provides the following existing shared services that can be used with virtual application patterns in each cloud group:
•System Monitoring service
The System Monitoring service provides the required resources (monitoring agents) to collect data that is related to performance and availability. The information that is provided by this feature is useful for system troubleshooting and making business decisions about your hardware and service usage.
The System Monitoring service provides the following monitoring services:
– Hub monitoring server
– Remote monitoring server
– IBM PureApplication System Monitoring Portal
– Monitoring Agent for IBM PureApplication System
– Automated load balancing to avoid overloading a remote monitoring server
•Caching service
The caching service is a shared service that allows virtual deployments in the cloud to store, share, and access caching information among components. The caching service also provides auto-scale capabilities so that new component instances can be created or destroyed without retransmitting information.
The caching service is based on WebSphere eXtreme Scale code and provides highly efficient caching. The caching service is self-managed and highly available, which provides simple and quick usage.
When the caching service is managed, you can perform operations that are related to grid caching. Grid caching maintains data that can be accessed from multiple clients, which minimizes network latency and reduces bandwidth.
•Elastic load balancing (ELB) proxy service
The elastic load balancer proxy service is a shared service that provides routing and load balancing to multiple deployed web applications. It provides a front end to virtual applications in the cloud by balancing the load across the instances of virtual applications. The service is shared by virtual applications that are deployed to the same cloud group.
When the ELB service is deployed and running in a cloud group, all new deployments of virtual applications are automatically configured to use the ELB service.
•Database Performance Monitor service
The database performance monitor service provides information about the health and availability of databases that are deployed in the PureApplication System. This information provides early warning of degraded database performance.
The database performance monitor also provides drill-down capability to determine the root cause of performance problems.
3.5.2 Deploying the System Monitoring service
After the System Monitoring service is deployed, it uses three virtual machines that are created to host the monitoring infrastructure for IBM PureApplication System.
The following functions are deployed to facilitate the collection of performance and availability information by monitoring agents:
•Hub monitoring server
•Remote monitoring server
•PureApplication System Agent
•Tivoli Data Warehouse
To deploy the System Monitoring service in IBM PureApplication System, you must be assigned the following roles:
•Allow delegation when full permission is selected.
•Workload resources administration role with permission to manage workload resources (full permission).
•Cloud group administration role with permission to view all cloud groups (read-only).
•Hardware administration role with permission to view all hardware resources (read-only).
•Security administration role with permission to view users/groups (read-only).
Complete the following steps to deploy the System Monitoring service:
1. At the IBM PureApplication System main menu, click Workload Console.
2. Click Cloud → Shared Services.
3. Click System Monitoring under Monitoring Services.
4. Click Deploy (in the upper right of the pane).
The Configure and deploy a shared service pane is displayed.
5. Complete the following fields:
– Password for the user ID sysadmin: The initial user ID for logging on to IBM PureApplication System Monitoring Portal.
– Password for the user ID itmuser: The itmuser ID is a user ID for collecting historical data.
– Password for the user ID db2inst1: This user is a user ID for creating and maintaining the Tivoli Data Warehouse database.
– Shared Service Sizing
Set the expected size of the System Monitoring service, which is based on the number of monitoring agents that you plan to connect to the monitoring servers in the System Monitoring service. You have the following options:
• Large (up to 5,000 agents)
• Medium (up to 2,000 agents)
• Small (up to 500 agents)
• Tiny (up to 200 agents)
6. Click OK.
Figure 3-20 on page 90 shows the configuration form for the System Monitoring shared service.
Figure 3-20 Configuring the System Monitoring shared service
7. In the Deploy Virtual Application pane, complete the following steps:
a. Select the cloud group to which you deploy the virtual application from the Cloud group drop-down list.
b. Select the profile that you want to use from the Profile drop-down list.
c. Click Generate to generate an SSH Key.
d. Click Download to save the key to your local system.
e. Click OK.
3.5.3 Using an external caching service
A common caching service scenario is deployed virtual machines that become a caching service and are automatically used by the virtual applications. Another approach is to set up a caching service for the cloud environment that is external. A WebSphere DataPower® XC10 Appliance is set up outside the cloud environment and provides caching services. The virtual applications are connected to the external caching service. This approach saves cloud resources and the XC10 Appliance provides a larger space than the internal caching service.
Complete the following steps to set up an XC10 Appliance to cache your cloud environment:
1. Open the console.
2. In the Workload Console, click Cloud → Shared Services.
3. Select Caching Service (External).
4. Click Deploy in the upper right corner.
5. Complete the following fields:
– External Caching Appliance Host Name
– External Caching Appliance Administrative User Name
– External Caching Appliance Administrative User Password
– External Caching Appliance Public Certificate
To use the XC10 Appliance as the caching service provider, you must import its trust certificate from the XC10 truststore file.
6. Click OK.
For more information, see the IBM PureApplication System at this website:
3.5.4 Deploying an ELB proxy shared service
The steps to deploy the ELB proxy service that is shipped with the IBM PureApplication System product are described in the following process. This process includes adding the shared service and deploying the shared service into the cloud system:
1. Click the Workload Console tab at the IBM PureApplication System console.
2. Click Cloud → Shared Services.
3. Select ELB Proxy Service and click Deploy on the toolbar.
4. Complete the following information in the Configure and deploy a shared service pane:
– ELB instances range
Specify the minimum and maximum number of ELB instances.
– Enable autowiring
Select this option if you want all new virtual application pattern deployments in the cloud group to automatically use elastic load balancing.
– Virtual Host
Specify the default virtual host for virtual applications in the cloud group.
– Scaling Properties
Specify the following options for scaling ELB instances:
• Select the CPU based option to enable or disable automatic scaling.
• With automatic scaling enabled, specify a threshold range and minimum time to trigger automatic scaling.
5. Click OK.
Figure 3-21 shows the configuration of an ELB proxy shared service.
Figure 3-21 Deploying an ELB proxy shared service
6. Complete the following steps to deploy Virtual Application of the ELB proxy:
a. Set the target cloud group.
b. Set the IP version (IPv4 or IPv6).
c. Select the cloud group.
7. In the Advanced section, you can set up SSH access to the virtual machines in the cloud group for troubleshooting and maintenance purposes.
For more information about SSH settings, see this website:
8. Click OK.
After these steps are completed, an ELB proxy shared service is deployed as an application. The instance is available in the list in the Shared Services Instances pane. The deployed service consists of one ELB Management virtual machine and a number of ELB Instance virtual machines as specified in the initial range setting.
3.5.5 Deploying the Database Performance Monitor service
Deploying the Database Performance Monitor service provides the monitoring infrastructure and information about the health and availability of DB2 databases that are deployed in the PureApplication System. This service detects signs of degraded database performance. Moreover, this monitoring service provides drill-down capability to determine the root cause of performance problems.
The database performance monitor service provides the following indicators and monitoring:
•A single health indicator for each database.
•Indicators to identify performance problems in the following areas:
– I/O
– Memory
– Storage
– Workload
– Sorting
•Each database instance has a monitor that provides information about its health and performance, including the following areas:
– SQL Statements
– I/O
– Memory
– Connection dashboards
In addition to health and performance information, some dashboards have services to tune database performance.
The database performance monitor service must be running for the monitoring services to be available. To deploy the Database Performance Monitor service, you must have the cloud administrator role. Any administrative users have access to multi-database performance monitoring, which covers all databases instances that are deployed in a cloud group.
The deployment is performed only once for each cloud group. Where Database Performance Monitor is required, complete the following steps:
1. From the Workload Console tab, click Cloud → Shared Services.
2. From the list of shares services, select Database Performance Monitoring.
3. Click Deploy.
4. Select the following sizing that is most appropriate for your environment:
– For eight or fewer databases with an aggregate database size of 400 GB or less, select Small.
– For 20 or fewer databases with an aggregate database size of 1 TB, select Medium.
– For anything larger, select Large.
5. Click OK.
6. In the Deploy Virtual Application pane, complete the following steps:
a. Select the cloud group to which you want to deploy the virtual application.
b. Select the Advanced option.
c. Click Generate to generate an SSH Key.
7. Click OK.
Figure 3-22 shows the Database Performance Monitoring service.
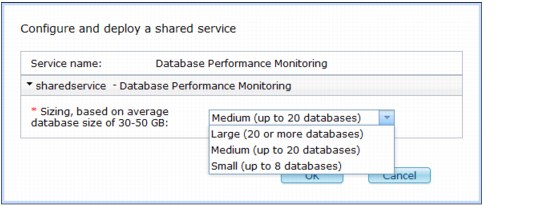
Figure 3-22 Deploying the Database Performance Monitor service
3.6 Managing environment profiles
Environment profiles are policies that group related deployment configuration, such as virtual machine names, IP address assignment, and cloud groups, which form logical deployment environments. Environment profiles also define how patterns are deployed to these resources and how these virtual pattern instances run in the cloud groups. This configuration provides IBM PureApplication System the capability to create logical isolation of resources through their allocation.
An environment profile can specify one or more cloud groups where it can be deployed. Also, a cloud group can be mapped by several environment profiles. Moreover, environment profiles grant access to user groups to specify who can use the profiles to deploy patterns. A profile can grant access to multiple user groups and a user group can be granted access to multiple profiles. Figure 3-23 shows how a few environment profiles might look and how they relate to other entities, such as cloud groups, user groups, and IP groups.
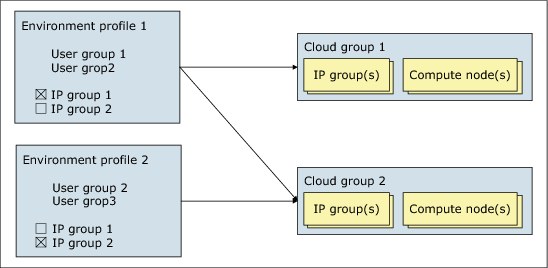
Figure 3-23 Typical PureApplication System resource instances
3.6.1 Adding environment profiles
To create an environment profile that is ready to be used for pattern deployment, you must have a cloud group that is configured and ready, with all hypervisors configured and available.
Complete the following steps to access the IBM PureApplication System administrative console to create an environment profile in the system:
1. Click the Workload Console tab at the top of the Welcome page.
2. Click Cloud → Environment Profiles.
3. Click the New icon (a plus sign image) on the toolbar.
4. Provide the following information:
– Name
Enter a unique name for the profile.
– Description
Enter a detailed description to identify the profile.
– Hypervisor type
Select the type of hypervisor in the cloud group or cloud groups that you are using. By default, it is PureSystems_ESX (VMware ESX).
– Environment
Select the environment in which this profile is to be created. The following options are available:
• All
• Development
• Test
• Quality Assurance
• Performance
• Research
• Production
• Pre-Production
5. Click OK to create the profile.
Figure 3-24 shows the initial creation of an environment profile.

Figure 3-24 Creating an environment profile
6. When the information is processed, the new profile is added to the Environment profiles list on the left panel of the panel, as shown in Figure 3-25.

Figure 3-25 List of available Environment profiles
3.6.2 Editing an environment profile
After an environment profile is created, you can modify its settings to suit the changing needs of your environment.
Complete the following steps to use the console to edit environmental profile configurations that you can access:
1. Click the Workload Console tab at the top of the Welcome page.
2. Click Cloud → Environment Profiles.
3. Select the environment profile to edit.
4. Modify the following information as necessary:
– Description of the environment profile.
– The environment type in the Environment field.
– Virtual machine name format (Optional)
Use the following predefined variables:
• ${hostname}
Replaced with the host name of the virtual machine; for example, My${hostname}VM.
• ${vs-name}
Replaced with the name of the virtual system instance; for example, My${vs-name}VM. This variable must be used with one of the other formatting variables. Otherwise, all virtual machines have the same name and any deployment fails.
• ${x-counter}
Replaced with a counter of x digits; for example, MyVM${3-counter}.
– IP addresses provided by
Specifies whether IBM PureApplication System or the pattern deployer provides the IP address on the deployment. If configured to IP Groups, the IP address is obtained automatically from the IP pool. Otherwise, when configured to Pattern Deployer, the IP address must be manually assigned by the user at pattern deployment time.
– Deployment priority
This setting is used to prioritize pattern instances that deal with resource contention (deployment, runtime resources, and failover). The following priority levels are available:
• Platinum: High(16) Medium(8) Low(4)
• Golden: High(12) Medium(6) Low(3)
• Silver: High(8) Medium(4) Low(2)
• Bronze: High(4) Medium(2) Low(1)
– Deploy to cloud groups
Select available cloud groups that are configured and ready for use. When you select a cloud group, the following information for the IP groups in that cloud group is provided:
• In use
Select this option to use the IP group in the environment profile.
• Name
Specifies the name of the IP group in the cloud that you selected.
• Alias
You can specify an alias name for the IP group for use in the environment profile.
• Subnet address
Specifies the subnet address of the IP group.
• Gateway
Specifies the gateway address of the IP group.
• Netmask
Specifies the netmask address of the IP group.
– Environment limits
Provides information about the limits of the virtual CPU, virtual memory, storage, and product licenses. You can set the license limit for each product by clicking the up or down arrow in the license limit column.
– Access granted to
Specify access to this environment profile for other users or groups of users. When a user or group is added, click the link beside the entry to toggle between the following access levels:
• Read
• Write
• All
– Comments
Add comment information that is relative to this environment profile.
Figure 3-26 shows the configuration of a new environment profile.
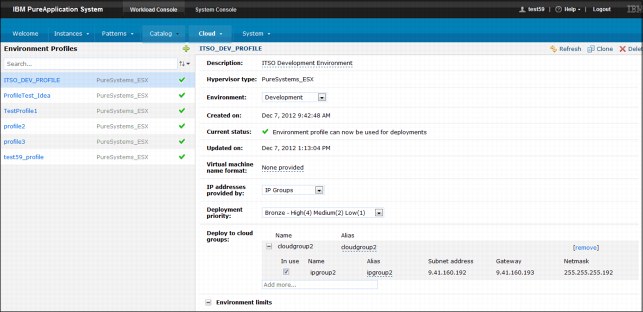
Figure 3-26 Environment profile configuration
3.6.3 Cloning an environment profile
Environment profiles that were created in IBM PureApplication System can be cloned and reused in some of the existing configurations. The cloning procedure is simple and requires only that you select an environment profile that most closely meets your needs. If the new profile is to deploy in a cloud other than the one that is specified in the original profile from which you are cloning, you must have a different cloud group that is configured and ready to be used.
All hypervisors must be configured and available in a cloud to create an environment profile that is ready to be deployed. Finally, when a profile is cloned, the hypervisor type cannot be changed.
From the IBM PureApplication System console, complete the following steps to clone environment profiles that are created in the system:
1. Click the Workload Console tab at the top of the Welcome page.
2. Click Cloud → Environment Profiles.
3. Click the wanted profile in the list of available profiles.
4. Click the Clone icon on the toolbar.
5. Provide the following information about the new environment profile:
– Name
Enter a new unique name for the environment profile.
– Description
Enter a description of the environment profile.
6. Click OK.
7. Enter the remaining profile configurations, following the same steps as described in 3.6.2, “Editing an environment profile”.
Figure 3-27 shows how to clone an environment profile.
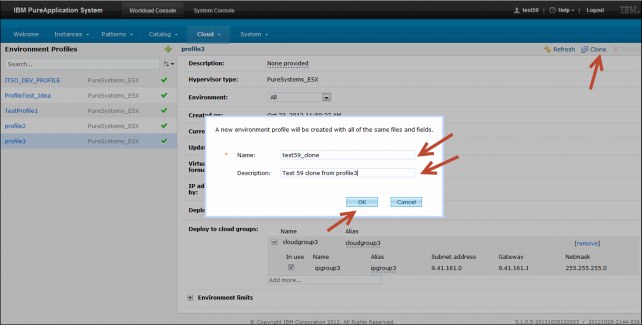
Figure 3-27 Cloning an environment profile
3.7 IBM PureApplication System isolation strategies
When an application is deployed to IBM PureApplication System, it is created as a pattern instance. Pattern instances contain the necessary virtual machines that run the middleware software that is needed to service the application requirements. The performance of these virtual machines that are created to run the pattern instances can be tuned through environment profiles and cloud group configurations. Those profiles and configurations influence the behavior of the virtual machines in the following respects:
•Prioritization
Each virtual machine instance has prioritization settings. These settings define the importance of each virtual machine relative to all the other virtual machines in the same cloud group.
These settings are significant during resource contention scenarios when a cloud group's virtual machines require more resources than the cloud group has available. In these situations, the system gives preference to the higher priority virtual machines.
IBM PureApplication System prioritizes a VM based on the following settings:
– Profile deployment priority
The deployment priority, which is specified by the administrator, is in the environment profile that is used to deploy the pattern. The following priority values are available:
• Platinum
• Golden
• Silver
• Bronze
– Deployer deployment priority
The priority that is used to deploy a pattern (set by the deployer) in the pattern deployment properties dialog. The following list notes the possible priority values:
• High
• Medium
• Low
|
Important: All virtual machines that are in the same pattern instance have the same priority because they are deployed together.
|
Prioritization also is relevant during failover, as in the case of a compute node failure. In such a scenario, the system recovers virtual machines from a failed node by restarting them on other available compute nodes in the same cloud group. Virtual machines with higher priority are recovered before lower priority virtual machines.
If the target compute nodes in the cloud group do not have enough resources available to restore all the virtual machines from the failed compute node, the lower priority virtual machines are not restarted. This situation requires manual intervention from a system administrator.
•Resource requirement
Each virtual machine that is deployed in IBM PureApplication System requires resources to function properly. The amount of resources that are needed is defined by configuring what a virtual machine uses from the pool of resources. These resources are allocated by the environment profile and provided by the cloud group. The following resources are the most common:
– CPU count
The number of virtual CPUs that are assigned to a virtual machine. This value depends on the following type setting of the cloud group that is associated with the virtual machine:
• A dedicated cloud group uses one physical CPU as a virtual CPU.
• An average cloud group creates four virtual CPUs from a physical CPU.
– Virtual memory (MB)
The amount of virtual memory that is assigned to a virtual machine.
When the resource requirements for virtual machines in a pattern are set, you must find the correct balance between application performance and resource usage. You must ensure that a virtual machine has at its disposal all of the resources that are required to handle the expected application load (without performance degradation). But, at the same time, you also must ensure that only the amount of resources that are required to handle the loads is provided.
As resources are used, they have a direct effect on the environment limits that are set by the environment profile. When the limit for a profile reaches zero, you cannot use that profile to deploy any more patterns until some of its pattern instances are stored or deleted.
Likewise, patterns that are deployed by separate environment profiles can over-allocate the resources in a cloud group. VMs with overly generous resource settings increase this over allocation unnecessarily.
Achieving the correct combination of application performance and resource allocation is important. This balance helps maximize the number of pattern instances that can be deployed with an environment profile and that can run in a cloud group.
3.7.1 Resource isolation via networking
IBM PureApplication System isolates management traffic and application workload traffic by using separate external physical networks. Another level of resource isolation among deployments is supported by the construct of cloud groups, IP groups, and environment profiles.
Virtual network isolation can be configured on a management network. Each cloud group has a unique management VLAN, such that VMs in a cloud group cannot access VMs in a different cloud group through the management VLAN. Virtual network isolation can be configured on application network by using IP groups. Two IP groups are isolated from each other if they are on different VLANs.
Through a combination of cloud groups and IP groups, an environment profile can have virtual network isolation from other environment profiles. This isolation is for management networks and application networks.
Figure 3-28 shows an example of virtually isolated environment profiles.
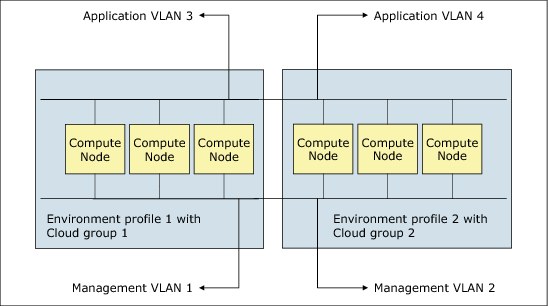
Figure 3-28 Environment profiles with physical compute node isolation and virtual network isolation
3.7.2 Resource isolation via access control
In addition to resource isolation by networking, virtual networking, and trust domains, PureApplication System supports resource isolation by using access control. This configuration provides workload resource and cloud resource isolation, such that users can deploy only workload patterns to cloud resources to which they are explicitly granted access rights. By using the fine-grained resource access control, you can set up environment profiles and isolate cloud resources. These controls are in place so that different groups of users are can use a different set of cloud resources.
Separate environment profiles can be configured to address different business needs for different users and user groups. Use an access control policy to maximize the environment profile access rights. User access to cloud resources is managed by using the environment profiles, which specify the set of cloud group resources, including IP groups, resource allocations, and license limitations that authorized users can use for deployment.
Users must be explicitly granted read access rights to an environment profile to deploy virtual application patterns and virtual system patterns to that environment profile. To deploy workload resources to an environment profile, a user must have the privileged Workload administration security role or read access rights to the environment profile.
Workload administrators with full permission roles must have read access rights to cloud resources to perform the following tasks:
•Create an environment by using those cloud resources.
•Grant other users access rights to the environment profile.
•Deploy shared services to the environment profile.
Users are automatically granted resource access rights to the virtual applications and virtual systems they deploy. However, users often are not granted access to system resources such as cloud groups, IP groups, compute nodes, and software licenses.
User management
IBM PureApplication System user management supports centralized user authentication by using an enterprise LDAP user directory server.
PureApplication System organizes security roles into the following areas of management responsibility:
•Workload administration
Essentially managing and monitoring all management function on the Workload console. Users are automatically granted the following sub roles:
– Create new patterns
– Create new environment profiles
– Create new catalog content
– IBM License Metric Tool
•Cloud group administration
Managing and monitoring cloud resources such as cloud groups, IP groups, virtual machines, and storage volumes.
•Hardware administration
Managing and monitoring hardware resources, system configuration, events, job queues, and system activities.
•Security administration
Managing security configuration, users, and user groups.
•Auditing administration
Managing and monitoring auditing resources.
3.7.3 Application environments
Companies often use an approach to separate environments according to application development lifecycle. The following typical divisions are available:
•Development (DEV)
An environment that is used for developing applications.
•Testing (TEST)
Used for testing applications.
•Production (PROD)
Used for running applications for use by business or users.
Each of these environments often are run on independent sets of hardware and network traffic to avoid cross environment issues.
A best practice in IBM PureApplication System is to create three cloud groups, one for each stage of the application development lifecycle, as shown in the following configuration examples:
•DEV cloud group, with one compute node, which gives developers 16 physical cores. Setting the cloud group type to average gives a 4-to-1 ratio of virtual CPUs, which gives developers 64 virtual CPUs.
•TEST cloud group with two compute nodes and cloud group type as dedicated to mimic production.
•A PROD cloud group, with three compute nodes and the cloud group type that is set to dedicated, since production applications are expected to be used heavily.
Each of these three cloud groups also need at least one IP group with an unused VLAN ID to keep their network traffic separated.
Figure 3-29 shows the isolation between the three application environments that are proposed in this scenario.
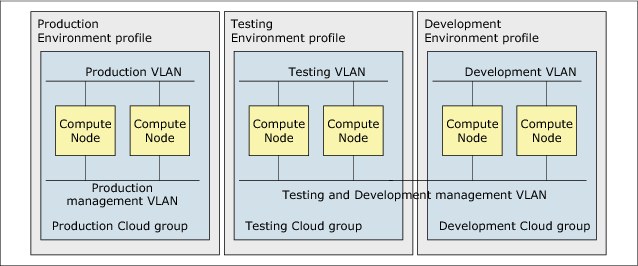
Figure 3-29 Resource isolation by using environment profiles
There are no hardware limitations for how many environment profiles can be created. However, there are some practical guidelines to indicate what is needed.
Typically, the set of users who can deploy patterns for a production environment is smaller than the set of deployers for a testing environment, which is smaller than the number for development. Likewise, the number of profiles that are needed for each runtime environment tends to decrease from development through production.
The following profiles examples each have a corresponding user group:
•Production application environment profiles
Used to deploy applications into the production environment, with priority set to golden and environment that is set to production.
Separated profiles for each production application, department, or line-of-business deploying production applications can be used. This configuration enables control over who can deploy patterns for each application and allocate resources differently for different applications or groups of applications.
•Test application environment profiles
Used to deploy applications into the testing environment, with priority set to silver and environment that is set to test.
Create one profile per team that is deploying one or more applications to be tested. The use of a separate profile for each team and assigning each profile separate resources, such as a separate IP group, helps keep that team's applications isolated within the cloud group. It also prevents one team from using up too much of the cloud group's resources so that not enough remains available for the other teams.
•Development application environment profiles
Used to deploy applications into the development environment, with priority set to bronze and environment that is set to development.
All developers can share one profile, but each must be trusted not to use too many resources. To enforce these limits, use a separate profile for each development team. A profile is useful only if it has settings that are different from other profiles, such as different settings for who can deploy patterns, what IP groups to use, or to enforce limits on resources such as CPU.
3.7.4 Multiple lines of businesses
As mentioned in 3.7.3, “Application environments” on page 103, another approach might be to isolate applications from different lines of business in a production environment. Because these applications are used for different business purposes, they should be isolated from each other.
Consider a use case in which an IBM PureApplication System in an enterprise is shared by the following departments:
•Marketing applications
•Human Resources applications
•Finance applications
The enterprise wants to divide the computing resources into a set for each of the following departments for resource isolation consideration:
•Marketing
•Human Resources
•Finance
To address the computing resource isolation and access control requirements, IBM PureApplication System provides the capabilities to create three cloud groups and environment profiles. Each department is granted access to its own separate environment profile. The three cloud groups provide physical isolation of the computing nodes among the departments. IP groups with distinct VLANs are used to provide virtual network isolation among the departments.
On a small configuration with six compute nodes, you can assign each cloud group two compute nodes with a different unused VLAN ID. You also can give each cloud group one or more IP groups.
The IP groups for a cloud group can have the same VLAN IDs, but the IP groups for different cloud groups need different VLAN IDs to isolate the cloud groups' network traffic from each other. Assuming that the applications are used heavily, set each cloud group's type to dedicated. Otherwise, if a cloud group has a surplus of applications that are used sparingly, set its type to average.
Create an environment profile for each production environment and assign it a user group whose users are responsible for deploying to that environment. The profiles deploy their patterns to the same cloud group, but they allocate resources with limits to help better isolate the teams' applications.
3.7.5 Resource isolation by using a trust domain
IBM PureApplication System uses management software within a management trust domain that contains a trust service to issue verifiable security tokens to virtual application patterns trust domains. A virtual application pattern deployment model organizes resources into trust domains to provide management and infrastructure isolation.
When deployed, each virtual application creates a separate deployment trust domain. These domains have a unique set of deployment security tokens and owner keys. Its resources can communicate only with other resources in the same trust domain. So, although several virtual application instances can be deployed in the same cloud group, with network visibility, they cannot communicate with one another. However, there is an exception; they can communicate if a trust relationship is explicitly established between the two trust domains.
Trust relationships can be established between deployment trust domains to allow communication across virtual application trust domains. This configuration is how shared services deployments establish trust relationships with other virtual application deployments. This process enables those applications to use the shared services.
Figure 3-30 shows an example of a cloud group that contains three virtual application deployments. Each deployment is in its own trust domain, which provides isolation from other deployments in the same cloud group.
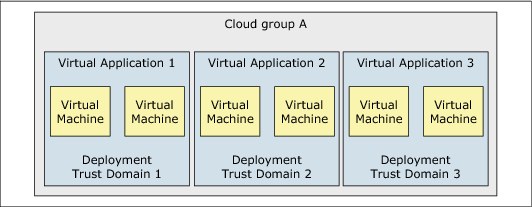
Figure 3-30 Deployments isolation by trust domains
Isolation through trust domain provides another level of resource isolation for virtual application pattern deployment. Isolation through trust domain extends network isolation. The level of isolation that is provided for security tokens and keys helps the system with security. It helps by preventing security attacks from spreading from one application deployment to other deployments, and to the system management trust domain in the event of a deployment compromise.
3.7.6 Isolation for shared resources
As noted in 3.5, “Managing shared services”, shared services can have only one instance of a type that is deployed in a cloud group.
Therefore, isolation of shared services is handled at the IP group level. This configuration means that although a specific instance of a deployed shared service is isolated between different IP groups, it is still shared between all patterns that are deployed into the same Cloud group as the shared service instance.
Different Environment profiles can use the same Cloud groups as deployment targets. This ability might indicate that patterns that are deployed by using different environment profiles would still share resources that are deployed to a common cloud group.
To create a deeper isolation, you can ensure that a specific cloud group is not shared among different environment profiles. In our previous example of isolation per lines of businesses, having a one-to-one relationship is beneficial. The one-to-one relationship was between the marketing cloud group and the marketing environment profile, which further helped isolate the shared resources between only marketing applications and patterns.
..................Content has been hidden....................
You can't read the all page of ebook, please click here login for view all page.