Chapter 1
ADVANCED COLLISION DETECTION
Collision detection is the math, art, science, or general guesswork used to determine whether some object has hit another object. This sounds pretty simple, but when you are dealing with objects that exist only in a computer's memory and are represented by a collection of various properties, some complexities can arrive.
The basic methods of collision detection are covered in Foundation ActionScript 3.0 Animation: Making Things Move! (hereafter referred to as Making Things Move). This chapter looks at one method of collision detection that wasn't covered in that book and a strategy to handle collisions between large amounts of objects.
Note that the subject of collision detection does not delve into what you do after you detect a collision. If you are making a game, you might want the colliding objects to blow up, change color, or simply disappear. One rather complex method of handling the results of a collision was covered in the "Conservation of Momentum" chapter of Making Things Move. But ultimately it's up to you (and the specs of the application or game you are building) to determine how to respond when a collision is detected.
Hit Testing Irregularly Shaped Objects
Making Things Move covered a few basic methods of collision detection, including the built-in hitTestObject and hitTestPoint methods, as well as distance-based collision detection. Each of these methods has its uses in terms of the shapes of objects on which you are doing collision detection. The hitTestObject method is great for detecting collisions between two rectangular-shaped objects, but will often generate false positives for other shapes. The hitTestPoint method is suitable for finding out whether the mouse is over a particular object or whether a very small point-like object has collided with any other shaped object, but it is rather useless for two larger objects. Distance-based collision detection is great for circular objects, but will often miss collisions on other shaped objects.
The Holy Grail of collision detection in Flash has been to test two irregularly shaped objects against each other and accurately know whether or not they are touching. Although it wasn't covered in Making Things Move, a method has existed for doing this via the BitmapData class since Flash 8. In fact, the method is even called hitTest.
First, a note on terminology. ActionScript contains a BitmapData class, which holds the actual bitmap image being displayed, and a Bitmap class, which is a display object that contains a BitmapData and allows it to be added to the display list. If I am referring to either one of these classes specifically, or an instance of either class, I will use the capitalized version. But often I might casually use the term bitmap in lowercase to more informally refer to a bitmap image. Do not confuse it with the Bitmap class.
BitmapData.hitTest compares two BitmapData objects and tells you whether any of their pixels are overlapping. Again, this sounds simple, but complexities arise once you start to think about it. Bitmaps are rectangular grids of pixels, so taken in its simplest form, this method would be no more complex (or useful) than the hitTestObject method on a display object. Where it really starts to get useful is when you have a transparent bitmap with a shape drawn in it.
When you create a BitmapData object, you specify whether it will support transparency right in the constructor:
new BitmapData(width, height, transparent, color);
That third parameter is a Boolean value (true/false) that sets the transparency option. If you set it to false, the bitmap will be completely opaque. Initially, it will appear as a rectangle filled with the specified background color. You can use the various BitmapData methods to change any of the pixels in the bitmap, but they will always be fully opaque and cover anything behind that BitmapData. Color values for each pixel will be 24-bit numbers in the form 0xRRGGBB. This is a 6-digit hexadecimal number, where the first pair of numbers specifies the value for the red channel from 00 (0) to FF (255), the second pair sets the green channel, and the third sets the blue channel. For example, 0xFFFFFF would be white, 0xFF0000 would be red, and 0xFF9900 would be orange. For setting and getting values of individual pixels, you would use the methods setPixel and getPixel, which use 24-bit color values.
However, when you specify true for the transparency option in a BitmapData class, each pixel now supports an alpha channel, using a 32-bit number in the format 0xAARRGGBB. Here, the first 2 digits represent the level of transparency for a pixel, where 00 would be completely transparent, and FF would be fully opaque. In a transparent BitmapData, you would use setPixel32 and getPixel32 to set and read colors of individual pixels. These methods take 32-bit numbers. Note that if you pass in a 24-bit number to one of these methods, the alpha channel will be evaluated as being 0, or fully transparent.
To see the exact difference between the two, let's create one of each. You can use the following class as the main class in a Flex Builder 3 or 4 ActionScript Project, or as the document class in Flash CS3 or CS4. This class, BitmapCompare, is available at this book's download site at www.friendsofed.com.
      package

      {

          import flash.display.Bitmap;

          import flash.display.BitmapData;

          import flash.display.Sprite;

          import flash.display.StageAlign;

          import flash.display.StageScaleMode;

          import flash.geom.Rectangle;


          public class BitmapCompare extends Sprite

          {

              public function BitmapCompare()

              {

                  stage.align = StageAlign.TOP_LEFT;

                  stage.scaleMode = StageScaleMode.NO_SCALE;


                  // draw a bunch of random lines

                  graphics.lineStyle(0);

                  for(var i:int = 0; i < 100; i++)

                  {

                      graphics.lineTo(Math.random() * 300,

                                      Math.random() * 400);

                  }


                  // create an opaque bitmap

                  var bmpd1:BitmapData = new BitmapData(300, 200,

                                                        false, 0xffffff);

                  bmpd1.fillRect(new Rectangle(100, 50, 100, 100), 0xff0000);

                  var bmp1:Bitmap = new Bitmap(bmpd1);

                  addChild(bmp1);


                  // create transparent bitmap

                  var bmpd2:BitmapData = new BitmapData(300, 200,

                                                        true, 0x00ffffff);

                  bmpd2.fillRect(new Rectangle(100, 50, 100, 100),

                                 0xffff0000);

                  var bmp2:Bitmap = new Bitmap(bmpd2);

                  bmp2.y = 200;

                  addChild(bmp2);

              }

          }

      }
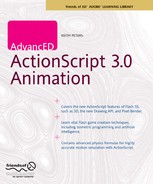
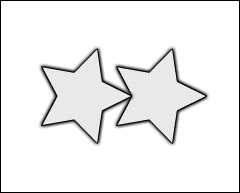
This code first draws a bunch of random lines on the stage, just so you can tell the difference between the stage and the bitmaps. It then creates two bitmaps and draws red squares in the center of each. The top bitmap is opaque and covers the lines completely. The bottom bitmap is transparent, so only the red square covers the lines on the stage. You can see the result in Figure 1-1.
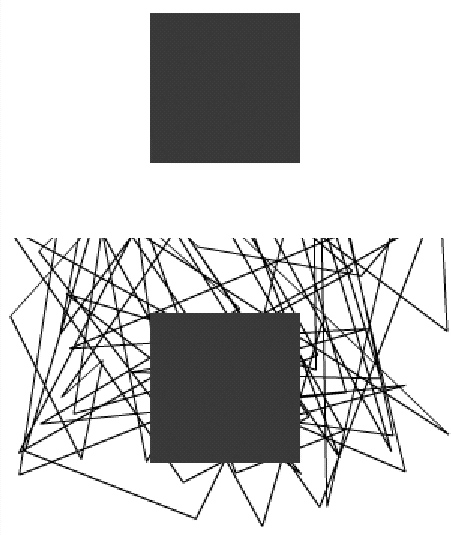
Figure 1-1. An opaque bitmap on top, transparent below
Furthermore, with a transparent bitmap you can use partial transparency. Change the second fillRect statement in the last code sample to the following:
bmpd2.fillRect(new Rectangle(100, 50, 100, 100), 0x80FF0000);
Note that we used a 32-bit AARRGGBB color value for the fill, and the alpha value has been halved to 0x80, or 128 in decimal. This makes the red square semitransparent, as seen in Figure 1-2.
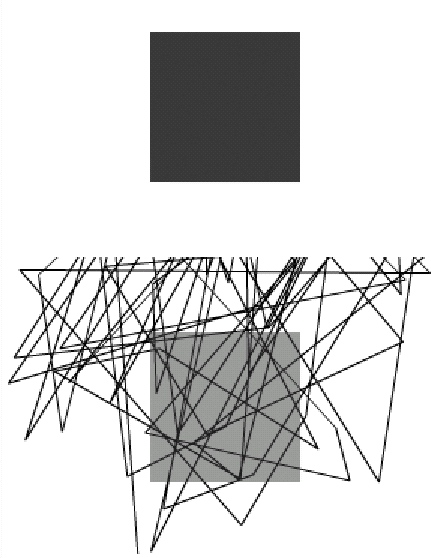
Figure 1-2. A semitransparent square
Bitmaps for collision detection
So now let's take a look at how to use bitmaps to achieve collision detection. First, we'll need a nice irregular shape to test with. A five-pointed star will do nicely. Why not make it into its very own class so we can reuse it? Here's the Star class, also available at the book's download site:
      package

      {

          import flash.display.Sprite;


          public class Star extends Sprite

          {

              public function Star(radius:Number, color:uint = 0xFFFF00):void

              {

                  graphics.lineStyle(0);

                  graphics.moveTo(radius, 0);


                  graphics.beginFill(color);

                  // draw 10 lines

                  for(var i:int = 1; i < 11; i++)

                  {

                      var radius2:Number = radius;

                      if(i % 2 > 0)

                      {

                       // alternate radius to make spikes every other line

                          radius2 = radius / 2;

                      }

                      var angle:Number = Math.PI * 2 / 10 * i;

                      graphics.lineTo(Math.cos(angle) * radius2,

                                      Math.sin(angle) * radius2);

                  }

              }

          }

      }
This just draws a series of lines at increasing angles and alternate radii, which cleverly form a star. And here is the class that does the hit testing. Again, like most of the code in this book, it can be used either as a document class in Flash CS3 or CS4, or as a main application class in Flex Builder 3 or 4, and is available from the book's download site.
      package

      {

          import flash.display.Bitmap;

          import flash.display.BitmapData;

          import flash.display.Sprite;

          import flash.display.StageAlign;

          import flash.display.StageScaleMode;

          import flash.events.MouseEvent;

          import flash.filters.GlowFilter;

          import flash.geom.Matrix;

          import flash.geom.Point;


          public class BitmapCollision1 extends Sprite

          {

              private var bmpd1:BitmapData;

              private var bmp1:Bitmap;

              private var bmpd2:BitmapData;

              private var bmp2:Bitmap;


              public function BitmapCollisson()

              {

                  stage.align = StageAlign.TOP_LEFT;

                  stage.scaleMode = StageScaleMode.NO_SCALE;


                  //  make a star

                  var star:Star = new Star(50);


                  // make a fixed bitmap, draw the star into it

                  bmpd1 = new BitmapData(100, 100, true, 0);

                  bmpd1.draw(star, new Matrix(1, 0, 0, 1, 50, 50));

                  bmp1 = new Bitmap(bmpd1);

                  bmp1.x = 200;

                  bmp1.y = 200;

                  addChild(bmp1);


                  // make moveable bitmap, draw the star into it, too

                  bmpd2 = new BitmapData(100, 100, true, 0);

                  bmpd2.draw(star, new Matrix(1, 0, 0, 1, 50, 50));

                  bmp2 = new Bitmap(bmpd2);

                  addChild(bmp2);


                  stage.addEventListener(MouseEvent.MOUSE_MOVE,

                                         onMouseMoving);


              }


              private function onMouseMoving(event:MouseEvent):void

              {

                  // move bmp2 to the mouse position (centered).

                  bmp2.x = mouseX - 50;

                  bmp2.y = mouseY - 50;


                  // the hit test itself.

                  if(bmpd1.hitTest(new Point(bmp1.x, bmp1.y), 255, bmpd2,

                                   new Point(bmp2.x, bmp2.y), 255))

                  {

                      bmp1.filters = [new GlowFilter()];

                      bmp2.filters = [new GlowFilter()];

                  }

                  else

                  {

                      bmp1.filters = [];

                      bmp2.filters = [];

                  }

               }

            }

         }
Here we create a star using Star class and draw it into two bitmaps. We use a matrix to offset the star during drawing by 50 pixels on each axis because the registration point of the star is in its center, and the registration point of the bitmap is at the top left. We offset it so we can see the whole star.
One of these bitmaps (bmp1) is in a fixed position on the stage; the other (bmp2) is set to follow the mouse around. The key line comes here:
      if(bmpd1.hitTest(new Point(bmp1.x, bmp1.y), 255, bmpd2,

                       new Point(bmp2.x, bmp2.y), 255))
This is what actually determines if the two bitmaps are touching. The signature for the BitmapData.hitTest method looks like this:
      hitTest(firstPoint:Point,

              firstAlphaThreshold:uint,

              secondObject:Object,

              secondPoint:Point,

              secondAlphaThreshold:uint);
You'll notice that the parameters are broken down into two groups: first and second. You supply a point value for each. This corresponds to the top-left corner of BitmapData. The reason for doing this is that each bitmap might be nested within another symbol or deeply nested within multiple symbols. In such a case, they might be in totally different coordinate systems. Specifying an arbitrary point lets you align the two coordinate systems if necessary, perhaps through using the DisplayObject. localToGlobal method. In this example, however, both bitmaps will be right on the stage, so we can use their local position directly to construct the point for each.
The next first/last parameters are for the alpha threshold. As you saw earlier, in a transparent BitmapData, each pixel's transparency can range from 0 (fully transparent) to 255 (fully opaque). The alpha threshold parameters specify how opaque a pixel must be in order to register a hit. In this example, we set both of these to 255, meaning that for a pixel in either bitmap to be considered for a hit test, it must be fully opaque. We'll do another example later that shows the use of a lower threshold.
Finally, there is the secondObject parameter. Note that it is typed to an object. Here you can use a Point, a Rectangle, or another BitmapData as the object to test against. If you are using a Point or Rectangle, you do not need to use the final two parameters. Testing against a Point is useful if you want to test whether the mouse is touching a bitmap. A quick example follows:
      if(myBitmapData.hitTest(new Point(myBitmapData.x, myBitmapData.y),

                              255

                              new Point(mouseX, mouseY)))

      {

          // mouse is touching bitmap

      }
I can't think of a particularly useful example for testing a bitmap against a rectangle, but it's good to know that if the need arises, it's there!
In our example, however, we are using another BitmapData object, so we pass that in along with the second Point and alpha threshold.
Finally, if there is a hit, we give each star a red glow through the use of a default glow filter. If no hit, we remove any filter. You can see the results in Figures 1-3 and 1-4.
|
Figure 1-3. Stars are not touching. |
Figure 1-4. And now they are. |
Play with this for awhile, and you'll see that it truly is pixel to-pixel collision detection.
Hit testing with semitransparent shapes
In the preceding example, we drew a star that was totally opaque into each bitmap. We were thus testing against fully opaque pixels in each bitmap and therefore we set the alpha threshold to 255 in each one. (We actually could have set the alpha threshold to anything above zero and had the same effect.)
Now let's look at hit testing with a shape that isn't fully opaque. We'll alter the BitmapCollsion1 class slightly, naming it BitmapCollision2 (available for download on the book's site):
      package

      {

          import flash.display.Bitmap;

          import flash.display.BitmapData;

          import flash.display.GradientType;

          import flash.display.Sprite;

          import flash.display.StageAlign;

          import flash.display.StageScaleMode;

          import flash.events.MouseEvent;

          import flash.filters.GlowFilter;

          import flash.geom.Matrix;

          import flash.geom.Point;


          public class BitmapCollision2 extends Sprite

          {

              private var bmpd1:BitmapData;

              private var bmp1:Bitmap;

              private var bmpd2:BitmapData;

              private var bmp2:Bitmap;


              public function BitmapCollision2()

              {

                  stage.align = StageAlign.TOP_LEFT;

                  stage.scaleMode = StageScaleMode.NO_SCALE;


                  // make a star

                  var star:Star = new Star(50);


                  // make a gradient circle

                  var matrix:Matrix = new Matrix();

                  matrix.createGradientBox(100, 100, 0, −50, −50);

                  var circle:Sprite = new Sprite();

                  circle.graphics.beginGradientFill(GradientType.RADIAL,

                                                   [0, 0], [1, 0]

                                                   [0, 255], matrix);

                  circle.graphics.drawCircle(0, 0, 50);

                  circle.graphics.endFill();


                  // make fixed bitmap, draw the star into it

                  bmpd1 = new BitmapData(100, 100, true, 0);

                  bmpd1.draw(star, new Matrix(1, 0, 0, 1, 50, 50));

                  bmp1 = new Bitmap(bmpd1);

                  bmp1.x = 200;

                  bmp1.y = 200;

                  addChild(bmp1);


                  // make a moveable bitmap, draw the star into it,too

                  bmpd2 = new BitmapData(100, 100, true, 0);

                  bmpd2.draw(circle, new Matrix(1, 0, 0, 1, 50, 50));

                  bmp2 = new Bitmap(bmpd2);

                  addChild(bmp2);


                  stage.addEventListener(MouseEvent.MOUSE_MOVE,

                                         onMouseMoving);

              }


              private function onMouseMoving(event:MouseEvent):void

              {

                  // move bmp2 to the mouse position (centered).

                  bmp2.x = mouseX - 50;

                  bmp2.y = mouseY - 50;


                  // the hit test itself.

                  if(bmpd1.hitTest(new Point(bmp1.x, bmp1.y), 255, bmpd2,

                                   new Point(bmp2.x, bmp2.y), 255))

                  {

                      bmp1.filters = [new GlowFilter()];

                      bmp2.filters = [new GlowFilter()];

                  }


                  else

                  {

                      bmp1.filters = [];

                      bmp2.filters = [];

                  }

              }

          }

      }
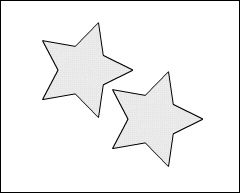
Here we make a new Sprite named circle and draw a radial gradient-filled circle shape in it. We draw this to bmpd2 instead of the star. If you test this, you'll see that no hit will be registered until the very center of the circle touches the star because only at the center is the circle fully opaque. You can see the results in Figures 1-5 and 1-6.
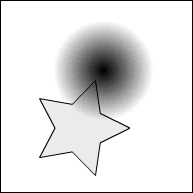
Figure 1-5. The star is touching the circle, but not a pixel that has the required alpha threshold. |
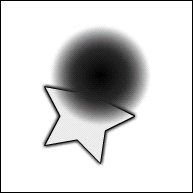
Figure 1-6. Only the center of the circle has an alpha of 255, so you get a hit. |
Change the hit test line to make the second alpha threshold a lower value like so:
      if(bmpd1.hitTest(new Point(bmp1.x, bmp1.y), 255, bmpd2,

                       new Point(bmp2.x, bmp2.y), 128))
Now you have to move the circle only part way onto the square, just so it hits a pixel whose alpha is at least 128. Try setting that second alpha threshold to different values to see the effects. Note that if you set it to zero, you might get a hit even before the circle touches the star because it will successfully hit test even against the fully transparent pixels in the very corner of the bitmap. Remember that the bitmap itself is still a rectangle, even if you can't see it all. Also note that changing the first alpha threshold (to anything other than 0) won't change anything because the star doesn't have any semitransparent pixels—they are either fully transparent or fully opaque.
Using BitmapData.hitTest for nonbitmaps
In the examples so far, we've been using Bitmap objects directly as the display objects we are moving around and testing against. But in many (if not most) cases, you'll actually be moving around different types of display objects such as MovieClip,Sprite, or Shape objects. Because you can't do this type of hit testing on these types of objects, you'll need to revise the setup a bit. The strategy is to keep a couple of offline BitmapData objects around, but not on the display list. Each time you want to check a collision between two of your actual display objects, draw one to each bitmap and perform your hit test on the bitmaps.
Realize that this is not the only way, or necessarily the best possible way, of using bitmaps for collision detection. There are probably dozens of possible methods, and this one works fine. Feel free to use it as is or improve on it.
Here's the class, BitmapCollision3(download it from the book's site):
      package

      {

          import flash.display.BitmapData;

          import flash.display.Sprite;

          import flash.display.StageAlign;

          import flash.display.StageScaleMode;

          import flash.events.MouseEvent;

          import flash.filters.GlowFilter;

          import flash.geom.Matrix;

          import flash.geom.Point;


          public class BitmapCollision3 extends Sprite

          {

              private var bmpd1:BitmapData;

              private var bmpd2:BitmapData;

              private var star1:Star;

              private var star2:Star;


              public function BitmapCollision3()

              {

                  stage.align = StageAlign.TOP_LEFT;

                  stage.scaleMode = StageScaleMode.NO_SCALE;


                  // make two stars, add to stage

                  star1 = new Star(50);

                  addChild(star1);


                  star2 = new Star(50);

                  star2.x = 200;

                  star2.y = 200;

                  addChild(star2);


                  // make two bitmaps, not on stage

                  bmpd1 = new BitmapData(stage.stageWidth, stage.stageHeight, true, 0);

                  bmpd2 = bmpd1.clone();


                  stage.addEventListener(MouseEvent.MOUSE_MOVE,

                                         onMouseMoving);

              }


              private function onMouseMoving(event:MouseEvent):void

              {

                  // move star1 to the to the mouse position

                  star1.x = mouseX;

                  star1.y = mouseY;


                  // clear the bitmaps

                  bmpd1.fillRect(bmpd1.rect, 0);

                  bmpd2.fillRect(bmpd2.rect, 0);


                  // draw one star to each bitmap

                  bmpd1.draw(star1,

                             new Matrix(1, 0, 0, 1, star1.x, star1.y));

                  bmpd2.draw(star2,

                             new Matrix(1, 0, 0, 1, star2.x star2.y));


                  // the hit test itself.

                  if(bmpd1.hitTest(new Point(), 255, bmpd2, new Point(), 255))

                  {

                      star1.filters = [new GlowFilter()];

                      star2.filters = [new GlowFilter()];

                  }

                  else

                  {

                      star1.filters = [];

                      star2.filters = [];

                  }

              }

          }

      }
In the constructor this time, we make two BitmapData objects and two stars. There's no need to put the BitmapData objects in Bitmaps, as they are not going on the display list. The stars, on the other hand, do get added to the display list. The first star, star1, gets moved around with the mouse. Each time the mouse is moved, both bitmaps are cleared by using fillRect, passing in a color value of zero. Remember that if the alpha channel is not specified, it is taken as zero, so this has the result of making all pixels completely transparent. Then each star is drawn to its corresponding bitmap:
      bmpd1.draw(star1, new Matrix(1, 0, 0, 1, star1.x, star1.y));

      bmpd2.draw(star2, new Matrix(1, 0, 0, 1, star2.x, star2.y));
The matrix uses the stars' x and y positions as translation values, resulting in each star being drawn in the same position it is in on the stage. Now we can do the hit test:
if(bmpd1.hitTest(new Point(), 255, bmpd2, new Point(), 255))
Because BitmapData is not on the display list or even in a Bitmap wrapper, and because both stars are in the same coordinate space and have been drawn to each BitmapData in their relative positions, we don't need to do any correction of coordinate spaces. We just pass in a new default Point (which will have x and y both zero) to each of the Point arguments. We'll leave the alpha thresholds at 255 because both stars are fully opaque.
Although this example doesn't look any different from the others, it's actually completely inverted, with the bitmaps invisible and the stars visible. Yet it works exactly the same way.
These are just a few examples of using BitmapData.hitTest to do collision detection on noncircle, rectangle, or point-shaped objects. I'm sure once you get how it all works, you can think up some cool variations for it.
Next up, we'll look at how to do collision detection on a large scale.
Hit Testing with a Large Number of Objects
ActionScript in Flash Player 10 runs faster than ever before and it lets us do more stuff at once and move more objects at the same time. But there are still limits. If you start moving lots of objects on the screen, sooner or later things will start to bog down. Collision detection among large numbers of objects compounds the problem because each object needs to be compared against every other object. This is not limited to collision detection only; any particle system or game in which a lot of objects need to interact with each other, such as via gravity or flocking (see Chapter 2),will run into the same problems.
If you have just six objects interacting with each other, each object needs to pair up with every other object and do its hit test, gravitational attraction, or whatever action it needs to do with that other object. At first glance, this means 6 times 6, or 36 individual comparisons. But, as described in Making Things Move, it's actually fewer than half of that: 15 to be precise. Given objects A, B, C, D, E, F, you need to do the following pairings:
AB, AC, AD, AE, AF
BC, BD, BE, BF
CD, CE, CF
DE, DF
EF
Notice that B does not have to check with A because A has already checked with B. By the time you get to E, it's already been checked against everything but F. And after that, F has been checked by all the others. The formula for how many comparisons need to occur is as follows, where N is the number of objects:
(N2 - N)/2
For 6 objects, that's (36 - 6)/2 or 15.
For 10 objects, that's (100 - 10)/2 or 45 checks.
20 objects means 190 checks, and 30 objects is 435!
You see that this goes up very quickly, and you need to do something to limit it. One hundred objects aren't really hard to move around the screen in ActionScript 3.0, but when you start doing collision detection or some other interobject comparisons, that's 4,950 separate checks to do! If you are using distance-based collision detection, that's 4,950 times calculating the distance between two objects. If you're using bitmap collision, as described earlier in the chapter, that's 4,950 times clearing two bitmaps, drawing two objects, and calling the hitTest method. On every frame! That's bound to slow your SWF file down.
Fortunately, there is a trick to limit the number of checks you need to do. Think about this: if two relatively small objects are on opposite sides of the screen, there's no way they could possibly be colliding. But to discover that, we need to calculate the distance between them, right? So we are back to square one. But maybe there's another way.
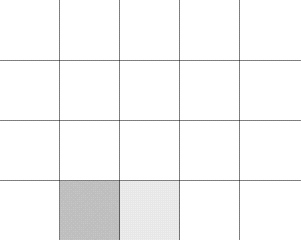
Suppose that we break down the screen into a grid of square cells, in which each cell is at least as large as the largest object, and then we assign each object to one of the cells in that grid—based on where the center of that object is located. If we set it up just right, an object in a given cell can collide only with the objects in the eight other cells surrounding it. Look at Figure 1-7, for example.
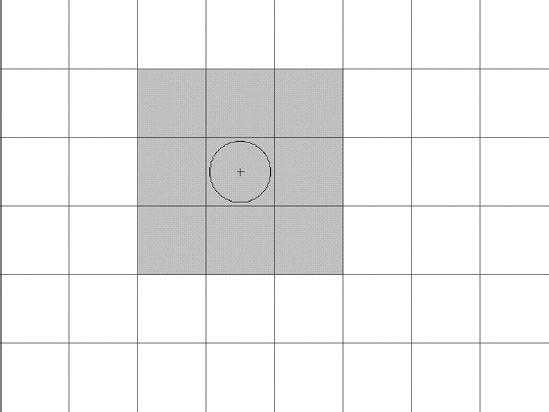
Figure 1-7. The ball can collide only with objects in the shaded cells.
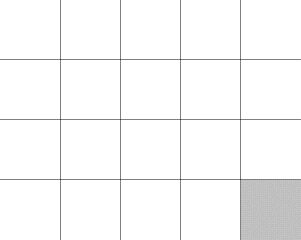
The ball shown is assigned to a cell based on its center point. The only objects it can hit are those in the shaded cells. There is no way it can collide with an object in any of the white cells. Even if the ball were on the very edge of that cell, and another ball were on the very edge of a white cell, they could not touch each other (see Figure 1-8).
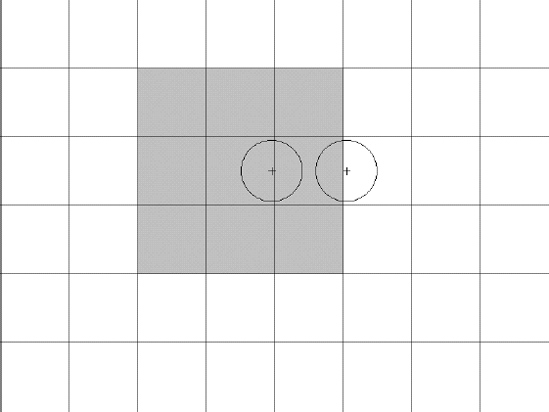
Figure 1-8. There's no way the two balls can collide.
Again, this scenario depends on the size of the cells being at least as large as the largest object you will be comparing. If either of the balls were larger than the cells, it would be possible for them to hit each other in the above scenario.
Okay, that's the basic setup. Knowing that, there are probably a number of ways to proceed. I'm not sure there is a single best way, but the goal is to test each object against all the other objects it could possibly reach and make sure that you never test any two objects against each other twice. That's where things get a bit tricky.
I'll outline the method I came up with, which will seem pretty abstract. Just try to get an idea of which areas of the grid we'll be doing collision detection with. Exactly how we'll do all that will be discussed next.
Implementing grid-based collision detection
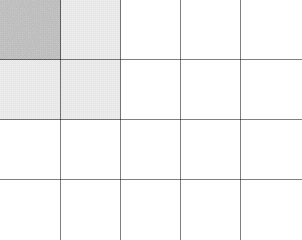
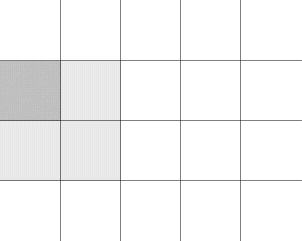
We'll start in the upper-left corner. I'll reduce the grid size a bit to make things simpler. See Figure 1-9.
You'll want to test all the objects in that first darker cell with all the objects in all the surrounding cells. Of course, there are no cells to the left or above it, so you just need to check the three light gray cells. Again, there is no way that an object in that dark gray cell can possibly hit anything in any of the white cells.
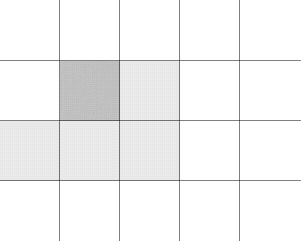
When that's done, we move on to the next cell. See Figure 1-10.
|
Figure 1-9. Test all the objects in the first cell with all the objects in the surrounding cells. |
Figure 1-10. Continuing with the next cell |
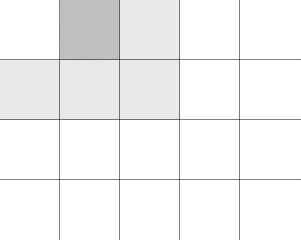
With this one, there are a couple more available cells surrounding it, but remember that we already compared all the objects in that first cell with all the objects in the three surrounding cells, which includes the one being tested now. So there is no need to test anything with the first cell again.
We continue across the first row in the same fashion. We only need to test the current cell, the cell to its right, and the three cells below it. See Figures 1-11, 1-12, and 1-13.
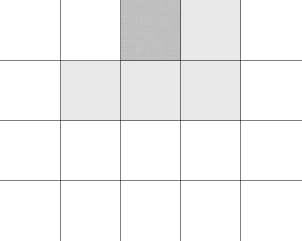
Figure 1-11. Continuing across the first row |
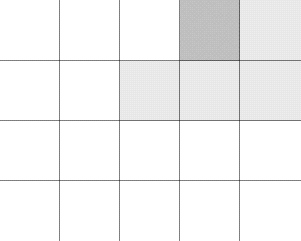
Figure 1-12. Next column in first row |
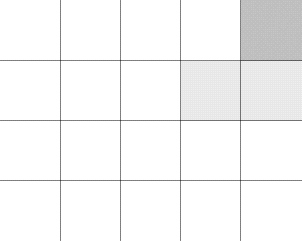
Figure 1-13. Final column in first row |
|
Of course, when we get to the last cell in the row, there is nothing to the right, so it's just the two below it.
We then start row two. See Figures 1-14 and 1-15.
|
Figure 1-14. Starting the second row |
Figure 1-15. Next column in second row |
We begin to have all of the surrounding cells available, but the top row has already been completely checked against anything in the second row. So we can ignore that. It winds up being no different from the first row. It's always nice when you can reuse your code.
Finally, we get to the last row. See Figures 1-16 and 1-17.
|
Figure 1-16. The last row |
Figure 1-17. Second column, last row |

Here, there is no lower row to worry about, and the upper row is done. So we just have to test each cell against the cell to the right. When we get to the last cell, there is nothing to even test against because all other cells have already tested against it. See Figure 1-18.
Okay, that's what we have to do. Now how do we do it? Well, at most, we are going to have five cells to deal with: the main cell we are examining, the one to the right, and the three below. Each of these "cells" is actually an array of objects. Call these arrays cell0, cell1, cell2, cell3, cell4, and cell5. And to keep it simple, we'll assume that each cell contains only Ball objects.
|
Figure 1-18. Nothing to do here |
Let's take cell0, the first array of ball objects. Any of the balls in this cell might be hitting any of the others, so we need to test them all against each other. We do that via a double loop, as described in Making Things Move. Here's a rough pass at the code for it:
      for(var i:int = 0; i < cell0.length - 1; i++)

      {

          var ballA:Ball = cell0[i] as Ball;

          for(var j:int = i + 1; j < cell0.length; j++)

          {

              var ballB:Ball = cell0[j] as Ball;

              // hit test or other reaction between ballA and ballB

          }

      }
This tests each ball against every other ball, in a way that no ball is ever tested against itself, and no pair is ever tested twice. That does it for all collision detection between the balls in cell0. Now we move on to testing cell0 against cell1. This is a bit different: we take each ball in cell0 and test them, one by one, against each ball in cell1. Again, this winds up as a double loop:
      for(var i:int = 0; i < cell0.length; i++)

      {

          var ballA:Ball = cell0[i] as Ball;

          for(var j:int = 0; j < cell1.length; j++)

          {

              var ballB:Ball = cell1[j] as Ball;

              // hit test or other reaction between ballA and ballB

          }

      }
Note that this code iterates fully through all the elements of both arrays, unlike the first comparison, which did some fancy tricks to avoid double-checking. We don't have to worry about that here because we're dealing with two arrays that contain completely different elements.
We can repeat this last type of check to compare cell0 with cell2, cell3, cell4, and cell5. At that point, cell0 would be complete, and we would move on to the next cell, which would then become cell0. Of course, there will be fewer than four surrounding cells for all the cells on the left, right, or bottom edge, so we have to take that into account.
Now, if your brain is like mine, it's hard to read all this and see how that complexity could possibly be more efficient than just comparing all the objects to each other. But let's do the math. Remember that if we compared 100 objects with each other, we would do 4,950 checks. In the examples that follow, we'll be keeping track of exactly how many comparisons actually occur. The numbers will vary based on the size of the screen, the size of the objects, the number of objects, the size of the grid, and the random distribution of the objects. In my tests, 100 objects were averaging between 100 and 200 individual hit tests. That's a saving of about 4,800 checks! Because each hit test consists of several lines of code, including a fairly expensive square root calculation, the CPU savings can be significant.
Of course, there is significant overhead in creating and updating the grid, assigning all the objects to it, and looping through all those arrays, which is something you'll usually do on every frame. In the case of a large number of objects, the savings you get from the reduced number of calculations will far outweigh that overhead. But in a system with fewer objects, it will be more efficient to just check each object against all the others. We'll discuss how to gauge the benefits of both methods to decide when to use each later in the chapter.
Coding the grid
Okay, our first go at this will be purely for clarity's sake. We'll break down each function so you can see what's happening as we go through it. Then we'll go clean it up and make it a reusable class.
Before we dive into the collision detection itself, let's get something to detect collisions: the Ball class, which you can download at this book's site at www.friendsofed.com
      package

      {

          import flash.display.Sprite;


          public class Ball extends Sprite

          {


              private var _color:uint;

              private var _radius:Number;

              private var _vx:Number = 0;

              private var _vy:Number = 0;


              public function Ball(radius:Number, color:uint = 0xffffff)

              {

                  _radius = radius;

                  _color = color;

                  draw();

              }


              private function draw():void

              {

                  // draw a circle with a dot in the center

                  graphics.clear();

                  graphics.lineStyle(0);


                  graphics.beginFill(_color, .5);

                  graphics.drawCircle(0, 0, _radius);

                  graphics.endFill();

                  graphics.drawCircle(0, 0, 1);

              }


              public function update():void

              {

                  // add velocity to position

                  x += _vx;

                  y += _vy;

              }


              public function set color(value:uint):void

              {

                  _color = value;

                  draw();

              }


              public function get color():uint

              {

                  return _color;

              }


              public function set radius(value:Number):void

              {

                  _radius = value;

                  draw();

              }


              public function get radius():Number

              {

                  return _radius;

              }


              public function set vx(value:Number):void

              {

                  _vx = value;

              }


              public function get vx():Number

              {

                  return _vx;

              }


              public function set vy(value:Number):void

              {

                  _vy = value;

              }


              public function get vy():Number

              {

                 return_vy;

              }


          }

      }
There's no rocket science here. It takes a radius and a color and then draws a circle. Each circle keeps track of its x and y velocity and adds them to its position when told to update. Good enough.
Now here's the start of the application class, which you can use as your main class in Flex Builder or your document class in Flash CS3 or CS4. Make sure that the Ball class is in the same location as this class. I'll keep everything in the default package for now, again for clarity. Feel free to organize the classes into a package structure that works for you. This is the GridCollision class, which you can download from this book's download page.
      package {

          import flash.display.Sprite;

          import flash.display.StageAlign;

          import flash.display.StageScaleMode;


          public class GridCollision extends Sprite

          {

              private const GRID_SIZE:Number = 50;

              private const RADIUS:Number = 25;


              private var _balls:Array;

              private var _grid:Array;

              private var _numBalls:int = 100;

              private var _numChecks:int = 0;


              public function GridCollision()

              {

                  stage.align = StageAlign.TOP_LEFT;

                  stage.scaleMode = StageScaleMode.NO_SCALE;


                  makeBalls();

                  makeGrid();

                  drawGrid();

                  assignBallsToGrid();

                  checkGrid();

                  trace(_numChecks);

              }


          // the rest of the methods described in this section will go here

          }

      }
Here we have some constants for the grid size and the radius of the balls. Remember that the grid size should be at least the size of the largest object, which for a circle would be twice its radius. So we satisfied that requirement.
Then we have an array for the balls and another array to serve as the grid. We'll be testing with 100 balls and we have a variable to hold the cumulative number of hit tests we're doing.
The constructor calls a number of methods: to create the balls, make the grid, draw the grid, assign the balls to the grid, and check the grid for collisions. Finally it traces out how many hit tests were done.
Now let's start in on the other methods of the class. First is makeBalls:
      private function makeBalls():void

      {

          _balls = new Array();

          for(var i:int = 0; i < _numBalls; i++)

          {

              // create a Ball and add it to the display list

              // and the _balls array

              var ball:Ball = new Ball(RADIUS);

              ball.x = Math.random() * stage.stageWidth;

              ball.y = Math.random() * stage.stageHieght;

              addChild(ball);

              _balls.push(ball);

          }

      }
Again, nothing too complex here. This makes an array, runs a loop creating a bunch of instances of Ball, randomly scatters them around the stage, adds them to the display list, and pushes them in the _balls array.
Next is the makeGrid() method:
       private function makeGrid():void

       {

           _grid = new Array();

           // stage width / grid size = number of columns

           for(var i:int = 0; i < stage.stageWidth / GRID_SIZE; i++)

           {

               _grid[i] = new Array();

               // stage height / grid size = number of rows

               for(var j:int = 0; j < stage.stageHeight / GRID_SIZE; j++)

               {

                   _grid[i][j] = new Array();

               }

           }

       }
Here we create a two-dimensional array in which each element represents a square portion of the screen. Each element of the two-dimensional array contains yet another array. (You could call this a three-dimensional array, but it doesn't really fit our paradigm.) These final arrays will be used to hold the objects assigned to each area of the grid.
The next method, drawGrid(), is for your eyes only. It doesn't do anything useful in terms of collision detection; it just helps you visualize where each grid element is. In a final game or application, you would most likely not draw the grid.
      private function drawGrid():void

      {

          // draw lines to indicate rows and columns

          graphics.lineStyle(0, .5);

          for(var i:int = 0; i <= stage.stageWidth; i += GRID_SIZE)

          {

              graphics.moveTo(i, 0);

              graphics.lineTo(i, stage.stageHeight);

          }

          for(i = 0; i <= stage.stageHieght; i += GRID_SIZE)

          {

              graphics.moveTo(0, i);

              graphics.lineTo(stage.stageHieght, i);

          }

      }
On to one of the most important methods, assignBallsToGrid:
      private function assignBallsToGrid():void

      {

          for(var i:int = 0; i < _numBalls; i++)

          {

              // dividing position by grid size

              // tells us which row and column each ball is in

              var ball:Ball = _balls[i] as Ball;

              var xpos:int = Math.floor(ball.x / GRID_SIZE);

              var ypos:int = Math.floor(ball.y / GRID_SIZE);

              _grid[xpos][ypos].push(ball);

          }

      }
This code might need a bit of explanation. The first part is pretty obvious: loop through the array, getting a reference to each Ball object in it. We then divide that ball's x position by the grid size and round the result down to the nearest integer value. This tells us in which column of the grid that ball should be. We do the same thing for the y position, which gives us the row of the grid to put it in. See Figure 1-19.
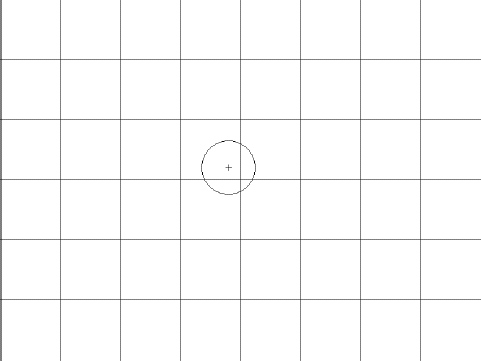
Figure 1-19. Figuring out which grid element a ball belongs to
In this example, let's say that the grid elements are 100×100. The ball you see there is at a position of 380 on the x-axis and 280 on the y-axis. We divide 380 by 100 and get 3.8. Round that down to get 3, which tells us that the ball goes in column 3 of the grid. Remember that arrays are zero-indexed, so an index of 3 is actually the fourth column. Doing the same thing for y tells us that it's in row 2 (the third row). You can easily validate the math by looking at the diagram and seeing that the center point of the ball is indeed in the fourth column, third row of the grid (counting from the top left).
Going back to the code, we assign the results of these calculations to xpos and ypos and use them to index the two-dimensional grid. Because each element of that two-dimensional array is an array itself, we push the object onto the array in that element.
When the loop is finished, each object will be in a specific element in the grid. Some grid elements will contain a single object; some will contain multiple objects; many will be empty. Now we are ready to do our hit testing.
The checkGrid() method does all the heavy lifting. In fact, it relies on a few other methods that you'll soon see as well. Let's jump in:
       private function checkGrid():void

       {

           // loop through each row and column of grid

           for(var i:int = 0; i < _grid.length; i++)

           {

               for(var j:int = 0; j < _grid[i].length; j++)

               {

                   // examine all the objects in the first cell

                   // against each other

                   checkOneCell(i, j);


                  checkTwoCells(i, j, i + 1, j);     // cell to the right

                  checkTwoCells(i, j, i - 1, j + 1); // below to the left

                  checkTwoCells(i, j, i, j + 1);     // directly below

                  checkTwoCells(i, j, i + 1, j + 1); // below to the right

               }

           }

       }
We use a double loop to loop through each column and row of the grid. The indexes i and j represent the cell we are currently examining. The first thing we do is compare all the objects in that cell to each other via the checkOneCell() method:
       private function checkOneCell(x:int, y:int):void

       {

           // check all the balls in a single cell against each other

           var cell:Array = _grid[x][y] as Array;


           for(var i:int = 0; i < cell.length - 1; i++)

           {

               var ballA:Ball = cell[i] as Ball;

               for(var j:int = i + 1; j < cell.length; j++)

               {

                   var ballB:Ball = cell[j] as Ball;

                   checkCollision(ballA, ballB);

               }

           }

       }
This code does a double loop through the array, as described in Making Things Move, which results in every object in the cell compared with every other object exactly one time.
We then call the checkTwoCells() method four times:
      checkTwoCells(i, j, i + 1, j);       // cell to the right

      checkTwoCells(i, j, i - 1, j + 1);   // cell below to the left

      checkTwoCells(i, j, i, j + 1);       // cell directly below

      checkTwoCells(i, j, i + 1, j + 1);   // cell below to the right
The indexes i and j still refer to the main cell we are checking. Then i + 1, j refers to the cell to the right; i −1, j + 1 is the cell to the lower left; i, j + 1 is directly below; and i + 1, j + 1 is the lower right, exactly as shown in Figures 1-9 through 1-18. Here is checkTwoCells()
       private function checkTwoCells(x1:int, y1:int, x2:int, y2:int):void

       {

           // make sure the second cell really exists

           if(x2 < 0) return;

           if(x2 >= _grid.length) return;

           if(y2 >= _grid[x2].length) return;


           var cell0:Array = _grid[x1][y1] as Array;

           var cell1:Array = _grid[x2][y2] as Array;


           // check all the balls in in one cell against all in the other

           for(var i:int = 0; i < cell0.length; i++)

           {

               var ballA:Ball = cell0[i] as Ball;

               for(var j:int = 0; j < cell1.length; j++)

               {

                   var ballB:Ball = cell1[j] as Ball;

                   checkCollision(ballA, ballB);

               }

           }

       }
Here, i and j have become x1 and y1. These variables are used to get a reference to the first cell. The next two parameters have become x2 and y2. We need to make sure that they are in range. If x2 is less than zero, or greater than or equal to _grid.length,_grid[x2] will be null. This will occur if the main cell is in the first or last column. (See Figures 1-9 and 1-13.) Similarly, if y2 is greater than the number of cells in that column, it will be out of range, and _grid[x2][y2] will be null (See Figures 1-16 through 1-18.) If any of these conditions occur, we just exit out of the method because there is no valid second cell to check against.
However, if we make it past that, we can successfully get references to the two cells to check. We use a double loop to loop through all the elements of the first cell and compare them with all the elements of the second cell, exactly as described earlier.
Last but not least is the collision detection itself. We've gotten all the way down to the point where we have two objects to test against each other. We call checkCollision(), passing in a reference to each of them. That method looks like this:
       private function checkCollision(ballA:Ball, ballB:Ball):void

       {

           // if distance is less than sum of radii, collision

           _numChecks++;

           var dx:Number = ballB.x - ballA.x;

           var dy:Number = ballB.y - ballA.y;

           var dist:Number = Math.sqrt(dx * dx + dy * dy);

           if(dist < ballA.radius + ballB.radius)

           {

               ballA.color = 0×ff0000;

               ballB.color = 0×ff0000;

           }

       }
Because we are actually down to the point of performing real live collision detection between two objects, we update the _numChecks property. Then we do a standard distance-based, collision-detection method using the square of the distances between the two balls on the x-axis and y-axis. If it is less than the sum of their radii, we color them both red. We could actually do even more optimization by getting rid of the square root, squaring the sum of the radii, and comparing them. Any time you can avoid a Math function, you can save some CPU time.
Whew. That's a lot of work, but remember that you are avoiding executing the last method possibly thousands of times. If all goes well, you should wind up with something like Figure 1-20.
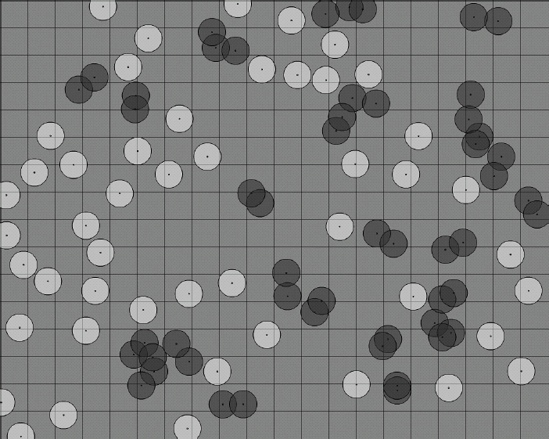
Figure 1-20. One hundred objects, successfully hit-tested
Verify that all the balls that are touching are red, and those that are not touching are white. If that's not the case, there's an error somewhere. Find it and fix it before moving on. The most important part of a collision-detection routine is, of course, accurately detecting collisions.
Testing and tuning the grid
Each time you run this application, you should get a trace of how many collision checks were done. On my computer, with a screen resolution of 1440×900 and running the SWF in a maximized browser, I get anywhere from 80 to 130 hit tests occurring for the exact code described previously: 100 balls of radius 25 and a grid size of 50. A smaller stage size will generate more hit tests. Run it a few times to see what range of numbers you get. Because the only thing changing in consecutive runs is the random distribution of the balls, you will get an idea of the average you are getting.
Now try increasing the size of the grid by setting it to 100, for example. You'll notice that you will get a significantly higher number of hit tests because there are more balls in each cell. This sounds bad, but it also decreases the number of cells and the number of arrays you have to loop through, which can be a benefit, as you'll soon see.
Now try reducing the grid size to 40—or even 30. There are fewer hit tests, but look closely at the results. You'll probably see an occasional missed hit—two objects touching that have not been marked as hitting (that is, they are still white). This is not good, but it should serve to remind you of the importance of the grid size being at least as large as the largest object. You could take this a step further and dynamically set the size of the grid based on the largest object in the simulation.
Set the grid size back to 50 and change the line that creates each ball in makeBalls to this:
var ball:Ball = new Ball(Math.random() * RADIUS);
This change shouldn't have any effect on the number of checks; it works fine. It just points out that the system still works when the objects are of different sizes—keeping in mind the rule about grid size, of course.
Now let's do some serious tuning and see how we're actually doing in terms of performance, particularly in comparison with the "test each object against every other object" method.
To do this, we'll need another method to test against. Well call this method basicCheck(). Here it is:
       private function basicCheck():void

       {

           for(var i:int = 0; i < _balls.length - 1; i++)

           {

               var ballA:Ball = _balls[i] as Ball;

               for(var j:int = i + 1; j < _balls.length; j++)

               {

                   var ballB:Ball = _balls[j] as Ball;

                   checkCollision(ballA, ballB);

               }

           }

       }
This is the code that will generate 4,950 hit tests for 100 objects. We know we are beating that in terms of raw number of checks, but there is a heck of a lot less overhead than all that grid stuff. How do the two methods stack up against each other? Are we really seeing any benefit?
Well, obviously we must be seeing some benefit or this chapter wouldn't be here, but instead of taking my word for it, I'll let you see for yourself. What we'll do is do run our grid-based code ten times and then run this method ten times, and see which takes less time to run. This will happen in the constructor, which I've changed to look like this:
      public function GridCollision()

      {

          stage.align = StageAlign.TOP_LEFT;

          stage.scaleMode = StageScaleMode.NO_SCALE;


          makeBalls();

          drawGrid();


          var startTime:int;

          var elapsed:int;

          var i:int;


          // get initial time

          startTime = getTimer();

          // do this 10 times

          for(i = 0; i < 10; i++)

          {

              makeGrid();

              assignBallsToGrid();

              checkGrid();

          }

          // subtract current time from start time

          elapsed = getTimer() - startTime;

          trace("Grid-based:", elapsed);


          // do again for basic check

          startTime = getTimer();

          for(i = 0; i < 10; i++)

          {

              basicCheck();

          }

          elapsed = getTimer() - startTime;

          trace("Basic check", elapsed);

      }
Here we create variables for the start time and elapsed time of each test. Set the start time to the result of getTimer() and run the following three methods ten times:
       makeGrid();

       assignBallsToGrid();

       checkGrid();
Subtract the start time from the current time to see how long that took. Do it again with basicCheck() run ten times.
What kind of results does that give you? For my setup, I'm seeing that the grid-based method runs almost 2.5 times faster than the basic check. Not as dramatic as I would have expected, considering we're doing away with 4,800 hit tests, which shows that the grid method does have considerable overhead. But still, a 2.5 times increase in speed is a good thing, right?
Furthermore, the more objects you have, the better savings you're going to see. If I increase the _numBalls property to 1000, the grid-based method handles it in less than a second, whereas the basic check takes more than 13 seconds. (Of course, one frame per second is not an acceptable frame rate, but it's better than 13 seconds per frame!) On the other hand, if I reduce the number of balls down to 50, the basic check is actually faster. So there is a make/break point where the overhead starts to outweigh the savings in the hit testing you're getting, and it's better to switch over to a simple test. Where that point is depends on your application and needs to be tested for.
Set _numBalls back to 100 and run it a few times just to get an idea how long the grid-based method is taking. On my machine, I'm averaging about 55 milliseconds for the 10 runs. Now change the grid size from 50 to 75. My average goes down to about 37 milliseconds. I found that a grid size of between 85 to 100 averages about 32 milliseconds, which is more than 4 times faster than the basic check! Note that all these numbers are just examples to serve as a basic guide. You might get very different results. The important fact to take away is that by tweaking the grid size you can find a setting that gives you optimal results for your application. There are a lot of variables here: stage size, number of objects, size of objects, grid size, and the hit testing algorithm you are using (not to mention individual computer performance). I haven't come up with a magic formula that will give you the best parameters to use.
Making it a reusable class
Hopefully, going through the GridCollision class has helped you get a good grasp of the concepts behind grid-based collision detection and proven its worthiness. But there are quite a few problems with it. First of all, it's all wrapped up in the main document class, so it would require copying and pasting to use it in another application. It's also heavily coupled with the Ball class. If you wanted to use it with another class of object, you'd have to change all references to that class. Furthermore, the hit testing algorithm is coded into it as a distance-based collision detection. You might want to use a simple hitTestObject or even a bitmap-based hit test instead. So let's create a new class that handles all these issues and is about as optimized as I could make it. We'll call it CollisionGrid, which is among this book's downloads at www.friendsofed.com:
       package

       {

           import flash.display.DisplayObject;

           import flash.display.Graphic;

           import flash.events.EventDispatcher;


           public class CollisionGrid extends EventDispatcher

           {

               private var _checks:Vector.<DisplayObject>;

               private var _grid:Vector.<Vector.<DisplayObject>>;

               private var _gridSize:Number;

               private var _height:Number;

               private var _numCells:int;

               private var _numCols:int;

               private var _numRows:int;

               private var _width:Number;


               public function CollisionGrid(width:Number,

                                             height:Number,

                                             gridSize:Number)

               {

                   _width = width;

                   _height = height;

                   _gridSize = gridSize;

                   _numCols = Math.ceil(_width / _gridSize);


                   _numRows = Math.ceil(_height / _gridSize);

                   _numCells = _numCols * _numRows;

               }


               public function drawGrid(graphics:Graphics):void

               {

                   // make lines to represent grid

                   graphics.lineStyle(0, .5);

                   for(var i:int = 0; i <= _width; i += _gridSize)

                   {

                       graphics.moveTo(i, 0);

                       graphics.lineTo(i, _height);

                   }

                   for(i = 0; i <= _height; i += _gridSize)

                   {

                       graphics.moveTo(0, i);

                       graphics.lineTo(_width, i);

                   }

               }


               public function check(objects:Vector.<DisplayObject>):void

               {

                   var numObjects:int = objects.length;

                   _grid = new Vector.<Vector.<DisplayObject>>(_numCells);

                   _checks = new Vector.<Vector.<DisplayObject>>();

                   // loop through all objects

                   for(var i:int = 0; i < numObjects; i++)

                   {

                       var obj:DisplayObject = objects[i];

                       // use  a single index to represent position in

                       // one dimensional grid

                       var index:int = Math.floor(obj.y / _gridSize) *

                                    _numCols + Math.floor(obj.x / _gridSize);

                       // only create cell here if an object is assigned to i

                       if(_grid[index] == null)

                       {

                           _grid[index] = new Vector.<DisplayObject>;

                       }

                       // put the object in the cell

                       _grid[index].push(obj);

                   }


                   checkGrid();

               }


               private function checkGrid():void

               {

                   // loop through each cell of grid

                   for(var i:int = 0; i < _numCols; i++)


                   {

                       for(var j:int = 0; j < _numRows; j++)

                       {

                           // all the objects in the first cell

                           // against each other

                           checkOneCell(i, j);

                           checkTwoCells(i, j, i + 1, j);      // right

                           checkTwoCells(i, j, i - 1, j + 1);  // lower left

                           checkTwoCells(i, j, i,     j + 1);  // lower

                           checkTwoCells(i, j, i + 1, j + 1);  // lower right

                        }

                    }

                }


                private function checkOneCell(x:int, y:int):void

                {

                    // get cell represented by x, y

                    var cell:Vector.<DisplayObject> = _grid[y * _numCols + x];

                    if(cell == null) return;


                    // how many objects in cell

                    var cellLength:int = cell.length;


                    // compare all objects to each other

                    for(var i:int = 0; i < cellLength - 1; i++)

                    {

                        var objA:DisplayObject = cell[i];

                        for(var j:int = i + 1; j < cellLength; j++)

                        {

                            var objB:DisplayObject = cell[j];

                            _checks.push(objA, objB);

                        }

                    }

                }


                private function checkTwoCells(x1:int, y1:int,

                                               x2:int, y2:int):void

                {

                    // make sure cell exists in grid

                    if(x2 >= _numCols || x2 < 0 || y2 >= _numRows) return;

                    // get each cell, make sure there are objects in each

                    var cellA:Vector.<DisplayObject> =

                                   _grid[y1 * _numCols + x1];

                    var cellB:Vector.<DisplayObject> =

                                   _grid[y2 * _numCols + x2];

                    if(cellA == null || cellB == null) return;


                    var cellALength:int = cellA.length;

                    var cellBLength:int = cellB.length;


                    // compare all objs in one cell to all in the other

                    for(var i:int = 0; i < cellALength; i++)

                    {

                        var objA:DisplayObject = cellA[i];

                        for(var j:int = 0; j < cellBLength; j++)

                        {

                            var objB:DisplayObject = cellB[j];

                            _checks.push(objA, objB);

                       }

                   }

               }


               public function get checks():Array

               {

                   return _checks;

               }

           }

       }
Most of this code should be familiar from the previous example. A lot has been done to make it as optimized as possible, especially the use of vectors. Vectors are new to Flash 10, and are essentially typed arrays. Because the compiler knows that every element in the vector is going to be the same type, it can create much more efficient byte code that executes faster at run time. Switching from arrays to vectors nearly doubles the performance of this application!
The drawGrid() method is no different from what you saw earlier. It draws a grid!
The check() method is the main public method you will interact with in this class. You pass it a vector of DisplayObjects. I chose DisplayObject because objects used for collision detection are usually sprites, movie clips, shapes, or bitmaps, which are all defined by classes that inherit from DisplayObject. DisplayObjects also all have x and y properties, which we need to determine their position and hence their location in the grid. If you are using a custom class that does not inherit from DisplayObject, be sure to change the type in the class.
The check() method creates a vector called _grid, and another called _checks. You are familiar with _grid, but it is implemented a bit differently here—as a one-dimensional vector with some tricky indexing instead of a two-dimensional array. This is done because it is quicker and uses fewer resources to loop through a single array than to loop through two. We'll go through it in more detail very shortly. The _checks vector will be used to hold a list of objects that need to be hit tested. Note that the CollisionGrid class does not do the hit testing itself. It makes the grid, assigns the objects to it, and generates a list of objects that could potentially be colliding. It's up to you, the user of the class, to go through this array and do the actual collision detection.
Next, it loops through the vector of DisplayObjects passed to it and assigns each one to the grid. This bit of code might need some explanation:
         for(var i:int = 0; i < numObjects; i++)

         {

             var obj:DisplayObject = objects[i];

             //use a single index to represent positon in

             // one dimensional grid

             var index:int = Math.floor(obj.y / _gridSize) * _numCols +

                             Math.floor(obj.x / _gridSize);

             // only create cell here if an object is assigned to i

             if(_grid[index] == null)

             {

                 _grid[index] = new Vector.<DisplayObject>;

             }

             // put the object in the cell

             _grid[index].push(obj);

         }
Again, we are using a one-dimensional vector instead of a two-dimensional array. The index variable figures out what element of that vector corresponds to a specific row and column. The basic formula is the following, where x and y are the integer column and row indexes:
index = y * numColumns + x
Figure 1-21 should help to explain.
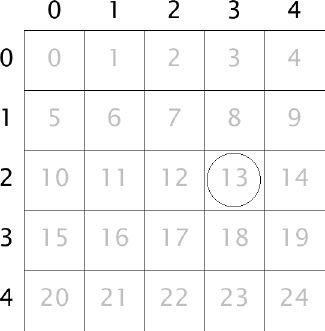
Figure 1-21. Using a single flat array as a grid
There are five columns and five rows. The object is in column 3 and row 2, so x = 3, and y = 2. Thus the index is 2 * 5 + 3, or 13, and that's exactly where you see it in the grid.
In the code, we are getting the column and row index the same way we were before:
Math.floor(obj.x / _gridSize)
Math.floor(obj.y / _gridSize)
The only difference is that we are doing the whole thing in one line:
       index = Math.floor(obj.y / _gridSize) * _numCols +

               Math.floor(obj.x / _gridSize);
The next statement is another optimization trick. Instead of looping through and creating a vector for each grid cell, many of which will never be used, we just check whether or not a vector exists there. If not, we create it. This is a form of lazy instantiation. In this case "lazy" isn't a derogatory term; it just refers to the decision to hold off creating something until you actually need it. There are cases when it makes sense and other times when it doesn't. Here, it seems to be a good idea:
            if(_grid[index] == null)

            {

                _grid[index] = new Vector.<DisplayObject>

            }
When we get to the final line of this loop, we know that the vector exists and we push the object onto it:
_grid[index].push(obj);
The final line of the check() method calls checkGrid(), which I'll repeat here:
       private function checkGrid():void

       {

           // loop through each cell of grid

           for(var i:int = 0; i < _numCols; i++)

           {

               for(var j:int = 0; j < _numRows; j++)

               {

                   // all the objects in the first cell against each other

                   checkOneCell(i, j);

                   checkTwoCells(i, j, i + 1, j);     // right

                   checkTwoCells(i, j, i - 1, j + 1); // lower left

                   checkTwoCells(i, j, i,     j + 1); // lower

                   checkTwoCells(i, j, i + 1, j + 1); // lower right

               }

           }

       }
This doesn't do anything different from the earlier example.
The checkOneCell() and checkTwoCells90() methods work essentially the same as well. Of course, they use one-dimensional vectors instead of two-dimensional arrays, and because vectors are created only for a cell when actually needed, they first check to see whether the cell is null. Also notice that instead of doing collision detection, they simply push the two objects they are checking onto the _checks vector.
At the end of it all, _checks will contain a list of objects that need to be checked against each other. This is a simple list in which each 2 consecutive elements need to be checked (that is, check element 0 with element 1, element 2 with 3, 4 with 5, and so on). Finally, we provide a public getter called checks to access this list.
Using the class
Okay, we have this lovely class, so let's see it in action. Here, I've altered the main class, naming it GridCollision2. Like everything else, it's downloadable from www.friendsofed.com.
      package {

          import flash.display.Sprite;

          import flash.display.StageAlign;

          import flash.display.StageScaleMode;

          import flash.utils.getTimer;

          import flash.display.DisplayObject;


          public class GridCollision2 extends Sprite

          {

              private const GRID_SIZE:Number = 80;

              private const RADIUS:Number = 25;


              private var _balls:Vector.<DisplayObject>;

              private var _grid:CollisionGrid;

              private var _numBalls:int = 100;


              public function GridCollision2()

              {

                  stage.align = StageAlign.TOP_LEFT;

                  stage.scaleMode = StageScaleMode.NO_SCALE;


                  _grid = new CollisionGrid(stage.stageWidth,

                                            stage.stageHeight,

                                            GRID_SIZE);


                  _grid.drawGrid(graphics);


                  makeBalls();


                  var startTime:int;

                  var elapsed:int;


                  // loop 10 times and measure elapsed time

                  startTime = getTimer();

                  for(var i:int = 0; i < 10; i++)

                  {

                      _grid.check(_balls);

                      var numChecks:int = _grid.checks.length;

                      for(var j:int = 0; j < numChecks; j += 2)


                      {

                         checkCollision(_grid.checks[j] as Ball,

                                        _grid.checks[j + 1] as Ball);

                      }

                  }

                  elapsed = getTimer() - startTime;

                  trace("Elapsed:", elapsed);

              }


              private function makeBalls():void

              {

                  // create balls, add to display list and _balls list

                  _balls = new Vector.<DisplayObject>(_numBalls);

                  for(var i:int = 0; i < _numBalls; i++)

                  {

                      var ball:Ball = new Ball(RADIUS);

                      ball.x = Math.random() * stage.stageWidth;

                      ball.y = Math.random() * stage.stageHeight;

                      ball.vx = Math.random() * 4 - 2;

                      ball.vy = Math.random() * 4 - 2;

                      addChild(ball);

                      _balls[i] = ball;

                  }

              }


              private function checkCollision(ballA:Ball, ballB:Ball):void

              {

                  // perform collision ctest between two individual balls

                  var dx:Number = ballB.x - ballA.x;

                  var dy:Number = ballB.y - ballA.y;

                  var dist:Number = Math.sqrt(dx * dx + dy * dy);

                  if(dist < ballA.radius + ballB.radius)

                  {

                      ballA.color = 0×ff0000;

                      ballB.color = 0×ff0000;

                  }

              }

           }

       }
The main changes are in the constructor. Because making and drawing the grid are encapsulated in the CollisionGrid class and just take a single line of code each, I removed the separate methods for makeGrid() and drawGrid() and just do those things directly in the constructor.
The makeBalls() method is called next. It is nearly identical to the earlier example, except that it uses a vector instead of an array.
There's a single timer loop because I was interested only in testing this new class. You can certainly add another timer loop for the basic check to compare that as well, but you should already have an idea of how long that takes. In that loop, we call _grid.check(_balls). We've already looked at that in depth. When that is finished, we know that _grids.checks contains a vector of objects to compare. The next for loop shows how to use it:
       for(var j:int = 0; j < numChecks; j += 2)

       {

           checkCollision(_grid.checks[j] as Ball,

                          _grid.checks[j + 1] as Ball);

       }
Here we loop through that vector, incrementing by 2 each time; then we get references to the next 2 items with the indexes j and j + 1. We cast these as Balls and send them to the checkCollision() method, which hasn't changed at all.
In my tests, this application runs almost twice as fast as the first example, owing mainly to the use of vectors and probably to the fact that we create vectors for cells only when we actually need them (lazy instantiation). We're ready for prime time with this, which means we can start to animate it.
Animating is really not much different from the single hit test; you just do it more often. Also, because we've presumably tuned the engine to the stage size and number of objects and have figured out our ideal grid size, we can get rid of the timing loop. But remember that when using this type of collision grid again in a new project or changing the parameters of this application, you'll want to do some timing tests again to get it tuned.
Our main class becomes this, which you can find on this book's download page:
      package {

          import flash.display.Sprite;

          import flash.display.StageAlign;

          import flash.display.StageScaleMode;

          import flash.display.DisplayObject;

          import flash.events.Event;


          public class GridCollision3 extends Sprite

          {

              private const GRID_SIZE:Number = 80;

              private const RADIUS:Number = 25;


              private var _balls:Vector.<DisplayObject>;

              private var _grid:CollisionGrid;

              private var _numBalls:int = 100;


              public function GridCollision3()

              {

                  stage.align = StageAlign.TOP_LEFT;

                  stage.scaleMode = StageScaleMode.NO_SCALE;


                  _grid = new CollisionGrid(stage.stageWidth,

                                            stage.stageHeight,

                                            GRID_SIZE);


                  _grid.drawGrid(graphics);


                  makeBalls();

                  addEventListener(Event.ENTER_FRAME, onEnterFrame);

               }


               function onEnterFrame(event:Event):void

               {

                   // add velocity to position of each ball

                   updateBalls();

                   // determine which balls need to be checked

                   _grid.check(_balls);

                   var numChecks:int = _grid.checks.length;

                   for(var j:int = 0; j < numChecks; j += 2)

                   {

                       // check each pair

                       checkCollision(_grid.checks[j] as Ball,

                                      _grid.checks[j + 1] as Ball);

                   }

               }


               private function makeBalls():void

               {

                  // create all the balls

                  _balls = new Vector.<DisplayObject>(_numBalls);

                  for(var i:int = 0; i < _numBalls; i++)

                  {

                      var ball:Ball = new Ball(RADIUS);

                      ball.x = Math.random() * stage.stageWidth;

                      ball.y = Math.random() * stage.stageHeight;

                      ball.vx = Math.random() * 4 - 2;

                      ball.vy = Math.random() * 4 - 2;

                      addChild(ball);

                      _balls[i] = ball;

                  }

               }


               private function updateBalls():void

               {

                   for(var i:int = 0; i < _numBalls; i++)

                   {

                       // move each ball, bounce off walls

                       var ball:Ball = _balls[i] as Ball;

                       ball.update();

                       if(ball.x < RADIUS)

                       {


                           ball.x = RADIUS;

                           ball.vx *= −1;

                       }


                       else if(ball.x > stage.stageWidth - RADIUS)

                       {

                           ball.x = stage.stageWidth - RADIUS;

                           ball.vx *= −1;

                       }

                       if(ball.y < RADIUS)

                       {


                           ball.y = RADIUS;

                           ball.vy *= −1;

                       }

                       else if(ball.y > stage.stageHeight - RADIUS)

                       {


                           ball.y = stage.stageHeight - RADIUS;

                           ball.vy *= −1;

                       }

                       ball.color = 0×ffffff;

                   }

               }


               private function checkCollision(ballA:Ball, ballB:Ball):void

               {

                   // perform check between two individual balls

                   var dx:Number = ballB.x - ballA.x;

                   var dy:Number = ballB.y - ballA.y;

                   var dist:Number = Math.sqrt(dx * dx + dy * dy);

                   if(dist < ballA.radius + ballB.radius)

                   {

                       ballA.color = 0×ff0000;

                       ballB.color = 0×ff0000;

                   }

               }

          }

      }
The main changes are the addition of the onEnterFrame() method and updateBalls() method. The constructor now just creates the grid and balls and sets up the ENTER_FRAME listener. The onEnterFrame() method updates each ball's position via the updateBalls() method and then does the grid-based collision detection exactly as before. The updateBalls() method just moves things around, wrapping them around the screen and changes the color of each ball back to white at the beginning of each frame. Only if they collide in the checkCollision() method are they reset to red.
Of course, you can use a different type of collision reaction here now to get something that looks like the balls actually bouncing off of each other. This is covered extensively in the "Conservation of Momentum" chapter of Making Things Move.
This method of collision detection should increase the number of things you can have moving around the stage at one time and reacting with each other by several times. Just remember the tuning tips and test, test, test to make sure that you are getting the best performance and accurate detection.
Collision detection: Not just for collisions
When you think of the term collision detection, it's natural to think only about two objects hitting each other. But particularly when you are using a distance-based method, it's sometimes better to think about it terms of the spatial relationship between two objects. Maybe you are not only interested in collisions, per se, but also in whether two objects are within a certain distance of each other. Perhaps in a game, the enemy has to be within so many pixels of a "good guy" in order to see him, for example.
For this, we can still use a grid-based collision detection setup, but instead of the size of the objects determining the grid size, it's the critical distance between two objects that would be important instead. In Making Things Move, I showed an example of particles interacting that was inspired by Jared Tarbell's Node Garden (at www.levitated.net. I realized that this would be a perfect example to convert to a grid-based setup, so I did just that. First let's take a look at the original code:
      package {

          import flash.display.Sprite;

          import flash.display.StageScaleMode;

          import flash.display.StageAlign;

          import flash.events.Event;

          import flash.geom.Point;


          [SWF(backgroundColor=0×000000)]

          public class NodeGardenLines extends Sprite

          {

              private var particles:Array;

              private var numParticles:uint = 30;

              private var minDist:Number = 100;

              private var springAmount:Number = .001;


              public function NodeGardenLines()

              {

                  init();

              }


              private function init():void

              {

                  stage.scaleMode = StageScaleMode.NO_SCALE;

                  stage.align = StageAlign.TOP_LEFT;

                  particles = new Array();

                  for(var i:uint = 0; i < numParticles; i++)

                  {

                      // create all the particles

                      var particle:Ball = new Ball(3, 0×ffffff);

                      particle.x = Math.random() * stage.stageWidth;

                      particle.y = Math.random() * stage.stageHeight;


                      particle.vx = Math.random() * 6 - 3;

                      particle.vy = Math.random() * 6 - 3;

                      addChild(particle);

                      particles.push(particle);

                  }


                  addEventListener(Event.ENTER_FRAME, onEnterFrame);

              }


              private function onEnterFrame(event:Event):void

              {

                  graphics.clear();

                  for(var i:uint = 0; i < numParticles; i++)

                  {

                      // update each particle wrap around screen

                      var particle:Ball = particles[i];

                      particle.x += particle.vx;

                      particle.y += particle.vy;

                      if(particle.x > stage.stageWidth)

                      {

                          particle.x = 0;

                      }

                      else if(particle.x < 0)

                      {

                          particle.x = stage.stageWidth;

                      }

                      if(particle.y > stage.stageHeight)

                      {

                          particle.y = 0;

                      }

                      else if(particle.y < 0)

                      {

                          particle.y = stage.stageHeight;

                      }

                  }


                  for(i=0; i < numParticles - 1; i++)

                  {

                      var partA:Ball = particles[i];

                      for(var j:uint = i + 1; j < numParticles; j++)

                      {

                          // spring each particle to each other particle

                          var partB:Ball = particles[j];

                          spring(partA, partB);

                      }

                  }

              }


              private function spring(partA:Ball, partB:Ball):void

              {

                  var dx:Number = partB.x - partA.x;

                  var dy:Number = partB.y - partA.y;

                  var dist:Number = Math.sqrt(dx * dx + dy * dy);

                  if(dist < minDist)

                  {

                      // if particles are close enough, draw a line

                      // and spring them toward each other

                      graphics.lineStyle(1, 0×ffffff, 1 - dist / minDist);

                      graphics.moveTo(partA.x, partA.y);

                      graphics.lineTo(partB.x, partB.y);

                      // acceleration is proportional to distance

                      var ax:Number = dx * springAmount;

                      var ay:Number = dy * springAmount;

                      // add accel to each particle, in opposite directions

                      partA.vx += ax;

                      partA.vy += ay;

                      partB.vx -= ax;

                      partB.vy -= ay;

                  }

              }

         }

     }
I won't go into explaining this code in depth. It basically creates a number of particles and moves them around. If two particles are less than a specific distance from each other, they will spring toward each other, and a line will be drawn between them. The closer the particles, the stronger the force between them, and the brighter the line. Notice also that the stage color has been set to black with SWF metadata at the top of the class:
[SWF(backgroundColor=0×000000)]
This metadata will work in Flex Builder or Flash CS4, but Flash CS3 will ignore it, requiring you to set the background color in the Properties Inspector instead. But because we'll soon be using Flash 10-specific features (vectors), I'll assume that you are using Flash CS4.
This file also uses a class called Ball, which is slightly different from the Ball class we've used so far in this chapter. The one we've been using will look slightly different, but will work just fine.
This example uses 30 particles, with a distance of 100 pixels or less for particles to react to each other. As is, this works just fine and doesn't need any improvement. But let's push it beyond its comfort zone by changing a couple of parameters:
     private var numParticles:uint = 500;

     private var minDist:Number = 50;
We'll increase the number of particles to 500, and the distance will go down to 50. If you are using the Flash authoring environment, you'll probably want to make the stage size a bit larger to handle all the particles without crowding them—say 1000×800. When you run the file now, you'll see that it is struggling significantly, achieving maybe a few frames per second.
Now let's see how implementing grid-based collision detection can help. The loop that does the checking between all the particles is in bold. That's the part we need to replace with the grid. We'll also probably see some improvement simply by changing the arrays into vectors. If you are curious, first try changing each instance of Array to Vector.<DisplayObject> and see how much that improves things. You'll also need to import the flash.display.DisplayObject class and cast the objects to the Ball class when you access them, like so:
var particle:Ball = particles[i] as Ball;
In my tests, although there seemed to be some improvement, it was slight. A double loop with 500 elements results in 124,750 checks on every frame. It's vital to get that number down because only a small percent of them are potential collisions. Implementing grid-based collision detection will bring that down to fewer than 10,000 checks. Here's the code in a new class called NodeGardenGrid (the lines in bold are the only ones that have changed from the original):
      package {

          import flash.display.DisplayObject;

          import flash.display.Sprite;

          import flash.display.StageScaleMode;

          import flash.display.StageAlign;

          import flash.events.Event;

          import flash.geom.Point;


          [SWF(backgroundColor=0×000000)]

          public class NodeGardenGrid extends Sprite

          {

              private var particles:Vector.<DisplayObject>;

              private var numParticles:uint = 500;

              private var minDist:Number = 50;

              private var springAmount:Number = .001;

              private var grid:CollisionGrid;


              public function NodeGardenGrid()

              {

                  init();

              }


              private function init():void

              {

                  stage.scaleMode = StageScaleMode.NO_SCALE;

                  stage.align = StageAlign.TOP_LEFT;


                  grid = new CollisionGrid(stage.stageWidth,

                                           stage.stageHeight, 50);

                  particles = new Vector.<DisplayObject>();

                  for(var i:uint = 0; i < numParticles; i++)

                  {

                      // create all particle

                      var particle:Ball = new Ball(3, 0×ffffff);

                      particle.x = Math.random() * stage.stageWidth;


                      particle.y = Math.random() * stage.stageHeight;

                      particle.vx = Math.random() * 6 - 3;

                      particle.vy = Math.random() * 6 - 3;

                      addChild(particle);

                      particles.push(particle);

                  }


                  addEventListener(Event.ENTER_FRAME, onEnterFrame);

               }


               private function onEnterFrame(event:Event):void

               {

                   graphics.clear();

                   for(var i:uint = 0; i < numParticles; i++)

                   {

                       // update particles, wrap around stage

                       var particle:Ball = particles[i] as Ball;

                       particle.x += particle.vx;

                       particle.y += particle.vy;

                       if(particle.x > stage.stageWidth)

                       {

                           particle.x = 0;

                       }

                       else if(particle < 0)

                       {

                           particle.x = stage.stageWidth;

                       }

                       if(particle.y > stage.stageHeight)

                       {

                           particle.y = 0;

                       }

                       else if(particle.y < 0)

                       {

                           particle.y = stage.stageHeight;

                       }

                   }

                   // determine which particles need to be checked

                   grid.check(particles);

                   var checks:Vector.<DisplayObject> = grid.checks;

                   trace(checks.length);

                   var numChecks:int = checks.length;

                   for(i=0; i < numChecks; i += 2)

                   {

                       // spring each pair toward each other

                       var partA:Ball = checks[i] as Ball;

                       var partB:Ball = checks[i + 1] as Ball;

                       spring(partA, partB);

                   }

              }


              private function spring(partA:Ball, partB:Ball):void

              {

                  var dx:Number = partB.x - partA.x;

                  var dy:Number = partB.y - partA.y;

                  var dist:Number = Math.sqrt(dx * dx + dy * dy);

                  if(dist < minDist)

                  {

                      graphics.lineStyle(1, 0×ffffff, 1 - dist / minDist);

                      graphics.moveTo(partA.x, partA.y);

                      graphics.lineTo(partB.x, partB.y);

                      var ax:Number = dx * springAmount;

                      var ay:Number = dy * springAmount;

                      partA.vx += ax;

                      partA.vy += ay;

                      partB.vx -= ax;

                      partB.vy -= ay;

                  }

              }

         }

     }
Ensure that your movie is set to publish to the Flash 10 format and that the CollisionGrid.as file is in your class path. In my tests, this resulted in about 6,500 checks per frame. Note that the grid is created with a grid size of 50, which is the same value as minDist. This particular code does not rely on the radii of the particles, only the distance between them. Remember that you'd probably want to do some actual timing tests and adjust the grid size for best performance, however. A larger grid size will give you more checks to do, but will result in less looping through arrays. Somewhere you'll hit a sweet spot of best performance. But even at the minimal value of 50, the performance is appreciably better.
Summary
So that covers our discussion of advanced collision detection. There are many ways these two techniques (bitmap- and grid-based collision checking) can be used, and the examples here were just a few ideas to get you started. Again, the most important thing to take away from this, particularly in the grid-based system, is to test, test, test; measure performance; and tune the collision engine for the best results. And remember that it excels in high numbers of objects, but the overhead outweighs any benefits for a smaller number of objects.
Next up is a very different subject, steering behaviors. We'll also get into a bit of artificial intelligence.