Chapter 7
3D IN FLASH 10
Since I've been involved in Flash, I've seen a new version of the Flash authoring tool, along with a new Flash Player, come out about every 18 months. Shortly after each version is released, the rumors, speculations, and wish lists for what will be in the next version begin. Routinely, one of the longed-for features is native 3D. And just as routinely, hopes are dashed when it doesn't appear. Until Flash 10.
You could always do 3D in Flash by scaling and positioning things to make them look like they are nearer or farther away. With ActionScript camethe capability to write real 3D engines. I covered the basics of this in Making Things Move, and in the last couple of years, numerous powerful 3D engines have appeared for Flash. PaperVision3D, Away3D, and others have the capability to load full 3D models and textures from professional modeling tools, and render and manipulate them in real time. But all these processes are done in ActionScript via classes that have been written by members of the community. They are compiled and run in the Player instead of being a native part of the Player itself.
In Flash 10, for the first time ever, we have the ability to create a display object—a sprite, movie clip, text field, and so on—and then directly manipulate it in 3D space. You can do this right in the Flash authoring tool itself and also via ActionScript. This chapter will focus on the ActionScript part.
Although this feature doesn't have anywhere near the capabilities of PaperVision3D—such as loading in models and textures, automatic depth sorting, and so on—it is extremely easy to work with and will be more than enough for many basic 3D effects you want to do in Flash. Well, what are we waitingfor? Let's do 3D.
Flash 10 3D Basics
This is an advanced book, so I assume that you know at least a little bit about 3D. You have three dimensions: x is horizontal, y is vertical, and z is in and out. In Flash, the origin, or zero point, is the top-left corner of the screen, at least in 2D. The y-axis might seem upside down to you if you are used to working in normal Cartesian coordinates, but you'll get used to it. In Flash 10 3D, z-axis values get higher as an object moves "into the screen" or away from the viewer. In other words, an object with a lower z position will appear in front of an object with a higher z position. See Figure 7-1.
It's also worth mentioning how rotation works on various axes in Flash 10 3D. Rotation around the z-axis goes clockwise as the angle increases, as viewed from in front. Again, this is opposite of what you might be used to. Rotation on the y-axis also goes clockwise (as viewed from above). On the x-axis, rotation goes clockwise when viewed from the left side of an object (see Figure 7-2).
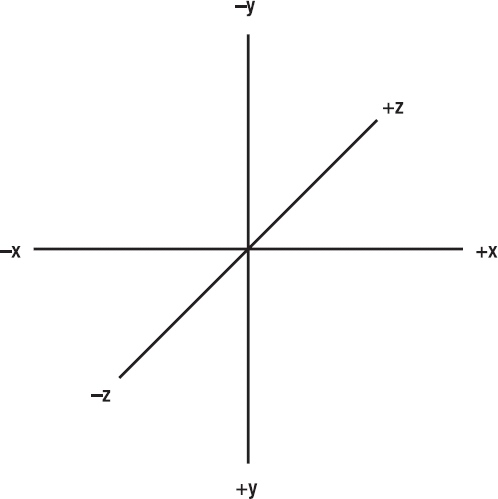
Figure 7-1. Flash 10 3D coordinates
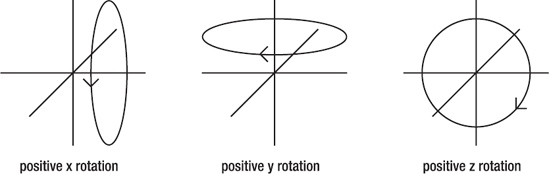
Figure 7-2. Flash 10 3D rotations
Another important thing to realize is that for 3D rotation in Flash 10, angles are in degrees, not radians. This might seem odd if you've gotten used to programming 3D, in which you use a lot of trigonometric functions that operate on radians. But 3D in Flash is tied to the authoring tools, which are geared toward designers, not engineers. They want to put something at a 45-degree angle, not a Math.PI/4 radian angle. In case you need a reminder of how to convert between radians and degrees, here you go:
      radians = degrees * PI / 180

      degrees = radians * 180 / PI
Okay, now that we've defined our terms, let's look at what we have to work with in Flash 10 in terms of the 3D application programming interface (API). Although there is a lot more than these, the real meat of the whole new 3D API comes down to four new properties: z, rotationX, rotationY, and rotationZ. We'll cover the rest of the stuff, but these four properties will be your best friends while creating basic 3D effects.
Let's try it out. Create the following class and compile it. As with all files in this chapter and the rest of the book, you can find them at the book's download page on www.friendsofed.com. This file name is Test3D.as:
       package {

           import flash.display.Shape;

           import flash.display.Sprite;

           import flash.display.StageAlign;

           import flash.display.StageScaleMode;

           import flash.events.Event;

           import flash.geom.PerspectiveProjection;

           import flash.geom.Point;


           [SWF(backgroundColor=0xffffff)]

           public class Test3D extends Sprite

           {


               private var _shape:Shape;


               public function Test3D()

               {


                   stage.align = StageAlign.TOP_LEFT;

                   stage.scaleMode = StageScaleMode.NO_SCALE;


                   _shape = new Shape();

                   _shape.graphics.beginFill(0xff0000);

                   _shape.graphics.drawRect(−100, −100, 200, 200);

                   _shape.x = stage.stageWidth / 2;

                   _shape.y = stage.stageHeight /

                   addChild(_shape);

                   addEventListener(Event.ENTER_FRAME, onEnterFrame);

               }


               private function onEnterFrame(event:Event):void

               {

                   _shape.rotationY += 2;

               }

           }

       }
Amazing! Native 3D in Flash!
Setting the vanishing point
I know you want to dive in and start making cool 3D stuff, but please read this section—there's some vital stuff here. Even if you know 3D, there are some quirks in Flash that will drive you crazy unless you know what's happening. Once you understand it, it will make sense, but otherwise you'll swear Flash is just plain broken.
If you used the last class as a document class for an FLA and compiled via Flash CS4, you probably saw something like Figure 7-3.
However, if you compiled for Flash 10 via Flex Builder or another setup using the Flex 4 SDK, you most likely saw something like Figure 7-4.
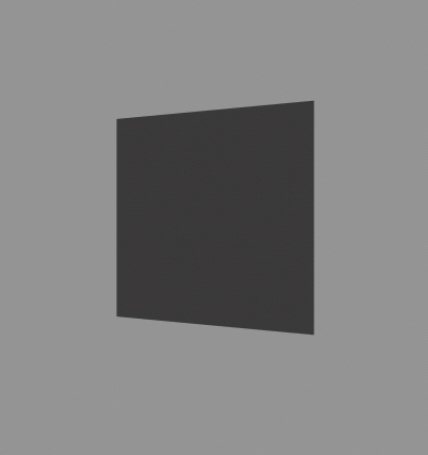
Figure 7-3. Rotation of a plane compiled in Flash CS4 |
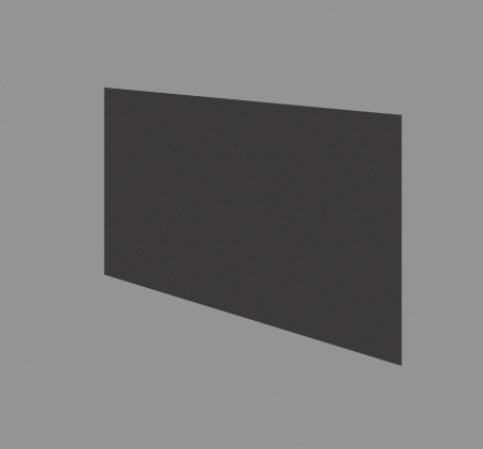
Figure 7-4. Rotation of a plane compiled in Flex Builder |
You see that it's kind of stretching off to the top left. The reason for this difference lies not in how the movies are compiled, but in the different ways they are published and how Flash sets the vanishing point. In 3D, the vanishing point is the point on which all objects converge as they move into the distance. I could insert a picture of a railroad track going off to the horizon, but you know what I'm talking about. When you code 3D from scratch, you have to manually choose a point to be the vanishing point and make sure that all objects converge on it. People usually choose the center of the stage as a vanishing point.
Flash 10 3D automatically sets the vanishing point for you and it will set it to the center of the stage. But it only does this a single time, the instant the SWF loads. When you test the movie from Flash, it pops up in a window based on the size set in the document properties panel. So the vanishing point is at its center, and that works out just fine.
However, in Flex Builder, the default size for a SWF is set to 500×375 pixels. Thus your vanishing point will be at 250, 187.5. But as soon as you set the stage.align to StageAlign.TOP_LEFT, and stage.scaleMode to StageScaleMode.NO_SCALE, it increases the size of the stage. (It's a common practice to set them so the SWF doesn't scale all its content if the display area increases—it just makes the stage larger.) You can see that by tracing out the stage width and height just before and after these calls:
      trace(stage.stageWidth, stage.stageHeight); // 500, 375

      stage.align = StageAlign.TOP_LEFT;

      stage.scaleMode = StageScaleMode.NO_SCALE;

      trace(stage.stageWidth, stage.stageHeight); // 1440, 794
You'll get a different value for the last trace, depending on the size of your browser. So, the stage size changes, and the sprite is then placed at the new center of the stage, which is something like 720, 397. But the vanishing point is still stuck at 250, 187.5. That's the problem right there.
The easiest way to fix this is to explicitly set a width and height in your SWF metadata:
[SWF(backgroundColor=0xffffff, width=800, height=800)]
This runs before the vanishing point is calculated, so it will be calculated as the center of 800, 800. The stage size won't change after the align and scaleMode are set, so your sprite gets placed at the same center.
But, perhaps you want to have a variable stage size, one that does fill the browser window no matter what size it is. Doing that is a bit more complex, but not too bad. You need to use a new class called PerspectiveProjection. This class controls various aspects about how 3D perspective is rendered, including the vanishing point. Each display object in Flash 10 now can now have a PerspectiveProjection assigned to it to control how it renders 3D. It is assigned to the perspectiveProjection property of the transform property. So, for a sprite named, for example, you would access it like so:
s.transform.perspectiveProjection
The PerspectiveProjection class has a property named projectionCenter, which is an instance of the Point class. This is actually what we have been calling the vanishing point. Thus, to set the vanishing point for a display object to the center of the stage, you would do something like the following:
      s.transform.perspectiveProjection.projectionCenter =

          new Point(stage.stageWidth / 2, stage.stageHeight / 2);
It sets the vanishing point for only that one object. But it also sets the vanishing point for any children of that object. If you want to set the vanishing point for all objects in the movie, set it on the root level, like so:
      root.transform.perspectiveProjection.projectionCenter =

             new Point(stage.stageWidth / 2, stage.stageHeight / 2);
The following class does just that, right after setting the stage's align and scaleMode, which fixes the problem we saw earlier:
      package {

          import flash.display.Shape;

          import flash.display.Sprite;

          import flash.display.StageAlign;


          import flash.display.StageScaleMode;

          import flash.events.Event;

          import flash.geom.PerspectiveProjection;

          import flash.geom.Point;


          [SWF(backgroundColor=0xffffff)]

          public class Test3D extends Sprite

          {


              private var _shape:Shape;


              public function Test3D()

              {


                  stage.align = StageAlign.TOP_LEFT;

                  stage.scaleMode = StageScaleMode.NO_SCALE;

                  root.transform.perspectiveProjection.projectionCenter =
                          new Point(stage.stageWidth / 2,

                                    stage.stageHeight / 2);


                  _shape = new Shape();

                  _shape.graphics.beginFill(0xff0000);

                  _shape.graphics.drawRect(−100, −100, 200, 200);

                  _shape.x = stage.stageWidth / 2;

                  _shape.y = stage.stageHeight / 2;

                  addChild(_shape);

                  addEventListener(Event.ENTER_FRAME, onEnterFrame);

              }


              private function onEnterFrame(event:Event):void

              {

                  _shape.rotationY += 2;

              }

          }

       }
You can go one step further and change the center point whenever the stage resizes by doing the following:
          package {

              import flash.display.Shape;

              import flash.display.Sprite;

              import flash.display.StageAlign;

              import flash.display.StageScaleMode;

              import flash.events.Event;

              import flash.geom.PerspectiveProjection;

              import flash.geom.Point;


              public class Test3D extends Sprite

              {

                  private var _shape:Shape;


                   public function Test3D()

                   {

                       stage.addEventListener(Event.RESIZE, onResize)

                       stage.align = StageAlign.TOP_LEFT;

                       stage.scaleMode = StageScaleMode.NO_SCALE;


                       _shape = new Shape();

                       _shape.graphics.beginFill(0xff0000);

                       _shape.graphics.drawRect(−100, −100, 200, 200);

                       _shape.x = stage.stageWidth / 2;

                       _shape.y = stage.stageHeight / 2;

                       addChild(_shape);


                       addEventListener(Event.ENTER_FRAME, onEnterFrame);

                   }


                   private function onResize(event:Event):void

                   {

                       root.transform.perspectiveProjection.projectionCenter =

                               new Point(stage.stageWidth / 2,

                                         stage.stageHeight / 2);

                       if(_shape != null)

                       {

                          _shape.x = stage.stageWidth / 2;

                          _shape.y = stage.stageHeight / 2;

                       }

                   }


                   private function onEnterFrame(event:Event):void

                   {

                       _shape.rotationY += 2;

                   }

                }

             }
Because we listen for the resize event as a first action, the onResize method will be called as soon as we change the stage settings and the stage resizes, which will set the projection center immediately. It will also be called any other time the user changes the stage size by resizing the browser. I've also repositioned the shape to make sure it's always center stage as well. But onResize will be called the first time before the shape has been created, so we have to make sure it exists first. hence the conditional in there.
For simplicity's sake, I'll go with the first solution of just setting the stage size with metadata in the rest of the chapter.
Okay, that's the vital stuff you need to know to keep your movies' perspectives looking good. Let's see what else we can do with 3D.
3D Positioning
This one is pretty obvious. I assume that you don't need to be told how to change an object's position on the x- and y-axis. Changing it on the z-axis is just as easy. The next class (found in the Position3D. as file) sets up a sine wave that swings a shape out into the distance and back, over and over. It also follows the mouse position on x and y:
      package

      {

          import flash.display.Shape;

          import flash.display.Sprite;

          import flash.events.Event;


          [SWF(width=800, height=800, backgroundColor=0xffffff)]

          public class Position3D extends Sprite

          {

              private var _shape:Shape;

              private var _n:Number = 0;


              public function Position3D()

              {

                  _shape = new Shape();

                  _shape.graphics.beginFill(0x00ff00);

                  _shape.graphics.drawRect(−100, −100, 200, 200);

                  _shape.graphics.endFill();

                  addChild(_shape);


                  addEventListener(Event.ENTER_FRAME, onEnterFrame);

              }


              private function onEnterFrame(event:Event):void

              {

                  _shape.x = mouseX;

                  _shape.y = mouseY;

                  _shape.z = 10000 + Math.sin(_n += .1) * 10000;

              }

           }

         }
I think the important thing to take away from this example is that once you change the z position, the x and y of a display object no longer directly refer to screen coordinates; they refer to 3D space coordinates. If you don't move your mouse, the x and the y of the shape do not change, but its x and y coordinates change onscreen. Only when z is equal to zero do the object's x and y match the screen x and y. This is because when z is less than zero, Flash scales the object up; when it's greater than zero, Flash scales the object down, but when z is exactly zero, the scale will be 100%.
Depth sorting
One thing you'll run into as soon as you start creating multiple objects and positioning in 3D space is that objects that are farther away (higher z value) sometimes appear in front of objects that are closer. I imagine you want to know the property or method. Unfortunately, there is no method or property you can set or call to ensure that objects are sorted correctly.
The 3D API in Flash 10 handles perspective scaling and distortion on an individual display object—and even that object's children if it has any—but it does not affect the order in which they are drawn to the screen. This is still handled the same way as for 2D objects in Flash 9: any object put on the display list via the addChild method will appear in front of previous objects added to the same container. The only ways to alter this are the various methods for managing the display list, such as addChild, addChildAt, swapChildren, removeChild, and so on. And because there is no sort method on a display object container, any depth sorting has to be done manually.
To look at how to solve the issue, let's first make an example that demonstrates the problem. How about a forest full of trees?
        package

        {

            import flash.display.Shape;

            import flash.display.Sprite;

            import flash.display.StageAlign;

            import flash.display.StageScaleMode;


            [SWF(width=800, height=800, backgroundColor = 0xccffcc)]

            public class DepthSort extends Sprite

            {

                public function DepthSort()

                {

                    stage.align = StageAlign.TOP_LEFT;

                    stage.scaleMode = StageScaleMode.NO_SCALE;


                    for(var i:int = 0; i < 500; i++)

                    {

                        var tree:Shape = new Shape();

                        tree.graphics.beginFill(Math.random() * 255 << 8);

                        tree.graphics.lineTo(−10, 0);

                        tree.graphics.lineTo(−10, −30);

                        tree.graphics.lineTo(−40, −30);

                        tree.graphics.lineTo(0, −100);

                        tree.graphics.lineTo(40, −30);

                        tree.graphics.lineTo(10, −30);

                        tree.graphics.lineTo(10, 0);

                        tree.graphics.lineTo(0, 0);

                        tree.graphics.endFill();


                        tree.x = Math.random() * stage.stageWidth;

                        tree.y = stage.stageHeight −100;

                        tree.z = Math.random() * 10000;

                        addChild(tree);

                    }

                }

            }

        }
Here we created a whole bunch of shapes and used the drawing API to draw a randomly shaded green tree in each one. each one is randomly placed on x, y, and z. Not the high point in Flash design, but it serves the purpose. It doesn't look quite right, as you can see in Figure 7-5.
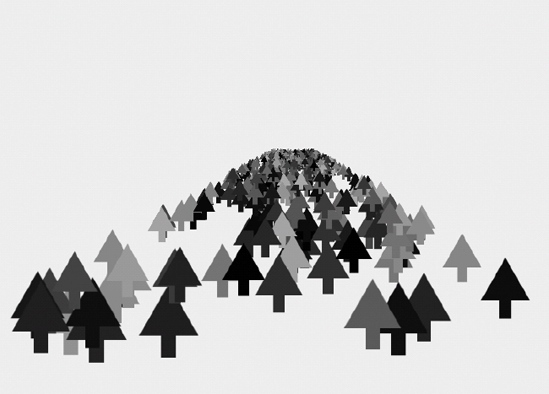
Figure 7-5. Perspective is fine, but no depth sorting
Again, we can't sort the display list, but we can sort an array. So instead of adding each tree to the display list as it's created, let's put it in an array. Then we can sort the array and add the trees to the display list in the right order—those with high z values first, lower z values later.
      package

      {

          import flash.display.Shape;

          import flash.display.Sprite;


          import flash.display.StageAlign;

          import flash.display.StageScaleMode;


          [SWF(width=800, height=800, backgroundColor = 0xccffcc)]

          public class DepthSort extends Sprite

          {

              private var _trees:Array;


              public function DepthSort()

              {

                  stage.align = StageAlign.TOP_LEFT;

                  stage.scaleMode = StageScaleMode.NO_SCALE;


                  _trees = new Array();


                  for(var i:int = 0; i < 500; i++)

                  {

                      var tree:Shape = new Shape();

                      tree.graphics.beginFill(Math.random() * 255 << 8);

                      tree.graphics.lineTo(−10, 0);

                      tree.graphics.lineTo(−10, −30);

                      tree.graphics.lineTo(−40, −30);

                      tree.graphics.lineTo(0, −100);

                      tree.graphics.lineTo(40, −30);

                      tree.graphics.lineTo(10, −30);

                      tree.graphics.lineTo(10, 0);

                      tree.graphics.lineTo(0, 0);

                      tree.graphics.endFill();

                      tree.x = Math.random() * stage.stageWidth;

                      tree.y = stage.stageHeight −100;

                      tree.z = Math.random() * 10000;

                      _trees.push(tree);

                  }


                  _trees.sortOn("z", Array.NUMERIC | Array.DESCENDING);

                  for(i = 0; i < 500; i++)

                  {

                      addChild(_trees[i] as Shape);

                  }

              }

          }

      }
Although this doesn't make the picture you see in Figure 7-6 any more artistic, at least the far away trees are behind the close ones, as you'd see them in a real forest.
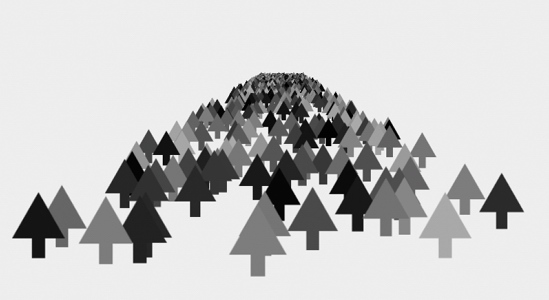
Figure 7-6. Forest, now with depth sorting
3D containers
When I first started playing with the API, one of the things that made me really happy about 3D in Flash 10 was the realization that display object containers transform their children when they are transformed. In other words, when you add some display objects to a sprite and then move that container sprite around, it doesn't simply flatten the view of that sprite and move it around as a single object in 3D. No, it actually transforms each child so it looks like they are all moving individually in 3D space.
This is one of those things that's a lot easier to show than to describe. So the next class demonstrates it. Why don't we use something other than shapes with squares drawn in them this time? Text fields are display objects, too, and can be moved around in 3D exactly the same way. We'll make a sprite, throw a bunch of text fields in it with some random letters, and then move the sprite around. You can find the next example in the Container3D.as file:
       package

       {

           import flash.display.Sprite;

           import flash.display.StageAlign;

           import flash.display.StageScaleMode;

           import flash.events.Event;

           import flash.text.TextField;

           import flash.text.TextFormat;


           [SWF(width=800, height=800, backgroundColor=0xffffff)]

           public class Container3D extends Sprite

           {


               private var _sprite:Sprite;

               private var _n:Number = 0;


               public function Container3D()

               {

                   stage.align = StageAlign.TOP_LEFT;

                   stage.scaleMode = StageScaleMode.NO_SCALE;


                   _sprite = new Sprite();

                   _sprite.y = stage.stageHeight / 2;


                   for(var i:int = 0; i < 100; i++)

                   {


                       var tf:TextField = new TextField();

                       tf.defaultTextFormat = new TextFormat("Arial", 40);

                       tf.text = String.fromCharCode(65 +

                                        Math.floor(Math.random() * 25));

                       tf.selectable = false;

                       tf.x = Math.random() * 300 − 150;

                       tf.y = Math.random() * 300 − 150;

                       tf.z = Math.random() * 1000;

                       _sprite.addChild(tf);

                   }


                   addChild(_sprite);


                   addEventListener(Event.ENTER_FRAME, onEnterFrame);

               }


               private function onEnterFrame(event:Event):void

               {

                   _sprite.x = stage.stageWidth / 2 + Math.cos(_n) * 200;

                   _n += .05;

               }

           }

       }
Each text field is randomly positioned in three dimensions within the parent sprite. Although the sprite is just moving back and forth on the x-axis, you can see the parallax effect as the letters move back and forth in 3D. See Figure 7-7.
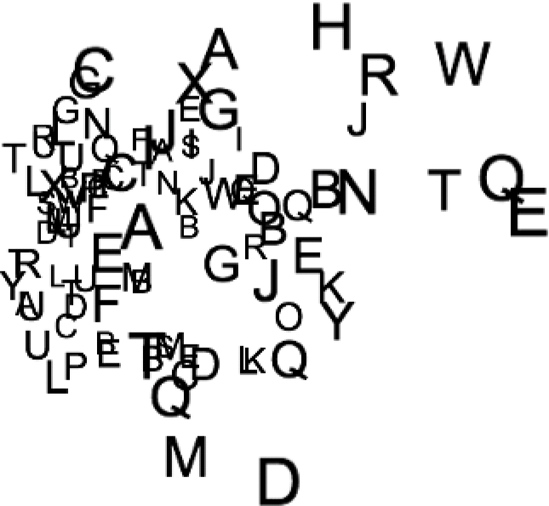
Figure 7-7. 3D containers that look much better in motion!
3D Rotation
In addition to moving things around in 3D space, you can rotate any display object on any axis. We already saw a quick example of that at the beginning of the chapter, rotating a shape on the y-axis. I don't think I have to walk you through repeating this example on the x-and z-axis because you can probably figure that out on your own, and have probably gone way on ahead of the class and got something rotating on all three axes at once. (If you haven't, go ahead and try it.)
When you're ready, let's jump into rotating containers with display objects in them. First, we'll re-create that first experiment, but put the shape inside a sprite first. You can find the RotateAndPosition.as example file on the book's download page:
package {

           import flash.display.Shape;

           import flash.display.Sprite;

           import flash.events.Event;


           [SWF(width=800, height=800, backgroundColor = 0xffffff)]

           public class RotateAndPosition extends Sprite

           {

               private var _holder:Sprite;


               public function RotateAndPosition()

               {


                    _holder = new Sprite();

                    _holder.x = stage.stageWidth / 2;

                    _holder.y = stage.stageHeight / 2;

                    addChild(_holder);


                    var shape:Shape = new Shape();

                    shape.z = 200;

                    shape.graphics.beginFill(0xff0000);

                    shape.graphics.drawRect(−100, −100, 200, 200);

                    _holder.addChild(shape);


                    addEventListener(Event.ENTER_FRAME, onEnterFrame);

               }


               private function onEnterFrame(event:Event):void

               {

                   _holder.rotationY += 2;

               }

           }

       }
This just gives us a rotating square like before. But now let's move the square around within the container. First on the x-axis—add the line in bold in the constructor:
       var shape:Shape = new Shape();

       shape.x = 200;

       shape.graphics.beginFill(0xff0000);

       shape.graphics.drawRect(−100, −100, 200, 200);

       _holder.addChild(shape);
Now instead of just rotating, it's kind of orbiting the center. We can get a different effect by moving the shape on the z-axis first:
       var shape:Shape = new Shape();

       shape.z = 200;

       shape.graphics.beginFill(0xff0000);

       shape.graphics.drawRect(−100, −100, 200, 200);

       _holder.addChild(shape);
Well that's pretty cool. Let's make another square:
       package {

           import flash.display.Shape;

           import flash.display.Sprite;

           import flash.events.Event;


           [SWF(width=800, height=800, backgroundColor = 0xffffff)]

           public class RotateAndPosition extends Sprite

           {

               private var _holder:Sprite;


               public function RotateAndPosition()

               {

                   _holder = new Sprite();

                   _holder.x = stage.stageWidth / 2;

                   _holder.y = stage.stageHeight / 2;

                   addChild(_holder);


                    var shape1:Shape = new Shape();

                    shape1.z = 200;

                    shape1.graphics.beginFill(0xff0000);

                    shape1.graphics.drawRect(−100, −100, 200, 200);

                    _holder.addChild(shape1);


                    var shape2:Shape = new Shape();

                    shape2.z = −200;

                    shape2.graphics.beginFill(0xff0000);

                    shape2.graphics.drawRect(−100, −100, 200, 200);

                    _holder.addChild(shape2);


                   addEventListener(Event.ENTER_FRAME, onEnterFrame);

               }


               private function onEnterFrame(event:Event):void

               {

                   _holder.rotationY += 2;

               }

           }

       }
We'll put one at a z of 200 and the other at −200. Now when we rotate the container, they'll kind of rotate around each other. But why limit it to y rotation? Change onEnterFrame to add some rotation on another axis:
       private function onEnterFrame(event:Event):void

       {

           _holder.rotationY += 2;

           _holder.rotationX += 1.5;

       }
Heck, this is just too easy. Let's add some more squares! This time, we'll push them off to the left and right on the x-axis, but we'll also rotate them 90 degrees:
       var shape3:Shape = new Shape();

       shape3.x = 200;

       shape3.rotationY = 90;

       shape3.graphics.beginFill(0xff0000);

       shape3.graphics.drawRect(−100, −100, 200, 200);

       _holder.addChild(shape3);


       var shape4:Shape = new Shape();

       shape4.x = −200;

       shape4.rotationY = −90;

       shape4.graphics.beginFill(0xff0000);

       shape4.graphics.drawRect(−100, −100, 200, 200);

       _holder.addChild(shape4);
Now you have four walls orbiting each other. Why stop there? You're probably way ahead of me, but let's add a floor and ceiling (in a rough sense):
       var shape5:Shape = new Shape();

       shape5.y = 200;

       shape5.rotationX = 90;

       shape5.graphics.beginFill(0xff0000);

       shape5.graphics.drawRect(−100, −100, 200, 200);

       _holder.addChild(shape5);


       var shape6:Shape = new Shape();

       shape6.y = −200;

       shape6.rotationX = −90;

       shape6.graphics.beginFill(0xff0000);

       shape6.graphics.drawRect(−100, −100, 200, 200);

       _holder.addChild(shape6);
You can see the results in Figure 7-8.
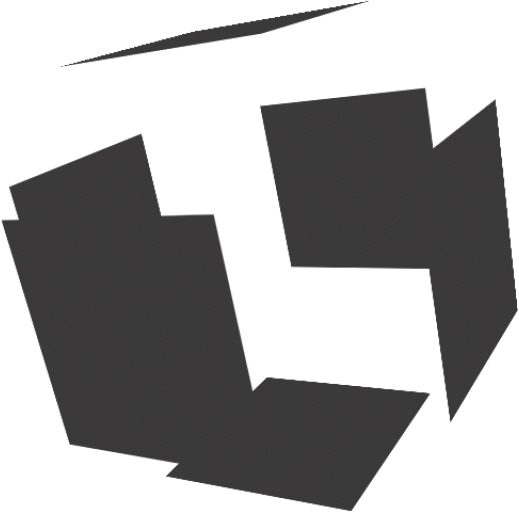
Figure 7-8. Rotating cube!.
Pretty neat, eh? And amazingly simple. Not even a single line of trig. I know exactly what you're thinking now, too: photo cube! Well, maybe that's not exactly what you're thinking, but I'm sure you're thinking that those red squares are getting a bit stale and they need something different. Of course, once you start changing colors and so forth, you'll ruin my carefully crafted illusion. Okay, go ahead and try it. Make each square a different color by changing the hex value in the beginFill call. You can even do it randomly if you want:
shape1.graphics.beginFill(Math.random() * 0xffffff);
You should see something like Figure 7-9.
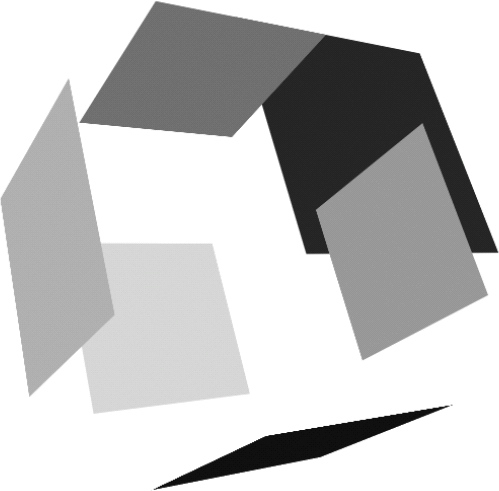
Figure 7-9. Adobe, we have a problem.
Now that things aren't all red, you see the problem. If it's not clear in the screenshot here, what's happening is that parts of the cube that should be in back are now appearing in front. I'm hoping you've learned enough already to recognize instantly that this is a problem in depth sorting. Well, we've already learned about depth sorting and how to deal with that, so we can dive right in and apply it. The next class, available in the RotateAndPosition2.as file, attempts to solve the depth problem the way we just learned—by sorting the shapes by their z property and adding them to the display list in that order. I added a makeShape method to remove some of the duplication:
       package {

           import flash.display.Shape;

           import flash.display.Sprite;

           import flash.events.Event;


           [SWF(width=800, height=800, backgroundColor = 0xffffff)]

           public class RotateAndPosition2 extends Sprite

           {

               private var _holder:Sprite;

               private var _shapes:Array;


               public function RotateAndPosition2()

               {

                   _holder = new Sprite();

                   _holder.x = stage.stageWidth / 2;

                   _holder.y = stage.stageHeight / 2;

                   addChild(_holder);


                   var shape1:Shape = makeShape();

                   shape1.z = 200;


                   var shape2:Shape = makeShape();

                   shape2.z = −200;


                   var shape3:Shape = makeShape();

                   shape3.x = 200;

                   shape3.rotationY = 90;


                   var shape4:Shape = makeShape();

                   shape4.x = −200;

                   shape4.rotationY = −90;


                   var shape5:Shape = makeShape();

                   shape5.y = 200;

                   shape5.rotationX = 90;


                   var shape6:Shape = makeShape();

                   shape6.y = −200;

                   shape6.rotationX  = 90;


                   _shapes = [shape1, shape2, shape3, shape4, shape5, shape6];

                   sortShapes();


                   addEventListener(Event.ENTER_FRAME, onEnterFrame);

               }


               private function makeShape():Shape

               {

                   var shape:Shape = new Shape();

                   shape.graphics.beginFill(Math.random() * 0xffffff);

                   shape.graphics.drawRect(−100, −100, 200, 200);

                   _holder.addChild(shape);

                   return shape;

               }


               private function sortShapes():void

               {

                   _shapes.sortOn("z", Array.NUMERIC | Array.DESCENDING);

                   for(var i:int = 0; i < _shapes.length; i++)


                   {

                       _holder.addChildAt(_shapes[i] as Shape, i);

                   }

               }


               private function onEnterFrame(event:Event):void

               {

                   _holder.rotationY += 2;

                   _holder.rotationX += 1.5;

                   sortShapes();

               }

           }

       }
In addition to the cleanup, we have an array called _shapes that contains all the shapes. The sortShapes method is called after each rotation. It sorts the shapes array on z and adds each one back on to the holder in the correct z order.
But, when you test it, it doesn't really do a darned thing. The problem is that we're sorting the elements on the z-axis internal to the container. So although they are correctly sorted on z, when the container is flipped around, they are suddenly completely backward. What we need to do is sort things in the order in which they appear from outside the holder. In other words, even if object A has a lower z depth than object B, it should appear behind object B when the container is rotated so that it is "backward" in respect to the z-axis.
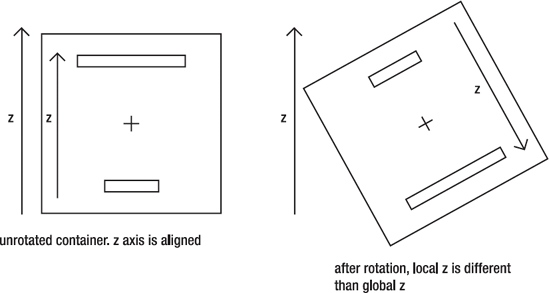
Figure 7-10. The effects of rotating a 3D container
To do this, we need to write a custom sort function that transforms the local coordinates inside the container to the world (or stage or root) coordinates and then sorts based on it. The Array.sort method allows you to pass in a function as a parameter. This function is then called multiple times with pairs of objects during a sort. The function should return a negative number if the first object should be placed before the second in the array, a positive number if the first object should be placed after the second, and zero if they should be left as they are.
So now we need a way to convert the local coordinates to world coordinates. There are numerous ways to do this, including manually doing coordinate rotation that involves lots of complex trigonometry. Luckily, Flash 10 now has a new class, flash.geom.Matrix3D, which contains all kinds of useful methods for manipulating 3D coordinates. Even here, there are probably multiple ways of accomplishing what we are about to do. I don't know if the way I'm presenting is the best way, but it does get the job done and without too much pain.
This makes use of a method called deltaTransformVector on the Matrix3D class. Basically what this does is take a 3D point (stored in a Vector3D object) and applies the rotation and scaling portions of a 3D matrix to it. In simple terms, it rotates the positions of all our shapes according to the rotation of the container and lets us know where they sit in the global 3D space.
So first we need the Matrix3D that represents the rotation of the container. We can get that by typing the following:
container.transform.matrix3D
We can then call the deltaTransformVector method, passing in the 3D position of a point, and get its rotated position:
       rotatedPosition = _holder.transform.matrix3D.deltaTransformVector(

                                                         originalPosition)
If we do that to the positions of two separate shapes, we'll thenknow which one is farther away on the z-axis as seen from a global viewpoint. The last piece of the puzzle we need is how to get a Vector3D representation of the position of a display object. We could just create one on the fly by using the object's x, y, and z properties, but it happens that one already exists:
displayObject.transform.Matrix3D.position
Now we have everything we need to get the global coordinates of two display objects:
       var posA:Vector3D = objA.transform.matrix3D.position;

       posA = _holder.transform.matrix3D.deltaTransformVector(posA);

       var posB:Vector3D = objB.transform.matrix3D.position;

       posB = _holder.transform.matrix3D.deltaTransformVector(posB);
We can then make a sort compare function, which will determine which of two display objects is in front:
       private function depthSort(objA:DisplayObject, objB:DisplayObject):int

       {

           var posA:Vector3D = objA.transform.matrix3D.position;

           posA = _holder.transform.matrix3D.deltaTransformVector(posA)

           var posB:Vector3D = objB.transform.matrix3D.position;

           posB = _holder.transform.matrix3D.deltaTransformVector(posB);

           return posB.z - posA.z;

       }
If object A is farther away than object B from a rotated, global viewpoint, this function will return a negative number, indicating that object A should be sorted before B in the array. We can then implement this in the sortShapes method quite easily:
       private function sortShapes():void

       {

           _shapes.sort(depthSort);

           for(var i:int = 0; i < _shapes.length; i++)

           {

               _holder.addChildAt(_shapes[i] as Shape, i);

           }

       }
Now the rotating shapes should sort just fine, creating a nice 3D object, as you can see in Figure 7-11.

Figure 7-11. Correct depth sorting, even in a rotating container
By altering this slightly, we can get a carousel type of layout, often (maybe too often) used for navigation or for displaying galleries of images. I won't actually load any images in the next example, but you can easily modify the sprites to be loaders and supply them with a list of URLs. Anyway, here's the code, as found in the Carousel.as file:
       package

       {

           import flash.display.DisplayObject;

           import flash.display.Sprite;

           import flash.events.Event;

           import flash.geom.Vector3D;


           [SWF(width=800, height=800, backgroundColor = 0xffffff)]

           public class Carousel extends Sprite

           {

               private var _holder:Sprite;

               private var _items:Array;


               private var _radius:Number = 200;

               private var _numItems:int = 5;


               public function Carousel()

               {

                   _holder = new Sprite();

                   _holder.x = stage.stageWidth / 2;

                   _holder.y = stage.stageHeight / 2;

                   _holder.z = 0;

                   addChild(_holder);


                   _items = new Array();

                   for(var i:int = 0; i < _numItems; i++)

                   {

                       var angle:Number = Math.PI * 2 / _numItems * i;

                       var item:Sprite = makeItem();

                       item.x = Math.cos(angle) * _radius;

                       item.z = Math.sin(angle) * _radius;

                       item.rotationY = −360 / _numItems * i + 90;

                       _items.push(item);

                   }

                   sortItems();


                   addEventListener(Event.ENTER_FRAME, onEnterFrame);

               }


               private function makeItem():Sprite

               {

                   var item:Sprite = new Sprite();

                   item.graphics.beginFill(Math.random() * 0xffffff);

                   item.graphics.drawRect(−50, −50, 100, 100);

                   _holder.addChild(item);

                   return item;

               }


               private function sortItems():void

               {

                   _items.sort(depthSort);

                   for(var i:int = 0; i < _items.length; i++)

                   {

                       _holder.addChildAt(_items[i] as Sprite, i);

                   }

               }


               private function depthSort(objA:DisplayObject,

                                          objB:DisplayObject):int

               {

                   var posA:Vector3D = objA.transform.matrix3D.position;

                   posA =

                       _holder.transform.matrix3D.deltaTransformVector(posA);


                   var posB:Vector3D = objB.transform.matrix3D.position;

                   posB =

                       _holder.transform.matrix3D.deltaTransformVector(posB);

                   return posB.z - posA.z;

               }


               private function onEnterFrame(event:Event):void

               {

                   _holder.rotationY += (stage.stageWidth / 2 - mouseX) * .01;

                   _holder.y += (mouseY - _holder.y) * .1;

                   sortItems();

               }

           }

       }
The biggest changes are in bold: how the images get positioned and rotated originally, and how the container is moved in the onEnterFrame method. Instead of manually place each square, we do it in a loop this time, dividing Math.PI * 2 radians (360 degrees) by the number of items and multiplying it by the current item number. Using some trig on the resulting angle, along with a radius, gives us the x and z position for each item. We then do a similar calculation with the rotationY property, this time using degrees directly. Finally, in the enterFrame handler, we rotate the container on the y-axis based on the mouse position, as well as move it up and down on the y-axis to follow the mouse.
You can see how this looks in Figure 7-12.

Figure 7-12. A 3D carousel
Now that we have some basic ideas of how to position and rotate things in 3D, let's take a closer look at how to fine-tune the appearance of 3D.
Field of View and Focal Length
Obviously, when you are viewing any kind of image on a flat screen, you are actually viewing a two-dimensional image. Programs that render things in 3D use a number of tricks to give the illusion of a third dimension in a 2D plane. These various tricks come under the heading of perspective.
One trick of perspective is having things that are supposed to be in the distance appear behind things that are closer. We dealt with that in the last section when we did depth sorting. Another trick is making things in the distance somewhat faded out, like fog. Similarly, you can have objects at a certain depth in focus, and any objects closer or farther away out of focus. This is known as depth of field.
But the trick with the most impact by far is to make things that are farther away smaller, and have them approach a vanishing point as they go away and get smaller. Of course, depth sorting is pretty important for indicating a third dimension, too. Improper depth sorting will certainly ruin any illusion of 3D, as you have seen. But if you do only depth sorting and don't scale objects according to their depth, you don't really get much of a sense of 3D, either.
The big question is this: how much do you scale objects up and down as they get closer and farther away? Fortunately, this question has existed and been asked and answered by artists, engineers, and photographers long before personal computers existed. It all comes down to optics and the way the lens of either your eye or a camera works. If you've done any photography, you know that there are wide-angle lenses and telephoto lenses (and a whole range between). There are even "fish-eye" lenses that are essentially ultra-wide angle.
A wide-angle lens has a wide field of view. In other words, if you project an arc or cone out in front of the lens, covering the area it could "see," that cone would be very wide and cover a lot of area. A fish-eye lens can see almost 180 degrees. In a telephoto lens, this cone would be very narrow, covering a narrow sliver of the world in front of it.
Along with field of view is another concept, focal length, which is the distance from the center of the lens to its focal point (the point where the rays passing through it converge). See Figure 7-13.
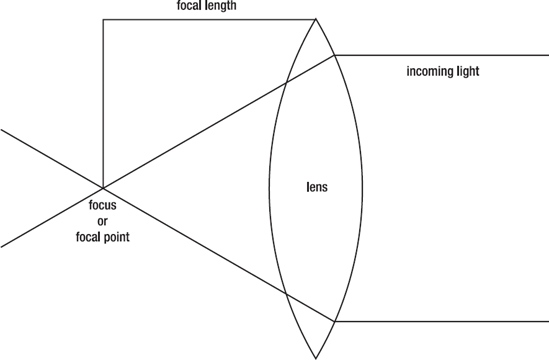
Figure 7-13. Focal length of a lens
Focal length is described a bit differently in the Adobe help files, but it still works out to be the same concept. Focal length and field of view are intimately related, and are also what determine how much scaling or distortion appears. A wider field of view, as in a wide-angle lens, results in a shorter focal length and a lot more scaling (which is why photos taken with a fish-eye lens often appear very distorted). A narrower field of view, as in a telephoto lens, results in a very long focal length and far less distortion. A good example of this includes photos from baseball games, taken from way back in the outfield where the pitcher and the batter appear almost the same size, despite the batter being farther away. In human perception, this kind of photo, with little or no distortion, can actually seem more distorted and give the impression that the batter is huge. You can see the relationship between field of view and focal length in Figures 7-14 and 7-15.
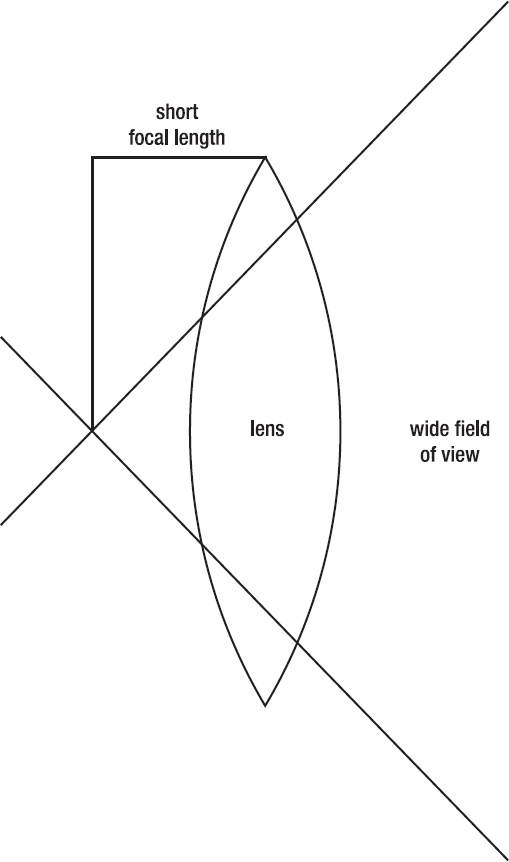
Figure 7-14. Wide angle lens, short focal length
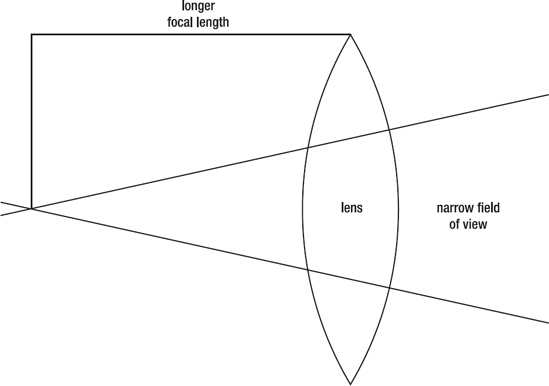
Figure 7-15. Narrow angle (telephoto) lens, long focal length
In Flash 10 3D, you can control this distortion by setting either focal length or field of view. Actually, setting either one will change the other, but you get to use the one that's most comfortable to you. This is done through two properties on the perspectiveProjection property of a display object's transform property: focalLength and fieldOfView. Generally, it's best to set these on the root of your movie unless you have some need to have different containers or objects have different perspectives (perhaps if viewing things in different windows).
The field of view is measured in terms of degrees, and it needs to be greater than 0 and less than 180, or else you will get an error. Setting a field of view of 0 means you wouldn't be able to see anything. Setting it to 180 would make your focal length 0, which I imagine would cause some problems in trying to calculate and render an image. You'll probably want to avoid numbers very close to these extremes, anyway. A field of view close to zero gives you a focal length close to infinity, which effectively cancels out any 3D perspective scaling. Fields of view close to 180 give you tiny focal lengths and a massive distortion of your rendered image. In the physical world, it is possible to get a field of view greater than 180. As far as I can tell, the widest angle lens ever made had a field of view of 220 degrees!
Anyway, getting back to Flash, it's a good thing to play around with these values and see what they do. You can do so right from the Carousel example in the last section. Just add the line in bold, right in the constructor:
         public function Carousel()

         {

             root.transform.perspectiveProjection.fieldOfView = 110;

             _holder = new Sprite();

             _holder.x = stage.stageWidth / 2;

             _holder.y = stage.stageHeight / 2;

             _holder.z = 0;

             addChild(_holder);

             ...
This gives you a very pronounced perspective. Because the squares closer to the "camera" are much larger now, this is probably a good setting for a photo gallery type of application. See Figure 7-16.
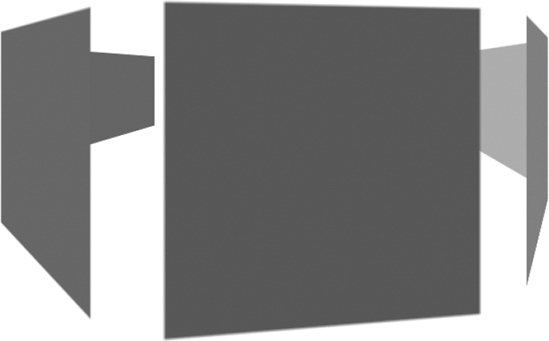
Figure 7-16. Wide field of view equals more perspective distortion
Try setting it down to 25, which narrows the field of view considerably. Now the perspective scaling is much less noticeable. See Figure 7-17.
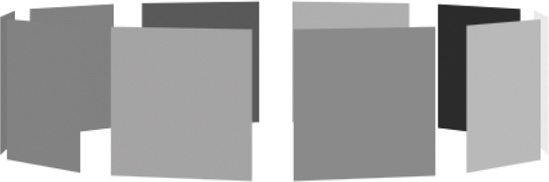
Figure 7-17. Narrow field of view, less distortion
You should also try various high and low values for focal length, to see what they do, as in the following example:
root.transform.perspectiveProjection.focalLength = 300;
Again, short focal lengths result in more distortion; high values result in less distortion.
Screen and 3D Coordinates
Occasionally you might need to find out the screen coordinates that correspond to a point in 3D space. Or in reverse, you might need to take a point on the screen and figure out where it translates to in 3D space. Fortunately, display objects have two built-in methods just for that purpose: local3DToGlobal. The first converts from a flash.geom.Vector3D object to a 2D flash.geom.Point object, and the second does the conversion the other way around.
First, let's see the local3DToGlobal method in action. We'll make a sprite and move it around in 3D. In that sprite there are some graphics, with a circle drawn at x=200, y=0, z=0. Then we'll create another sprite that will track that circle as it moves around by transforming the local 3D point (200, 0, 0) to global screen coordinates. Here's the class, which you can find in the LocalGlobal.as file:
         package

         {

             import flash.display.Sprite;

             import flash.events.Event;

             import flash.geom.Point;

             import flash.geom.Vector3D;


             [SWF(width=800, height=800)]

             public class LocalGlobal extends Sprite

             {


                 private var _sprite:Sprite;

                 private var _tracker:Sprite;

                 private var _angle:Number = 0;


                 public function LocalGlobal()

                 {

                     _sprite = new Sprite();

                     _sprite.graphics.lineStyle(10);

                     _sprite.graphics.lineTo(200, 0);

                     _sprite.graphics.drawCircle(200, 0, 10);

                     _sprite.x = 400;

                     _sprite.y = 400;

                     addChild(_sprite);


                     _tracker = new Sprite();

                     _tracker.graphics.lineStyle(2, 0xff0000);

                     _tracker.graphics.drawCircle(0, 0, 20);

                     addChild(_tracker);

                     addEventListener(Event.ENTER_FRAME, onEnterFrame);

                 }


                 private function onEnterFrame(event:Event):void

                 {

                     _sprite.rotationX += 1;

                     _sprite.rotationY+= 1.2;

                     _sprite.rotationZ += .5;

                     _sprite.x = 400 + Math.cos(_angle) * 100;

                     _sprite.y = 400 + Math.sin(_angle) * 100;

                     _sprite.z = 200 + Math.cos(_angle * .8) * 400;

                     _angle += .05;

                     var p:Point =

                             _sprite.local3DToGlobal(new Vector3D(200, 0, 0));

                     _tracker.x = p.x;

                     _tracker.y = p.y;

                 }

             }

         }
The constructor makes a 3D sprite and a tracker sprite, and puts some graphics in them. The enterFrame handler mostly consists of some code to move the sprite around in 3D space in a seemingly random fashion. It's moving and rotating on all three axes at once, using numbers I just kind of randomly threw in there. The important part is the local3DToGlobal line, in which it converts (200, 0, 0) to a 2D Point object, and then assigns that location to the tracker sprite. When you run this, you'll see that although the sprite is moving all over the place in all three dimensions, the tracker follows the circle with no problem at all. See Figure 7-18.
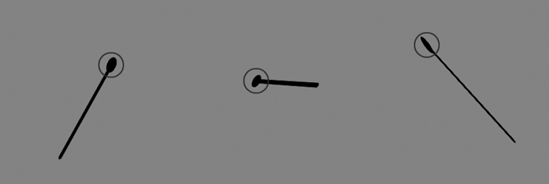
Figure 7-18. Multiple shots of tracking a 3D point in 2D
There are probably all kinds of uses for this, including knowing when a 3D object has gone off screen. Because a 3D object's x or y position might be much larger than the screen coordinates and still be visible if it is far back on the z-axis, it might be useful to know whether an object really was onscreen.
Going the other way, we can convert from a screen position to local 3D coordinates. I made a few changes to the last file, now class GlobalLocal, in the GlobalLocal.as file. The main changes are outlined in bold:
       package

       {

           import flash.display.Sprite;

           import flash.events.Event;

           import flash.geom.Point;

           import flash.geom.Vector3D;


           [SWF(width=800, height=800)]

           public class GlobalLocal extends Sprite

           {

               private var _sprite:Sprite;

               private var _tracker:Sprite;

               private var _angle:Number = 0;


               public function GlobalLocal()

               {

                   _sprite = new Sprite();

                   _sprite.graphics.lineStyle(5);

                   _sprite.graphics.drawRect(−200, −200, 400, 400);

                   _sprite.x = 400;

                   _sprite.y = 400;

                   addChild(_sprite);


                   _tracker = new Sprite();

                   _tracker.graphics.lineStyle(2, 0xff0000);

                   _tracker.graphics.drawCircle(0, 0, 20);

                   _sprite.addChild(_tracker);

                   addEventListener(Event.ENTER_FRAME, onEnterFrame);

               }


               private function onEnterFrame(event:Event):void

               {

                   _sprite.rotationX += 1;

                   _sprite.rotationY+= 1.2;

                   _sprite.rotationZ += .5;

                   _sprite.x = 400 + Math.cos(_angle) * 100;

                   _sprite.y = 400 + Math.sin(_angle) * 100;

                   _sprite.z = 200 + Math.cos(_angle * .8) * 400;

                   _angle += .05;


                   var p:Vector3D =

                          _sprite.globalToLocal3D(new Point(mouseX, mouseY));

                   _tracker.x = p.x;

                   _tracker.y = p.y;

               }

           }

       }
Here we draw a large square to the rotating sprite and put the tracker right inside of it. In the enterFrame handler, we call globalToLocal3D to get the 3D coordinates that relate to the current mouse position. This comes through as a Vector3D object. The z property of this Vector3D will always be 0 in this case, so we just use its x and y properties to set the position of the tracker within the rotating sprite. As you can see, it moves around in 3D but follows the mouse, which is moving in 2D. You can see this in Figure 7-19.
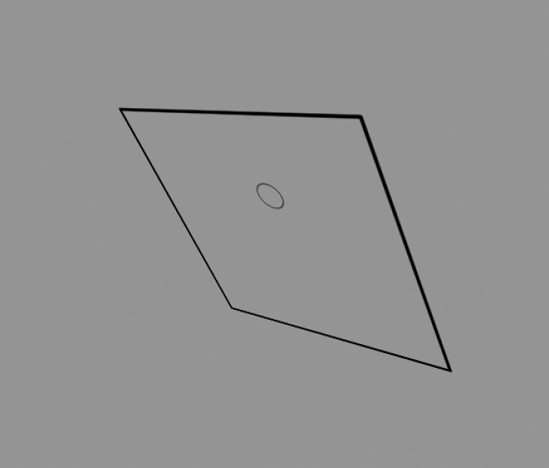
Figure 7-19. Tracking 2D coordinates in 3D
As cool as this is, though, I found a much simpler way to do the same thing: using local mouse coordinates of the rotated object. It turns out that if you access the mouseX and mouseY properties of a 3D transformed object, it will automatically do that global-to-local 3D conversion. So our onEnterFrame handler can become a bit simpler:
         private function onEnterFrame(event:Event):void

         {

             _sprite.rotationX += 1;

             _sprite.rotationY+= 1.2;

             _sprite.rotationZ += .5;

             _sprite.x = 400 + Math.cos(_angle) * 100;

             _sprite.y = 400 + Math.sin(_angle) * 100;

             _sprite.z = 200 + Math.cos(_angle * .8) * 400;

             _angle += .05;

             _tracker.x = _sprite.mouseX;

             _tracker.y = _sprite.mouseY;

         }
This does exactly the same thing. Realize that it works only if you are converting mouse coordinates. If you want to convert the coordinates of an object on. stage to local 3D coordinates, you'll still need to use the conversion function.
Pointing at Something
Once you get comfortable with Flash 10 3D, you might want to start poking around the various related classes in the help files to see what's there. A good place to start is the flash.geom package, which contains stuff like Matrix3D, Orientation3D, PerspectiveProjection, Utils3D, and Vector3D. All those classes are chock-full of methods to help you do all kinds of 3D calculations. A rather neat one I dug up in the Matrix3D class is the pointAt method.
The pointAt method takes a Vector3D object as a target to point at. If called from the matrix3D object of a display object's transform property, it will rotate that display object in 3D to point at the specified location. The following class, found in the FollowMouse3D.as file, demonstrates this in action:
         package

         {

             import flash.display.Sprite;

             import flash.events.Event;

             import flash.events.MouseEvent;

             import flash.geom.Vector3D;


             [SWF(width=800, height=800, backgroundColor = 0xffffff)]

             public class FollowMouse3D extends Sprite

             {

                 private var _sprite:Sprite;

                 private var _angleX:Number = 0;

                 private var _angleY:Number = 0;

                 private var _angleZ:Number = 0;


                 public function FollowMouse3D()

                 {

                     _sprite = new Sprite();

                     _sprite.x = 400;

                     _sprite.y = 400;

                     _sprite.z = 200;

                     _sprite.graphics.beginFill(0xff0000);

                     _sprite.graphics.moveTo(0, 50);

                     _sprite.graphics.lineTo(−25, 25);

                     _sprite.graphics.lineTo(−10, 25);

                     _sprite.graphics.lineTo(−10, −50);

                     _sprite.graphics.lineTo(10, −50);

                     _sprite.graphics.lineTo(10, 25);

                     _sprite.graphics.lineTo(25, 25);

                     _sprite.graphics.lineTo(0, 50);

                     _sprite.graphics.endFill();

                     addChild(_sprite);


                     addEventListener(Event.ENTER_FRAME, onEnterFrame);

                 }


                 private function onEnterFrame(event:Event):void

                 {

                     _sprite.x = 400 + Math.sin(_angleX += .11) * 200;

                     _sprite.y = 400 + Math.sin(_angleY += .07) * 200;

                     _sprite.z = Math.sin(_angleZ += .09) * 200;

                     _sprite.transform.matrix3D.pointAt(new Vector3D(mouseX,

                                                                     mouseY,

                                                                     0));

                 }

             }

        }
The constructor consists mostly of a bunch of lineTos that draw an arrow in a sprite.
The onEnterFrame method consists mostly of some code to move that sprite all around in 3D, not unlike the LocalGlobal example. The last line calls the pointAt method on the matrix3D object on the transform property of the sprite. It passes in a new Vector3D object made up of the mouse x and y coordinates, plus 0 on the z-axis. And just like that, the sprite, with its drawn arrow, will point at the mouse on each frame. It's moving all over the place, and you can move the mouse all over the place, but it never loses track (see Figure 7-20).
|
|
Figure 7-20. Pointing at the mouse in 3D |

I'm not sure how practical this example is in and of itself, but I can think of all kinds of uses for this technique in making 3D games: steering, aiming, and so on.
Summary
Although we covered a lot in this chapter, we really just barely scratched the surface of 3D in Flash 10. We'll be looking into a few more 3D topics in the next chapter on the new drawing API features, but hopefully this chapter has giving you a jump start on what's possible in this subject. Again, look through the documentation, specifically for flash.display.DisplayObject and all the stuff in the flash.geom package. I'm sure you're going to have fun with this