Chapter 6
ADVANCED PHYSICS: NUMERICAL
INTEGRATION
In Making Things Move, I presented some elementary physics formulas for programming motion in Flash. It mainly came down to this: add acceleration to velocity and add velocity to position in every frame. I knew this wasn't the most accurate physics possible and made lots of disclaimers to that point. Still, I knew it was good enough for games and animations most people would be doing in Flash.
After writing the first version of the book, I discovered that what I was describing is commonly known as Euler integration. And it is indeed pretty inaccurate. It's also fairly simple, good enough for most casual applications, and pretty widely used. But if Euler integration is not so great, what are the alternatives? This chapter is at least a partial answer to that question. We'll take a look at what numerical integration is and what's wrong with Euler, along with two alternatives and why you might want to consider using them.
Also, I'll save you some embarrassment at your next dinner party and tell you that Euler (which is pronounced "oiler", not "you-ler") is named after Leonhard Euler, a physicist and mathematician from the 18th century. Then again, if you're talking about Euler integration at a dinner party, embarrassment might be unavoidable.
Numerical Integration and Why Euler Is "Bad"
First of all, when I say "bad," I mean inaccurate. In other words, if you were to simulate an object moving according to various forces using Euler integration, it would not be a perfectly accurate picture of what would happen to that object in the real world. However, it would be close enough for casual games, animations, nonscientific simulations, and so on—and most people would never see anything wrong with it. But in cases where you want or need a higher degree of accuracy, Euler just won't cut it.
Why not? Well, the formulas for motion, velocity, mass, and acceleration have all been worked out for centuries (thank Isaac Newton), and they work really well. If you took high school algebra, you probably remember the word problem that says, "A boy standing on a roof 50 feet off the ground throws a ball up into the air at a velocity of 30 feet per second...." And then you have to calculate when it will hit the ground or how high it is at a certain time. The formula you use is the following, where t is the time in seconds,vo is the initial velocity, ho is the initial height, and y is the height at the given time:
![]()
If you follow that formula, you'll have no problem. It's perfectly accurate. So why don't we just use it for all our motion and be done with it? First, it describes a single axis of motion for a single object moving in a single arc, with no other forces than gravity acting on it. Throw in another dimension or two, such as air resistance, bouncing, additional objects and collisions; and any other forces such as wind, and it suddenly becomes incredibly complex.
A far more practical approach is to take a snapshot of the object at discrete intervals, take any forces acting on it at that one instance, calculate its velocity, and update its position. This process is called integration. The ideal goal of integration is shown in Figure 6-1.
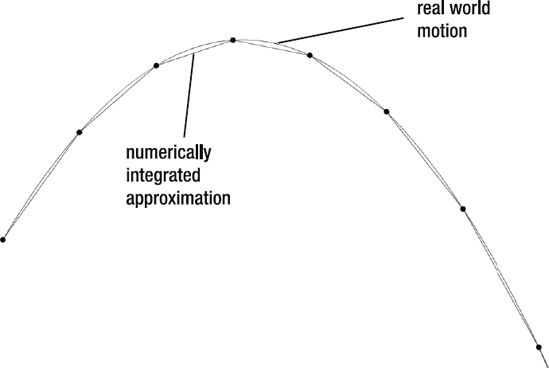
Figure 6-1. Real world motion and integrated approximation (ideal)
The top line is the smooth curve that an object would actually travel through. The lower segmented line represents the velocities and positions you try to achieve with integration. The various methods of integration are attempts to draw a series of straight lines that closely match the curve.
The problem with this is that physical forces act continuously in the real world. The forces on an object are changing its position and velocity continuously, not in discrete jumps like that. For example, gravity would be acting continuously on a falling object, increasing its speed, thus changing its position smoothly over time. If we just apply gravity to an object and update its velocity and position once per frame, we are missing the effects of gravity and velocity for all the points in between. So the more often you update, the more accurate you are, but there's always some discrepancy.
The Euler integration solution to this discrepancy is to ignore it, so it isn't very accurate. I can't put it any simpler than that. Figure 6-2 shows the actual result of Euler integration calculated in one-second intervals to exaggerate the error.
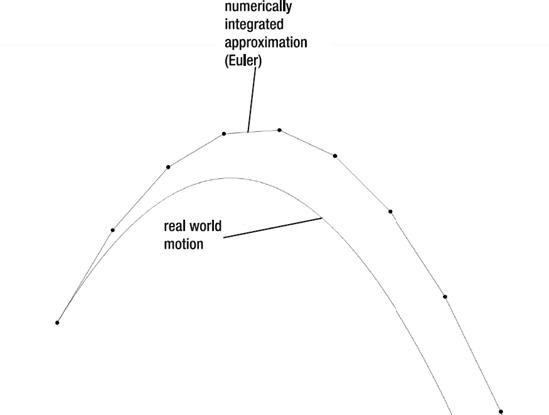
Figure 6-2. Real world motion and Euler integration
Again, if you decrease the interval, you get a better result, but it will be accurate only when increased infinitely. Good luck with that.
Furthermore, Euler can also get into situations in which it becomes unstable. This can happen quite easily with springs. The inaccuracies in the integration can sometimes lead to a point where the velocity keeps increasing and the whole thing blows apart.
But if Euler is that bad, what are the alternatives? The two we'll cover here are called Runge-Kutta integration and Verlet integration. Like Euler, they are named for the people who came up with them: Carl Runge, Martin Wilhelm Kutta, and Loup Verlet. As you will see, these two other methods have their strengths in different areas: Runge-Kutta is used when a higher degree of accuracy is desired, and Verlet is often used in computer graphics for creating "rag doll physics," a sort of inverse kinematics. If that doesn't make much sense to you now, don't worry. When we get there, you'll see that it's pretty easy to work with and can create some really great effects. First up, let's dive into Runge-Kutta.
Runge-Kutta Integration
As discussed in the previous section, Euler integration fails because it tries to integrate acceleration, velocity, and position in discrete steps. Because those things are changing continuously, this type of integration results only in an approximation, which is not quite accurate. Runge-Kutta integration doesn't actually get around this time-step inaccuracy problem, but it does add in some extra calculations designed to get a better estimation of position and velocity. Just make sure that you're clear on that; just because you're using Runge-Kutta doesn't mean you will have a perfectly accurate simulation, just a more accurate one.
So how accurate is Runge-Kutta? I'll go out on a limb and say it's probably as accurate as you'll ever need for any kind of simulation you'll ever do in Flash. If your application is that critical, you probably shouldn't be using Flash in the first place.
I think the second time I ever heard the term Runge-Kutta was at a Flash user group meeting in Boston, at which James Battat presented a series of physics simulations he and a colleague had done using ActionScript 2.0 and Runge-Kutta integration for an introductory physics course in mechanical systems they were teaching at Harvard University under the Presidential Instructional Technology Fellowship Summer Program. That was a pretty good testimonial to its accuracy and made me want to look into it further.
Naturally there is our old friend, the technology trade-off. Runge-Kutta is more accurate, but that accuracy comes at the cost of more calculations, meaning more CPU use, slower execution, and so on. So please do not jump on the Runge-Kutta bandwagon just because it's "better," more accurate, or because all the cool kids are doing it. Make sure that extra accuracy is something you absolutely need. Even though I'm writing a half a chapter about it, I'll tell you flat out that in almost every case you'll come across in Flash, you don't need that high degree of accuracy and you'll just be heating up your CPU for no good reason.
Okay, warnings out of the way. Let's see how Runge-Kutta works. And let's start calling it RK for short.
RK still does the time-step thing, but instead of blindly adding acceleration to velocity and velocity to position for each step and calling it a day, it samples the curve multiple times within a single time step to get an idea of what the curve is actually doing at that point. It then takes a weighted average of these samples to try to get a better approximation of the curve. Not too complex an idea, really. Let's go a bit deeper and see exactly how it's implemented.
There are two main flavors of RK: Runge-Kutta second order integration (RK2 for short) and Runge-Kutta fourth order integration (RK4). Thenumbers refer to the number of intermediate samplings done. RK2 samples two values per time step, and RK4 samples four. Most often you'll hear about RK4, which is good because talking about "Runge-Kutta fourth order integration" makes you sound really intelligent.
We'll look at RK2 first because it's a bit simpler to understand and is a good lead-in to RK4. You might also see this technique listed under other names: "improved Euler," "midpoint Euler," or just "the midpoint method." It's all the same thing. As its alternate names suggest, RK2 is not too different from the Euler method of integration and indeed does something with a midpoint.
The strategy is to compute the acceleration, velocity, and position as they exist for the current state of the object (basic Euler integration); then calculate what the state of the object would be after applying the acceleration and velocity you just computed, averaging those two, and applying it to the state of the object. In other words, where Euler tries to guess the overall velocity over a span of time based on a single point, RK2 gets the velocity at the beginning and end points of that time span and averages them to get an estimate of the velocity over that period. Again it's not 100% accurate, but it is far more accurate than Euler alone. Figure 6-3 shows the result of Euler versus RK2.
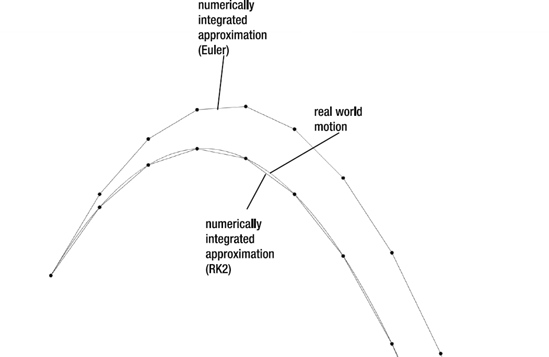
Figure 6-3. Real world motion, Euler integration, and RK2
At this resolution and this time span, you can't really see any discrepancy in the RK2 graph. That's pretty good—probably more than good enough for anything you're going to do in Flash.
Of course, if that's not good enough, there's always RK4, which averages out the slope of the curve based on four samples within the segment. I won't show this because it would be indistinguishable from RK2 at this resolution. But it goes without saying that it is more accurate.
Time-based motion
Okay, okay, enough talking. Show us some code!
All right, all right, I will. But one more explanation first. All the code we use in this section will be using time-based instead of frame-based motion code. This topic is covered in Chapter 19 of Making Things Move, but I'll cover it briefly here.
In a lot of simple Flash-based motion code, there are values for velocity and acceleration, and we apply them to our objects on each frame. The number of units we are moving things is considered to be pixels, and the time interval is one frame. So our speed is in terms of "pixels per frame" instead of miles per hour or feet per second. And we tweak the values for gravity, speed, and various forces based on what looks good in the final movie. But if we're going through all this extra work to come up with something that is more accurate, we probably want to use standard measurements, at least for time. So we'll be keeping track of real live milliseconds and updating everything based on how many seconds have passed in real time. The objects will move at the same speed as they would in the real world, and we can measure them pretty accurately.
To do that, we have to use the flash.utils.getTimer method to measure the elapsed time since the last update. This elapsed time feeds right into all the standard equations for motion, even Euler. For example, the Euler equation for velocity is new position = old position + velocity * elapsed time. The only reason you get away without it in frame-based animation is because you are using pixels per frame—updating every frame, the elapsed time is one. Velocity times one equals velocity so you can just say new position = old position + velocity.
We'll also do a few other things that are worth mentioning. One is to store position, velocity, and acceleration in Point objects. The Point class contains x and y properties, so instead of having vx and vy for velocity, we'll have just a single velocity variable. And we'll keep track of position the same way—assigning it back to the display object after all the calculations are done. Finally, instead of adding gravity directly to velocity, we'll create an acceleration method that will return a point containing acceleration values on the x- and y-axis. For now, this will just be 0 on x and the gravity value on y, but when you start adding more complex forces, it can do much more. In those cases, the resulting acceleration could be affected by an object's position and velocity, so we'll pass those in to the acceleration method as parameters.
Just to get used to using all this in a familiar setting, let's do it for Euler. Here's the class, available as the Euler.as file from the book's download page at www.friendsofed.com:
    package {

        import flash.display.Sprite;

        import flash.display.StageAlign;

        import flash.display.StageScaleMode;

        import flash.events.Event;

        import flash.geom.Point;

        import flash.utils.getTimer;


        public class Euler extends Sprite

        {

            private var _ball:Sprite;

            private var _position:Point;

            private var _velocity:Point;

            private var _gravity:Number = 32;

            private var _bounce:Number = −0.6;

            private var _oldTime:int;


            public function Euler()

            {


                stage.align = StageAlign.TOP_LEFT;

                stage.scaleMode = StageScaleMode.NO_SCALE;


                _ball = new Sprite();

                _ball.graphics.beginFill(0xff0000);

                _ball.graphics.drawCircle(0, 0, 20);

                _ball.graphics.endFill();

                _ball.x = 50;

                _ball.y = 50;

                addChild(_ball);


                _velocity = new Point(100, 0);

                _position = new Point(_ball.x, _ball.y);


                _oldTime = getTimer();

                addEventListener(Event.ENTER_FRAME, onEnterFrame);

            }


            private function onEnterFrame(event:Event):void

            {


                var time:int = getTimer();

                var elapsed:Number = (time - _oldTime) / 1000;

                _oldTime = time;


                var accel:Point = acceleration(_position, _velocity);

                _position.x += _velocity.x * elapsed;

                _position.y += _velocity.y * elapsed;

                _velocity.x += accel.x * elapsed;

                _velocity.y += accel.y * elapsed;


                // check if object has gone past any boundaries

                // and bounce off them.

                if(_position.y > stage.stageHeight - 20)

                {

                   _position.y = stage.stageHeight - 20;

                   _velocity.y *= _bounce;

                }

                if(_position.x > stage.stageWidth - 20)

                {


                   _position.x = stage.stageWidth - 20;

                   _velocity.x *= _bounce

                }

                else if(_position.x < 20)

                {

                    _position.x = 20;

                    _velocity.x *= _bounce;

                }


                _ball.x = _position.x;

                _ball.y = _position.y;

            }

            private function acceleration(p:Point, v:Point):Point

            {


                return new Point(0, _gravity);

            }

        }

    }
We create a ball, set the position and velocity values, and take note of the current time with the getTimer method, which returns the amount of time that the movie has been running in milliseconds,. We store that in _oldTime On each frame we call it again. The difference between the old time and the new time is the elapsed time since the last frame. Divide it by 1000 to have seconds instead of milliseconds. Make sure that we reset _oldTime so it's accurate the next time around.
Then we call the acceleration method to get the force(s) that will be applied to the object. Again, it's just gravity in this case.
Now, before we add velocity to the ball's position, we multiply it by the elapsed time. Same with adding the acceleration to the velocity. Thus if more time elapses between frames, the acceleration and velocity are multiplied by a higher number, and the ball moves more. If less time has elapsed between frames, it moves less. You can actually run this movie at a variety of different frame rates and observe the same motion. Of course, on a slower frame rate, it will be choppier and smoother on a higher frame rate, but the ball should move the same distance across the screen in the same amount of time. Go ahead and set stage.frameRate to 10 and then to 100. Although 100 looks a lot smoother, the ball moves in the same path at the same speed.
I also threw a bounce in there just to keep the thing on screen long enough for you to see what's happening. I'll talk about that later.
Now you might be thinking, "Okay, but the ball is falling awfully slowly. That's not very realistic." We set gravity to 32, which is what gravity is in the real world: 32 feet per second, per second. In other words, a falling object will increase its speed by 32 feet per second for each second it is falling. So if the units are feet and seconds, and we're applying that unchanged to the position of a sprite, our scale is one pixel = one foot. So imagine a 40-foot round ball falling from the top of an 800- or 900-feet tall building—maybe it will look a bit more realistic!
You might want to scale things. Suppose that we want 100 pixels to equal 1 foot. We can set that in a variable and apply it whenever we go between foot-based positions and pixel-based positions:
    package {

        import flash.display.Sprite;

        import flash.display.StageAlign;

        import flash.display.StageScaleMode;

        import flash.events.Event;

        import flash.geom.Point;

        import flash.utils.getTimer;


        public class Euler extends Sprite

        {

            private var _ball:Sprite;

            private var _position:Point;

            private var _velocity:Point;

            private var _gravity:Number = 32;

            private var _bounce:Number = −0.6;

            private var _oldTime:int;

            private var _pixelsPerFoot:Number = 100;


            public function Euler()

            {

                stage.align = StageAlign.TOP_LEFT;

                stage.scaleMode = StageScaleMode.NO_SCALE;


                _ball = new Sprite();

                _ball.graphics.beginFill(0xff0000);

                _ball.graphics.drawCircle(0, 0, 20);

                _ball.graphics.endFill();

                _ball.x = 50;

                _ball.y = 50;

                addChild(_ball);


                _velocity = new Point(10, 0);

                _position = new Point(_ball.x / _pixelsPerFoot,

                                      _ball.y / _pixelsPerFoot);


                _oldTime = getTimer();

                addEventListener(Event.ENTER_FRAME, onEnterFrame);

            }


            private function onEnterFrame(event:Event):void

            {

                var time:int = getTimer();

                var elapsed:Number = (time - _oldTime) / 1000;

                _oldTime = time;


                var accel:Point = acceleration(_position, _velocity);

                _position.x += _velocity.x * elapsed;

                _position.y += _velocity.y * elapsed;

                _velocity.x += accel.x * elapsed;

                _velocity.y += accel.y * elapsed;


                if(_position.y > (stage.stageHeight - 20) / _pixelsPerFoot)

                {

                    _position.y = (stage.stageHeight - 20) /

                                   _pixelsPerFoot;

                    _velocity.y *= _bounce;

                }


                if(_position.x > (stage.stageWidth - 20) / _pixelsPerFoot)

                {

                    _position.x = (stage.stageWidth - 20) / _pixelsPerFoot;

                    _velocity.x *= _bounce

                }

                else if(_position.x < 20 / _pixelsPerFoot)

                {

                    _position.x = 20 / _pixelsPerFoot;

                    _velocity.x *= _bounce;

                }


                _ball.x = _position.x * _pixelsPerFoot;

                _ball.y = _position.y * _pixelsPerFoot;

            }

            private function acceleration(p:Point, v:Point):Point

            {

                return new Point(0, _gravity);

            }

        }

    }
Now you have something like a four- or five-inch round ball falling from eight or nine feet up. (Note that I also adjusted the initial velocity to be a bit less.) This might be closer to your expectations.
Okay, that's Euler integration in a time-based environment. Now let's get back to Runge-Kutta.
Coding Runge-Kutta second order integration (RK2)
To recap RK2, the plan is to calculate the acceleration and velocity at the beginning of the time step, again at the end of the time step, and take a sort of average between the two.
Let's go through it in pseudocode.
First, calculate the acceleration at the start of the time step; then calculate position and velocity, exactly as we just did with Euler. But this time we'll store the new position and velocity in separate variables:
    // position1 is current position of object

    // velocity1 is current velocity of object

    acceleration1 = acceleration(position1, velocity1)


    position2 = position1 + velocity1 * time

    velocity2 = velocity1 + acceleration1 * time
Now position2 and velocity2 represent where the object will be at the end of this time step. Next we'll need the acceleration at the end of that step:
acceleration2 = acceleration(position2, velocity2)
Now here's the key part of RK2, in which we average the velocity and acceleration of these two states:
    position1 += (velocity1 + velocity2) / 2 * time

    velocity1 += (acceleration1 + acceleration2) / 2 * time
We basically just take the start and end velocity and average them, multiply by the elapsed time, and add that to the object's position. Average the start and end accelerations, times elapsed time, and add that to the velocity.
And that is RK2! Let's see it in code:
    package {

        import flash.display.Sprite;

        import flash.display.StageAlign;

        import flash.display.StageScaleMode;

        import flash.events.Event;

        import flash.geom.Point;

        import flash.utils.getTimer;


        public class RK2 extends Sprite

        {

            private var _ball:Sprite;

            private var _position:Point;

            private var _velocity:Point;

            private var _gravity:Number = 32;

            private var _bounce:Number = −0.6;

            private var _oldTime:int;

            private var _pixelsPerFoot:Number = 10;


            public function RK2()

            {

                stage.align = StageAlign.TOP_LEFT;

                stage.scaleMode = StageScaleMode.NO_SCALE;


                _ball = new Sprite();

                _ball.graphics.beginFill(0xff0000);

                _ball.graphics.drawCircle(0, 0, 20);

                _ball.graphics.endFill();

                _ball.x = 50;

                _ball.y = 50;

                addChild(_ball);


                _velocity = new Point(10, 0);

                _position = new Point(_ball.x / _pixelsPerFoot,

                                      _ball.y / _pixelsPerFoot);


                _oldTime = getTimer();

                addEventListener(Event.ENTER_FRAME, onEnterFrame);

            }


            private function onEnterFrame(event:Event):void

            {

                var time:int = getTimer();

                var elapsed:Number = (time - _oldTime) / 1000;

                _oldTime = time;


                var accel1:Point = acceleration(_position, _velocity);


                var position2:Point = new Point();

                position2.x = _position.x + _velocity.x * elapsed;

                position2.y = _position.y + _velocity.y * elapsed;


                var velocity2:Point = new Point();

                velocity2.x = _velocity.x + accel1.x * elapsed;

                velocity2.y = _velocity.y + accel1.x * elapsed;


                var accel2:Point = acceleration(position2, velocity2);


                _position.x += (_velocity.x + velocity2.x) / 2 * elapsed;

                _position.y += (_velocity.y + velocity2.y) / 2 * elapsed;


                _velocity.x += (accel1.x + accel2.x) / 2 * elapsed;

                _velocity.y += (accel1.y + accel2.y) / 2 * elapsed;


                if(_position.y > (stage.stageHeight - 20) / _pixelsPerFoot)

                {

                   _position.y = (stage.stageHeight - 20) /

                                  _pixelsPerFoot;

                   _velocity.y *= _bounce;

                }

                if(_position.x > (stage.stageWidth - 20) / _pixelsPerFoot)

                {

                    _position.x = (stage.stageWidth - 20) / _pixelsPerFoot;

                    _velocity.x *= _bounce

                }

                else if(_position.x < 20 / _pixelsPerFoot)

                {

                    _position.x = 20 / _pixelsPerFoot;

                    velocity.x *= _bounce;

                }

                _ball.x = _position.x * _pixelsPerFoot;

                _ball.y = _position.y * _pixelsPerFoot;

            }


            private function acceleration(p:Point, v:Point):Point

            {

                return new Point(0, _gravity);

            }

        }

    }
If you understood the explanations, you should see what's going on in the code just fine. Now run this file and see how much better and more realistic it looks than the Euler version! What? It looks the same to you? Well it looks the same to me, too, but it really is slightly different. This is why I said that Euler is good enough for most of what you'll ever need to do in Flash. And realize that Figure 6-3 was calculated with a one-second time step, so it's exaggerated. If your Flash movie is running at 24 frames per second, that's a much smaller time step, and Euler will be much closer to RK2.
But also realize that this is a very simple simulation. When you start adding additional forces and carry the simulation on longer than a few seconds, you will see more variance. At any rate, if accuracy is what you need, you now know how to squeeze a bit more of it out of your Flash physics.
But wait! There's more! That's only RK2. We still have RK4 to discuss!
Coding Runge-Kutta fourth order integration (RK4)
RK4 is the big daddy of numerical integration. If people refer to "Runge-Kutta," they are most likely talking about RK4. If you have a decent idea about what's going on with RK2, this shouldn't be that big a leap for you. We'll do pretty much the same thing, but instead of just sampling the beginning and end points of the segment, we'll sample and average a total of four points.
In RK4, however, the average is a bit different. Let's see how it looks in pseudocode. It gets pretty long, so I shortened the names here:
      // pos1 is current position of object

      // vel1 is current velocity of object

      acc1 = acceleration(pos1, vel1)


      pos2 = pos1 + vel1 / 2 * time

      vel2 = vel1 + acc1 / 2 * time

      acc2 = acceleration(pos2, vel2)


      pos3 = pos1 + vel2 / 2 * time

      vel3 = vel1 + acc2 / 2 * time

      acc3 = acceleration(pos3, vel3)


      pos4 = pos1 + vel3 * time

      vel4 = vel1 + acc3 * time

      acc3 = acceleration(pos4, vel4)


      pos1 += (vel1 + vel2 * 2 + vel3 * 2 + vel4) / 6 * time

      vel1 += (acc1 + acc2 * 2 + acc3 * 2 + acc4) / 6 * time
Note that the first and fourth order values are taken as is, but the second and third order values are divided by two when being calculated, and multiplied by two when averaged. This gives a special weighting to the ends and the middle of the curve. In other words, instead of all four sampled points being equally added up and divided by four, the middle two are doubled, and the total is divided by six. Do I understand exactly what is going on here? No. But it took both Runge and Kutta to figure this one out, and they are both much smarter than me. I think it took them a long time, so I'm okay with my vague understanding. The important thing is that I understand it just enough to actually get it working in ActionScript. All right, take a deep breath; here's the code:
    package {

        import flash.display.Sprite;

        import flash.display.StageAlign;

        import flash.display.StageScaleMode;

        import flash.events.Event;

        import flash.geom.Point;

        import flash.utils.getTimer;


        public class RK4 extends Sprite

        {

            private var _ball:Sprite;

            private var _position:Point;

            private var _velocity:Point;

            private var _gravity:Number = 32;

            private var _bounce:Number = −0.6;

            private var _oldTime:int;

            private var _pixelsPerFoot:Number = 10;


            public function RK4()

            {

                stage.align = StageAlign.TOP_LEFT;

                stage.scaleMode = StageScaleMode.NO_SCALE;


                _ball = new Sprite();

                _ball.graphics.beginFill(0xff0000);

                _ball.graphics.drawCircle(0, 0, 20);

                _ball.graphics.endFill();

                _ball.x = 50;

                _ball.y = 50;

                addChild(_ball);


                _velocity = new Point(10, 0);

                _position = new Point(_ball.x / _pixelsPerFoot,

                                      _ball.y / _pixelsPerFoot);


                _oldTime = getTimer();

                addEventListener(Event.ENTER_FRAME, onEnterFrame);

            }


            private function onEnterFrame(event:Event):void

            {

                var time:int = getTimer();

                var elapsed:Number = (time - _oldTime) / 1000;

                _oldTime = time;


                var accel1:Point = acceleration(_position, _velocity);


                var position2:Point = new Point();

                position2.x = _position.x + _velocity.x / 2 * elapsed;

                position2.y = _position.y + _velocity.y / 2 * elapsed;


                var velocity2:Point = new Point();

                velocity2.x = _velocity.x + accel1.x / 2 * elapsed;

                velocity2.y = _velocity.y + accel1.x / 2 * elapsed;


                var accel2:Point = acceleration(position2, velocity2);


                var position3:Point = new Point();

                position3.x = _position.x + velocity2.x / 2 * elapsed;

                position3.y = _position.y + velocity2.y / 2 * elapsed;


                var velocity3:Point = new Point();

                velocity3.x = _velocity.x + accel2.x / 2 * elapsed;

                velocity3.y = _velocity.y + accel2.y / 2 * elapsed;


                var accel3:Point = acceleration(position3, velocity3);


                var position4:Point = new Point();

                position4.x = _position.x + velocity3.x * elapsed;

                position4.y = _position.y + velocity3.y * elapsed;


                var velocity4:Point = new Point();

                velocity4.x = _velocity.x + accel3.x * elapsed;

                velocity4.y = _velocity.y + accel3.y * elapsed;


                var accel4:Point = acceleration(position4, velocity4);


                _position.x += (_velocity.x +

                                2 * velocity2.x +

                                2 * velocity3.x +

                                velocity4.x) / 6 * elapsed;


                _position.y += (_velocity.y +

                                2 * velocity2.y +

                                2 * velocity3.y +

                                velocity4.y) / 6 * elapsed;


                _velocity.x += (accel1.x +

                                2 * accel2.x +

                                2 * accel3.x +

                                accel4.x) / 6 * elapsed;


                _velocity.y += (accel1.y +

                                2 * accel2.y +

                                2 * accel3.y +

                                accel4.y) / 6 * elapsed;


                if(_position.y > (stage.stageHeight - 20) / _pixelsPerFoot)

                {

                    _position.y = (stage.stageHeight - 20) /

                                   _pixelsPerFoot;

                    _velocity.y *= _bounce;

                }

                if(_position.x > (stage.stageWidth - 20) / _pixelsPerFoot)

                {

                    _position.x = (stage.stageWidth - 20) / _pixelsPerFoot;

                    _velocity.x *= _bounce

                }

                else if(_position.x < 20 / _pixelsPerFoot)

                {

                    _position.x = 20 / _pixelsPerFoot;

                    _velocity.x *= _bounce;

                }


                _ball.x = _position.x * _pixelsPerFoot;

                _ball.y = _position.y * _pixelsPerFoot;

            }


            private function acceleration(p:Point, v:Point):Point

            {

                return new Point(0, _gravity);

            }

        }

    }
Wow. I'm thinking that if you had any inclination toward using RK4 just because it is "cool," it just went out the window after seeing this code. Yeah, it's long, but if you have a basic idea of what's going on in the pseudocode, you should be able to follow along.
Again, if you can see any difference between this and RK2, or even Euler for that matter, you have better eyes than I do. I won't show any more in-depth examples for this reason and because implementing RK4 is only the tip of the iceberg in creating a truly accurate simulation, as we'll see in the next section.
Weak links
Right now, the basic code for the ball's motion is about as accurate as you are realistically going to get using numerical integration. However, as an accurate model of motion, the file as it stands now is useless. That's because the bounce mechanism we are using is totally bogus. Even worse than Euler integration, this method of bouncing was purely developed as a quick and easy method that looks good to the eye. It is not at all accurate from a physics standpoint, however. Likewise with most of the other motion code from Making Things Move: friction, collision reactions, large body gravity, springs, and so on. Most of them are based on real world physics formulas, but almost all contain some simplification or trick to make them a bit easier to code and a bit kinder to the CPU.
If you go through all the trouble to code RK4 and sacrifice all that extra compilation for the sake of accuracy, don't sabotage yourself by implementing inaccurate solutions to other parts of the simulation. Unfortunately, I can't rewrite all of Making Things Move for perfect accuracy and fit it into one chapter, so you're on your own from here. But you should find just about everything you need in a decent college physics text book.
Runge-Kutta summary
Although I've given you several warnings about diving into Runge-Kutta integration needlessly, that's not to belittle or demean it; it's a valuable tool for accurate simulations and is pretty much the standard for quality physics code in the programming community. Besides being more accurate than Euler, it is more stable, so if your springs keep blowing apart, you might want to look into RK. I don't imagine that it's something most ActionScript developers will need on a day-to-day basis, but I do hope that this chapter helps a few people when they need it.
Now, in the second part of this chapter, we'll cover yet another form of numerical integration that I think you'll find extremely useful and quite fun to create with: Verlet integration.
Verlet Integration
Verlet (pronounced ver-lay)integration was originally developed as a means of simulating molecular interactions. In such a case, you have many particles that interact with each other in fixed relationships. Each particle can have many other particles pushing or pulling it this way or that way, and there are other forces acting on it to change its position and velocity. Existing forms of integration can become too complex and too unstable in such situations, so Verlet integration was devised as a more efficient, more stable solution.
In today's software world, Verlet integration is often used for the creation of "rag doll physics" systems or for programmed character animation. The technique was popularized in a 2003 article titled, "Advanced Character Physics," by Thomas Jakobsen, which is still available on www.gamasutra.com (an excellent resource for gaming, physics, and other programming related knowledge, by the way). The code in this section is largely based on the system described in that article (modified for use in ActionScript 3.0, of course).
Because Verlet integration's strong point is not super accuracy like Runge-Kutta, I'll move back into frame-based animation just to keep things a bit more simple and clear (there's nothing preventing it from being applied in a time-based system).
One of the key features of Verlet integration is that you don't explicitly store an object's velocity. Instead, you store its last position. Then when you need to know its velocity, you subtract the last position from its current position. Thus, every time you move an object, you are also changing its velocity. This simplifies a lot of things. Say an object is at an x coordinate of 100, and I move it to 110. The next time it updates, it will see that it moved 10 pixels to the right since the last update and take on a value of 10 as its x velocity. On each successive update, the old x will continue to be 10 pixels to the left of the current x, so the object will continue moving across the screen to the right. So you can see that you impart velocity just by changing an object's position.
You might be able to see how this process is useful for molecular simulations. If you have a large number of particles all banging around together, each one attracting and repelling several others while trying to maintain specific distances from each other, they can all just change each others' positions and let Verlet integration take care of the acceleration and velocity that those changes imply.
Another common feature of Verlet integration, as it is commonly used in software, is the concept of constraints between objects. Two objects can be paired to each other and told to maintain a specific distance from each other. If they get farther apart or closer together, they will then adjust themselves back to the positions needed to maintain their distance, which of course changes their velocity. Objects can have multiple relationships so that a single object can be tied to more than one other object. Verlet is very efficient at handling all these relationships and maintaining all these individual distance requirements. So it becomes a great tool to use to start building up complex moving structures such as rag dolls.
Although I keep referring to them as objects, the things moving around usually don't have any shape or form. They are really just points. And I like to refer to the fixed distance between two points as a stick. A stick is made up of two points, and structures are made up of one or more sticks. Also, as just mentioned, two or more sticks can share a point, which lets you make hinged parts. Figure 6-4 shows their relationships.
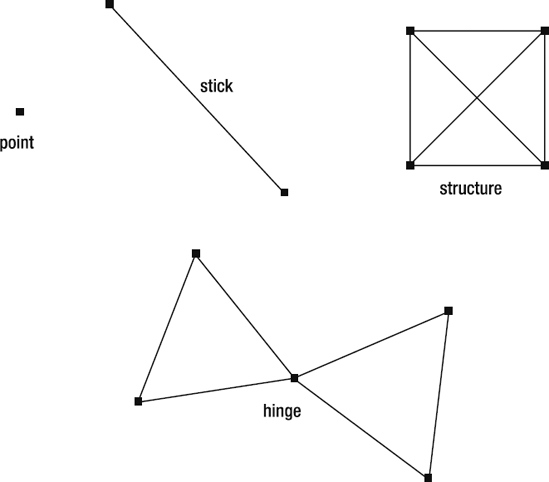
Figure 6-4. Points, sticks, structures, and hinges in Verlet integration
Let's start at the beginning and get a point moving around.
Verlet points
We'll create a VerletPoint class to encapsulate the behavior of a single point acting with Verlet integration. The point will, of course, need x and y properties, properties for the old x and old y, and an update method. The update method tells the point to take the difference of where it was after its last update and where it is now, and use that value as its current velocity. It will then add that velocity to its current position. But just before doing that, it has to store the current position as its "old" position so that on the next update it knows where it was. Here's the basic logic:
    temp = currentPosition

    velocity = currentPosition - oldPosition

    currentPosition += velocity

    oldPosition = temp
You need to store the current position in a temporary variable because you'll be changing it before you get a chance to assign it to the old position. And you can't assign it to the old position earlier because you need to use the "current old position" within the calculation.
Then you can calculate velocity as the current position minus the old position, and add that velocity to the position. Finally you assign what was the current position over to the old position.
Here's the VerletPoint class:
    package

    {

        import flash.display.Graphics;

        import flash.geom.Rectangle;


        public class VerletPoint

        {

            public var x:Number;

            public var y:Number;


            private var _oldX:Number;

            private var _oldY:Number;


            public function VerletPoint(x:Number, y:Number)

            {

                setPosition(x, y);

            }


            // basic verlet formula

            public function update():void

            {

                var tempX:Number = x;

                var tempY:Number = y;

                x += vx;


                y += vy;

                _oldX = tempX;

                _oldY = tempY;

            }


            // set position without changing velocity

            public function setPosition(x:Number, y:Number):void

            {

                this.x = _oldX = x;

                this.y = _oldY = y;

            }


            // make sure point does not go outside rect

            public function constrain(rect:Rectangle):void

            {

                x = Math.max(rect.left, Math.min(rect.right, x));

                y = Math.max(rect.top, Math.min(rect.bottom, y));

            }


            // velocity is current position - old position

            public function set vx(value:Number):void

            {

                _oldX = x - value;

            }

            public function get vx():Number

            {

                return x - _oldX;

            }


            // velocity is current position - old position

            public function set vy(value:Number):void

            {

                _oldY = y - value;

            }

            public function get vy():Number

            {

                return y - _oldY;

            }


            public function render(g:Graphics):void

            {

                g.beginFill(0);

                g.drawCircle(x, y, 4);

                g.endFill();

            }


        }

    }
Amazingly simple. You might be wondering why there are getters and setters for x velocity and y velocity (vx and vy) when I said Verlet integration doesn't explicitly store velocity. Those getters and setters aren't storing anything. When you set vx, for example, it subtracts that amount from the current x and assigns that to _oldX. This ensures that when update runs and subtracts _oldX from x, that very same x velocity will be found. As for the getter, it's just subtracting old from current. So no velocity is stored explicitly.
I also threw in a setPosition method, which sets both the old and the new values to the specified position. This is useful if you want to move a point to a certain location but not have that move change the point's velocity. Because the old and new positions are the same, the velocity will be zero.
I'll cover that constrain method in a moment, but first I'll mention the render method here. Because the VerletPoint is not a display object, we can't directly see it on stage. The render method takes an instance of Graphics and draws a small dot there, based on its position. This isn't something you'd probably want to do in your final movie or game, but it's useful for debugging and testing.
Let's see it in action:
    package {

        import flash.display.Sprite;

        import flash.display.StageAlign;

        import flash.display.StageScaleMode;

        import flash.events.Event;


        public class VerletPointTest extends Sprite

        {

            private var _point:VerletPoint;


            public function VerletPointTest()

            {

                stage.align = StageAlign.TOP_LEFT;

                stage.scaleMode = StageScaleMode.NO_SCALE;


                _point = new VerletPoint(100, 100);

                addEventListener(Event.ENTER_FRAME, onEnterFrame);

            }


            private function onEnterFrame(event:Event):void

            {

                _point.update();

                graphics.clear();

                _point.render(graphics);

            }

        }

    }
In the constructor, we create a VerletPoint and listen for the enterFrame event. In that handler, we call update on the point and then clear the graphics and call render. Now, if you run it, you should see the dot, but it will just be sitting there. We need to add some velocity. You can do that by setting vx or vy, like so, anywhere in the constructor after the point is created:
_point.vx = 5;
This would move back the old x so that the update method sees a five-pixel change and takes that as velocity. But you can also just move the point:
_point.x += 5;
In most systems, this process would just change the point's position and not affect its velocity at all. But in Verlet integration, it also sets the point moving in that direction. It might help to think of it in these terms: instead of picking up the point and placing it five pixels over, it's more like you are pushing it five pixels over—giving it a little shove, after which it just keeps on going.
When you apply gravity, you have the same options. You can do it by adding to the y velocity or just by adding to the y position. Putting either of these lines in the onEnterFrame method, just before the update, takes care of gravity:
_point.vy += .5;
or
_point.y += .5;
The second line seems to be just changing position linearly, but remember that changing the position will change the velocity, so it does act to constantly increase the velocity, like gravity. Although changing the velocity through the vx and vy accessors probably makes it clearer what is going on, changing the position is much more efficient because you're changing only a single public variable. If there are lots of particles interacting, and you need to make things really efficient, this will help.
Constraining points
You might think that it would be nice to keep these points on stage. Constraining points to an area is another integral part of Verlet integration and is quite simple. All we really have to do is ensure that a point is within the rectangle that is our stage (or another rectangular area if you want to define one). To do this, we make sure that the point's x is no less than the rectangle's left edge and no more than its right edge, and not higher or lower than the rectangle's top and bottom. Here's where that constrain method comes into play. In our main class, we'll create a rectangle describing the area of the stage (or again, any rectangular area you want). We'll pass this in through the constrain method on each frame, just before the update. All this does is make sure that the x value of the point is no less or greater than the bounds of the rectangle. It's kind of a shortcut into a couple of lines, but if you do the logic you'll see that it works. Here's that constrain method from VerletPoint again:
    public function constrain(rect:Rectangle):void

    {

        x = Math.max(rect.left, Math.min(rect.right, x));

        y = Math.max(rect.top, Math.min(rect.bottom, y));

    }
And here's the test class utilizing it:
    package {

        import flash.display.Sprite;

        import flash.display.StageAlign;


        import flash.display.StageScaleMode;

        import flash.events.Event;

        import flash.geom.Rectangle;


        public class VerletPointTest extends Sprite

        {

            private var _point:VerletPoint;

            private var _stageRect:Rectangle;


            public function VerletPointTest()

            {

                stage.align = StageAlign.TOP_LEFT;

                stage.scaleMode = StageScaleMode.NO_SCALE;

                _stageRect = new Rectangle(0, 0,

                                           stage.stageWidth,

                                           stage.stageHeight);


                _point = new VerletPoint(100, 100);

                _point.x += 5;

                addEventListener(Event.ENTER_FRAME, onEnterFrame);

            }


            private function onEnterFrame(event:Event):void

            {

                _point.y += .5;

                _point.update();

                _point.constrain(_stageRect);


                graphics.clear();

                _point.render(graphics);

            }

        }

    }
Now I know what you're going to say: it doesn't bounce. That's right, it doesn't. Now, you could probably modify constrain to add in a bounce. It would get a bit more complex, but it would have those points looking a lot better when they hit the walls. But remember that in general, points are really used only to define sticks and structures, and generally don't have any real visual representation themselves. So let's keep an eye on this one, see how sticks and structures react when they hit a wall, and not add any additional complexity to the VerletPoint class unless we decide we need it.
Speaking of sticks, let's take a look at them now!
Verlet sticks
Again, a stick binds two points together. It has a length property, which is the distance that it tries to keep between its two points. If the points are not exactly that distance apart, it will move them closer together or farther apart to satisfy the length property.
Here is the VerletStick class:
    package

    {

        import flash.display.Graphics;


        public class VerletStick

        {

            private var _pointA:VerletPoint;

            private var _pointB:VerletPoint;

            private var _length:Number;


            public function VerletStick(pointA:VerletPoint,

                                        pointB:VerletPoint,

                                        length:Number = −1)

            {

                _pointA = pointA;

                _pointB = pointB;

                if(length == −1)

                {

                    var dx:Number = _pointA.x - _pointB.x;

                    var dy:Number = _pointA.y - _pointB.y;

                    _length = Math.sqrt(dx * dx + dy * dy);

                }

                else

                {

                    _length = length;

                }

            }


            public function update():void

            {

                var dx:Number = _pointB.x - _pointA.x;

                var dy:Number = _pointB.y - _pointA.y;

                var dist:Number = Math.sqrt(dx * dx + dy * dy);

                var diff:Number = _length - dist;

                var offsetX:Number = (diff * dx / dist) / 2;

                var offsetY:Number = (diff * dy / dist) / 2;

                _pointA.x -= offsetX;

                _pointA.y -= offsetY;

                _pointB.x += offsetX;

                _pointB.y += offsetY;

            }

            public function render(g:Graphics):void

            {

                g.lineStyle(0);

                g.moveTo(_pointA.x, _pointA.y);

                g.lineTo(_pointB.x, _pointB.y);

            }

        }

    }
|
The constructor takes two First we get the distance between the two points and subtract it from the length property of the stick. This tells us how much longer or shorter the stick currently is from its ideal length. This is stored in the We then do some tricky trigonometry to get the x and y components of this difference. Realize that because cosine is adjacent/hypotenuse and sine is opposite/hypotenuse, the following diff * dx / dist
|
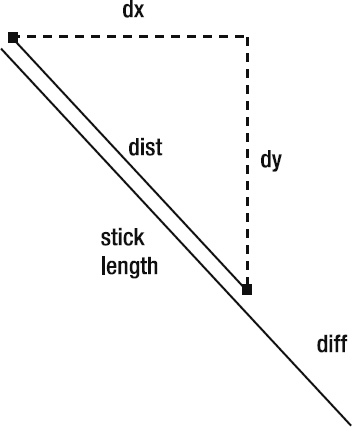
Figure 6-5. Calculating the distance between the two points and the difference between it and its ideal length" |
is actually the same as this, where angle is the angle between the two points:
    diff * cos(angle)

    diff * sin(angle)
But this lets us avoid three trigonometry operations: Math.atan2 to get the angle, and Math.cos and Math.sin to get the x and y offsets. You can see this in Figure 6-6.
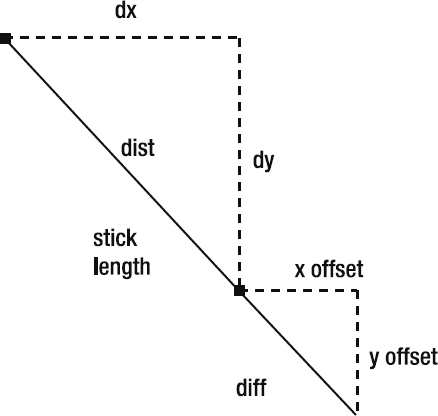
Figure 6-6. Calculating the x and y components of the difference
Note that we divide the result of this by 2 because we'll be moving both points one-half the distance to their ideal spots. Finally, we take this offsetX and offsetY and subtract them from the first point; then add them to the second point. This puts them exactly the distance away from each other to satisfy the length property, as shown in Figure 6-7.
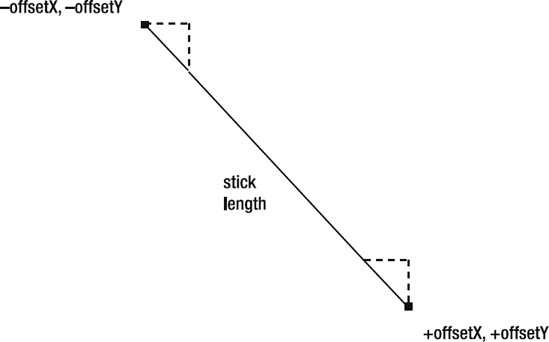
Figure 6-7. Moving each point by half the difference on each axis makes the distance equal to the stick length.
There are other ways to calculate this same thing, and some might be more efficient. But with only a single Math class operation, this one is not bad. And I think it's relatively clear what it's doing (after my explanations and diagrams, anyway), which is good for the purposes of this book.
Let's make a stick and see what it does!
    package {

        import flash.display.Sprite;

        import flash.display.StageAlign;

        import flash.display.StageScaleMode;

        import flash.events.Event;

        import flash.geom.Rectangle;


        public class VerletStickTest extends Sprite

        {

            private var _pointA:VerletPoint;

            private var _pointB:VerletPoint;

            private var _stick:VerletStick;

            private var _stageRect:Rectangle;


            public function VerletStickTest()

            {

                stage.align = StageAlign.TOP_LEFT;

                stage.scaleMode = StageScaleMode.NO_SCALE;

                _stageRect = new Rectangle(0, 0,

                                           stage.stageWidth,

                                           stage.stageHeight);


                _pointA = new VerletPoint(100, 100);

                _pointB = new VerletPoint(105, 200);


                _stick = new VerletStick(_pointA, _pointB);


                addEventListener(Event.ENTER_FRAME, onEnterFrame);

            }


            private function onEnterFrame(event:Event):void

            {

                _pointA.y += .5;

                _pointA.update();

                _pointA.constrain(_stageRect);


                _pointB.y += .5;

                _pointB.update();

                _pointB.constrain(_stageRect);


                _stick.update();


                graphics.clear();

                _pointA.render(graphics);

                _pointB.render(graphics);

                _stick.render(graphics);

            }

        }

    }
As you can see, there's not much to do at all to add a single stick. First make the points; then make the stick, passing it two points. Then in the enterFrame handler, update the stick after updating the points. And render it of course.
When you run this one, you should see the stick appear and fall to the bottom of the stage. And magically it actually bounces a bit! How did this happen—because we didn't add any bounce code? This is because the update code for the stick is trying to push the points apart, but when the bottom point hits the edge of the rectangle, the constrain code pushes it back up. These two actions fight against each other briefly, and the result is that both points wind up moving upward a bit trying to satisfy all conditions.
Actually, this bouncing is kind of a side effect. I sort of like it, but because we didn't explicitly code it, it could be seen as a problem. To get rid of the bounce, we need to run through the point constrain calls and the stick update calls a few times to let them settle out before moving on. We can change the onEnterFrame method to do this:
    private function onEnterFrame(event:Event):void

    {

        _pointA.y += .5;

        _pointA.update();


        _pointB.y += .5;

        _pointB.update();


        for(var i:int = 0; i < 5; i++)

        {

            _pointA.constrain(_stageRect);

            _pointB.constrain(_stageRect);

            _stick.update();

        }


        graphics.clear();

        _pointA.render(graphics);

        _pointB.render(graphics);

        _stick.render(graphics);

    }
Looping through the points' constrain methods and the stick's update method a few times gives them a chance to arrive at a consensus on where the points should end up. Because you are not adding gravity or updating the points during these iterations, the only velocity that gets added is the difference from where each point was to where it ends up at the end of the loop, so you don't get that spring and bounce here. It's more like a steel rod than a springy green branch. Now you can adjust this loop to change the character of your simulation—either kind of bouncy with a lot of elasticity by just doing a single iteration through the loop or very rigid by adding more iterations.
Realize, however, that those iterations are executing quite a bit of code, particularly in the stick's update method. It's not bad here for a single stick, but when you have larger structures, more iterations can start taxing your computer's resources. My advice is to leave it at one iteration and adjust it upward if you feel you absolutely need to.
Verlet structures
A Verlet structure is more than one stick with some common points. The simplest solid structure is a triangle. We just make three points and add three sticks connecting them:
    package {

        import flash.display.Sprite;

        import flash.display.StageAlign;

        import flash.display.StageScaleMode;

        import flash.events.Event;

        import flash.geom.Rectangle;


        public class Triangle extends Sprite

        {

            private var _pointA:VerletPoint;

            private var _pointB:VerletPoint;

            private var _pointC:VerletPoint;

            private var _stickA:VerletStick;

            private var _stickB:VerletStick;

            private var _stickC:VerletStick;

            private var _stageRect:Rectangle;


            public function Triangle()

            {

                stage.align = StageAlign.TOP_LEFT;

                stage.scaleMode = StageScaleMode.NO_SCALE;

                _stageRect = new Rectangle(0, 0,

                                           stage.stageWidth,

                                           stage.stageHeight);


                _pointA = new VerletPoint(100, 100);

                _pointB = new VerletPoint(200, 100);

                _pointC = new VerletPoint(150, 200);


                _stickA = new VerletStick(_pointA, _pointB);

                _stickB = new VerletStick(_pointB, _pointC);

                _stickC = new VerletStick(_pointC, _pointA);


                addEventListener(Event.ENTER_FRAME, onEnterFrame);

            }


            private function onEnterFrame(event:Event):void

            {

                _pointA.y += .5;

                _pointA.update();


                _pointB.y += .5;

                _pointB.update();


                _pointC.y += .5;

                _pointC.update();


                for(var i:int = 0; i < 1; i++)

                {

                    _pointA.constrain(_stageRect);

                    _pointB.constrain(_stageRect);

                    _pointC.constrain(_stageRect);

                    _stickA.update();

                    _stickB.update();

                    _stickC.update();

                }


                graphics.clear();

                _pointA.render(graphics);

                _pointB.render(graphics);

                _pointC.render(graphics);

                _stickA.render(graphics);

                _stickB.render(graphics);

                _stickC.render(graphics);

            }

        }

    }
Here we make three points: A, B, and C; and three sticks: also A, B, and C. Each stick uses two different points so they form a triangle. Run this one, and you should see the triangle fall to the bottom of the stage, bounce up a bit, tip over, and land on its side. Try changing the constrain/update iteration variable to something larger than one and you can really see how this makes the structure more rigid.
Let's try for a square next. Your first attempt might be like this:
    package {

        import flash.display.Sprite;

        import flash.display.StageAlign;

        import flash.display.StageScaleMode;

        import flash.events.Event;

        import flash.geom.Rectangle;


        public class Square extends Sprite

        {

            private var _pointA:VerletPoint;

            private var _pointB:VerletPoint;

            private var _pointC:VerletPoint;

            private var _pointD:VerletPoint;

            private var _stickA:VerletStick;

            private var _stickB:VerletStick;

            private var _stickC:VerletStick;

            private var _stickD:VerletStick;

            private var _stageRect:Rectangle;


            public function Square()

            {

                stage.align = StageAlign.TOP_LEFT;

                stage.scaleMode = StageScaleMode.NO_SCALE;

                _stageRect = new Rectangle(0, 0,

                                           stage.stageWidth,

                                           stage.stageHeight);


                _pointA = new VerletPoint(100, 100);

                _pointB = new VerletPoint(200, 100);

                _pointC = new VerletPoint(200, 200);

                _pointD = new VerletPoint(100, 200);


                _stickA = new VerletStick(_pointA, _pointB);

                _stickB = new VerletStick(_pointB, _pointC);

                _stickC = new VerletStick(_pointC, _pointD);

                _stickD = new VerletStick(_pointD, _pointA);


                addEventListener(Event.ENTER_FRAME, onEnterFrame);

            }


            private function onEnterFrame(event:Event):void

            {

                _pointA.y += .5;

                _pointA.update();


                _pointB.y += .5;

                _pointB.update();


                _pointC.y += .5;

                _pointC.update();


                _pointD.y += .5;

                _pointD.update();


                for(var i:int = 0; i < 1; i++)

                {

                    _pointA.constrain(_stageRect);

                    _pointB.constrain(_stageRect);

                    _pointC.constrain(_stageRect);

                    _pointD.constrain(_stageRect);

                    _stickA.update();

                    _stickB.update();

                    _stickC.update();

                    _stickD.update();

                }


                graphics.clear();

                _pointA.render(graphics);

                _pointB.render(graphics);

                _pointC.render(graphics);

                _pointD.render(graphics);

                _stickA.render(graphics);

                _stickB.render(graphics);

                _stickC.render(graphics);

                _stickD.render(graphics);

            }

        }

    }
Make four points and connect them with four lines, right? That looks all right at first, but after it lands, it kind of falls flat—literally. In this case, it's a problem, but you're seeing your first glimpse of hinges here, which is a very cool feature. But before we go there, let's reinforce this box so it doesn't keep falling apart. We can do that with one more stick. Declare a _stickE variable and make it go diagonally from point A to point C:
_stickE = new VerletStick(_pointA, _pointC);
Make sure that you update it and render it in the enterFrame handler, too. If you really want to make it strong, you can put another one from point B to point D.
If this falling-straight-down business is too boring, you can give it some spin. Just shove one of the points a bit after you create it:
    _pointA = new VerletPoint(100, 100);

    _pointA.vx = 10;y
Because only one corner has any initial velocity, the whole thing will start spinning.
Now before we go any further, we should start thinking about cleaning up this code. Even with only four points and five sticks, it's getting a bit messy. Fortunately, after creating the sticks and points, we'll do the same things with each one: adding gravity to the points and updating them, constraining each point and updating each stick (perhaps multiple times), and then rendering all the points and sticks.
We can easily create an array of points and an array of sticks and do all these actions in a loop:
    package {


        import flash.display.Sprite;

        import flash.display.StageAlign;

        import flash.display.StageScaleMode;

        import flash.events.Event;

        import flash.geom.Rectangle;


        public class Square extends Sprite

        {

            private var _points:Array;

            private var _sticks:Array;

            private var _stageRect:Rectangle;


            public function Square()

            {

                stage.align = StageAlign.TOP_LEFT;

                stage.scaleMode = StageScaleMode.NO_SCALE;

                _stageRect = new Rectangle(0, 0,

                                           stage.stageWidth,

                                           stage.stageHeight);


                _points = new Array();

                _sticks = new Array();


                var pointA:VerletPoint = makePoint(100, 100);

                pointA.vx = 10;

                var pointB:VerletPoint = makePoint(200, 100);

                var pointC:VerletPoint = makePoint(200, 200);

                var pointD:VerletPoint = makePoint(100, 200);


                makeStick(pointA, pointB);

                makeStick(pointB, pointC);

                makeStick(pointC, pointD);

                makeStick(pointD, pointA);

                makeStick(pointA, pointC);


                addEventListener(Event.ENTER_FRAME, onEnterFrame);

            }


            private function onEnterFrame(event:Event):void

            {

                updatePoints();


                for(var i:int = 0; i < 1; i++)

                {


                    constrainPoints();

                    updateSticks();

                }


                graphics.clear();

                renderPoints();

                renderSticks();

            }


            private function makePoint(xpos:Number,

                                       ypos:Number):VerletPoint

            {

                var point:VerletPoint = new VerletPoint(xpos, ypos);

                _points.push(point);

                return point;

            }


            private function makeStick(pointA:VerletPoint,

                                       pointB:VerletPoint,

                                       length:Number = −1):VerletStick

            {

                var stick:VerletStick = new VerletStick(pointA,

                                                        pointB,

                                                        length);

                _sticks.push(stick);

                return stick;

            }


            private function updatePoints():void

            {

                for(var i:int = 0; i < _points.length; i++)

                {

                    var point:VerletPoint = _points[i] as VerletPoint;

                    point.y += .5;

                    point.update();

                }

            }


            private function constrainPoints():void

            {

                for(var i:int = 0; i < _points.length; i++)

                {

                    var point:VerletPoint = _points[i] as VerletPoint;

                    point.constrain(_stageRect);

                }

            }


            private function updateSticks():void

            {

                for(var i:int = 0; i < _sticks.length; i++)

                {

                    var stick:VerletStick = _sticks[i] as VerletStick;

                    stick.update();

                }

            }


            private function renderPoints():void

            {

                for(var i:int = 0; i < _points.length; i++)

                {

                    var point:VerletPoint = _points[i] as VerletPoint;

                    point.render(graphics);

                }

            }


            private function renderSticks():void

            {

                for(var i:int = 0; i < _sticks.length; i++)

                {

                    var stick:VerletStick = _sticks[i] as VerletStick;

                    stick.render(graphics);

                }

            }

        }

    }
Now we have a lot more small functions, but we're no longer stuck with individual variables for each point and stick. Look how clean the enterFrame handler has become. Furthermore, we can now add as many new points and sticks as we want, and not have to change any other code. They'll automatically go into the arrays and be updated, constrained, and rendered.
Hinges
Now that we have a nice code structure going on, we can go crazy making different kinds of forms. This is a good time to look at hinges, which are two structures that share a single point. They can each have freedom of movement, but will pivot around that one common point.
Here's how to do a swinging arm. I included only the constructor this time, which creates the points and sticks. All the other methods are exactly the same as in the last example:
    public function Hinge()

    {

        stage.align = StageAlign.TOP_LEFT;

        stage.scaleMode = StageScaleMode.NO_SCALE;

        _stageRect = new Rectangle(0, 0,

                                   stage.stageWidth,

                                   stage.stageHeight);


        _points = new Array();

        _sticks = new Array();


        // base

        var pointA:VerletPoint = makePoint(stage.stageWidth / 2,

                                           stage.stageHeight - 500);

        var pointB:VerletPoint = makePoint(0, stage.stageHeight);

        var pointC:VerletPoint = makePoint(stage.stageWidth,

                                           stage.stageHeight);


        // arm

        var pointD:VerletPoint = makePoint(stage.stageWidth / 2 + 350,

                                           stage.stageHeight - 500);


        // weight

        var pointE:VerletPoint = makePoint(stage.stageWidth / 2 + 360,

                                           stage.stageHeight - 510);

        var pointF:VerletPoint = makePoint(stage.stageWidth / 2 + 360,

                                           stage.stageHeight - 490);

        var pointG:VerletPoint = makePoint(stage.stageWidth / 2 + 370,

                                           stage.stageHeight - 500);


        // base

        makeStick(pointA, pointB);

        makeStick(pointB, pointC);

        makeStick(pointC, pointA);


        // arm

        makeStick(pointA, pointD);


        // weight

        makeStick(pointD, pointE);

        makeStick(pointD, pointF);

        makeStick(pointE, pointF);

        makeStick(pointE, pointG);

        makeStick(pointF, pointG);


        addEventListener(Event.ENTER_FRAME, onEnterFrame);

    }
This code creates a triangle base with an arm attached to the top point of the triangle and a weight attached to end of the arm. Because the arm and base share only one point, the arm can swing. The weight can also pivot on the end of the arm, although that's not as noticeable because of its size.
Taking it further
There is so much more you can do, such as moving all the update, constrain, and render methods to their own classes—maybe PointManager and StickManager or something. And building a visual editor for it sounds like a lot of fun. Okay, I actually built a couple of visual editors for this kind of thing, and it is a lot of fun!
You might want to create some more interesting graphics for each stick. If you place a graphic so its left edge is centered on the first point of a stick, scale it so it is the same size as the length of the stick and rotate it to match the stick's orientation, you now have a custom graphic for each stick instead of a black line. Customizing entire structures is a bigger challenge, but it can be done.
We are running out of room here, and I don't want to take all the fun away from you, so we'll end here and I'll let you go wild with this stuff. I have a feeling that when more people understand Verlet integration in Flash, there will be some really cool stuff appearing on the Web.
Summary
This chapter covered numerical integration—what it is and the problems that come with it. You now know that you've probably been using Euler integration (and you now know how to pronounce it) and you have a few alternatives available to use. And most importantly, you hopefully have an idea about when to use each one because they all have strengths and weaknesses.
Euler, Runge-Kutta, and Verlet are not the only forms of numerical integration. A quick check on Wikipedia brings up this list of interesting sounding names: Backward Euler, Semi–implicit Euler, Velocity Verlet, Beeman's algorithm, Heun's method, Newmark-beta method, Leapfrog integration, and Monte Carlo integration. I have no idea what they all are, but it might be fun to find out. Over to you!
Next up, we'll dive into some brand new Flash 10 features regarding 3D!