
Like many of the topics covered in this book, proper setup and configuration of an ASP.NET Core website could be an entire book on its own. Because this book is targeted to developers rather than system administrators, I’m not going to dive deeply into all the ins and outs of setting up and running a website. However, it is still worth doing a high-level overview of some of the most important factors to consider when setting up your website, partly because more of these configurations exist within code as compared to other versions of ASP.NET, and partly because I know that many developers are responsible for their own hosting for a variety of reasons.
I expect many of your projects will be upgrades from previous versions of ASP.NET and will reuse existing infrastructure.
Even in purely greenfield (new) projects, there are legitimate reasons to purchase hardware or use cloud-based servers instead of using cloud-based services.
There is a lot of truth to the adage “the cloud is just someone else’s computer.” Knowing what good security looks like when it is your server will only help you when securing cloud-based services.
Because this is such a large topic, though, I will largely focus on giving you a high-level overview with the intent that if you wish to dive more deeply into a topic, you can read more on your own. The topic of server and network security is much more heavily and skillfully covered than application development security is.
Setting Up Your Environment
Apache
Nginx
Internet Information Services (IIS)
There are plugins available for other servers as well, but be careful here: Apache, Nginx, and IIS all have had several decades of security hardening and have well-supported plugins. I don’t recommend venturing too far away from the tried and true here.
Web Server Security
Do not allow your website to write files to any folder within the website itself: It’s simply too easy for you to make a mistake that will allow hackers to access other files in your web folder. If you must save files, do so in a location that is as far away from your website as possible, such as a different drive or a different server entirely.
Do not allow users to save files using their own file name: You may run into name collisions if you do so. But more importantly, you open the door to allowing users to store files in other directories. Save the file with a unique identifier as a name, and then store a mapping from identifier to file name elsewhere.
Turn off directory browsing: Attackers will use this information to find configuration files, backups, etc. If you need users to browse your files, keep a list of files and programmatically display the list to users, preventing someone from misusing the directory browsing functionality.
Do not store your web files in the default location for your web server: For example, if you are using IIS, store your files in C:webfiles instead of C:inetpubwwwroot. This will make it (slightly) harder for attackers to find your files in case they’re able to access your server.
Turn off all unneeded services on your web server: Any service can serve as an entry point to your server, and therefore serve as a backdoor to your website. Turn these off if and when you can. This especially includes PowerShell. Between the power that PowerShell offers and the difficulty that virus scanners have in differentiating malicious vs. accepted scripts, PowerShell is an especially dangerous feature to leave on in your server.
Keep Servers Separated
Your web server would allow inbound connections for all IP addresses (for public websites) on web ports (usually 80 and 443). It would only allow inbound administrator connections (for remote desktop or SSH) from known, allowable addresses such as yours and your system administrator. Outbound connections would only be allowed for software update checks, calls to the mail server, writing to your log store, and calls to the database.
Your mail server would only allow inbound connections from your web server to the mail endpoint and only allow outbound connections to check for system updates and to send mail.
Your database server would only allow inbound connections from your web server to its database and only allow outbound connections to check for system updates and send backups to your storage location.
Leaving your mail server publicly exposed is basically asking hackers to use your server to send their spam. Leaving your database server publicly exposed is asking hackers to read the data in your database. Leaving these servers fully open to your web server, as opposed to opening ports for the specific services that are needed, opens yourself up to more serious breaches if your website server is breached. Layered security is important.
What if you need to access the mail and/or the database server? You could temporarily open a hole in your firewall to allow for the minimum number of users to access the server, do what you need to do, and then close the hole in the firewall again. This minimizes your risk that an attacker can gain a foothold in one of your servers behind one of your firewalls.
Server Separation and Microservices
If you are utilizing services and APIs for your backend processing, such as grouping related logic into separate services, you should take care to not mix APIs that are intended to be called publicly (such as AJAX calls from a browser) in the same API that are intended to be called from the server only. Separate these so you can properly hide APIs that are only intended to be accessible to internal components behind firewalls to keep them further away from potential hackers.
A Note About Separation of Duties
Assuming your team is large enough, removing access where it is not needed goes for developer access to production servers as well. Most developers have had the miserable experience of trying to debug a problem that only occurs on inaccessible boxes. It would be easier to debug these issues if we had direct access to the production machines. But, on the other hand, if a developer has access to a production machine, it would be relatively easy for a developer to funnel sensitive information to an undetected file on a server’s hard drive, then steal that file, and remove evidence of its existence. Or do something similar with data in the database. As irritating as it can be at times, we as developers should not have direct access to production machines.
Storing Secrets
Store your secrets within a dedicated key storage, such as Azure’s Key Vault or Amazon’s Key Management Service. This is the most secure option, but these services can be expensive if you have a large number of keys.
Store your secrets within environment variables on your server. This approach is better than storing secrets within configuration files because secrets are stored away from your website itself, but they are stored on the same server.
Store your secrets within a separate environment, behind a separate firewall, that you build yourself. Assuming you build the service correctly, this is a secure option. But when you factor in the effort to build and maintain such a system, you may be better off just purchasing storage in a cloud-based key storage service.
Store your secrets within appsettings.production.json on your server. This is not secure because the secrets are stored with your website, and you need to access the server to make changes to the file, but this approach can be adequate for small or insignificant sites. Remember, if you choose this option, your secrets must never be checked into source control.
You may be wondering whether it would be ok to encrypt your secrets in a configuration file and check that into source control. I don’t recommend it. Aside from the fact that you still need a way to store the cryptography keys themselves, you shouldn’t expose anything you don’t absolutely have to.
SSL/TLS
I mentioned in Chapter 4 that you really need to be using HTTPS everywhere. And by “everywhere” I mean every connection from every server for every purpose. You never know who might be listening in and for what purpose. Even if you ignore the idea that information sent via HTTP is more easily modified (imagine a hacker changing an image to show a malicious message), even partial data sent via HTTP can leak more information than you intend. Certificates are cheap and relatively easy to install, so there are no excuses not to use HTTPS everywhere. If you really cannot afford to purchase a certificate, Let’s Encrypt (letsencrypt.org) offers free certificates. Support for these free certificates is better for Linux-based systems, but instructions on installing these certificates in Windows and IIS do exist.
Once you have HTTPS set up, you will need to set up your website to redirect all HTTP traffic to HTTPS. To turn this on in ASP.NET Core, you just need to ensure that app.UseHttpsRedirection() is called within your Configure method of your Startup class. There are ways you can do this within IIS if you want a configuration option to enforce this, and I’ll cover the easiest way by far in a moment.
Allow Only TLS 1.2 and TLS 1.3
Whether you set up which protocols you accept on your server explicitly or not, you can tell your server which versions of HTTPS (SSL 1.0, 1.1, 1.2, or TLS 1.0, 1.1, 1.2, 1.3) your server will accept. Unless you have a specific need to allow for older protocols, I highly recommend accepting TLS 1.2 or 1.3 connections only. Various problems have been found with all older versions. There have been problems found with TLS 1.2 as well,5 but adoption of TLS 1.3 probably isn’t widespread enough to justify accepting TLS 1.3 only.
Setting Up HSTS

HSTS link in IIS
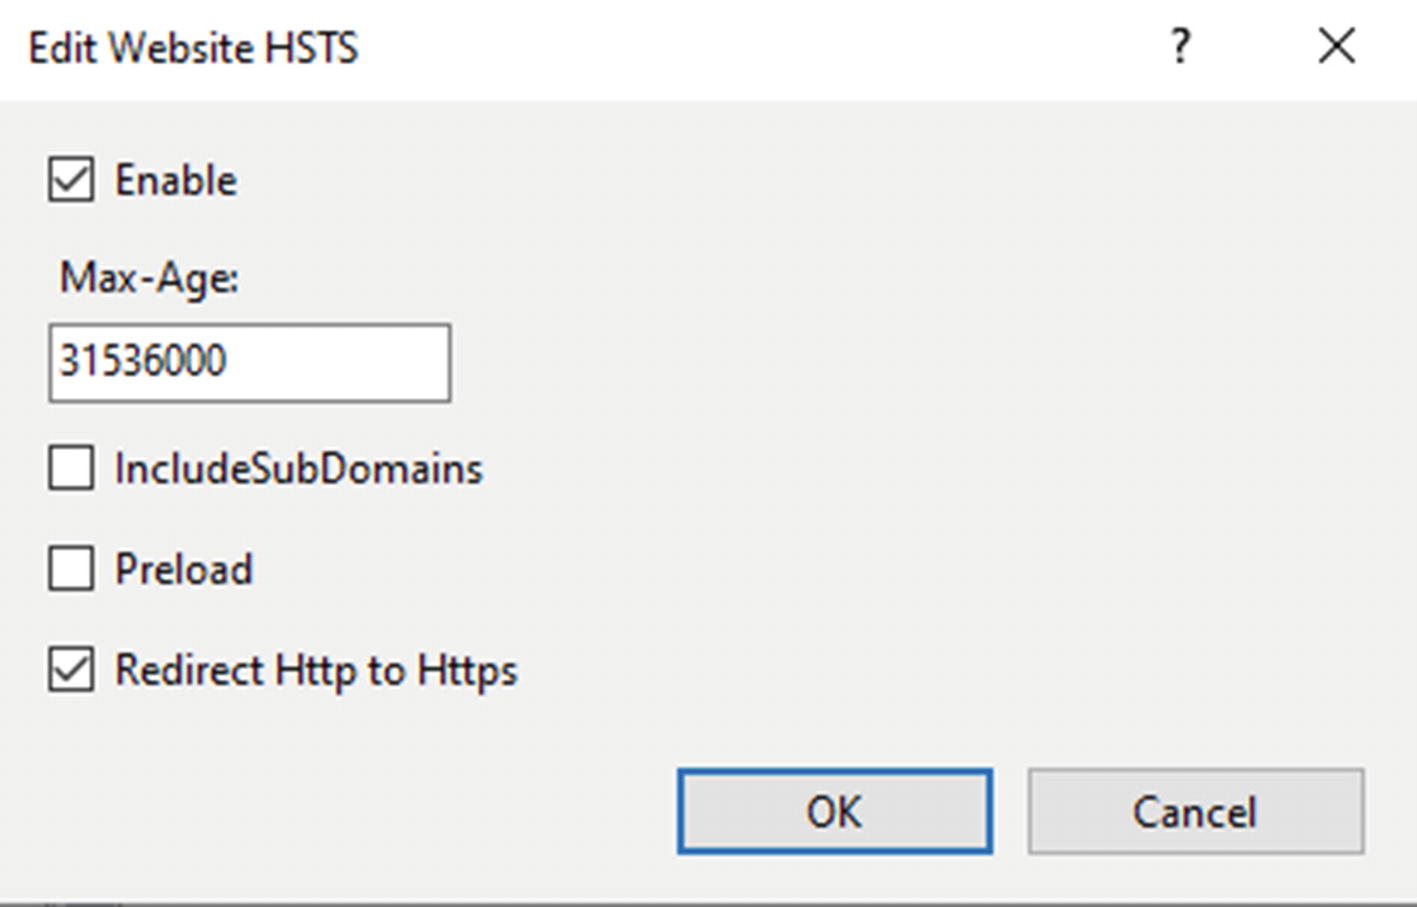
HSTS options in IIS
You’ll notice that in addition to the Max-Age (here set to the number of seconds in a year), there is an option to redirect all HTTP traffic to HTTPS.
It is worth emphasizing that you do need HTTPS redirection set up properly in order for HSTS to do any good. Browsers will ignore any HSTS directives coming from HTTP sites, so be sure to set up both redirection and HSTS to get the full benefits from using both.
Setting Up Headers
Adding headers in Startup
I didn’t include the CSP header in Listing 10-1 because it is very specific to your app, but you get the idea. Otherwise, if you need a refresher on what each of these headers does, please refer back to Chapter 4.
Adding these headers to your app can help prevent clickjacking attacks, which, if you recall from Chapter 5, is an attack where a hacker loads your site within an iframe and loads their content on top of yours, fooling a user into performing actions on your site that they don’t intend. Some security personnel will recommend adding JavaScript to your page that prevents the page from running if (top !== self), i.e., if the page is running within an iframe. HTML5 introduced the sandbox attribute on the iframe which can be configured to prevent JavaScript from running within the frame, killing any frame busting scripts. So, add the header. Don’t rely on JavaScript to solve your clickjacking vulnerabilities.
Adding headers via web.config
If you add headers as shown in Listing 10-2, you can view and edit them by going into IIS, clicking your website, and double-clicking the HTTP Response Headers icon. Just know that some deployment methods will overwrite your web.config file, so test your deployment method before storing too much information here.
Don’t get too creative in how you add headers. There is an attack called response splitting that occurs when a header allows newline characters. If an attacker can add newline characters, they can fool the browser into thinking that the attacker’s content, not yours, is to be rendered on the screen. To avoid this, stick to the options that ASP.NET and/or your web server provide.
Setting Up Page-Specific Headers
Caching directives on the error page

No cache headers as seen in Burp Suite
An attribute that overrides the Cache-Control header for a single page
The code for this should be fairly straightforward: it first looks to see if the header already exists, and if so, removes it. Then the code adds the new header.
If you recall, in Chapter 4 I said that you should use these cache directives on pages showing sensitive information to prevent browsers from storing this information on users’ machines. Now you know how to add these headers in your ASP.NET websites.
There will be other times when you will want to create your own page-specific headers. You’re most likely to want to do this for CSP headers when you have a third-party library that is only used on one or two pages that requires the use of a relaxed header. While it may be tempting to want to create one header with the relaxed rules for simplicity, you should have separate headers in this case. Fortunately, this method for creating page-specific headers is flexible enough to serve most needs.
Third-Party Components
Choose components from reputable sources whenever possible. While well-known companies aren’t immune from security issues, you can be reasonably sure that well-known companies are going to check for security issues at some level, when you can’t say the same for other components.
Minimize the number of permissions that are given to the component. When using server-side components, run them in their own process whenever possible and/or wrap them in a web service that is called from your website. When using JavaScript components, be sure you use CSP policies that allow only the permissions that component needs to get the job done.
Minimize the number of components that you use. Even if you are diligent about choosing reputable components and limiting their permissions, all it takes is one problem in one component for attackers to gain a foothold into your system. You can reduce this risk by using fewer components and avoiding using libraries that have significantly more features than you intend to use.
Monitoring Vulnerabilities
The National Vulnerability Database6 maintained by the National Institute of Standards and Technology (NIST) is one database that lists vulnerabilities for common software components. As mentioned earlier in the book, when researchers find vulnerabilities, they will often tell the company responsible first and then report the vulnerability to the NVD once it has been fixed. With this database, you can check to see if the components you use have known issues.
In the next chapter, I’ll show you how to check the NVD (and other vulnerability databases) for vulnerabilities in components that you use without having to search the library manually.
Integrity Hashes
Hackers adding malicious scripts to third-party components, hosted both by content delivery networks and locally, is rare but happens. You can protect yourself by including an integrity hash on your script or CSS tag via the Subresource Integrity feature. How does this work? Since you’ve gone through the hashing chapter, you already know that hashes can help you ensure that contents of files haven’t changed, and this is no different. All you need to do is add an integrity attribute to your tag and then use a value of an algorithm and base64-encoded hash, separated by a hyphen.
Script tag for an externally hosted jQuery library
You can see in Listing 10-5 that the SHA-256 hash is used. You can easily hash the file contents using a stronger hash, but there’s not much advantage to doing so.
It is a good idea to create hashes for locally created files, too. If a hacker, or malicious employee, can add malicious scripts to a trusted file, then your users could be hacked even more effectively than the best XSS attack would do. Rehashing the file every time can become tedious, though, so you may be tempted to automate the process of creating hashes. I would strongly advise against this. Generate hashes using a known, trusted version of the file to help minimize the risk of unexpected changes being made later.
Secure Your Test Environment
Unfortunately, it is all too common for development and product teams to spend a lot of time and effort securing their production systems and then leave their test systems completely unprotected. At best, this can leave attackers free to look for security holes in your app undetected, so they can target only known problems when they are on your production website. This problem can be much, much worse if you have production data in your test system for the sake of more realistic testing.
Never use production data in your test environment. If hackers get in and steal something, let them steal information associated with “John Doe” or “Bugs Bunny”.
Hide your test system behind a firewall so only users who need access to your system can find the site, much less log in. Never count on the URL being difficult to guess to protect your site from being discovered by hackers.
Use passwords that are as complex in your test environment as you do in production. You do not want hackers to guess your test environment password, crawl your site’s administration pages, and then use that information to attack your production environment.
Many years ago, I was doing a Google search to see if any of our test websites were being picked up by Google’s crawler. And indeed, I found one. Apparently, not only did we leave a link to the test site on one of our production sites, we left the test site available to the public. Be sure to test periodically to make sure your test websites are secured.
Web Application Firewalls
WAFs can block good traffic if not configured properly, and proper configuration can be difficult to do well. Watch your traffic before turning it on to make sure you’re not inadvertently blocking good traffic.
As of this writing, WAF products don’t pick up WebSocket (SignalR) traffic.
Like any security product, a WAF isn’t a magic bullet. Most attack tools have means to detect and work around most WAFs. Don’t expect your WAF to secure your website; you still need to practice good security hygiene.
Despite these issues, though, Web Application Firewalls are well worth considering when setting up and configuring your website.
I need to emphasize that a WAF cannot solve all of your security problems. Imagine a WAF like installing a security system for your home: like your security system will only do so much if you leave your windows unlocked or your valuables in your front yard, a WAF can only do so much if you have easy-to-exploit SQL injection vulnerabilities or obvious Insecure Direct Object References.
Summary
In this chapter, I talked at a high level about how to set up your web servers securely. I also talked about the importance of keeping your servers separated from both each other and the public as much as possible, how to use HTTPS to secure your sites, how to add security-related headers, and finally why it is important to secure your test site almost as much as you secure production.
In the last chapter, I’ll talk about how to add security into your software development life cycle, so you’re not scrambling at the end of a project trying to implement security fixes – or worse, scrambling to find and fix security issues after a breach occurs.