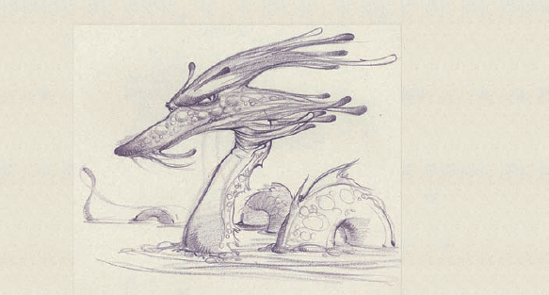
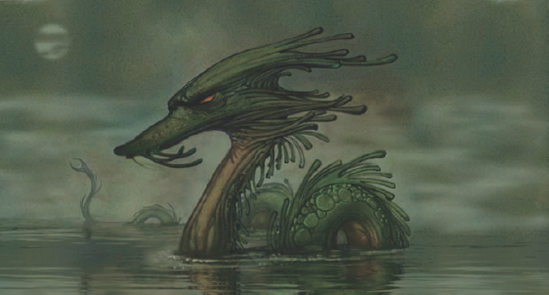
I have a fondness for sea and lake monsters. The Loch Ness monster in particular is one of my favorites. It really doesn't matter to me whether sea serpents exist or not; just the idea of them is so attractive. Every so often, I paint one just for the heck of it. Of all the paintings in this book, this is probably the one that I did mostly for the fun of it.
While this is not the most technical of all the paintings in the book as far as specific tricks and features used to create it, it's helpful to demonstrate the many techniques that I used to speed up the painting process immeasurably. I've already described some of these techniques in earlier chapters. However, it does not hurt to revisit them again to make sure you understand the process.
Chapter Contents
This painting is based on a sketch from one of my sketchbooks. I drew the sketch on 110-pound cover stock paper with a black grape Prismacolor pencil. I like to draw on heavyweight cover stock because it takes a lot of abuse and generally has a very nice surface on which to sketch. The black grape Prismacolor pencil is a nice dark, somewhat gray, violet color.
I scanned the original sketch at 300 dpi (dots per inch) for this tutorial. I reduced the image to about half of the original scanned size. Reducing the size was mainly for convenience when working with the image and because I generally knew how large the image would be printed.
Note
The scanned sketch is available for download at www.sybex.com/go/painter.
The first thing we need to do before we begin painting is create a paper texture that will be used as the base texture in the painting. The paper that this sketch was originally drawn on has a nice organic texture, and I want to use this texture in the painting. There are several ways to do this. I could build a texture by selecting some of the scanned sketch and repeatedly pasting copies until the whole canvas is covered, but an easier and less time-consuming solution is to scan a blank sheet of the same paper that I drew the image on. I've opted for the second solution and have scanned a whole sheet of the same type of paper.
Normally I would take the image of the scanned paper and make it a seamless texture. In this case, though, the seams formed at the edges of the scan are not very noticeable, so I'm not going to worry about making a seamless texture.
Scan a blank sheet of paper and then simply create a pattern to use in the painting by selecting the Capture Pattern command from the Patterns palette.
Select the entire image and create a paper texture using the Capture Paper command in the Papers palette.
Now there's a paper texture and a pattern to use in the image that is similar to the texture in the original sketch.
Note
Both the pattern and paper texture are available for download at
www.sybex.com/go/painter.Open the sketch in Painter. Initially, you want the drawing to be on its own layer, so select the entire image using the Ctrl+A (

The drawing crowds the edges of the scan, so add more space around the sketch using the Canvas Size command from the Canvas menu. The total size of the image is now about 1,900 pixels wide and 1,000 pixels tall. The exact size is not critical, and you could have added more or less. Figure 6.1 shows the sketch with additional space around the drawing created by the Canvas Size command.
Select the pattern created from the scanned paper, and fill the Canvas layer with the paper texture using the Paint Bucket tool. If the background is filled with a color or gradient instead of the paper pattern, make sure you select Clone Source from the Options bar when you select the Paint Bucket tool. Figure 6.2 shows the sketch with the Canvas layer filled with the paper pattern.
Duplicate the Sketch layer. Make sure the Duplicated layer is active, and click the small padlock icon to lock the layer so you don't accidentally draw or paint on the layer. You will use this layer only as a reference if you need to come back to the original sketch later in the painting. Click the eye icon to hide the layer.
The original Sketch layer is now dropped onto the canvas.
Pick Don's Digital Water 2 brush and, using greens, blues, violets, and browns, paint over the entire image to set the color and value of the painting.

I use this watercolor brush when I want to add color to an image without covering the original sketch. The colors mingle and blend with each other in a way similar to traditional watercolor. Selecting a lighter color actually paints the lighter color back into the image, unlike traditional watercolor. For this reason, it's a great brush to use when experimenting with the colors in a painting; it's easy to make color corrections. I use this brush and variations of it extensively in the early stages of paintings. I sometimes even set it so it will interact with my paper textures.
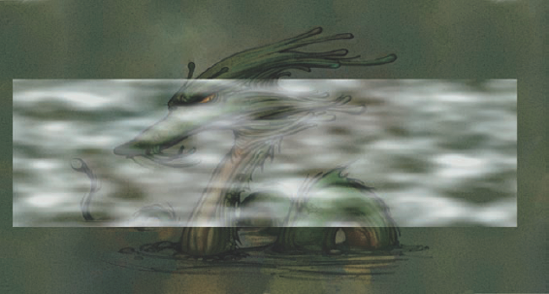
My goal is not to set the final colors of the painting at this point but merely to set the mood and cover the surface so I'm not painting on the bright canvas. Figure 6.3 shows the painting after using the watercolor brush to cover the whole surface. Notice where I used lighter colors and painted them back into the body of the sea monster.
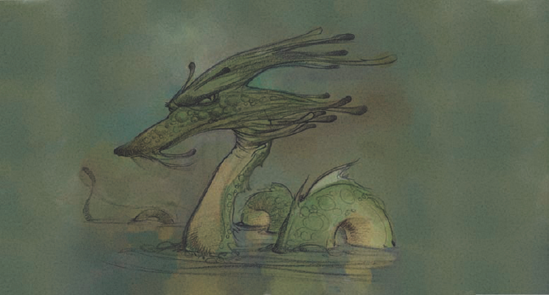
One characteristic of using a digital watercolor brush that can be both a pleasure and a pain is that the painted watercolor remains wet. Now, of course, it's not really wet, but it acts in a way that is quite different from most other brushes. At any time, we can come back with a digital watercolor brush and paint into the surface; the colors mix as if we were painting in wet paint!
Because the digital watercolor paint stays wet indefinitely, we cannot layer our strokes as we would if we were using traditional watercolor and painting over a dry Watercolor layer. If we want to layer our strokes, we must first go to the Layers menu and select Dry Digital Watercolor. The interesting thing is that digital watercolor does not actually create itself a new layer like the regular watercolor brushes, but we still need to use the Layers menu to dry the colors. We can now build up transparent layers of digital watercolor, though we must remember to dry the paint each time we want to start a new layer.
Another characteristic of digital watercolors is they do not react or interact with regular brushes. For example, we cannot use a blending brush on areas painted with digital watercolor. The blender has no effect. If we want regular brushes to interact with digital watercolor, we must also dry the layer again.
The most important thing to remember is that when using digital watercolor, even though it does not create a new layer, it acts as if it is painting on a new layer. Making changes or painting into that digital watercolor requires drying the Digital Watercolor layer.
We're now going to start painting on the sea monster. As in other chapters, we will do this on a new layer just in case we don't like the results or want to be able to make corrections easily.
Eventually we'll do a lot of work to the monster to make him scaly and wet looking, as expected of a typical sea monster. However, we'll add these details toward the end the painting process. This is only a sketch right now, and we need to paint more of the sea monster's character and additional details. The detailing will be a rather experimental process.
When I originally drew the sketch, it was rough. I never thought about the details since I really didn't know that I was going to be painting him.
Create a new layer. Also, make sure that the Pickup Underlying Color box is checked.
Choose the Pixel Spray airbrush from the Airbrushes category. This is the default brush in Painter.
Lower the Opacity setting of the brush to 10%, and set Size to about 3.
Beginning with dark colors and working from the edges of the sketch, I begin painting the sea monster. I use Pixel Spray airbrush at a lower Opacity setting so I can build the colors and textures of the beast, slowly allowing individual colors to mix with underlying color. I select most of my colors from within the image at this early stage. This helps me maintain a color harmony that is sometimes hard to acquire and maintain when constantly going to the Colors palette. Even though I am selecting my colors from within the image, I will go to the Colors palette to lighten or darken them as needed. Right now there's not a very wide range of value in the painting. Things are mostly on the darker side.
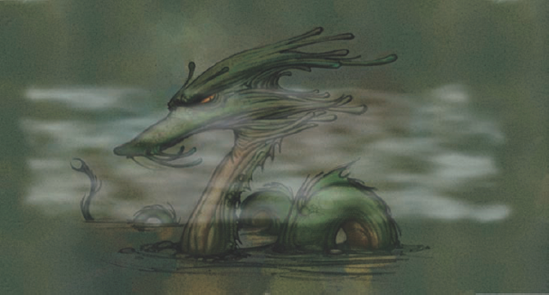
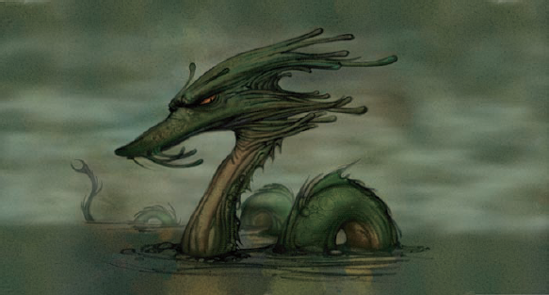
I am mostly concerned with refining the profile and edges of the sea monster. I also start to paint some lighter colors into his body, aiming for a kind of bumpy and scaly surface. Figure 6.4 shows the early stages of the painting using the Pixel Spray airbrush to refine the drawing and start building the form.
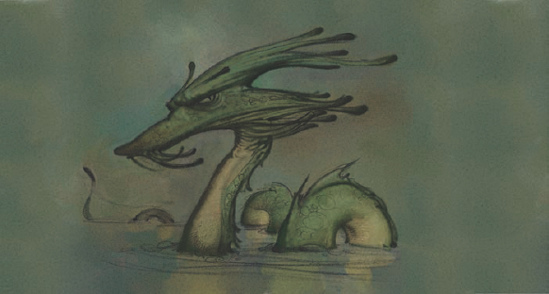
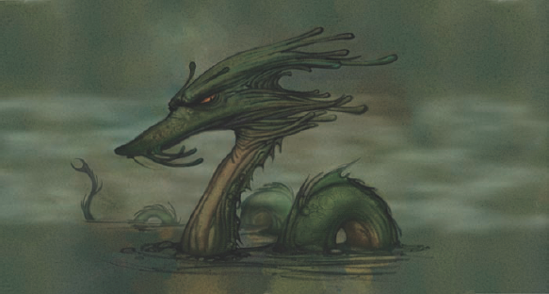
I add the golden color to the eye of the monster and paint a small vertical pupil over the gold. I'm still using the same Pixel Spray airbrush, painting on the same layer, and having a great time adding more and more detail. I mention this because there is always a danger when you're painting to get too involved in the details at the expense of the overall image. So while I'm going to try to add lots of detail, I will also try to remember that the overall impact of the piece should not be sacrificed for the smaller and less important details. Figure 6.5 shows the sea monster with his eye painted and detail in his head and neck. If I'm not careful, I will overdo it.

Figure 6.5. I paint the eye and start to get carried away with details in the head and neck. Hopefully it will not be too much.
It should be noted that as I paint the monster, I also paint in the background to help me clean up the edges and refine his shape. When I do this, I paint over some of the original texture in the background. This is not a problem because I will put it back later in the painting.
I'm at a point in the painting where most of the original sketch is covered. I've added a tail and fins to the monster's humps. I'm pretty happy with the overall look of the monster, and I don't think I've overdone the detail. I'm still only using the Pixel Spray airbrush for all the painting. So far in the painting, I've used only two brushes. Sometimes when working on a painting, it is better not to use all the available features. Sometimes less is more, and the simplest approach is the best (Figure 6.6).
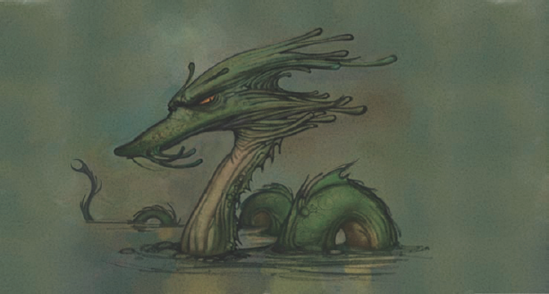
Figure 6.6. The sea serpent is coming right along, and all the work in the painting has been done with only two brushes. Sometimes the simplest approach is the best.
Because my sea serpent is a reptile of sorts, I want to add scales to his body. Painting scales individually can be a tedious process, and most of us would not have the patience to attempt doing this. Fortunately, there are several easy ways to add scales to our monster using patterns or paper textures.
A set of premade reptile paper textures and patterns is available for download at www.sybex.com/go/painter. It is a good idea, though, to go ahead and make a new paper texture and a new pattern so that you understand the process and can make additional libraries for yourself.
First, we need to create a scaly-looking paper texture. There is an often-overlooked feature in Painter that makes creating this type of texture extremely easy. This feature is found in the Canvas menu and is called Make Tessellation.
To create a scaly paper texture, we will do the following:
Create a new image that is approximately 600 pixels by 600 pixels. I usually find that creating a square paper texture works best.
In the Colors palette, select a mid-value to slightly lighter than mid-value color.
From the Canvas menu, select the Make Tessellation command.
The Make Tessellation options box opens (Figure 6.7).
In the Make Tessellation box, you're presented with several drop-down menus. In the Options box, select Add 500 Evenly Spaced Points. In the Display drop-down menu, you have several options.
We can base the tessellation on Triangles, Cracks, or Pieces. Generally, I find the triangles do not work very well for what I'm trying to do, so we will use either the Cracks or Pieces option. If we choose Pieces, the size of the individual elements will vary from small to large pieces. If we choose Cracks, the size of the individual elements will be relatively uniform.
For creating a reptile skin pattern, it really will not matter if we choose cracks or pieces.
Choose the Pieces option, and a preview image of a series of lines will appear in your new image.
Figure 6.8 shows how the image would be divided into 500 evenly spaced points using the Make Tessellation command.
If at this point we click Done, 500 evenly spaced points based on cracks will be added to the image. But we actually want the pattern to be a bit more complicated and have more scaly pieces.
Go to the Options menu and select Add 500 Evenly Spaced Points four additional times. Each time you select the option, another 500 points are added to the image.
Click the Done button. The individual pieces are drawn as white lines on a colored background. The color of the background is whatever color you selected in step 2.

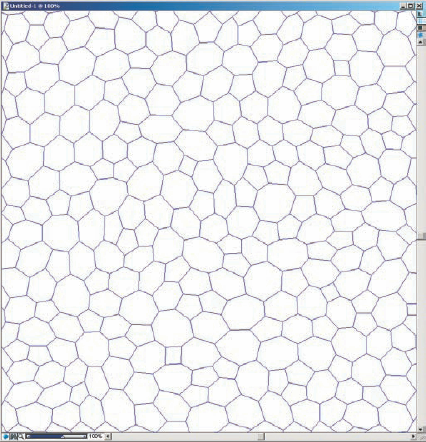
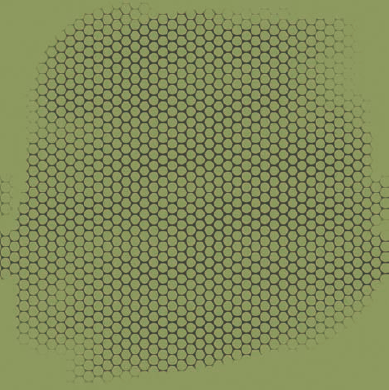
Figure 6.9 shows the image divided when we click the Done button. The pattern is now much more complicated and has a nice scaly feel about it.
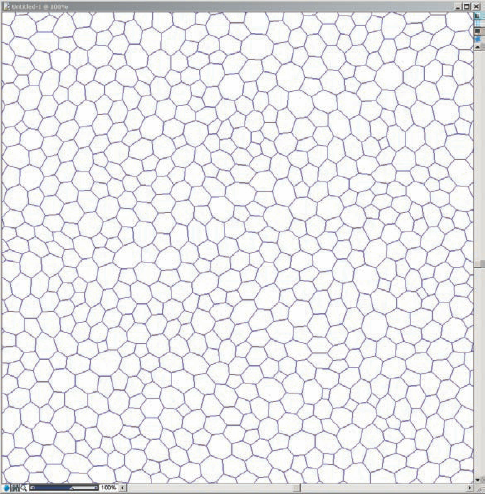
Unfortunately, the image we just created is not a seamless texture. If we used this image without making it a seamless texture, we would see seams at the edges where the pattern does not line up. So we need to take some time and make this reptile texture seamless.
In the Patterns palette, from the Patterns menu, select Define Pattern. You will notice in the preview window that the new reptile texture immediately becomes visible.
Hold down the Spacebar and Shift keys. In the image window, your cursor has become a small hand. Click and drag in the image. Notice as you drag in the image that the edges of the pattern become visible as broken lines or rough and uneven edges. Drag until you have the vertical and horizontal edges in the center of the image.
Here's where the work will become a little bit tedious.
Select Dons brush, and along with the Eraser, clean up and join the broken lines. Extreme accuracy is not important; what you're trying to do is get rid of the broken lines you can see in the image. Eventually when you paint and use this as a texture or pattern, you will not be able to tell where you made any of the corrections if you're careful.
Figure 6.10 shows a before and after comparison of the images. The left side of the image is before the seams were fixed, and the right side shows the same image with the seams painted.
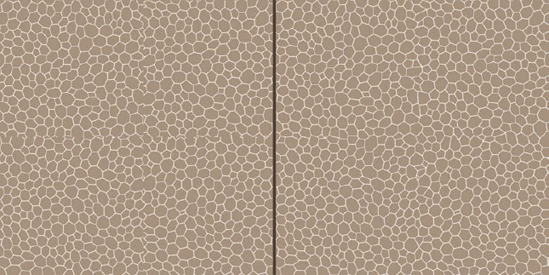
Figure 6.10. The image on the left without the seams fixed; on the right after fixing the seams with the Eraser and Dons brush
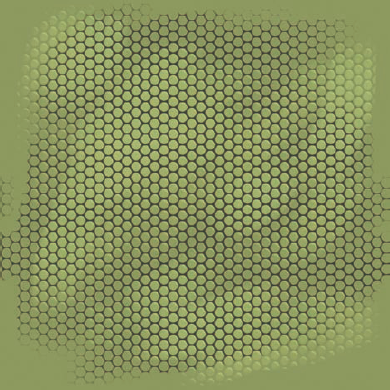
The lines in the image are crisp and sharp. A paper texture generally gives better results if there are no harsh edges. So we will slightly soften the lines in our texture using the Soften effect.
From the Effects menu, select the Soften command. The Aperture should have Gaussian checked, and the Amount should be set to approximately 4. Click OK.
Invert the lights and darks in the texture using the Effects > Tonal Control >, Negative menu.
The only real reason I invert the texture is to get a better sense of how it will look as a scaly pattern. The space between scales is generally darker than the scales themselves, and this lets me see the effect better.
There's one last step, and the texture will be ready to make into a paper and pattern.
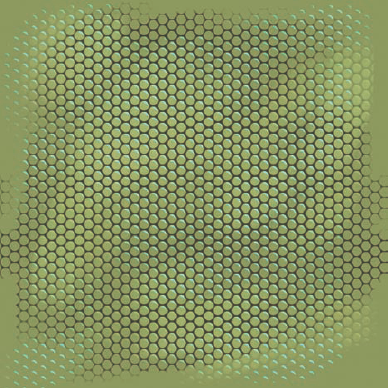
From the menu, select the Highpass command found in the Esoterica group of effects. With the Highpass options box open; check Circular, and set the Amount to 11.5. Click OK.
A slightly darker center has been added to each of the cells in our texture. This is done to add a bit more dimension to the painting when using this specific texture.
Select the entire image using Ctrl+A.
From the menu in the Papers palette, select Capture Paper.
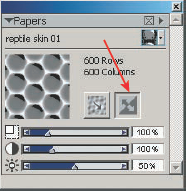
Name your paper
Reptile Skinor some other descriptive name, and set the Crossfade to 0 since the texture is already seamless. Click OK.The new paper is saved in the default paper library and becomes the active paper. We know it is the active paper because we can see a preview of it in the Papers palette.
Usually, when I create a paper texture, if the texture has been made from a color image, I also save it as a pattern. Patterns can be very useful because they use the color information, whereas a paper pattern does not.
From the Patterns menu in the Patterns palette, select Capture Pattern. Name your pattern, leave Rectangular Tile checked, and leave Bias set to 0. Click OK.
You now have a pretty convincing reptile texture saved as both a paper and a pattern.
Before we actually add scales to the dragon, we want to go through the procedure in a new image so it is clear and easily understandable. In this example, I will also use one of the reptile textures that I created earlier and that is available for download at www.sybex.com/go/painter instead of the texture we just created.
Begin by creating a new image. The actual size of the image does not matter, but try something in the 600- to 900-pixel range.
Since you are painting a reptile, go ahead and fill the test image with the mid-value green color.
Choose the Variable Chalk brush. You can find this brush in the Chalk brush category. In the Brush Property bar at the top of the screen, lower the Grain slider to about 6%.
Pick a darker green color, make sure you have a reptile paper texture active, and paint the scales in the new image. Figure 6.11 shows the darker scales painted using the Chalk brush.
Now that the darker edges of the scales are painted, let's add some lighter color between the dark scales.
In the Papers palette, invert the paper texture by pressing the Invert Paper button (Figure 6.12). Figure 6.12 shows the location of the Invert Paper button on the Papers palette.
Choose a lighter green color from the Colors palette.
Increase the Grain amount to 10%.
Use the Variable Chalk brush to paint lighter scales into the image (Figure 6.13).
Finally, we will add some highlights to the edges of the scales.
Once again, set the Grain slider to 6%.
Pick an even lighter green color than you used in step 6 and paint highlights on the scales once again using the Variable Chalk brush (Figure 6.14).
Notice that when I got toward the edges of the image, I did not need to paint a complete scale using the dark color, a lighter color, and the highlight color to have the effect read as reptile scales. This is an important concept to remember as we continue to paint on the sea serpent. It's not necessary to paint every little detail to have the viewer see what's intended. As I paint more into the sea serpent, I will use this idea; in some areas I paint only dark edges of the scales, while in other areas I paint only the lighter portion of the scales. This keeps the repetitive texture from becoming monotonous.
Now that I've explained how to create a paper texture and a pattern that looks like reptile skin and how to use the paper pattern to paint the effect of scales in an image, it's time to add some scales to the sea serpent.
Now we are ready to add scales to the sea serpent. We need to load the Reptile Paper library from the Papers palette.
Click on the Palette menu arrow in the upper-right corner of the Papers palette.
From the menu, select Open Library. In the option box that opens, select the Append button. If you choose to Load instead of Append, make sure that you have backed up any custom paper textures you have created.
Loading a paper library instead of appending the new textures into our current active library erases all the current paper textures. Because the Reptile Paper Texture library is relatively small, we should just append these textures to the open library.
Of course, another alterative is to use custom-created paper textures.
Note
The reptile paper library is available for download at www.sybex.com/go/painter.
We painted the earlier demonstration image in this chapter on the Canvas layer. Unlike that image, we'll paint the scales added in this painting on separate layers. There will be an individual layer for the dark scales and the light scales. We won't be worried about adding highlights to the scales in this image.
With the sea serpent image open
Create two new layers. Label one layer
dark scalesand the otherlight scales.Check the Pick Up Underlying Color box if it is not already checked.
Choose the Variable Chalk brush, and lower the Grain to 6% in the Brush property bar at the top of the screen.
Select one of the darker colors from within those painted on the sea serpent. Carefully paint dark scales on the monster. Use varying pressure, and do not paint completely uniform scales across the whole creature.
Using the Scale slider in the Papers palette, vary the size of the scales being painted. Keep the larger scales in the larger areas of the creature's body, and use smaller scales in the smaller areas such as the face and head. Figure 6.15 shows larger scales painted into the body of the sea serpent, with smaller scales on the belly and the face.
Use the Eraser tool to vary the Opacity setting of the painted scales in different areas of the body. You do not need to have a solid layer of scales painted to give the impression of a scaly surface.
Switch to the Light Scale layer. Select one of the lighter colors from within the serpent, and paint some lighter scales over the creature. Do not worry if the scales fill up and cover the darker scales. Using the Eraser tool and the Opacity setting of the layer, you can adjust the scales until they fit visually. Figure 6.16 shows the scales painted without adjusting the Opacity setting or erasing into the layer.
Using the Eraser tool, go into the Light Scale layer and erase any areas where you do not want light scales to show.
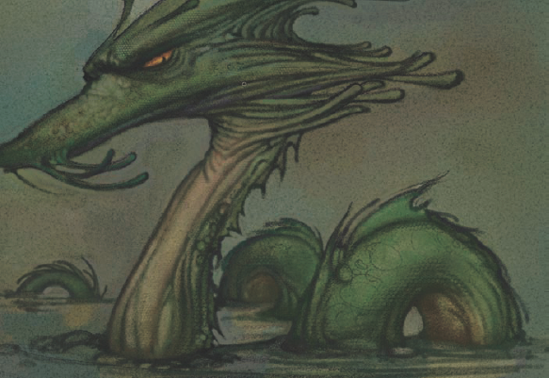
Figure 6.15. Dark scales are painted onto a new layer over the sea serpent. Larger scales are painted over the body, and smaller scales are painted over the belly and head of the creature.
Usually, I erase the scales where they overlap the darker and shadowed areas of the figure. Figure 6.17 shows the earlier image with some of the lighter scales erased in the shadow areas.
Figure 6.17. Some of the scales on a lighter layer are erased where they overlap the darker shadows in the serpent.
If the scales are still distracting because they're too noticeable, we can lower the Opacity setting of the layer.
Usually a more subtle look with the scales is better than something so obvious that it's distracting. There is no standard amount of Opacity reduction to suggest because every individual's image will look different. Just find what works best with the painting.
Continue painting the scales on the sea serpent, but don't paint too many. Do that and you run the risk of making the painting look mechanical and contrived.
The sea serpent is looking pretty good so far. But when I think of sea serpents, I often envision a misty or foggy environment where the creature suddenly appears as it silently swims through the water. Thick fog is also kind of spooky in its own right.
In the next section, we will add some fog to the painting and make the monster silently emerge from it.
Adding a fog bank to the painting gives a feeling of mystery to the scene. Adding fog is not difficult, but it does involve quite a few simple steps. The effort is worth it, though, because the fog adds so much visually to the painting.
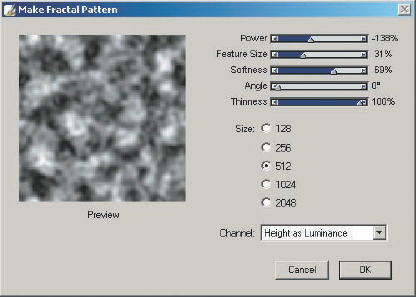
To add a layer of fog, we must first create an entirely new image using the Make Fractal Pattern command from the Patterns palette.
Create a fractal pattern that is 512×512 pixels in size. A pattern with smaller dimensions than this will not scale well for use in this image.
We also want the texture in the pattern to be large and relatively soft since we are going to be imitating a fog bank.
When you have the Make Fractal Pattern options box visible, you can either experiment until you get something you think will work or simply use these settings for the sliders (Figure 6.18):
Power: −138%
Feature Size: 31%
Softness: 69%
Angle: 0
Thinness: 100%
Click OK to exit the options box and create a new image.
The fractal pattern just created really does not look anything like fog. In the next few steps, we'll transform this black-and-white square into a convincing fog bank. The first thing we need to do is to get this fractal pattern we just created into our sea serpent picture.
Select the entire fractal pattern image.
Copy or cut the image and paste it into the sea serpent painting (Figure 6.19).
The fractal pattern image can be closed. We will not need it anymore. We can save the image when we close it or opt not to.
Lower the Opacity setting of this new layer to around 85%.
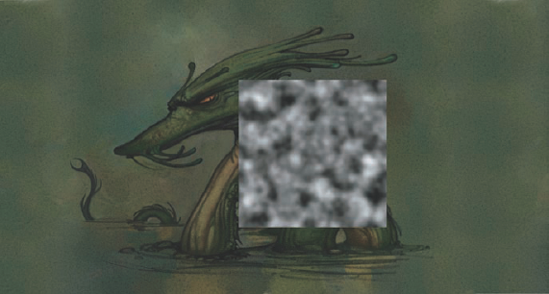
Figure 6.19. The fractal pattern image is pasted into the sea serpent painting in preparation for transforming it into a fog bank.
The amount is not critical; we just want to get a slight bit of transparency to the image so when we transform it, we have a little better idea of what we're doing.
In the Effects menu at the top of the screen, select Orientation and then Free Transform. Using the handles that appear at the corners and in the middle of each of the sides of the fractal pattern, scale the pattern so it covers almost the entire painting in the horizontal dimension.
Right-click the layer and select Commit to accept the transform and change the layer back to a default layer.
Move the layer up or down, depending on where the original layer is pasted into the painting. The bottom of the layer should be at about the same height as where the sea serpent's tail enters the water (Figure 6.20).
Change the Composite Method of the layer to Screen. All the black in the layer becomes transparent, or nearly so.
Erase the hard edges of the layer so you have soft edges around the entire layer's perimeter.
Lower the Opacity setting of the layer to about 40% (Figure 6.21).
From the Layers menu, load a selection based on the transparency of this Fog layer.
With the selection active, create a new layer.
Use the Digital airbrush and paint the fog a dark green color on the new layer.
The extent of where we are able to paint is constrained by the active selection. Most of the color goes on top of our clouds.
Change the Composite Method of this Painted layer to Color. The fog bank has now taken on a nice greenish tint.
Select the original black-and-white Fog layer. Change its Composite Method back to the default.
Select both the top Color layer and the bottom Fog layer, and collapse the two into one layer.
Change the Composite Method of this new layer back to Screen.
Lower the Opacity setting of the layer to about 45%.
Duplicate the layer. Label the bottom layer
Back Fogand the top layerFront Fog.Temporarily hide the Front Fog layer.
Using the Free Transform command, extend the Back Fog layer until it covers the entire width of the image. Right-click the layer to commit the transform.
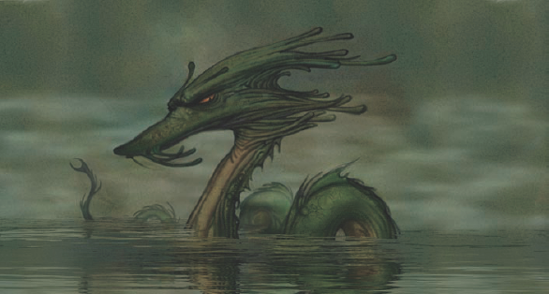
Use the Eraser tool to clear off any of the fog that is covering the front two sections of the sea monster (Figure 6.22).
Reveal the Front Fog layer.
Using the Free Transform command again, scale the Front Fog layer both higher and wide enough to cover the entire image. Commit to transform.
Lower the Opacity setting of the Front Fog layer to 30%.
Use the Eraser tool to clear any of the Front Fog layer that is covering the first three sections of the sea serpent. This leaves the last two humps of the monster covered by two layers of fog, the third hump covered by one layer of fog, and the front hump and neck not covered by any fog (Figure 6.23).
We'll save the painting in preparation for our next step, which will be adding the sea serpent's reflection in the water. We'll drop all the layers to the canvas and save the image again using the Iterative Save feature. To make the reflections work in the next section, we need to be working with an image that's just the Canvas layer.
To add a reflection of the sea serpent in the water, we will use a slightly different technique than presented in Chapter 2, "Painting Clouds, Water, and Stone." The new technique is actually a bit easier and the results, in my opinion, are very cool and just as effective.
Because the sea monster is positioned so low in the picture plane, we will not be able to see a complete reflection, so we won't be able to include his head. This actually simplifies the problem a bit since we won't need to deal with the complexities of getting the head reflection looking good.
Let's begin.
Use the Rectangular Selection tool and drag a selection around the entire lower half of the painting from the tip of the tail to the bottom of the image.
Copy and paste the selection back into the image.
Using Effects > Orientation > Flip Vertical, flip the whole selection along its vertical axis.
Using the Lasso tool, select the tail and last hump of the sea serpent on the new layer.
Copy and paste the selection into a new layer. The new layer contains only the tail and last hump.
We now have two layers. One layer is the entire lower half of the image, and the other layer, copied from the first, is only the tail and the last hump of the sea serpent. Both these layers are flipped vertically from the original image.
Using the Free Transform command, scale both of the new layers until they are about 50% of their original size in the vertical dimension. Right-click and commit both layers back to default layers.
In the Patterns palette, select the Water pattern.
Note
The water pattern is in the pattern library that is available to download at
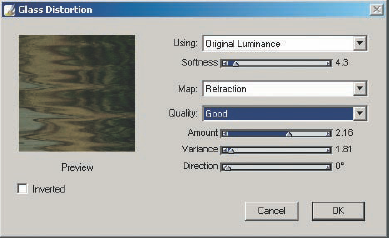
www.sybex.com/go/painter.With the larger of the two layers active, select from the Effects > Focus > Glass Distortion. In the options box that appears, use the following settings (Figure 6.24).
Click OK to apply the effect to the active layer. The layer now looks like a reflection in water.
Apply the same effect to the second layer.
With the reflection-like effect applied to both layers, the painting now looks a lot more like a sea serpent swimming in the water (Figure 6.25).
Choose each layer individually, and from the Effects menu, select Soften. Leave the slider to the default amount of 3, and click OK.
Using the Eraser tool, go back to each layer and erase the reflections that cover some of the lower parts of the monster.
You may need to lower the Opacity setting of each layer as you work so that you can see the bottom edge of the original monster. When you're finished erasing, you can raise the Opacity setting back to 100%.
Save the image, and drop multiple layers on the canvas. After you've dropped the layers onto the Canvas layer, use the Iterative Save feature and save the file once again.
That's all there is to this technique of adding simple reflections under an object. I need to add some finishing details to the water like waves and wakes caused by his motion. These are easy to paint and will add interest to the water area.
Use Dons brush to paint some waves and wakes caused by the sea serpent moving in the water. Also, paint some larger scales on the first hump.
Refine and paint more detail into the back fin on each of the humps and tail. The amount of detail you paint is completely up to you.
There is no right or wrong stopping point. The painting should now look something like Figure 6.26.
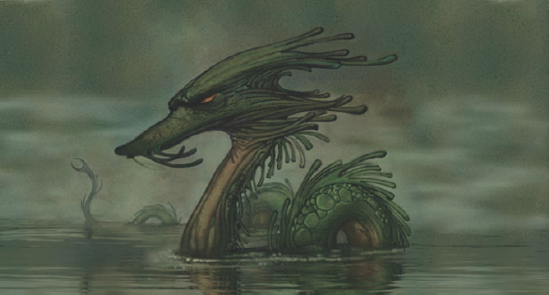
Figure 6.26. Some waves and wakes have been painted into the reflections, and more detail has been added to the monster.
We're getting pretty close to finishing the painting, but there are a few more small details to add before we're done.
Because this is a dark and murky scene, I am going to add a little moon in the sky. This is easy to do and takes only a few steps, but it will add greatly to the look and feel of the image.
To add a sense of the time of day or at least how dark the environment is I will add a small moon to the upper left corner of the painting. To do this, follow these steps:
Create a new layer in the image.
Using the Oval Selection tool and holding down the Shift key, click and drag a small circular selection on the new layer.
Use the Paint Bucket tool with a color selected from one of the lighter areas in the painting, and fill the circular selection on the new layer.
Change the Composite Method of the new layer to Screen.
Deselect the circle using Ctrl+D.
Use the Soften effect with a setting of 15 to blur the moon.
Lower the Opacity setting of the Moon layer to about 65%.
Use the Eraser and a couple of soft horizontal lines through the moon to simulate clouds passing in front of it.
If you are satisfied with the position of the moon in the painting, go ahead and drop it onto the Canvas layer. If you want to change the moon's position, move it anywhere you want using the Layer Adjuster tool.
That's all there is to creating a simple moon (Figure 6.27).
There are really only a couple of things left to do to finish the painting of the sea serpent.
Because he is swimming around in the ocean, we need to add a few intense highlights to make him look wet. This is easily done on a new layer or on the Canvas layer if you're confident with your abilities.
Choose Dons brush and a light, slightly greenish color to paint some intense highlights on the closest parts of the sea monster. Do not paint too many, as it is easy to overdo the effect (Figure 6.28).
When you are happy with the placement of the highlights on the new layer, drop the layer onto the canvas. Make sure you save the image.
Pick the Glow brush from the F-X category, choose a bright red color, and carefully paint a bit of glow to the sea serpent's eye.
The final touch to finish the painting is to add a lighting effect found in Effects > Surface Control > Apply Lighting. When the options box opens, choose the third lighting scheme called Splashy Color, leave all the default settings alone, and click OK.

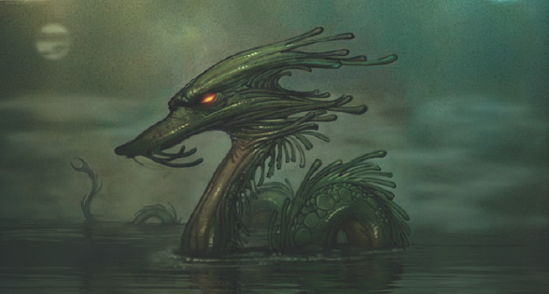
The lighting effect is applied to the image, making it darker, adding a nice transition of color from warmer on the left to cooler on the right, and increasing the saturation of the whole painting slightly. The painting is finished (Figure 6.29).
While this painting was not a particularly complicated piece, it still presented you with several important techniques.
You made a paper texture that you could use to simulate the scaled surface of a reptile. You then were able to use the paper texture in conjunction with various layers to carefully apply a texture to the sea serpent's body. The most important part of this exercise was learning how to use individual layers to control the effect.
You also saw an alternative way of creating a reflection of an object in a watery surface. This technique is in many ways easier than the one presented earlier in the chapter, yet the results of both are similar. It is good when you learn a new application to see various ways of arriving at the same end; I hope this revelation will encourage you to seek out different techniques.
Finally, you saw a technique for creating a fog bank. You can also use this technique to create other weather-related effects, including rain and snow storms.
I hope that you will take what you've learned here and expand upon it while painting your own images.