The painting for this tutorial is based on the fairytale Little Red Riding Hood and is pretty straightforward. Most of the tutorial will take place in the painting of the background.
A combination of techniques is used to paint the dense undergrowth in the background. This includes the creative use of paper textures, patterns, custom brushes, and the image hose. Some of these techniques were demonstrated individually in earlier chapters, but this chapter combines them to paint the background on which the heroine does her thing.
Red herself is simply painted using just a few brushes. There really is no special technique used to paint the main character.
Chapter Contents
Importing the Sketch and Setting Up the Image
Using Custom Brushes to Paint the Forest Background
Making a Grass Paper Texture
Building a Grass Nozzle File
Painting Red Riding Hood
Finishing Touches
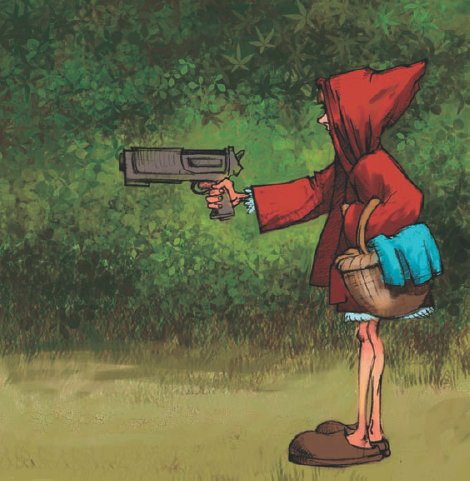
This painting of Red Riding Hood is based on a sketch I did several years ago. Occasionally I get in a fairytale mood, and usually, I add some sort of twist to the original fairytale. In this particular case, Little Red Riding Hood is not nearly the helpless maiden she is in the story. I added a large gun that she must've had discreetly tucked into her cape. Of course, a gun is way too big for dear Red Riding Hood, but that's part of the fun.
The original sketch was scanned at 300 dpi (dots per inch), which made it approximately 5,000 pixels in height. I find this size too large to work on comfortably, so I reduced the size to around 1,500 or 2,000 pixels in the largest dimension. This size makes it easier to paint quickly in the early stages. Then I can gradually increase the size to add details as I finish the image.
Note
The scanned sketch is available for download at www.sybex.com/go/painter.
Open the sketch in Painter, and put the drawing on its own layer by selecting the entire image using the Ctrl+A keyboard combination.
Cut the image using Ctrl+X, and paste it back into itself using Ctrl+V.
With the sketch layer active, use the Effects > Tonal Control > Equalize command to remove most of the grays from the image.
I'm not so worried about any gray in the sketch itself, but we want to make sure that the background areas of the sketch are white so that when we change the layer's Composite Method to Multiply or Gel, these areas will become transparent and not create a gray tint over the colors we paint.
Change the Composite Method of the new Sketch layer to Multiply so that all the white in the image becomes transparent.
Select the whole image again, make sure the Canvas layer is the active layer, and press the Backspace key to clear the sketch from the bottom Canvas layer.
Figure 7.1 shows the original sketch.
The whole background will be filled with dense undergrowth and a lot of plants. It will be much easier to cover the background with plants and shrubs if we work on top of a green color and don't worry about making sure the Canvas layer doesn't show through what we're painting. Red Riding Hood herself will be standing on a gravel path.
Fill the Canvas layer with a gradient starting with a dark green color at the top of the image and ending with a tan color at the bottom. Using the default Digital airbrush, block in the basic colors of Red Riding Hood.
This is going to be a fun painting because of the complementary color scheme. But having a bright red figure on a very green background poses its own unique set of challenges. We have to carefully think out the colors as we paint them. I will try to make sure that I get some colors from the red figure into a green background. If I don't do this, there is a chance that the figure will become so isolated from the background that it does not look like it should be part of the painting. Figure 7.2 shows the sketch with the Canvas layer filled using a gradient and Red Riding Hood's colors quickly painted in.
Duplicate the Sketch layer in case you need to refer back to it somewhere later in the painting.
Click the padlock icon so you do not accidentally paint on this layer, and then click the eye icon to hide the layer.
(As the painting progresses and it's no longer necessary to refer back to the sketch, I will delete this layer.)
The painting feels a little tight on the left side. To add room, go to the Canvas menu and select Canvas Size. When the options box appears, add 250 pixels to the left side of the painting.
The added space is white, so go ahead and fill it with the same gradient used to fill the background. If the original green and tan colors are not still the active colors, simply select them from the top and bottom of the background using the Dropper tool.
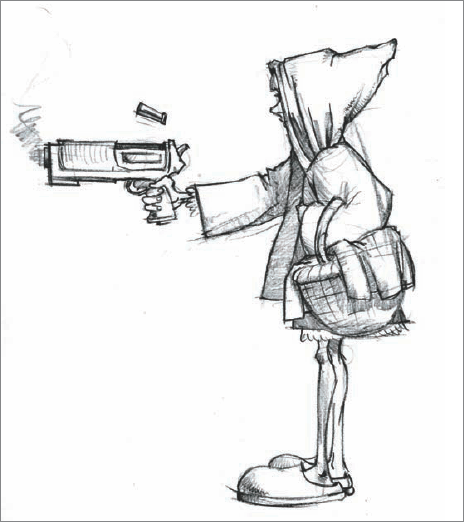
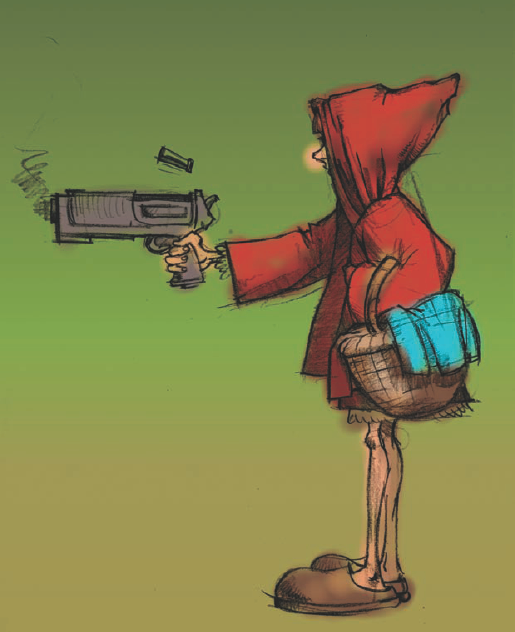
Figure 7.2. A linear gradient ramping from green at the top to tan at the bottom has filled the background, and the basic colors of Red Riding Hood are painted.
We have finished the basic preparation of the image. We have chosen a color scheme and painted the main colors into the image. Save the image using the Iterative Save command. We are ready to start painting.
Most of the work in this painting is development of a lush and wildly overgrown forest setting in which Red Riding Hood has been walking. We will use a number of techniques to create this cluttered and chaotic background. To paint the background, we will quickly use techniques in Painter that allow us to paint the impression of lots of detail without lots of effort: we will use a combination of custom paper textures, custom brushes, custom patterns, and custom image hose nozzles.
Perhaps you're wondering why we're putting so much work into creating custom assets. Surely if we spent the same amount of time just painting, we could accomplish just as much. Let me assure you that this is not case. A bit of time spent creating custom assets can save hours of work later on. An additional advantage is that the custom resources we create are reusable. Eventually, we will have a complete library of custom resources we've created that can be used in many ways and in many paintings, saving us hours of time in the future.
A portion of this tutorial will be showing how to create these custom assets and use them in a painting. In-depth instructions are available in the Painter manual and help file.
It would be way too difficult to try to get so specific that I tell you what brush to use and where. Because artists have their own way of working, individual and specific brushes will not be called for at every step. You should pick and use brushes you want when you want. Specifically, I mean that I will not specify using Leaf Brush number 1 or 2 or 3 at any specific or particular time. I will expect you to pick and choose your brushes, paper textures, and patterns and use them to create your own image.
We will be creating each type of asset step by step. We will not, however, be creating every brush, paper, or pattern used in the painting. All the different assets used to create this painting are available for you to download. In fact, there are more custom materials and libraries in the downloadable libraries than we used in the painting.
Note
All the paper textures, patterns, brushes, and image hoses used in this tutorial are available for download at www.sybex.com/go/painter.
To begin, we will create a custom Leaf brush. This is an overview of the technique you could use to create your own brushes used in this painting; it is not a tutorial on all the features in Painter's Brush Creator.
The brush we will create is not the only one that is used to paint the background in the painting, but only one of many. All the brushes that we use in the painting are available for download at www.sybex.com/go/painter.
Let's create a Leaf brush that we can use to paint the background.
The Leaf brush that we will create is one of many we will create using the same technique we'll use in the Red Riding Hood painting. The brush is created from a freeware dingbat font called Botarosa1. This font is freely available for download all over the Internet and is included with the downloads available to you with this book at www.sybex.com/go/painter. It is a simple font with some nice leaf shapes. Dingbat fonts are a great resource for creating custom brushes.
The first thing to do when creating custom brush is to select an existing brush as the foundation of the new one. In this case, choose Dons brush as the base brush. This is a simple brush, just like the brush we will be creating. Try to pick basic brushes that have similar characteristics to the kind of brush you want to create.
To create a nice Leaf brush, do the following:
Create a new image that is approximately 600×600 pixels in size. The actual size of the image is really not critical.
Make sure the paper color of this image is white. Brushes use only black-and-white information, and there's no reason to have a colored background.
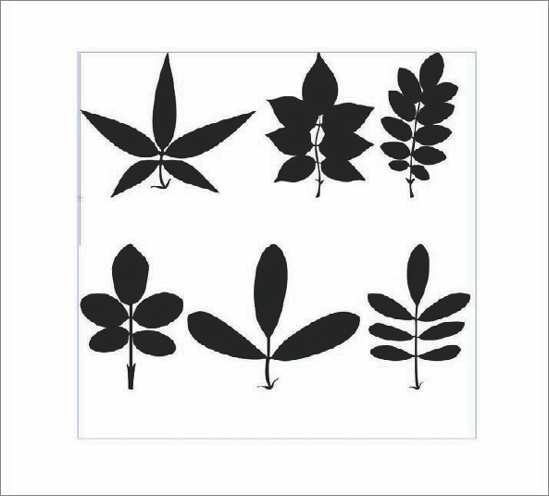
Pick the Text tool, and click in your new image. From the Text Property Bar at the top of the screen, choose Botarosa1 from the drop-down list of available fonts.
Set Size to approximately 70 points using the Size slider, also in the Property Bar, just to the right of the Font drop-down list.
Click in your image and type ABCDEF. You should now see some nice leaf shapes, as in Figure 7.3.
We can make each of these leaf shapes into a different brush. In this tutorial, we will use only the first shape.
We need to convert the Text layer into a regular layer before we can continue.
Right-click on the Text layer and select Commit from the pop-up options. This changes the Text layer into a default layer.
Pick the Crop tool, and drag a selection around the first leaf. Move each edge of the crop box as close as possible to the leaf edges without intersecting them.
Crop the image so that only the first leaf remains.
Drop the Leaf layer onto the canvas.
Select the entire image.
In the Brush Selector bar, click the Palette menu arrow, and pick Capture Dab.
While it appears that nothing has happened, the selected image has actually been captured as a new brush dab. It might be possible to see a ghost image of the leaf around the brush cursor by moving the brush back over the image. Currently, the brush is not useful and needs some tweaking to make it behave so we can paint the leaves in our image.
To make these adjustments to the Leaf brush, we need to open the Brush Creator. There are two ways to access the Brush Creator; we can use the keyboard command Ctrl+B, or we can go to the window menu and choose Show Brush Creator.
The Brush Creator is a powerful tool that contains three different sections represented by tabs at the top of the window: Randomizer, Transposer, and Stroke Designer. We will concern ourselves only with the Stroke Designer.
I encourage you to learn to use the Brush Creator. You'll soon find that you will be creating custom brushes for almost every project you work on. In this case, we're going to use it to create just this one brush.
We can use this method to create additional brushes for this painting if we want to take the time.
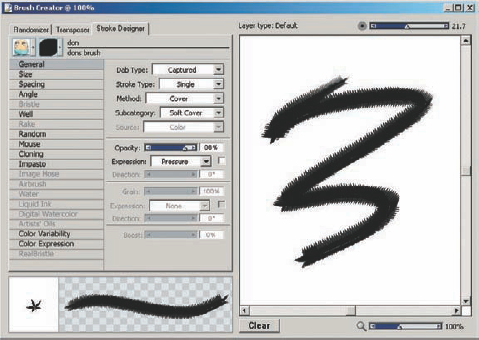
The Brush Creator has several important areas. The large white area is called the Scratchpad, where we can test your brushstroke, and at the bottom of the window is the preview grid. The preview grid shows how our current stroke looks and automatically updates as we change any of the settings.
Go ahead and draw a stroke in the Scratchpad. The stroke does look somewhat like leaves, but the individual dabs are overlapping, and the leaf is pointed in only one direction. This is obviously not how you would want a Leaf brush to paint (Figure 7.4).
We will adjust some settings to make the Leaf brush behave more like we want.
We'll make these adjustments to the controls on the left side of the Brush Creator:
In the General controls, set the Opacity setting to 86%.
In the Size controls, set the Min Size slider to 85%. This lets the size of the dab vary between full size and 85% of full size. Then set the Expression drop-down menu to Random. This causes the size of each dab to be painted randomly.
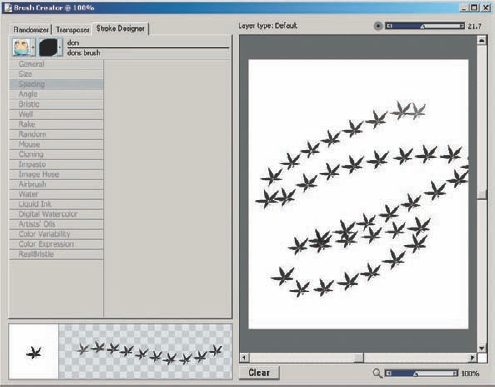
In the Spacing controls, set the Spacing slider up to 200% and the Min spacing up to 20.
Go ahead and draw a stroke in the Scratchpad. Notice now, in the preview grid, there is quite a bit of space between each dab (Figure 7.5).
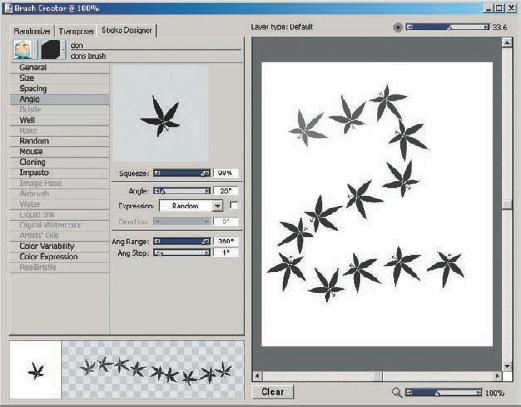
In the Angle controls, set the Squeeze slider up to 99% or less. You want a setting less than 100%. Choose Random from the Expression drop-down menu, and set the Angle Range to 360° and the Ang Step to anywhere between 1° and 5°.
Draw a new stroke in the Scratchpad, and notice how the leaves are painted randomly at different angles (Figure 7.6).
In the Random Controls, set the Jitter to 2.0. The Jitter randomly offsets the stroke in both the horizontal and vertical axes.
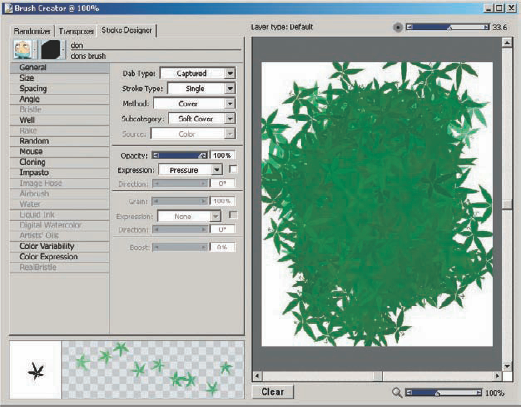
Use the Colors palette to choose a nice green color for the last adjustment to the brush. You will not notice any change if you leave the color set to black.
In the Color Variability controls, move the H slider to 5%, the S slider to 5%, and the V slider to 5%. These controls vary the color of each dab using that dab's Hue, Saturation, and Value settings.
To see the effect of these adjustments, we can fill the Scratchpad with strokes from our brush. The result is a slight variation in color of the individual leaves in the stroke (Figure 7.7).
In the Property Bar at the top of the screen, choose Variant and pick Save Variant. A box will pop up, and you can name your new brush.
When naming new brushes, it's important to give each a name that will adequately describe the brush. In this case, I simply named the brush Leaf 01.
One last thing that we want to do is restore the brush we began with to its original state. Unlike Photoshop, Painter remembers any changes we make to a brush and does not automatically default back to the original when we close the program. Because we made changes to the default Dons brush, it is now a Leaf brush and not the original Dons brush.
To restore the brush to its original state, we'll go to the Variant menu again and select Restore Default Variant. Dons brush is now restored to its original settings before we made any changes.
The newly created Leaf brush can be found in the same category as the original brush used to create it.
That is all there is to it. I used this technique to create each Leaf brush used in the painting. Now we will switch back to using these brushes and paint the background in the Red Riding Hood painting.
Now we have created a brush to use to paint the background. A number of additional brushes are available in the library that you have downloaded. If you've not yet installed those brushes, you might want to go ahead and do that because you will want to use more than one brush to paint the background. Forests have lots of different vegetation growing in them, and we want an organic feel, not a monotonous repetitive look in the background.
Once the brushes are installed, open the Red Riding Hood painting. Currently there are two layers in this file. There's the Canvas layer with the gradient and colors painted on it, and there's the Sketch layer above.
Create a new layer above the Canvas layer. Make sure the Pick Up Underlying Color box is checked.
Using various Leaf brushes, cover the background behind Red Riding Hood. Start with darker colors to look like deeper areas of the forest hidden in shadow, and work toward lighter colors in the front of the image. Don't worry if some of the leaves overlap into the character. You will either erase them or paint over them in later stages. Make sure that the size of the leaves varies from smaller in the background to larger in the foreground. You may also want to use the colors of the leaves to help set the character apart from the background (Figure 7.8).
Switch to the Variable Chalk brush. From the Papers palette, pick one of the stick paper textures and paint some stalks at the bottom edge of the leaves. Don't worry if the stick paper looks rather mechanical at this point. You'll fix that as you continue to paint.
Continue to use the same brush, but switch the paper texture to Basic Paper, one of Painter's default papers, and paint the path that Red Riding Hood is standing on.
Choose the Eraser, and clean up any stray leaves or stick strokes that are covering Red Riding Hood.
Switch to the Sketch layer and, using the Eraser brush, clean up the sketch, getting rid of any of the messy strokes left from the original drawing.
Create a new layer above the leaves but below the sketch, choose Dons brush, and paint the colors of the character carefully on this new layer (Figure 7.9).

I actually thought I would do most of the painting on one layer, but as I started to work, I could see that one layer would not do. It's necessary to separate the background from the character. The background needs more work than I originally thought, and trying to paint around the character would be tedious and difficult. The best thing would be to separate the background from the character; that way, I can work on the background without fear of overpainting the figure, and then work on the figure without fear of messing up my background.
It is easier to separate the background and character now, in the beginning stages of a painting, than to separate them later when more finished work is done. Ideally, it would have been best to separate the character from the background while the painting was still just a sketch.
First, drop all the layers onto the canvas. Also, delete the extra Sketch layer since you're probably not going to need it again.
Because the colors in the image are quite distinct and separate, it is not too difficult to isolate the character. Select the background using the Magic Wand and the Rectangular Selection and Oval Selection tools.
With the majority of the background selected, invert the selection and use Save Selection in the Select menu.
Go into the Channels palette and paint on the Alpha layer to clean up the mask. When the Alpha layer is visible, it appears red at 50% opacity. You can paint on the Alpha layer using any brush.
Usually I use one of the Pen brushes that has a smooth edge and is very opaque. Using either black, which adds to the mask, or white, which erases from the mask, I clean up the edges and get rid of any stray areas outside or inside the mask.
If you have stray areas outside the figure in the background, you can use the Selection tools to select those areas and then use the Backspace key to clear them.
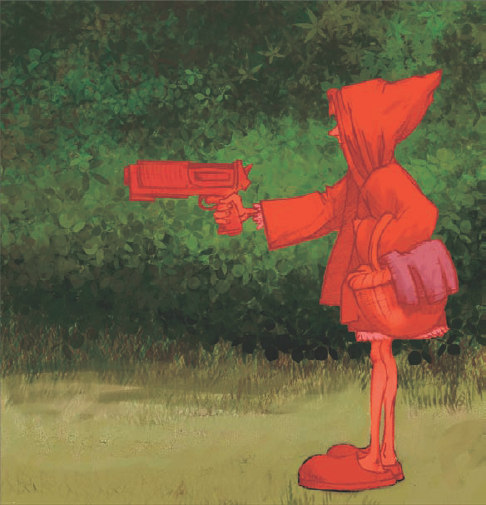
Figure 7.10 shows the mask created in the Alpha channel over the character.
It is a simple matter to load the selection based on the Alpha channel and either copy or cut Red Riding Hood out of the background and paste her into her own layer. When you have done this, make sure to save the image again using the Iterative Save feature.
When Red Riding Hood is on her own layer, go back into the background and, using a variety of Leaf brushes, paint more and more foliage.
As you get closer to the path, switch from Leaf brushes to Stick brushes. The stick brushes were created in the same manner as the Leaf brushes. In fact, the dingbat font used to create the leaves also has some characters that look like sticks. These characters were used to create the brushes.
Note
The Stick brushes that I'm using can be found in this chapter's resources, which are available to download if you have not already done so at www.sybex.com/go/painter.
I don't want leaves going all the way to the ground; I would rather have some sticks and some grass growing up to meet the leaves. I paint sticks in dark greens knowing that, as I paint grass and more leaves, the sticks will recede into the shadows (Figure 7.11).
I don't want the forest to look completely friendly. I believe it can use a few more interesting shapes than just those created with the Leaf brushes. I decide I'm going to add a few thorn bushes.
Now, I could go ahead and paint these bushes by hand, but it would be rather tedious and could take a lot of time. Fortunately, Painter has a nice feature called Patterns that makes painting a series of thorny vines simple.
Most people's first thought when using Patterns in Painter is how to use them for backgrounds and textures. Actually, it was quite a while after I started using Painter that I discovered the true power of patterns. When we combine them with the Pattern Pen brushes, we have a whole new set of tools that can create some unique effects.
In this particular painting, we're going to use patterns to paint some thorny vines in our background forest.
Much of the time when I'm creating shapes that I will use in patterns, I do so in either Corel Draw or Adobe Illustrator. I could create the same shapes using Painter's Pen tool and will do so if it is a very simple shape. I just find it easier to do more complicated shapes in the other programs. There are also more options available in Draw and Illustrator, so most of the time I use these other programs.
I don't want to go into how to create shapes in Draw or Illustrator, so the file that I used is included in this chapter's assets. If you want to follow along and create your own thorns, you can use this or, if you would rather not bother creating a pattern right now, you can simply load the thorn pattern using the Pattern Mover and continue on to the next section.
Note
The original file used to create a thorn pattern as well as the thorn pattern itself are available for download in this chapter's assets at www.sybex.com/go/painter.
To create a pattern to use with the pattern pens, do the following:
Open the file
thorns.PSD(Figure 7.12).This file consists of two layers: the Canvas layer and a Thorn layer. A Thorn layer consists of shapes created in Illustrator and exported as a Photoshop file. I do this using vector programs to get clean shapes. You can draw your shapes if you are not as concerned with accuracy. I often just draw them if I'm going to use the pattern in a rough painting. In this particular case, though, I wanted a very clean, precise, and relatively nasty-looking thorny vine.
For this thorn pattern, I want to use the transparency of the Thorn layer. To do this, I need to make sure that the Thorn layer is active before capturing my pattern. If the Canvas layer is active and I capture the pattern, I will not get the results I am hoping for.
With the Thorn layer active, choose Capture Pattern from the Palette menu. The Palette menu is accessed using the small palette menu triangle in the upper-right corner of the Patterns palette.
The Capture Patterns option box will open. Your preview should look something like Figure 7.13. Name the pattern, leave all the settings default, and click OK.

If your preview of the pattern looks like Figure 7.14, chances are the Canvas layer is the active layer. You could go ahead and save this pattern, but it will not behave correctly when you paint.
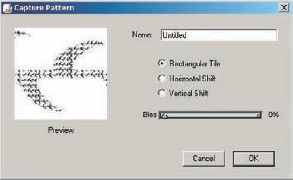
Figure 7.13. The preview window of the Capture Pattern option box showing the pattern captured correctly
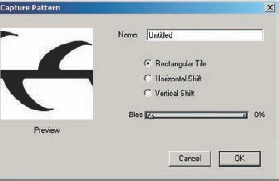
Figure 7.14. The preview window of the Capture Pattern option box showing the pattern incorrectly captured
That's all there is to creating a pattern to paint thorny vines in our painting. In the next steps I will show you how to use the pattern we just created to add thorny vines to our painting.
Make sure that the Thorn pattern is the active pattern. If you cannot see thorns in the preview window, choose the Thorn pattern from the drop-down list.
In the Brush Selector, choose the Pattern Pen Masked. You can find this brush in the Pattern Pens category.
Create a new layer above the background and, using this brush, draw some long and graceful thorny vines. The vine pattern will follow the direction of your stroke (Figure 7.15).
The potential creativity using this brush is limited only by your imagination. You can use it to draw almost anything, from chains, tree branches, and trunks to jungle vines and jewelry—virtually anything that you need to paint in a long and continuous path, and even some things that don't need to be in a path.
Though the thorns are drawn, they are a little rough, and the black is a little too stark for the painting. To make them integrate into the background better, follow these steps:
Check the Preserve Transparency box with the Thorn layer active.
Using Dons brush, paint some dark olive green colors over the thorns. Because the Preserve Transparency box is checked, you don't need to worry about painting outside the thorns. A few large strokes, and you'll be done.
Apply the Soften effect to the thorns. Use the default settings and click OK.
Uncheck the Preserve Transparency box and use the Soften effect once again. This time lower the amount to something between 2 and 2.5.
Lower the Thorn layer Opacity setting to 85%.
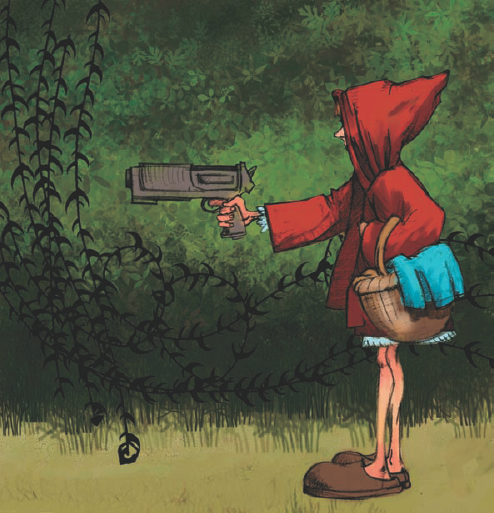
The thorns are finished. They add some graceful curves to the background forest and improve the overall composition of the painting (Figure 7.16).
Create another layer over the thorny vines, and paint a few more leaves. Drop the Leaf and Vine layers onto the canvas (Figure 7.17).

Figure 7.16. A Thorn layer is painted using the Pattern brush, and a few small adjustments are made to the layer so it integrates into the background.
The background is looking pretty good. The transition area between the background foliage and the path is pretty sparse. We need to paint some grass over this area to give it detail.
In the next section, we will make a grass paper texture and use it to paint grass in the path.
Using simple image-based paper textures is one of the best ways to paint repetitive elements in any painting. Paper textures are easy to use, and they don't take much time to make. In this section, I will show you how to make a simple paper texture that looks like grass. We will use the new texture to add grass to the transition area between the foliage and the path in our painting.
If you do not want to create a paper texture at this time, you can use the assets that are available to download. Both the paper texture and the image file used to create the texture are available to download at www.sybex.com/go/painter.
Note
The paper texture library and original file used to create one of the grass paper textures are available for download at www.sybex.com/go/painter.
To create a new paper texture that looks like grass, follow these steps:
Create a new image that is 700 pixels wide by 200 pixels tall. The exact dimensions of the image are not that important, but something around this size will work well.
Using black as your color, draw a number of grass-like strokes across the image.
Do not worry about trying to draw strokes that look exactly like blades of grass. It should take you no more than a minute or two to draw all the strokes. You will have an image that looks something like Figure 7.18.
Select the entire image.
From the Papers palette menu, choose Capture Paper.
The Save Paper box appears. Name your new paper, and set the Crossfade slider to 0. Click OK.
The preview window in the Papers palette will update and show your new paper texture as the active paper.

That is the basic method used to create a paper texture in Painter. You can quickly and easily create a library of paper textures to use in any project.
Consult the Painter help file to learn how to save individual libraries using the Paper Mover.
Now that we have created a grass paper texture, let's check out how the texture will work in a test image.
Create a new image that is about 900×900 pixels.
Pick the Variable Chalk brush.
Choose a nice green color from the Colors palette.
Draw some grass in your image.
Your image probably looks something like Figure 7.19. It is likely that this is not what you expected to see, and it would not be very useful in the painting process. The result is way too mechanical and not nearly random enough to paint convincing grass.

Figure 7.19. The results of painting with the newly created paper texture. The results are not what we want.
There is not actually a problem with the paper texture. It will work just fine if we make one more adjustment. Interestingly enough, it is an adjustment to the brush we will be painting with.
From the Window menu, select Brush Controls Show Random. The Brush Controls appear with the Random controls expanded. Check the Random Brush Stroke Grain box.
Now go back to the image and paint once again using the Variable Chalk brush.
Checking the box causes Painter to randomly move the paper texture as each dab is painted. The overall effect is very random and appears much more organic, as you can see in Figure 7.20.

Figure 7.20. Checking the Random Brush Stroke Grain box causes Painter to randomly move the paper texture as you paint, giving a much more organic result.
Remember though, that this is a change to the brush and not the paper texture. Painter will remember this change each time you use this brush unless you tell it to restore the default variant.
Note
There are several premade grass paper textures in the library.
Now go back to the painting and create a new layer above the Canvas layer.
Use the Variable Chalk brush that has the Random Brush Stroke Grain box checked and paint a layer of grassy strokes blending the path into the foliage.
You can switch between paper textures as you paint, so vary the paper textures you use to give a more natural-appearing grassy edge. There is even a clover paper texture in the library for you to try.
When you're happy with the look of your grassy edge, drop the layer onto the canvas.
Your image should now look something like Figure 7.21.
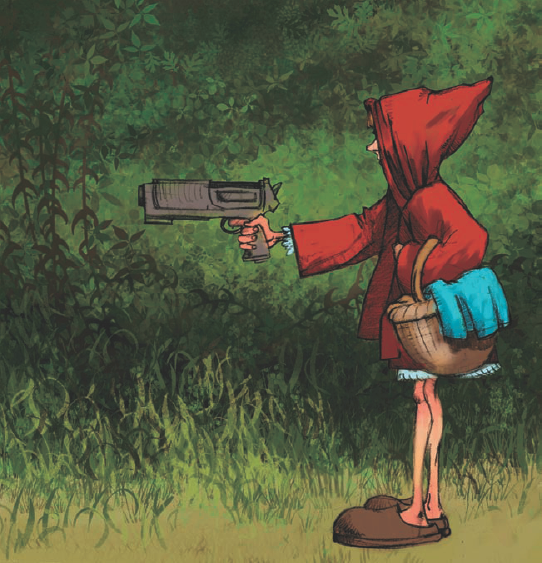
Figure 7.21. A grassy edge transitioning from the path to the leafy undergrowth has been painted using custom paper textures.
The final step in painting the background will be to use a custom image hose nozzle and paint a number of hand-painted blades of grass at the front edge of the background.
Using hand-painted grass will help unify the figure with the background. Up to this point, there has been a lot of detail in the background, but because none of it has been hand-painted, it has a different style than Red Riding Hood.
As with earlier sections in this chapter, you have the option of building a nozzle or simply using one of the assets provided. The nozzle files used in the painting are available for download at www.sybex.com/go/painter. One version includes drop shadows and the second just the blades of grass.
If you are going to use the downloaded nozzle files, you can skip this section and go on to the next.
Note
The nozzle files used in the tutorial are available for download at www.sybex.com/go/painter.
The first step to building a grass nozzle file to use with the Image Hose is to paint a number of individual blades of grass.
Create a new file that is approximately 1200 pixels wide by 300 pixels high.
Create a new layer.
Paint 8 or 10 individual blades of grass using Dons brush or any other brush you would like to use. Paint all the blades of grass on the transparent layer (Figure 7.22). Your blades of grass will probably look quite a bit different from mine, but that's just fine.
Select each blade of grass, and cut and paste it into a new layer. It is important that each blade of grass is on its own layer.
Select all the layers by holding down the Shift key and clicking on each layer in the Layer palette, using the keyboard combination Ctrl+Shift+1, or using the Layers palette menu and choosing Select All Layers.
Group all the selected layers using the keyboard combination Ctrl+G.
From the Nozzle palette, choose Make Nozzle from Group.
A new
RIFfile is created and displayed on the screen. The individual blades of grass have been arranged in a grid on a black background. You will not be able to see the grid, but each cell is as large as needed to encompass the largest single element.Save the file in Painter's native
RIFformat, adding a suffixnozzleto the filename.

It is always a good idea to add the word nozzle as a suffix to the file; otherwise, you will have difficulty trying to decide which files are nozzles and which are regular files. It gets harder as you make more custom nozzles.
That's all there is to making a simple nozzle file. Of course, the more images you begin with, the less repetition the nozzle file will have. Quite often I simply take the entire layer of objects, make a duplicate layer, and flip that layer horizontally, instantly doubling the number of individual elements in the nozzle.
We will use this file to paint some grass in our painting.
When we use the image hose, painting grass is a pretty straightforward process. Normally, it wouldn't merit its own short section, but there is one trick I want to show you that will make the grass look a lot better.
Choose the Image Hose brush, Dons Foliage spray. This brush is simply a default image hose with a couple of adjustments made so it will paint the nozzle in a predictable way.
Click the secondary color square in the Colors palette, and then choose a dark green color from within the painting using the eyedropper.
We'll go ahead and click the primary color once we've picked a dark green secondary color. We want to do this so that when we go back to regular painting and use the eyedropper to choose colors, we're not choosing colors for the secondary color. Most brushes paint with the primary color, and if we're choosing secondary colors instead, painting can become a very frustrating experience.
In the options bar, lower the Grain slider to about 40%.
By using the Grain slider, we can influence how much of the secondary color is mixed with the image hose nozzle. This is a great way to make one image hose paint multiple areas. For example, we might want to paint a row of leaves that appears to be in shadow, so we would lower the percentage of grain using the slider. We can use the same image hose to paint leaves in sunlight by raising the grain amount to 100%. At 100%, we are using the image hose with the original colors just as you created it.
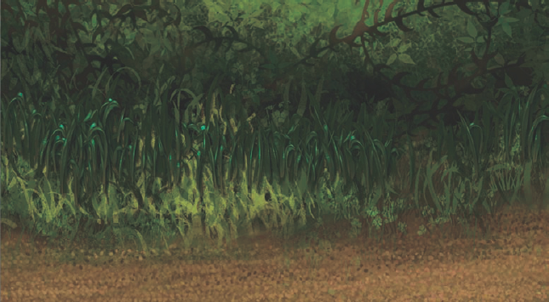
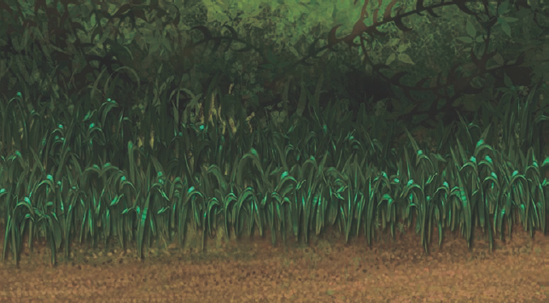
Paint a row or two of grass across the bottom of the image (Figure 7.23).
Now raise the Grain to 100% and paint another row of brighter grass across the darker grass (Figure 7.24).
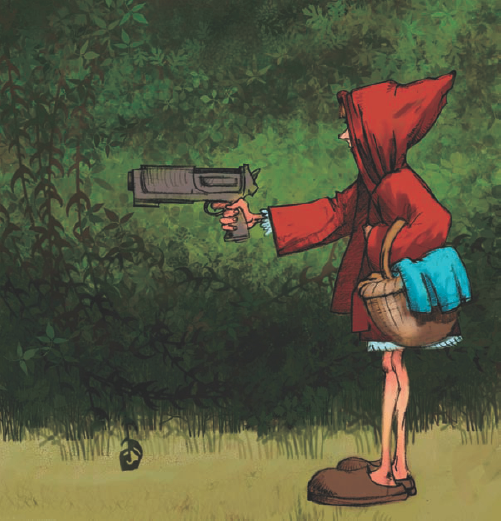
Go ahead and continue to paint as much grass as you want in the background. This grass adds more detail and helps visually integrate Red Riding Hood into the background.
The background is now complete. All that we need to do now is to finish painting Red Riding Hood and her gun.
Painting Red Riding Hood is a straightforward process. Virtually all of the painting was done using Dons brush. There are not many tricks and techniques in this section. You should go about painting the character any way you would like her to appear. If you're not quite sure what to do, use my image as reference.
We paint Red Riding Hood on her own layer and use the Eraser to clean up any stray edges. The gun is completely made up. Use your creativity and do whatever you would like with its design. Maybe you want to make it into a light saber? Anyway, let your imagination run free.
There can be some difficulty when painting this much red into a green background. Use the whites in both the gun and Red Riding Hood's dress to help unify the color scheme by making the whites more blue-green than gray. I also made the fabric in Red Riding Hood's basket quite green to help tie the figure into the background. Also notice that some brown colors in the basket are similar to the browns used in the thorny vines. All of these small touches help create a painting with a harmonious color scheme. You do not want any one area isolated.
The pattern on the fabric in the picnic basket is one from the Weaves palette.
Create a new layer.
Select the area over the picnic basket using the Rectangular Selection tool.
Fill the selected area with a weave.
Change the Composite Method of the layer to Overlay.
Erase everything outside of the edges of the fabric.
Lower the Opacity setting of the layer to about 60%.
Use the Soften effect at the default settings to slightly blur the weave pattern (Figure 7.25).
The painting is 99 percent finished at this point. We just need to add a few finishing touches, and we will be done.
I want to add a little bit more detail and finish to the path. Right now, the bottoms of the blades of grass are floating just a little bit. If I paint up some dark gravel around them, it should help make them look like they are anchored to the ground.
I am going to use a custom brush called Gravel Painter to add some dirt around the bases of the grass. This brush is located in the brush library downloaded for the book at www.sybex.com/go/painter.
Note
Note: The Gravel Painter brush is available for download, as are all the other brushes used in these tutorials at www.sybex.com/go/painter.
We are going to paint the gravel on a new layer created above the canvas but underneath Red Riding Hood.
Create a new layer above the canvas but below Red Riding Hood.
Pick the Gravel brush and, starting with a darker brown, paint under the blades of grass, gradually getting lighter toward the bottom of the painting.
Paint the shadow under Red Riding Hood with the same dark brown colors used under the grass.
When the path is painted to your satisfaction, go ahead and drop the layer onto the canvas.
That's all there is to finishing up the path. Custom brushes can make such chores go very quickly and easily.
For a final touch, we will add some pattern to Red Riding Hood's cape. To do this, I will use a different paper texture and the good old Variable Chalk brush.
Create a new layer.
Choose one of the Wallpaper paper textures. These textures are also available for download if you have not already done so at
www.sybex.com/go/painter.Using the Variable Chalk brush and a red color selected from the lighter areas of Red Riding Hood's cape, lightly paint texture over the cape.
Erase any of the brushstrokes that overlap into the background.
Duplicate the layer.
Hide the bottom layer so only the top pattern layer is visible.
Lower the Opacity setting of the layer until the light pattern is just visible in the light areas of the cape.
Using the Eraser, erase any of the pattern that is in shadow areas.
Reveal the hidden layer and change its Composite Method to Multiply.
Lower the Opacity setting of the Multiply layer until it is just visible in the darker and shadowy areas of the cape.
Erase any of the dark patterns that overlap into the light areas of the cape.
When the patterns look good over the cape, select both layers and Red Riding Hood's layer and collapse them together.
Use the Eraser to clean up any edges that may have gotten messy when collapsing the layers.
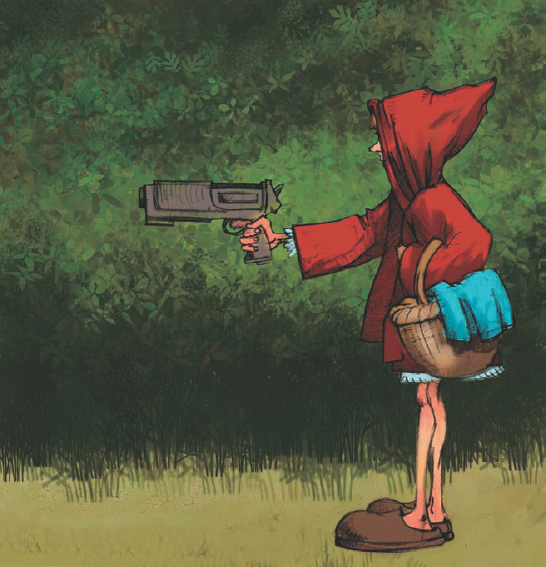
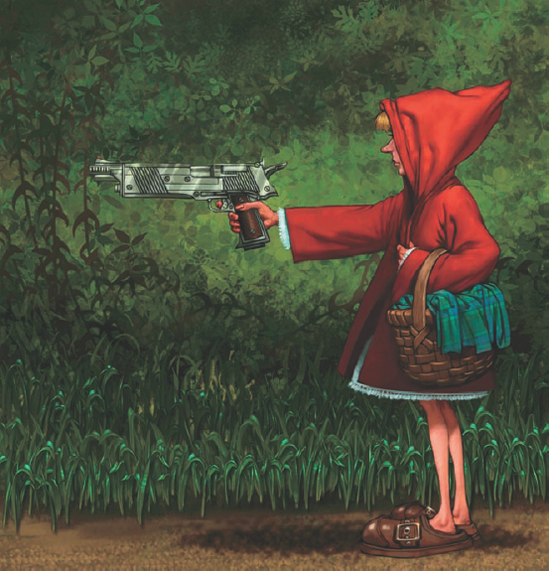
Red Riding Hood is finished (Figure 7.26).

The painting is finished, but the lighting effects often give that little extra sparkle to a painting. The final touch I use is to add a lighting effect over the whole image.
So in this painting, as in earlier paintings, I add a lighting effect from the Effects > Surface Control > Apply lighting menu. At this point, you should choose any of the effects you like. I again use the Splashy Color preset.
The effect was too intense, so using Fade from the Edit menu, I reduced the effect 50%.
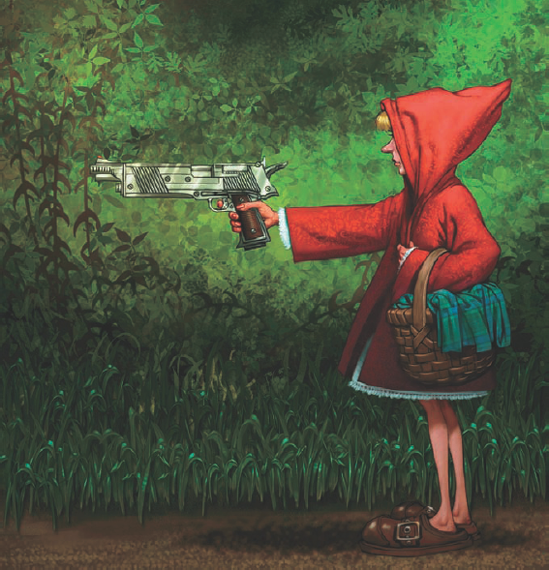
Now the painting is finally and completely finished (Figure 7.27).
It seems like we've covered just about every possible subject in Painter, though in reality we covered only a few. It is important to see how you can build a complicated and detailed background using just a few of the more normal features among all the available ones. We really only used paper textures, patterns, and the image hose to create a very thick and dense forest undergrowth.
I do hope that you will find these techniques useful in your own personal projects. Don't worry if it takes a little bit of practice before you are comfortable using them all together. Ultimately, you will have a great arsenal of techniques to use when you work with digital paint.