Chapter 15: Getting Started with Vertical Slice Architecture
In this chapter, we'll explore Vertical Slice Architecture, which moves all elements of a feature back together. It is almost the opposite of layering, but not totally. Vertical Slice Architecture also gives us a clean separation between requests, leading to an implicit Command Query Responsibility Segregation (CQRS) design. We piece all of that together using MediatR, which we explored in the previous chapter.
The following topics will be covered in this chapter:
- Vertical Slice Architecture
- A small project using Vertical Slice Architecture
- Continuing your journey: A few tips and tricks
Vertical Slice Architecture
As was said at the beginning of the previous chapter, instead of separating an application horizontally, a vertical slice groups all horizontal concerns together to encapsulate a feature. Here is a diagram that illustrates that:
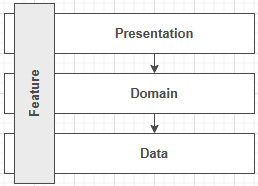
Figure 15.1 – Diagram representing a vertical slice crossing all layers
Jimmy Bogard, who is the pioneer of this type of architecture and who promotes it frequently, says the following:
What does that mean? Let's split that sentence into two distinct points:
- "minimize coupling between slices" (improved maintainability, loose coupling)
- "maximize coupling within a slice" (cohesion)
We could see the former as: instead of spreading code around multiple layers, with potentially superfluous abstractions along the way, let's regroup that code together. That helps keep the tight coupling inside a vertical slice to create a cohesive unit of code that serves a single purpose: handling the feature's logic.
We could see the latter as: one vertical slice should not depend on another. With that in mind, when you modify a vertical slice, you don't have to worry about the impact on the other slices because the coupling is minimal.
Then we could wrap that to create software around the business problem that you are trying to solve instead of around the developer's concerns, which your client has no interest in (such as data access).
What are the advantages and disadvantages?
On the upside, we have the following:
- We reduce coupling between features, making it easier to work on such a project. We only need to think about a single vertical slice, not N layers, improving maintainability by centralizing the code around a shared concern.
- We can choose how each vertical slice interacts with the external resources they require without thinking about the other slices. That adds flexibility since one slice can use T-SQL while another uses EF Core.
- We can start small with a few lines of code (described as Transaction Scripts in Patterns of Enterprise Application Architecture by Martin Fowler) without extravagant design or over-engineering. Then we can refactor our way to a better design when the need arises, and patterns start to emerge, leading to a faster time to market.
- Each vertical slice should contain precisely the right amount of code needed for it to be correct – not more, not less. That leads to a more robust codebase (less code means less extraneous code).
- It is easier for newcomers to find their way around an existing system since each feature is independent, with its code grouped, leading to a faster onboarding time.
- All that you already know still applies.
Tip
From my experience, features tend to start small and grow over time. While using a software, the users often find out what they really need, updating the workflow they thought they initially required, which leads to changes in the software. There are many projects that I wish were built using Vertical Slice Architecture instead of layering.
Now some downsides:
- It may take time to wrap your head around it if you're used to layering, leading to an adaptation period to learn a new way to think about your software.
- It is a "newer" type of architecture, and people don't like change.
Note
Another thing that I learned the hard way is to embrace change. I don't think that I've seen one project end as it was supposed to. Everyone figures out the missing pieces of the business processes while using the software. That leads to the following advice: release as fast as you can and have your customer use the software as soon as possible. That advice can be easier to achieve with Vertical Slice Architecture because you are building value for your customers instead of more or less useful abstractions and layers.
At the beginning of my career, I was frustrated when specifications changed, and I thought that better planning would have fixed that. Sometimes better planning would have helped, but sometimes, the client just did not know and had to try the application to figure it out. My advice here is don't be frustrated when the specs change, even if that means rewriting a part of the software that took you days or more to code in the first place; that will happen all the time. Learn to accept that instead, and find ways to reduce the number of times it happens by helping your clients figure out their needs.
The following points are downsides that can become upsides:
- If you are used to working in silos, it may be harder to assign tasks by concerns (such as the data guys doing the data stuff). But in the end, it should be an advantage; everyone in your team (or teams) should work more closely together, leading to more learning and collaboration and possibly a new cross-functional team(s) (which definitely is an excellent thing).
- Refactoring: You need refactoring skills. Over time, most systems need some refactoring. That can be caused by changes in the requirements, or due to technical debt. No matter the reason, if you don't, you may very well end up with a Big Ball of Mud. Writing isolated code at first then refactoring to patterns is a crucial part of Vertical Slice Architecture. That's one of the best ways to keep cohesion high inside a slice and coupling as low as possible between slices.
Note
A way to start refactoring that business logic would be to push the logic into the domain model, creating a rich domain model. You can also use other design patterns and techniques to fine-tune the code and make it more maintainable, such as by creating services or even layers. A layer does not have to cross all vertical slices; it can cross only a subset of them. Compared to other application-level patterns, such as layering, there are fewer Vertical Slice Architecture rules, leading to more choices on your end. You can use all design patterns, principles, and best practices inside a vertical slice without exporting those choices to other vertical slices.
How do you organize a project into Vertical Slice Architecture? Unfortunately, there is no definitive answer to that; it's like everything when designing software: it depends. We will explore one way in the next project, but you can organize your project as you see fit. Then we will dig deeper into refactoring and organization. Before that, let's have a quick look at the Big Ball of Mud anti-pattern.
Anti-pattern: Big Ball of Mud
Big Ball of Mud describes a system that ended up badly, or that was never designed. Sometimes a system starts great but evolves into a Big Ball of Mud due to pressure, volatile requirements, impossible deadlines, bad practices, or any other reasons. Big Ball of Mud is often referred to as spaghetti code, which means pretty much the same thing.
That's it for this anti-pattern; it is simply an unmaintainable codebase or a very hard to maintain codebase. Next, we will get into that Vertical Slice Architecture project.
Project: Vertical Slice Architecture
Context: We are getting tired of layering, and we got asked to rebuild our small demo shop using Vertical Slice Architecture.
Here is an updated diagram that shows how the project is conceptually organized:

Figure 15.2 – Diagram representing the organization of the project
Each vertical box is a use case (or slice), while each horizontal arrow is a crosscutting concern or some shared components. This is a small project, so the data access code (DbContext) and the Product model are shared between all use cases. That sharing has nothing to do with Vertical Slice Architecture, but as a tiny project, it is hard to split it up more. I'll go into more detail at the end of the section.
Here are the actors:
- ProductsController is the web API entry point to manage products.
- StocksController is the web API entry point to manage inventory (add or remove stocks).
- AddStocks, RemoveStocks, and ListAllProducts are the same use cases that we are copying around in our project.
- The persistence "layer" consists of an EF Core DbContext that persists the Product model.
We could add other crosscutting concerns on top of our vertical slices, such as authorization, error management, and logging, to name a few. We will explore only validation in this sample.
Next, let's take a look at how the project is organized.
Project organization
Here is how we organized the project:
- The Data directory contains EF Core-related classes.
- The Features directory contains the features. Each subfolder contains its underlying use cases (vertical slices).
- Each use case is self-contained and exposes the following classes:
a) Command represents the MediatR request.
b) Result is the return value of that request.
c) MapperProfile instructs AutoMapper how to map the objects that are use case-related.
d) Validator contains the validation rules to validate the Command objects.
e) Handler contains the use case logic: how to handle the request.
- The Models directory contains the domain model.

Figure 15.3 – Solution Explorer view of the file organization
We have a MapperProfile class for each use case in this project, but we could share one per feature instead, moving the MapperProfile class to the same level as the controller.
In this project, we add request validation. To achieve that, we are using FluentValidation. You could also use System.ComponentModel.DataAnnotations or any other validation system that you want to. What is great about FluentValidation is that it is easy to keep the validation within our vertical slice but outside of the class to be validated (compared to DataAnnotations, for example). Moreover, it is easy to test and extend.
Like other tools, FluentValidation can scan assemblies for validators with the following line (highlighted):
var currentAssembly = GetType().Assembly;
services.AddAutoMapper(currentAssembly);
services.AddMediatR(currentAssembly);
services.AddDependencyInjectionModules(currentAssembly);
services
.AddControllers()
.AddFluentValidation(config => config.RegisterValidatorsFromAssembly(currentAssembly));
The validators themselves are part of each vertical slice. Let's take a look at those features next.
Exploring a feature
In this subsection, we'll explore the RemoveStocks feature. We had the same logic in previous samples but organized differently (which is pretty much the difference between one architectural style and another). Let's look at the code, which I describe after each block:
namespace VerticalApp.Features.Stocks
{
public class RemoveStocks
{
The RemoveStocks class contains multiple nested classes to help organize our feature and save us some headache about naming collision.
public class Command : IRequest<Result>
{
public int ProductId { get; set; }
public int Amount { get; set; }
}
The Command class is the input of the use case: the request. The request contains everything needed to execute the operation (that is, to remove stocks from the inventory). The IRequest<TResult> interface tells MediatR that the Command class is a request and should be routed to its handler. The Result class (which follows here) is the return value of that handler:
public class Result
{
public int QuantityInStock { get; set; }
}
The Result class represents the output of the use case. That's what the handler will return.
public class MapperProfile : Profile
{
public MapperProfile()
{
CreateMap<Product, Result>();
}
}
The mapper profile is optional, but it allows encapsulating AutoMapper maps that are related to the use case. In the preceding code, we registered the map from a Product instance to a Result instance.
public class Validator : AbstractValidator<Command>
{
public Validator()
{
RuleFor(x => x.Amount).GreaterThan(0);
}
}
The validator is optional but allows validating the input (Command) before it hits the handler. To make this work, we need to implement an IPipelineBehavior<TRequest, TResponse> interface that is added to the MediatR pipeline (after we are done with the RemoveStock feature). Next is the Handler class, which implements the use case logic:
public class Handler : IRequestHandler<Command, Result>
{
private readonly ProductContext _db;
private readonly IMapper _mapper;
public Handler(ProductContext db, IMapper mapper)
{
_db = db ?? throw new ArgumentNullException(nameof(db));
_mapper = mapper ?? throw new ArgumentNullException(nameof(mapper));
}
public async Task<Result> Handle(Command request, CancellationToken cancellationToken)
{
var product = await _db.Products.FindAsync(request.ProductId);
if (request.Amount > product.QuantityInStock)
{
throw new NotEnoughStockException(product.QuantityInStock, request.Amount);
}
product.QuantityInStock -= request.Amount;
await _db.SaveChangesAsync();
var result = _mapper.Map<Result>(product);
return result;
}
}
}
}
The Handler class inherits from IRequestHandler<Command, Result>, which links it to the Command class. It implements the same logic as the previous implementations, beginning in Chapter 12, Understanding Layering.
To summarize, the RemoveStocks class contains all the required sub-classes for that specific use case. As a reminder, now that we read the code, the pieces of each use case are the following:
- Command is the input DTO.
- Result is the output DTO.
- MapperProfile is the AutoMapper profile that maps DTOs to domain models (and vice versa).
- Validator validates the Command DTO (the input).
- Handler encapsulates the use case logic.
Let's now look at the StocksController class, which translates the HTTP requests to the MediatR pipeline:
namespace VerticalApp.Features.Stocks
{
[ApiController]
[Route("products/{productId}/")]
public class StocksController : ControllerBase
{
private readonly IMediator _mediator;
public StocksController(IMediator mediator)
{
_mediator = mediator ?? throw new ArgumentNullException(nameof(mediator));
}
We inject an IMediator implementation in the controller since we are using it in all of the actions that follow.
[HttpPost("add-stocks")]
public async Task<ActionResult<AddStocks.Result>> AddAsync(
int productId,
[FromBody] AddStocks.Command command
)
{
command.ProductId = productId;
var result = await _mediator.Send(command);
return Ok(result);
}
In the preceding code, we read the content of an AddStocks.Command instance from the body, then we set ProductId for the reasons discussed in Chapter 12, Understanding Layering, to finally send the command object into the MediatR pipeline. From there, MediatR routes the request to the handler that we explored a few pages ago, before returning the result of that operation with an HTTP 200 OK status code.
[HttpPost("remove-stocks")]
public async Task<ActionResult<RemoveStocks.Result>> RemoveAsync(
int productId,
[FromBody] RemoveStocks.Command command
)
{
try
{
command.ProductId = productId;
var result = await _mediator.Send(command);
return Ok(result);
}
catch (NotEnoughStockException ex)
{
return Conflict(new
{
ex.Message,
ex.AmountToRemove,
ex.QuantityInStock
});
}
}
}
}
The remove-stocks action has the same logic as the add-stocks one, with the added try/catch block (like the previous implementations of this code).
One of the differences between the preceding code and previous implementations is that we moved the DTOs to the vertical slice itself (highlighted lines). Each vertical slice defines the input, the logic, and the output of that feature, as follows:
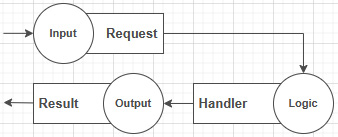
Figure 15.4 – Diagram representing the three primary pieces of a vertical slice
When we add input validation, we have the following:
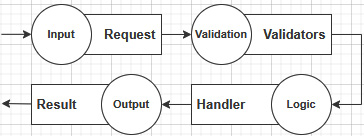
Figure 15.5 – Diagram representing the three primary pieces of a vertical slice, with added validation
All in all, the code of the controller is thin, creating a tiny layer between HTTP and our domain, mapping the HTTP requests to the MediatR pipeline, and the responses back to HTTP. We still have the extra line for the productId and that try/catch block, but we could get rid of these using custom model binders (see the end of the chapter for some additional resources).
With that in place, it is now straightforward to add new features to the project. Visually, we end up with the following vertical slices (bold), possible expansions (normal), and shared classes (italics):
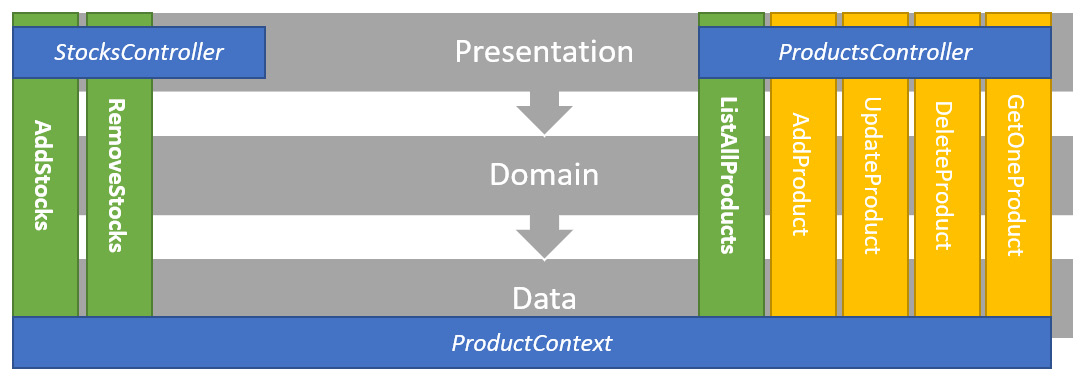
Figure 15.6 – Diagram representing the project and possible extensions related to product management
Next, we add the missing parts to use those IValidator implementations.
Request validation
We now have most of the code to run our little project. However, we still have no validation in our MediatR pipeline, only validators. Fortunately, MediatR has an IPipelineBehavior<in TRequest, TResponse> interface that allows us to extend the request pipeline. It works like an MVC filter. Speaking of which, we also need a filter to control the HTTP response when a validation error occurs. That will allow us to encapsulate validation logic in two small classes. Those two classes will intercept and handle all validation exceptions thrown by any feature.
Let's start with a high-level view:
- The HTTP request passes through the ASP.NET MVC pipeline up to the controller.
- The controller sends a command that passes through the MediatR pipeline:

Figure 15.7 – High-level flow of a successful HTTP request
What we want to do is the following:
- Add an IExceptionFilter that catches ValidationException (from FluentValidation) in the MVC pipeline (in the Filters section of the diagram).
- Add a MediatR IPipelineBehavior that validates requests and throws a ValidationException when the request validation fails (in the Behaviors section of the diagram).
After adding those two pieces, our request flow will become something like this:
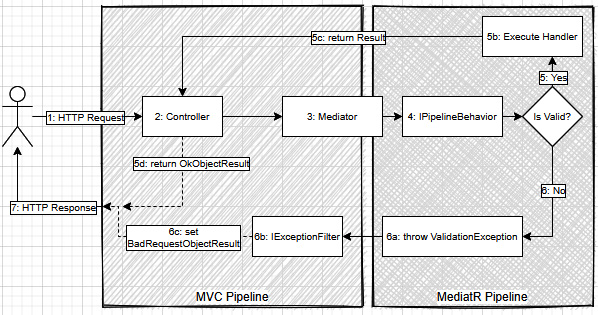
Figure 15.8 – Request flow including request validation details
- The user sends an HTTP request.
- The controller sends a command through the mediator.
- The mediator runs the request through its pipeline.
- The IPipelineBehavior implementation validates the request.
- If the request is valid, the following occurs:
a) The request continues through the MediatR pipeline until it reaches the handler.
b) The Handler is executed.
c) The Handler returns a Result instance.
d) The controller transfers that Result object into an OkObjectResult object.
- If the validation of the request fails, the following occurs:
a) The IPipelineBehavior implementation throws a ValidationException.
b) The IActionFilter implementation catches and handles the exception.
c) The filter sets the action result to a BadRequestObjectResult.
- MVC transforms the resulting IActionResult into a 200 OK (success) or a 400 BadRequest (validation failure) response and serializes the resulting object into the response body.
Now that we understand the theoretical aspects of the changes, let's start by coding the IPipelineBehavior implementation. I named it ThrowFluentValidationExceptionBehavior because it throws a ValidationException (from FluentValidation), and it is a MediatR behavior:
namespace VerticalApp
{
public class ThrowFluentValidationExceptionBehavior<TRequest, TResponse> : IPipelineBehavior<TRequest, TResponse>
where TRequest : IBaseRequest
We start by implementing the IPipelineBehavior<TRequest, TResponse> interface. Our class forwards both generic parameters to the IPipelineBehavior interface to serve all types of requests, as long as the request implements IBaseRequest. The IRequest<out TResponse> interface that the Command class implements inherits from IBaseRequest.
{
private readonly IEnumerable<IValidator<TRequest>> _validators;
public ThrowFluentValidationExceptionBehavior (IEnumerable<IValidator<TRequest>> validators)
{
_validators = validators ?? throw new ArgumentNullException(nameof(validators));
}
Here is part of the magic; by injecting a list of IValidator<TRequest>, our behavior will have access to the validators of the current request (any type of request).
public Task<TResponse> Handle(TRequest request, CancellationToken cancellationToken, RequestHandlerDelegate<TResponse> next)
{
var failures = _validators
.Select(v => v.Validate(request))
.SelectMany(r => r.Errors);
if (failures.Any())
{
throw new ValidationException(failures);
}
return next();
}
}
}
Finally, in the Handle method, we run all validators (see the highlighted code) and project the errors into the failures variable. If there are any failures, it throws a ValidationException that contains all the failures. If the validation succeeds, it returns the next element of the pipeline. This concept is similar to the Chain of Responsibility pattern, which we explored in Chapter 10, Behavioral Patterns.
Next, to make it work, we must register it in the composition root. Since we don't want to register it for every feature in our project, we are going to register it as an open generic type like this (in the Startup class):
services.AddSingleton(
typeof(IPipelineBehavior<,>),
typeof(ThrowFluentValidationExceptionBehavior<,>)
);
This code means: "add and instance of ThrowFluentValidationExceptionBehavior in the pipeline for all requests." So our behavior runs every time, no matter the type of the request.
If we run the code, we get the following error, which is not elegant:

Figure 15.9 – The result of the ThrowFluentValidationExceptionBehavior without the MVC filter
To manage the way MVC outputs those exceptions, we can create and add an IExceptionFilter to its pipeline. I decided to call it FluentValidationExceptionFilter because it is an exception filter that handles exeptions of type FluentValidation.ValidationException. That class looks like the following:
namespace VerticalApp
{
public class FluentValidationExceptionFilter : IExceptionFilter
{
public void OnException(ExceptionContext context)
{
if (context.Exception is ValidationException ex)
{
context.Result = new BadRequestObjectResult(new
{
ex.Message,
ex.Errors,
});
context.ExceptionHandled = true;
}
}
}
}
The preceding code validates whether the value of the Exception property (the current exception) is a ValidationException. If it is, it sets the Result property's value to an instance of BadRequestObjectResult. It creates an anonymous object with two properties directly taken from the ValidationException object: Message and Errors. Message is the error message, and Errors is a collection of ValidationFailure objects.
Afterward, it sets the ExceptionHandled property to true, so MVC knows the exception was handled and stops caring about it, like it never happened. Those few lines of code are the equivalent of returning a BadRequest(new {...}) from a controller action, but applied globally, for all controllers' actions.
One last step: we must register it with the MVC pipeline so it gets used. In the Startup class, we replace the empty services.AddControllers() method call with the following:
services.AddControllers(options => options
.Filters.Add<FluentValidationExceptionFilter>())
That adds our new filter to the MVC pipeline. From now on, whenever an unhandled exception occurs, our filter will be executed.
Now, if we run a request that should not pass validation (such as add 0 new stock), we get the following result:
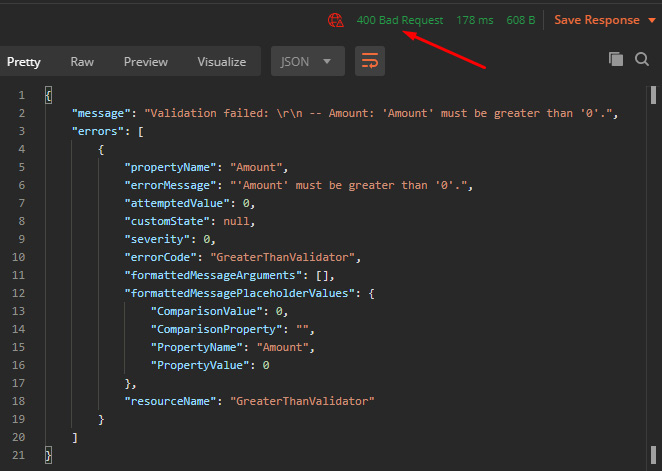
Figure 15.10 – The result of the ThrowFluentValidationExceptionBehavior handled by the FluentValidationExceptionFilter
That is more elegant and can be handled by clients more easily. You can also customize the exception you throw in your implementation of the IPipelineBehavior interface and the object you serialize in your implementation of the IExceptionFilter. You can also leverage custom implementation of the IExceptionFilter interface in non-MediatR-based projects since it is MVC. There are other types of filters too. Filters are really good at handling cross-cutting concerns in MVC.
Next, we'll explore a bit of testing. I won't test the whole application, but I'll get into a few advantages of testing Vertical Slice Architecture versus other architecture types.
Testing
For this project, I wrote one integration test per use case outcome, which lowers the number of unit tests required while increasing the level of confidence in the system at the same time. Why? Because we are testing the features themselves instead of many abstracted parts independently. We could also add as many unit tests as we want. I'm not telling you to stop writing unit tests; on the contrary, I think this approach helps you to write fewer but better feature-oriented tests, diminishing the need for mock-heavy unit tests.
Let's take a look at the Stocks use cases tests:
namespace VerticalApp.Features.Stocks
{
public class StocksTest : BaseIntegrationTest
{
public StocksTest()
: base(databaseName: "StocksTest") { }
The BaseIntegrationTest class encapsulates the boilerplate code of the dependency injection and database seeding logic. I'm going to omit it for brevity reasons, but you can consult the full source code in the GitHub repository (https://net5.link/DfSf).
protected async override Task SeedAsync(ProductContext db)
{
await db.Products.AddAsync(new Product
{
Id = 4,
Name = "Ghost Pepper",
QuantityInStock = 10
});
await db.Products.AddAsync(new Product
{
Id = 5,
Name = "Carolina Reaper",
QuantityInStock = 10
});
await db.SaveChangesAsync();
}
In the SeedAsync method, we insert two products in the in-memory test database.
public class AddStocksTest : StocksTest{...}
public class RemoveStocksTest : StocksTest
{
private const int _productId = 5;
[Fact]
public async Task Should_decrement_ QuantityInStock_by_the_specified_amount()
{
// Arrange
var serviceProvider = _services.BuildServiceProvider();
using var scope = serviceProvider.CreateScope();
var mediator = scope.ServiceProvider. GetRequiredService<IMediator>();
// Act
var result = await mediator.Send(new RemoveStocks.Command
{
ProductId = _productId,
Amount = 10
});
// Assert
using var assertScope = serviceProvider.CreateScope();
var db = assertScope.ServiceProvider. GetRequiredService<ProductContext>();
var peppers = await db.Products.FindAsync( _productId);
Assert.Equal(0, peppers.QuantityInStock);
}
[Fact]
public async Task Should_throw_a_NotEnoughStockException_when_the_resulting_QuantityInStock_would_be_less_than_zero()
{
// Arrange
using var scope = _services. BuildServiceProvider().CreateScope();
var mediator = scope.ServiceProvider. GetRequiredService<IMediator>();
// Act & Assert
await Assert.ThrowsAsync<NotEnoughStockException>(() => mediator.Send(new RemoveStocks.Command
{
ProductId = _productId,
Amount = 11
}));
}
}
}
}
The RemoveStocksTest class contains two test cases:
- Should decrement QuantityInStock by the specified amount.
- Should throw a NotEnoughStockException when the resulting QuantityInStock would be less than zero.
In the Arrange phase, the test methods get services from the IoC container, creating a ServiceProvider instance, then creating a scope that simulates the scope of an HTTP request. From that scope, both test cases get an instance of IMediator.
Then, in the Act phase, both tests send the command to IMediator, just like the controller does, testing the whole pipeline in the process.
In the Assert phase, the first test creates a new scope to make sure it receives a new instance of the ProductContext class and that the query does not return some uncommitted EF Core entities. Then it validates whether the saved data is correct. The second test case validates that Handler has thrown a NotEnoughStockException.
That's it; with that little amount of code, we tested the three primary logic path of our two stocks use cases. We could also test the whole web API by sending an HTTP request to the controller instead. On the other hand, we could unit test the controller by mocking the IMediator interface. Your testing strategy depends on your needs, but testing from the IMediator will work for any type of application that uses MediatR, which is why I opted for that strategy here.
Next, we'll look at a few tricks and processes to get started with a bigger application. These are ways that I found work for me, and that may well suit you too. Take what works for you and leave the rest; we are all different and work differently.
Continuing your journey
The previous project was tiny. It had a shared model that served as the data layer because that model was composed of only a single class. When you are building a bigger application, you will most likely have more than a class, so I'll try to give you a good starting point to tackle bigger apps. The idea is to create slices that are as small as possible, limit interactions with other slices as much as possible, then refactor that code into better code. We cannot remove coupling, so we need to organize it instead.
Here is a workflow that we could call "start small and refactor":
- Write the contracts that cover your feature (input and output).
- Write one or more integration tests that cover your feature, using those contracts; the Query or Command class (IRequest) as input and the Result class as output.
- Implement your Handler, Validator, MapperProfile, and any other bit that needs to be coded. At this point, the code could be a giant Handler; it does not matter.
- Once your integration tests pass, refactor that code by breaking down your giant Handler.Handle method (if needed).
- Make sure your tests still pass.
During step 2, you may also want to test the validation rules as unit tests. It is way easier and faster to test multiple combinations and scenarios from unit tests, and you don't need to access a database for that. The same also applies to any other part of your system that is not tied to an external resource.
During step 4, you may find duplicated logic between features. If that's the case, it is time to encapsulate that logic elsewhere, in a shared place. That could be to create a method in the model, create a service class, or any other pattern and technique that you know that might solve your logic duplication problem. Working from isolated features and extracting shared logic will help you design the application. You want to push that shared logic outside of a handler, not the other way around (well once you have that shared logic, you can use it wherever needed). Here, I want to emphasize shared logic, which means a business rule. When a business rule changes, all consumers of that business rule must also change their behavior. Avoid sharing similar code but do share business rules.
What is very important when designing software is to focus on the functional needs, not the technical ones. Your clients and users don't care about the technical stuff; they want results, new features, bug fixes, and improvements. Simultaneously, beware of the technical debt and don't skip that refactoring step, or your project may end up in trouble. That advice also applies to all types of architecture.
Another piece of advice is to keep all of the code that makes a vertical slice as close as possible. You don't have to keep all classes of a use case in a single file, but I feel that helps. You can also create a folder hierarchy where the deeper levels share the previous levels. For example, I recently implemented a workflow in an MVC application related to shipments. The creation process was in multiple steps. So I ended up with a hierarchy that looked like the following (directories are bold):
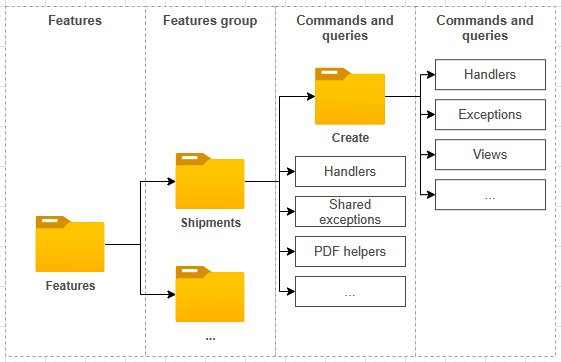
Figure 15.11 – The organizational hierarchy of directories and elements
Initially, I just coded all the handlers one by one, then I saw patterns emerge, so I took that shared logic and encapsulated it into shared classes. Then I started to reuse some exceptions at upper levels, so I moved those up from the Features/Shipments/Create folder/namespace to the Features/Shipments folder/namespace. I also extracted a service class to manage shared logic between multiple use cases and more (I'll skip all the details as they are irrelevant). In the end, I have only the code that I need, no duplicated logic, and the collaborators (classes, interfaces) are close to each other. I registered only three interfaces with the IoC container, and two of them are related to PDF generation. The coupling between features is minimal, while parts of the system work in synergy (cohesion). Moreover, there is very little to no coupling with other parts of the system. If we compare that result to another type of architecture such as layering, I would most likely have needed more abstractions such as repositories, services, and whatnot; the end result with Vertical Slice Architecture is simpler.
The key point here is to code your handlers independently, organize them the best you can, keep an eye open for shared logic and emerging patterns, extract and encapsulate that logic, and try to limit interactions between use cases and slices.
Now, what is a slice? Personally, I see slices as composites. Each Features/Shipments/Create/[*]Handler is a slice. When put together, they compose the Features/Shipments/Create slice (a bigger slice). Then, all slices from Features/Shipments become another big slice, leading to something like this:
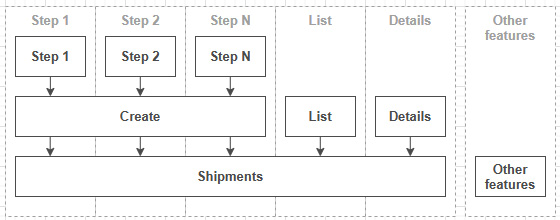
Figure 15.12 – A diagram displaying a top-down coupling structure where smaller parts (top) depend on bigger parts (middle) of complex features (bottom) based on their cohesion with one another (vertically)
There is strong coupling inside of Step 1, with limited coupling between the other steps; they share some creation code as part of the Create slice. Create, List, and Details also share some code, but in a limited way; they are all part of the Shipments slice and access or manipulate the same entity: one or more shipments. Finally, the Shipments slice shares no code (or very little) with Other Features.
OK, this was my definition of a slice and how I see them; maybe other people have other points of view on that, which is fine. I find that by following the pattern that I just described, I end up with limited coupling and maximum cohesion.
Summary
In this chapter, we overviewed Vertical Slice Architecture, which flips layers by 90°. Vertical Slice Architecture is about writing minimal code to generate maximum value by getting superfluous abstractions and rules out of the equation by relying on the developers' skills and judgment instead.
Refactoring is a critical factor in a Vertical Slice Architecture project; success or failure will most likely depend on it. All patterns, including layers, can be used in conjunction with Vertical Slice Architecture. It has lots of advantages over layering with little to no disadvantages. Teams who work in silos (horizontal teams) may need to rethink that before switching to Vertical Slice Architecture and create multi-functional teams instead (vertical teams).
With Vertical Slice Architecture, we replaced the low-value abstraction with commands and queries (CQRS-inspired). Those are then routed to their respective Handler using the Mediator pattern (helped by MediatR). That allows encapsulating the business logic and decoupling it from its callers (the controllers in the sample). Those commands and queries ensure that each bit of domain logic is centralized in a single location.
We can encapsulate crosscutting concerns using a classic MVC filter, an ASP.NET middleware, or a MediatR IPipelineBehavior, depending on where we want that concern handled. We can also implement a composite solution using many of those options, as we did in the code sample to handle validation.
We can significantly reduce the number of mocks required for our tests by testing each vertical slice with integration tests. That could also lower the number of unit tests significantly, testing features instead of mocked units of code. Our focus should be on producing features, not on the details behind querying the infrastructure or the code itself (OK, that's important too).
Note
It is important to note that you can still write as many unit tests as you need; nothing from Vertical Slice Architecture stops you from doing that. That's one of the advantages: use all that you know in the slice you are working on, without the need to export it globally to other slices.
All in all, we explored a modern way to design an application that aligns well with Agile development, and that helps generate value for your customers.
Now let's see how Vertical Slice Architecture can help us follow the SOLID principles:
- S: Each vertical slice (feature) becomes a cohesive unit that changes as a whole, leading to the segregation of responsibilities per feature. Based on a CQRS-inspired approach, each feature splits the application's complexity into commands and queries, leading to multiple small pieces. Each piece handles a part of the process. For example, we can define an input, a validator, a mapper profile, a handler, a result, an HTTP bridge (controller), and as many more pieces as we need to craft the slice.
- O: We can enhance the system globally by extending the ASP.NET, MVC, or MediatR pipelines. The features themselves can be designed as one see fit, having a limited direct impact on the OCP.
- L: N/A.
- I: By organizing features by units of domain-centric use cases, we end up with many client-specific components instead of general-purpose elements, like layers.
- D: All of the pieces of a slice depend only on interfaces and are tied together using dependency injection. Furthermore, by cutting the less useful abstractions out of the system, we simplify it, making it more maintainable and more concise. By having so many pieces of a feature living close to each other, the system becomes easier to maintain with improved discoverability.
In the next chapter, we will explore another architectural style and talk about microservices.
Questions
Let's take a look at a few practice questions:
- What design patterns can we use in a vertical slice?
- Is it true that when using Vertical Slice Architecture, you must pick a single ORM and stick with it, such as a data layer?
- What will likely happen if you don't refactor your code and pay the technical debt in the long run?
- Can we handle crosscutting concerns using behaviors and MVC filters in other types of applications or are they enabled by Vertical Slice Architecture?
- What does cohesion mean?
- What does tight coupling mean?
Further reading
Here are a few links to build upon what we learned in the chapter:
- For UI implementations, you can look at how Jimmy Bogard upgraded ContosoUniversity:
a) ContosoUniversity on ASP.NET Core with .NET Core https://net5.link/UXnr
b) ContosoUniversity on ASP.NET Core 3.1 on .NET Core and Razor Pages https://net5.link/6Lbo
- FluentValidation https://net5.link/xXgp
- ExceptionMapper is an open source project of mine, which is an ASP.NET Core middleware that reacts to Exception. You can map certain exception types to HTTP status codes, automatically serialize them as JSON ProblemDetails, and so on: https://net5.link/dtRi
- AutoMapper https://net5.link/5AUZ
- MediatR https://net5.link/ZQap
- To avoid setting ProductId manually in the Vertical Slice project, you can use the open source HybridModelBinding project, or read the official documentation about custom model binding and implement your own:
a) Custom Model Binding in ASP.NET Core https://net5.link/65pb
b) HybridModelBinding https://net5.link/EyKK