Chapter 3: Architectural Principles
This chapter focus on fundamental architectural principles instead of design patterns. The reason behind this is simple: those principles are the foundation of modern software engineering. Moreover, we apply these principles throughout the book to make sure that by the end, we write better code and make better software design decisions.
In this chapter, we will cover the following topics:
- The SOLID principles and their importance
- The DRY principle
- The separation of concerns principle
The SOLID principles
SOLID is an acronym representing five principles that extend the basic OOP concepts of Abstraction, Encapsulation, Inheritance, and Polymorphism. They add more details about what to do and how to do it, guiding developers toward more robust designs.
It is also important to note that they are principles, not rules to follow at all costs. Weigh the cost in the context of what you are building. If you are building a small tool, it may be OK to cut it short more than if you are designing a business-critical application. For the latter case, you may want to consider being stricter. However, following them is usually a good idea, irrespective of the size of your application, which is the main reason to cover them here, in the beginning, before digging into design patterns.
The SOLID acronym represents the following:
- Single responsibility principle
- Open/Closed principle
- Liskov substitution principle
- Interface segregation principle
- Dependency inversion principle
By following these principles, your systems should become easier to test and maintain.
Single responsibility principle (SRP)
Essentially, the SRP means that a single class should hold one, and only one, responsibility, leading me to the following quote:
OK, but why? Before giving you the answer, I'd like you to think about each time that a specification was added, updated, or removed. Then, think about how easier it would have been if every single class in your system had only a single responsibility: one reason to change.
I don't know if you visualized that clearly or not, but I can think of a few projects off the top of my head that would have benefited from this principle. Software maintainability problems can be due to the programmers, the managers, or both. I think that nothing is black or white and that most situations are gray; sometimes, it is of a darker or lighter gray, but gray nonetheless. That lack of absoluteness is also true when designing software: do your best, learn from your mistakes, and be humble.
Let's review why that principle exists:
- Applications are born to change.
- To make our classes more reusable and create more flexible systems.
- To help maintain applications. Since you know the only thing a class does before updating it, you can quickly foresee the impact on the system, unlike with classes that hold many responsibilities, where updating one can break one or more other parts.
- To make our classes more readable. Fewer responsibilities lead to less code, and less code is simpler to visualize in a few seconds, leading to a quicker understanding of that piece of software.
Let's try this out in action. I have written some horrible code that violates a few principles, including the SRP. Let's start by analyzing the code to partially fix it, so that it no longer violates the SRP.
The following is an example of the poorly written code:
public class Book
{
public int Id { get; set; }
public string Title { get; set; }
private static int _lastId = 0;
public static List<Book> Books { get; }
public static int NextId => ++_lastId;
static Book()
{
Books = new List<Book>
{
new Book
{
Id = NextId,
Title = "Some cool computer book"
}
};
}
public Book(int? id = null)
{
Id = id ?? default(int);
}
public void Save()
{
// Create the book if it does not exist,
// otherwise, find its index and replace it
// by the current object.
if (Books.Any(x => x.Id == Id))
{
var index = Books.FindIndex(x => x.Id == Id);
Books[index] = this;
}
else
{
Books.Add(this);
}
}
public void Load()
{
// Validate that an Id is set
if (Id == default(int))
{
throw new Exception("You must set the Id to the Book Id you want to load.");
}
// Get the book
var book = Books.FirstOrDefault(x => x.Id == Id);
// Make sure it exist
if (book == null)
{
throw new Exception("This book does not exist");
}
// Copy the book properties to the current object
Id = book.Id; // this should already be set
Title = book.Title;
}
public void Display()
{
Console.WriteLine($"Book: {Title} ({Id})");
}
}
That class contains all the responsibilities of that super small console application. There is also the Program class, which contains a quick and dirty user interface, the consumer of the Book class.
The program offers the following options:

Figure 3.1 – The program's user interface
Let's look at the Program code:
class Program
{
static void Main(string[] args)
{
// ...
}
I omitted the Main method code because it is just a big switch with Console.WriteLine calls. It dispatches the user input to the other methods (explained later) when a user makes a choice. See https://net5.link/jpxa for more information on the Main method. Next, the method called when a user chooses 1:
private static void FetchAndDisplayBook()
{
var book = new Book(id: 1);
book.Load();
book.Display();
}
The FetchAndDisplayBook() method loads the book instance that has an id equal to 1, and then displays it in the console. Next, the method called when a user chooses 2:
private static void FailToFetchBook()
{
var book = new Book();
book.Load(); // Exception: You must set the Id to the Book Id you want to load.
book.Display();
}
The FailToFetchBook() method loads a book instance without specifying an id, which results in an exception thrown when loading the data; refer to the Book.Load() method (preceding code block, first highlight). Next, the method called when a user chooses 3:
private static void BookDoesNotExist()
{
var book = new Book(id: 999);
book.Load();
book.Display();
}
The BookDoesNotExist() method loads a book instance that does not exist, leading to an exception being thrown when loading the data; refer to the Book.Load() method (preceding code block, second highlight). Next, the method called when a user chooses 4:
private static void CreateOutOfOrderBook()
{
var book = new Book
{
Id = 4, // this value is not enforced by anything and will be overriden at some point.
Title = "Some out of order book"
};
book.Save();
book.Display();
}
The CreateOutOfOrderBook() method creates a book instance specifying an id manually. That ID could be overridden by the auto-incremental mechanism of the Book class. These kinds of behaviors are good indicators of a problem in the design of a program. Next, the method called when a user chooses 5:
private static void DisplayTheBookSomewhereElse()
{
Console.WriteLine("Oops! Can't do that, the Display method only write to the "Console".");
}
The DisplayTheBookSomewhereElse() method points to another problem with that design. We cannot display the books anywhere else other than in the console because the Book class owns the display mechanism; refer to the Book.Display() method. Next, the method called when a user chooses 6:
private static void CreateBook()
{
Console.Clear();
Console.WriteLine("Please enter the book title: ");
var title = Console.ReadLine();
var book = new Book { Id = Book.NextId, Title =
title };
book.Save();
}
The CreateBook() method lets us create new books. It uses the Book.NextId static property, which increments the Id. That breaks encapsulation and leaks the creation logic out to the consumer, which is another problem associated with the design that we will be fixing later. Next, the method called when a user chooses 7:
private static void ListAllBooks()
{
foreach (var book in Book.Books)
{
book.Display();
}
}
}
The ListAllBooks() method displays all of the books that we have created in the program.
Before going further, I'd like you to think about what is wrong in the Book class and how many responsibilities there are that violate the SRP. Once done, please continue reading.
OK, let's start by isolating features:
- The class is a data structure that represents a book (Id, Title).
- It saves and loads data, including keeping a list of all existing books (Books, Save(), Load()).
- It "manages" auto-incremented IDs by exposing the NextId property that hacks the feature into the program.
- It plays the presenter role, outputting a book in the console with its Display() method.
From those four points, what roles could we extract?
- It is a book.
- It does data access (manages the data).
- It presents the book to the user by outputting itself in the console.
These three elements are responsibilities, which is an excellent starting point for splitting the Book class. Let's look at those three classes:
- We can keep the Book class and make it a simple data structure that represents a book.
- We can create a BookStore class whose role is to access the data.
- We can create a BookPresenter class that outputs (presents) a book on the console.
Here are those three classes:
public class Book
{
public int Id { get; set; }
public string Title { get; set; }
}
public class BookStore
{
private static int _lastId = 0;
private static List<Book> _books;
public static int NextId => ++_lastId;
static BookStore()
{
_books = new List<Book>
{
new Book
{
Id = NextId,
Title = "Some cool computer book"
}
};
}
public IEnumerable<Book> Books => _books;
public void Save(Book book)
{
// Create the book when it does not exist,
// otherwise, find its index and replace it
// by the specified book.
if (_books.Any(x => x.Id == book.Id))
{
var index = _books.FindIndex(x => x.Id == book.Id);
_books[index] = book;
}
else
{
_books.Add(book);
}
}
public Book Load(int bookId)
{
return _books.FirstOrDefault(x => x.Id == bookId);
}
}
public class BookPresenter
{
public void Display(Book book)
{
Console.WriteLine($"Book: {book.Title} ({book.Id})");
}
}
That does not fix every problem yet, but at least it is a good start. By extracting the responsibilities, we have achieved the following:
- The FailToFetchBook() use case has been fixed (see the Load() method).
- Fetching a book is now more elegant and more intuitive.
- We also opened a possibility about the DisplayTheBookSomewhereElse() use case (to be revisited later).
From an SRP standpoint, we still have a problem or two:
- The auto-incremented ID is still exposed publicly, and BookStore is not managing it.
- The Save() method is handling the creation and the update of books, which seems like two responsibilities, not one.
For the next updates, we focus on those two problems that share a synergy, making them easier to fix independently than together (dividing responsibility between the methods).
What we are about to do is the following:
- Hide the BookStore.NextId property to fix encapsulation (not the SRP, but it is essential nonetheless).
- Split the BookStore.Save() method into two methods: Create() and Replace().
- Update our user interface: Program.cs.
After hiding the NextId property, we need to move that feature inside the BookStore class. The most logical place would be the Save() method (not yet split in two), since we want a new unique identifier for each new book. Here are the changes:
public class BookStore
{
...
private static int NextId => ++_lastId;
...
public void Save(Book book)
{
...
else
{
book.Id = NextId;
_books.Add(book);
}
}
}
The auto-incremented identifier is still a half-baked feature. To help improve it more, let's split the Save() method into two. By looking at the resulting code, we can imagine that handling both use cases was easier to write. It is also easier to read and clearer to use for any developer who may come into contact with that code in the future. See for yourself:
public void Create(Book book)
{
if (book.Id != default(int))
{
throw new Exception("A new book cannot be created with an id.");
}
book.Id = NextId;
_books.Add(book);
}
public void Replace(Book book)
{
if (_books.Any(x => x.Id == book.Id))
{
throw new Exception($"Book {book.Id} does not exist!");
}
var index = _books.FindIndex(x => x.Id == book.Id);
_books[index] = book;
}
Now we are beginning to get somewhere. We have successfully split the responsibilities into three classes and also split the Save() method, such that both handle only a single operation.
The Program methods now looks like this:
private static readonly BookStore _bookStore = new BookStore();
private static readonly BookPresenter _bookPresenter = new BookPresenter();
//...
private static void FetchAndDisplayBook()
{
var book = _bookStore.Load(1);
_bookPresenter.Display(book);
}
private static void FailToFetchBook()
{
// This cannot happen anymore, this has been fixed automatically.
}
private static void BookDoesNotExist()
{
var book = _bookStore.Load(999);
if (book == null)
{
// Book does not exist
}
}
private static void CreateOutOfOrderBook()
{
var book = new Book
{
Id = 4,
Title = "Some out of order book"
};
_bookStore.Create(book); // Exception: A new book cannot be created with an id.
_bookPresenter.Display(book);
}
private static void DisplayTheBookSomewhereElse()
{
Console.WriteLine("This is now possible, but we need a new Presenter; not 100% there yet!");
}
private static void CreateBook()
{
Console.Clear();
Console.WriteLine("Please enter the book title: ");
var title = Console.ReadLine();
var book = new Book { Title = title };
_bookStore.Create(book);
}
private static void ListAllBooks()
{
foreach (var book in _bookStore.Books)
{
_bookPresenter.Display(book);
}
}
Apart from automatically fixing the FailToFetchBook method, I found the code easier to read. Let's compare the FetchAndDisplayBook method:
// Old
private static void FetchAndDisplayBook()
{
var book = new Book(id: 1);
book.Load();
book.Display();
}
// New
private static void FetchAndDisplayBook()
{
var book = _bookStore.Load(1);
_bookPresenter.Display(book);
}
Conclusion
One thing to be careful about when thinking about the SRP is not to over-separate classes. The more classes in a system, the more complex to assemble the system can become, the harder it can be to debug or to follow the execution paths. On the other hand, many well-separated responsibilities should lead to a better, more testable system.
How to describe "one reason" or "a single responsibility" is unfortunately impossible to define, and I don't have a hard guideline to give you here. When in doubt, with no one else to help you figure out your design dilemma, I'd say that you should split it.
A good indicator of the SRP violation is when you don't know how to name an element. That is often a good pointer that the element should not reside there, should be extracted, or should be split into multiple smaller pieces.
Another good indicator is when a method becomes too big, optionally with many if statements or loops. In that case, you should split that method into multiple smaller ones. That should make the code easier to read and make the initial method's body cleaner. It often also helps you get rid of useless comments. Please name your private methods clearly, or this won't aid readability (see the Naming example section).
How can you know when a class is getting too thin? Once again, you won't like it. I don't have any hard guidelines for this either. However, if you are looking at your system and all of your classes only have a single method in them, you might have abused the SRP. That said, I am not saying that a class with only one method is wrong.
Naming example
In this example, we extract methods to see how naming them well improves readability by applying the SRP to the following long method. Let's take a first look at the RandomizeOneString method of the OneMethodExampleService class:
namespace ClearName
{
public class OneMethodExampleService : IExampleService
{
private readonly IEnumerable<string> _data;
private static readonly Random _random = new Random();
public OneMethodExampleService(IEnumerable<string> data)
{
_data = data ?? throw new ArgumentNullException(nameof(data));
}
public RandomResult RandomizeOneString()
{
// Find the upper bound
var upperBound = _data.Count();
// Randomly select the index of the string to return
var index = _random.Next(0, upperBound);
// Shuffle the elements to add more randomness
var shuffledList = _data
.Select(value => new { Value = value, Order = _random.NextDouble() })
.OrderBy(x => x.Order)
.Select(x => x.Value)
;
// Return the randomly selected element
var randomString = shuffledList.ElementAt(index);
return new RandomResult(randomString, index, shuffledList);
}
}
}
With all of the comments, we can isolate a few operations that need to happen in order to find that random string. Those operations are as follows:
- Finding the upper bound of the _data field (an IEnumerable<string>).
- Generating the next random index at which our item should be taken.
- Shuffling the list of items to add more randomness.
- Returning the results, including the index and the shuffled data, to make it easier to display later.
Once we isolated those operations, we can extract a method for each one.
Note
I do not recommend systematically extracting one-line methods as it creates lots of code that is not necessarily useful. That said, if you find that extracting a one-line method makes the code more readable, by all means do it.
By taking that into account, we could extract one method and make it easier to read, like the one from the CleanExampleService class. Doing that led to applying the SRP inside the class for improved readability, as we can see here:
public RandomResult RandomizeOneString()
{
var upperBound = _data.Count();
var index = _random.Next(0, upperBound);
var shuffledData = ShuffleData();
var randomString = shuffledData.ElementAt(index);
return new RandomResult(randomString, index, shuffledData);
}
In that resulting method, we even removed the comments, so by extracting the shuffle responsibility away from the RandomizeOneString method, we made the code easier to read than before. Moreover, by using descriptive variable names, it becomes easier to follow the method, without the comments.
We only studied a small part of the code, but the full code sample is available on GitHub. In Startup.cs, you can comment out the first line, #define USE_CLEAN_SERVICE, to use the OneMethodExampleService class instead of CleanExampleService; they do the same thing.
The full sample also exhibits the ISP and the DIP in action; we cover those two principles soon. You should come back to this sample (the full source code) once you read the chapter.
Open/Closed principle (OCP)
Let's start this section with a quote from Bertrand Meyer:
OK, but what does this mean, you may ask yourself? It means that a class's behaviors should be updatable from the outside, a.k.a., from the caller code. Instead of manually rewriting the code of a method inside the class, you should be able to change the class behaviors from the outside, without altering the code itself.
The best way to pull that off is to assemble the application using multiple well-designed units of code, sewed together using dependency injection.
To illustrate that, let's play with a ninja, a sword, and a shuriken; be careful, that's dangerous ground here!
Here is the IAttackable interface used in all the examples:
public interface IAttackable { }
Let's start with an example that does not follow the OCP:
public class Ninja : IAttackable
{
//…
public AttackResult Attack(IAttackable target)
{
if (IsCloseRange(target))
{
return new AttackResult(new Sword(), this, target);
}
else
{
return new AttackResult(new Shuriken(), this, target);
}
}
//…
}
In this example, we can see that the Ninja class selects a weapon depending on its target range. The idea behind that is not wrong, but what happens when we add new weapons to our ninja's arsenal? At that point, we would need to open the Ninja class and update its Attack method.
Let's rethink the Ninja class by setting the weapon externally and by abstracting the Attack method. We could manage the equipped weapon internally, but for simplicity, we are managing it from the consuming code.
Our empty shell now looks like this:
public class Ninja : IAttackable
{
public Weapon EquippedWeapon { get; set; }
// ...
public AttackResult Attack(IAttackable target)
{
throw new NotImplementedException();
}
// ...
}
Now, the ninja's attack is directly related to his equipped weapon; for example, a shuriken is thrown, while a sword is used to deliver a close-range blow. The OCP dictates that the attack should be handled elsewhere, allowing the modification of the ninja's behavior without altering its code.
What we want to do is called composition, and the best way of implementing this is the Strategy pattern, which we explore in more detail in Chapter 6, Understanding the Strategy, Abstract Factory, and Singleton Design Patterns and Chapter 7, Deep Dive into Dependency Injection. For now, let's forget about those details, and let's play with some code that follows the OCP.
The new Attack method goes like this:
public AttackResult Attack(IAttackable target)
{
return new AttackResult(EquippedWeapon, this, target);
}
It now does the same thing as initially, but we can add weapons, set the EquippedWeapon property, and the program should use the new weapon instead; no more need to change the Ninja class for that.
OK, let's be honest; that code does nothing. It only allows us to print out what is going on in our program and show how we can modify the behaviors without modifying the class itself. We could, however, start from there to create a small ninja game. We could manage the ninjas' positions to compute the actual distance between them and enforce minimum and maximum ranges for each weapon, but that is way beyond the scope of the current section.
Now, let's take a look at the AttackResult class. We can see that it is a small data structure containing no behavior. It is used by our program to output the result:
public class AttackResult
{
public Weapon Weapon { get; }
public IAttackable Attacker { get; }
public IAttackable Target { get; }
public AttackResult(Weapon weapon, IAttackable attacker, IAttackable target)
{
Weapon = weapon;
Attacker = attacker;
Target = target;
}
}
The program code, in the Startup class, appears as follows:
// Setup the response
context.Response.ContentType = "text/html";
// Create actors
var target = new Ninja("The Unseen Mirage");
var ninja = new Ninja("The Blue Phantom");
// First attack (Sword)
ninja.EquippedWeapon = new Sword();
var result = ninja.Attack(target);
await PrintAttackResult(result);
// Second attack (Shuriken)
ninja.EquippedWeapon = new Shuriken();
var result2 = ninja.Attack(target);
await PrintAttackResult(result2);
// Write the outcome of an AttackResult to the response stream
async Task PrintAttackResult(AttackResult attackResult)
{
await context.Response.WriteAsync($"'{attackResult.Attacker}' attacked '{attackResult.Target}' using'{attackResult.Weapon}'!<br>");
}
When running the program, using the dotnet run command and browsing to https ://localhost:5001/, we should have the following output:
'The Blue Phantom' attacked 'The Unseen Mirage' using 'Sword'!
'The Blue Phantom' attacked 'The Unseen Mirage' using 'Shuriken'!
In a more complex application, combining composition and dependency injection would allow the application of behavior changes to the whole program from a single place, called the composition root, without changing our existing code; "open for extension, but closed for modification." To add new weapons, we can create new classes and do not need to modify any existing ones.
All of those new terms could be overwhelming at first, but we cover them in more detail in subsequent chapters and use those techniques extensively throughout the book.
A bit of history
The first appearance of the OCP, in 1988, was referring to inheritance, and OOP has evolved a lot since then. You should, most of the time, opt for composition over inheritance. Inheritance is still a useful concept, but you should be careful when using it; it is a concept that is easy to misuse, creating direct coupling between classes.
Liskov substitution principle (LSP)
The LSP emanated from Barbara Liskov at the end of the '80s and was revisited during the '90s by both Liskov and Jeannette Wing to create the principle that we know and use today. It is also similar to Design by contract, by Bertrand Meyer.
The LSP focuses on preserving subtype behaviors, which leads to system stability. Before going any further, let's start with the formal definition introduced by Wing and Liskov:
Let ![]() be a property provable about objects
be a property provable about objects ![]() of type T. Then,
of type T. Then, ![]() should be true for objects
should be true for objects ![]() of type S, where S is a subtype of T.
of type S, where S is a subtype of T.
This means that you should be able to swap an object of type T with an object of type S, where S is the subtype of T, without breaking your program's correctness.
Without putting up some effort, you can't violate the following rules in C#, but they are still worth mentioning:
- The contravariance of method arguments in the subtype.
- The covariance of return types in the subtype.
One way to break contravariance would be to test for a specific subtype, such as the following:
public void SomeMethod(SomeType input)
{
if (input is SomeSubType)
// …
}
One way to break covariance would be to return a supertype as a subtype, which would require some work on the developer's side.
Then, to prove subtype correctness, we must follow a few more rules:
- Any precondition implemented in a supertype should yield the same outcome in its subtypes, but subtypes can be less strict about it, never more.
- Any postcondition implemented in a supertype should yield the same outcome in its subtypes, but subtypes can be more strict about it, never less.
- Subtypes must preserve the invariance of the supertype; in other words, the behaviors of the supertype must not change.
Finally, we must add the "history constraint" to that list of rules, which states that what happened in the supertype must still happen in the subtype. While subtypes can add new properties and methods (in other words, new behaviors), they must not modify the supertype state in any new way.
OK, at this point, you are right to feel that this is rather complex. Rest assured that this is the less important of those principles, yet the more complex, and we are moving as far as we can from inheritance, so this should not apply often.
That said, I'd resume all of that previous complexity by doing the following:
- In your subtypes, add new behaviors; don't change existing ones.
You should be able to swap a class by one of its subclasses without breaking anything.
It is important to note that "without breaking anything" includes not throwing new exceptions in subtypes. Subtyping exceptions thrown by the supertype is acceptable as the existing code should already handle those and catch the subtyped exceptions if they do.
As a side note, before even bothering with the LSP, start by applying the "is-a" rule from inheritance; if a subtype is not a supertype, don't use inheritance.
To make a LEGO® analogy: LSP is like swapping a 4x2 blue block with a 4x2 green block: neither the structural integrity of the structure nor the role of the block changed, just its color.
Tip
An excellent way of enforcing those behavioral constraints is automated testing. You could write a test suite and run it against all subclasses of a specific supertype to make sure that behaviors are preserved.
Let's jump into some code to visualize that out in practice.
Project – HallOfFame
Now, let's see what this looks like in code. For this one, we explore a hall of fame feature of a fictive game that we are working on.
Feature description: the game should accumulate the number of enemies killed during the game session, and if you killed at least 100 enemies, your ninja should reach the hall of fame. The hall of fame should be ordered from the best score to the worst.
We created the following automated tests to enforce those rules, with sut (subject under test) being of type HallOfFame. Here is the empty implementation of the HallOfFame class:
public class HallOfFame
{
public virtual void Add(Ninja ninja)
=> throw new NotImplementedException();
public virtual IEnumerable<Ninja> Members
=> throw new NotImplementedException();
}
Note
I'm not following the convention that I talked about in the previous chapter because I need inheritance to reuse my test suite for the three versions of the code. That could not have been done using nested classes.
The Add() method should add ninjas that killed more than 100 enemies:
public static TheoryData<Ninja> NinjaWithAtLeast100Kills => new TheoryData<Ninja>
{
new Ninja { Kills = 100 },
new Ninja { Kills = 101 },
new Ninja { Kills = 200 },
};
[Theory]
[MemberData(nameof(NinjaWithAtLeast100Kills))]
public void Add_should_add_the_specified_ninja(Ninja expectedNinja)
{
// Act
sut.Add(expectedNinja);
// Assert
Assert.Collection(sut.Members,
ninja => Assert.Same(expectedNinja, ninja)
);
}
The Add() method should not add a ninja more than once:
[Fact]
public void Add_should_not_add_existing_ninja()
{
// Arrange
var expectedNinja = new Ninja { Kills = 200 };
// Act
sut.Add(expectedNinja);
sut.Add(expectedNinja);
// Assert
Assert.Collection(sut.Members,
ninja => Assert.Same(expectedNinja, ninja)
);
}
The Add() method should validate that a ninja has at least 100 kills before adding it to the Members collection of the HallOfFame instance under test:
[Fact]
public void Add_should_not_add_ninja_with_less_than_100_kills()
{
// Arrange
var ninja = new Ninja { Kills = 99 };
// Act
sut.Add(ninja);
// Assert
Assert.Empty(sut.Members);
}
The Members property of the HallOfFame class should return its ninja ordered by their number of kills, from the most to the least:
[Fact]
public void Members_should_return_ninja_ordered_by_kills_desc()
{
// Arrange
sut.Add(new Ninja { Kills = 100 });
sut.Add(new Ninja { Kills = 150 });
sut.Add(new Ninja { Kills = 200 });
// Act
var result = sut.Members;
// Assert
Assert.Collection(result,
ninja => Assert.Equal(200, ninja.Kills),
ninja => Assert.Equal(150, ninja.Kills),
ninja => Assert.Equal(100, ninja.Kills)
);
}
The implementation of the HallOfFame class looks like this:
public class HallOfFame
{
protected HashSet<Ninja> InternalMembers { get; } = new HashSet<Ninja>();
public virtual void Add(Ninja ninja)
{
if (InternalMembers.Contains(ninja))
{
return;
}
if (ninja.Kills >= 100)
{
InternalMembers.Add(ninja);
}
}
public virtual IEnumerable<Ninja> Members
=> new ReadOnlyCollection<Ninja>(
InternalMembers
.OrderByDescending(x => x.Kills)
.ToArray()
);
}
Now that we have completed our feature and pushed our changes, we demo the hall of fame to our client.
Update 1
After the demo, an idea arises: why not add a hall of heroes for players who do not qualify for the hall of fame? After deliberation, we decided that we should implement that feature.
Feature description: the game should accumulate the number of enemies killed during the game session (already done), and add all ninjas to the hall of heroes, no matter the score. The results should be ordered by the best score first, in descending order, and each ninja should only be present once.
The first idea that arises to implement this feature quickly is to reuse the hall of fame code. Step one, we decide to create a HallOfHeroes class that inherits the HallOfFame class and rewrite the Add() method to support the new specifications.
After thinking about it, do you think that change would break the LSP?
Before giving you the answer, let's take a look at that HallOfHeroes class:
namespace LSP.Examples.Update1
{
public class HallOfHeroes : HallOfFame
{
public override void Add(Ninja ninja)
{
if (InternalMembers.Contains(ninja))
{
return;
}
InternalMembers.Add(ninja);
}
}
}
Since the LSP states that subclasses can be less strict about preconditions, removing the number of kill preconditions should be acceptable.
Now, if we run the tests built for HallOfFame by using HallOfHeroes instead, the only test that fails is the one related to our precondition, so the subclass changed no behavior, and all use cases are still valid.
To test our features more efficiently, we can encapsulate all shared tests into a base class but keep Add_should_not_add_ninja_with_less_than_100_kills only for the HallOfFame tests.
With that in place to validate our code, we can begin to explore the role of the LSP as we can use an instance of HallOfHeroes everywhere our program expects a HallOfFame instance, without breaking it.
Here is the complete BaseLSPTest class:
namespace LSP.Examples
{
public abstract class BaseLSPTest
{
protected abstract HallOfFame sut { get; }
public static TheoryData<Ninja> NinjaWithAtLeast100Kills => new TheoryData<Ninja>
{
new Ninja { Kills = 100 },
new Ninja { Kills = 101 },
new Ninja { Kills = 200 },
};
[Fact]
public void Add_should_not_add_existing_ninja()
{
// Arrange
var expectedNinja = new Ninja { Kills = 200 };
// Act
sut.Add(expectedNinja);
sut.Add(expectedNinja);
// Assert
Assert.Collection(sut.Members,
ninja => Assert.Same(expectedNinja, ninja)
);
}
[Theory]
[MemberData(nameof(NinjaWithAtLeast100Kills))]
public void Add_should_add_the_specified_ninja(Ninja expectedNinja)
{
// Act
sut.Add(expectedNinja);
// Assert
Assert.Collection(sut.Members,
ninja => Assert.Same(expectedNinja, ninja)
);
}
[Fact]
public void Members_should_return_ninja_ordered_by_kills_desc()
{
// Arrange
sut.Add(new Ninja { Kills = 100 });
sut.Add(new Ninja { Kills = 150 });
sut.Add(new Ninja { Kills = 200 });
// Act
var result = sut.Members;
// Assert
Assert.Collection(result,
ninja => Assert.Equal(200, ninja.Kills),
ninja => Assert.Equal(150, ninja.Kills),
ninja => Assert.Equal(100, ninja.Kills)
);
}
}
}
The HallOfFameTest class is way simpler and looks like the following:
using LSP.Models;
using Xunit;
namespace LSP.Examples
{
public class HallOfFameTest : BaseLSPTest
{
protected override HallOfFame sut { get; } = new HallOfFame();
[Fact]
public void Add_should_not_add_ninja_with_less_than_100_kills()
{
// Arrange
var ninja = new Ninja { Kills = 99 };
// Act
sut.Add(ninja);
// Assert
Assert.Empty(sut.Members);
}
}
}
Finally, the HallOfHeroesTest class is almost empty:
using LSP.Models;
namespace LSP.Examples.Update1
{
public class HallOfHeroesTest : BaseLSPTest
{
protected override HallOfFame sut { get; } = new HallOfHeroes();
}
}
That new feature is implemented, but we are not done yet.
Update 2
Later on, the game is using those classes. However, Joe, another developer, decides to use HallOfHeroes in a new feature, but he needs to know when duplicated ninjas are added, so he decides to replace the return; statement with throw new DuplicateNinjaException() instead. He is proud of his feature and shows that to the team.
Do you think Joe's update is breaking the LSP?
The class looks like this after the changes:
using LSP.Models;
using System;
namespace LSP.Examples.Update2
{
public class HallOfHeroes : HallOfFame
{
public override void Add(Ninja ninja)
{
if (InternalMembers.Contains(ninja))
{
throw new DuplicateNinjaException();
}
InternalMembers.Add(ninja);
}
}
public class DuplicateNinjaException : Exception
{
public DuplicateNinjaException()
: base("Cannot add the same ninja twice!") { }
}
}
Yes, it is violating the LSP. Moreover, if our engineer had run the tests, it would have been clear that one test was failing!
What do you think is violating the LSP?
All of the existing code was not expecting a DuplicateNinjaException to be thrown anywhere by a HallOfFame instance, so that could have created runtime crashes, possibly breaking the game. Throwing new exceptions in subclasses is forbidden as per the LSP.
Update 3
To fix his mistake and conform to the LSP, our engineer decides to add an AddingDuplicateNinja event to the HallOfHeroes class and then subscribes to that event instead of catching the DuplicateNinjaException.
Would that fix the previous LSP violation?
The updated code looks like this:
using LSP.Models;
using System;
namespace LSP.Examples.Update3
{
public class HallOfHeroes : HallOfFame
{
public event EventHandler<AddingDuplicateNinjaEventArgs> AddingDuplicateNinja;
public override void Add(Ninja ninja)
{
if (InternalMembers.Contains(ninja))
{
OnAddingDuplicateNinja(new AddingDuplicateNinjaEventArgs(ninja));
return;
}
InternalMembers.Add(ninja);
}
protected virtual void OnAddingDuplicateNinja(AddingDuplicateNinjaEventArgs e)
{
AddingDuplicateNinja?.Invoke(this, e);
}
}
public class AddingDuplicateNinjaEventArgs : EventArgs
{
public Ninja DuplicatedNinja { get; }
public AddingDuplicateNinjaEventArgs(Ninja ninja)
{
DuplicatedNinja = ninja ?? throw new ArgumentNullException(nameof(ninja));
}
}
}
Yes, that fix allowed the existing code to run smoothly while adding the new feature that Joe required. Publishing an event instead of throwing an Exception was just one way to fix our fictional problem. In a real-life scenario, you should choose the solution that fits your problem best.
The important part of the previous example is that introducing a new exception type can seem harmless but can cause much harm. The same goes for other LSP violations.
Conclusion
Once again, this is only a principle, not a law. A good tip would be to see the violation of the LSP as a code smell. From there, perform some analysis to see whether you have a design problem and what could be the impact. Use your analytical skills on a case-by-case basis and conclude whether or not it would be acceptable to break the LSP in that specific case.
I think that we could also name this principle the backward-compatibility principle, because everything that worked in a way before should still work at least the same way after the substitution, which is why this principle is important.
The more we advance, the more we move away from inheritance, and the less we need this principle. Don't get me wrong here, if you use inheritance, do your best to apply the LSP, and you will most likely be rewarded by doing so.
Interface segregation principle (ISP)
Let's start with another famous quote, by Robert C. Martin:
What does that mean? It means the following:
- You should create interfaces.
- You should value small interfaces more.
- You should not try to create a multipurpose interface as "an interface to rule them all."
An interface could refer to a class interface here (all exposed elements of a class), but I prefer to focus on C# interfaces instead, as we use them a lot throughout the book. If you know C++, you could see an interface as a header file.
What is an interface?
Interfaces are one of the most useful tools in the C# box to create flexible and maintainable software alike. I'll try to give you a clear definition of what an interface is, but don't worry; it is very hard to understand and grasp the power of interfaces from an explanation.
- The role of an interface is to define a cohesive contract (public methods, properties, and events); there is no code in an interface; it is only a contract.
- An interface should be small (ISP), and its members should align toward a common goal (cohesion) and share a single responsibility (SRP).
- In C#, a class can implement multiple interfaces, and by doing so, a class can expose multiples of those public contracts or, more accurately, be used as any of them (polymorphism).
Let's be honest, that definition is still a bit abstract, but rest assured, we use interfaces intensively throughout the book, so by the end, interfaces should not hold many secrets for you.
On another more fundamental note
A class does not inherit from an interface; it implements an interface. However, an interface can inherit from another interface.
Project – The door locks
One way to see a contract would be as a key and a lock. Each key fits one lock based on a specific contract defining how the key should be made to work. If we have multiple locks following the same contract, one key should fit all of those locks, while multiple keys could also fit the same lock as long as they are identical.
The idea behind an interface is the same; an interface describes what is available, and the implementation decides how it does it, leaving the consumer to expect a behavior (by following the contract) to happen while ignoring how it is done in the background (by the implementation).
Our key contract looks like this:
/// <summary>
/// Represents a key that can open zero or more locks.
/// </summary>
public interface IKey
{
/// <summary>
/// Gets the key's signature.
/// This should be used by <see cref="ILock"/> to decide whether or not the key matches the lock.
/// </summary>
string Signature { get; }
}
And our lock contract appears like this:
/// <summary>
/// Represents a lock than can be opened by zero or more keys.
/// </summary>
public interface ILock
{
/// <summary>
/// Gets if the lock is locked or not.
/// </summary>
bool IsLocked { get; }
/// <summary>
/// Locks the lock using the specified <see cref="IKey"/>.
/// </summary>
/// <param name="key">The <see cref="IKey"/> used to lock the lock.</param>
/// <exception cref="KeyDoesNotMatchException">The <see cref="Exception"/> that is thrown when the specified <see cref="IKey"/> does not match the <see cref="ILock"/>.</exception>
void Lock(IKey key);
/// <summary>
/// Unlocks the lock using the specified <see cref="IKey"/>.
/// </summary>
/// <param name="key">The <see cref="IKey"/> used to unlock the lock.</param>
/// <exception cref="KeyDoesNotMatchException">The <see cref="Exception"/> that is thrown when the specified <see cref="IKey"/> does not match the <see cref="ILock"/>.</exception>
void Unlock(IKey key);
/// <summary>
/// Validate that the key's <see cref="IKey.Signature"/> match the lock.
/// </summary>
/// <param name="key">The <see cref="IKey"/> to validate.</param>
/// <returns><c>true</c> if the key's <see cref="IKey.Signature"/> match the lock; otherwise <c>false</c>.</returns>
bool DoesMatch(IKey key);
}
As you can see, the contract is clear, and a few details have been added to describe what is to be expected when using it or when implementing it.
Note
These specifications could help enforce an extended view of the LSP by validating that implementations respect their contract, allowing the consumer to use any implementation of the interfaces safely.
Please note that it is rare that exceptions are defined at the interface level as I did. In our case, I felt that it made more sense to do that, making the description of the contract crystal clear, instead of returning a bool that could have been misleading. Moreover, returning a bool would have created a lack of feedback about the source of the failure. We could have returned an object or picked another solution, but it would have added unwanted complexity to the code sample. We are exploring alternatives to similar problems later in the book.
Let's take a look at a basic key and lock implementation.
Basic implementations
Physical keys and locks are easy to visualize. A key has notches and ridges, a length, a thickness, is made from particular materials giving it a color, and so on. A lock, on the other hand, is composed of pins and springs. When you insert the right key into the right lock, you can lock or unlock it.
In our case, to keep it simple, we use the Signature property of the IKey interface to represent the physical key's properties while the lock can handle keys as it wishes.
Our most basic key and lock implementation looks like this:
public class BasicKey : IKey
{
public BasicKey(string signature)
{
Signature = signature ?? throw new ArgumentNullException(nameof(signature));
}
public string Signature { get; }
}
public class BasicLock : ILock
{
private readonly string _expectedSignature;
public BasicLock(string expectedSignature)
{
_expectedSignature = expectedSignature ?? throw new ArgumentNullException(nameof(expectedSignature));
}
public bool IsLocked { get; private set; }
public bool DoesMatch(IKey key)
{
return key.Signature.Equals(_expectedSignature);
}
public void Lock(IKey key)
{
if (!DoesMatch(key))
{
throw new KeyDoesNotMatchException(key);
}
IsLocked = true;
}
public void Unlock(IKey key)
{
if (!DoesMatch(key))
{
throw new KeyDoesNotMatchException(key);
}
IsLocked = false;
}
}
As you can see, the implementations are doing what was described by the interface and its /// comments, using a private field named _expectedSignature to validate the key's signature.
For reasons of brevity, I'm not copying all the tests here, but most of the code of this sample is covered by unit tests that you can browse on GitHub or clone locally. Here is an example, covering the specifications of the DoesMatch method:
using Xunit;
namespace DoorLock
{
public class BasicLockTest
{
private readonly IKey _workingKey;
private readonly IKey _invalidKey;
private readonly BasicLock sut;
public BasicLockTest()
{
sut = new BasicLock("WorkingKey");
_invalidKey = new BasicKey("InvalidKey");
_workingKey = new BasicKey("WorkingKey");
}
public class DoesMatch : BasicLockTest
{
[Fact]
public void Should_return_true_when_the_key_matches_the_lock()
{
// Act
var result = sut.DoesMatch(_workingKey);
// Assert
Assert.True(result, "The key should match the lock.");
}
[Fact]
public void Should_return_false_when_the_key_does_not_match_the_lock()
{
// Act
var result = sut.DoesMatch(_invalidKey);
// Assert
Assert.False(result, "The key should not match the lock.");
}
}
//...
}
}
We can see that the tests of DoesMatch are a direct representation of the interface /// comments:
<returns><c>true</c> if the key's <see cref="IKey.Signature"/> match the lock; otherwise <c>false</c>.</returns>.
Let's get into a few more implementations before going further into the ISP.
Multi-lock implementation
To prove that small, well-defined interfaces are important, let's implement a special type of lock: a lock that contains other locks, the MultiLock class:
public class MultiLock : ILock
{
private readonly List<ILock> _locks;
public MultiLock(List<ILock> locks)
{
_locks = locks ?? throw new ArgumentNullException(nameof(locks));
}
public MultiLock(params ILock[] locks)
: this(new List<ILock>(locks))
{
if (locks == null) { throw new ArgumentNullException(nameof(locks)); }
}
public bool IsLocked => _locks.Any(@ lock => @ lock.IsLocked);
public bool DoesMatch(IKey key)
{
return _locks.Any(@ lock => @ lock.DoesMatch(key));
}
public void Lock(IKey key)
{
if (!DoesMatch(key))
{
throw new KeyDoesNotMatchException(key);
}
_locks
.Where(@ lock => @ lock.DoesMatch(key))
.ToList()
.ForEach(@ lock => @ lock.Lock(key));
}
public void Unlock(IKey key)
{
if (!DoesMatch(key))
{
throw new KeyDoesNotMatchException(key);
}
_locks
.Where(@ lock => @ lock.DoesMatch(key))
.ToList()
.ForEach(@ lock => @ lock.Unlock(key));
}
}
That new class allows consumers to create a lock composed of other locks. MultiLock remains locked until all locks are unlocked and get locked as soon as any lock is locked.
As a side note
The MultiLock class implements the composite design pattern, discussed later in the book.
Picklock
Now that we have secure locks, someone needs to create a picklock, but how would we create that? Do you think that a picklock is an IKey?
In a different design, maybe; in ours, no, a picklock is not a key. So, instead of wrapping the use of the IKey interface, let's create an IPicklock interface that defines picklocks:
/// <summary>
/// Represent a tool that can be used to pick a lock.
/// </summary>
public interface IPicklock
{
/// <summary>
/// Create a key that fits the specified <see cref="ILock"/>.
/// </summary>
/// <param name="lock">The lock to pick.</param>
/// <returns>The key that fits the specified <see cref="ILock"/>.</returns>
/// <exception cref="ImpossibleToPickTheLockException">
/// The <see cref="Exception"/> that is thrown when a lock cannot be picked using the current <see cref="IPicklock"/>.
/// </exception>
IKey CreateMatchingKeyFor(ILock @lock);
/// <summary>
/// Unlock the specified <see cref="ILock"/>.
/// </summary>
/// <param name="lock">The lock to pick.</param>
/// <exception cref="ImpossibleToPickTheLockException">
/// The <see cref="Exception"/> that is thrown when a
lock cannot be picked using the current <see
cref="IPicklock"/>.
/// </exception>
void Pick(ILock @lock);
}
Once again, I wrote the specifications using /// right on the interface, including the exceptions.
The initial implementation is based on a collection of IKey.Signature. That collection is injected into the constructor so we can reuse our picklock. We could regard it as a predefined collection of keys, a kind of keyring:
public class PredefinedPicklock : IPicklock
{
private readonly string[] _signatures;
public PredefinedPicklock(string[] signatures)
{
_signatures = signatures ?? throw new ArgumentNullException(nameof(signatures));
}
public IKey CreateMatchingKeyFor(ILock @lock)
{
var key = new FakeKey();
foreach (var signature in _signatures)
{
key.Signature = signature;
if (@ lock.DoesMatch(key))
{
return key;
}
}
throw new ImpossibleToPickTheLockException(@lock);
}
public void Pick(ILock @lock)
{
var key = new FakeKey();
foreach (var signature in _signatures)
{
key.Signature = signature;
if (@ lock.DoesMatch(key))
{
@ lock.Unlock(key);
if (!@ lock.IsLocked)
{
return;
}
}
}
throw new ImpossibleToPickTheLockException(@lock);
}
private class FakeKey : IKey
{
public string Signature { get; set; }
}
}
From that sample, we can see a private implementation of IKey named FakeKey. We use that implementation inside the PredefinedPicklock class to simulate a key and send an IKey.Signature to the ILock instance that we are trying to pick. Unfortunately, PredefinedPicklock has very limited capabilities.
The strength of interfaces is starting to show from this sample. If we take a look at the Pick test method named Should_unlock_the_specified_ILock, we can see how we leveraged the use of the ILock interface by testing it against different types of lock without knowing it inside the test case:
using Xunit;
namespace DoorLock
{
public class PredefinedPicklockTest
{
//...
public class Pick : PredefinedPicklockTest
{
public static TheoryData<ILock> PickableLocks = new TheoryData<ILock>
{
new BasicLock("key1", isLocked: true),
new MultiLock(
new BasicLock("key2", isLocked: true),
new BasicLock("key3", isLocked: true)
),
new MultiLock(
new BasicLock("key2", isLocked: true),
new MultiLock(
new BasicLock("key1", isLocked: true),
new BasicLock("key3", isLocked: true)
)
)
};
[Theory]
[MemberData(nameof(PickableLocks))]
public void Should_unlock_the_specified_ILock(ILock @lock)
{
// Arrange
Assert.True(@ lock.IsLocked, "The lock should be locked.");
var sut = new PredefinedPicklock(new[] { "key1", "key2", "key3" });
// Act
sut.Pick(@lock);
// Assert
Assert.False(@ lock.IsLocked, "The lock should be unlocked.");
}
//...
}
}
}
That is just the beginning. By using interfaces, we can add flexibility without much effort. We could expand this example for quite some time, like creating a BruteForcePickLock implementation that tries to generate the IKey signature automatically. That last idea could be a helpful exercise for you to do.
Contract tests
Before moving forward, I'd like to take a look at the ContractsTests class. That class contains our initial assessments regarding a key and a door:
using System.Collections.Generic;
using Xunit;
namespace DoorLock
{
public class ContractsTests
{
[Fact]
public void A_single_key_should_fit_multiple_locks_expecting_the_same_signature()
{
IKey key = new BasicKey("key1");
LockAndAssertResult(new BasicLock("key1"));
LockAndAssertResult(new BasicLock("key1"));
LockAndAssertResult(new MultiLock(new List<ILock> {
new BasicLock("key1"),
new BasicLock("key1")
}));
void LockAndAssertResult(ILock @lock)
{
var result = @ lock.DoesMatch(key);
Assert.True(result, $"The key '{key.Signature}' should fit the lock");
}
}
[Fact]
public void Multiple_keys_with_the_same_signature_should_fit_the_same_lock()
{
ILock @lock = new BasicLock("key1");
var picklock = new PredefinedPicklock(new[] { "key1" });
var fakeKey = picklock.CreateMatchingKeyFor(@lock);
LockAndAssertResult(new BasicKey("key1"));
LockAndAssertResult(new BasicKey("key1"));
LockAndAssertResult(fakeKey);
void LockAndAssertResult(IKey key)
{
var result = @ lock.DoesMatch(key);
Assert.True(result, $"The key '{key.Signature}' should fit the lock");
}
}
}
}
In those two test methods, we can see the reusability and versatility of interfaces. No matter the lock, we can infer its usage from its interface and lower repetitive code.
In a program, as we explore throughout the book, we can leverage those interfaces for multiple reasons, including dependency injection.
Note
If you wonder how I can write methods inside methods, we will be talking about expression-bodied function members (C# 6) in Chapter 4, The MVC Pattern using Razor.
Conclusion of this example
Now that we have talked about all of that, why are smaller interfaces better? Let's start by merging all of our interfaces into one like this:
public interface IMixedInterface
{
IKey CreateMatchingKeyFor(ILock @lock);
void Pick(ILock @lock);
string Signature { get; }
bool IsLocked { get; }
void Lock(IKey key);
void Unlock(IKey key);
bool DoesMatch(IKey key);
}
When you look at it, what does that interface tell you? Personally, it's telling me that there are way too many responsibilities in there and that I would have a hard time building a system around it.
The main problem with that interface is that every door would also be a key and a picklock, thus making no sense. By splitting the interfaces, it is easier to implement different, smaller parts of the system without compromise. If we want to have a key that is also a picklock, we can implement both the IKey and the IPicklock interfaces, but all keys would not be required to be a picklock too.
Let's jump to another example to add more perspective.
Project – Library
Context: We are building a web application where users have different roles; some are administrators, and some are just consuming the app. The administrators can read and write all of the data in the system while the normal users can only read. UI-wise, there are two distinct parts: the public UI and an admin panel.
Since users are not allowed to write data, we don't want to expose those methods there just in case certain developers, at some point in time, decide to use them. We don't want unused code to linger around in places where that code should not be used. On the other hand, we don't want to create two classes either, one that reads and one that writes; we prefer keeping only one data access class, which should be easier to maintain.
To do that, let's start by remodeling the earlier BookStore class by extracting an interface. To improve readability, let's rename the Load() method to Find(), and then let's add a Remove() method; which was missing before. The new interface looks like this:
public interface IBookStore
{
IEnumerable<Book> Books { get; }
Book Find(int bookId);
void Create(Book book);
void Replace(Book book);
void Remove(Book book);
}
Then, to make sure that consumers cannot alter our IBookStore instances from the outside (encapsulation), let's also update the Books property of our BookStore class to return a type ReadOnlyCollection<Book> instead of the _books field directly. This does not affect the interface, just our implementation, but it also allows me to introduce that concept.
Note
The System.Collections.ObjectModel namespace contains a few read-only classes:
a) ReadOnlyCollection<T>
b) ReadOnlyDictionary<TKey,TValue>
c) ReadOnlyObservableCollection<T>
Those are very useful for exposing data to the clients without allowing them to modify it. In our example, the IEnumerable<Book> instance is of the ReadOnlyCollection<Book> type. We could have kept returning our internal List<Book>, but some clever developer could have figured this out, cast IEnumerable<Book> to a List<Book>, and added some books to it, thereby breaking encapsulation!
Now, let's look at that updated BookStore class:
public class BookStore : IBookStore
{
private static int _lastId = 0;
private static List<Book> _books;
private static int NextId => ++_lastId;
static BookStore()
{
_books = new List<Book>
{
new Book
{
Id = NextId,
Title = "Some cool computer book"
}
};
}
public IEnumerable<Book> Books => new ReadOnlyCollection<Book>(_books);
public Book Find(int bookId)
{
return _books.FirstOrDefault(x => x.Id == bookId);
}
public void Create(Book book)
{
if (book.Id != default(int))
{
throw new Exception("A new book cannot be created with an id.");
}
book.Id = NextId;
_books.Add(book);
}
public void Replace(Book book)
{
if (_books.Any(x => x.Id == book.Id))
{
throw new Exception($"Book {book.Id} does not exist!");
}
var index = _books.FindIndex(x => x.Id == book.Id);
_books[index] = book;
}
public void Remove(Book book)
{
if (_books.Any(x => x.Id == book.Id))
{
throw new Exception($"Book {book.Id} does not exist!");
}
var index = _books.FindIndex(x => x.Id == book.Id);
_books.RemoveAt(index);
}
}
When looking at that code, if we expose the interface in the public UI, we expose the write interface as well, which is what we want to avoid.
To solve our design problem, we can use the ISP and start by splitting the IBookStore interface into two: IBookReader and IBookWriter:
public interface IBookReader
{
IEnumerable<Book> Books { get; }
Book Find(int bookId);
}
public interface IBookWriter
{
void Create(Book book);
void Replace(Book book);
void Remove(Book book);
}
By following the ISP, we could even split IBookWriter into three interfaces: IBookCreator, IBookReplacer, and IBookRemover. Word of warning, we must be careful, because doing ultra-granular interface segregation like that could create quite a mess in your system, but it could also be super beneficial, depending on the context and your goals.
Tip
So, a word of advice. Be careful not to overuse this principle blindly and think about cohesion and about what you are trying to build, and not about how granular an interface can blindly become. The more granular your interfaces, the more flexible your system could be, but remember that flexibility has a cost, and that cost can become very high very quickly.
Now, we need to update our BookStore class. First, we have to implement our two new interfaces:
public class BookStore : IBookReader, IBookWriter
{
// ...
}
That was easy! With that new BookStore class, we can use IBookReader and IBookWriter independently like this:
IBookReader reader = new BookStore();
IBookWriter writer = new BookStore();
// ...
var book3 = reader.Find(3);
// ...
writer.Create(new Book { Title = "Some nice new title!" });
// ...
Let's focus on the reader and writer variables. On the public side, we can now use only the IBookReader interface, hiding the BookStore implementation behind the interface. On the administrator side, we could use both interfaces to manage books.
Conclusion
To resume the idea behind the ISP, if you have multiple smaller interfaces, it is easier to reuse them and to expose only the features that you need instead of exposing APIs that are not needed. This is the goal: only depend on interfaces that you consume. Furthermore, with multiple specialized interfaces, it is easier to compose bigger pieces by implementing multiple interfaces if needed. If we compare that to the opposite, we cannot remove methods from a big interface if we don't need it in one of its implementation.
If you don't see all of the benefits yet, don't worry. All the pieces should come together once we cover the next principle, DIP, and dependency injection. With all of that, we can achieve adequate interface segregation in an elegant and manageable way.
Dependency inversion principle (DIP)
And yet another quote, from Robert C. Martin (including the implied context from Wikipedia):
In the previous section, I introduced you to interfaces with the SRP and the ISP. Interfaces are one of the pivotal elements of our SOLID arsenal! Moreover, using interfaces is the best way to approach the DIP. Of course, abstract classes are also abstractions, but as a rule of thumb, you should depend on interfaces whenever possible instead.
Why not use abstract classes, you might think? An abstract class is an abstraction, but is not 100% abstract, and if it is, you should replace it with an interface. Abstract classes are used to encapsulate default behaviors that you can then inherit in sub-classes. They are useful, but interfaces are more flexible, more powerful, and better suited to design contracts.
Moreover, using interfaces can save you countless hours of struggling and complex workaround when programming unit tests. That is even truer if you are building a framework or library that other people use. In that case, please be kind and provide your consumers with interfaces.
All of that talk about interfaces again is nice, but how can dependencies be inversed? Let's begin by comparing a direct dependency and an inverted dependency.
Direct dependency
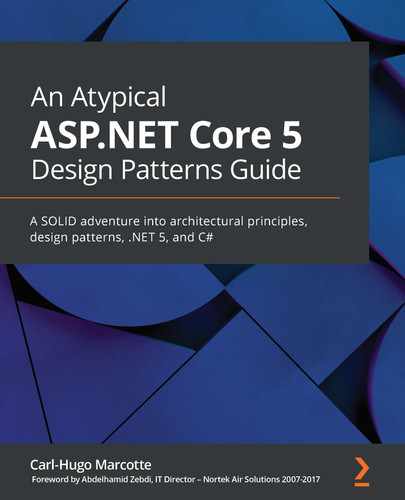
If we have a Ninja class using a Weapon instance, the dependency graph should look like this because the Ninja directly depends on the Weapon class:
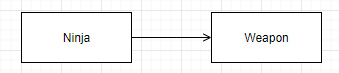
Figure 3.2 – Direct dependency schema
Inverted dependency
If we invert the dependency by introducing an abstraction, the Ninja class would depend only on that new IWeapon interface. Doing this gives us the flexibility to change the type of weapon without any impact on the system's stability and without altering the Ninja class, especially if we also followed the OCP. Indirectly, the Ninja still uses a Weapon class instance, thereby breaking the direct dependency.
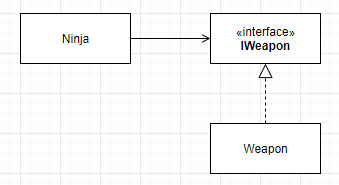
Figure 3.3 – Indirect dependency schema
Inverting subsystems using DIP
To go a little further, you can also isolate and decouple a complete subsystem this way by creating two or more assemblies:
- An abstraction assembly containing only interfaces.
- One or more other assemblies that contain the implementation of the contracts from that first assembly.
There are multiple examples of this in .NET, such as the Microsoft.Extensions.DependencyInjection.Abstractions and the Microsoft.Extensions.DependencyInjection assemblies. We are also exploring this concept in Chapter 12, Understanding Layering.
Before jumping into more code, let's take a look at another schema representing this idea. This time, it is related to abstracting data access from the database itself (we will also talk more about this later):

Figure 3.4 – Diagram representing how to break tight coupling by inverting dependencies
In the diagram, the App package directly depends on the Abstractions package while two implementations are available: Local and Sql. From there, we should be able to swap one implementation for the other without breaking our App. The reason is that we depend on the abstractions and coded the app using those abstractions. No matter what implementations are used, the program should run just fine.
Another example that I recently designed in a microservices-based application is a publish-subscribe (pub-sub) communication library. There are some abstractions that the microservices use, and there are one or more implementations that are swappable, so one microservice could use a provider, while another microservice could use another provider without directly depending on it. We discuss the Pub-Sub pattern and microservices architecture in Chapter 16, Introduction to Microservices Architecture. Until then, think of a microservice as an application.
Packages
The packages described here could be namespaces as well as assemblies. By dividing responsibilities around assemblies, it creates the possibility to load only the implementations that need to be loaded. For example, one app could load the "local" assembly and another app could load the "SQL" assembly, while a third app could load both.
Project – Dependency inversion
Context: We just learned about the DIP and want to apply it to our bookstore app. Since we do not have any real user interface yet, we believe that it makes sense to create multiple reusable assemblies that our ASP.NET Core app can use later, allowing us to swap one GUI with another. Meanwhile, we are going to test our code using a little console application.
There are three projects:
- GUI: the console app
- Core: the application logic
- Data: the data access
Layering
This concept is called layering. We will visit layering in more depth later. For now, you can think of it as splitting responsibilities into different assemblies.
Using a classical dependency hierarchy, we would end up with the following dependency graph:

Figure 3.5 – Diagram representing assemblies that directly depend on the next assembly
This is not very flexible as all assemblies are directly linked to the next in line, creating a strong, unbreakable bond between them. Let's now revisit this using the DIP.
Note
To keep it simple and to focus on only one portion of the code, I only abstracted the data portion of the program. We will explore dependency inversion in more depth further on in the book, along with dependency injection.
For now, focus on DIP.Data, DIP.Data.InMemory, and the code sample of the chapter.
In the solution, there are four projects; three libraries and one console. Their goals are as follows:
- DIP.Console is the entry point, the program. Its role is to compose and run the application. It uses DIP.Core and defines what implementation should be used to cover the DIP.Data interfaces, in this case, DIP.Data.InMemory.
- DIP.Core is the program core, the shared logic. Its only dependency is on DIP.Data, abstracting away the implementation.
- DIP.Data contains persistence interfaces: IBookReader and IBookWriter. It also contains the data model (the Book class).
- DIP.Data.InMemory is a concrete implementation of DIP.Data.
To visualize the assemblies' relationships, let's take a look at the following diagram:
Figure 3.6 – Diagram representing assemblies that invert the dependency flow, breaking coupling between DIP.Core and DIP.Data.InMemory
If we start by looking at the PublicService class of the Core project, we can see that it only depends on the Data project's IBookReader interface:
public class PublicService
{
public IBookReader _bookReader;
public Task<IEnumerable<Book>> FindAllAsync()
{
return Task.FromResult(_bookReader.Books);
}
public Task<Book> FindAsync(int bookId)
{
var book = _bookReader.Find(bookId);
return Task.FromResult(book);
}
}
The PublicService class defines a few methods that use the IBookReader abstraction to query books. PublicService plays the consumer role and doesn't know about any concrete class. Even if we wanted to, the implementation is not accessible from this project. We succeeded; we inverted the dependency. Yes, as easy as that.
Note
Having a public field such as _bookReader breaks encapsulation, so don't do that in your projects. I just wanted to keep the focus of the example on the DIP. We see how to take advantage of the DIP using good practices later, including leveraging dependency injection.
Without any concrete implementation, an interface does nothing, so the other part of the DIP is to configure the consumer by defining what the implementations that back those abstractions are. To help us out, let's create a private class named Composer inside Program to centralize this step of the DIP.
That is, once again, not something you usually want to do in a real project, but until we cover dependency injection, we have to rely on a more manual approach, so let's take a look at that light version, focusing on PublicService:
private static class Composer
{
private readonly static BookStore BookStore = new
BookStore();
// ...
public static PublicService CreatePublicService()
{
return new PublicService
{
_bookReader = BookStore
};
}
}
The CreatePublicService() method is responsible for building the PublicService instance. In it, we assign an instance of the concrete class, BookStore, to the public IBookReader _bookReader; field, leaving PublicService unaware of its _bookReader implementation.
Have you noticed any DIP violations in the PublicService class?
Yes indeed, PublicService is concrete, and Program uses it directly. This is a violation of the DIP. If you want to try out dependency inversion, you could fix this violation in a project; coding is always the best way to learn!
This little sample shows how to invert dependency, making sure of the following:
- The code always depends on abstraction (interfaces).
- The projects also depend on abstractions (depending on DIP.Data instead of DIP.Data.InMemory).
Conclusion
The conclusion of this principle is strongly tied to what is coming next (see the next section). Nevertheless, the idea is to depend on abstractions (interfaces or abstract classes). Try to stick to interfaces as much as possible. They are more flexible than abstract classes.
Depending upon concretions creates tight coupling between classes, which leads to a system that can be harder to maintain. The cohesion between your dependencies plays an essential role in whether the coupling will help or hurt you in the long run. More on that later.
What's next?
The words dependency injection came out a few times, and you may be curious about it, so let's take a peek at what that is. Dependency injection, or Inversion of Control (IoC), is a mechanism (a concept) that is a first-class citizen of ASP.NET Core. It allows you to map abstractions to implementations, and, when you need a new type, the whole object tree gets created automatically for you by following your configuration. Once you get used to it, you cannot move back; but beware of the challenges as you may need to "unlearn" a part of what you know to embrace this new technique.
Enough talking. Let's get through those last sections before getting too excited about dependency injection. We will start that journey in Chapter 7, Deep Dive into Dependency Injection.
Other important principles
I found two other principles to talk about briefly before going further:
- Separation of concerns
- Don't repeat yourself (DRY)
Of course, after reading the SOLID principles, you may find these more basic, but they are still complementary to what we just learned.
Note
There are many other principles, some that you may already know, some that you will most likely learn about later, but at some point, I have to choose the subjects or face writing an encyclopedia-sized book.
Separation of concerns
The idea is to separate your software into logical blocks, where each block is a concern; this can go from factoring a program into modules to applying the SRP to some subsystems. That can be applied to any programming paradigm. How to encapsulate a specific concern depends on the paradigm and the concern's level. The higher the level, the broader the solution; the lower the level, the more granular it becomes.
For example, the following applies:
- By using aspect-oriented programming (AOP), we could see security or logging as cross-cutting concerns, encapsulating the code in an aspect.
- By using object-oriented programming (OOP), we could also see security or logging as a cross-cutting concern, encapsulating shared logic in an ASP.NET filter.
- By using OOP again, we could see the rendering of a web page and the handling of an HTTP request as two concerns, leading to the MVC pattern; the view "renders" the page, while the controller handles the HTTP request.
- By using any paradigm, we could see adding extension points as a concern, leading to a plugin-based design.
- Using any paradigm again, we could see a component, responsible for copying an object into another, as a concern. In contrast, another component's responsibility could be to orchestrate those copies efficiently by following some rules, such as limiting the amount of copy that can happen in parallel, queuing the overflowing operations, and more.
As you may have noticed with those examples, a concern can be a significant matter or a tiny detail; nonetheless, it is imperative to consider concerns when dividing your software into pieces to create cohesive units. A good separation of concerns should help you create modular designs and help you face design dilemmas more effectively.
Don't repeat yourself (DRY)
OK, this principle's name is self-explanatory, and, as we already saw with the SRP and the OCP, we can, and should, extend and encapsulate logic into smaller units, aiming at reusability and lower maintenance costs.
The DRY principle explains it more or less the other way around by stating the following:
The goal is to avoid making multiple changes when a specification changes. Why? To avoid forgetting to make one, or to avoid creating inconsistencies and bugs in the program.
It is very important to regroup duplicated logic by concern, not only by the look of multiple blocks of code. Let's look at those two methods from the Program class of a previous sample:
private static async Task PublicAppAsync()
{
var publicService = Composer.CreatePublicService();
var books = await publicService.FindAllAsync();
foreach (var book in books)
{
presenter.Display(book);
}
}
private static async Task AdminAppAsync()
{
var adminService = Composer.CreateAdminService();
var books = await adminService.FindAllAsync();
foreach (var book in books)
{
presenter.Display(book);
}
}
The code is very similar, but trying to extract a single method out of those would be a mistake. Why? Because the public program and the admin program can have different reasons to change (adding filters in the admin panel, but not in the public section, for example).
However, we could create a display method in the presenter class that handles a collection of books, replacing the foreach loop with a presenter.Display(books) call. We could then move those two methods out of Program without much impact. In the future, that would allow us to support multiple implementations, one for the admins and one for the public users for added flexibility.
Tip
I have told you this already, but here we go again. When you don't know how to name a class or a method, you may have isolated an invalid or an incomplete concern. This is a good indicator that you should go back to the drawing board.
Summary
In this chapter, we covered many architectural principles. We began by exploring the five SOLID principles and their importance in modern software engineering to then jump to the DRY and separation of concerns principles, which add some more guidance to the mix. By following those principles, you should be able to build better, more maintainable software. As we also covered, principles are only principles, not laws. You must always be careful not to abuse them so they remain helpful instead of harmful. The context is always important; internal tools and critical business apps require different levels of tinkering. Try not to over-engineer everything.
With all of those principles in our toolbox, we are now ready to jump into design patterns and get our designing level one step further! In the next few chapters, we explore how to implement some of the most frequently used GoF patterns and how those are applied at another level with dependency injection. Dependency injection is going to help follow the SOLID principles in our day-to-day designs, but before that, in the next two chapters, we explore ASP.NET Core MVC.
Questions
Let's take a look at a few practice questions:
- How many principles are represented by the SOLID acronym?
- Is it true that when following the SOLID principles, the idea is to create bigger components that can each manage more elements of a program by creating God-sized classes?
- By following the DRY principle, you want to remove all code duplication from everywhere, irrespective of the source, and encapsulate that code into a reusable component. Is this affirmation correct?
- Is it true that the ISP tells us that creating multiple smaller interfaces is better than creating one large one?
- What principle tells us that creating multiple smaller classes that handle a single responsibility is better than one class handling multiple responsibilities?