Chapter 17: ASP.NET Core User Interfaces
In this chapter, we'll explore different ways to create user interfaces using ASP.NET Core 5 and its extensive offerings. We have MVC, Razor Pages, and Blazor (Chapter 18, A Brief Look into Blazor) as macro-models. Then we have partial views, view components, Tag Helpers, display templates, editor templates, and Razor components to micro-manage our UIs. Furthermore, the .NET 5 ecosystem includes other non-web technologies to build UIs, such as WinForm, WPF, UWP, and Xamarin.
The goal of this chapter is not to cover every aspect of all of those elements and technologies but to lay out a plan explaining their roles and ways to use them.
The following topics will be covered in this chapter:
- Getting familiar with Razor Pages
- Organizing the user interface
- C# 9 features
- Display and Editor Templates
Getting familiar with Razor Pages
As its name implies, Razor Pages is a server-side way of rendering web content, organized by pages. That applies very well to the web, as people visit pages, not controllers. Razor Pages shares many components with MVC under the hood.
If you want to know if using MVC or Razor Pages is the best for your project, ask yourself if organizing your project into pages would be more suitable for your scenario. If yes, go Razor Pages; otherwise, pick something else, such as MVC or a SPA. We can also use both Razor Pages and MVC in the same application, so there is no need to choose only one.
Using Razor Pages is very similar to MVC. In the Startup.ConfigureServices method, instead of services.AddControllersWithViews(); or services.AddControllers();, we can call the services.AddRazorPages(); extension method.
The same applies to the Startup.Configure method where we must map Razor Pages routes using the endpoints.MapRazorPages(); method.
The use of the other middlewares is the same. Here is an example of Startup:
public class Startup
{
public void ConfigureServices(IServiceCollection services)
{
services.AddRazorPages();
}
public void Configure(IApplicationBuilder app, IWebHostEnvironment env)
{
if (env.IsDevelopment())
{
app.UseDeveloperExceptionPage();
}
else
{
app.UseExceptionHandler("/Error");
app.UseHsts();
}
app.UseHttpsRedirection();
app.UseStaticFiles();
app.UseRouting()
app.UseAuthorization();
app.UseEndpoints(endpoints =>
{
endpoints.MapRazorPages();
});
}
}
With the two highlighted lines, ASP.NET handles the routing and the model binding for us, as with MVC.
We can use the webapp project template to create a Razor Pages project:
dotnet new webapp
Design
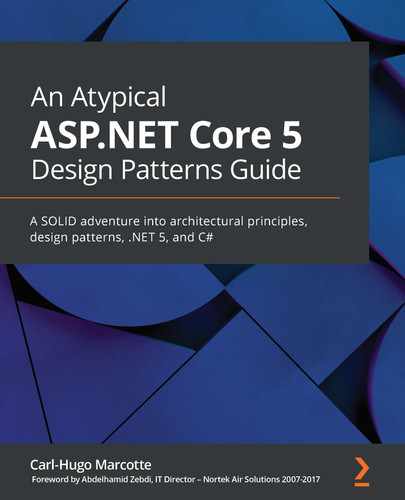
Each page can handle one or more GET or POST methods. The idea is that each page is self-sufficient (SRP). To get started, a page consists of two parts: a view and a model. The model must inherit from PageModel. The view must use the @model directive to link to its page model, and the @page directive tells ASP.NET that it is a Razor page, not just an MVC view.
Here is a visual representation of that relationship:
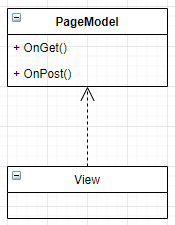
Figure 17.1 – Diagram representing a Razor page
Here is an example that I scaffolded using Visual Studio. The @page and @model directives are highlighted in the following snippet:
PagesEmployeesCreate.cshtml
@page
@model PageController.Pages.Employees.CreateModel
@{
ViewData["Title"] = "Create";
}
<h1>Create</h1>
<h4>Employee</h4>
<hr />
<div class="row">
<div class="col-md-4">
<form method="post">
<div asp-validation-summary="ModelOnly" class="text-danger"></div>
<div class="form-group">
<label asp-for="Employee.FirstName" class="control-label"></label>
<input asp-for="Employee.FirstName" class="form-control" />
<span asp-validation-for="Employee.FirstName" class="text-danger"></span>
</div>
<div class="form-group">
<label asp-for="Employee.LastName" class="control-label"></label>
<input asp-for="Employee.LastName" class="form-control" />
<span asp-validation-for="Employee.LastName" class="text-danger"></span>
</div>
<div class="form-group">
<input type="submit" value="Create" class="btn btn-primary" />
</div>
</form>
</div>
</div>
<div>
<a asp-page="Index">Back to List</a>
</div>
@section Scripts {
@{await Html.RenderPartialAsync ("_ValidationScriptsPartial");}
}
Next is the PageModel, which we discuss here:
PagesEmployeesCreate.cshtml.cs
namespace PageController.Pages.Employees
{
public class CreateModel : PageModel
{
private readonly EmployeeDbContext _context;
public CreateModel(EmployeeDbContext context)
{
_context = context;
}
public IActionResult OnGet()
{
return Page();
}
[BindProperty]
public Employee Employee { get; set; }
public async Task<IActionResult> OnPostAsync()
{
if (!ModelState.IsValid)
{
return Page();
}
_context.Employees.Add(Employee);
await _context.SaveChangesAsync();
return RedirectToPage("./Index");
}
}
}
From that code, we can see both parts: the view and the model. In the PageModel code, the [BindProperty] attribute is what tells ASP.NET to bind the form post to the Employee property. That's the equivalent of an MVC action that looks like this:
[HttpPost]
public Task<IActionResult> MyAction([FromForm] Employee employee) {…}
Visually, a user requesting a page would look like this:
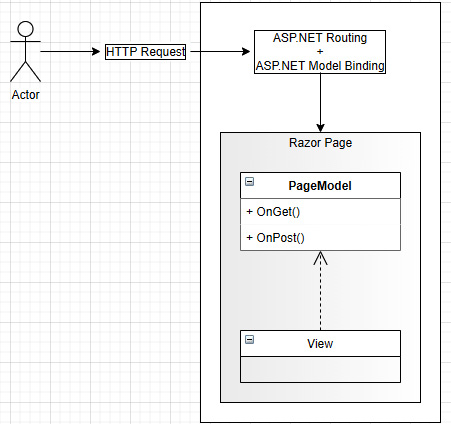
Figure 17.2 – User requesting a page
By default, pages live under the Pages directory instead of the Views directory. The layout mechanism of MVC is also available with Razor Pages. The default layout is in the Pages/Shared/_Layout.cshtml file; the Pages/_ViewStart.cshtml and Pages/_ViewImports.cshtml files play the same role as their MVC equivalent, but for Razor Pages.
Routing
In MVC, we can control the routing by creating global route patterns or with attributes. In Razor Pages, we can also control those routes. By default, the routing system automatically creates routes based on the filesystem, making it faster for us to get started. To use automatic routing, we just have to include the @page directive at the top of the page, and ASP.NET Core does the magic for us.
The routing system used by Razor Pages is simple yet powerful. The default pattern is the page's location without the Pages folder and the .cshtml extension with the Index.cshtml pages being optional (like the Index View of MVC). Instead of endless explanations, let's look at some examples:

In Razor Pages, the routing system chooses the page to be displayed, based on the URL.
We can also replace those defaults with custom routes. The way to replace the default route of a page is by providing a route template after the @page directive, such as @page "/some-route". That page now handles the /some-route URL instead of the default one. The template supports the same as MVC routes, including parameters and constraints.
Covering every aspect of Razor Pages is out of the scope of the current book, but I encourage you to dig deeper into that way of building websites and web applications. It is enjoyable, powerful, and sometimes simpler than MVC.
However, if you need other HTTP methods than GET and POST, Razor Pages might not be for you.
Conclusion
Razor Pages is a good alternative when you want to organize your website or web application by pages instead of controllers. Many features from MVC are supported, such as validation (ModelState and ValidationSummary), the routing system, model binding, Tag Helpers, and more.
Now let's see how Razor Pages can help us follow the SOLID principles:
- S: Each PageModel is responsible for a single page, an essential point of Razor Pages.
- O: N/A.
- L: N/A.
- I: N/A.
- D: N/A.
The Single Responsibility Principle
One could see the "single responsibility" of a Razor Page as multiple responsibilities. It handles both reads and writes; the page model; HTTP requests; and could play with the HTTP response.
Just keep in mind that the goal of a Razor Page is to manage a page. That's a single responsibility. A responsibility does not translate into a single operation. That said, if you think there is too much code in one of your Razor Pages, there are ways to help diminish that burden by extracting and delegating part of those responsibilities to other components, leaving the PageModel with fewer responsibilities and less code. For example, you could use MediatR to extract the business logic elsewhere.
We could see a Razor Page as a simplified Page Controller (Martin Fowler Patterns of Enterprise Application Architecture (PoEAA)). Why simplified? Because ASP.NET does most of the Page Controller work for us, leaving us only the model (domain logic) and the view to implement. See the Further reading section for more information.
Now that we know about Razor Pages and MVC, it is time to explore the options that ASP.NET Core 5 offers to us to organize our UIs.
Organizing the user interface
In this section, we will explore three options:
- Partial views to encapsulate reusable UI parts.
- Tag Helpers that enable us to write HTML-like Razor code instead of a C#-like syntax.
- View components that allow encapsulating logic with one or more views to create reusable components.
Keep in mind that we can use these options in both MVC and Razor Pages.
Partial views
A partial view is a part of a view created in a cshtml file, a Razor file. The content (markup) of the partial view is rendered at the location it was included by the <partial> Tag Helper or the @ Html.PartialAsync() method. ASP.NET introduced the concept in MVC, hence the view. For Razor Pages, you could see partial views as partial pages.
We can place partial views files almost anywhere in our projects, but I'd suggest keeping them close to the views that use them. You can also keep them in the Shared folder. As a rule of thumb, the filename of a partial view begins with _, like _CreateOrEditForm.cshtml.
Partial views are good at simplifying complex views and reusing part of the UI in multiple other views. Here is an example that helps simplify the _Layout.cshtml file:
<div class="container">
@ Html.PartialAsync("_CookieConsentPartial")
<partial name="_CookieConsentPartial" />
<main role="main" class="pb-3">
@RenderBody()
</main>
</div>
The two highlighted lines are doing the same thing, so only one is needed. That's the two code styles to load partial views; pick the one you prefer. This example inserts the content of the Pages/Shared/_CookieConsentPartial.cshtml file at that location in the page. Partial views are very similar to the good old includes from ASP and PHP, but they don't have direct access to the caller's scope (a very good thing).
By default, the current value of the Model property is sent to the partial view, but it is possible to send a different model, like this:
@{
var myModel = "My Model";
}
@ Html.PartialAsync("_SomePartialView", myModel)
<partial name="_SomePartialView" model="myModel" />
In this case, myModel is a string, but it could also be an object of any type.
The partial view are more robust than the includes were with added flexibility. Let's now dig into some code.
Project: Shared form
One of the possibilities of partial views is to share presentation code. In a CRUD project, the create and edit forms are often very similar, so we can leverage partial views to simplify such duplication maintenance. This is similar to the project implemented in Chapter 4, The MVC Pattern using Razor but using Razor Pages instead of MVC.
The initial Razor code for this project has been scaffolded by Visual Studio, based on the Employee class below:
namespace PageController.Data.Models
{
public class Employee
{
public int Id { get; set; }
[Required]
[StringLength(50)]
public string FirstName { get; set; }
[Required]
[StringLength(50)]
public string LastName { get; set; }
}
}
Next, we explore a way to centralize the form shared by both pages to enhance our module's maintainability. First, we must extract the shared portion of CreateModel and EditModel so the form can use it. The ICreateOrEditModel interface contains that shared contract:
Pages/Employees/ICreateOrEditModel.cs
public interface ICreateOrEditModel
{
Employee Employee { get; set; }
}
Then both CreateModel and EditModel must implement it:
Pages/Employees/Create.cshtml.cs
public class CreateModel : PageModel, ICreateOrEditModel
{
...
[BindProperty]
public Employee Employee { get; set; }
...
}
Pages/Employees/Edit.cshtml.cs
public class EditModel : PageModel, ICreateOrEditModel
{
...
[BindProperty]
public Employee Employee { get; set; }
...
}
Then we can isolate the shared portion of the forms and move that to the _Form.cshtml partial view (you can name it as you want):
Pages/Employees/_Form.cshtml
@model ICreateOrEditModel
<div class="form-group">
<label asp-for="Employee.FirstName" class="control-label"></label>
<input asp-for="Employee.FirstName" class="form-control" />
<span asp-validation-for="Employee.FirstName" class="text-danger"></span>
</div>
<div class="form-group">
<label asp-for="Employee.LastName" class="control-label"></label>
<input asp-for="Employee.LastName" class="form-control" />
<span asp-validation-for="Employee.LastName" class="text-danger"></span>
</div>
In the preceding code, we are using the ICreateOrEditModel interface as the @model so we have access to the Employee property of both the create and edit page models. Then we can include that partial view in both of our create and edit pages:
Pages/Employees/Create.cshtml
@page
@model PageController.Pages.Employees.CreateModel
...
<div class="row">
<div class="col-md-4">
<form method="post">
<div asp-validation-summary="ModelOnly" class="text-danger"></div>
<partial name="_Form" />
<div class="form-group">
<input type="submit" value="Create" class="btn btn-primary" />
</div>
</form>
</div>
</div>
Pages/Employees/Edit.cshtml
@page
@model PageController.Pages.Employees.EditModel
...
<div class="row">
<div class="col-md-4">
<form method="post">
<input type="hidden" asp-for="Employee.Id" />
<div asp-validation-summary="ModelOnly" class="text-danger"></div>
<partial name="_Form" />
<div class="form-group">
<input type="submit" value="Save" class="btn btn-primary" />
</div>
</form>
</div>
</div>
With that in place, we have one form to maintain and two pages that do different things. In this case the form is trivial, but in the case of a more substantial entity, this could save a lot of time.
Beware that complex logic within a partial view can become more problematic than the time saved by having it. If you see the amount of conditional code grow in a partial view, I'd recommend investigating whether another technique/pattern would be better. Getting rid of the partial view or creating multiple partial views used in fewer places could also be solutions. Sometimes we think that sharing is a good idea, but it turns out it was not. When that happens, admit your failure, then fix the problem.
Conclusion
Partial views are a great way to reuse parts of a UI or to divide a complex screen into smaller, more manageable elements. Partial views are the most basic way of encapsulating chunks of UI. Use them when the display logic is limited; for more advanced use cases, we'll explore other options in the following subsections.
Now let's see how partial views can help us follow the SOLID principles:
- S: Extracting manageable parts of the UI into partial views can lead to the encapsulation of component-like views that each manage a single display responsibility.
- O: N/A.
- L: N/A.
- I: N/A.
- D: N/A.
Tag Helpers
Tag Helpers are server-side helpers allowing developers to write more HTML-like code in Razor views, reducing the amount of C#-like code mixed into the view. We used Tag Helpers in the last example, maybe without knowing it.
Let's start by having a second look at the _Form.cshtml file:
Pages/Employees/_Form.cshtml
@model ICreateOrEditModel
<div class="form-group">
<label asp-for="Employee.FirstName" class="control-label"></label>
<input asp-for="Employee.FirstName" class="form-control" />
<span asp-validation-for="Employee.FirstName" class="text-danger"></span>
</div>
<div class="form-group">
<label asp-for="Employee.LastName" class="control-label"></label>
<input asp-for="Employee.LastName" class="form-control" />
<span asp-validation-for="Employee.LastName" class="text-danger"></span>
</div>
In that partial view, we used built-in ASP.NET Tag Helpers to enhance the HTML label, input, and span tags. The asp-* attributes are used to set the values of certain built-in Tag Helpers' properties.
For example, the Label Tag Helper generates the value of the HTML for attribute automatically, based on its asp-for attribute. Moreover, it generates the text of the label based on the property name or its [Display(Name = "Custom name")] attribute, if the model property was decorated by one.
To get the same output using HTML helpers, the partial view would look like this:
Pages/Employees/_Form-HtmlHelpers.cshtml
@model ICreateOrEditModel
<div class="form-group">
@ Html.LabelFor(x => x.Employee.FirstName, new { @class = "control-label" })
@ Html.TextBoxFor(x => x.Employee.FirstName, new { @class = "form-control" })
@ Html.ValidationMessageFor(x => x.Employee.FirstName, null, new { @class = "text-danger" })
</div>
<div class="form-group">
@ Html.LabelFor(x => x.Employee.LastName, new { @class = "control-label" })
@ Html.TextBoxFor(x => x.Employee.LastName, new { @class = "form-control" })
@ Html.ValidationMessageFor(x => x.Employee.LastName, null, new { @class = "text-danger" })
</div>
In both cases, the FirstName form-group is rendered as the following HTML:
<div class="form-group">
<label class="control-label" for="Employee_FirstName">FirstName</label>
<input class="form-control valid" type="text" data-val="true" data-val-length="The field FirstName must be a string with a maximum length of 50." data-val-length-max="50" data-val-required="The FirstName field is required." id="Employee_FirstName" maxlength="50" name="Employee.FirstName" value="Bob" aria-describedby="Employee_FirstName-error" aria-invalid="false">
<span class="text-danger field-validation-valid" data-valmsg-for="Employee.FirstName" data-valmsg-replace="true"></span>
</div>
I find the use of Tag Helpers more elegant than the old HTML helpers (C#), but that's my personal preference. Nevertheless, we can choose and mix both options.
Built-in Tag Helpers
There are many built-in Tag Helpers in ASP.NET Core. Some can help load different elements depending on the environment (production or development); others help build the href attribute of the <a> tag; and more.
Let's have a quick overview of what exists. If you want to learn more afterward, the official documentation is getting better and better since Microsoft open sourced it. I've added a few links in the Further reading section at the end of the chapter. Afterward, we will explore how to create custom Tag Helpers.
The Anchor Tag Helper
The Anchor Tag Helper enhances the <a> tag to generate the href attribute based on a controller action or a Razor page.
Here are a few examples for Razor Pages:

It is similar for MVC controllers:

The Anchor Tag Helper is very useful in creating links that look like HTML, incredibly convenient to set the class attribute without an anonymous object and an escape character (if you've used HTML helpers before, you'll know what I mean).
The asp-route-id attribute is a little different than the others. The asp-route-* attributes allow specifying the value for a parameter, such as id. So if the GET action looks like this:
[HttpGet]
public IActionResult Details(int something){ ... }
You would need a link that specifies the something parameter, which could be declared like this:
<a asp-controller="Employees" asp-action="Details" asp-route-something="123">...</a>
There are many more options behind this Tag Helper that we are not covering here, but with what we did, you know that you can leverage ASP.NET to generate links based on pages and controllers.
The Link Tag Helper
The Link Tag Helper allows you to define a fallback CSS href in case the primary one does not load (that is, if the CDN is down). Here is an example from the Razor Pages template:
<link rel="stylesheet" href="https://cdnjs.cloudflare.com/ajax/libs/twitter-bootstrap/4.1.3/css/bootstrap.min.css"
asp-fallback-href="~/lib/bootstrap/dist/css/bootstrap.min.css"
asp-fallback-test-class="sr-only"
asp-fallback-test-property="position"
asp-fallback-test-value="absolute"
crossorigin="anonymous"
integrity="sha256-eSi1q2PG6J7g7ib17yAaWMcrr5GrtohYChqibrV7PBE=" />
ASP.NET renders the required HTML and JavaScript to test if the CSS was loaded, based on the specified asp-fallback-test-* attributes. If it was not, it swaps it for the one specified in the asp-fallback-href attribute.
The Script Tag Helper
The Script Tag Helper allows you to define a fallback JavaScript file in case the primary one does not load (that is, if the CDN is down). Here is an example from the Razor Pages template:
<script src="https://cdnjs.cloudflare.com/ajax/libs/twitter-bootstrap/4.1.3/js/bootstrap.bundle.min.js"
asp-fallback-src="~/lib/bootstrap/dist/js/bootstrap.bundle.min.js"
asp-fallback-test="window.jQuery && window.jQuery.fn && window.jQuery.fn.modal"
crossorigin="anonymous"
integrity="sha256-E/V4cWE4qvAeO5MOhjtGtqDzPndRO1LBk8lJ/PR7CA4=">
</script>
ASP.NET renders the required HTML and JavaScript to test if the script was loaded, based on the specified asp-fallback-test attribute. If the script did not load, the browser swaps the source for the one specified in the asp-fallback-href attribute. This is the equivalent of the <link> tag but for <script> tags.
The Environment Tag Helper
The Environment Tag Helper allows rendering certain parts of the UI only for specific environments. For example, you could render some debugging information only when in Development.
The Environment Tag Helper is also a good complement to the <link> and <script> Tag Helpers, allowing us to load local not minified scripts when developing and CDN-hosted minified files in production.
We can define what environment to target by including or excluding environments using the include and exclude attributes, respectively. The value of those attributes can be a single environment name or a comma-separated list. Here are some examples:
<environment include="Development">
<div>Development Content.</div>
</environment>
The preceding snippet displays the <div> only when the environment is Development.
<environment exclude="Development">
<div>Content not to display in Development.</div>
</environment>
The preceding snippet displays the <div> for all environments but Development.
<environment include="Staging,Production">
<div>Staging and Production content.</div>
</environment>
The preceding snippet displays the <div> only for the Staging and Production environments.
<environment exclude="Staging,Production">
<div>Content not to display in Staging nor Production.</div>
</environment>
The preceding snippet displays the <div> for all environments but Staging and Production.
The Caching Tag Helpers
ASP.NET Core also provides the following caching related Tag Helpers:
- The Cache Tag Helper
- The Distributed Cache Tag Helper
- The Image Tag Helper
The Cache Tag Helper allows caching part of a view for 20 minutes, by default, and leverages the ASP.NET Core cache provider mechanism. A basic example could be caching a random number like this:
<cache>@(new Random().Next())</cache>
Multiple attributes can also be set to control how the cache is invalidated and what it targets. We could want to cache the greeting to a user, for example, but if we write the following, all users would see the greeting of the first user to trigger the cache:
<cache>Hello @this.User.Identity.Name!</cache>
To fix that issue, we can set the vary-by-user attribute to true:
<cache vary-by-user="true">
Hello @ this.User.Identity.Name!
</cache>
Multiple other vary-by-* attributes can be used in other cases, such as vary-by-header, vary-by-query, vary-by-route, and vary-by-cookie.
To control how the cache is invalidated, we can set the expires-on attribute to a DateTime object or the expires-after or expires-sliding attributes to a TimeSpan object.
If that is not enough, ASP.NET Core also provides a Distributed Cache Tag Helper that leverages the IDistributedCache implementation that you register. You must configure the distributed cache provider in the Startup class, or the Tag Helper will use the in-memory provider. You must also specify a unique key for each element by setting the name attribute. The other attributes are the same as the Cache Tag Helper.
The last cache-related Tag Helper is the Image Tag Helper. That Tag Helper allows invalidating images when they change. To do that, ASP.NET appends a version to its enhanced <img> tags that get invalidated when the file changes.
Since the Image Tag Helper enhances the <img> tag, there is no new tag here. To use this functionality, you must set an asp-append-version attribute to true on an <img> tag that has an src attribute like this:
<img src="~/images/some-picture.jpg" asp-append-version="true">
While using one or more of those three Tag Helpers, it is easier than ever to cache part of your views, but caching is a subject of its own that I prefer not to dig too deeply into here.
The Form Tag Helpers
ASP.NET Core provides multiple Tag Helpers when the time comes to create forms. Since forms are the way to gather user inputs, they are quite essential. Here, we cover the Form Tag Helper first, which extends the <form> HTML tag.
Its first advantage is the automatic rendering of an input[name="__RequestVerificationToken"] element to prevent cross-site request forgery (CSRF or XSRF). Razor Pages does the verification automatically, but MVC does not. To enable XSRF/CSRF protection when using MVC, we need to decorate the action or the controller with the [ValidateAntiForgeryToken] attribute.
The second advantage is to help with routing. The Form Tag Helper exposes the same attributes as the Anchor Tag Helper when routing time comes, like the asp-controller, asp-action, asp-page, and asp-route-* attributes.
To submit the form, you can proceed like any normal HTML <form> tag: with a button[type="submit"] or an input[type="submit"]. We can also set different actions on different buttons by using the same routing attributes.
Next, let's explore the Input Tag Helper that we saw earlier. The key attribute of the Input Tag Helper is asp-for. When setting it to a property of the view's model, ASP.NET automatically generates the name of the <input> tag, its value, the validation information, and the type of that input. For example, a bool is rendered as input[type=checkbox] while a string is rendered as input[type=text]. We can decorate our view models with data annotations to control the type of input to be generated, like [EmailAddress], [Url], or [DataType(DataType.*)].
Tip
When you have a property on your model representing a collection, you should use a for loop (not a foreach) to generate your form. Otherwise, in many cases, ASP.NET Core will not render the elements correctly, and you will receive a null value for those fields on the server after posting the form. Here is an example that works:
@for (var i = 0; i < Model.Destinations.Count; i++)
{
<input type="text" asp-for="@destinations[i].Name" class="control-label"></label>
<input type="text" asp-for="@destinations[i].Name" class="form-control" />
}
Another advantage of Tag Helpers that enhance HTML tags is that all standard HTML attributes are usable. So when you want to create an input[type=hidden] for the Id property of the model being edited, you can set the type attribute directly and override the defaults, like this:
<input type="hidden" asp-for="Employee.Id" />
We then have the Textarea Tag Helper that generates a <textarea> tag like this:
<textarea asp-for="Employee.Description"></textarea>
Then comes the Label Tag Helper that helps render <label> tags, like this:
<label asp-for="Employee.Description"></label>
Finally, the Select Tag Helper helps render <select> tags using the values specified in its asp-items attribute. The items must be an IEnumerable<SelectListItem> collection. The asp-for attribute serves the same purpose as the other Tag Helpers. Here is an example of a manually generated list of items bound to the SomeProperty property of the Model:
@{
var items = new[]
{
new SelectListItem("Make a selection", ""),
new SelectListItem("Choice 1", "1"),
new SelectListItem("Choice 2", "2"),
new SelectListItem("Choice 3", "3"),
};
}
<select asp-items="items" asp-for="SomeProperty"></select>
Tips: enum
You can use the Html.GetEnumSelectList<TEnum>() method to generate the list from an enum, where TEnum is the type of your enum. The generated <option> tags will have a numerical value equal to the value of the enum element and its text set to the textual representation of the enum element, like <option value="2">SecondOption</option>.
To customize the text of each option, you can decorate your enum members with attributes, like the [Display(Name = "Second option")] attribute, which would render <option value="2">Second option</option> instead, improving readability. Here's an example:
public enum MyEnum {
[Display(Name = "Second option")]
SecondOption = 2
}
To conclude this subsection, we have two more form-related Tag Helpers to cover, the Validation Message Tag Helper and the Validation Summary Tag Helper. They exist to help validate form inputs on the client side.
The Validation Summary Tag Helper is used to display the list of error messages of the ModelState property (ModelStateDictionary). That property is accessible in most MVC and Razor Pages related base classes, such as PageModel, PageBase, ControllerBase, and ActionContext (accessible from RazorPageBase.ViewContext in an MVC view). The following code creates a validation summary:
<div asp-validation-summary="ModelOnly" class="text-danger"></div>
The value of the asp-validation-summary attribute can be None, ModelOnly, or All:
- None means that no summary will be displayed.
- ModelOnly means that only errors not related to the model's properties will be displayed in the validation summary (the name is counter-intuitive if you ask me).
- All means that all errors, including property errors, will be displayed in the validation summary.
If you are using the Validation Message Tag Helper for your properties, I'd recommend setting that value to ModelOnly, which will allow sending custom validation messages from your page or action without duplicating the model's messages on the page.
The Validation Message Tag Helpers allows us to display the error message of a single property. Usually, these are displayed close to the element they represent, but they don't have to be. Here is an example:
<span asp-validation-for="Employee.FirstName" class="text-danger"></span>
The asp-validation-for attribute acts as the asp-for attribute but tells the element that it is for validation purposes instead of creating a form input. If the property (in this case, Employee.FirstName) is not valid, the error message is displayed; otherwise, it is not.
The class="text-danger" is a Bootstrap class that sets the text to a red color.
If we take a look again at the previous section's example, we will see that the following Razor code (first block) is rendered to the following HTML code (second block), with the Razor code highlights being translated to the HTML code highlights:
<div class="form-group">
<label asp-for="Employee.FirstName" class="control-label"></label>
<input asp-for="Employee.FirstName" class="form-control" />
<span asp-validation-for="Employee.FirstName" class="text-danger"></span>
</div>
<div class="form-group">
<label class="control-label"for="Employee_FirstName">FirstName</label>
<input class="form-control" type="text" data-val="true" data-val-length="The field FirstName must be a string with a maximum length of 50." data-val-length-max="50" data-val-required="The FirstName field is required." id="Employee_FirstName" maxlength="50" name="Employee.FirstName" value="">
<span class="text-danger field-validation-valid" data-valmsg-for="Employee.FirstName" data-valmsg-replace="true"></span>
</div>
The validation attributes (data-val-length, data-val-length-max, data-val-required, and maxlength) and the type attribute come from the Employee.FirstName property, which is defined as follows:
[Required]
[StringLength(50)]
public string FirstName { get; set; }
To conclude, the form Tag Helpers provided by ASP.NET Core are very handy at crafting readable forms, fast, and packed with functionalities.
The Partial Tag Helper
We already used the Partial Tag Helper in the previous subsection about partial views, but here are a few more use cases. The most trivial one implies to set only the name attribute as we did before:
<partial name="_Form" />
We can also specify a path instead of a name, like this:
<partial name="Employees/_PieceOfUI" />
That would load the _PieceOfUI.cshtml partial view from one of the following three files: /Pages/Employees/_PieceOfUI.cshtml or /Pages/Shared/Employees/_PieceOfUI.cshtml or /Views/Shared/Employees/_PieceOfUI.cshtml.
We can also pass a custom model to a partial view using the model attribute, like this:
Pages/Employees/PieceOfUIViewModel.cs
public record PieceOfUIViewModel(bool GenerateRandomNumber);
The PieceOfUIViewModel record class is a view model that we pass to the PieceOfUI partial view as follows. Records are a new C# 9 feature that we'll explore in the next section of this chapter. For now, think of PieceOfUIViewModel as a class with a read-only property named GenerateRandomNumber.
Pages/Employees/_PieceOfUI.cshtml
@model PieceOfUIViewModel
Piece of UI
@if (Model.GenerateRandomNumber) {
<text>| </text>
@(new Random().Next())
}
The preceding Razor code is the partial view that we render in the next block:
Pages/Shared/_Layout.cshtml
@using PageController.Pages.Employees
…
<partial name="Employees/_PieceOfUI" model="new PieceOfUIViewModel(true)" />
…
In that example, we pass an instance of PieceOfUIViewModel to the partial view, which in turn renders a random number or not (true or false), depending on the value of the GenerateRandomNumber property.
The for attribute allows similar behavior but through the model itself. If we go back to our shared form but create a new partial view without the need to implement any interface, we could end up with the following code instead:
_FormFor.cshtml
@using PageController.Data.Models
@model Employee
<div class="form-group">
<label asp-for="FirstName" class="control-label"></label>
<input asp-for="FirstName" class="form-control" />
<span asp-validation-for="FirstName" class="text-danger"></span>
</div>
<div class="form-group">
<label asp-for="LastName" class="control-label"></label>
<input asp-for="LastName" class="form-control" />
<span asp-validation-for="LastName" class="text-danger"></span>
</div>
Next, the code used by both views:
Create.cshtml and Edit.cshtml
…
<partial name="_FormFor" for="Employee" />
…
Even if the partial view is not aware of the Employee property on the original Model, it still renders the same form because the for attribute preserved that context for us.
One last attribute is view-data, allowing us to pass a ViewDataDictionary instance to the partial view. I recommend sticking with fully typed objects instead of playing with dictionaries and magic strings, but if you need it one day for some obscure cases, well, you know that the attribute exists.
The Component Tag Helper
The Component Tag Helper is used to render Razor Components into an MVC or Razor Pages application. We explore Razor components in Chapter 18, A Brief Look into Blazor, and briefly explore this Tag Helper as well.
Creating a custom Tag Helper
Now that we've sprinted through the built-in Tag Helpers, we can also create our own quite easily. We have two options; we can extend an existing tag or create a new tag.
In this example, we are creating the <pluralize> tag. The objective behind it is to replace code like this:
<p class="card-text">
@ Model.Count
@(Model.Count > 1 ? "Employees" : "Employee")
</p>
With code like this:
<p class="card-text">
<pluralize count="Model.Count" singular="{0} Employee" plural="{0} Employees" />
</p>
There is less context-switching with that code than with the first block as the whole block looks like HTML now.
Side effect
It would also be easier to localize a UI built using the <pluralize> Tag Helper than a UI filled with tertiary operators. As a quick change, we could inject an IStringLocalizer<T> into our PluralizeTagHelper class to localize the content of the Singular or Plural property before formatting it using string.Format().
Don't get me wrong here: I'm not telling you to stop writing C# into your views; I'm just pointing out another possible advantage of this versus using plain C#.
For that component, we need to create a PluralizeTagHelper class that we save into the TagHelpers directory. A Tag Helper must implement the ITagHelper interface but can also inherit from the TagHelper class. We are opting for the TagHelper class, which exposes a synchronous Process method that we can use.
Note
The TagHelper class does nothing more than adding the Process method to override and a default empty implementation of the ITagHelper interface.
The PluralizeTagHelper class that we are programming looks like this:
namespace PageController.TagHelpers
{
[HtmlTargetElement("pluralize", TagStructure = TagStructure.WithoutEndTag)]
This attribute tells Razor that we're extending the <pluralize> tag and that we can omit the end tag and write it like <pluralize /> instead of <pluralize></pluralize>.
public class PluralizeTagHelper : TagHelper
{
public int Count { get; set; }
public string Singular { get; set; }
public string Plural { get; set; }
The name of the properties directly translates to attributes in kebab-case format. So Singular translates to singular, while a property named ComplexAttributeName would translate to complex-attribute-name.
public override void Process(TagHelperContext context, TagHelperOutput output)
{
var text = Count > 1 ? Plural : Singular;
text = string.Format(text, Count);
The preceding code is the logic that chooses whether we display the singular or the plural version of the text.
output.TagName = null;
By setting the TagName property to null, we ensure that Razor does not render the content inside a <pluralize> tag; we only want to generate text.
output.Content.SetContent(text);
}
}
}
Finally, we set the value of what we want to output with the SetContent method of the TagHelperContent class. The TagHelperContent class exposes multiple other methods to append and set the content of the Tag Helper.
Like any other Tag Helper, we need to register it. We will register all Tag Helpers of the project, in a few pages, in Project: Reusable employee count.
When loading a page that displays the Pluralize Tag Helper, we end up with the following outputs:
# When count = 0
0 Employee
# When count = 1
1 Employee
# When count = 2
2 Employees
That's it for this one. Of course, we could create more complex Tag Helpers, but I'll leave that to you and your projects.
Tip
You can also download existing Tag Helpers from NuGet.org and publish your Tag Helpers on NuGet.org (or the third-party service of your choice) as NuGet packages.
Let's take a look at the Tag Helper Component next.
Creating an RSS feed TagHelperComponent
Context: We want to dynamically add a <link> tag into the <head> of every page without changing the _Layout.cshtml file. The expected output looks like the following:
<link href="/feed.xml" type="application/atom+xml" rel="alternate" title="Chapter 17 Code Samples App">
We can do that by implementing an ITagHelperComponent interface, or we can inherit from TagHelperComponent. We will do the latter.
Let's first look at the RssFeedTagHelperComponent class and its options:
namespace PageController.TagHelpers
{
public class RssFeedTagHelperComponentOptions
{
public string Href { get; set; } = "/feed.xml";
public string Type { get; set; } = "application/atom+xml";
public string Rel { get; set; } = "alternate";
public string Title { get; set; };
}
The RssFeedTagHelperComponentOptions class contains some properties with default values about what to write into the <link> tag, for convenience.
Next, the RssFeedTagHelperComponent looks like this:
public class RssFeedTagHelperComponent : TagHelperComponent
{
private readonly RssFeedTagHelperComponentOptions _options;
public RssFeedTagHelperComponent(RssFeedTagHelperComponentOptions options)
{
_options = options ?? throw new ArgumentNullException(nameof(options));
}
public override void Process(TagHelperContext context, TagHelperOutput output)
The Process method is where the magic happens. That can also be in the ITagHelperComponent.ProcessAsync method if you have asynchronous code to run.
{
if (context.TagName == "head")
Two sections can be extended by a Tag Helper component: the <head> and the <body>. Here, we want to append content to the <head>, so we are looking for that.
{
output.PostContent.AppendHtml(
$@"<link href=""{_options.Href}"" type=""{_options.Type}"" rel=""{_options.Rel}"" title=""{_options.Title}"">"
);
}
}
}
}
Finally, we append the <link> tag itself to the <head>, using our options object.
That code does nothing on its own; for it to run, we need to tell ASP.NET about it. To do that, we have multiple options, but as a big fan of Dependency Injection, that's the way that I chose here.
In the Startup class, we must register the RssFeedTagHelperComponentOptions and the RssFeedTagHelperComponent classes. Let's start with the options, which is a design choice and has nothing to do with the ITagHelperComponent itself:
services.Configure<RssFeedTagHelperComponentOptions>(Configuration.GetSection("RssFeed"));
services.AddSingleton(sp => sp.GetRequiredService<IOptionsMonitor <RssFeedTagHelperComponentOptions>>().CurrentValue);
Here, I decided to leverage the Options pattern, which allows overriding our default values from any configuration source like the appsettings.json file. Then I needed a raw RssFeedTagHelperComponentOptions, so I registered it as is (see Chapter 8, Options and Logging Pattern, for more information about this workaround).
Now that our options are registered, we can register the RssFeedTagHelperComponent as an ITagHelperComponent. Since the component is stateless, we can register it as a singleton, like this:
services.AddSingleton<ITagHelperComponent, RssFeedTagHelperComponent>();
That's it. When loading any page, the <link> tag is added to the <head> with the options that we defined! That's ASP.NET Core extensibility magic!
When we think about it, the options are endless; we could have components self-registering their CSS files or even minifying the <head> or the <body> or both. Here is an example of a minifier:
public class MinifierTagHelperComponent : TagHelperComponent
{
public override int Order => int.MaxValue;
public async override Task ProcessAsync(TagHelperContext context, TagHelperOutput output)
{
var childContent = await output.GetChildContentAsync();
var content = childContent.GetContent();
var result = Minify(content);
output.Content.SetHtmlContent(result);
}
private static string Minify(string input) { ... }
}
}
That is most likely not the optimal way of doing minification (I did not benchmark it), but I built it because it crossed my mind, and as a quick second example to trigger your imagination. All of the code is available in Git (https://net5.link/EcSc).
More info
The ITagHelper interface inherits from ITagHelperComponent, so you can technically create a Tag Helper that adds resources to the <head> or <body> of the page by combining both methods into one class.
Conclusion
Tag Helpers are a great way to create new HTML-like tags or to expand existing ones to lower the friction from switching context between C# and HTML in Razor code. ASP.NET Core is packed with existing Tag Helpers, and you may have used some without even knowing it.
Now let's see how creating Tag Helpers can help us follow the SOLID principles:
- S: Tag Helpers can help us encapsulate tag-related logic into reusable pieces of code.
- O: N/A.
- L: N/A.
- I: N/A.
- D: N/A.
View components
Now to a new concept: View components. A view component is a mix between a partial view and a controller action. It is composed of two parts:
- A class that inherits from ViewComponent or is decorated with a [ViewComponent] attribute. This class contains the logic.
- One or more cshtml views. These are the views that knows how to render the component.
There are multiple ways to organize the files that compose a view component. Since I prefer it when the files related to a feature are close together, I like to see all of the classes live in the same directory as the view itself (let's call that vertical slice inspired), like this:

Figure 17.3: A way to organize View components keeping all files together
Project: Reusable employee count
Context: We want to create a view component in the same Razor Pages project. That component should display the number of employees that are available in the system's database. The component should always be visible.
The widget is a Bootstrap card that looks like this:

Figure 17.4: The result, rendered in a browser, of the employee count view component
I decided to inherit the view component from ViewComponent so I can leverage the helper methods, such as View(). For the EmployeeCountViewModel, I decided to leverage record classes (see the Record classes (C# 9) section). The view model exposes a Count property:
Pages/Components/EmployeeCount/EmployeeCountViewModel.cs
public record EmployeeCountViewModel(int Count);
The EmployeeCountViewModel class is virtually the same as a class with a public int Count { get; } property:
Pages/Components/EmployeeCount/Default.cshtml
@model PageController.Pages.Shared.Components.EmployeeCount.EmployeeCountViewModel
<div class="card">
<div class="card-body">
<h5 class="card-title">Employee Count</h5>
<p class="card-text">
@ Model.Count
@(Model.Count > 1 ? "Employees" : "Employee")
</p>
<a asp-page="Employees/Index" class="card-link">Employees list</a>
</div>
</div>
As we saw in the View Model design pattern section of Chapter 4, The MVC Pattern using Razor, we inject a model, specifically crafted for this view, which is the default view of our view component, then we render the component using it. Now, to the view component:
Pages/Components/EmployeeCount/EmployeeCountViewComponent.cs
public class EmployeeCountViewComponent : ViewComponent
{
private readonly EmployeeDbContext _context;
public EmployeeCountViewComponent(EmployeeDbContext context)
{
_context = context ?? throw new ArgumentNullException(nameof(context));
}
Here, we inject the EmployeeDbContext so we can count the employees in the InvokeAsync method down below:
public async Task<IViewComponentResult> InvokeAsync()
{
var count = await _context.Employees.CountAsync();
return View(new EmployeeCountViewModel(count));
}
}
A view component's logic must be placed inside an InvokeAsync method that returns a Task<IViewComponentResult> or an Invoke method that returns an IViewComponentResult. In our case, we access a database, so we better go async not to block resources while waiting for the database. Then, similar to a controller action, we use the View<TModel>(TModel model) method of the ViewComponent base class to return a ViewViewComponentResult that contains an EmployeeCountViewModel instance.
To render a view component, we can use the Component.InvokeAsync() extension method, like this:
@await Component.InvokeAsync("EmployeeCount")
The name of the view component must exclude the ViewComponent suffix.
For a more refactor-friendly method, we can also pass the type instead of its name:
@await Component.InvokeAsync(typeof(PageController.Pages.Shared.Components.EmployeeCount.EmployeeCountViewComponent))
We can also use Tag Helpers to invoke our view components. To do so, we can register all view components as Tag Helpers by adding the following line to the _ViewImports.cshtml file:
@addTagHelper *, PageController
PageController is the name of the assembly to scan for view components (the name of the project).
Then we can use the <vc:[view-component-name]></vc:[view-component-name]> Tag Helper instead, like this:
<vc:employee-count></vc:employee-count>
vc is the default prefix that can be overridden.
We can achieve many things with view components, including passing arguments to the InvokeAsync method, so if you need some parameters, it is possible. Moreover, with view components and the power of dependency injection, we can create powerful UI pieces that are reusable and encapsulate complex logic, leading to a more maintainable application. We can also register components independently, no need to register them all at once.
Conclusion
View components are a mix between a partial view and a controller action, with the possibility of having a Tag Helper-like syntax. They support dependency injection for extensibility but are limited in other ways. They do not support optional parameters when using the Tag Helper syntax, only when using the Component.InvokeAsync() methods. The default places where we can save the views are limited but could be extended if one wants to.
In a nutshell, if you want a controller-like piece of UI that has logic or that needs to access external resources, a view component could be the right choice for you. On the other hand, if you want to create composable pieces of UI, Razor components might be a better fit (we cover those in the Getting familiar with Razor components section of Chapter 18, A Brief Look into Blazor).
Now let's see how creating view components can help us follow the SOLID principles:
- S: A view component helps us extract pieces of UI logic into independent components.
- O: N/A.
- L: N/A.
- I: N/A.
- D: N/A.
Next, we'll explore a few amazing C# features that are new to C# 9.
C# 9 features
In this section, we will visit the following new features:
- Top-level statements
- Target-typed new expressions
- Init-only properties
- Record classes
We will use the top-level statement to simplify some code samples, leading to one code file with less boilerplate code. Then we will dig into the new expressions that allow creating new instances with less typing. The init-only properties are the backbone of the record classes used in this chapter and are foundational to the MVU example presented in Chapter 18, A Brief Look into Blazor.
Top-level statements (C# 9)
Starting from C# 9, it is possible to write statements before declaring namespaces and other members. Those statements are compiled to an emitted Program.Main method.
With top-level statements, a minimal .NET "Hello World" program now looks like this:
using System;
Console.WriteLine("Hello world!");
Unfortunately, we also need a project to run, so we have to create a .csproj file with the following content:
<Project Sdk="Microsoft.NET.Sdk">
<PropertyGroup>
<TargetFramework>net5.0</TargetFramework>
<OutputType>Exe</OutputType>
</PropertyGroup>
</Project>
From there, we can use the .NET CLI to dotnet run the application.
We can also declare other members like classes and use them as we would in any console application. Classes must be declared after the top-level code.
Top-level statements are a great feature to get started with C# and write code samples by cutting out boilerplate code. I was slightly against the idea at first, but I now see many possibilities for it.
Target-typed new expressions (C# 9)
Target-typed new expressions are a new way of initializing types. Back in the day, C# 3 introduced the var keyword, which became very handy to work with generic types, LINQ return values, and more (I remember embracing that new construct with joy).
This new C# feature does the opposite of the var keyword by letting us call the constructor of a known type, like this:
using System;
using System.Collections.Generic;
List<string> list1 = new();
List<string> list2 = new(10);
List<string> list3 = new(capacity: 10);
var obj = new MyClass(new());
AnotherClass anotherObj = new() { Name = "My Name" };
public class MyClass {
public MyClass(AnotherClass property)
=> Property = property;
public AnotherClass Property { get; }
}
public class AnotherClass {
public string Name{ get; init; }
}
The first highlight shows the ability to create new objects when the type is known using the new() keyword and omitting the type name. The second list is created the same way, but we passed the argument 10 to its constructor. The third list uses the same approach but explicitly specifies the parameter name, as we could with any standard constructor.
The variable obj is created explicitly, but new() is used to create an instance of AnotherClass, which is inferred because the parameter type is known.
The final example demos the use of class initializers. As you may have noticed, the AnotherClass class has an init-only property, which is our next subject.
I can see the target-typed new expressions simplify many codebases. I started using them and they are one of the great addition of C# 9.0.
Init-only properties (C# 9)
Init-only properties are read-only properties that can be initialized using the class initializer. Before that, read-only properties could only be initialized in the constructor or with property initializers (such as public int SomeProp { get; } = 2;).
For example, let's take a class that holds the state of a counter. When using a read-only property, we would have the following class:
public class Counter
{
public int Count { get; }
}
Without a constructor, it is impossible to initialize the Count property, so we can't initialize an instance like this:
var counter = new Counter { Count = 2 };
That's the use case that init-only properties enable. We can rewrite the Counter class to make use of that by using the init keyword, like this:
public class Counter
{
public int Count { get; init; }
}
Init-only properties enable developers to create immutable properties that are settable using a class initializer. They are also a building block of the record classes.
Record classes (C# 9)
A record class uses init-only properties and allows making reference types (classes) immutable. The only way to change a record is to create a new one. Let's convert the Counter class into a record:
public record Counter
{
public int Count { get; init; }
}
Yes, it is as simple as replacing the class keyword with the record keyword.
But that's not all:
- We can simplify record creation.
- We can also use the with keyword to simplify "mutating" a record (creating a mutated copy without touching the initial one).
- Records support deconstruction, like the Tuple types.
- .NET auto-implements the Equals and GetHashCode methods. Those two methods compare the value of the properties instead of the reference to the object. That means that two different instances with the same values would be equal.
All in all, that means that we end up with an immutable reference type (class) that behaves like a value type (struct) without the copy allocation cost.
Simplifying the record creation
If we don't want to use a class initializer when creating instances, we can simplify the code of our records to the following:
public record Counter(int Count);
That syntax reminds me of TypeScript, where you can define properties and fields in the constructor, and they get implemented automatically without the need to do it manually. Then, we can create a new instance like any other class:
var counter = new Counter(2);
Console.WriteLine($"Count: {counter.Count}");
Running that code would output Count: 2 in the console. We can also add methods to the record class:
public record Counter(int Count)
{
public bool CanCount() => true;
}
You can do everything with a record that you would do with a class, and more.
The with keyword
The with keyword allows us to create a copy of a record and set only the properties that we want to change, keeping the other values as they were. Let's take a look at the following code (leveraging C# 9 top-level statements):
using System;
var initialDate = DateTime.UtcNow.AddMinutes(-1);
var initialForecast = new Forecast(initialDate, 20, "Sunny");
var currentForecast = initialForecast with { Date = DateTime.UtcNow };
Console.WriteLine(initialForecast);
Console.WriteLine(currentForecast);
public record Forecast(DateTime Date, int TemperatureC, string Summary)
{
public int TemperatureF => 32 + (int)(TemperatureC /
0.5556);
}
When we execute that code, we end up with a result similar to this:
Forecast { Date = 9/22/2020 12:04:20 AM, TemperatureC = 20, Summary = Sunny, TemperatureF = 67 }
Forecast { Date = 9/22/2020 12:05:20 AM, TemperatureC = 20, Summary = Sunny, TemperatureF = 67 }
The power of the with keyword allows us to create a copy of the initialForecast record and only change the Date property's value.
The with keyword is a compelling addition to the language.
Deconstruction
We can deconstruct record classes automatically like a Tuple:
using System;
var current = new Forecast(DateTime.UtcNow, 20, "Sunny");
var (date, temperatureC, summary) = current;
Console.WriteLine($"date: {date}");
Console.WriteLine($"temperatureC: {temperatureC}");
Console.WriteLine($"summary: {summary}");
public record Forecast(DateTime Date, int TemperatureC, string Summary)
{
public int TemperatureF => 32 + (int)(TemperatureC / 0.5556);
}
By default, all positional members (defined in the constructor) are deconstructable. In that example, we cannot access the TemperatureF property by using deconstruction because it is not a positional member.
We can create a custom deconstructor by implementing one or more Deconstruct method that exposes out parameters of the properties that we want to be deconstructible, like this:
using System;
var current = new Forecast(DateTime.UtcNow, 20, "Sunny");
var (date, temperatureC, summary, temperatureF) = current;
Console.WriteLine($"date: {date}");
Console.WriteLine($"temperatureC: {temperatureC}");
Console.WriteLine($"summary: {summary}");
Console.WriteLine($"temperatureF: {temperatureF}");
public record Forecast(DateTime Date, int TemperatureC, string Summary)
{
public int TemperatureF => 32 + (int)(TemperatureC / 0.5556);
public void Deconstruct(out DateTime date, out int temperatureC, out string summary, out int temperatureF)
=> (date, temperatureC, summary, temperatureF) = (Date, TemperatureC, Summary, TemperatureF);
}
With that updated sample, we can also access the TemperatureF property's value when deconstructing the record.
Equality comparison
As mentioned earlier, the default comparison between two records is made by its value and not its memory address, so two different instances with the same values are equal. The following code proves this:
using System;
var employee1 = new Employee("Johnny", "Mnemonic");
var employee2 = new Employee("Clark", "Kent");
var employee3 = new Employee("Johnny", "Mnemonic");
Console.WriteLine($"Does '{employee1}' equals '{employee2}'? {employee1 == employee2}");
Console.WriteLine($"Does '{employee1}' equals '{employee3}'? {employee1 == employee3}");
Console.WriteLine($"Does '{employee2}' equals '{employee3}'? {employee2 == employee3}");
public record Employee(string FirstName, string LastName);
When running that code, the output is as follows:
'Employee { FirstName = Johnny, LastName = Mnemonic }' equals 'Employee { FirstName = Clark, LastName = Kent }'? False
'Employee { FirstName = Johnny, LastName = Mnemonic }' equals 'Employee { FirstName = Johnny, LastName = Mnemonic }'? True
'Employee { FirstName = Clark, LastName = Kent }' equals 'Employee { FirstName = Johnny, LastName = Mnemonic }'? False
In that example, even if employee1 and employee3 are two different objects, when we compare them using employee1 == employee3, the result is true, proving that values were compared, not instances.
You may not have noticed, but the ToString() method of record classes is returning a developer-friendly representation of its data. The ToString() method of an object is called implicitly when using string interpolation, like in the preceding code, hence the complete output.
On the other hand, if you want to know if they are the same instance, you can use the Object.ReferenceEquals() method like this:
Console.WriteLine($"Is 'employee1' the same as 'employee3'? {Object.ReferenceEquals(employee1, employee3)}");
This will output the following:
Is 'employee1' the same as 'employee3'? False
Conclusion
Record classes are a great new addition that allows creating immutable types in a few keystrokes. Furthermore, they support deconstruction and implement equality comparison that compares the value of properties, not whether the instances are the same, simplifying our lives in many cases.
Init-only properties can also be beneficial for regular classes when one prefers class initializers to constructors.
Opinions
I think that record classes could be convenient for one-way binding UIs that follow patterns like Redux (JavaScript) and Model-View-Update (MVU). I played along those lines with C# 9.0/.NET 5 previews, leading to a very elegant MVU result, which I encapsulated in an open source library on GitHub. We'll use that library to implement the MVU pattern in the next chapter.
Records could also fit well for view models and DTOs. Those are ephemeral objects that are generally not to be mutated.
Next, we'll explore display and editor templates to attach parts of UIs to types.
Display and Editor Templates
In this section, we'll look at how to use display and editor templates to divide our UIs into model-oriented partial views. These have been available since MVC on the .NET Framework and are not new to ASP.NET Core. Unfortunately, they are often forgotten or overlooked at the expense of brand-new things that come out.
Display templates are Razor views that override the default rendering template of a given type. Editor templates are the same, but override the editor's view of a given type.
Each type can have a display template and an editor template. They are also stored hierarchically so that each type can have globally shared templates and specific ones per area, controller, section, or page. In a complex application, this could be very handy to override an individual template for a particular section of the app.
A display template must be created in a DisplayTemplates directory, and an editor template must be created in an EditorTemplates directory. These directories can be placed at different levels. Moreover, the directory structure depends on whether you're using MVC or Razor Pages.
ASP.NET loads them in order of priority, from the more specific to the more general. That allows us to create a shared template, shared between all pages or all controllers, then override it for a specific controller or a specific page.
For MVC, the order in which they are loaded is as follows:
- Views/[some controller]/DisplayTemplates
- Views/Shared/DisplayTemplates
For Razor pages, the order in which they are loaded is as follows:
- Pages/[some directory]/DisplayTemplates
- Pages/Shared/DisplayTemplates
Note
The same logic applies to areas; MVC searches for display and editor templates like any other views.
Both display and editor templates are .cshtml files with a @ model directive that points to the type they are for. For example, Views/Shared/DisplayTemplates/SomeModel.cshtml should have a @ model SomeModel directive at the top. The same goes for Views/Shared/EditorTemplates/SomeModel.cshtml.
Let's start with display templates.
Display Templates
Let's use a CRUD UI to manage the employees that we scaffolded again for this section. See the TransformTemplateView project.
Context: We want to encapsulate the way employees are displayed in both Details and Delete pages. Instead of creating a partial view, we have decided to use a display template.
We don't want that template to be used elsewhere, so we create it specifically in the Pages/Employees directory. Let's start with that display template:
Pages/Employees/DisplayTemplates/Employee.cshtml
@model Data.Models.Employee
<dl class="row">
<dt class="col-sm-2">
@ Html.DisplayNameFor(model => model.FirstName)
</dt>
<dd class="col-sm-10">
@ Html.DisplayFor(model => model.FirstName)
</dd>
<dt class="col-sm-2">
@ Html.DisplayNameFor(model => model.LastName)
</dt>
<dd class="col-sm-10">
@ Html.DisplayFor(model => model.LastName)
</dd>
</dl>
That file is a copy of the scaffolded files that we had. To render a display template, we must call one of the @ Html.DisplayFor() extension methods. In the details and delete views, we can replace the old code with @ Html.DisplayFor(x => x.Employee). From there, the rendering engine of ASP.NET Core will find the template and render it (as easy as that).
Next, we look at the two pages that consume that display template:
Pages/Employees/Details.cshtml
@page
@model TransformTemplateView.Pages.Employees.DetailsModel
@{
ViewData["Title"] = "Details";
}
<h1>Details</h1>
<div>
<h4>Employee</h4>
<hr />
@ Html.DisplayFor(x => x.Employee)
</div>
<div>
<a asp-page="./Edit" asp-route-id="@ Model.Employee.Id">Edit</a> |
<a asp-page="./Index">Back to List</a>
</div>
Pages/Employees/Delete.cshtml
@page
@model TransformTemplateView.Pages.Employees.DeleteModel
@{
ViewData["Title"] = "Delete";
}
<h1>Delete</h1>
<h3>Are you sure you want to delete this?</h3>
<div>
<h4>Employee</h4>
<hr />
@ Html.DisplayFor(x => x.Employee)
<form method="post">
<input type="hidden" asp-for="Employee.Id" />
<input type="submit" value="Delete" class="btn btn-danger" /> |
<a asp-page="./Index">Back to List</a>
</form>
</div>
Just like that, we centralized the display of an employee to one cshtml file, located and loaded automatically by its type, not by a string like partial views. But that's not it – display templates are more powerful than that, as we are about to see, after our overview of editor templates.
Editor Templates
The editor templates work in the same way as display templates, so let's rebuild the same thing that we did with a partial view, but with an editor template.
Reminder: We want to encapsulate the Employee form and reuse it in both Create and Edit views.
Once again, we don't want that template to be used elsewhere, so we create it at the same level, under Pages/Employees. Let's take a look at the code:
Pages/Employees/EditorTemplates/Employee.cshtml
@model Data.Models.Employee
<div class="form-group">
<label asp-for="FirstName" class="control-label"></label>
<input asp-for="FirstName" class="form-control" />
<span asp-validation-for="FirstName" class="text-danger"></span>
</div>
<div class="form-group">
<label asp-for="LastName" class="control-label"></label>
<input asp-for="LastName" class="form-control" />
<span asp-validation-for="LastName" class="text-danger"></span>
</div>
That's the same view as the partial view that we created in a previous sample. It is important to remember that display and editor templates are designed around a type, in this case the Employee class.
To tell ASP.NET Core to create an editor for a model, we can use one of the @ Html.EditorFor() extension method overloads. In both Create and Edit views, we are replacing the form with a call to @ Html.EditorFor(m => m.Employee):
Pages/Employees/Create.cshtml
@model TransformTemplateView.Pages.Employees.CreateModel
@{
ViewData["Title"] = "Create";
}
<h1>Create</h1>
<h4>Employee</h4>
<hr />
<div class="row">
<div class="col-md-4">
<form method="post">
<div asp-validation-summary="ModelOnly" class="text-danger"></div>
@ Html.EditorFor(m => m.Employee)
<div class="form-group">
<input type="submit" value="Create" class="btn btn-primary" />
</div>
</form>
</div>
</div>
Pages/Employees/Edit.cshtml
@page
@model TransformTemplateView.Pages.Employees.EditModel
@{
ViewData["Title"] = "Edit";
}
<h1>Edit</h1>
<h4>Employee</h4>
<hr />
<div class="row">
<div class="col-md-4">
<form method="post">
<div asp-validation-summary="ModelOnly" class="text-danger"></div>
<input type="hidden" asp-for="Employee.Id" />
@ Html.EditorFor(m => m.Employee)
<div class="form-group">
<input type="submit" value="Save" class="btn btn-primary" />
</div>
</form>
</div>
</div>
And like the display templates, that's the only thing that we need to do. When running the project, both create and edit pages use the same form, specifically crafted for the Employee class.
We are about to explore the power of display templates in the next example. Keep in mind that you can achieve the same with editor templates.
Project : Composite BookStore revisited
Context: We want to revisit how we are displaying the composite bookstore's UI that we built earlier, in Chapter 3, Architectural Principles, and Chapter 9, Structural Patterns. The goal is to get the display logic out of the classes, decoupling them from their HTML output.
What could be better than display templates to encapsulate those small blocks of UI?
Let's first inspect the steps to take:
- Update the model classes.
- Create the views and transfer the rendering logic there (the HTML).
Let's start by updating the model classes:
Models/*.cs
namespace TransformTemplateView.Models
{
public interface IComponent
{
void Add(IComponent bookComponent);
void Remove(IComponent bookComponent);
int Count();
}
First, we removed the Display method and the Type property from IComponent. Both are used to display the IComponent instance.
public class Book : IComponent
{
public Book(string title)
{
Title = title ?? throw new ArgumentNullException(nameof(title));
}
public string Title { get; set; }
public int Count() => 1;
public void Add(IComponent bookComponent) => throw new NotSupportedException();
public void Remove(IComponent bookComponent) => throw new NotSupportedException();
}
Then we did the same for the Book class (both members were part of the IComponent interface).
public abstract class BookComposite : IComponent
{
protected readonly List<IComponent> children;
public BookComposite(string name)
{
Name = name ?? throw new ArgumentNullException(nameof(name));
children = new List<IComponent>();
}
public string Name { get; }
public virtual ReadOnlyCollection<IComponent> Components => new ReadOnlyCollection<IComponent>(children);
public virtual string Type => GetType().Name;
public virtual void Add(IComponent bookComponent) => children.Add(bookComponent);
public virtual int Count() => children.Sum(child => child.Count());
public virtual void Remove(IComponent bookComponent) => children.Remove(bookComponent);
public virtual void AddRange(IComponent[] components) => children.AddRange(components);
}
Then, we stripped all the display code from BookComposite and added a property named Components that exposes its children to the display template.
The Corporation, Section, and Store classes that follow are only organizational types since we are keeping the bookstore logic to a minimum to explore patterns and features, not the business model of a fake store:
public class Corporation : BookComposite
{
public Corporation(string name) : base(name) { }
}
public class Section : BookComposite
{
public Section(string name) : base(name) { }
}
public class Store : BookComposite
{
public Store(string name) : base(name) { }
}
The Set class is a little different. It is an organizational type, but it requires some books (see the books parameter of its constructor here):
public class Set : BookComposite
{
public Set(string name, params IComponent[] books)
: base(name)
{
AddRange(books);
}
}
}
That code represents our first step and is conceptually very similar to what we had in the original code, without the display logic.
Now, to create the new, updated display code, we create the following three Razor files:
- The Razor Page itself, displayed when a client requests it, in the Pages/BookStore/Index.chhtml file.
- The View Template to render the books, in the Pages/BookStore/DisplayTemplates/Book.chhtml file.
- The View Template to render all of the other BookComposite objects, in the Pages/BookStore/DisplayTemplates/BookComposite.chhtml file.
Let's look at how the files are organized, then at the code:

Figure 17.5: Solution Explorer's view of the revised BookStore display templates and Index page
Let's start with the page model:
Pages/BookStore/Index.cshtml.cs
using Microsoft.AspNetCore.Mvc.RazorPages;
using System;
using System.Collections.ObjectModel;
using TransformTemplateView.Models;
using TransformTemplateView.Services;
namespace TransformTemplateView.Pages.BookStore
{
public class IndexModel : PageModel
{
private readonly ICorporationFactory _corporationFactory;
public IndexModel(ICorporationFactory corporationFactory)
{
_corporationFactory = corporationFactory ?? throw new ArgumentNullException(nameof(corporationFactory));
}
First, we used constructor injection to gain access to the ICorporationFactory.
public ReadOnlyCollection<IComponent> Components { get; private set; }
Then we expose a collection of IComponent that the view needs to render the page.
public void OnGet()
{
var corporation = _corporationFactory.Create();
Components = new ReadOnlyCollection<IComponent>(new IComponent[] { corporation });
}
}
}
Finally, when someone sends a GET request to that page, it builds the ReadOnlyCollection<IComponent> instance by calling the _corporationFactory.Create() method.
Next, the page's view:
Pages/BookStore/Index.cshtml
@page
@model TransformTemplateView.Pages.BookStore.IndexModel
@{
ViewData["Title"] = "My BookStore";
}
<section class="card">
<h1 class="card-header">@ViewData["Title"]</h1>
<ul class="list-group list-group-flush">
@ Html.DisplayFor(x => x.Components)
</ul>
</section>
That markup creates a Bootstrap 4 .card to hold our bookstore data. The key to that view is the DisplayFor() call (highlighted).
Since the Components property of our PageModel is a ReadOnlyCollection<T> that implements IEnumerable<T> that inherits from IEnumerable, ASP.NET Core loops and renders all elements of the Components collection. In our case, that's only one Corporation object, but it could be more.
For each of those elements, ASP.NET Core tries to find the right display template for that type. Since we don't have a Corporation template, it goes up the inheritance chain to find the BookComposite template and renders the element. Let's look at those templates now, starting with BookComposite:
Pages/BookStore/DisplayTemplates/BookComposite.cshtml
@model BookComposite
<li class="list-group-item">
<section class="card">
<h5 class="card-header">
@ Model.Name
<span class="badge badge-secondary float-right">@Model.Count()</span>
</h5>
<ul class="list-group list-group-flush">
@ Html.DisplayFor(x => x.Components)
</ul>
<div class="card-footer text-muted">
<small class="text-muted text-
right">@ Model.Type</small>
</div>
</section>
</li>
The @model BookComposite directive instructs the framework about the type it knows how to render.
The template renders a Bootstrap 4 .card inside a .list-group-item. Since the page renders the Components inside a <ul class="list-group list-group-flush">, those <li> elements will make a nice-looking UI.
The template does the same as the page and calls @ Html.DisplayFor(x => x.Components), which allows rendering any type that implements the IComponent interface.
Highlights
That's the power of the display templates right there; with them, we can craft a complex model-based recursive UI, with little effort.
In more details, what happens is the following:
- ReadOnlyCollection<T> implements IEnumerable<T>, so ASP.NET loops and renders all its content. In our case, that's a collection containing two Store instances.
- For each element, ASP.NET tries to find the right display template for that type. Since we don't have a Store template, it goes up the inheritance chain to find the BookComposite template and renders the elements.
- Then, for each Store, it renders its children; in our case, instances of Section and Set, using the BookComposite template (we don't have Set or Section templates).
- From those Section and Set objects, the Book objects are rendered using the Book template (which we are about to look at), while other non-book objects are rendered using the BookComposite template.
Let's start with the Razor code to render Book instances:
Pages/BookStore/DisplayTemplates/Book.cshtml
@model Book
<li class="list-group-item">
@ Model.Title
<small class="text-muted">(Book)</small>
</li>
The Book template is a leaf of the tree and displays the details of a Book, nothing more (instructed by the @model Book directive).
If we compare that code with the initial model that we had, it is very similar. The BookComposite template is also very similar to what we were building in the BookComposite.Display() method.
The most significant difference is the level of difficulty that was required to write the presentation code. It is feasible to render a small element using a StringBuilder, but it can become tedious to render a complex web page. Display templates allowed us to write that same code very easily with IntelliSense and tooling support.
Important note
Display templates and editor templates are an excellent way to create a type-oriented UI design (model-oriented).
If we take a subset of our BookStore, what happens in the background is the following:
Figure 17.6: A subset of the rendering flow done by ASP.NET, based on our display templates
This completes our example. With that few lines of code, we were able to render a complex UI that supports a non-linear composite data structure. We could extend that UI, by rendering each class differently, such as including a logo for Corporation objects or cover images for BookSet objects.
Conclusion
As we explored in this chapter, we discovered many ways to render components and parts of a page, but display and editor templates are convenient ones that are often overlooked. We can render complex polymorphic UI with little effort.
Now let's see how this approach can help us follow the SOLID principles:
- S: By extracting the rendering of objects from the models, we divided both responsibilities into two different pieces.
- O: By managing independent, type-related pieces of the UI, we can change how a type is rendered without impacting it directly or its consumers.
- L: N/A.
- I: N/A.
- D: N/A.
Note
We could see the display and editor templates as Transformers from the Transform View pattern. We could also see Razor as an implementation of the Template View pattern. Martin Fowler introduced those patterns in his book, Patterns of Enterprise Application Architecture (PoEAA), in 2002. See the Further reading section for more information.
Summary
In this chapter, we explored Razor Pages, which allowed us to organize our web applications by page instead of controllers. Razor Pages leverages the same tools as MVC. Both technologies can also be combined and used together, allowing you to build parts of your application using Razor Pages and other parts using MVC.
Then we tackled partial views, which allow reusing parts of a UI and break down complex UI into smaller pieces. When we have complex logic, we can move from partial views to view components, a controller action-like view. We also tackled Tag Helpers to create reusable UI parts or extend existing HTML elements, or to just consume the built-in ones.
We explored multiple new C# 9 features, from top-level statements to target-typed new expressions, init-only properties, and the new record classes. We then dug deeper into record classes, which offer many possibilities as an immutable reference type.
Finally, we explored yet another way to divide UIs into smaller pieces, but this time, oriented around the model classes themselves. Display and editor templates give us the power to dynamically build a model-based UI for both display and modification purposes.
With all of that, we've almost dipped into everything that ASP.NET Core has to offer in terms of web UIs, but we are not done yet; we still have Blazor to explore in the next chapter to complete our full-stack journey into .NET 5.
Questions
Let's take a look at a few practice questions:
- What is Razor Pages good for?
- When using Razor Pages, do we have access to model binding, model validation, and routing of MVC?
- Can we use a partial view to query a database?
- Can we extend existing tags with Tag Helpers?
- Can we use view components to query a database?
- Does the following code compiles: List<string> list = new();?
- Does the following code compiles: public class MyDTO(int Id, string Name);?
- How many display templates can a class have?
- To what do we link (or associate) a display or an editor template?
Further reading
- Here are a few links to build upon what we learned in the chapter:
- Partial views in ASP.NET Core https://net5.link/p1oW
- View components in ASP.NET Core https://net5.link/DNsE
- Tag Helpers in ASP.NET Core https://net5.link/JaZQ
- Page Controller (Martin Fowler PoEAA) https://net5.link/LLQg
- Template View (Martin Fowler PoEAA) https://net5.link/TFM9
- Transform View (Martin Fowler PoEAA) https://net5.link/4Gom
- Stator (StateR) is a simple, dependency injection-oriented, Redux-inspired, or Model-View-Update (MVU) experiment using C# 9.0 https://net5.link/Z7Ej