Designing Your First Biped Character
Little Billy by Sean Danyi (2004).
Former Student Spotlight: Zach Parrish
Rigging is the big step in creating a short film that most beginners completely underestimate. Many blossoming students or beginners are anxious to start making things move and do not give as much thought and foresight to the end result. The final outcome really begins with the first time the character is sketched out. The concept for a character dictates its personality, which dictates how it moves, which dictates how it can be modeled and rigged. Give some thought to the whole picture as you work through your film and it will enhance the end result that much more.
The few problems I had on my short film were a direct result of not thinking ahead. I was too anxious to make things move that I didn’t fully plan each step. My models feet were big, almost as long as his leg; consequently, I had to sort of swing his feet out to the side to make him walk semi-naturally. The problem was, that I didn’t think about this when I was modeling or rigging. So the rig was not as flexible as it could have been, which slowed and limited the animation process. The creation of that short film taught me more than I had anticipated. I think it’s a big stepping stone in the maturation of a student film maker to do the whole process, even if it isn’t for a whole film. It can be used to simply do a basic animation exercise. That way, you learn the pitfalls, the easier areas, and also the areas you prefer to focus on. And finding your area of interest is the most important part.
Zach graduated with his Bachelor of Fine Arts degree in 3D animation from the Savannah College of Art and Design (SCAD). During his final quarter at SCAD, he began online courses through Animation Mentor. He was hired directly out of SCAD by Rhythm & Hues Studios in Marina Del Rey, CA. He is currently working at Rhythm & Hues, continuing his education with Animation Mentor and looking forward to his future endeavors in the world of Character Animation. You can see more of his work and what he is up to at his website: www.zapmyshorts.com
Bananas by Zach Parrish (2006).
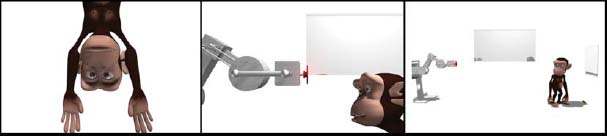
Character Design Workflow.
Bananas by Zach Parrish (2006).
Creating a character can be an enormous task. Production studios invest months (and sometimes even years) to simply get the design of a character just right. Sometimes, there is an entire team of artists with varied backgrounds (such as painters, sculptors, and concept artists) who work together to develop a single character.
When designing your first character to model, rig, and animate, it is important to remember the most important rule of all: KEEP IT SIMPLE. Complexity will come later. A biped is a great character for beginners to start with because of the varied problems that will be addressed during the process. It is also one of the easiest of which to gather research since you, in fact, are bipedal. When you have a question about how something moves, you simply have to study your own mechanics. Many of the rigging solutions that are used for a biped can be reused with other types of creatures and props. However, it is important to stick to simple and stylized design ideas. The more realistic and detailed the character becomes, the more difficult it is to set up for animation.
Analyzing Your Character
The first character you design should be simple. Remember this general rule: the easier and the simpler you make the design, the easier and the simpler the entire process will be. This rule really applies to anything in life. You will encounter obstacles, so why complicate the situation – unless, of course, you thrive on challenges and have no problem tackling these obstacles on your own.
In addition to thinking about what your character looks like, you should consider other aspects that will help define their design. For a well-rounded character, you should base your design on a realistic character or story. Even though you may not be pursuing an animated story with the character for your first animation, in order to get a plausible character, there needs to be some type of background developed for personality, motivation, and purpose. If you do not have a concrete story idea, you can still answer questions that help create this background. This process is called character analysis and has been used by writers and actors for many years.
You should ask not only questions like color, gender, and height, but also questions that answer background information, such as whether the character has brothers, sisters, or is an only child. How old is the character? Is he a child? Is she a teenager? Is he a parent? Are they androgynous? Schizophrenic? All of these answers have a huge impact on how the character behaves and will actually help you come up with ideas for how they look. It is really not important that your audience knows the answer to these questions. As an animator, however, the more you understand your character, the more believable your character will become. As you answer these questions (Assignment 1.1), try to visualize your character. Keep a sketchbook handy and begin preliminary sketches. As you sketch, think about design considerations discussed in this chapter.
Design Considerations
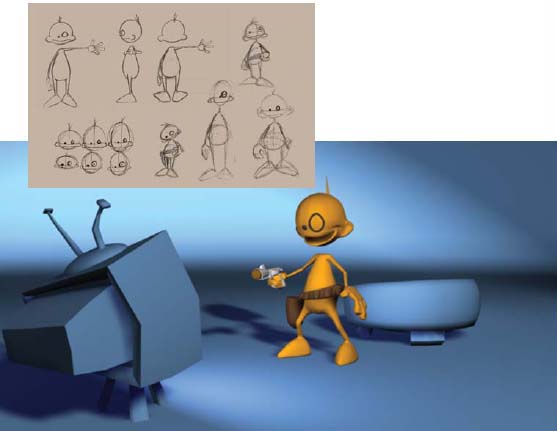
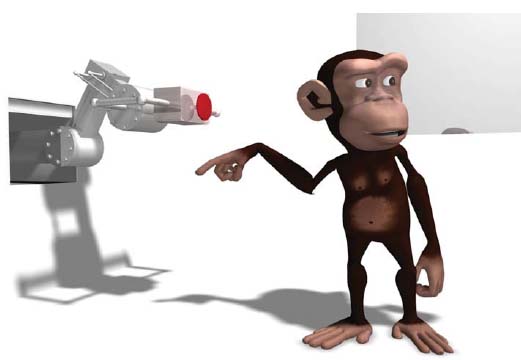
For your first character design, there should be requirements as well as limitations. The first requirement is to make sure that your character is bipedal. You can design animal characters as long as they move like a human. You can design tails, large ears, or antennae for added character. Stay away from birds unless their wings will function like human arms, but realize that bird legs operate more like human arms than legs. Characters that use their arms to walk, such as monkeys, can be completed with this process, but I highly recommend that you feel comfortable with creating and animating bipedal characters before you attempt a character that walks on all fours. The reason for this is because it takes more time for research and development of creatures to which you do not have instant access. With a humanistic biped, you can refer to your own skeleton, muscle structure, and motion.
Others may tell you that designing and modeling your characters in a relaxed posed will bring you better deformations, especially in the shoulders, elbows, and knees. While this may be true, this type of pose is definitely more difficult to rig for the first time. Your character should be designed, modeled, and rigged in the T-pose for a predictable and reliable process.
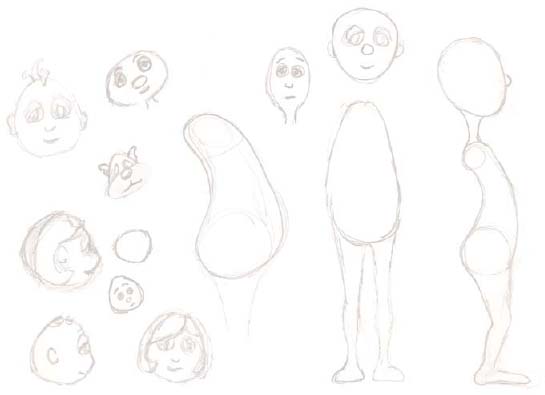
Preliminary sketches in sketchbook.

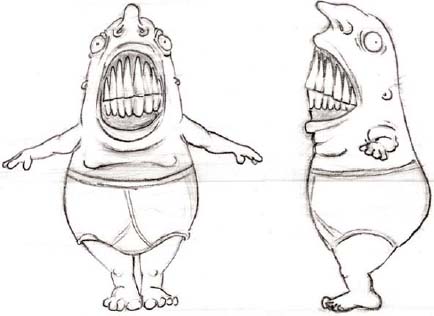
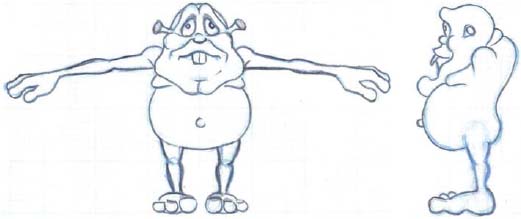
Character from “Trigger” by Ryan Yokley (2002). Adding big teeth, a tail, and antennae are great ways to give your character extra personality! This character’s legs are drawn too close together. Make sure to leave some space between them.
Character from “Sniff” by Dan Nichols (2004). This character’s arms are not drawn parallel to the ground, and feet are too close together. This can be more difficult to rig for the first time. Make sure your arms are straight, not sloped.
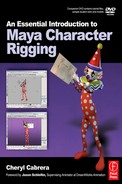
Quite frankly, robots and aliens are overdone. In order for your design to stand out among the others, your design must be different. If you insist on designing a robot, make sure that all bendable areas (knees, ankles, toes, shoulders, elbows, wrists, fingers, neck, hips, and the torso) are designed for flexibility, such as rubber hoses.
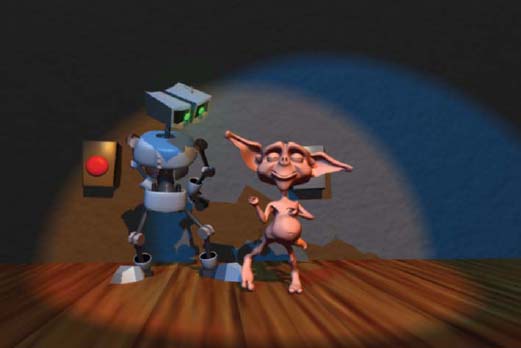
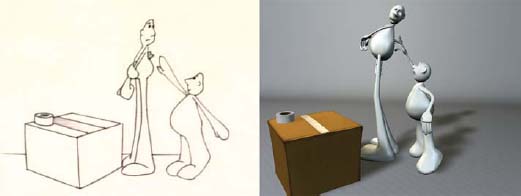
Characters from “Botones” by Arturo deLaGuardia (2002). Robots and aliens can make great characters if your story and design are unique!
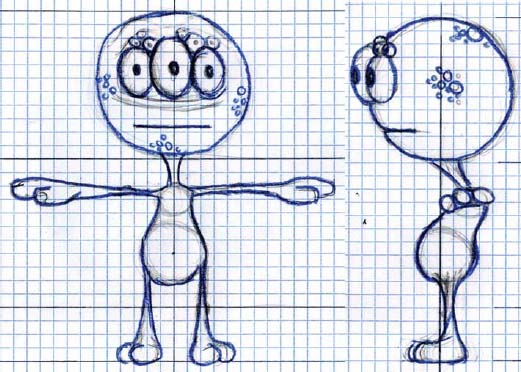
Character by Neil Helm (2006). The man of many eyes!
Characters can also be made of primitive objects. Cylinders can be used for the limbs and a sphere for the head, etc. The only real concern is to make sure the objects have enough divisions for deformations later. We will talk in more detail about this when we discuss modeling techniques in Chapter 2.
Characters, Storyboard and Frame from “Sticky” by Katie Folsom (2004). These characters are made from modified primitive objects. A simplified design can still convey emotion and tell great stories.
Proportions
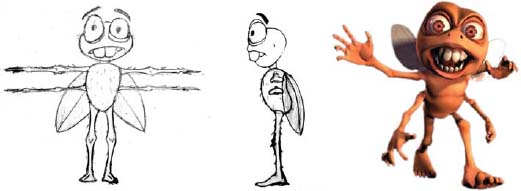
Character by Eric Urban (2006). Larger, exaggerated head and arms on this character create a focal point and require more work when animating. Extra arms means extra work Fly wings are great, just stay away from bird wings as a beginner.
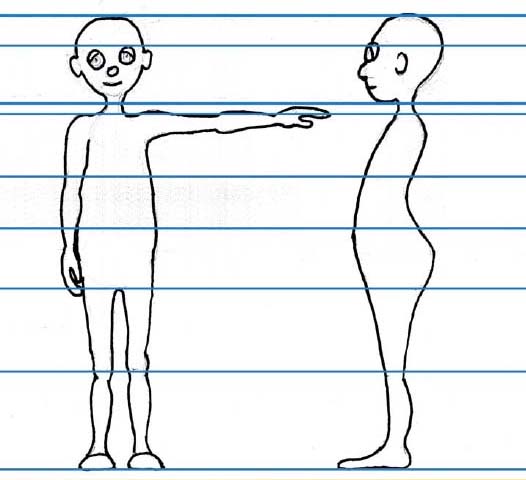
When you begin to draw out a character design, you must consider proportions. The height proportion of a perfect human body is equal to eight heads high. The arm span from the shoulder to the finger tips is about three and a half heads long, and the opened hand is the same size as the face. This is, however, animation. Anything goes! We have the freedom to exaggerate anything which will make the character more interesting. For a simple approach and to ensure your first experience rigging goes smoothly, I highly recommend a slender character with normal proportions, or perhaps one or two things exaggerated, such as longer arms, or a larger head.
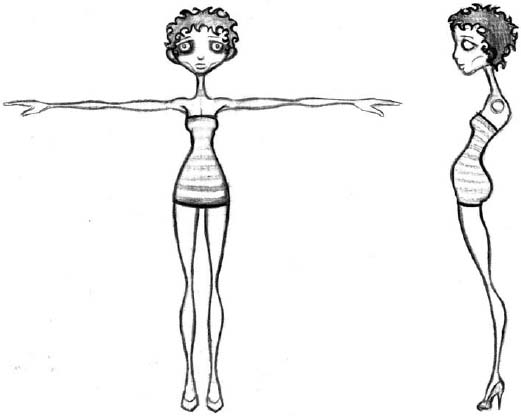
“Libby” Character by Fay Helfer (2004). Longer, thinner character designs will ensure your first experience in 3D character creation goes smoothly.
![]() Anything that is exaggerated, especially larger, draws focus.
Anything that is exaggerated, especially larger, draws focus.
Because it draws focus, it takes greater effort to create plausible animation with an exaggerated body part, since the audience is paying more attention to that area. Larger heads are top heavy, particularly if the body is smaller in proportions. Attention is brought to the head because of its size, and all movement is heightened. Because the head doesn’t deform outside of facial features, it appears to be a floating boulder. Large feet are generally not a problem if the character has long legs. However, if the character has short or fat legs, the ankle movement is limited when flexing and pointing the foot. Large hands can be a huge problem and quickly die if the animator leaves them in a single position for too many frames. Much attention is drawn to the hands because they serve a needed purpose, and we use them for so much of what we do, including expressing what we say. Therefore, an animator must keep them alive when animating.
Begin by figuring out how many heads high your character will be. The length of the arms, legs, and torso will need to be considered because different challenges occur with different sizes. Short, fat characters are harder to set up and animate than tall and thin ones. Problems are encountered with shorter characters because of a limited range of motion, caused by their shorter limbs. If the character is plump or overweight, that decreases the range of motion as well. A shorter character will waddle in lieu of walking or striding. For them to walk, they must take shorter, quicker steps. The arms have limited range of motion as well. If the character has to reach the top of his head, he probably won’t be able to reach. This could introduce some funny animation. Imagine a character trying to scratch his head with short arms. If he can’t reach his head, he may have to rub it on a wall or utilize a prop to satisfy this need. Another solution would be to design longer arms beyond normal proportions, or add some stretching ability in the controls for the arm, so that the character has the ability to extend his reach.
“Bernie” Character by Fay Helfer (2004). Shorter, fatter character designs are more difficult. Longer arms can help with range of motion, but then become an exaggerated feature.
Clothing Considerations
If you design your character with clothing, make sure to stay away from rigid ornamentation and details in flexible areas of the body, particularly in the torso area. The torso is one of the most flexible areas of your body, so any rigid object will constantly intersect the deforming geometry of the clothing. Examples include buttons, belt buckles, and armor. There are more advanced ways of controlling these items (such as using hair follicles to rivet the button in place), but these techniques are outside the realm of this book. If the geometry of these items is treated as a flexible, rubbery object, be aware that the item will stretch and distort. Design your clothes with the idea that they are made of some kind of stretchable fabric or material, such as knit, lycra, or rubber. If your detail objects are modeled separately and overlap other geometry, such as a necktie over a shirt, there are interpenetration issues that can be alleviated by setting up a control rig (which will be discussed in Chapter 6) or by adding dynamics (which will not be covered in this book).

Character by Nathan Englehardt (2005). Design your character’s clothing to be simple and of stretchable fabric. Posture is fine to alter, but be careful not to distort the center of gravity too far.
Rigid objects can be placed in non-flexible areas, such as eyeglasses on the face, a helmet on the head, a watch on the forearm, earrings on the ears or rings on the fingers. Think about where the object will be positioned, and if the area has little or no need for bending, then the object should not cause a problem. Model these objects separately so that if they do become an issue, you can reevaluate their necessity and hide or delete them if necessary.
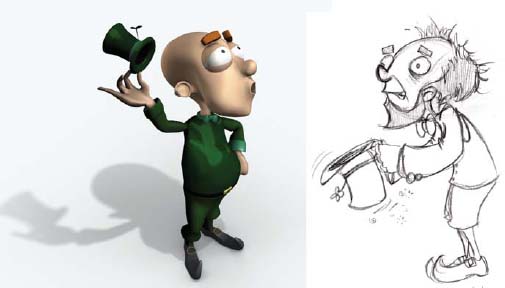
3D Render and Concept drawing for “Bernie” by David Leonard (2006).
It is not necessary that your character be modeled as one seamless piece of geometry. Even if the character is designed without clothing, you can strategically place the seams so that they do not become a focal point.
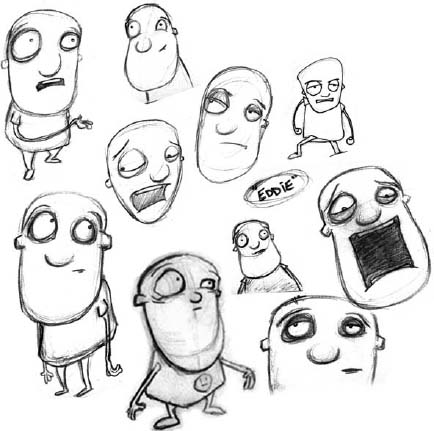
Concept drawings for “Eddie” by Adam Levine (2004).
Begin by creating some rough drawings of your character using lines, spheres, and cylinders. I prefer drawing the side views first, because I can think about the character’s posture, draw a line to represent their spine, and then draw spheres or ovals where the shoulders and hips belong. Think about the shape of the head and torso. Some typical shapes include round, oval, pear, apple, and hourglass.
Once you have created preliminary sketches based on your character analysis and design considerations, you are ready to finalize the design into a character sheet. In 2D animation, character model or turnaround sheets are typically used by the animation staff to ensure artistic consistency by all animators during a production. In 3D animation, these drawings are used as reference during the modeling process.
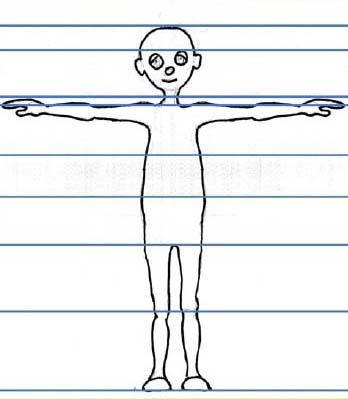
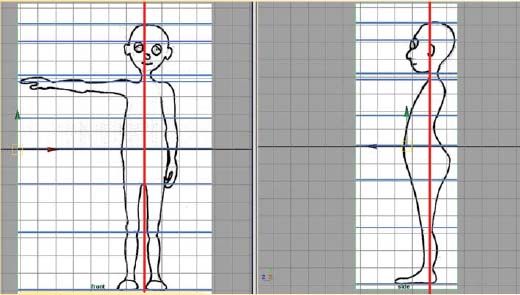
For the most predictable motion achieved during setup later, the character’s front pose should be drawn in the “T” stance: arms parallel to the ground with the palms facing down (not forward) with fingers open. The thumbs can be in any position. The feet should be facing straight ahead and flat on the ground. The legs can be bent slightly and should be hip distance apart with some space between them and the feet. Be careful not to make an inverted “V” shape with the legs. Having the legs spread too far will cause undesirable rotations. The head should also be facing forward. It is not necessary to draw the arms in the side view. You also want to draw a top view of the arms with the hands and a separate top view of the feet. Additional drawings of the back and ![]() views are not absolutely necessary, but can prove useful.
views are not absolutely necessary, but can prove useful.
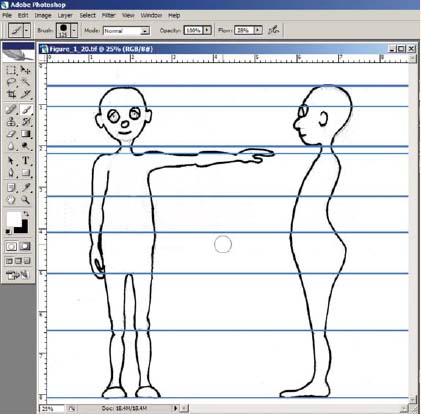
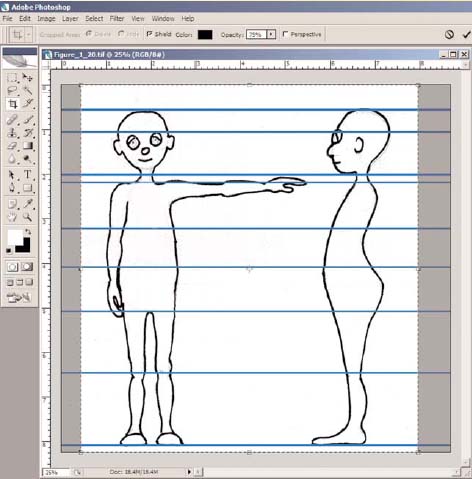
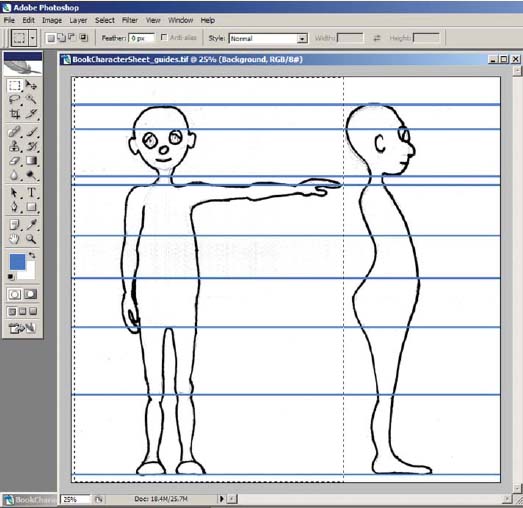
You should begin by drawing either the front or side view first. Once the first drawing is complete, you can draw horizontal guidelines to indicate the positions of the top of the head, the eyes, the chin, the top of the shoulder, the top of the pelvis, the top of the thighs, knees, and the feet to ensure that they line up in the other views.
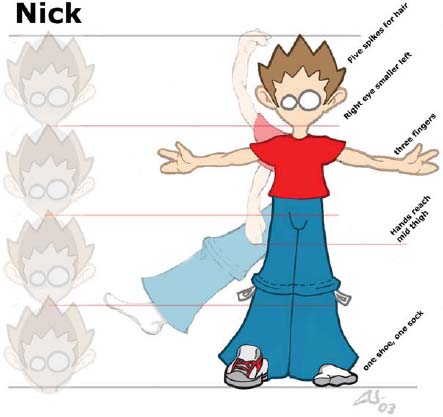
Character Sheet by Nick DuBois (2003). The palms should face down, the legs should have some space between them.
When the drawings of the front, side, hand, and foot are complete, it is a good idea to photocopy the originals and ink the photocopies to clean up the lines. The inked images will make a cleaner scan than a pencil drawing. Ink your character outlines in black and the horizontal guidelines in blue. Scan the drawings and prepare them for use as a reference in Maya. You will then save these images into the source image folder in your project files, and bring these drawings into a Maya scene file to use as a reference when modeling (Assignment 1.2).
1.1 When creating your character, KEEP IT SIMPLE.
1.2 The easier and the simpler you make the design, the easier and the simpler the entire process will be.
1.3 The more you understand your character, the more believable your character will become.
1.4 Creating a character analysis will help you achieve greater understanding of your character’s background.
1.5 Characteristics you should include on a bipedal character for optimal learning:
Two legs.
Two arms.
Two hands and two fingers, which include a minimum of a thumb and middle finger or mitt.
1.6 Characteristics you should include for a more predictable outcome:
T-pose.
Feet should be planted on the ground, hip distance apart.
Toes should be facing forward.
Geometry should be present in the crotch area.
Palms should face down.
Shoulders should be defined on top, arcs in the armpit.
1.7 Characteristics you should avoid until further experience:
Buttons and rigid objects.
Wings.
Four legs.
Poses other than a T-pose.
1.8 Characteristics you can include to add personality:
Ears.
Tails.
Antennae.
Teeth.
1.9 Design concerns:
Overweight characters decrease the range of motion a character has because geometry will collide, causing interpenetration.
Short legs equal a limited range of motion.
Large feet are awkward, especially with short legs.
Exaggerated proportions create a focal point.
Overlapping geometry creates interpenetrations when designing clothing.
1.10 Creating a character sheet finalizes the design and aids in the modeling process.
Assignments: Designing a Character
Assignment 1.1: Analyze Your Character
On a sheet of paper, answer the following questions about your character. Keep your sketchbook handy and draw any ideas that come to mind.
1. Where is your character from? Did your character grow up somewhere else or did they always live in the same place? Did they grow up in the city or in a log cabin on a mountain? Are they from this planet or another? Are they from a wealthy family or a poor one? Were they educated as a child? Are they an only child? Do they have siblings?
2. Where does your character live? What country, city, or planet does this character call home? Do they live in a city or the country? Alone or with a roommate? Still with their parents? Are they married? Do they have any children?
3. What is your character name and how old is your character? Is he a child? A teenager? An adult?
4. What does your character look like? What is your character’s height? Are they small, or tall? Is your character thin or fat? Do they have an apple shaped torso? Is it round? Is it square? What shape is their face? Do they have big ears? How about a tail? Are they male or female? Do they have any physical abnormalities? (large nose, big feet, etc.).
5. How does your character earn a living? What is their trade or career? Are they a student? Are they a criminal?
Assignment 1.2: Create Character Model Sheets
Materials Needed:
pencil
8½" × 11" paper or smaller, but no smaller than 5" × 7"
black and blue markers or pen and ink
access to a photocopier
access to a scanner
Adobe Photoshop or other image editing software.
1. Draw front or side of character.
a. First determine proportions. Draw a circle for the size of the head. Then stack 5 to 8 of these circles to establish your character’s height. Draw horizontal guidelines across the page at the top and bottom of each sphere. Begin the drawing for your character to the right of this stack of circles. Proceed to EITHER b or c.
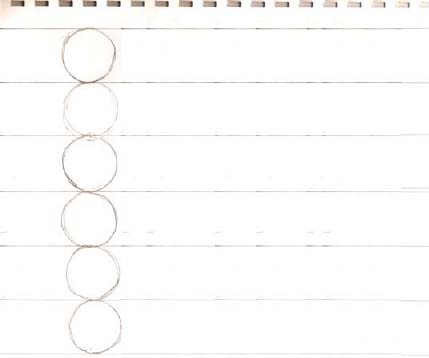
Proportional circles six heads high with horizontal guidelines.
b. Beginning with the FRONT view: Draw a circle for your head. Don’t worry about shape at this point – you can change that later. Think about how long the neck will be and then draw a smaller circle for the shoulder area and one for the hip area. Draw ovals to represent the feet.
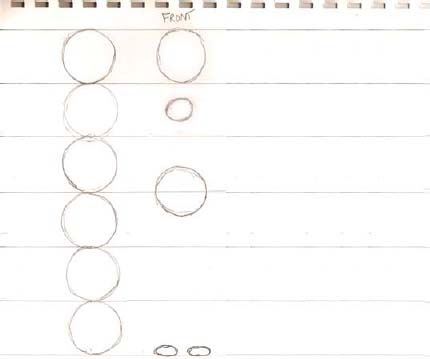
Head, shoulder, torso, and feet roughed in for the front view.
Draw lines for the neck, connecting the head to the shoulders. Draw lines for the torso, then lines for the legs. The arms and hands are 3 ½ heads long. The hand alone should be ¾ of a head long, about the size of the face. Make sure the character is drawn in the T stance, arms parallel to ground, palms facing down, feet should be facing forward and hip distance apart, space between legs and feet, head forward. Redefine the shape of the face if necessary.
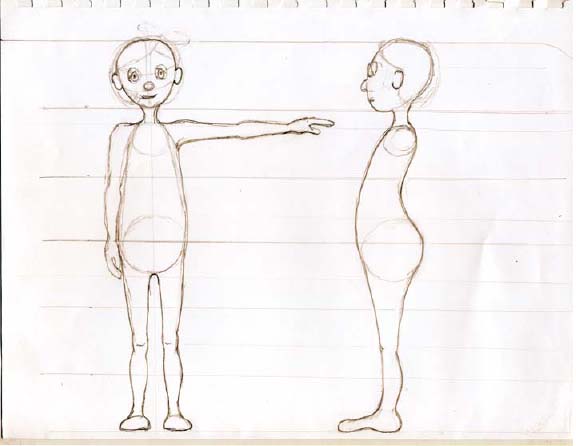
Sketched character front and side drawings.
c. Beginning with the SIDE view: The side view should be drawn so that your character is facing to the left of your computer screen. Again, begin by drawing a circle for your head. Draw a curve that represents the spine and posture of your character. Draw a smaller circle for the shoulder area and one for the hip area. Draw an oval to represent the foot.
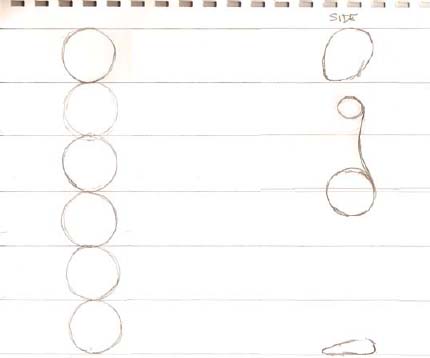
Head, shoulder, torso, and feet roughed in for the side view.
Draw lines for the neck, connecting the head to the shoulders. Draw lines for the torso, then lines for the legs, consider if you want the legs to be bent or straight. Redefine the shape of the face if necessary.
2. Redraw horizontal guidelines.
Once the front or side drawing is complete, redefine the horizontal guidelines to indicate the positions of the top of the head, the eyes, the chin, the top of the shoulder, the top of the pelvis, the top of the thighs, knees, and the feet to ensure that they line up in the other views. These lines are helpful to ensure that your proportions are consistent from one view to the next.
3. Draw the additional images, front or side, top of arm and hand, top of foot, and back (optional).
a. Follow the same guidelines discussed already to complete the side or front drawing.
b. On a separate sheet of paper, draw the arm and hand from the top view. Do not forget to use your proportion guidelines. The arms and hands are 3½ heads long. The hand alone should be ¾ of a head long, about the size of the face.
c. On a separate sheet of paper, draw the foot from the top view.
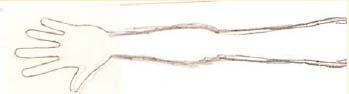
Arm and hand drawing, top view.
4. Photocopy the original drawings.
5. Ink the photocopy.
Using a black marker or ink, trace the photocopy outline of your character. Using a blue marker or ink, trace the horizontal guidelines in blue.
Inked photocopy with blue guidelines.
Assignment 1.3: Scan and Prepare
Materials Needed:
access to a scanner
Adobe Photoshop or other image editing software.
1. Open Adobe Photoshop or your scanning software.
2. Scan your drawings with a resolution no lower than 200 (dpi, ppi, etc.).
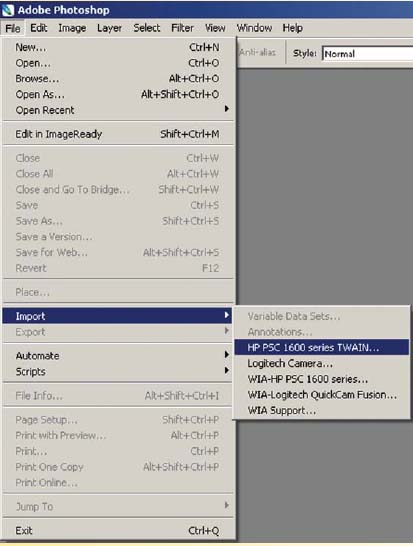
a. In Photoshop, go to [File > Import] and choose your scanner.
b. In the scanner settings, choose the appropriate resolution.
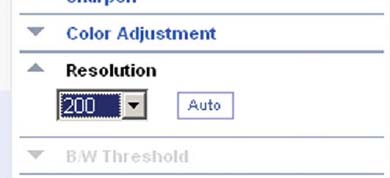
Adjust your scanner resolution to a minimum of 200 dpi.
3. Once scanned, you will need to clean up your image by doing the following:
a. In Photoshop, go to [Layer > Duplicate Layer …] and click OK to create a copy of the background image. This is necessary in order to rotate in the next step.
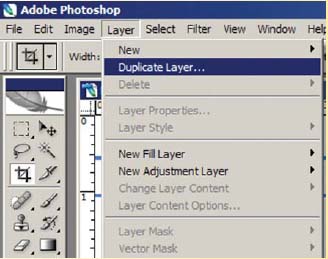
Layer > Duplicate Layer …
b. Go to [Edit > Free Transform] or press (ctrl+t) on the keyboard and rotate the image so that the guidelines are perfectly horizontal across the image. If your image was placed straight on the scanner, and your drawing was not crooked, this will not be necessary.
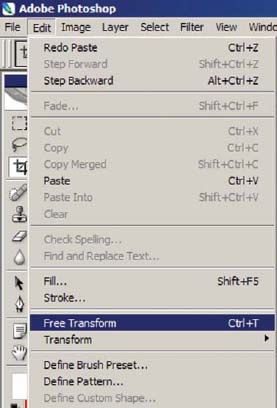
Edit > Free Transform.
c. Go to [Image > Adjustments > Levels] or press (ctrl+l) on the keyboard slide by click dragging the white triangle shape to the left to set the highlights of the image and remove any dark areas.
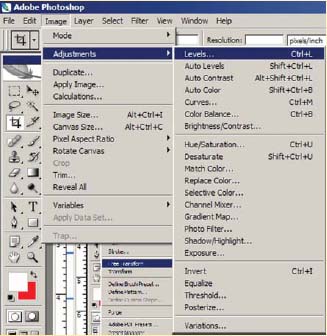
Image > Adjustments > Levels.
d. Choose the paintbrush tool by pressing (b) on the keyboard. Erase any stray marks if necessary.
Clean up your image using a white paintbrush.
e. Choose the crop tool by pressing (c) on the keyboard. Drag select around the front and side drawings to remove any unnecessary areas. Hit enter on your keyboard to execute the crop.
Crop any unwanted area.
f. Go to [Layer > Flatten Image]. This will remove the additional layer and prepare the file for saving.
g. Go to [File > Save As] and save the file in TIFF format. Type in the name of the file, something like the name of your character: name_characterSheet.tif. Save these files in your sourceimages folder in your Maya project file.
h. Repeat steps a–g for the arm and hand from the top view, the foot from the top view, and any additional drawings you may have.
Marquee select the front view of your character.
4. Divide the front and side images into separate files.
a. In Photoshop, choose the rectangular marquee tool – by pressing (m). Click drag around the front view to create a selection.
b. Go to [Edit > Copy] or press (ctrl+c) on the keyboard to make a copy.
c. Go to [Edit > New] or press (ctrl+n) to make a new file. Photoshop automatically creates the new file with image dimensions based on what was copied into the clipboard. Hit Enter.
d. Go to [Edit > Paste] or press (ctrl+v) on the keyboard.
e. Go to [Layer > Flatten Image].
f. Before closing the file, make a note of the image dimensions. Go to [Image > Image Size …] Under Pixel Dimensions, make a note of the width and height of the image. You can include these numbers in the file name for accessible notation.
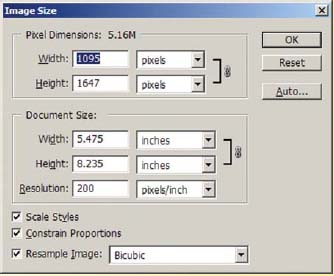
Record the width and height of the image’s pixel dimensions for use in Maya.
g. Go to [File > Save As] and save the file in TIFF format. Type in the name of the file: name_front_widthXheight.tif. Save these files in your sourceimages folder in your Maya project file.

Front view saved as name_front_widthXheight.tif.
h. Repeat steps a–g for the side view, naming the saved file: name_side_widthXheight.tif.
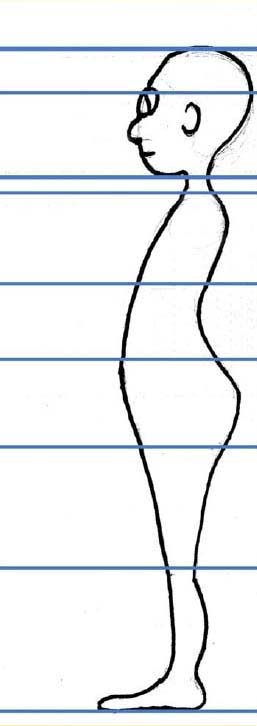
Side view saved as name_side_widthXheight.tif
i. Repeat steps a–g for the arm and hand from the top view, the foot from the top view, and any additional drawings you may have. Since I drew half a T-pose, I created a T-pose in Photoshop by duplicating and flipping the drawing horizontally.
T-pose created in Photoshop.
Assignment 1.4: Bring Your Drawings into Maya
When bringing an image into Maya, I recommend the use of a NURBS plane and a file texture that is mapped onto that plane. I do not recommend the use of Maya’s image plane, which is an option for the camera. The reason for this is that it is difficult to reposition camera image planes, which may be necessary during the modeling process.
1. If you haven’t created a project folder already, make sure to do so now:
a. From your computer’s desktop, go to START > PROGRAMS and select Maya.
b. Once Maya is open go to [File > Project > New …] the New Project window opens.
c. Enter the name of the new project in the Name text box [a]. For example, MayaCharacterRigging.
d. In the Location text box, enter or browse to the directory that will contain the new project [b] (e.g. G:).
e. Click Use Defaults to let Maya assign the default folder names for your project.
f. Click Accept.
2. Set your project.
a. Go to [File > Project > Set …] browse to your project folder and click OK.
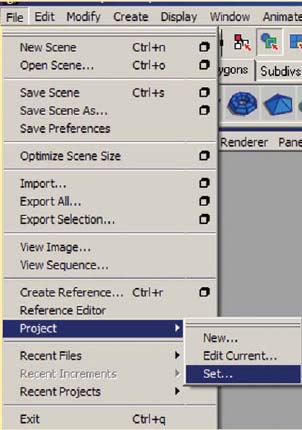
File > Project > Set …
![]()
The proper way to start Maya is to set your project before you begin working for the day. You should never double-click directly on a scene file in order to open Maya, as this will change the relative paths to absolute paths when saving your files. This will cause problems, especially with larger scene files and in larger productions.
3. Create a plane for the front view and assign a shader to it. Go to [Create > NURBS Primitives > and uncheck interactive creation].
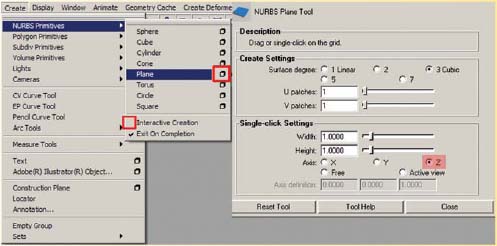
Create a NURBS plane on the Z axis.
a. In the perspective window, go to [Create > NURBS Primitives > Plane – option box]. Name the plane: front_reference_plane.
![]()
The Maya scene uses centimeters as the default proportions. You can change this in the preferences.
b. In the channels box, rescale the plane according to your image dimensions from Photoshop but at a 1/100 of its original value. For example, my image is 1095 pixels × 1647 pixels. My width would be 10.95, the ScaleX value. The height would be 16.47, the ScaleY value. Otherwise, your image will be incredibly large for your scene.
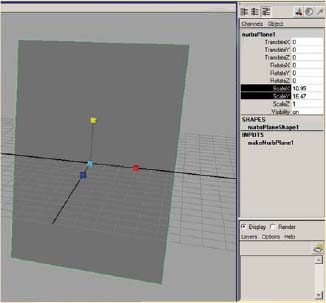
Change the Scale of the plane to match 1/100th of the pixel dimensions of the file.
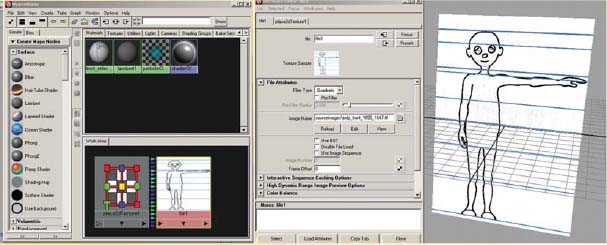
c. Go to [Window > Rendering Editors > Hypershade].
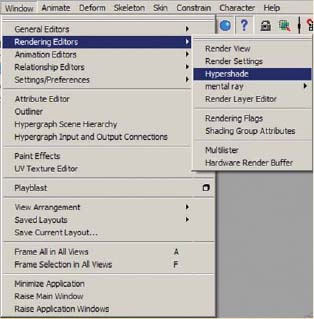
Window > Rendering Editors > Hypershade.
d. In the hypershade, go to [Create > Materials > Lambert] (or click on the lambert material on the left hand side of the hypershade window).
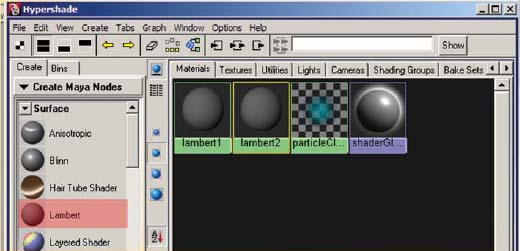
Click on the lambert material on the left in the hypershade window.
![]()
Materials will be discussed further in Chapter 4. Lambert material isn’t shiny, so it’s easy to see while you are working. You don’t want to use the default Lambert1 material because everything created in Maya has the Lambert1 material as a default. If you change that material, everything you create in Maya will have the changes as well.
e. MMB (middle mouse button) click and drag the newly created lambert material onto your NURBS plane, front_reference_plane.
f. Double-click on the newly created lambert material. This will open the attribute editor. Rename the material front_reference_lambert. It is important to take time and label everything in Maya to keep an organized scene file.
g. Click on the checkered box to the right of Color. This will open the Create Render Node window.
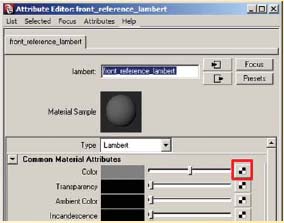
Click on the checkered box to the right of the Color attribute in the Attribute Editor.
h. Under the 2D Textures section, make sure that “normal” is selected. Then click on File. This will connect a File node to the color inputs of the shader.
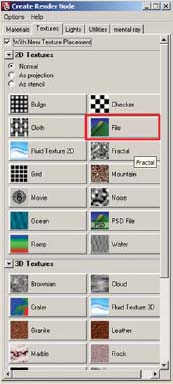
Click on File under 2D Textures in the Create Render Node window.
i. Click on the Folder icon to the right of “Image Name”. This should open the sourceimages folder (assuming you set the project as in step 1). Choose name_front_widthXheight.tif which tells Maya where to find the file we would like to display on our plane, then click “open”.
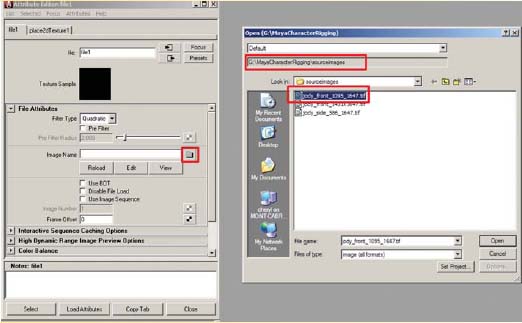
Click on the folder icon in the Attribute Editor for file1.
This file does NOT exist inside the Maya scene file. We have simply created a path to the file.
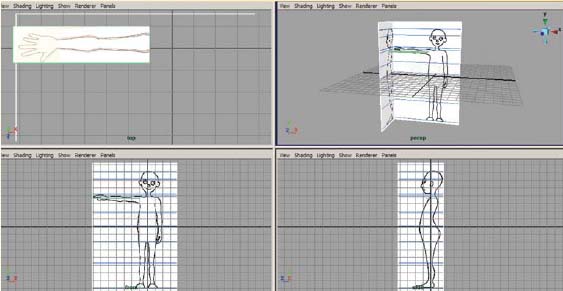
j. You should now see the image appear in your Maya view panel if you move your cursor over a view panel and press (6) on your keyboard, which turns Hardware Texturing on.
Your image appears on the NURBS plane if you press (6) on the keyboard while your cursor is over a view panel.
4. Create a plane for the side view and assign a shader to it. These steps are similar to those for the front view, but changes have been made to the plane axis and the scale axis.
a. In the perspective window, go to [Create > NURBS Primitives > Plane – option box]. Change the axis to the X axis, then hold down the x key on the keyboard and click on the center of the grid. Name the plane: side_reference_plane.
b. In the channels box, rescale the plane according to your image dimensions from Photoshop. My image is 586 pixels × 1647 pixels. My Width would be 5.86, the ScaleZ value. The Height would be 16.47, the ScaleY value.
c. Go to [Window > Rendering Editors > Hypershade]. In the hypershade, go to [Create > Materials > Lambert]. MMB click and drag the newly created lambert material onto your NURBS plane, front_reference_plane.
d. Double-click on the newly created lambert material. Rename the material side_reference_lambert.
e. Click on the checkered box to the right of Color, and then click on File listed under 2D Textures.
f. Click on the Folder icon to the right of Image Name.
g. Choose name_side_widthXheight.tif.
5. Repeat steps a–i for your top arm and hand view, top foot view, and any other views you may have. Remember, you will have to change the axis that the plane is created on and scaling axis will be different for each view. Experiment to see which one should work.
6. Reposition the images and make them non-selectable.
a. Your side image should be facing toward the left of your screen. If not, you can rotate it simply by clicking on the side_reference_ plane and in the channel box, type 180 for rotateY.
Make sure your side image faces toward the left side of your screen.
b. Click on your side image and using the Move tool – by pressing (w), click only on X (red arrow) and Z (blue arrow) to align the side_reference_ plane with the left edge of the front_reference_ plane.
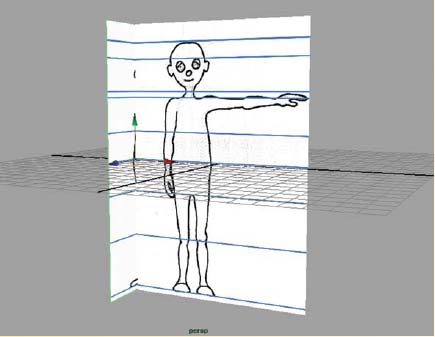
Reposition the side plane to line up with the left edge of your front plane.
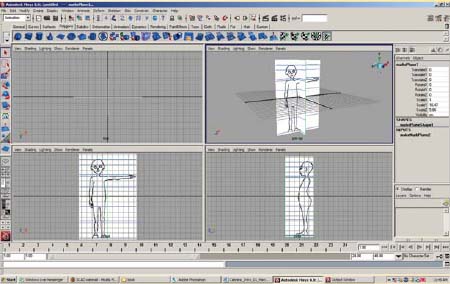
Shift select both planes, then using the grid as a guide and your move tool, make sure the front_reference_plane is centered in the front view and the side_reference_plane is centered in the side view.
Reposition your front and side planes to be centered on the grid.
c. The height of the planes should automatically line up. If not, use the move tool or press (w) and click only on the Y (green arrow) to adjust their positions. It is okay if your drawings do not line up exactly. These images are going to be used as a starting point when modeling, not the “be all and end all” of your design.
d. Reposition any other images as necessary.
Reposition other planes, such as the top arm view.
e. In the Layer Editor of the Channel Box, click the “create a new layer” box. Double-click on the new layer (layer1) and rename this layer reference_layer, then click save. Shift select all of the planes you have made, RMB click and hold on top of the reference_layer and choose Add Selected Objects. To make the objects non-selectable, click two times in the empty box between the V (visibility) and the layer name. An R (reference) should appear. This keeps any objects assigned to a layer visible but not selectable.
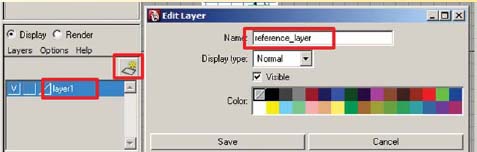
Click on the create a new layer button in the Layer Editor and rename it reference_layer.
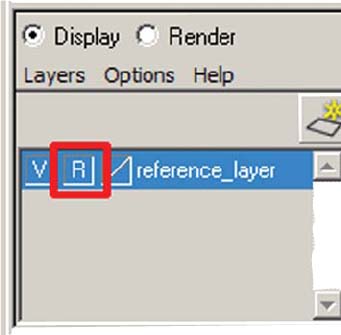
Assign all of your planes to the layer and make it a referenced layer R.
7. Save your scene file.
a. Go to [File > Save As]. This should open the scenes folder of your project (assuming you set the project as in step 1).
b. Name your scene 01_referenceImages.ma.
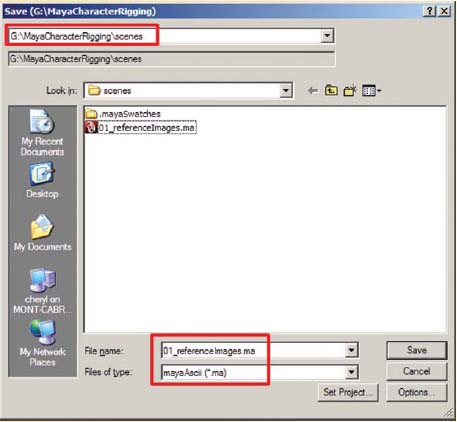
Name your scene 01_referenceImages.ma.
.mb or .ma?
Maya binary files (.mb) are stored using the binary code and are smaller in file size. Maya ascii files (.ma) are stored using text and can be opened for editing. It really does not matter which type you use, however, if you need to open a newer file in an older version of Maya, you can edit the ascii file in Wordpad, or another text editing program, to state the earlier version.