Creating Your First Biped Character: Shading and Texturing Basics
“Eddie” by Adam Levine (2004).
Former Student Spotlight: Nathan Engelhardt
Being a newcomer to an intimidating 3D software packages like Maya, Max, Lightwave, etc. can be a frightening and frustrating experience. I remember the first day I opened Maya on a school computer. I was so afraid that I’d melt my computer or something if a wrong button was pushed. To be honest I think most people feel this way when first opening a major 3D package. It’s important as a newbie to not get overwhelmed by the mass information that’s infused in the software. Take your time, stumble, learn from your mistakes, and don’t be afraid of pushing that wrong button over and over again (I’ve pushed it many times with still no success of melting my computer, if that’s what you also worry about).
Secondly, and ironically more important than the first, is to be aware of what you are interested in. So often I hear about students who want to learn everything and anything about their preferred 3D software package, me included. They become knowledgeable in many aspects of the package but a master of none (I.E. animation, rigging, texturing, lighting, effects, etc.). Although, being a jack-of-all-trades may be considered a valuable asset to smaller companies and productions, large animation and visual effects houses (Pixar, Dreamworks, Blue Sky, ILM, Sony, etc.) like a strict study in one category of interest. A focus! Becoming a generalist or a specialist is simply a matter of personal preference. The sooner you realize which you’d like to be, the better.
And lastly, which again is the most important; understand that these software packages will come and go in time. Sounds easy enough, I know. Make sure you don’t spend all your time learning Maya, its interface, its functionality, etc. because when Maya is eventually bought out by The Melting Computers of America Association Inc. and all the menus change and things that use to be familiar disappear … what then? A classically trained painter would easily side with the argument that knowing the process, techniques, and basic fundamental principles of lighting, composition, etc. are much more useful than knowing how to use a brush. Although the understanding of how to use a brush (Maya) helps an artist fully utilize a tool, it does not, however, MAKE an artist out of anyone. Learn the principals of whatever it is you are interested in, and no matter what the newest and greatest tool is, YOU will never become outdated.
Traffic Light by Nathan Engelhardt (2007).
Nathan Engelhardt graduated from the Savannah College of Art and Design in Spring of 2007 with a BFA in Animation. His first position after graduation was as an animator at Blue Sky, working on Horton Hears a Who. He recently enrolled in online classes to further his animation studies at Animation Mentor.com and expects to graduate from their program sometime in 2008 with an advanced study in animation. More of Nathan’s work can be viewed at: www.nathanengelhardt.com.

Shading and Texturing Modeling Workflow.
With the theme of keeping things simple, this chapter is going to focus on an easy way to add color and a bit of artistic detail to your character. The topic of shading and texturing is a lengthy one, and it could easily be expanded to create an entire book (and has been by several other authors). However, since the focus of this book is on the skeletal system and controls, this one short chapter will provide enough information to get you started with shading and texturing.
The easiest solution for adding color to your character is by simply adding a material, or shader, to your geometry. Maya has several surface materials available, and the chosen material depends on how much light is reflected or absorbed by the surface. The material applied to an object can also control its transparency.
Of course, there are many more qualities to a surface shader than color, transparency, and reflectivity. Additional detail can be added if textures are used. For this detail we will be using the 3D Paint Tool, which allows an interactive level of painting directly on your 3D model. Other details, such as the consideration of how rough or smooth the surface is that you are trying to create, involves the use bump or displacement maps, which is beyond the scope of this chapter. Once again, this chapter only covers the tools that I feel give you the easiest ability to add color and some detail.
The hypershade is a work area that allows you to create and edit the materials and textures necessary for your geometry. To create a material in the hypershade, simply click on the desired surface and it will appear in the work area. To apply it to the geometry, you can MMB (middle mouse button) click and drag it onto your geometry in the view panel. Another option is to select the geometry first, then RMB (right mouse button) over the shader in the hypershade and choose assign material to selection from the marking menu that appears. While the hypershade is a great place for organizing and keeping track of all of your materials needed in the Maya scene, the easiest way to add a material to an object is simply to RMB click and hold over the object and choose assign new material from the marking menu that appears. If working in polygons, a material can be applied to selected polygonal faces, allowing one surface to be defined into separate areas such as skin color or clothing. Once a material has been added to the geometry, it is a good idea to rename the material. With the material selected, the attribute editor can then be opened [ctrl+a] and attributes such as color can be changed for the desired look.
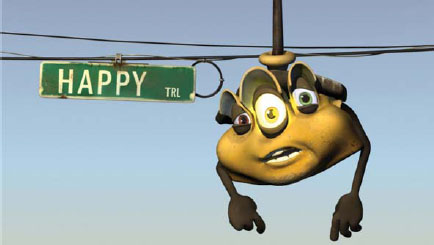
The hypershade can be found under the Windows menu in the Rendering Editors submenu.
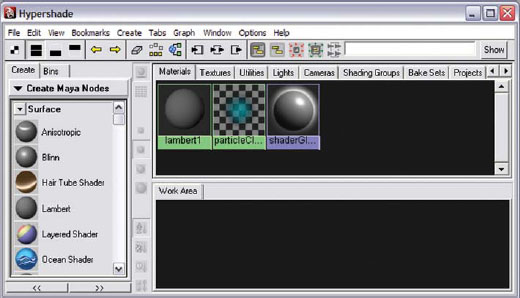
The hypershade window.
Materials
Each material defines itself by the amount of light that is reflected by the surface. The following materials are most commonly used as follows.
Lambert
This material does not have specular highlights and is perfect for matte surfaces, such as rubber or objects painted with matte paint. This material is the one I suggest for your character’s skin and most cotton fabrics. This material is based on the Beer–Lambert law, which defines the relationship of how light is absorbed based on the properties of the material that the light is hitting.
Blinn
This material is great for simulating objects that are made of glass or metal. This material was developed by Jim Blinn.
This material is used mainly for glossy surfaces such as hard shiny plastic. It is a pretty good shader to use for eyeballs. This material, and the Phong E, was developed by Bui Tuong Phong.
Phong E
This material has a softer highlight than that of the Phong material. Great for materials such as frosted glass, brushed metal, or any other material with complicated highlights.
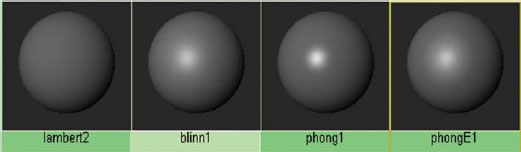
The different Materials in the hypershade.
Using the 3D Paint Tool allows the creation of the texture to fit the object. If you are working in polygons, before you can use the 3D Paint Tool to texture your model you will have to lay out the UVs first. For most polygon models, the Automatic Mapping option serves quite nicely. NURBS models do not need to be mapped; NURBS utilize their Control Vertices as UVs.
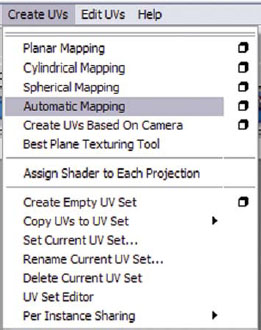
The Automatic Mapping command can be found in the Polygons menu set by pressing (F3) on the keyboard under the Polygons menu in the Create UV’s submenu.
The 3D Paint Tool is a relatively quick and simple means of adding a file texture (or marking areas for more detailed texturing in Photoshop or another painting program). This tool allows you to paint color (or transparency, or any channel available in the material attributes) directly onto your model using the artisan brush (the same brush used earlier for the sculpt geometry tool). The brush size, shape, feather, and opacity can be changed easily. Simple tasks such as erase, clone, smear, and blur can be applied directly onto your model. Maya’s 3D Paint Tools encompass enough options to create a basic texture beyond simply applying single-color shaders to selected faces. As you are working, make sure hardware texturing is turned on [6] in order to see what and where you’ll be painting later.
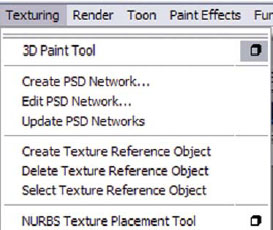
The 3D Paint Tool can be found in the Rendering menu set by pressing (F6) on the keyboard under the Texturing menu.
![]()
When working with the 3D Paint Tool, it is extremely important that you set your project so that Maya knows where to save the file textures. (To do this, go to [File > Project > Set] and choose your project folder.) This will keep all of your project related assets in the same folder and keep your paths relative.
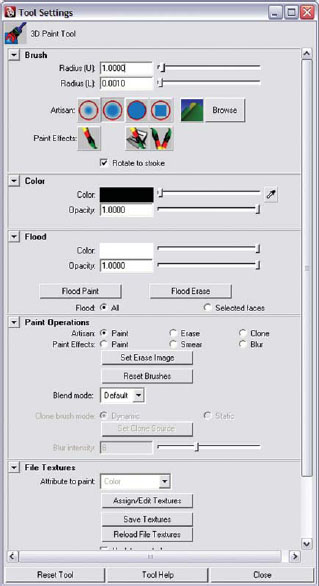
The 3D Paint Tool options Window.
4.1 Texturing and shading can be a lengthy topic, but it can also be approached in a simpler way.
4.2 The hypershade is the work area that allows you to create and edit materials and textures.
4.3 A material defines how a surface is seen when the computer creates a rendered image.
4.4 The most commonly used materials for character shading are: Lambert, Blinn, Phong, and Phong E.
4.5 When texturing polygons, it is necessary to lay out the UVs for the geometry for first.
4.6 The 3D Paint Tool provides a quick and simple method for adding detail by an interactive creation of a file texture on your model.
Assignments: Shading and Texturing a Character
Assignment 4.1: Apply a colored material to your character
1. Open Maya and set your project.
a. Go to [Start>Programs] and select Maya.
b. Once Maya is open go to [File>Project>Set …] browse to your project folder and click OK.
2. Open your last saved file. Go to [File>Open] and select 03_asgn03.ma.
3. Set all four view panels to turn off X-ray Mode and wireframe on shaded.
4. Turn hardware texturing on by pressing (6) on the keyboard so that you can see your reference images.
5. Make sure that your geometry layer is set to Normal so that you are able to select the geometry.
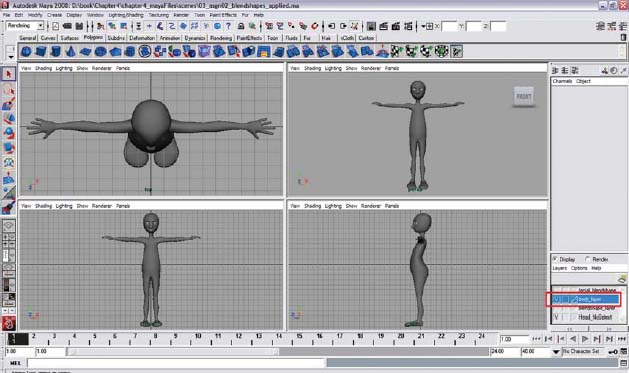
The work area with the geometry layer set to Normal.
6. Select the piece of geometry you wish to color.
7. RMB click and hold over the object and choose assign new material from the marking menu that appears. Once the material has been added to the geometry, the attribute editor is opened. Rename the material (something like body_lambert should do). Change the color by clicking on the color box. This opens the color chooser window and allows you to select any color desired.
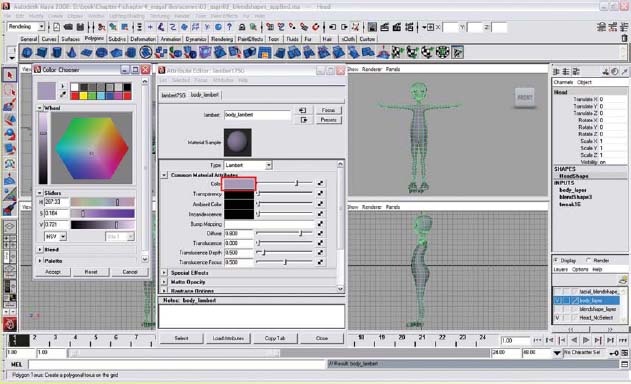
Choosing a color for the body lambert Material.
8. Save your scene file.
a. Go to [File > save as]. This should open the scenes folder of your project (assuming you set the project as in step 1).
b. Name your scene 04_asgnOl.ma.
Assignment 4.2: Add Details Using the 3D Paint Tool (Optional)
For best results, use a pressure-sensitive graphics pen and tablet for this process, instead of your mouse.
1. Open Maya and set your project.
a. Go to [Start > Programs] and select Maya.
b. Once Maya is open go to [File > Project > Set …] browse to your project folder and click OK.
2. Open your last saved file. Go to [File > Open] and select 04_asgn01.ma.
3. Select the object you wish to texture. If your geometry is NURBS, skip to step 8.
4. Go to [Polygons > Create UVs > Automatic Mapping]. The default settings should work fine. If necessary, you can open the option box and reset the settings.
5. In the orthographic view panels, resize the projected planes to fit your geometry.
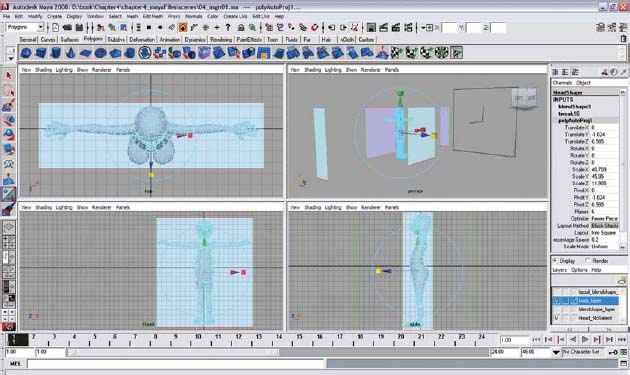
Resizing the UV Automatic Mapping projection planes.
6. To view the layout of the map, look under [Window > UV Texture Editor]. The Automatic Mapping has created several sections of UVs. All of the shapes should be within the 0–1 texture space (the square colored by the material).
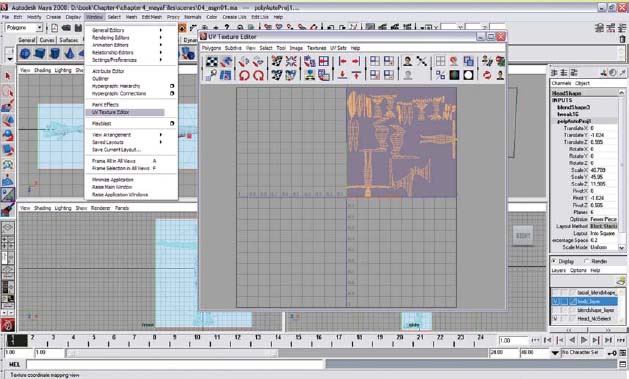
The UV Texture Editor.
7. Go back into object mode (F8) on the keyboard, because Automatic Mapping placed you into component mode.
8. Now we can paint directly on our model. Select the object you wish to texture. Go to [Texturing > 3D Paint Tool – option box]. This will open the tool settings window.
9. If you place your mouse cursor over your model, you will see a red X in the paintbrush circle. Before you can paint you must first assign an image file texture to paint upon. Scroll down the tool settings window to the File Textures section. Choose which attribute you wish to paint (Color, Transparency, Bump, etc.), as well as which image format you want (default is set to Maya .iff, but if you want to edit the image outside of Maya, .tga would be better). Then click Assign/Edit Textures. This will open the Assign/Edit Textures window.
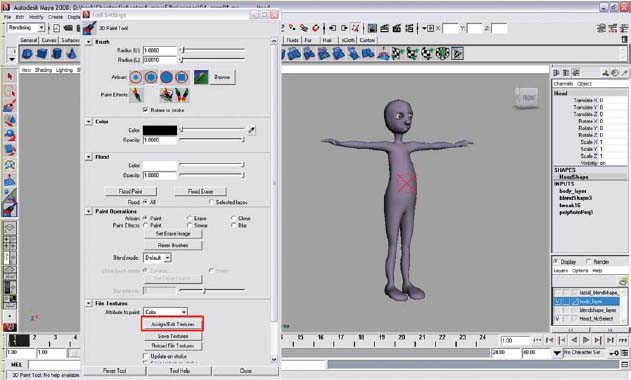
Assigning a texture file.
10. Decide how large your image needs to be. If painting an entire character’s body, I suggest making the file size for X and Y 1024. This number represents the pixel dimension of the file that is applied to your model. Larger pixel dimensions will be necessary for larger models, so that the quality of the resulting texture is not pixilated. However, too large of an image will slow down the painting process and add expensive render time (a good rule of thumb is to keep the file size dimensions 2048 or smaller). Keep Aspect Ratio should remain checked, since your map occupies a square; also, keep the size as a power of 2, since computer calculations are based on the binary system (128, 256, 512, 1024, 2048).
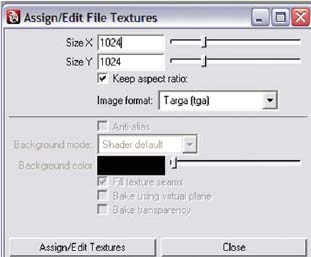
Defining the file texture size.
11. Click Assign/Edit Textures
12. Now, you can paint! The base color of your model is the color you chose when you assigned the material in Assignment 4.1; when you erase, you will actually be erasing back to this base color. If you want to change color from the color you chose when you first assigned the material, go to the Flood section and change the Color. Before doing any other painting, click Flood Paint. However, this does not change your base color. If you click Flood Erase, the area will return to the base color.
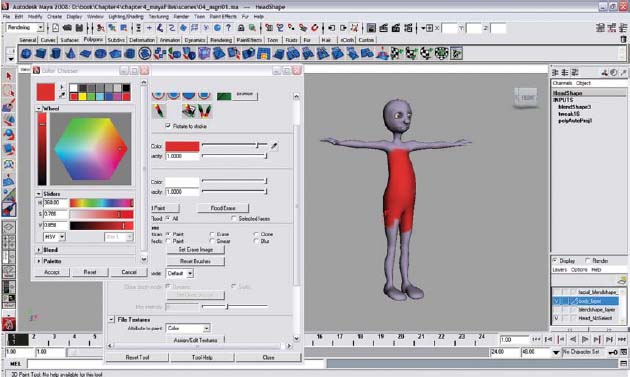
Painting with the 3D Paint Tool.
13. Under the Brush section, you can adjust the upper and lower brush radius, choose between a Gaussian brush, soft brush, hard brush, square brush, or load different brush shapes from Artisan’s Browse box (these include charcoal, hatched, marker, and even skin-bump brushes). You can even choose a paint effects brush and paint a 2D image of the paint effects brush. The hotkey to change the brush size interactively is (b). Simply hold down the (b) key, place your brush over your model, and (left mouse button) LMB click and drag left to right to change the brush size smaller and larger.
14. Under the Color menu, you can change the color of the brush, as well as adjust the opacity.
15. Under the Paint Operations Menu, you will find both Artisan and Paint Effects operations, including Paint, Erase, Clone, and Blur. You can even change the blend mode, working with lighten, darken, multiply, screen, and overlay modes. (These work in a very similar manner to blend modes in Photoshop.)
16. Once you have painted your model, make sure to scroll down the tool settings window to the File Textures section. Click Save Textures. This should create and save the file into a 3DPaint Textures folder in your project folder, (assuming you set the project as in step 1).
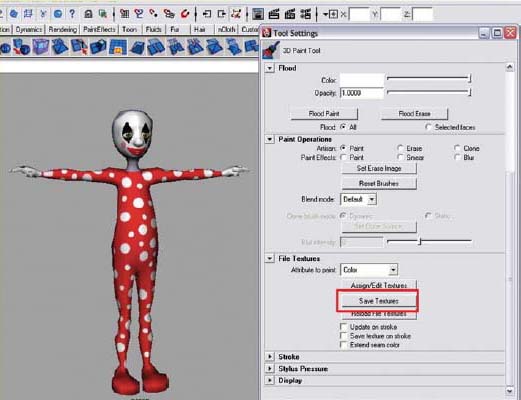
Saving the file texture when painting is complete with the 3D Paint Tool.
17. Save your scene file. Name your scene 04_asgn02.ma