
Chapter 4: Object-Oriented Programming in Java
In This Chapter
![]() Using classes with finesse
Using classes with finesse
![]() Working with Java’s classes and interfaces
Working with Java’s classes and interfaces
![]() Being part of Java’s inner circle
Being part of Java’s inner circle
If you remember nothing else about Java, remember these ideas from Chapter 2 of this minibook:
Java is an object-oriented programming language. So, as a developer, your primary goal is to describe objects. Your closely related goal is to describe objects’ close cousins —; namely, classes. A class is the idea behind a certain kind of thing. An object is a concrete instance of a class.
And if you remember nothing else about those ideas, remember the following two-word summary:
Classes; objects.
Chapter 2 in this minibook covers the highlights of object-oriented programming in Java. This chapter covers some of object-oriented programming’s finer points.
Static Fields and Methods
In Listing 4-1, I reproduce a small portion of the source code of Android’s Toast class.
Listing 4-1: An Unrepresentative Sample of Android’s Toast Class Code
public class Toast {
public static final int LENGTH_LONG = 1;
public static Toast makeText(Context context,
CharSequence text,
int duration) {
Toast result = new Toast(context);
LayoutInflater inflate = (LayoutInflater) context.
getSystemService(Context.LAYOUT_INFLATER_SERVICE);
View v = inflate.inflate
(com.android.internal.
R.layout.transient_notification, null);
TextView tv = (TextView)v.findViewById
(com.android.internal.R.id.message);
tv.setText(text);
result.mNextView = v;
result.mDuration = duration;
return result;
}
public void show() {
if (mNextView == null) {
throw new RuntimeException
(“setView must have been called”);
}
INotificationManager service = getService();
String pkg = mContext.getPackageName();
TN tn = mTN;
try {
service.enqueueToast(pkg, tn, mDuration);
} catch (RemoteException e) {
// Empty
}
}
}
According to the code in Listing 4-1, the Toast class has a static field named LENGTH_LONG and a static method named makeText. Anything that’s declared to be static belongs to the whole class, not to any particular instance of the class. When you create the static field, LENGTH_LONG, you create only one copy of the field. This copy stays with the entire Toast class. No matter how many instances of the Toast class you create — one, nine, or none — you have just one LENGTH_LONG field.
Contrast this with the situation in Chapter 2 of this minibook. In that chapter, the Account class has fields name, address, and balance. The fields aren’t static, so every instance of the Account class has its own name, its own address, and its own balance. One instance has name Barry Burd and balance 24.02, and another instance has name John Q. Public with balance –471.03. To refer to Burd’s balance, you may write something like myAccount.balance, as in the following code
Account myAccount = new Account();
myAccount.name
myAccount.address = “222 Cyberspace Lane”;
myAccount.balance = 24.02;
To refer to a non-static member of a class, you write the name of an object (such as myAccount), followed by a dot, and then the name of the member (such as balance).
But the Toast class’s LENGTH_LONG field is static. When you create a Toast instance, you don’t create a new LENGTH_LONG field. Your Dalvik virtual machine’s Toast class has one LENGTH_LONG field, and that’s that. Accordingly, you refer to LENGTH_LONG by prefacing the field name with the Toast class name, followed by a dot:
Toast.LENGTH_LONG
In fact, a typical use of Toast in an Android app refers to the static field LENGTH_LONG and the static method makeText:
Toast.makeText
(getApplication(), “Whoa!”, Toast.LENGTH_LONG).show();
A call to the Toast class’s makeText method returns an actual object — an instance of the Toast class. (You can verify this by looking at the first line of the makeText method in Listing 4-1.) So in an Android app, an expression such as
Toast.makeText
(getApplication(), “Whoa!”, Toast.LENGTH_LONG)
stands for an object. And (again according to Listing 4-1) each object created from the Toast class has its own non-static show method. That’s why you normally follow a Toast.makeText call with .show().
Here’s one final word about Listing 4-1: In addition to being static, the LENGTH_LONG field is also final. A final field is one whose value cannot be changed. In other words, when you declare LENGTH_LONG, you can initialize its value to 1 (as in Listing 4-1). But elsewhere in the code, you can’t write LENGTH_LONG = 2. (For that matter, you can’t even write LENGTH_LONG = 1 elsewhere in the code.)
 Many programming languages use the word constant (or the abbreviation
 const) to refer to a variable whose value cannot be changed.
Interfaces and Callbacks
Listing 4-2 contains a snippet from Android’s predeclared Java code. The listing contains a Java interface.
Listing 4-2: Android’s OnClickListener Interface
public interface OnClickListener {
void onClick(View v);
}
An interface is like a class, but it’s different. (So, what else is new? A cow is like a planet, but it’s quite a bit different. Cows moo; planets hang in space.) Anyway, when you hear the word interface, you can start by thinking of a class. Then, in your head, note the following things:
• A class doesn’t extend an interface. Instead, a class implements an interface.
Later in this chapter, you can see the following line of code:
class MyListener implements OnClickListener
• A class can extend only one parent class, but a class can implement more than one interface.
For example, if you want MyListener objects to listen for long clicks as well as regular clicks, you can write
class MyListener implements OnClickListener,
OnLongClickListener {
A long click is what non-developers would probably call a touch-and-hold motion.
• An interface can extend another interface.
For example, in the following line of code, a homegrown interface named SomeListener extends Android’s built-in OnClickListener interface:
public interface SomeListener extends OnClickListener {
• An interface can extend more than one interface.
• An interface’s methods have no bodies of their own.
In Listing 4-2, the onClick method has no body — no curly braces and no statements to execute. In place of a body, there’s just a semicolon.
A method with no body, like the method defined in Listing 4-2, is an abstract method.
• When you implement an interface, you provide bodies for all the interface’s methods.
That’s why the MyListener class in Listing 4-3 has an onClick method. By announcing that it will implement the OnClickListener interface, the MyListener class agrees that it will give meaning to the interface’s onClick method. In this situation, giving meaning means declaring an onClick method with curly braces, a body, and maybe some statements to execute.
Listing 4-3: Implementing Android’s OnClickListener Interface
package com.allmycode.samples;
import android.app.Activity;
import android.os.Bundle;
import android.view.View;
import android.view.View.OnClickListener;
import android.widget.Button;
public class MyActivity extends Activity {
Button button;
@Override
public void onCreate(Bundle savedInstanceState) {
super.onCreate(savedInstanceState);
setContentView(R.layout.main);
button = ((Button) findViewById(R.id.button1));
button.setOnClickListener(new MyListener(this));
}
}
class MyListener implements OnClickListener {
Activity activity;
MyListener (Activity activity) {
this.activity = activity;
}
@Override
public void onClick(View arg0) {
((MyActivity) activity).button.setBackgroundColor
(android.graphics.Color.GRAY);
}
}
Listing 4-3 doesn’t illustrate the most popular way to implement the OnClickListener interface, but the listing presents a straightforward use of interfaces and their implementations.
When you announce that you’re going to implement an interface (as in class MyListener implements OnClickListener), the Java compiler takes this announcement seriously. In the body of the class, if you fail to give meaning to any of the interface’s methods, the compiler yells at you.
 If you’re really lazy, you can quickly find out what methods need to be declared in your interface-implementing code. Try to compile the code, and the compiler lists all the methods that you should have declared but didn’t.
Chapter 2 in this minibook introduces the use of @Override — a Java annotation. Normally, you use @Override to signal the replacement of a method that’s already been declared in a superclass. But from Java 6 onward, you can also use @Override to signal an interface method’s implementation. That’s what I do in Listing 4-3.
You can think of an interface as a kind of contract. When you write
class MyListener implements OnClickListener
you’re binding MyListener to the contract described in Listing 4-2. That contract states, “You, the implementing class, hereby agree to provide a body for each of the abstract methods declared in the interface and to indemnify and hold harmless this interface for any damages, mishaps, or embarrassments from wearing pocket protectors.”
As a member of society, you have exactly two biological parents, but you can enter into agreements with several companies. In the same way, a Java class has only one parent class, but a class can implement many interfaces.
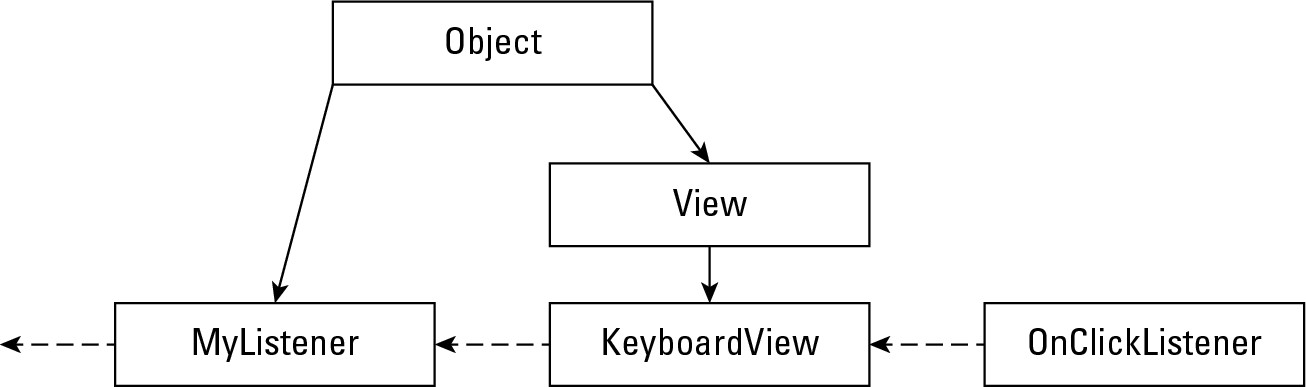
The interface-implementing hierarchy (if you can call it a “hierarchy”) cuts across the class-extension hierarchy. This idea is illustrated in Figure 4-1, where I display class extensions vertically and display interface implementations horizontally. (Android’s KeyboardView class lives in the android.inputmethod service package. Both KeyboardView and the homegrown MyListener class in Listing 4-3 implement Android’s OnClickListener interface.)
Figure 4-1: The interface hierarchy cuts across the class hierarchy.
Event handling and callbacks
The big news in Listing 4-3, shown in the preceding section, is the handling of the user’s button click. Anything the user does (such as pressing a key, touching the screen, or whatever) is an event. The code that responds to the user’s press or touch is the event-handling code.
Some things that the user doesn’t do are also events. For example, when you turn on a device’s GPS sensor and the sensor gets its first fix, Android calls the onGpsStatusChanged event handler.
Listing 4-3 deals with the click event with three parts of its code:
• The MyListener class declaration says that this class implements OnClickListener.
• The activity’s onCreate method sets the button’s click handler to a new MyListener object.
• The code for the MyListener class has an onClick method.
Taken together, all three of these tricks make the MyListener class handle button clicks. Figure 4-2 illustrates the process.
Figure 4-2: Handling an event.
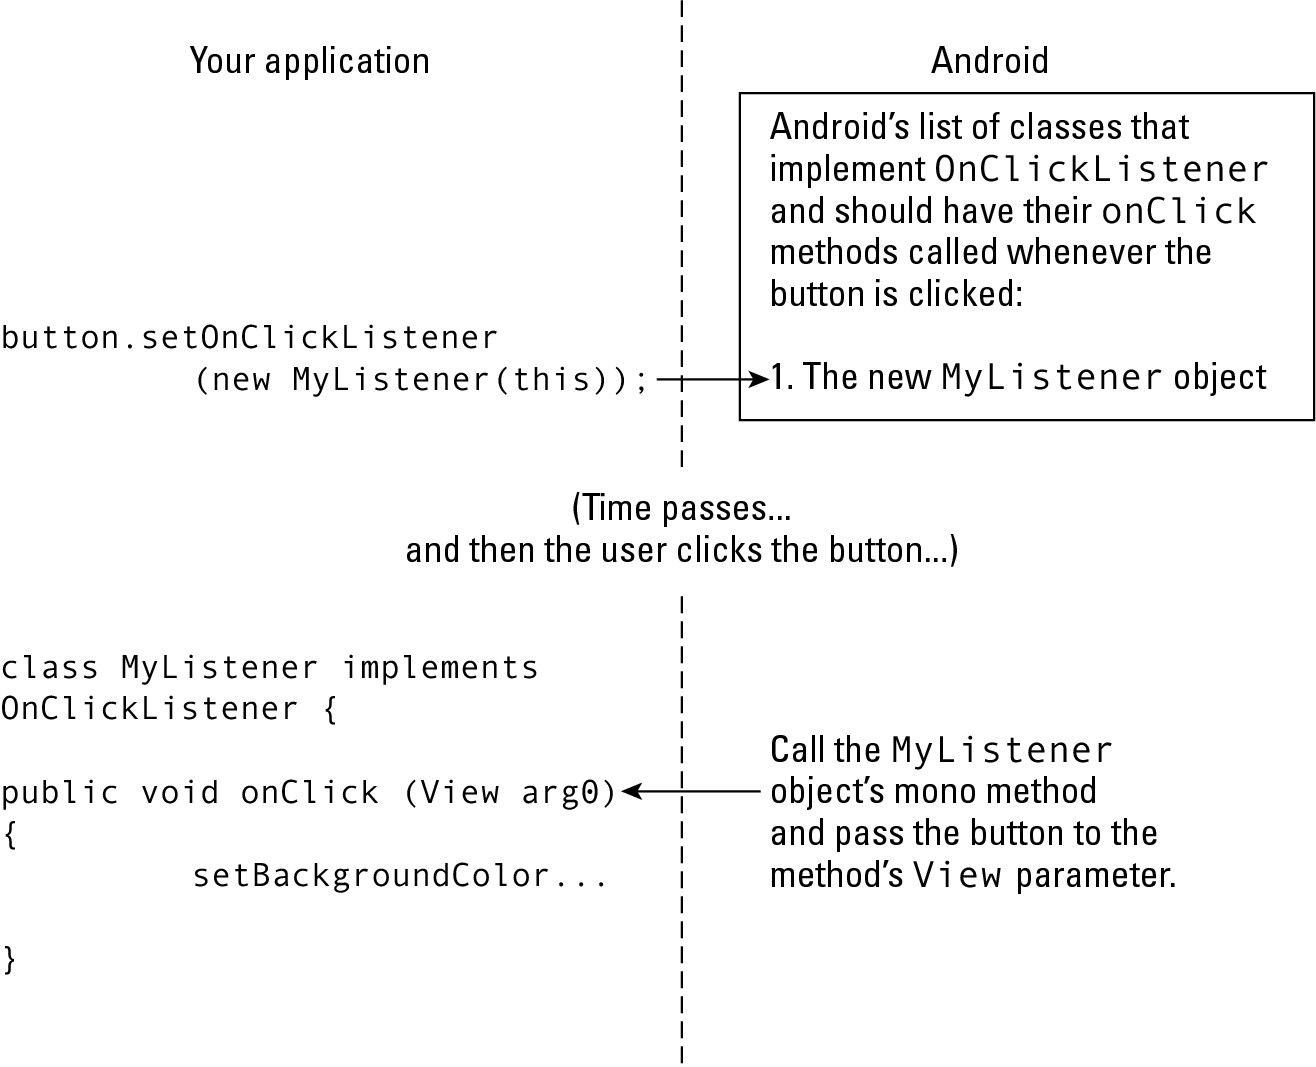
When the user clicks the button, Android says, “Okay, the button was clicked. So, what should I do about that?” And the answer is, “Call an onClick method.” It’s as if Android has code that looks like this:
OnClickListener object1;
if (buttonJustGotClicked()) {
object1.onClick(infoAboutTheClick);
}
Of course, behind every answer is yet another question. In this situation, the follow-up question is, “Where does Android find onClick methods to call?” And there’s another question: “What if you don’t want Android to call certain onClick methods that are lurking in your code?”
Well, that’s why you call the setOnClickListener method. In Listing 4-3, the call
button.setOnClickListener(new MyListener(this));
creates a new MyListener object. You tell Android to “put the new object’s onClick method on your list of methods to be called. Call this object’s onClick method whenever the button is clicked.”
And in response to this request, Android asks, “Oh, yeah? How do I know that your MyListener object has an onClick method that I can call?” And before you can answer the question, Android notices that your MyListener class implements the OnClickListener interface. So (because of the code in Listing 4-2) your MyListener object has an onClick method.
Of course, Android doesn’t really ask, “How do I know that your MyListener object has an onClick method?” For one thing, Android doesn’t say anything because Android doesn’t have a mouth. And for another thing, Android’s code to call onClick declares the object containing the onClick method to be of type OnClickListener. So if your MyListener method doesn’t implement OnClickListener, Java notices a type inconsistency (and Java complains vigorously).
So here’s the sequence of events (follow along in Figure 4-2): Your app registers a listener with Android. Then your app goes about its business. When a relevant event takes place (such as the clicking of a button) Android calls back to your app’s code. Android calls the onClick method inside whatever object you registered.
Android calls back to your app’s code, so the term callback describes the mechanism that Android uses to handle events.
An object remembers who created it
In the preceding section, I raise several questions about the interaction between your app and Android’s callback. But in that section, I miss one of the questions. The question is this: In the onClick method of Listing 4-3, how does the code know what button means? Listing 4-3 contains two classes — MyActivity and MyListener. Without jumping through some hoops, one class doesn’t know anything about another class’s fields.
In Listing 4-3, the keyword this sits inside the code that defines the MyActivity class:
button.setOnClickListener(new MyListener(this));
In Java, this refers to “the object that contains the current line of code.” So, in Listing 4-3, the word this refers to an instance of MyActivity — the activity that’s being displayed on the device’s screen. The current MyActivity instance has a button. So far, so good.
Later in Listing 4-3, the MyListener constructor tucks a reference to the current activity into one of its fields. (See Figure 4-3.)
Figure 4-3: How a listener remembers its creator.

 For more information about constructors and about the use of the word
 this inside a constructor, see Chapter 2 in this minibook.
Looking again at Figure 4-3, MyListener refers to an activity, and that activity contains a button. When Android calls the onClick method, the method executes an instruction that’s very much like this one:
activity.button.setBackgroundColor
(android.graphics.Color.GRAY);
The instruction takes the referenced activity’s button and sets the button’s background color to gray. (To make things work properly, you have to do some casting in the onClick method of Listing 4-3, but you can worry about the casting when you glance at Chapter 3 of this minibook.)
An easier way to handle an event
If you read the preceding section and then you read this section, you’ll probably want to send me a nasty e-mail message. The preceding section describes an admittedly convoluted way to make a listener remember which activity’s button to tweak. It’s important to know how Listing 4-3 works, but if you modify Listing 4-3 so that the activity is its own listener, things become much simpler. Listing 4-4 shows you how to do it.
Listing 4-4: An Activity Eats Its Own Dog Food
package com.allmycode.samples;
import android.app.Activity;
import android.os.Bundle;
import android.view.View;
import android.view.View.OnClickListener;
import android.widget.Button;
public class MyActivity extends Activity
implements OnClickListener {
Button button;
@Override
public void onCreate(Bundle savedInstanceState) {
super.onCreate(savedInstanceState);
setContentView(R.layout.main);
button = ((Button) findViewById(R.id.button1));
button.setOnClickListener(this);
}
@Override
public void onClick(View arg0) {
button.setBackgroundColor
(android.graphics.Color.GRAY);
}
}
The earlier section starts with a question: “In the onClick method, how does the code know what button means?” In this section, that question goes away just as my lap goes away when I stand up.
In Listing 4-4, both the button and the onClick method are members inside the activity. So the onClick method has free and easy access to the button. You don’t need an Activity field as in Listing 4-4, and you don’t need any fancy casting from Activity to MyActivity.
You have to remind Android that MyActivity contains an onClick method; you do that by adding implements OnClickListener to the declaration of MyActivity. You must also remind Android to notify the current MyActivity object whenever the button gets clicked. You do this reminding by writing
button.setOnClickListener(this);
which, roughly speaking, translates to “Hey, Android! When someone clicks the button, call the onClick method that’s inside this object (a MyActivity object, which fortunately implements OnClickListener).”
The pattern in Listing 4-4 (having an Activity implement whatever interface it requires) is a very common Java programming idiom.
Classes That Must (And Must Not) Be Extended
If a Java class isn’t broken, don’t fix it.
Suppose you want to add functionality to an existing Java class. You like Android’s Activity class, but the predeclared Activity class displays nothing on the screen. Do you rewrite Android’s Activity class? No.
Instead of rewriting an existing class, you extend the class. Even in a do-nothing Android “Hello” application, you write
public class MyActivity extends Activity
Then, in the MyActivity class’s declaration, you write
@Override
public void onCreate(Bundle savedInstanceState) {
super.onCreate(savedInstanceState);
setContentView(R.layout.main);
}
Your MyActivity class creates new functionality by extending most of Android’s Activity functionality while overriding the Activity class’s brain-dead onCreate method.
Java’s final classes
In object-oriented programming, extending a class is the noblest thing you can do.
But some classes aren’t meant to be extended. Take, for example, Java’s String class. A String is a String is a String. You don’t want somebody’s MyString.length method to return the length of time it takes to scramble a string’s characters. To prevent someone from doing something unexpected, unconventional, or unusual with a string’s methods, the creators of Java made the String class final:
public final class String
Some of Android’s predeclared classes are also final, including the Calendar class, the Telephony class, and (one of my favorites) the MathUtils class.
Java’s abstract classes
Just as a final class hates to be extended, an abstract class insists on being extended. Android’s ViewGroup is an example of an abstract class. (See Listing 4-5.)
Listing 4-5: A Small Part of Android’s ViewGroup Class
public abstract class ViewGroup {
public void bringChildToFront(View child) {
int index = indexOfChild(child);
if (index >= 0) {
removeFromArray(index);
addInArray(child, mChildrenCount);
child.mParent = this;
}
}
protected abstract void onLayout(boolean changed,
int l, int t, int r, int b);
}
Android’s ViewGroup.java file is more than 3,700 lines long. So Listing 4-5 has only a tiny fraction of the file’s code. But you can see from Listing 4-5 how a class becomes abstract. To no one’s surprise, the word abstract precedes the word class. But the word abstract also starts the declaration of some methods belonging to the class.
The founders of Android decided that the idea of a ViewGroup is useful. They were correct because your favorite Android layouts (LinearLayout, RelativeLayout, and so on) are subclasses of ViewGroup. They also understood that from one kind of ViewGroup to another, some functionality doesn’t change. For example, Listing 4-5 defines a bringChildToFront method, and subclasses of ViewGroup inherit this method.
But the founders also realized that some aspects of a ViewGroup make no sense unless you work with a particular kind of group. For example, a LinearLayout positions things one after another, and an AbsoluteLayout positions things according to specified coordinates. So Listing 4-5 doesn’t have a full-blown onLayout method. The onLayout declaration in Listing 4-5 has no method body. But Android requires each subclass of the ViewGroup class to declare its own onLayout method. Java enforces this requirement when (as in Listing 4-5) you declare method onLayout to be abstract.
As a developer, you can’t create an object from an abstract class. If you write
ViewGroup group = new ViewGroup();
Java tells you that you’re behaving badly. To do something useful with the ViewGroup class, you need a subclass of the ViewGroup class. The subclass has a concrete version of each abstract method in the ViewGroup class:
package com.allmycode.samples;
import android.content.Context;
import android.view.ViewGroup;
public class MyLayout extends ViewGroup {
public MyLayout(Context context) {
super(context);
}
@Override
protected void onLayout(boolean changed,
int l, int t, int r, int b);
}
}
Inner Classes
Here’s big news! You can define a class inside another class! Most classes don’t live inside another class, and most classes don’t contain other classes. But when the idea behind one class screams out to be part of another class, feel free to create a class within a class.
Named inner classes
For the user, Listing 4-6 behaves the same way as Listings 4-3 and 4-4. But in Listing 4-6, the MyActivity class contains its own MyListener class.
Listing 4-6: A Class within a Class
package com.allmycode.samples;
import android.app.Activity;
import android.os.Bundle;
import android.view.View;
import android.view.View.OnClickListener;
import android.widget.Button;
public class MyActivity extends Activity {
Button button;
@Override
public void onCreate(Bundle savedInstanceState) {
super.onCreate(savedInstanceState);
setContentView(R.layout.main);
button = ((Button) findViewById(R.id.button1));
button.setOnClickListener(new MyListener());
}
class MyListener implements OnClickListener {
@Override
public void onClick(View arg0) {
button.setBackgroundColor
(android.graphics.Color.GRAY);
}
}
}
The MyListener class in Listing 4-6 is an inner class. An inner class is a lot like any other class. But within an inner class’s code, you can refer to the enclosing class’s fields. For example, the onClick method inside MyListener uses the name button, and button is defined in the enclosing MyActivity class.
Listings 4-4 and 4-6 are very similar. In both listings, you circumvent the complexities described in the section “An object remembers who created it,” earlier in this chapter. For this chapter’s example, the choice of Listing 4-4 or Listing 4-6 is largely a matter of taste.
Anonymous inner classes
Notice that the code in Listing 4-6 uses the MyListener class only once. (The only use is in a call to button.setOnClickListener.) So I ask, do you really need a name for something that’s used only once? No, you don’t. You can substitute the entire definition of the inner class inside the call to button.setOnClickListener. When you do this, you have an anonymous inner class. Listing 4-7 shows you how it works.
Listing 4-7: A Class with No Name (Inside a Class with a Name)
package com.allmycode.samples;
import android.app.Activity;
import android.os.Bundle;
import android.view.View;
import android.view.View.OnClickListener;
import android.widget.Button;
public class MyActivity extends Activity {
Button button;
@Override
public void onCreate(Bundle savedInstanceState) {
super.onCreate(savedInstanceState);
setContentView(R.layout.main);
button = ((Button) findViewById(R.id.button1));
button.setOnClickListener(new OnClickListener() {
@Override
public void onClick(View arg0) {
button.setBackgroundColor
(android.graphics.Color.GRAY);
}
});
}
}
Inner classes are good for things like event handlers, such as the onClick method in this chapter’s examples. The most difficult thing about an anonymous inner class is keeping track of the parentheses, the curly braces, and the indentation. So my humble advice is, start by writing code without any inner classes, such as the code in Listing 4-3 or Listing 4-4. Later, when you become bored with ordinary Java classes, experiment by changing some of your ordinary classes into inner classes.