
Chapter 2: Installing the Software Tools
In This Chapter
![]() Putting Android tools on your laptop or desktop
Putting Android tools on your laptop or desktop
![]() Tweaking your installation settings
Tweaking your installation settings
There are two kinds of people — people who love tools, and people who don’t have strong feelings about tools. (As far as I know, no one dislikes tools.) I’m a tool lover because I enjoy the leverage that tools give me. With the right tool, I can easily do things that would otherwise require monumental effort. And I can do these things over and over again, getting better with practice using the tools so that the tasks I’m dealing with become easier as time goes on.
Of course, my tool-o-philia isn’t always a good thing. I’m not handy with skills like carpentry, car repair, or plumbing, but I can’t resist buying greasy old screwdrivers and other such tools at garage sales. Among other things, I have what I think is the world’s biggest monkey wrench, which I bought several years ago for only seven dollars. But I’d be useless (if not dangerous) using the wrench, so it sits in my attic waiting for my kids to deal with it when, years from now, they inherit my house full of junk.
But software tools are great. They’re not greasy; many good tools are free; and if you lose a tool, you can usually find it by searching your computer’s hard drive.
Anyway, this chapter is about Android development tools. Enjoy!
Installing the Java Development Kit
Java is the lingua franca of Android application development. To write Android apps, you normally use Java.
 In the preceding paragraph, I write that for Android apps, you normally use Java. I’m very careful not to imply that you always use Java. Android enjoys lots of different development modes. For example, with Android’s Native Development Kit (NDK), you can write code that runs directly on a device’s hardware in C or C++. You can develop in HTML and JavaScript to run code on the device’s browser. You can even develop in Adobe AIR. And companies create other specialized development environments all the time. Even so, Java is the language of choice in the Android community. Google creates new versions of Android with Java in mind. And in general, you get a good power-to-ease-of-use ratio when you develop Android apps in Java.
 For a closer look at Android’s Native Development Kit, see Book VI.
To develop Android apps, you need the Java Development Kit. If you run Windows, Linux, or Solaris, you can get the kit at the Oracle.com website — more on that in the next section. Macintosh users have a few other possibilities, which I detail in just a bit.
Java for Windows, Linux, and Solaris
As I write this chapter, the exact URL for downloading the Java Development Kit for Windows, Linux, or Solaris is http://www.oracle.com/tech network/java/javase/downloads. I don’t expect that URL to work forever and ever, but if you visit http://www.oracle.com and poke around for Java, you’ll certainly reach the Java Development Kit download page. One way or another, keep a few things in mind:
• Java comes in three separate editions.
A bit of background here: A programming language is a bunch of rules describing the way you can write instructions for the computer to follow. An application programming interface (API) is a bunch of reusable code for performing common tasks in a particular language. (Another name for an API is a library.)
Now, there’s only one Java language, but the Java language has three official APIs. When you download Java from www.oracle.com you download some Java language tools and one of the three Java APIs. Taken together, the big bundle containing the language tools and one of the three APIs is called an edition of the Java Software Development Kit (SDK). The three available Java SDK editions are as follows:
• Java Platform, Standard Edition (Java SE)
The Standard Edition has code for anything you can imagine doing on a single desktop computer, and much more. This edition does text-handling, mathematical calculations, input/output, collections of objects, and much more.
To develop Android apps, you want the Java Platform, Standard Edition.
• Java Platform, Enterprise Edition (Java EE)
The Enterprise Edition has code for things you do on an industrial-strength server. This edition includes web server tools, sophisticated database tools, messaging between servers and clients, management of systems, and the entire kitchen sink.
• Java Platform, Micro Edition (Java ME)
The Micro Edition has code for small devices, such as phones, TV set-top boxes, and Blu-ray players. This edition has limited capabilities that fit nicely into special-purpose devices that aren’t as powerful as today’s computers.
At first glance, the Micro Edition seems perfect for Android app development. But the creators of Android decided to bypass Java ME and create their own micro edition of sorts. In a way, the Android SDK is an alternative to Java ME. To be more precise, the Android SDK is both an alternative to Java ME and a user of the Java SE. (That is, the Android SDK defers to Java SE to perform some important jobs.)
The stewards of Java flip-flop between the names Java Software Development Kit and Java Development Kit (JDK). The two names are synonymous.
 To develop Android apps, you want the Java Platform, Standard Edition. If you already have Java’s Enterprise Edition and you don’t want more stuff on your hard drive, the Enterprise Edition is okay. But the Enterprise Edition has much more than you need for developing Android apps, and the extra Enterprise features might confuse you. (I know this because the extra Enterprise features confuse me!)
• Java comes in several different versions, with several updates to each version.
Java’s version numbering demonstrates what can happen when the marketing department disrupts the timeline in the space-time continuum. Java’s earliest releases were numbered “1.0.” Next came version “1.1”, and then the strangely named “Java 2, version 1.2.” The extraneous digit 2 hung around through “Java 2, version 1.3”, “Java 2, version 1.4”, and finally “Java 2, version 5.0.” (The spontaneous jump from 1.4 to 5.0 was lots of fun.)
Next up was “Java 6” (with no extra 2 and no “.0”). After that is Java 7. Each version is updated often, so a visit to www.oracle.com may offer Java SE 7 Update 13 for download.
Any version of Java starting with Java 2, version 5.0 and onward, is fine for Android development. Versions like 1.4 are not sufficient.
• Java has two kinds of downloads.
When you visit www.oracle.com, you see two acronyms floating around: JRE (Java Runtime Environment) and JDK (Java Development Kit). The JRE has everything you need in order to run existing Java programs. Whether you know it, your desktop computer probably has a version of the JRE.
The JDK has everything you need in order to run existing Java programs and everything you need in order to create new Java programs. The JDK has the entire JRE and more.
As an Android developer, you must create your own Java programs. So the download that you want is the JDK, which includes the JRE. You do not want the JRE alone.
Download and install the Java JDK, not the Java JRE.
• Java might come with other tools.
A glance at the Java download page shows several options — options to download Java with NetBeans, JavaFX, the Java source code, the Java SE documentation, and some other stuff. You might find the Java SE documentation helpful, especially if you don’t want to repeatedly visit Oracle’s online Java documentation. But the rest of the options (NetBeans, JavaFX, and the others) don’t help with Android app development.
Those pesky filename extensions
On a Windows computer, the filenames displayed in My Computer or in Windows Explorer can be misleading. You may visit your Downloads directory and see the name jdk-7u13-windows-x64. Instead of just jdk-7u13-windows-x64, the file’s full name is jdk-7u13-windows-x64.exe. In other directories you may see two MyAndroidProgram files. What you don’t see is that one file’s real name is MyAndroidProgram.java and the other file’s real name is MyAndroidProgram.class.
The ugly truth is that My Computer and Windows Explorer can hide a file’s extensions. This awful feature tends to confuse people. So if you don’t want to be confused, modify the Windows Hide Extensions feature. To do this, you have to open the Folder Options dialog box. Here’s how:
![]() In Windows XP with the control panel’s default (category) view: Choose Start⇒Control Panel⇒Appearance and Themes⇒Folder Options.
In Windows XP with the control panel’s default (category) view: Choose Start⇒Control Panel⇒Appearance and Themes⇒Folder Options.
![]() In Windows Vista or Windows 7 with the control panel’s default (category) view: Choose Start⇒Control Panel⇒Appearance and Personalization⇒Folder Options.
In Windows Vista or Windows 7 with the control panel’s default (category) view: Choose Start⇒Control Panel⇒Appearance and Personalization⇒Folder Options.
![]() In Windows XP, Windows Vista or Windows 7 with the control panel’s classic view: Choose Start⇒Control Panel⇒Folder Options.
In Windows XP, Windows Vista or Windows 7 with the control panel’s classic view: Choose Start⇒Control Panel⇒Folder Options.
In the Folder Options dialog box, click the View tab. Then look for the Hide Extensions for Known File Types option. Make sure that this check box is not selected.
After you’ve downloaded the Java SE JDK, follow the instructions at www.oracle.com for installing the software. On Windows, you normally double-click a file with the .exe extension. On Linux, you install an .rpm file or run a self-extracting .bin file. (I’ve never met a Linux geek who didn’t know what to do with these files.)
Java for Macintosh
To develop Android programs on a Mac, you need OS X 10.5.8 or later, and your Mac must have an Intel processor. (The Android docs say that you can’t develop Android apps on a PowerPC Mac or on a Mac with OS X 10.5.7. Of course, for every hardware or software requirement, someone tries to create a workaround, or hack. Anyway, apply hacks at your own risk.)
To find out which version of OS X you’re running, do the following:
1. Choose Apple⇒About This Mac.
2. In the About This Mac dialog that appears, look for the word Version.
You’ll see Version 10.6.4 (or something like that) in very light gray text.
After deciding that you have OS X 10.5.8 or later, the next step is finding out whether your system already has the Java Development Kit. You have two choices:
• You can trust me on the subject of OS X version numbers.
Macintosh OS X 10.5 (codenamed Leopard) and OS X 10.6 (codenamed Snow Leopard) have the Java Development Kit preinstalled. If you have either version of OS X (possibly with more dots in the version numbers, such as 10.6.4), from the Java point of view, you’re good to go.
Macintosh OS X 10.7 (codenamed Lion) comes without the Java Development Kit. So if you purchased OS X 10.7 thinking that you’d have the latest and the best, you may have gotten the latest, but (depending on your needs) you may not have gotten the best. But don’t despair. Instead, keep reading.
If you don’t trust me about OS X version numbers (and frankly, you shouldn’t trust everything you find in print), you have the following alternative:
• You can perform tests on your development computer to discover the presence of a Java Development Kit and of a development kit’s version number.
You have several choices for these tests. I explore two of the choices in this chapter — in fact, in the very next two sections.
Run Java Preferences to determine your JDK version
Here’s how you run the utility:
1. In the dock, select the Finder.
A Finder window opens.
2. In the Finder window’s sidebar, select Applications.
A list of applications appears in the Finder window’s main panel.
3. In the Finder window’s main panel, double-click Utilities.
A list of utilities appears in the Finder window’s main panel.
4. In the list of utilities, look for a Java Preferences entry.
If you don’t find a Java Preferences entry, don’t fret ( . . . not yet, anyway). You might still have a Java Development Kit. Skip to the test described in the next section.
5. If you have a Java Preferences entry, double-click that entry.
After an uncomfortable delay, your computer displays a window showing information about your computer’s Java Development Kit. My Mac displays the name Java SE 6 (along with the more cryptic version number 1.6.0_22-b04-307). That’s just fine.
To develop Android applications, you need Java SE 5 (also known as version number 1.5.0) or higher.
If the Java Preferences utility doesn’t satisfy your needs, you can poke around in Macintosh’s Unix command window. The next session tells you how.
Issue a Terminal command to determine your JDK version
To determine your Mac’s JDK version, follow these steps:
1. In the Spotlight search field, type the word Terminal.
2. When Terminal shows up as the Spotlight’s top hit, press Enter.
A Terminal window opens (usually with plain black text on a plain white background).
3. In the Terminal window, type the following text and then press Enter:
javac -version
On my computer, the Terminal window responds with the following text:
javac 1.6.0_22
If your computer responds with the number 1.5.0 or higher, you can pop open the champagne and look forward to some good times developing Android apps.
 The Macintosh Terminal presents a strange (sometimes confusing) mix of case-sensitivity and “case-unsensitivity.” For example, to see a list of users, you can type either w or W on the Terminal command line. To see a manual page describing that
 w command, you may type man w, MAN w, or even mAn w. But if you type man W, you get the unfriendly No manual entry for W response. In the same way, the javac -version command requires all the letters in version to be lowercase. Typing the incorrect javac -Version command gives you a disappointing invalid flag: -Version message.
If your computer responds with something like command not found, you may be running Mac OS X 10.7.0 or later. If your computer responds with a version number like 1.4.2 (or anything else that’s less than 1.5.0), you may be running an older version of Mac OS X.
If your Mac doesn’t have the Java JDK version 1.5.0 or greater . . .
As usual, here are a few things you can try:
• Visit www.oracle.com/technetwork/java/javase/downloads and look for a version of the Java JDK for the Mac. With the release of OS X 10.7, Apple agreed to let Oracle take charge of the JDK on the Macintosh. By the time you read this chapter, Oracle may have posted this software on its website. If you don’t find the software on Oracle’s site, you can also look for links at http://openjdk.org.
• Visit http://code.google.com/p/openjdk-osx-build/downloads/ list?q=label:Featured and look for a prerelease version of Java for Mac OS X Lion.
• Choose Apple⇒Software Update. In the resulting window, look for any update having to do with Java.
• Search for Java at http://developer.apple.com. Poke around and look for a version of Java for your version of Mac OS X.
Installing the Android SDK Starter Package
The Android Software Development Kit (SDK) contains the libraries that you need for developing Android applications. The SDK has code for drawing forms on a device’s screen, code for dialing phone numbers, code for taking pictures with the device’s camera, and a lot more. The kit also contains bare-bones tools for creating, running, and testing your Android applications. By barebones tools, I mean tools that you can run by typing instructions in your development computer’s command window (in the Command Prompt on Windows, or in the Terminal application on Linux and on a Mac). These tools perform all the logic required to do full-fledged Android development, but the SDK has no friendly user interface for invoking these tools. That friendly user interface comes in the next section, when you install Eclipse.
As you plow through various pieces of documentation, you’ll see several uses of the acronym API. In the previous section, the Java API is a bunch of reusable code for performing common tasks with the Java programming language. In this section, the libraries in the Android SDK form the Android API — a bunch of reusable code for performing common tasks inside Android apps. To create Android apps, you need both APIs — the Java API and the Android API.
You normally drink down Android’s SDK in two separate gulps. First, you get the Android SDK starter package — hence, the title for this section. Then you use the starter package to install the real Android SDK.
This separation between the SDK starter package and the actual SDK can be confusing because the Android website doesn’t clearly highlight the distinction.
To install the Android SDK starter package, follow these steps:
1. Visit http://developer.android.com.
2. On the main page that appears, click the link to download the Android SDK.
3. Find a link appropriate to your operating system (Windows, Mac OS X, or Linux).
4. Click the link to begin the download.
For Windows, the web page provides two download options — a .zip file download and an .exe file download. If you’re not sure which file you want, choose the .exe file download.
 Today I stumbled on a little bug in the Android SDK starter package installation file for Windows. After installing the Java Development Kit and then launching the starter package installation program, I got a window telling me
 Java SE Development Kit (JDK) not found. Hey, what gives? I installed the JDK! Well, I searched online for a solution to the problem. If I click the window’s Back button and then click the window’s Next button again, the evil JDK Not Found message goes away. (Actually, if you encounter this bug, there’s another way around it. Forget about the starter package’s .exe file and instead download the alternative Android SDK starter package .zip file. Then extract the .zip file to a place on your computer’s hard drive.)
For Mac OS X and for Linux, the web page provides a compressed archive file (a .zip file for Mac OS X and a .tgz file for Linux). Whichever file you download, double-click the file to view the file’s contents and then drag the file’s contents to a convenient place on your computer’s hard drive.
If time has passed since I wrote this section and you find other formats for Android SDK downloads (.dmg files, .bin files, and so on), close your eyes and point to the screen. If you select any file that’s appropriate for your operating system, you’ll be okay.
Whatever operating system you run, whichever file format you download, make sure you know where (among the folders on your hard drive) the Android SDK starter package gets installed. (That’s where the entire SDK will soon be installed.) I call this folder the ANDROID_HOME directory. You’ll refer back to this location to find files that you need and to tell parts of your system where the Android libraries live.
You can find out a bit more by browsing your ANDROID_HOME directory’s contents. The directory has folders named docs, platform-tools, platforms, samples, tools, and others.
Installing the Eclipse Development Environment
An integrated development environment (IDE) is a program that provides tools to help you create software easily and efficiently. You can develop software (including Android apps) without an IDE, but the time and effort you save using an IDE makes the IDE worthwhile. (Some hard-core developers disagree with me, but that’s another matter.)
According to the Eclipse Foundation’s website, Eclipse is “a universal tool platform — an open extensible IDE for anything and nothing in particular.” Indeed, Eclipse is versatile. Most developers think of Eclipse as an IDE for developing Java programs, but Eclipse has tools for developing in C++, in PHP, and in many other languages. I’ve seen incarnations of Eclipse that have nothing to do with program development. (I’ve even seen Lively Browser — a web browser whose tabs are built from Eclipse components.)
Downloading Eclipse
Here’s how you download Eclipse:
1. Visit www.eclipse.org.
2. Look for a way to download Eclipse for your operating system.
Today, I visit www.eclipse.org and see a big button displaying the words Get Started Now . . . Download Eclipse. Tomorrow, who knows?
After clicking the Download Eclipse button, I see a drop-down list with the names of three commonly used operating systems — Windows, Linux, and Mac OS X. In this drop-down list, I select the operating system that’s installed on my development computer.
3. Choose an Eclipse package from the available packages.
As I look at the Eclipse site today, I see Eclipse IDE for Java Developers, Eclipse IDE for Java EE Developers, Eclipse Classic, Eclipse IDE for C/C++ Developers, and others. To my great surprise, I also see MOTODEV Studio for Android.
For developing Android apps, I recommend either Eclipse IDE for Java Developers or MOTODEV Studio for Android. As luck would have it, these are the two smallest downloads in the list. (Each is a mere 100MB.)
In mid-2011 (where I live at the moment, probably ancient times for you, the reader), most of the Android developer documentation refers to plain old Eclipse (that is, Eclipse IDE for Java Developers). So I hesitate to recommend MOTODEV Studio exclusively. But from what I’ve heard, MOTODEV Studio has all the Android tools of Eclipse IDE for Java Developers, plus more. So if you don’t mind seeing more options on your screen than the documentation normally describes, get MOTODEV Studio for Android. If you want a plainer environment, select Eclipse IDE for Java Developers.
When winds blow to the northeast, and the moon is full, the Eclipse downloads page doesn’t offer you the option of getting MOTODEV Studio. In that case, you can download MOTODEV Studio directly from http://developer.motorola.com.
If you prefer, you can install the MOTODEV tools as a plug-in to your existing Eclipse installation. Visit http://developer.motorola.com for details.
4. Select 32-bit or 64-bit.
For most Eclipse packages, you can choose between the 32-bit version and the 64-bit version. If you know that you’re running a 64-bit operating system, choose the 64-bit package. If you’re running a 32-bit operating system, or if you’re not sure, choose the 32-bit package.
5. Follow the appropriate links to get the download to begin.
The links you follow depend on which of the many mirror sites is offering up your download. Just wade through the possibilities and get the download going.
Installing Eclipse
Precisely how you install Eclipse depends on your operating system and on what kind of file you get when you download Eclipse. Here’s a brief summary:
• If you run Windows and the download is an .exe file:
Double-click the .exe file’s icon.
• If you run Windows and the download is a .zip file:
Extract the file’s contents to the directory of your choice.
In other words, find the .zip file’s icon in Windows Explorer. Then double-click the .zip file’s icon. (As a result, Windows Explorer displays the contents of the .zip file, which consists of only one folder — a folder named eclipse.) Drag the eclipse folder to a convenient place in your development computer’s file system.
My favorite place to drag the eclipse folder is directly onto the C: drive. So my C: drive has folders named Program Files, Windows, eclipse, and others. I avoid making the eclipse folder be a subfolder of Program Files because from time to time, I’ve had problems dealing with the blank space in the name Program Files.
After copying the eclipse folder to a place on your hard drive, you can run Eclipse by double-clicking the eclipse.exe file inside that folder.
• If you run Mac OS X:
If you download a .tar.gz file, find the file in your Downloads folder and double-click it. Double-clicking the file should extract the file’s contents. After extraction, your Downloads folder contains a new Eclipse folder. Drag this new Eclipse folder to your Applications folder, and you’re all set.
If you download a .dmg file, your web browser may open the file for you. If not, find the .dmg file in your Downloads folder and double-click the file. Follow any instructions that appear after this double-click. If you’re expected to drag Eclipse or MOTODEV Studio into your Applications folder, do so.
• If you run Linux:
You might get a .tar.gz file, but there’s a chance you’ll get a self-extracting .bin file. Extract the .tar.gz file to your favorite directory, or execute the self-extracting .bin file.
Configuring Eclipse
Your Eclipse installation might need a bit of tuning. Here’s what you do:
1. Launch Eclipse.
When you launch Eclipse, you see a Workspace Launcher dialog box. The dialog box asks where, on your computer’s file system, you want to store the code that you will create using Eclipse.
2. In the Workspace Launcher dialog box, click OK to accept the default.
Or don’t accept the default! One way or another, it’s no big deal.
If this is your first time using a particular Eclipse workspace, Eclipse starts up with a Welcome screen. Through the ages, most of the Eclipse Welcome screens have displayed a few icons along with very little text.
3. Hover over the icons on Eclipse’s Welcome screen until you find an icon whose tooltip contains the word Workbench.
4. Click the Workbench icon to open Eclipse’s main screen.
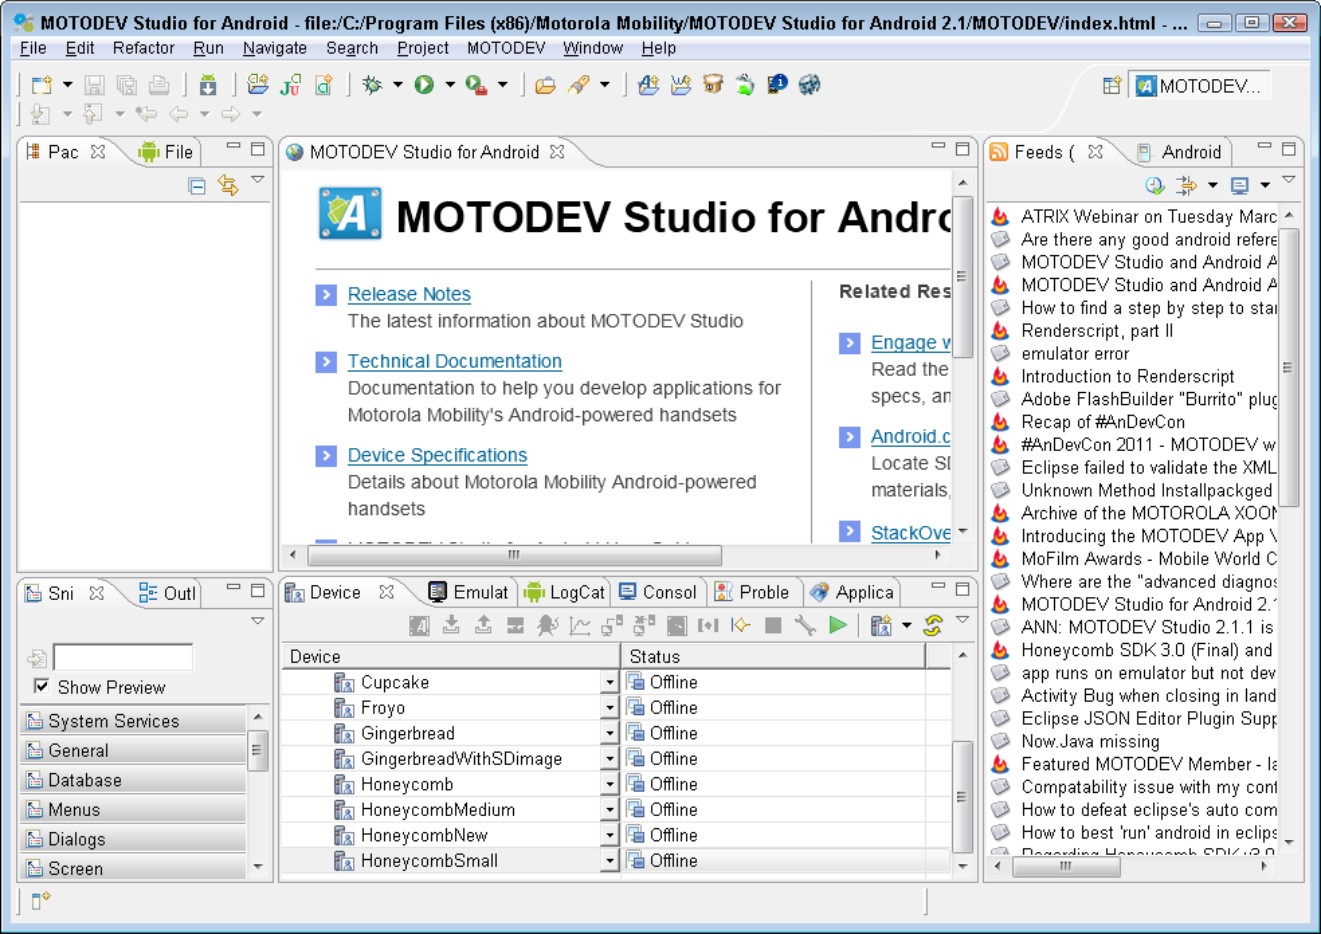
A view of the main screen, after opening Eclipse with a brand new workspace, is shown in Figure 2-1. If you downloaded MOTODEV Studio for Android (a particular version of Eclipse), you see the main screen in Figure 2-2.
Figure 2-1: The Eclipse workbench with a brand new workspace.
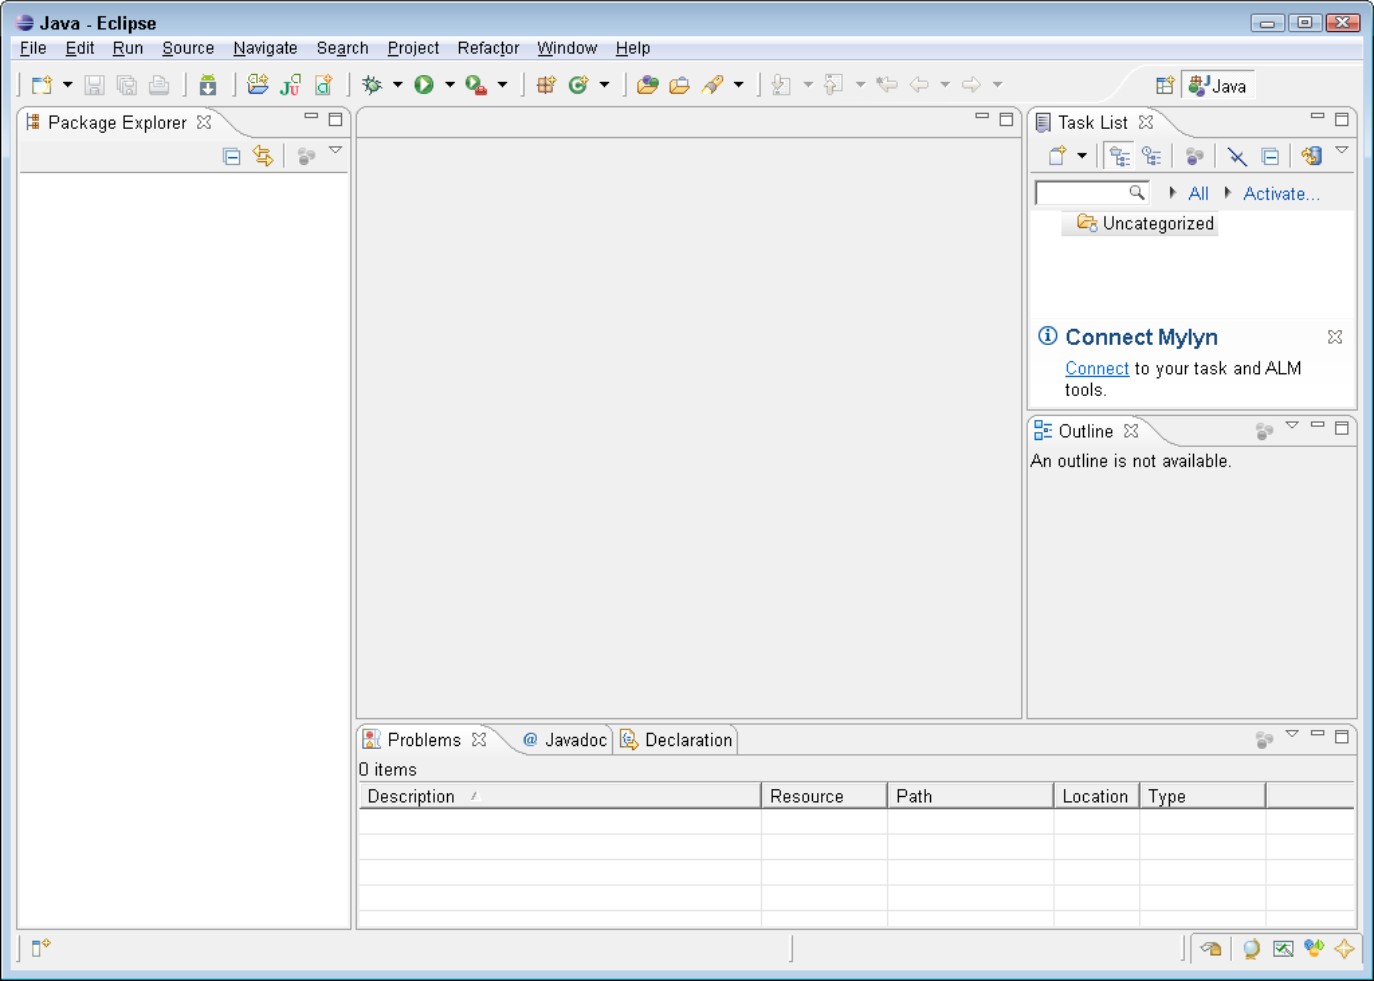
Eclipse is running. Now the fun begins.
Do I have the Eclipse Android Development Kit?
Eclipse is a generic platform. Eclipse doesn’t owe its existence to Android. When you download Eclipse, you don’t necessarily get any tools that are useful for developing Android apps.
Figure 2-2: The MOTODEV Studio workbench with a brand new workspace.
But Eclipse is well known for its plug-ins. Eclipse plug-ins add all kinds of tools to the barebones Eclipse platform. In fact, even Eclipse’s signature tool, Java Development Tools (JDT), is a plug-in.
To develop Android apps, you need Eclipse’s ADT — the Android Development Tools — plug-in. If you download Eclipse in the form of MOTODEV Studio for Android, you get the ADT along with the big download.
To find out if your Eclipse installation has the ADT plug-in, choose File⇒New⇒Project in Eclipse’s main menu. If Eclipse displays anything about an Android project, you’re home free.
If you already have Eclipse on your computer, or if you download a non-Android-specific version of Eclipse, your Eclipse installation probably doesn’t have the ADT plug-in. You can add the ADT to Eclipse by following these instructions:
1. In Eclipse’s main menu, choose Help⇒Install New Software.
An Install dialog box opens.
2. In the Install dialog box, click the Add button.
An Add Repository dialog box opens.
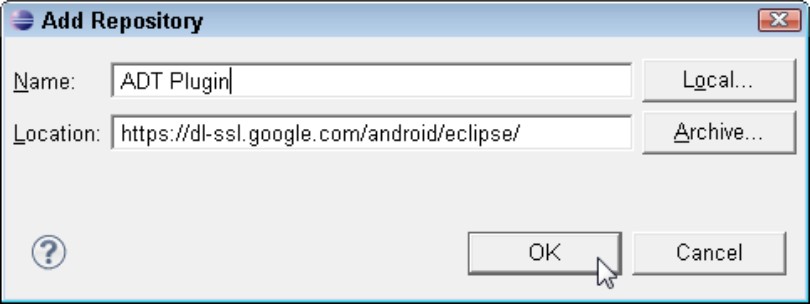
3. In the Add Repository dialog box, type a name (ideally, a name that reminds you of the Android ADT) and a location URL (see Figure 2-3).
The Add Repository dialog’s Location field isn’t like your Web browser’s Address field. You can’t surf to https://dl-ssl.google.com/android/eclipse/ in a web browser. No ordinary web page has this address. Instead, you must use the URL in an Eclipse dialog box, as I describe in these steps. Also, when you type this URL, you can’t abbreviate the URL by omitting the https:// part. (The s in https stands for “secure.”)
The Add Repository dialog box’s Location field isn’t like your web browser’s Address field. You can’t abbreviate the URL by omitting the https:// part. (And, by the way, the s in https stands for secure.)
Figure 2-3: Eclipse’s Add Repository dialog box.
4. Click OK to close the Add Repository dialog box.
At this point in your journey, the Install dialog box displays a list of plug-ins that are available on your location URL’s server. (See Figure 2-4.) If you’re like me, you want everything.
Figure 2-4: The Install dialog box.
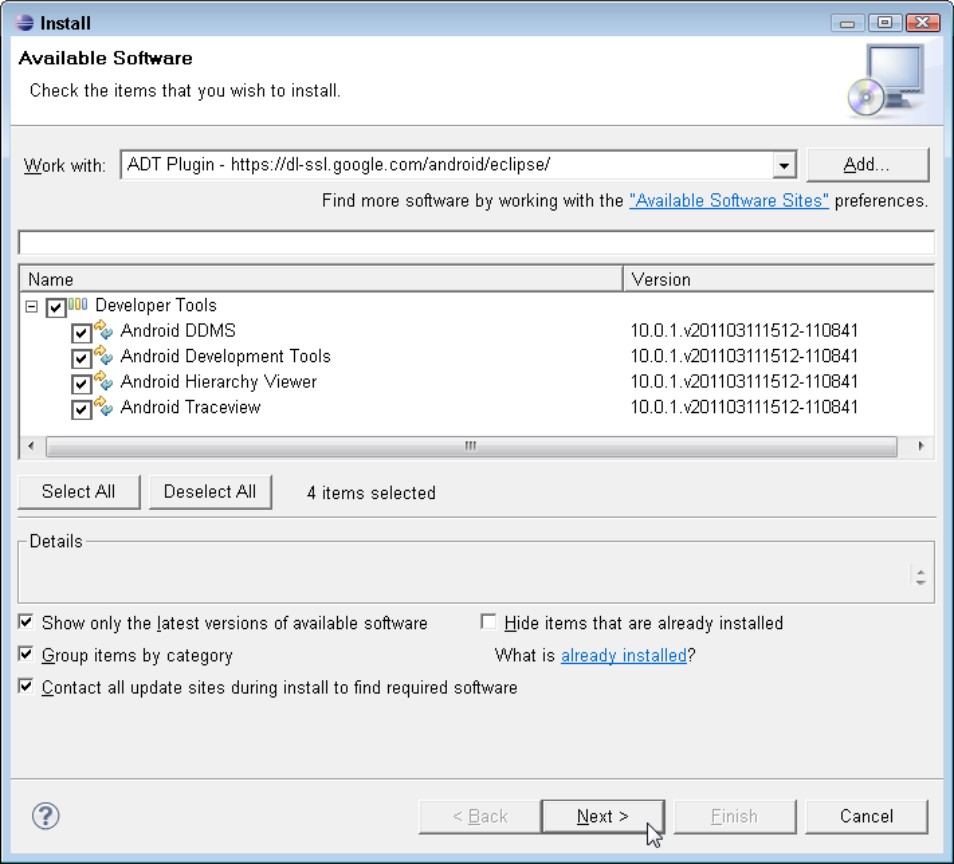
5. Click the Select All button and then click Next.
At this point, Eclipse asks for your acceptance of the license agreement’s terms (which include no mention of your first-born child).
6. Accept the agreement and follow any other instructions that Eclipse throws at you.
After some clicking and agreeing, your download begins. The plug-in installs itself automatically into Eclipse. When the download is finished, you have the Eclipse Android Development Tools plug-in.
Dude, where’s my Android SDK?
After installing Eclipse’s Android Development Tools, the next step is to make sure that Eclipse knows where to find the Android SDK (the stuff that you download a few sections back). To do this, follow these steps:
1. In Eclipse’s main menu, choose Window⇒Preferences.
Eclipse’s Preferences dialog box opens.
2. In the tree list on the left side of the Preferences dialog box, select Android.
Don’t expand the Android branch of the tree. Simply click the word Android.
An SDK Location field appears in the main body of the Preferences dialog box. (See Figure 2-5.)
Figure 2-5: Telling Eclipse about the location of your Android SDK.

At this point, the installing of Eclipse or MOTODEV Studio may have automatically filled in the SDK Location field (shown in Figure 2-5). If so, you’re finished with this set of instructions. If so, skip Step 3.
3. Click the Browse button and (of course) browse to the folder on your hard drive where you installed the Android SDK.
In a previous section, I called this folder your ANDROID_HOME directory.
4. Click Apply, OK, and all those good things to return to the main Eclipse workbench.
After selecting a location for the Android SDK, you may see a message saying SDK Platform Tools component is missing! Please use the SDK Manager to install it. As ferocious as this message looks, the message isn’t disastrous. The message simply warns you that you must perform this chapter’s next set of steps.
Look again at Figure 2-5 and notice the text field in the window’s upper-left corner. That unlabeled text field is for filtering the names of Eclipse preference types. The tree of preference types (part of which is shown in Figure 2-5) expands to approximately 150 branches, and each branch refers to its own set of choices in the main body of the Preferences window. If you want to see a bunch of Eclipse preferences related to font (for example), type font in the little text field. When you type font, Eclipse displays only branches of the tree containing the word font.
Fattening Up the Android SDK
In the earlier “Installing the Android SDK Starter Package” section, you install the starter portion of the Android SDK. At this point in your travels, you install the rest of the SDK. The following section tells you how.
Installing platform tools
Like everything else in this world, Android changes. One month, developers work with Android 2.3, codenamed Gingerbread. Later that year, developers use Android 3.0, codenamed Honeycomb. Each version of Android represents a new platform or a new API level, depending on the way you refer to the version.
For more information about Android API levels, visit http://developer.android.com/guide/appendix/api-levels.html#level.
Terms like platform and API level have slightly different meanings in the Android world. But as a rule, platforms and API levels change in lockstep. For example, the Éclair Android release was platform 2.1, API level 7. The next release, Froyo (“frozen yogurt”) was platform 2.2, API level 8.
Before you conclude that Éclair was once Android’s “flavor of the month,” I should point out that new Android releases tend to arrive every five or six months. Each Android release is installed on various devices, and those devices may keep these releases a long, long time.
Anyway, the Android SDK comes with several developer tools — tools for compiling, testing, and debugging Android code. Some of these tools don’t change from one Android release to another. For example, to test your code, you usually start by running the code on an emulator. The emulator program runs on your development computer (your PC, your Mac, or your Linux computer). The emulator displays a picture of a mobile device (for example, a phone or a tablet device). The emulator shows you how your code will probably behave when you later run your code on a real phone or a real tablet device.
Now, an emulator doesn’t change much from one Android platform to another. After all, an emulator represents the general capabilities of mobile devices in the marketplace. There are hundreds of makes and models of such devices, and the engineers who design all this hardware don’t sit around waiting for the mythical Android 7.5, codenamed Sugar High, to be released in the year 2015. Emulators and Android platforms don’t change in lockstep. So when you download the Android SDK starter package (as you do in an earlier section) you get the emulator tool as part of the package. This emulator tool lives in a tools folder inside your ANDROID_HOME directory.
As timeless as the emulator tool may be, some of the SDK’s other tools are intimately tied to their respective Android versions. For example, the Android Debug Bridge (adb) is a tool to connect your development computer to a device that’s executing your new code. (The adb also “connects” your development computer to a running emulator, even though the emulator is running on your development computer.) The adb is an invaluable tool for testing Android applications. The creators of Android revise the adb with every new Android platform, so the adb isn’t in the tools folder, and the adb doesn’t come with the Android SDK starter package. Instead, the adb is destined to reside in the platform-tools directory (a subdirectory of your ANDROID_HOME directory). To create the platform-tools directory and to populate the directory with things like adb, you run a program that comes with the starter package. Fortunately, you can do this by pointing and clicking within the Eclipse development environment.
1. In Eclipse’s main menu, choose Window⇒Android SDK and AVD Manager.
After selecting this option, Eclipse opens a new window. You’ll never guess what the window’s name is.
After choosing Window⇒Android SDK and AVD Manager, you may see a troublesome message that tells you Location of the Android SDK has not been setup in the preferences. If you do, return to the section titled “Dude, where’s my Android SDK?” earlier in this chapter.
2. In the left panel of the Android SDK and AVD Manager window, select Available Packages.
In the main panel, you see a tree with a branch labeled Android Repository.
3. Click the little plus sign to expand the Android Repository branch of the tree.
When the branch expands, you see a whole bunch of stuff, including Android SDK Platform-Tools, SDK Platform Android 2.2, Samples for SDK API 11, and many others.
4. Place a check mark next to the Android Repository label.
When you do so, Eclipse automatically puts check marks in all the subbranches of the Android Repository branch, as shown in Figure 2-6. Now you’re ready to start downloading all the platform-specific stuff.
Figure 2-6: Choosing from the list of available packages.
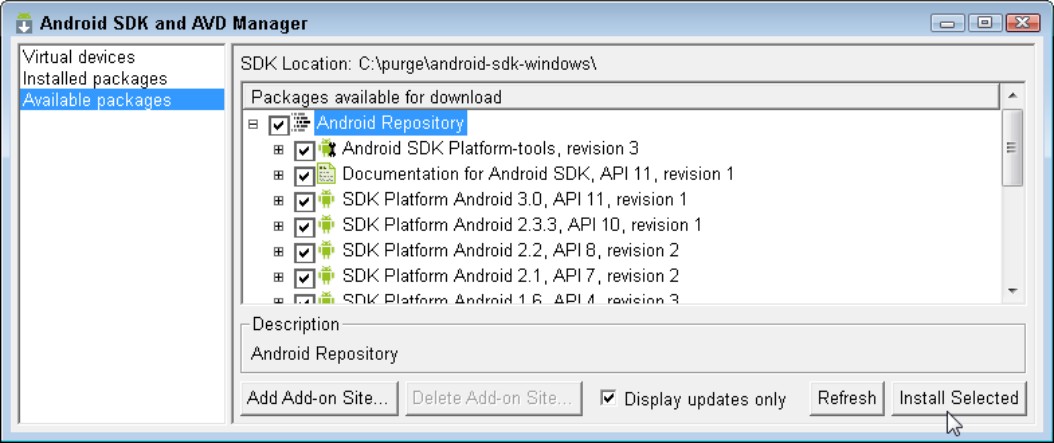
5. In the lower-right corner of the Android SDK and AVD Manager window, click Install Selected.
6. Do any remaining license accepting and clicking to make the download begin.
Creating an Android Virtual Device
You might be itching to run some code, but first you must have something that can run an Android program. By “something,” I mean either an Android device (a phone, a tablet, an Android enabled refrigerator, whatever) or a virtual device. An Android Virtual Device (AVD) is a test bed for Android code on your development computer (your PC, your Mac, or your Linux computer).
Based on the stuff in the previous section, you may think that you download AVDs when you install the Android SDK starter package. After all, the starter package includes an emulator as part of its tools directory. The problem is, the SDK’s emulator isn’t the same as an AVD. The emulator is a generic program that translates Android code into code that your development computer can execute. But the emulator doesn’t display a particular phone or tablet device on your screen. The emulator doesn’t know what kind of device you want to display. Do you want a camera phone with 800-x-480-pixel resolution, or have you opted for a tablet device with its own built-in accelerometer and gyroscope? All these choices belong to a particular AVD. An AVD is actually a bunch of settings, telling the emulator all the details about the device to be emulated.
So before you can run Android apps on your computer, you must first create at least one AVD. In fact, you can create several AVDs and use one of them to run a particular Android app.
To create an AVD, follow these steps:
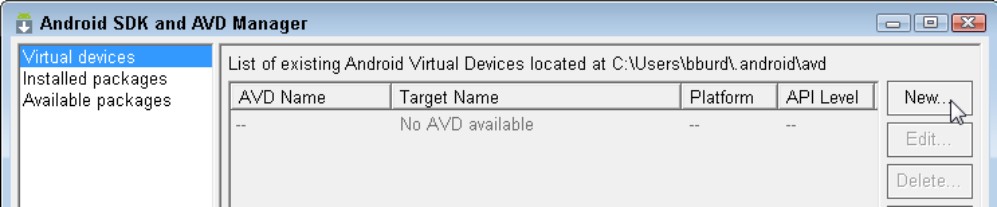
1. In Eclipse’s main menu, choose Window⇒Android SDK and AVD Manager.
The Android SDK and AVD Manager window opens.
2. In the Android SDK and AVD Manager window, click New, as shown in Figure 2-7.
The Create New Android Virtual Device (AVD) window opens. That’s nice!
Figure 2-7: An old friend, the Android SDK and AVD Manager.
3. Create a name for your virtual device.
You can name your device My Sweet Petunia, but in Figure 2-8, I name my device Gingerbread-800by480. The name serves to remind me of this device’s capabilities.
Figure 2-8: Creating a new Android virtual device.
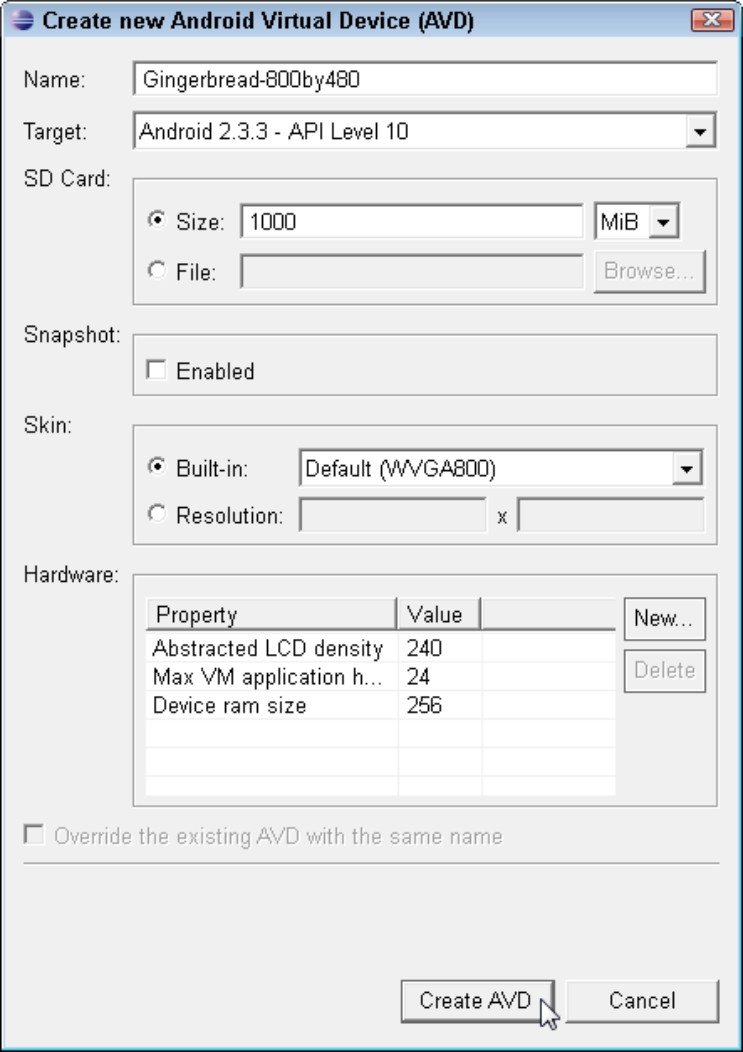
4. Select a target platform for your virtual device.
In Figure 2-8, I select the Android 2.3.3 platform. My virtual device can run Android 2.3.3 programs.
5. Decide what kind of secure digital (SD) card your device has.
In Figure 2-8, I decide on an SD card with a modest 1000 MiB, which is roughly 1GB. Alternatively, I could have selected the File radio button and specified the name of a file on my hard drive. That file would be storing information as if it were a real SD card on a real device.
Recently, my department hired a new person. We offered a salary of $50K, which (we thought) meant $50,000 per year. Little did we know that the new person expected to be paid $51,200 each year. Computer scientists use the letter K (or the prefix “Kilo”) to mean 1,024 because 1,024 is a power of 2 (and powers of 2 are very handy in computer science). The trouble is, the formal meaning of “Kilo” in the metric system is 1,000, not 1,024. To help clear things up (and to have fun creating new words) a commission of engineers created the Kibibyte (KiB) meaning 1,024 bytes, the Mebibyte (MiB) which is 1,048,576 bytes, and the Gibibyte (GiB) meaning 1,073,741,824 bytes. Most people (computer scientists included) don’t know about KiBs or MiBs, and don’t worry about the difference between MiBs and ordinary megabytes. I’m surprised that the developers of Android’s SDK and AVD Manager thought about this issue.
6. Select or specify a display resolution for your virtual device.
In Figure 2-8, I chose the default WVGA800 resolution, which is 800x480 pixels.
7. Leave the other choices at their defaults (or don’t, if you don’t want to) and click the Create AVD button.
Your computer returns you to the Android SDK and AVD Manager window, where you see a brand-new AVD in the list. (See Figure 2-9.)
Figure 2-9: You’ve created an Android virtual device.

This section’s steps work with any copy of Eclipse that has the Android Development Tools plug-in. This includes MOTODEV Studio for Android, which is an enhanced copy of Eclipse. But MOTODEV Studio provides another way to create AVDs. The other way uses a wizard interface with an impressive number of options. To start the wizard, choose MOTODEV⇒New Android Virtual Device from the Studio’s main menu. From then on, do what the nice wizard tells you to do.
And that does it! You’re ready to run your first Android app. I don’t know about you, but I’m excited. (Sure, I’m not watching you read this book, but I’m excited on your behalf.) Chapter 3 in this minibook guides you through the run of an Android application. Go for it!