
Chapter 3: Services
In This Chapter
![]() Running code without bothering the user
Running code without bothering the user
![]() Running code when a device starts
Running code when a device starts
![]() Starting, binding, and querying
Starting, binding, and querying
![]() Sending messages from one process to another
Sending messages from one process to another
Some things are of no concern to the user of an Android device. “A process on your phone is checking for e-mail right now . . . Nope, no new e-mail. Sorry about the interruption. Get back to what you were doing. You’ll hear from me again in exactly one minute.” Such notices are intrusive and unnecessary, especially on a device with limited screen real estate.
To do something behind the scenes, you don’t want an Android activity. An activity normally has a layout file, and the user deals with the layout’s gizmos on the screen. Instead, you want the kind of component that runs quietly in the background. In other words, you want an Android service.
A Very Simple Service
I start this chapter with an embarrassingly simple example — a service that doesn’t do anything. This lazy service simply illustrates the minimum service source code requirements.
The service
Listing 3-1 contains the good-for-nothing service.
Listing 3-1: An Un-Weather Service
package com.allmycode.services;
import android.app.Service;
import android.content.Intent;
import android.os.IBinder;
import android.widget.Toast;
public class MyWeatherService extends Service {
@Override
public IBinder onBind(Intent intent) {
Toast.makeText(this, R.string.service_bound,
Toast.LENGTH_SHORT).show();
return null;
}
@Override
public int onStartCommand(Intent intent,
int flags, int startId) {
Toast.makeText(this, R.string.service_started,
Toast.LENGTH_SHORT).show();
return START_STICKY;
}
@Override
public void onDestroy() {
Toast.makeText(this, R.string.service_destroyed,
Toast.LENGTH_SHORT).show();
}
}
In truth, the service in Listing 3-1 has more code than is absolutely necessary. As a subclass of the abstract android.app.Service class, the only required method in Listing 3-1 is onBind. Still, the listing’s onStart Command and onDestroy methods are a bit more useful than the methods that would be inherited from the android.app.Service class.
The required onBind method in Listing 3-1 returns null. Normally, the object returned by an onBind method implements the android.os.IBinder interface, and an object that implements IBinder allows one process to exchange information with another process. That’s nice, but in this simple example, the service doesn’t exchange information.
I put the service from Listing 3-1 in its own Eclipse project, with its own package name. So this service runs as its own application in its own process on an emulator or a device. The service has no user interface (and, therefore, no layout file). The application’s AndroidManifest.xml file has no <activity> element but instead has the <service> element shown in Listing 3-2.
Listing 3-2: An Element in the Un-Weather Service’s AndroidManifest.xml File
<service android:name=”.MyWeatherService”>
<intent-filter>
<action android:name=”com.allmycode.WEATHER” />
</intent-filter>
</service>
A client activity
To start the service in Listing 3-1, other components refer to the action named in Listing 3-2. Listing 3-3 shows you how.
Listing 3-3: A Client for the Un-Weather Service
package com.allmycode.demos;
import android.app.Activity;
import android.content.Intent;
import android.os.Bundle;
import android.view.View;
public class ServiceConsumerActivity extends Activity {
Intent intent = new Intent();
@Override
public void onCreate(Bundle savedInstanceState) {
super.onCreate(savedInstanceState);
setContentView(R.layout.main);
intent.setAction(“com.allmycode.WEATHER”);
}
public void onStartClick(View view) {
startService(intent);
}
public void onStopClick(View view) {
stopService(intent);
}
}
The activity in Listing 3-3 has two buttons — a Start button and a Stop button. (See Figure 3-1.)
Figure 3-1: Start and stop a service. How simple is that?
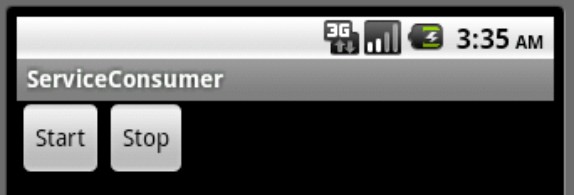
In creating the layout, I took the liberty of assigning listener method names to the two buttons:
<Button android:text=”Start”
android:onClick=”onStartClick”
android:id=”@+id/button1”
android:layout_height=”wrap_content”
android:layout_width=”wrap_content”>
</Button>
<Button android:text=”Stop”
android:onClick=”onStopClick”
android:id=”@+id/button4”
android:layout_height=”wrap_content”
android:layout_width=”wrap_content”>
</Button>
So clicking the Start button calls startService(intent), and clicking the Stop button calls stopService(intent). In addition to starting and stopping the service, each click displays a Toast view.
 For a brief treatise on Android’s
 Toast class, see the “Informing the user” section, later in this chapter.
A service’s primary purposes are to run in the background (independent of any obvious user interaction) and to offer help to other apps. So if the code in Listing 3-1 represented a useful service, this code would be doing something about the weather. (For code that does something useful, see this chapter’s “Talking about the Weather” section.)
Here’s what happens when you play with the buttons in Figure 3-1:
• Press Start and then press Stop.
After pressing Start, you see the Service Started toast. Then, after pressing Stop, you see the Service Destroyed toast. No surprises here!
• Press Stop twice in a row.
If the service is running, the first call to stopService (in Listing 3-3) destroys the service. The second call to stopService doesn’t display a Service Destroyed toast because a component that’s not running can’t be destroyed.
• Press Start twice in a row and then press Stop twice in a row.
As a result, you see two Service Started toasts followed by only one Service Destroyed toast. Each startService call (from Listing 3-3) triggers a call to onStartCommand in Listing 3-1. But the first stop Service call (again, from Listing 3-3) destroys the service. Subsequence stopService calls have no effect.
• Press Start and then press the emulator’s Back button.
When you press the Back button, you don’t see a Service Destroyed toast. And that’s the essence of an Android service. A service can live on after the activity that started the service has been destroyed.
Services start, stop, and start again
A service has no user interface, and it may continue to run after you destroy the service’s starting activity. That can be a dangerous combination of traits. Services without interfaces can hang around indefinitely like Rasputin — the mad monk of czarist Russia that no one could kill. If developers don’t include code to manage their services, the services clog up the system. No one’s happy.
Of course, Android can kill services in order to reclaim needed memory. The http://developer.android.com/reference/android/app/Service.html page lists all the situations in which Android kills or doesn’t kill a service, and it doesn’t make light reading.
One insight about the lifetime of a service comes from the onStartCommand method in Listing 3-1. The onStartCommand method takes an Intent parameter. The parameter’s value points to whatever Intent object the startService method sends. (See Listing 3-3.) The onStartCommand method returns an int value. In Listing 3-1, the int value is Service.START_STICKY. This constant value tells Android how to restart the service at some time interval after killing it. The alternative int values are as follows:
• START_STICKY: If Android kills the service, Android waits for a certain time interval and then restarts the service. Upon restart, Android feeds the service the intent from whatever startService call is next in the queue of such commands. If no startService calls are waiting to start this particular service, Android feeds null to the onStartCommand method’s Intent parameter.
• START_REDELIVER_INTENT: If Android kills the service, Android waits for a certain time interval and then restarts the service. Upon restart, Android feeds the service the intent that came as a parameter in the current call to onStartCommand.
• START_NOT_STICKY: If Android kills the service, Android doesn’t automatically restart the service. Android restarts the service if and when the next startService call queues up to start this particular service.
• START_STICKY_COMPATIBILITY: If Android kills the service, Android tries to restart the service the way START_STICKY restarts services. But Android doesn’t promise to restart the service.
The bottom line is, you should be proactive in starting and stopping your own service. Don’t be a memory hog by relying on the system to clean up after you. Be aware of your service’s lifespan, and destroy your service when it’s no longer needed. Add a stopService call to your activity’s onPause or onDestroy method if it makes sense to do so. And if a service knows that it’s no longer useful, have the service call its own stopSelf method.
Android calls an activity’s onDestroy method whenever the user turns the device (from portrait to landscape, for example). If you put a stopService call in an activity’s onDestroy method, you must deal with all possible situations in which the service halts. For details, see this chapter’s “Talking about the Weather” section.
Running a Service at Boot Time
How important is your service? Does your service start on rare occasions when the user presses a certain button? Or does your service start when the device powers up?
If Android users can’t survive without running your service, you can start the service at boot time. To do so, you create another kind of component — a broadcast receiver.
A broadcast receiver responds to intents that you fling into the air using the sendBroadcast or sendOrderedBroadcast method. Android provides special treatment for an intent sent with either of these methods.
• When you call startActivity or startService, Android looks for one component to satisfy the intent.
If the system finds more than one suitable activity (two installed web browsers, for example), Android displays a dialog box prompting the user to choose among the alternatives.
• When you call sendBroadcast or sendOrderedBroadcast, Android fires up all the receivers whose filters satisfy the intent.
With sendOrderedBroadcast, Android runs receivers one after the other. Each receiver can pass the intent on to the next receiver in line or can break the chain by calling its abortBroadcast method.
With sendBroadcast, Android may interleave the running of several receivers. In this scenario, having a receiver abort a broadcast doesn’t make sense.
Consider the Weather service in Listing 3-1. In the same application, create a Java class with the code from Listing 3-4.
Listing 3-4: A Simple Broadcast Receiver
package com.allmycode.services;
import android.content.BroadcastReceiver;
import android.content.Context;
import android.content.Intent;
public class MyBootReceiver extends BroadcastReceiver {
@Override
public void onReceive(Context context, Intent intent) {
Intent serviceIntent = new Intent();
serviceIntent.setClass(context,
MyWeatherService.class);
context.startService(serviceIntent);
}
}
When MyBootReceiver runs, it starts an instance of the MyWeather Service class. The not-too-difficult trick is to make MyBootReceiver run when the emulator or device starts.
Listing 3-5 shows you the mechanics of launching the receiver in Listing 3-4.
Listing 3-5: Manifest Elements for the Receiver in Listing 3-4
<uses-permission android:name=
“android.permission.RECEIVE_BOOT_COMPLETED”/>
<application android:icon=”@drawable/icon”
android:label=”@string/app_name”>
<service android:name=”.MyWeatherService”>
<intent-filter>
<action android:name=”com.allmycode.WEATHER” />
</intent-filter>
</service>
<receiver android:name=”.MyBootReceiver”>
<intent-filter>
<action android:name=
“android.intent.action.BOOT_COMPLETED” />
<category android:name=
“android.intent.category.HOME” />
</intent-filter>
</receiver>
</application>
The <uses-permission> element in Listing 3-5 grants this app permission to receive BOOT_COMPLETED broadcasts. In the receiver’s <action> element, the android:name attribute says, “Wake me up if anyone hollers android.intent.action.BOOT_COMPLETED.” When you launch your emulator or you turn on your device, Android runs through its normal boot sequence and then sends an intent containing the BOOT_COMPLETED action. At that point, Android finds the receiver in Listing 3-4 and calls the receiver’s onReceive method. In turn, the onReceive method in Listing 3-4 gooses the Weather service in Listing 3-1.
 A broadcast receiver lives long enough to run its
 onReceive method and then the receiver stops running. A receiver doesn’t have any onCreate or onDestroy methods, or any of the lifecycle methods belonging to other kinds of components. A broadcast receiver does its work and then hides in the shadows until the next relevant broadcast comes along.
You can download this section’s example from the book’s website. To test the code, install the code, shut down the emulator, and then restart the emulator. Ay, there’s the rub! Starting an emulator once is annoying enough. Starting it several times (because you got some detail wrong the first few times) is a pain in the class.
Your code can’t test Listing 3-4 by creating an ACTION_BOOT_COMPLETED intent. Android reserves ACTION_BOOT_COMPLETED for system-level code only. By using the Android Debug Bridge, though, you can launch an intent as a Linux shell superuser. Here’s how:
1. Install this section’s code onto an emulator.
2. On your development computer, launch a command window.
For details, see Book VI, Chapter 3.
3. In the command window, issue the cd command to make the ANDROID_HOME/platform-tools directory your working directory.
Again, see Book VI, Chapter 3 for details.
4. Type the following command, all on one line:
adb shell am broadcast
-a android.intent.action.BOOT_COMPLETED
Using Android’s am command, you can call startActivity, startService, and sendBroadcast as if you were Android itself (or himself, or herself, or whoever). When you issue the command in Step 4, Android behaves as if the system has just finished booting.
 You can see all the
 am command’s options by typing adb shell am in your development computer’s command window.
For more information about the Android Debug Bridge, see Book I, Chapter 2. For more information about broadcast receivers, see Chapter 4 in this minibook.
Starting and Binding
You can do two kinds of things with a service:
• You can start and stop a service.
You do this by calling the Context class’s startService and stop Service methods. Also, a service can take the bull by the horns and call its own stopSelf or stopSelfResult method.
When you call startService, you create only a momentary relationship with the service. Android creates an instance of the service if no instances are already running. In addition, Android calls the service’s onStartCommand method. (See Listing 3-1.)
Calls to startService don’t pile up. To illustrate the point, consider this sequence of method calls, along with their resulting Android responses:
Activity A calls startService to start MyService.
Android instantiates MyService and
calls the instance’s onStartCommand method.
Activity B calls startService to start MyService.
Android calls the existing instance’s
onStartCommand method.
Activity A calls stopService to stop MyService.
Android destroys the MyService instance.
Activity B calls stopService to stop MyService.
Android says “The joke’s on you.” There’s no
instance of MyService to stop.
• You can bind to, and unbind from, a service.
You do this by calling the Context class’s bindService and unbindService methods. Between binding and unbinding, you have an ongoing connection with the service. Through this connection, you can send messages to the service and receive messages from the service. That’s useful!
When you call bindService, Android creates an instance of the service if no instances are running already. In addition, Android calls the service’s onBind method. (For an example, skip ahead to Listings 3-6 and 3-7.)
 When you call
 bindService, Android doesn’t call the service’s onStartCommand method.
Calls to bindService pile up. A service can have many bindings at once, each to a different activity. Your service’s code can keep track of all this hubbub by maintaining a collection of binding objects (an ArrayList, or whatever). When you call unbindService, you don’t destroy the service instance. Android keeps the service alive as long as any activities are bound to the service.
Services can receive Start requests and Bind requests all at the same time. When all bound activities unbind themselves from a particular service, the system checks whether anybody started the service this time around. If so, the system waits for somebody to call stopService before destroying the service.
Android can terminate activities to reclaim memory. If I were a service and Android terminated the activities that were bound to me, I’d be afraid for my own survival. Test your apps for unwanted results from the untimely termination of activities and their services. If, in testing, you experience any unexpected behavior due to the early termination of a service, please fix the code.
The previous sections’ examples started and stopped a service. The rest of this chapter binds and unbinds with a service.
Talking about the Weather
Every Android book needs a Weather Service example, and this book is no exception. In this section, your activity binds to a service, which in turn reaches out for weather information over the Internet.
A service
I build the example in stages. The first stage is essence de service. An activity binds to the service, gets back some fake responses to nonsense queries, and then unbinds. Listing 3-6 contains the service.
Listing 3-6: A Weather Service with a Fear of Commitment
package com.allmycode.services;
import android.app.Service;
import android.content.Intent;
import android.os.Bundle;
import android.os.Handler;
import android.os.IBinder;
import android.os.Message;
import android.os.Messenger;
import android.os.RemoteException;
import android.widget.Toast;
public class MyWeatherService extends Service {
Messenger messengerToClient = null;
MyIncomingHandler myIncomingHandler =
new MyIncomingHandler();
Messenger messengerToService =
new Messenger(myIncomingHandler);
@Override
public IBinder onBind(Intent intent) {
doToast(R.string.service_bound);
return messengerToService.getBinder();
}
class MyIncomingHandler extends Handler {
@Override
public void handleMessage(Message incomingMessage) {
messengerToClient = incomingMessage.replyTo;
Bundle reply = new Bundle();
reply.putString(“weather”, “It’s dark at night.”);
Message replyMessage = Message.obtain();
replyMessage.setData(reply);
try {
messengerToClient.send(replyMessage);
} catch (RemoteException e) {
e.printStackTrace();
}
doToast(R.string.message_handled);
}
}
@Override
public boolean onUnbind(Intent intent) {
doToast(R.string.service_stopped_itself);
stopSelf();
return false;
}
@Override
public void onDestroy() {
myIncomingHandler = null;
doToast(R.string.service_destroyed);
}
void doToast(int resource) {
Toast.makeText(this, resource,
Toast.LENGTH_SHORT).show();
}
}
The flow of control in Listing 3-6 isn’t simple, so I’ve created Figure 3-2 to help you understand what’s going on. The first thing to notice in Figure 3-2 is that the service doesn’t interact directly with a client application. Instead, the service gets calls indirectly through the Android operating system.
Figure 3-2: Binding and messaging.
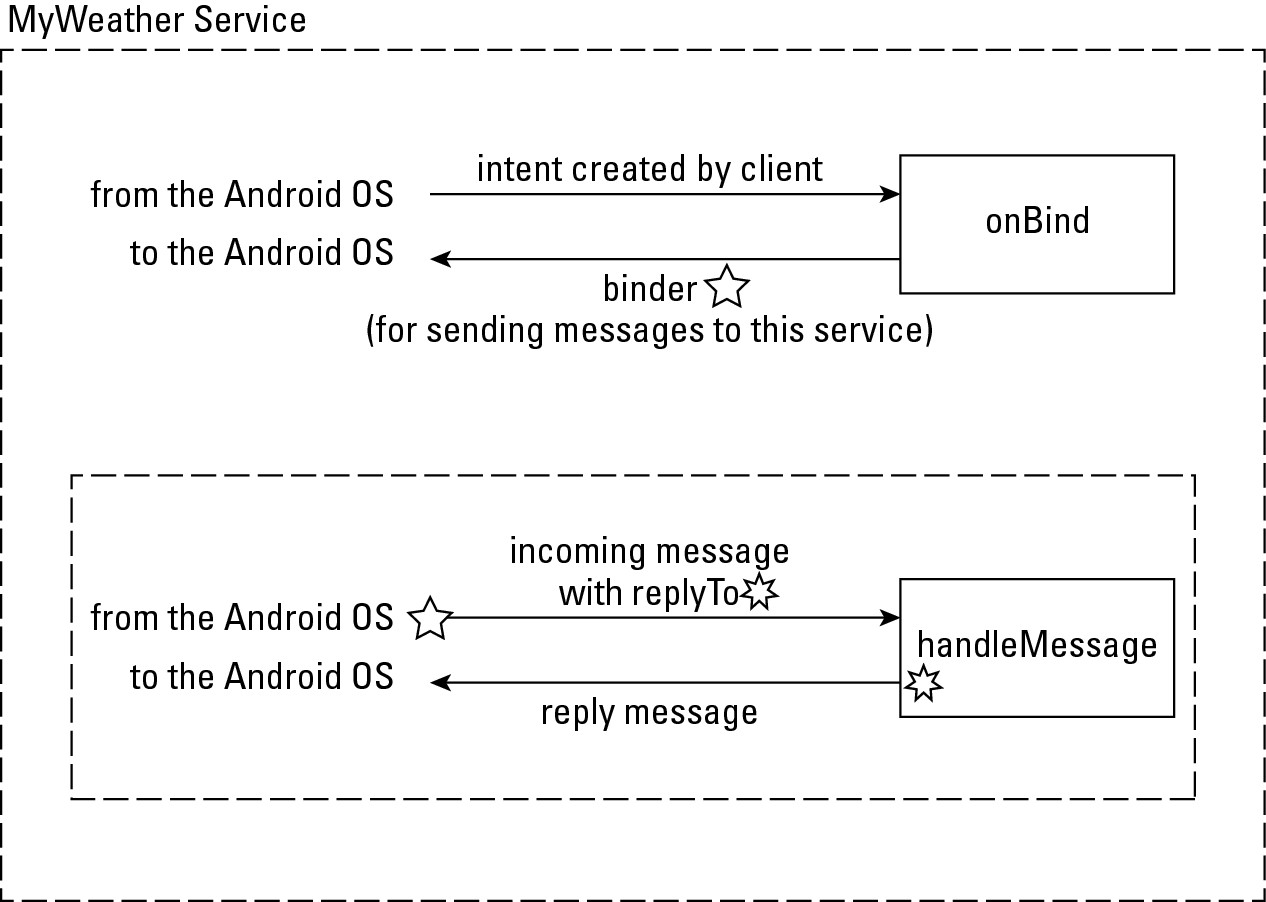
Like many other communication regimens, the talk between a client and a service has two phases:
• The first phase (the binding phase) establishes a line of communication.
• In the second phase, the client and the service exchange useful information via messages. In general, the client sends a request for information and the service sends a reply.
To bind to a service, a client sends an intent. Android hands this intent to the service’s onBind method. In response, the onBind method returns a binder — an object that implements the IBinder interface. (See Listing 3-6 and Figure 3-2.) The binder is like a business card. By returning a binder, the service says, “Android, tell the client application that it can reach me at this address.” That’s why, in Listing 3-6, the service creates the binder from an instance of MyIncomingHandler. (It’s the same as printing a business card from an instance of “my answering machine’s phone number.”)
Android delivers the binder to the client app. Eventually, the client app queries the service. The query contains a request for specific information. But the query also contains a replyTo field. The service’s inner class (in this example, MyIncomingHandler) uses the replyTo information to send an answer back to the client app. In Listing 3-6, I keep things simple by replying It’s dark at night no matter what query the client sends. (A weather report like this is always correct.)
A client
Listing 3-7 contains a client for the service in Listing 3-6.
Listing 3-7: A Client for the Service in Listing 3-6
package com.allmycode.demos;
import android.app.Activity;
import android.content.ComponentName;
import android.content.Context;
import android.content.Intent;
import android.content.ServiceConnection;
import android.content.SharedPreferences;
import android.os.Bundle;
import android.os.Handler;
import android.os.IBinder;
import android.os.Message;
import android.os.Messenger;
import android.os.RemoteException;
import android.view.View;
import android.view.View.OnClickListener;
import android.widget.Button;
import android.widget.EditText;
import android.widget.TextView;
import android.widget.Toast;
public class ServiceConsumerActivity extends Activity
implements OnClickListener {
Messenger messengerToService = null;
MyIncomingHandler myIncomingHandler =
new MyIncomingHandler();
Messenger messengerFromService =
new Messenger(myIncomingHandler);
ServiceConnection connection =
new MyServiceConnection();
SharedPreferences prefs;
boolean isBound = false;
void bind() {
Intent intent = new Intent();
intent.setAction(“com.allmycode.WEATHER”);
isBound =
bindService(intent, connection,
Context.BIND_AUTO_CREATE);
}
public void queryService() {
if (isBound) {
Bundle bundle = new Bundle();
bundle.putString(“location”, “Philadelphia”);
Message message = Message.obtain();
message.replyTo = messengerFromService;
message.setData(bundle);
try {
messengerToService.send(message);
} catch (RemoteException e) {
e.printStackTrace();
}
} else {
textView1.setText(R.string.service_not_bound);
}
}
class MyIncomingHandler extends Handler {
@Override
public void handleMessage(Message msg) {
Bundle bundle = msg.getData();
textView1.setText(bundle.getString(“weather”));
}
}
void unbind() {
if (isBound) {
unbindService(connection);
isBound = false;
}
}
class MyServiceConnection implements ServiceConnection {
public void onServiceConnected(
ComponentName className, IBinder binder) {
messengerToService = new Messenger(binder);
doToast(R.string.service_connected);
}
public void onServiceDisconnected(ComponentName n) {
messengerToService = null;
doToast(R.string.service_crashed);
}
}
void doToast(int resource) {
Toast.makeText(this, resource,
Toast.LENGTH_SHORT).show();
}
@Override
public void onDestroy() {
super.onDestroy();
prefs = getSharedPreferences(“PREFS”, MODE_PRIVATE);
SharedPreferences.Editor editor = prefs.edit();
editor.putBoolean(“isBound”, isBound);
editor.putString(“report”, textView1.getText()
.toString());
editor.commit();
unbind();
}
@Override
public void onCreate(Bundle savedInstanceState) {
super.onCreate(savedInstanceState);
setContentView(R.layout.main);
prefs = getSharedPreferences(“PREFS”, MODE_PRIVATE);
if (prefs != null) {
textView1 = (TextView) findViewById(R.id.textView1);
textView1.setText(prefs.getString(“report”,
getString(R.string.report_appears_here)));
if (prefs.getBoolean(“isBound”, false)) {
bind();
}
}
// The rest of the code is boilerplate stuff
// such as onCreate.
}
The first several lines of Listing 3-7 are parallel to the code in Listing 3-6. Like the service in Listing 3-6, the client in Listing 3-7 has messengers and an incoming handler class.
Figure 3-3 shows a layout that I created for the activity in Listing 3-7. The bind, queryService, and unbind methods in Listing 3-7 handle the button clicks in Figure 3-3. (This section’s service doesn’t care what city you’re in, so the EditText view set up for a city name or zip code in Figure 3-3 doesn’t serve any purpose. It’s a placeholder for user input in subsequent examples.)
Informing the user
Near the bottom of Figure 3-3, there’s a rounded rectangle containing the words Message handled. The rectangle illustrates the use of Android’s Toast class. A toast is an unobtrusive little view that displays some useful information for a brief period of time. A toast view pops up on the screen, the way a hot piece of bread pops up from a toaster. (Rumor has it that the Android class name Toast comes from this goofy analogy.)
Figure 3-3: A user interface for the activity in Listing 3-7.
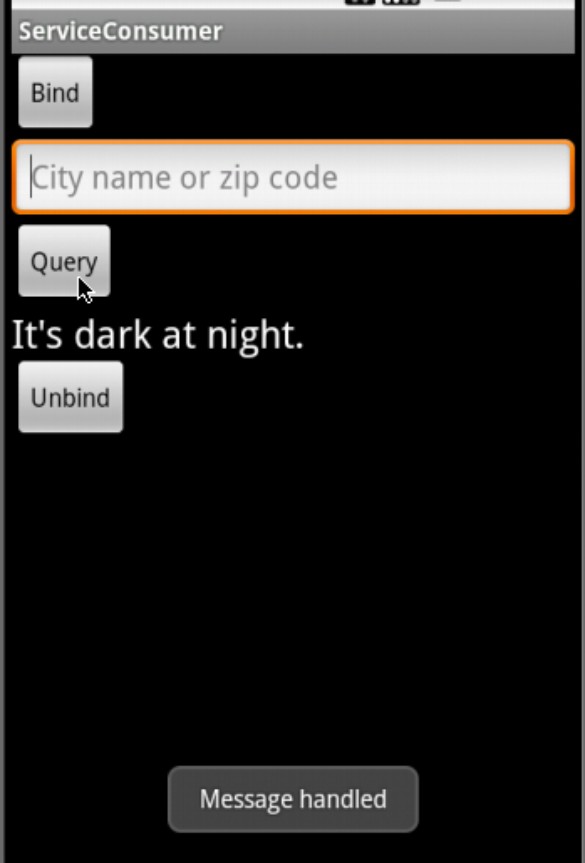
A toast view typically displays a message for the user to read. So Android developers often talk about toast messages. In principle, there’s nothing wrong with the term toast message. But much of this chapter deals with instances of the android.os.Message class — messages sent between a service and its client. And near the bottom of Figure 3-3, the words Message handled refer to a message between a service and its client, not to a toast message. So in Figure 3-3, a toast message informs the user about a completely different kind of message. What’s an author to do? In this chapter, I use the word message to refer to communication between a service and its client. In other chapters, I throw around the words toast message without worrying about the problem.
The Toast class has two extremely useful methods: makeText and show.
• The static Toast.makeText method creates an instance of the Toast class.
The makeText method has three parameters.
• The first parameter is a context (the word this in Listing 3-7).
• The second parameter is either a resource or a sequence of characters (a String, for example).
If you call makeText with a String, the user sees the String when Android displays the toast. If you call makeText with a resource, Android looks for the resource in your app’s res directory. In Listing 3-7, the code calls makeText twice — once with resource R.string.service_connected and once with R.string. service_crashed.
If you use an int value (42, for example) for the second parameter of the makeText method, Android doesn’t display the characters 42 in the toast view. Instead, Android looks for a resource whose value in R.java is 42. Your R.java file probably doesn’t contain the number 42. So instead of a toast view, you get a ResourceNotFound exception. Your app crashes, and you groan in dismay.
• The makeText method’s third parameter is either Toast.LENGTH_LONG or Toast.LENGTH_SHORT. With LENGTH_LONG, the toast view appears for about four seconds. With LENGTH_SHORT, the toast view appears for approximately two seconds.
• The show method tells Android to display the toast view.
In Listing 3-7, notice that I call both makeText and show in one Java statement. If you forget to call the show method, the toast view doesn’t appear. You stare in disbelief wondering why you don’t see the toast view. (“Who stole my toast?” you ask.) When you finally figure out that you forgot to call the show method, you feel foolish. (At least that’s the way I felt when I forgot earlier today.)
Binding to the service
In Listing 3-7, the call to bindService takes three parameters — an intent, a service connection, and an int value representing flags.
• The intent helps determine which service to invoke.
In Listing 3-7, the intent has action “com.allmycode.WEATHER”. That’s good because my service’s AndroidManifest.xml file contains the following elements:
<application android:icon=”@drawable/icon”
android:label=”@string/app_name”>
<service android:name=”.MyWeatherService”>
<intent-filter>
<action android:name=”com.allmycode.WEATHER” />
</intent-filter>
</service>
</application>
(Only a snippet from the AndroidManifest.xml file appears in this chapter.)
• The connection is the virtual rope between the client and the service.
The connection parameter in Listing 3-7 implements the android.content.ServiceConnection interface. I define the MyServiceConnection class later in Listing 3-7.
Notice that in one of the MyServiceConnection class’s methods, Android hands the service’s business card (the binder) to the client. This is a bit different from the code in Listing 3-6, where the service gets replyTo information from each incoming message. The difference stems from the way the client and the service talk to each other. The client initiates communications, and the service twiddles its virtual thumbs waiting for communications.
Another thing to notice about MyServiceConnection is the peculiar role of the onServiceDisconnected method. As the toast implies, Android doesn’t call onServiceDisconnected unless the service takes a dive prematurely.
• The flags provide additional information about the run of the service.
When Android needs more memory, Android terminates processes. In Listing 3-7, the flag BIND_AUTO_CREATE tells Android to avoid terminating the service’s process while your activity runs. An alternative, BIND_NOT_FOREGROUND, tells Android not to consider your activity’s needs when deciding whether to terminate the service’s process.
Querying the service
In Listing 3-7, the queryService method asks the service for the answer to a question. Here’s what the queryService method does:
1. The queryService method obtains a blank message from the android.os.Message class.
2. The queryService method adds a question (the bundle) to the message.
3. The queryService method tells a messenger to send the message to the service.
A bundle (an instance of android.os.Bundle) is something that a process can write to and that another process can read from. You see a bundle in every activity’s onCreate method. In the world of data communications, sending a message is likened to writing data. So in Listing 3-7, the code juggles bundles.
• The queryService method puts a bundle on a message and then “writes” the message to an Android message queue.
• The handleMessage method in the MyIncomingHandler class “reads” a message from an Android message queue and then gets the message’s bundle for display on the device’s screen.
Using shared preferences to restart a connection
Listing 3-7 contains an important lesson about the life of a service. A service that’s bound to another component (an activity, for example) tends to stay alive. If developers don’t explicitly unbind from services, the services build up and start clogging Android’s pipes. So a good citizen does the housekeeping to unbind services.
So in Listing 3-7, the onDestroy method unbinds the service. So far, so good. But what happens when the user turns the device sideways? Chapter 1 of this minibook reminds you what happens when the user reorients the device — Android destroys the current activity and re-creates the activity in the new orientation. So if you’re not careful, the user loses the service just by moving the device. That’s probably not what you want.
To defend against this problem, use shared preferences. With shared preferences, you can store information. Later, your app (or, if you want, someone else’s app) can retrieve the information.
Here’s how you wield a set of shared preferences:
• To create shared preferences, call the android.content.Context class’s getSharedPreferences method.
For parameters, feed a name and a mode to the method call. In Listing 3-7, the name is the string “PREFS” and the mode is the int value android.content.Context.MODE_PRIVATE. The alternatives are
• MODE_PRIVATE: No other process can read from or write to these preferences.
• MODE_WORLD_READABLE: Other processes can read from these preferences.
• MODE_WORLD_WRITEABLE: Other processes can write to these preferences.
• MODE_MULTI_PROCESS: Other processes can write to these preferences even while a process is in the middle of a read operation. Weird things can happen with this much concurrency. So watch out!
You can combine modes with Java’s bitwise or operator. So a call such as
getSharedPreferences(“PREFS”,
MODE_WORLD_READABLE | MODE_WORLD_WRITEABLE);
makes your preferences both readable and writable for all other processes.
• To add values to a set of shared preferences, use an instance of the android.content.SharedPreferences.Editor class.
In Listing 3-7, the onDestroy method creates a new editor object. Then the code uses the editor to add a name/value pair (“isBound”, isBound) to the shared preferences. The Editor class has methods such as putInt, putString, putStringSet, and so on.
• To finish the job, call the editor’s commit method.
Again, see Listing 3-7.
• To retrieve an existing set of shared preferences, call getSharedPreferences, using the same name as the name you used to create the preferences.
Can you guess which listing contains an example of this code? Yes! Listing 3-7. Look at the listing’s onCreate method.
• To read values from an existing set of shared preferences, call getBoolean, getInt, getFloat, or one of the other get methods belonging to the SharedPreferences class.
In Listing 3-7, the call to getBoolean takes two parameters. The first parameter is the name in whatever name/value pair you’re trying to get. The second parameter is a default value. So when you call prefs.getBoolean(“isBound”, false), if prefs has no pair with name “isBound”, the method call returns false.
In Listing 3-7, the onDestroy method saves the value of isBound. Then, when Android revives the activity, the onCreate method retrieves the isBound value. In effect, the onCreate method “finds out” whether the service was bound before the activity was destroyed. If the service was bound, the code renews its connection, making another call to the bindService method.
Using attributes in an app’s AndroidManifest.xml document, you can keep Android from destroying an activity when the user reorients the device. For information, see Chapter 1 of this minibook.
Getting Real Weather Data
In this section, you do something about the weather. You supplement the code in Listings 3-6 and 3-7 so that your app retrieves real weather data. Fortunately, the code changes don’t require major surgery. Here’s what you do:
• In the client app, get the user’s input from the EditText widget and send this input to the service.
That is, change the statement
bundle.putString(“location”, “Philadelphia”);
in Listing 3-7 to a statement such as
bundle.putString(“location”, locationText.getText()
.toString().trim());
• In the service, send the incoming message’s text to the Google’s weather server.
That is, change the statement
reply.putString(“weather”, “It’s dark at night.”);
in Listing 3-6 to a statement such as
reply.putString(“weather”,
getWeatherString(incomingMessage));
Google’s weather server takes a city name or a zip code and returns an XML document describing the weather at that location. Here’s an abridged version of a response from Google’s weather API:
<xml_api_reply version=”1”>
<weather module_id=”0” tab_id=”0” mobile_row=”0”
mobile_zipped=”1” row=”0” section=”0”>
<forecast_information>
<city data=”San Francisco, CA” />
<postal_code data=”San Francisco” />
<latitude_e6 data=”” />
<longitude_e6 data=”” />
<forecast_date data=”2011-08-07” />
<current_date_time
data=”2011-08-07 18:56:00 +0000” />
<unit_system data=”US” />
</forecast_information>
<current_conditions>
<condition data=”Overcast” />
<temp_f data=”59” />
<temp_c data=”15” />
<humidity data=”Humidity: 77%” />
<icon data=”/ig/images/weather/cloudy.gif” />
<wind_condition data=”Wind: W at 10 mph” />
</current_conditions>
<forecast_conditions>
<day_of_week data=”Sun” />
<low data=”54” />
<high data=”63” />
<icon
data=”/ig/images/weather/mostly_sunny.gif” />
<condition data=”Mostly Sunny” />
</forecast_conditions>
</weather>
</xml_api_reply>
You can get a similar XML response by typing http://www.google.com/ig/api?weather=San%20Francisco in your web browser’s address field. In this address, the characters %20 are the web’s way of encoding a blank space.
• In the service, submit Google’s response to an XML parser.
An XML parser is a program that sifts information from XML files. This section’s code contains a parser that ferrets out the Fahrenheit temperature and the weather condition from Google’s response. (I apologize in advance to non-U.S., non-Belize readers for the use of the Fahrenheit scale. Bad habits are difficult to break.)
In the old days, before XML was commonly used, your app would be screen scraping. Screen scraping refers to the practice of fishing for data in an ordinary web page. In the pre-XML era, your code had to eliminate the page’s colors, font tags, advertisements, and any other irrelevant material. Then your code had to search the page for the current Fahrenheit temperature, making every effort to avoid grabbing next week’s forecast or the cost of a subscription to Weather and Wine Weekly. Then you hoped that any future changes in the website’s layout didn’t spoil the correctness of your code. Undoubtedly, parsing XML is more reliable.
• As a final step, your service gets the result returned from the XML parser and forwards that result to the client app.
Dealing with XML
Listing 3-8 contains a harmless-looking Weather class, and Listing 3-9 contains an XML parser.
Listing 3-8: A Weather Class
package com.allmycode.services;
public class Weather {
private int temperature = 0;
private String condition = “”;
public Weather() {
}
public Integer getTemperature() {
return temperature;
}
public void setTemperature(Integer temperature) {
this.temperature = temperature;
}
public String getCondition() {
return condition;
}
public void setCondition(String condition) {
this.condition = condition;
}
}
Listing 3-9: What to Do When You Find XML Elements
package com.allmycode.services;
import org.xml.sax.Attributes;
import org.xml.sax.SAXException;
import org.xml.sax.helpers.DefaultHandler;
public class MySaxHandler extends DefaultHandler {
private static final String CURRENT_CONDITIONS =
“current_conditions”;
private static final String DATA = “data”;
private static final String CONDITION = “condition”;
private static final String TEMP_F = “temp_f”;
private Weather weather = new Weather();
private boolean current_conditions = false;
public Weather getWeather() {
return weather;
}
@Override
public void startElement(String namespaceURI,
String localName, String qName,
Attributes attributes) throws SAXException {
if (localName.equals(CURRENT_CONDITIONS)) {
current_conditions = true;
} else {
if (current_conditions) {
if (localName.equals(TEMP_F)) {
String dataAttribute =
attributes.getValue(DATA);
weather.setTemperature(Integer
.parseInt(dataAttribute));
} else if (localName.equals(CONDITION)) {
String condAttribute =
attributes.getValue(DATA);
weather.setCondition(condAttribute);
}
}
}
}
@Override
public void endElement(String namespaceURI,
String localName, String qName) throws SAXException {
if (localName.equals(CURRENT_CONDITIONS)) {
current_conditions = false;
}
}
}
The code in Listing 3-9 has more to do with XML than with Android, so I don’t go into detail about the code in Listing 3-9. Briefly, XML parsers come in two popular flavors: SAX parsers and DOM parsers. The acronym SAX stands for Simple API for XML, and the acronym DOM stands for Document Object Model. Listing 3-9 uses SAX because SAX parsers have a smaller memory footprint than DOM parsers.
A DOM parser picks apart an entire XML document, loads all this information into memory, and then lets you query the parser for values anywhere in the document. “What’s the value of the data attribute inside the <temp_f> element in the <current_conditions> element?”, you ask. The DOM parser answers, but only after analyzing the entire document.
A SAX parser scans an XML document one piece at a time, keeping only the current piece in memory. At every step, the parser offers to report its findings. “I found a start tag” or “I found an attribute,” says the parser. The code in Listing 3-9 monitors parser findings for relevant data and adds any useful data to an instance of the Weather class.
For some tips on deciphering the contents of XML documents, see Book II, Chapter 5.
Getting info from an online server
Listing 3-10 contains the code to submit a location to Google’s weather API, to call an XML parser, and to turn the parser’s result into a usable string. Simply add Listing 3-10’s code to the code in Listing 3-7.
Listing 3-10: Getting Weather Information from Google
String getWeatherString(Message message) {
Bundle query = message.getData();
String location = query.getString(“location”);
String weatherString;
if (location != null && !location.equals(“”)) {
Weather weather = getWeather(location);
weatherString =
Integer.toString(weather.getTemperature())
+ (char) 0x00B0 + “F “
+ weather.getCondition();
} else {
weatherString = “It’s dark at night.”;
}
return weatherString;
}
private static final String GOOGLE_WEATHER_URL =
“http://www.google.com/ig/api?weather=”;
public Weather getWeather(String location) {
URL url;
Weather weather = null;
try {
url =
new URL(GOOGLE_WEATHER_URL
+ location.replace(“ “, “%20”));
SAXParser parser =
SAXParserFactory.newInstance().newSAXParser();
XMLReader reader = parser.getXMLReader();
MySaxHandler saxHandler = new MySaxHandler();
reader.setContentHandler(saxHandler);
reader.parse(new InputSource(url.openStream()));
weather = saxHandler.getWeather();
} catch (Exception e) {
e.printStackTrace();
}
return weather;
}
In Listing 3-10, the getWeatherString method extracts the user’s input from the message sent to the service. The method then submits the user’s input to the getWeather method (also in Listing 3-10). In Listing 3-10, the only other excitement comes from the (char) 0x00B0 value. The hex value B0 (decimal value 176) is the Unicode representation for the degree symbol. (See the text view in Figure 3-4.)
Figure 3-4: Displaying weather information.

The getWeather method in Listing 3-10 does what Java programs do when they get a response from a web server and submit the response to a SAX parser. I review the steps briefly because the code is mostly boilerplate. You can paste it into your own app with barely any changes.
1. Create a URL pointing to Google’s weather server.
2. Create a SAXParser instance and then use the parser to get an XMLReader instance (whatever an XMLReader instance is).
3. Create a MySaxHandler instance (see Listing 3-9) and feed the MySaxHandler instance to the XMLReader instance.
4. Connect to Google by creating new InputSource(url.open Stream()).
5. Call the reader’s parse method, feeding Google’s response to the reader.
6. Get a Weather instance from the SAX handler.
Whew!
Talking to a Service as if You’re Right Next Door
Where I come from, you’re thought to be sophisticated if you’re multilingual. Do you speak a foreign language? If so, you’re cool.
Learning a second language is easy. Just find something whose acronym ends with the letter L, and learn how to use it. In this section, you read about AIDL — the Android Interface Definition Language.
Aside from being a language, AIDL is a programming idiom. AIDL is a way of rewriting some of your Java code to make it more natural and more straightforward.
In Listings 3-6 and 3-7, a service and its client pass messages back and forth. The message-passing paradigm is nice, but wouldn’t life be simpler if the client could simply call one of the service’s methods? That’s exactly what AIDL does for your code.
Using AIDL
Here’s how AIDL works:
1. Start with a service and a client, such as the code in Listings 3-6 and 3-7, and create an .aidl file.
The .aidl file describes the kind of information to be passed between the service and the client.
2. Put copies of the .aidl file in both the service’s and the client’s projects.
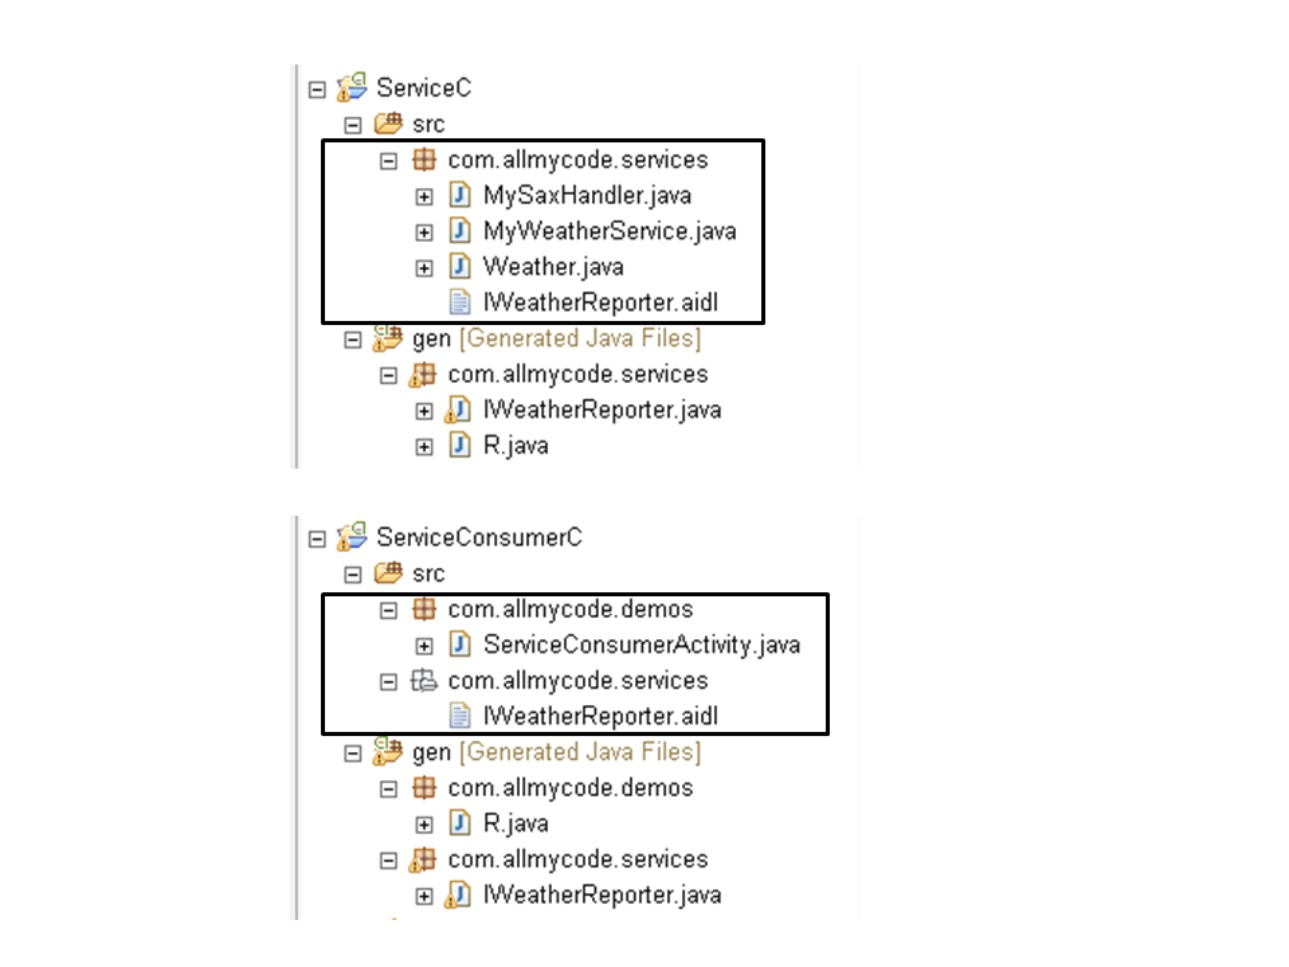
The .aidl file belongs to the service’s package. So to place a copy of the .aidl file in the client’s project, you create a version of the service’s package in the client project. See Figure 3-5, in which, with the help of some fancy photo-editing software, the source folders for both projects are visible.
When you add .aidl files to the two projects, Eclipse automatically generates new Java code. You see evidence of this in Figure 3-5 in the projects’ gen folders.
3. In the client, remove the message-sending code and add code that (at least in appearance) calls the service’s methods directly.
4. In the service, remove references to the Messenger class and the incoming handler class.
With AIDL, neither the client nor the service needs an explicit messenger. In addition, a method inside the service is being called directly (at least in appearance), so the service no longer needs an incoming handler class. (Well, that’s almost true.)
Figure 3-5: The source folders in the server and client projects.
AIDL and Java code
Listing 3-11 shows my WeatherInterface.aidl file. The file is almost a plain old Java source file. The big difference is the use of the non-Java keyword in. This in keyword tells the world that the service’s code receives a String value (rather than sends a String value).
Listing 3-11: The WeatherInterface.aidl File
package com.allmycode.services;
interface WeatherInterface
{
String fetchWeather(in String location);
}
Eclipse automatically generates a WeatherInterface.java file based on the information you supply in the WeatherInterface.aidl file. The WeatherInterface.java code defines a Java interface that extends Android’s own android.os.IInterface. (You see? You don’t write WeatherInterface.java because WeatherInterface.java belongs to one of Android’s packages — not to your package.) You can peek at the gen folder’s WeatherInterface.java file, but you’ll be just as happy if you don’t.
Listing 3-12 contains the AIDL version of the service in Listing 3-6. For your reading pleasure, I’ve set the AIDL-specific code in bold.
Listing 3-12: A Service That Uses AIDL
package com.allmycode.services;
import java.net.URL;
import javax.xml.parsers.SAXParser;
import javax.xml.parsers.SAXParserFactory;
import org.xml.sax.InputSource;
import org.xml.sax.XMLReader;
import android.app.Service;
import android.content.Intent;
import android.os.Bundle;
import android.os.IBinder;
import android.os.Message;
import android.widget.Toast;
public class MyWeatherService extends Service {
@Override
public IBinder onBind(Intent intent) {
doToast(R.string.service_bound);
return new WeatherFetcher();
}
class WeatherFetcher extends WeatherInterface.Stub {
public String fetchWeather(String city) {
String weatherString = null;
if (city != null) {
Weather weather = getWeather(city);
weatherString =
Integer.toString(weather.getTemperature())
+ (char) 0x00B0 + “F “
+ weather.getCondition();
}
return weatherString;
}
}
String getWeatherString(Message message) {
Bundle query = message.getData();
String location = query.getString(“location”);
String weatherString;
if (location != null && !location.equals(“”)) {
Weather weather = getWeather(location);
weatherString =
Integer.toString(weather.getTemperature())
+ (char) 0x00B0 + “F “
+ weather.getCondition();
} else {
weatherString = “It’s dark at night.”;
}
return weatherString;
}
private static final String GOOGLE_WEATHER_URL =
“http://www.google.com/ig/api?weather=”;
public Weather getWeather(String location) {
URL url;
Weather weather = null;
try {
url =
new URL(GOOGLE_WEATHER_URL
+ location.replace(“ “, “%20”));
SAXParser parser =
SAXParserFactory.newInstance().newSAXParser();
XMLReader reader = parser.getXMLReader();
MySaxHandler saxHandler = new MySaxHandler();
reader.setContentHandler(saxHandler);
reader.parse(new InputSource(url.openStream()));
weather = saxHandler.getWeather();
} catch (Exception e) {
e.printStackTrace();
}
return weather;
}
@Override
public boolean onUnbind(Intent intent) {
doToast(R.string.service_stopped_itself);
stopSelf();
return false;
}
@Override
public void onDestroy() {
doToast(R.string.service_destroyed);
}
void doToast(int resource) {
Toast.makeText(this, resource, Toast.LENGTH_SHORT)
.show();
}
}
The code in Listing 3-6 has a messenger and an incoming message handler. The message handler sends a message to be delivered to the client. In contrast, the code in Listing 3-12 has a fetchWeather method, which simply returns a String value. The class in Listing 3-12 can’t shoot the messenger because the class doesn’t even see the messenger.
Listing 3-13 contains the AIDL version of the stuff in Listing 3-7. Once again, I’ve set the AIDL-specific code in bold.
Listing 13-13: A Client That Uses AIDL
package com.allmycode.demos;
import android.app.Activity;
import android.content.ComponentName;
import android.content.Context;
import android.content.Intent;
import android.content.ServiceConnection;
import android.content.SharedPreferences;
import android.os.Bundle;
import android.os.IBinder;
import android.os.RemoteException;
import android.view.View;
import android.view.View.OnClickListener;
import android.widget.Button;
import android.widget.EditText;
import android.widget.TextView;
import android.widget.Toast;
import com.allmycode.services.WeatherInterface;
public class ServiceConsumerActivity extends Activity
implements OnClickListener {
WeatherInterface reporter;
ServiceConnection connection =
new MyServiceConnection();
SharedPreferences prefs;
boolean isBound = false;
void bind() {
Intent intent = new Intent();
intent.setAction(“com.allmycode.WEATHER”);
isBound =
bindService(intent, connection,
Context.BIND_AUTO_CREATE);
}
public void queryService() {
if (isBound) {
try {
String report =
reporter.fetchWeather(locationText.getText()
.toString());
textView1.setText(report);
} catch (RemoteException e) {
e.printStackTrace();
}
} else {
textView1.setText(R.string.service_not_bound);
}
}
void unbind() {
if (isBound) {
unbindService(connection);
isBound = false;
}
}
class MyServiceConnection implements ServiceConnection {
public void onServiceConnected(
ComponentName className, IBinder binder) {
reporter =
WeatherInterface.Stub.asInterface(binder);
doToast(R.string.service_connected);
}
public void onServiceDisconnected(ComponentName n) {
doToast(R.string.service_crashed);
}
}
void doToast(int resource) {
Toast.makeText(this, resource, Toast.LENGTH_SHORT)
.show();
}
@Override
public void onDestroy() {
super.onDestroy();
prefs = getSharedPreferences(“PREFS”, MODE_PRIVATE);
SharedPreferences.Editor editor = prefs.edit();
editor.putBoolean(“isBound”, isBound);
editor.putString(“report”, textView1.getText()
.toString());
editor.commit();
unbind();
}
@Override
public void onCreate(Bundle savedInstanceState) {
super.onCreate(savedInstanceState);
setContentView(R.layout.main);
prefs = getSharedPreferences(“PREFS”, MODE_PRIVATE);
if (prefs != null) {
textView1 = (TextView) findViewById(R.id.textView1);
textView1.setText(prefs.getString(“report”,
getString(R.string.report_appears_here)));
if (prefs.getBoolean(“isBound”, false)) {
bind();
}
}
// The rest of the code is boilerplate stuff
// such as onCreate.
}
Upon connecting to the service, the client in Listing 3-13 creates an instance of the AIDL-generated code. The client does this by executing reporter = WeatherInterface.Stub.asInterface(binder). Then, with this new reporter object, the client makes what appears to be an ordinary call to the reporter object’s fetchWeather method.
In Listings 3-12 and 3-13, the developer is free of the messy messaging business when one process communicates with another. So the developer — that’s you! — can concentrate instead on the underlying application logic. Nice stuff!