
Chapter 4: Broadcast Receivers
In This Chapter
![]() Creating broadcast receivers
Creating broadcast receivers
![]() Organizing data from broadcast receivers
Organizing data from broadcast receivers
![]() Restricting a receiver’s access
Restricting a receiver’s access
Chapter 3 of this minibook introduces a broadcast receiver for the purpose of running code at boot time. Here’s a summary of that chapter’s broadcast receiver news:
• When you send a broadcast, Android fires up all the receivers whose filters satisfy the intent.
• A broadcast receiver runs long enough to execute the code in the receiver’s onReceive method. A receiver has no onCreate, on Destroy, or onAnythingElse methods — only onReceive. After Android finishes executing the onReceive method’s code, the broadcast receiver becomes dormant, doing nothing until an app sends another matching broadcast.
This chapter describes broadcast receivers in more detail.
Receivers 101
This chapter’s first example contains the world’s simplest broadcast receiver. To be precise, Listing 4-1 contains the receiver class (MyReceiver, which extends BroadcastReceiver), Listing 4-2 contains code to broadcast to the receiver, and Listing 4-3 contains the example’s AndroidManifest.xml file.
Listing 4-1: A Simple Broadcast Receiver
package com.allmycode.rec1;
import android.content.BroadcastReceiver;
import android.content.Context;
import android.content.Intent;
import android.util.Log;
public class MyReceiver extends BroadcastReceiver {
@Override
public void onReceive(Context arg0, Intent arg1) {
Log.i(“MyRecevier”, “Received a broadcast”);
}
}
A class that extends android.content.BroadcastReceiver must implement the onReceive method. The class in Listing 4-1 says, “When I receive a broadcast, I’ll write an entry in Android’s log file.”
Listing 4-2: A Simple Broadcaster
package com.allmycode.rec1;
import android.app.Activity;
import android.content.Intent;
import android.os.Bundle;
import android.view.View;
public class MyActivity extends Activity {
@Override
public void onCreate(Bundle savedInstanceState) {
super.onCreate(savedInstanceState);
setContentView(R.layout.main);
}
public void onButtonClick(View view) {
Intent intent = new Intent();
intent.setAction(“com.allmycode.ACTION”);
sendBroadcast(intent);
}
}
In Listing 4-2, the onButtonClick method sends a broadcast. The method creates an intent and then feeds the intent to the sendBroadcast broadcast method.
Listing 4-3: Declaring a Broadcast Receiver
<?xml version=”1.0” encoding=”utf-8”?>
<manifest xmlns:android=
“http://schemas.android.com/apk/res/android”
package=“com.allmycode.rec1“
android:versionCode=“1“
android:versionName=“1.0“>
<uses-sdk android:minSdkVersion=“8“ />
<application android:icon=“@drawable/icon“
android:label=“@string/app_name“>
<activity android:name=“.MyActivity“
android:label=“@string/app_name“>
<intent-filter>
<action android:name=
„android.intent.action.MAIN“ />
<category android:name=
„android.intent.category.LAUNCHER“ />
</intent-filter>
</activity>
<receiver android:name=”.MyReceiver”>
<intent-filter>
<action android:name=”com.allmycode.ACTION” />
</intent-filter>
</receiver>
</application>
</manifest>
In Listing 4-3, the receiver’s action is “com.allmycode.ACTION”. And, sure enough, in Listing 4-2, the broadcast intent’s action is also “com.allmycode.ACTION”. With no other constraints in either listing, the broadcast matches the receiver. So when you run the code in Listings 4-1, 4-2, and 4-3, Android calls the receiver’s onReceive method. The method writes an entry to Android’s log file.
Creating a receiver on the fly
Of Android’s four components (Activity, Service, BroadcastReceiver, and ContentProvider), the BroadcastReceiver is the only component that doesn’t require its own AndroidManifest.xml element. Instead of creating a <receiver> element the way I do in Listing 4-3, you can register a broadcast receiver on the fly in your code. Listing 4-4 shows you how.
Listing 4-4: Registering a New Broadcast Receiver
public void onButtonClick(View view) {
IntentFilter filter = new IntentFilter();
filter.addAction(“com.allmycode.ACTION”);
registerReceiver(new MyReceiver(), filter);
Intent intent = new Intent();
intent.setAction(“com.allmycode.ACTION”);
sendBroadcast(intent);
}
With the bold code in Listing 4-4, you eliminate the need for the <receiver> element in Listing 4-3.
Juggling receivers and broadcasts
You can create several instances of a broadcast receiver and send several broadcasts. Listings 4-5 and 4-6 illustrate the situation.
Listing 4-5: Registering Several Receivers
public void onButtonClick(View view) {
IntentFilter filter = new IntentFilter();
filter.addAction(“com.allmycode.ACTION”);
MyReceiver receiver = new MyReceiver();
registerReceiver(receiver, filter);
registerReceiver(receiver, filter);
registerReceiver(new MyReceiver(), filter);
Intent intent = new Intent();
intent.setAction(“com.allmycode.ACTION”);
sendBroadcast(intent);
Log.i(“MyActivity”,
“Sent a broadcast; about to send another...”);
sendBroadcast(intent);
}
Listing 4-6: Entries in the Log
MyActivity(280): Sent a broadcast; about to send another...
MyRecevier(280): Received a broadcast
MyRecevier(280): Received a broadcast
MyRecevier(280): Received a broadcast
MyRecevier(280): Received a broadcast
Listing 4-5 contains an alternative to the onButtonClick method in Listing 4-2, and Listing 4-6 shows the output (using the MyReceiver class from Listing 4-1). Here’s how it all works:
• Listing 4-5 registers two instances of MyReceiver.
Sure, the code in Listing 4-5 calls registerReceiver three times. But the second call is redundant because it contains the same MyReceiver instance as the first registerReceiver call.
• Listing 4-5 sends two broadcasts.
No argument about that.
• After sending the first of the two broadcasts, the activity logs the words Sent a broadcast; about to send another....
But in Listing 4-6, you see log entries in a different order. In Listing 4-6, you see the activity bragging about having sent one broadcast. Then you see two broadcasts landing on two receivers (for a total of four log entries).
Remember that a broadcast isn’t a method call. Sending a broadcast means flinging a message to the Android operating system. The system then calls onReceive methods in its own good time. So calls to on Receive (and their corresponding log entries) arrive out of sync with the sender’s code. That asynchronous affect happens even if the sender and receiver classes belong to the same app.
How to unregister a receiver
You can unregister, reregister, and re-unregister broadcast receivers. You can even un-re-un-re-unregister broadcast receivers. Listings 4-7 and 4-8 illustrate all this with some code.
Listing 4-7: Registering and Unregistering
public void onButtonClick(View view) {
IntentFilter filter = new IntentFilter();
filter.addAction(“com.allmycode.ACTION”);
filter.addDataScheme(“letter”);
MyReceiver receiver1 = new MyReceiver(1);
MyReceiver receiver2 = new MyReceiver(2);
registerReceiver(receiver1, filter);
registerReceiver(receiver2, filter);
Intent intent = new Intent();
intent.setAction(“com.allmycode.ACTION”);
intent.setData(Uri.parse(“letter:A”));
sendBroadcast(intent);
unregisterReceiver(receiver1);
sendBroadcast(intent);
intent.setData(Uri.parse(“letter:B”));
sendBroadcast(intent);
registerReceiver(receiver1, filter);
}
In Listing 4-7, I give each receiver its own int value in the receiver’s constructor call. This helps the receiver identify itself in a log entry. I also add identifying letters to the code’s intents. But I break my bad habit of pasting extras onto intents. Instead, I create my own URI scheme (the Letter scheme) and send an opaque URI along with each intent.
 An opaque URI is a URI that has no particular structure to the right of the first colon. I describe opaque URIs in Chapter 2 of this minibook.
Listing 4-8 contains the receiver’s code. The receiver writes its number and the broadcast’s letter to each log entry.
Listing 4-8: A More Verbose Broadcast Receiver
package com.allmycode.rec1;
import android.content.BroadcastReceiver;
import android.content.Context;
import android.content.Intent;
import android.util.Log;
public class MyReceiver extends BroadcastReceiver {
private int number;
public MyReceiver(int number) {
this.number = number;
}
@Override
public void onReceive(Context context, Intent intent) {
String letter =
intent.getData().getSchemeSpecificPart();
Log.i(“MyRecevier”, number + “ Received a broadcast “
+ letter);
}
}
What’s the log output of the code in Listings 4-7 and 4-8? Listing 4-9 has the answer.
Listing 4-9: Entries in the Log
MyRecevier(278): 1 Received a broadcast A
MyRecevier(278): 2 Received a broadcast A
MyRecevier(278): 2 Received a broadcast A
MyRecevier(278): 2 Received a broadcast B
Here’s what happens when you run the code in Listing 4-7:
• The code registers two instances of MyReceiver, numbered 1 and 2.
• The code sends a broadcast with letter A.
Both receivers get the broadcast. (See the first two lines in Listing 4-9.)
• The code unregisters receiver1.
At this point, only receiver2 is registered.
• The code sends another broadcast with letter A.
Only receiver2 gets the broadcast. (See the third line in Listing 4-9.)
• The code sends another broadcast with letter B.
Again, receiver2 gets the broadcast. (See the last line in Listing 4-9.)
• The code re-registers receiver1.
Too late. All the broadcasts have propagated through the system, and each broadcast has died its own quiet death. So receiver1 doesn’t get a broadcast, and nothing new appears in Listing 4-9.
A receiver can continue to receive until you unregister the receiver. (Notice how receiver2 gets all three broadcasts in this section’s example.)
In contrast, Android wipes away a broadcast after the broadcast reaches all currently registered receivers. (At the end of this section’s example, re- registering receiver1 has no visible affect because all the code’s broadcasts have run their course.)
The preceding paragraph says, “Android wipes away a broadcast after the broadcast reaches all currently registered receivers.” That’s a half-truth. You can send a broadcast that sticks around on the system long after the broadcast has finished reaching all currently registered receivers. In other words, you can create a sticky broadcast. To find out more about it, skip ahead to the “How to be a stickler” section.
 When I write “registered receivers,” I include any receivers declared in the
 AndroidManifest.xml file. You don’t call registerReceiver to start these manifest file broadcast receivers. Android registers an instance of each manifest file receiver when you install the file’s app. If you happen to call registerReceiver for a receiver that you’ve declared in the AndroidManifest.xml file, Android responds by registering an additional instance of your broadcast receiver class.
Beyond the Fundamentals
The earlier section deals with some minimalist, no-nonsense broadcast receiver examples. This section covers some additional broadcast receiver features.
Managing receivers
The previous section’s code is nice and simple. At least I think it’s nice because I’m a teacher, both by profession and in spirit. I like the little examples, even if they’re not sturdy enough to survive real-world use.
But some hard-core developers don’t agree with me. They’d call Listings 4-4, 4-5, and 4-7 “bad and simple” because (and I’m being painfully honest) the code in these listings can’t take a beating in the real world. In fact, the code in these listings probably wouldn’t survive gentle petting. To find out why, try this experiment:
1. Create a brand-new Android project with target API 8 or greater.
Actually, APIs earlier than API 8 are okay. But with earlier APIs, views don’t have the nice android:onClick attribute. So with an earlier API you extend OnClickListener and do some other boring stuff.
2. Start with the activity code in Listing 4-2.
3. Change the activity’s onButtonClick method to match the code in Listing 4-4.
4. In the main.xml layout, add a button whose click-handler is the activity’s onButtonClick method.
5. Use the AndroidManifest.xml document in Listing 4-3.
6. Run the app.
7. While you wait for the app to load, switch to Eclipse’s DDMS perspective.
For details on switching between Eclipse perspectives, see Book II, Chapter 1.
When the app finishes loading, you see a button on the emulator’s screen. It’s the button that you created in Step 4.
8. Click the button, and look at the resulting entries in Eclipse’s LogCat view.
You see two MyReceiver Received a broadcast entries because Android is running two MyReceiver instances. One instance comes from the <receiver> element in the AndroidManifest.xml document. The other receiver comes from the registerReceiver method call in Listing 4-4.
Having two MyReceiver instances isn’t bad. But in most cases, it’s probably not what you want. Observing these two instances is a side benefit that comes from performing this experiment.
9. While the app is still running, press the emulator’s Back button, and look again at Eclipse’s LogCat view.
In Eclipse’s LogCat view, you see a big, ugly activity has leaked IntentReceiver error message. The message tells you that Android has destroyed your activity and (because you forgot to do it . . .) Android has also unregistered one of your MyReceiver instances.
If you call registerReceiver, Android wants you to unregister the receiver before terminating your activity. When you press the Back button, Android calls your activity’s onPause, onStop, and onDestroy methods. In this experiment’s code, you don’t override the inherited onPause, onStop, and onDestroy methods, so Android calls these inherited methods.
In this experiment, Android finds the inherited onDestroy method particularly painful. You’re getting rid of your activity and leaving your registered receiver in limbo. If lots of developers do the same thing, the user’s Android device experiences the Night of the Living Broadcast Receivers.
So Android says, “If you refuse to clean up after yourself, I’ll clean up for you. I’ll terminate your broadcast receiver. And just like your mother, I’ll show my disapproval by writing an entry to the log file.” (If only Mom had been so even-tempered!)
Android doesn’t like the MyReceiver instance that I register and don’t unregister in Listing 4-4. But Android isn’t upset about the MyReceiver instance from the AndroidManifest.xml file (see Listing 4-3). Android expects receivers declared this way to have a life of their own, surviving past the lifetime of any activities in the application.
 The error message
 activity has leaked IntentReceiver hints that the SDK has an IntentReceiver class. But that’s misleading. The name IntentReceiver is an artifact from Android’s early history. What used to be called an IntentReceiver is now a BroadcastReceiver.
You might not be impressed by Step 9’s activity has leaked IntentReceiver message. After all, Android doesn’t alert the user, so your app doesn’t look bad. And when the user clicks the Back button, you probably don’t mind that Android terminates your broadcast receiver. So what’s the big deal? Well, try the next few steps . . .
10. Restart this section’s app.
11. Again, press the button on the activity’s screen to invoke the code in Listing 4-4.
12. While the app is still running, turn the emulator sideways by pressing Ctrl+F11.
Of course, if you’re testing on a real device, simply turn the device sideways.
In Eclipse’s LogCat view, look again for the insulting activity has leaked IntentReceiver error message. Unless you override the default behavior, Android destroys and re-creates your activity when the device’s orientation changes. As far as the user is concerned, the activity is still alive and well. But unbeknownst to the user, Android killed the broadcast receiver and hasn’t revived it.
This anomaly makes little difference in Listing 4-4, where you register the receiver and send a broadcast using the same button. But the state of your process has changed considerably. In a real-life app, you’ve lost a broadcast receiver just by tilting the device. It’s difficult to imagine a scenario in which you want that to happen.
In most of this chapter’s simple examples, I register and unregister receivers in an onButtonClick method. That’s okay if I include logic to deal with the nastiness in this section’s example. Of course, the logic can become complicated, and it’s easy to make mistakes.
In general, the easiest way to deal with runtime receiver registrations is to register and unregister in the activity’s complementary lifecycle methods. Listing 4-10 shows you what to do.
Listing 4-10: Dealing with the Component Lifecycle
package com.allmycode.rec1;
import android.app.Activity;
import android.content.Intent;
import android.content.IntentFilter;
import android.os.Bundle;
import android.view.View;
public class MyActivity extends Activity {
MyReceiver receiver = new MyReceiver();
@Override
public void onCreate(Bundle savedInstanceState) {
super.onCreate(savedInstanceState);
setContentView(R.layout.main);
}
@Override
public void onResume() {
super.onResume();
IntentFilter filter = new IntentFilter();
filter.addAction(“com.allmycode.ACTION”);
registerReceiver(receiver, filter);
}
@Override
public void onPause() {
super.onPause();
unregisterReceiver(receiver);
}
public void onButtonClick(View view) {
Intent intent = new Intent();
intent.setAction(“com.allmycode.ACTION”);
sendBroadcast(intent);
}
}
I can state the big message in Listing 4-10 very simply: Make things in an activity’s onResume method and then get rid of these things in the activity’s onPause method. If you want things to live longer, make things in the activity’s onCreate method and get rid of these things in the activity’s on Destroy method. That’s it. (And yes, I’m aware that I wrote this three-page section to pontificate about something that I can summarize at the end in only two sentences. Thanks for noticing!)
How to be a stickler
An ordinary broadcast disintegrates after it’s sent to all the matching, currently running receivers. But another kind of broadcast — a sticky broadcast — hangs on until someone or something explicitly removes the broadcast. To remove a sticky broadcast, you can call removeStickyBroadcast. Alternatively, you can turn off your device, hit your device with a hammer, or do other unpleasant things. Listing 4-11 contains some informative code.
Listing 4-11: Sending a Sticky Broadcast
public void onButtonClick(View view) {
IntentFilter filter = new IntentFilter();
filter.addAction(“com.allmycode.ACTION”);
filter.addDataScheme(“letter”);
MyReceiver receiver1 = new MyReceiver(1);
MyReceiver receiver2 = new MyReceiver(2);
MyReceiver receiver3 = new MyReceiver(3);
Intent intent = new Intent();
intent.setAction(“com.allmycode.ACTION”);
intent.setData(Uri.parse(“letter:A”));
registerReceiver(receiver1, filter);
sendStickyBroadcast(intent);
registerReceiver(receiver2, filter);
removeStickyBroadcast(intent);
registerReceiver(receiver3, filter);
}
With the sending and registering business in Listing 4-11 and the receiver I set up back in Listing 4-8, Android logs the entries shown in Listing 4-12.
Listing 4-12: Log File Entries
MyRecevier(282): 1 Received a broadcast A
MyRecevier(282): 2 Received a broadcast A
In Listing 4-11, I register receiver1 before sending the broadcast. So receiver1 receives the broadcast. No big deal here.
At this point in the run of Listing 4-11, receiver1 is the only currently registered receiver, and receiver1 has received the broadcast. But the broadcast is sticky, so the broadcast lives on. On the next line of code, when I register receiver2 in Listing 4-11, receiver2 receives the broadcast. That’s what stickiness does.
In the last two statements of Listing 4-11, I remove the sticky broadcast (with a method call, not with turpentine), and I register receiver3. Because I’ve removed the only matching broadcast, receiver3 receives nothing.
A component that calls sendStickyBroadcast (or calls the closely related sendStickyOrderedBroadcast method) must have the <uses-permission android:name=”android.permission.BROADCAST_STICKY” /> element in its app’s AndroidManifest.xml document. A component that calls sendBroadcast (or its friend, the sendOrderedBroadcast method) doesn’t need permission to do so.
Using receiver intents
At some point, you might have several receivers and several sticky broadcasts vying for attention in a multiprocess, nondeterministic fashion. Sounds like fun, doesn’t it? You may also be dealing with broadcasts from other apps and from the system itself. To help you keep track of the comings and goings, the registerReceiver method returns an intent. This intent comes from one of the (possibly many) broadcasts that the newly registered receiver catches.
In Listing 4-13, I register two receivers and fling two sticky broadcasts (“letter:A” and “letter:O”) into the air. For each receiver registration, Listing 4-13 logs an intent caught by the receiver.
Listing 4-13: Getting an Intent from a Receiver’s Registration
public void onButtonClick(View view) {
IntentFilter filter = new IntentFilter();
filter.addAction(“com.allmycode.ACTION”);
filter.addAction(“com.allmycode.OTHER_ACTION”);
filter.addDataScheme(“letter”);
MyReceiver receiver1 = new MyReceiver(1);
MyReceiver receiver2 = new MyReceiver(2);
Intent returnedIntent =
registerReceiver(receiver1, filter);
Log.i(“MyActivity”, getStatus(returnedIntent));
Intent intentAct = new Intent();
intentAct.setAction(“com.allmycode.ACTION”);
intentAct.setData(Uri.parse(“letter:A”));
sendStickyBroadcast(intentAct);
Intent intentOth = new Intent();
intentOth.setAction(“com.allmycode.OTHER_ACTION”);
intentOth.setData(Uri.parse(“letter:O”));
sendStickyBroadcast(intentOth);
returnedIntent = registerReceiver(receiver2, filter);
Log.i(“MyActivity”, getStatus(returnedIntent));
}
private String getStatus(Intent returnedIntent) {
if (returnedIntent == null) {
return “null”;
} else {
return returnedIntent.toString();
}
}
Listing 4-14 shows the results of a run of Listing 4-13’s code (using the receiver in Listing 4-8). The first registration returns null rather than an actual intent. This happens because no broadcast is alive when the code executes this first registration.
Listing 4-14: Log This!
MyActivity(313): null
MyActivity(313):
Intent { act=com.allmycode.ACTION dat=letter:A }
MyRecevier(313): 1 Received a broadcast A
MyRecevier(313): 1 Received a broadcast O
MyRecevier(313): 2 Received a broadcast A
MyRecevier(313): 2 Received a broadcast O
The second receiver registration returns the “com.allmycode.ACTION” intent. The receiver’s filter has both “com.allmycode.ACTION” and “com.allmycode.OTHER_ACTION”, and both of these actions belong to active sticky broadcasts. But the call to registerReceiver returns only one of the broadcasts’ intents.
One way or another, two receivers catch two broadcasts. The final four entries in Listing 4-14 contain reports from the receivers themselves. Notice how, in its typical asynchronous flurry, Android logs all the receivers’ steps after returning from the second registerReceiver call. Without concurrent processing, Android would complete a receiver’s onReceive method before returning from the second registerReceiver call. You’d see lines in Listing 4-14 in a different order.
Ordered broadcasts
Android takes a regular broadcast and throws it into the air. Then the receivers with matching filters jump like basketball players, catching the broadcast in no particular order. This “no particular order” behavior can be nice because it frees up the system to make the most of any available processing time.
But occasionally you want a predictable sequence of onReceive calls. To achieve such behavior, you assign priorities to the receivers’ intent filters and then send an ordered broadcast.
In this chapter’s log listings, receivers seem to form a first-come/first-served waiting line to catch broadcasts. That’s fine. But in general, Android makes no promises about this polite behavior. In fact, Android might run two receivers at once. You never know.
Listing 4-15 prioritizes receivers and sends an ordered broadcast.
Listing 4-15: Set Your Priorities
public void onButtonClick(View view) {
IntentFilter filter = new IntentFilter();
filter.addAction(“com.allmycode.ACTION”);
filter.addDataScheme(“letter”);
IntentFilter filter1 = new IntentFilter(filter);
IntentFilter filter2 = new IntentFilter(filter);
IntentFilter filter3 = new IntentFilter(filter);
filter1.setPriority(17);
filter2
.setPriority(IntentFilter.SYSTEM_HIGH_PRIORITY - 1);
filter3.setPriority(-853);
MyReceiver receiver1 = new MyReceiver(1);
MyReceiver receiver2 = new MyReceiver(2);
MyReceiver receiver3 = new MyReceiver(3);
registerReceiver(receiver1, filter1);
registerReceiver(receiver2, filter2);
registerReceiver(receiver3, filter3);
Intent intent = new Intent();
intent.setAction(“com.allmycode.ACTION”);
intent.setData(Uri.parse(“letter:A”));
sendOrderedBroadcast(intent, null);
Log.i(“MyActivity”,
“Now watch the log entries pour in...”);
}
From a single intent filter, Listing 4-15 stamps out three copies. Then the code assigns a priority to each copy. Priorities are int values, ranging from @nd999 to 999. Android reserves the values –1000 (IntentFilter.SYSTEM_LOW_PRIORITY) and 1000 (IntentFilter.SYSTEM_HIGH_PRIORITY) for its own private use.
 You can set an intent filter’s priority in an app’s
 AndroidManifest.xml document. Do so with an attribute, such as android:priority=”17”.
After registering three receivers (one for each of the three filters), Listing 4-15 sends an ordered broadcast and lets the chips fall where they may. The chips fall in Listing 4-16.
Listing 4-16: Yet Another Log
MyActivity(284): Now watch the log entries pour in...
MyRecevier(284): 2 Received a broadcast A
MyRecevier(284): 1 Received a broadcast A
MyRecevier(284): 3 Received a broadcast A
Listing 4-16 confirms that receiver2 — the receiver with highest priority — receives the broadcast first. Poor receiver3 — the receiver with the lowest priority — receives the broadcast last.
Stopping a broadcast in its tracks
In the preceding section, an ordered broadcast travels from one receiver to another. The sequence of receivers depends on their relative priorities.
In this section, you play a nasty trick on all but one of the receiver instances. Change the MyReceiver class’s code, as in Listing 4-17.
Listing 4-17: Aborting a Broadcast
package com.allmycode.rec1;
import android.content.BroadcastReceiver;
import android.content.Context;
import android.content.Intent;
import android.util.Log;
public class MyReceiver extends BroadcastReceiver {
private int number;
public MyReceiver(int number) {
this.number = number;
}
@Override
public void onReceive(Context context, Intent intent) {
String letter =
intent.getData().getSchemeSpecificPart();
Log.i(“MyRecevier”, number + “ Received a broadcast “
+ letter);
abortBroadcast();
}
}
With the call to abortBroadcast in Listing 4-17, a run of the code in Listing 4-15 creates only two log entries:
MyActivity(281): Now watch the log entries pour in...
MyRecevier(281): 2 Received a broadcast A
The second log entry comes from an instance of the receiver in Listing 4-17. The listing’s call to abortBroadcast stops the ordered broadcast in its tracks. Other instances of MyReceiver never see the broadcast.
The abortBroadcast method works only with ordered broadcasts. Normally, you have a MyReceiver instance abort a broadcast so that some other receiver (maybe a YourReceiver instance) doesn’t get the broadcast. But in this chapter’s examples, I keep things simple by creating only one MyReceiver class and several instances of the class.
Getting results from receivers
What will they think of next? You have sticky broadcasts and ordered broadcasts. Why not have a broadcast that’s both sticky and ordered? Developers typically use sticky, ordered broadcasts to collect results from several broadcast receivers.
Listing 4-18 contains a receiver on steroids.
Listing 4-18: A Receiver Manages Data
package com.allmycode.rec1;
import java.util.ArrayList;
import android.app.Activity;
import android.content.BroadcastReceiver;
import android.content.Context;
import android.content.Intent;
import android.os.Bundle;
import android.util.Log;
public class MyReceiver extends BroadcastReceiver {
private int number;
private boolean INTENTIONALLY_FAIL = false;
public MyReceiver(int number) {
this.number = number;
}
@Override
public void onReceive(Context context, Intent intent) {
String letter =
intent.getData().getSchemeSpecificPart();
Log.i(“MyRecevier”, number + “ Received a broadcast “
+ letter);
if (INTENTIONALLY_FAIL) {
setResultCode(Activity.RESULT_CANCELED);
return;
}
if (getResultCode() == Activity.RESULT_OK) {
Bundle bundle = getResultExtras(true);
ArrayList<Integer> receiverNums =
bundle.getIntegerArrayList(“receiverNums”);
if (receiverNums != null) {
receiverNums.add(new Integer(number));
}
setResultExtras(bundle);
}
}
}
An ordered broadcast goes to an ordered chain of receiver instances. Along with the broadcast, each receiver instance gets result extras from the previous receiver in the chain. These result extras take the form of a bundle.
For the lowdown on bundles, see Chapter 3 of this minibook.
An instance of the receiver in Listing 4-18 gets a bundle containing an ArrayList of integers. This ArrayList happens to contain the numbers of all the previous receiver instances in the ordered broadcast’s chain. The instance in Listing 4-18 adds its own number to the ArrayList and then sets its own result to be the newly enhanced ArrayList. The next receiver instance in the chain gets this newly enhanced ArrayList.
An ordered broadcast also comes with an int valued code. In Listing 4-18, the call to getResultCode checks for the android.app.Activity.RESULT_OK code. Any receiver instance in the chain can mess up the works with a result code that’s not OK.
In Listing 4-18, I add an extra INTENTIONALLY_FAIL constant to test undesirable situations. Changing the constant’s value to true forces Listing 4-18 to set the result code to android.app.Activity.RESULT_CANCELED. After that, any result from the ordered broadcast can’t be trusted.
Always remove testing and debugging code (such as the INTENTIONALLY_FAIL code in Listing 4-18) before you publish your app.
Listing 4-19 puts the receiver in Listing 4-18 through its paces.
Listing 4-19: Dealing with the Result from a Chain of Receivers
package com.allmycode.rec1;
import java.util.ArrayList;
import android.app.Activity;
import android.content.BroadcastReceiver;
import android.content.Context;
import android.content.Intent;
import android.content.IntentFilter;
import android.net.Uri;
import android.os.Bundle;
import android.util.Log;
import android.view.View;
public class MyActivity extends Activity {
@Override
public void onCreate(Bundle savedInstanceState) {
super.onCreate(savedInstanceState);
setContentView(R.layout.main);
}
public void onButtonClick(View view) {
IntentFilter filter = new IntentFilter();
filter.addAction(“com.allmycode.ACTION”);
filter.addDataScheme(“letter”);
IntentFilter filter1 = new IntentFilter(filter);
IntentFilter filter2 = new IntentFilter(filter);
IntentFilter filter3 = new IntentFilter(filter);
MyReceiver receiver1 = new MyReceiver(1);
MyReceiver receiver2 = new MyReceiver(2);
MyReceiver receiver3 = new MyReceiver(3);
registerReceiver(receiver1, filter1);
registerReceiver(receiver2, filter2);
registerReceiver(receiver3, filter3);
Intent intent = new Intent();
intent.setAction(„com.allmycode.ACTION“);
intent.setData(Uri.parse(„letter:A“));
MyEndResultReceiver resultReceiver =
new MyEndResultReceiver();
ArrayList<Integer> receiverNums =
new ArrayList<Integer>();
Bundle bundle = new Bundle();
bundle.putIntegerArrayList(“receiverNums”,
receiverNums);
sendStickyOrderedBroadcast(intent, resultReceiver,
null, Activity.RESULT_OK, null, bundle);
}
}
class MyEndResultReceiver extends BroadcastReceiver {
final static String CLASSNAME = “MyEndResultReceiver”;
@Override
public void onReceive(Context context, Intent intent) {
if (getResultCode() == Activity.RESULT_OK) {
Bundle bundle = getResultExtras(true);
ArrayList<Integer> receiverNums =
bundle.getIntegerArrayList(“receiverNums”);
Log.i(CLASSNAME, receiverNums.toString());
} else {
Log.i(
CLASSNAME,
“Result code: “
+ Integer.toString(getResultCode()));
}
}
}
In Listing 4-19, the call to sendStickyOrderedBroadcast takes a boatload of parameters. The official signature of method sendStickyOrderedBroadcast is as follows:
public void
sendStickyOrderedBroadcast(Intent intent,
BroadcastReceiver resultReceiver,
Handler scheduler,
int initialCode,
String initialData,
Bundle initialExtras)
• The intent parameter plays the same role as any other broadcast’s intent.
The intent presents a list of criteria to test against receivers’ filters.
• The resultReceiver is the last instance in the ordered broadcast’s calling chain.
By specifying the result receiver, you know where to look for the accumulated results.
• The scheduler (if it’s not null) handles messages coming from the resultReceiver.
• The initialCode is the starting value for the sequence of result codes passed from one receiver to the next.
In most apps, the initialCode’s value is Activity.RESULT_OK. You give the initialCode a different value only when you’re making up your own custom result code values. When you do such a thing, you program your app to respond sensibly to each of the made-up values.
• The initialData (if it’s not null) is a starting value for a string that’s passed from receiver to receiver in the chain.
An ordered broadcast carries a bundle (the result extras) and a code (an int value, such as Activity.RESULT_OK). In addition, an order broadcast carries result data — a String value that can be examined and modified by each receiver instance in the chain.
• The initialExtras is a starting value for the broadcast’s bundle of extra stuff.
In Listing 4-19, the initialExtras bundle is an empty ArrayList. Each receiver instance that gets the broadcast adds its number to this ArrayList.
Listing 4-20 shows the output of the code in Listings 4-18 and 4-19.
Listing 4-20: More Log Entries
MyRecevier(3602): 1 Received a broadcast A
MyRecevier(3602): 2 Received a broadcast A
MyRecevier(3602): 3 Received a broadcast A
MyEndResultReceiver(3602): [1, 2, 3]
The broadcast ends its run at an instance of MyEndResultReceiver — the instance named last in the chain by the sendStickyOrderedBroadcast call in Listing 4-19. When this last receiver does it stuff, the receiver logs [1, 2, 3] — the accumulated ArrayList of receiver numbers.
Using permissions and other tricks
To send a broadcast, you toss an intent into the ether. A broadcast receiver gets the intent if the receiver’s filter matches the intent. And that’s the whole story. Or is it?
When you send a broadcast, you can also specify a permission. Permissions come from those <uses-permission> elements that you put in your AndroidManifest.xml document (after first forgetting to do it and getting an error message). In Listing 4-21, the sendBroadcast call’s second parameter is a permission.
Listing 4-21: Requiring a Permission
public void onButtonClick(View view) {
Intent intent = new Intent();
intent.setAction(“THIS_ACTION”);
sendBroadcast(intent,
android.Manifest.permission.INTERNET);
}
The receiver declared in Listing 4-22 catches the broadcast in Listing 4-21.
Listing 4-22: Declaring That an App Has a Permission
<?xml version=”1.0” encoding=”utf-8”?>
<manifest xmlns:android=
“http://schemas.android.com/apk/res/android”
package=”com.allmycode.receiver2”
android:versionCode=”1”
android:versionName=”1.0”>
<uses-sdk android:minSdkVersion=”8” />
<uses-permission
android:name=”android.permission.INTERNET” />
<application android:icon=”@drawable/icon”
android:label=”@string/app_name”>
<receiver android:name=
“com.allmycode.receiver2.MyReceiverWithPermission”>
<intent-filter>
<action android:name=”THIS_ACTION” />
</intent-filter>
</receiver>
</application>
</manifest>
Another receiver, in an app whose manifest doesn’t have the <uses- permission> element, can’t receive the broadcast from Listing 4-21.
Android’s built-in android.Manifest.permission.INTERNET constant (used in Listing 4-21) has String value “android.permission.INTERNET”. At the risk of being gauche, you can use the quoted string “android.permission.INTERNET” in the Java code of Listing 4-21. But you can’t use the android.Manifest.permission.INTERNET constant in Listing 4-13 or in any other AndroidManifest.xml document.
Android has all kinds of mechanisms for shielding components from other components. For example, you can add an attribute to the <receiver> start tag in Listing 4-22:
<receiver android:name=
“com.allmycode.receiver2.MyReceiverWithPermission”
android:exported=”false”>
If you do, no component outside the receiver’s app can send a broadcast to this receiver.
Standard Broadcasts
Chapter 2 of this minibook contains a list of some standard actions for starting activities. Android’s SDK also contains standard actions for send- ing broadcasts. Table 4-1 has a list of some actions that your app can broadcast.
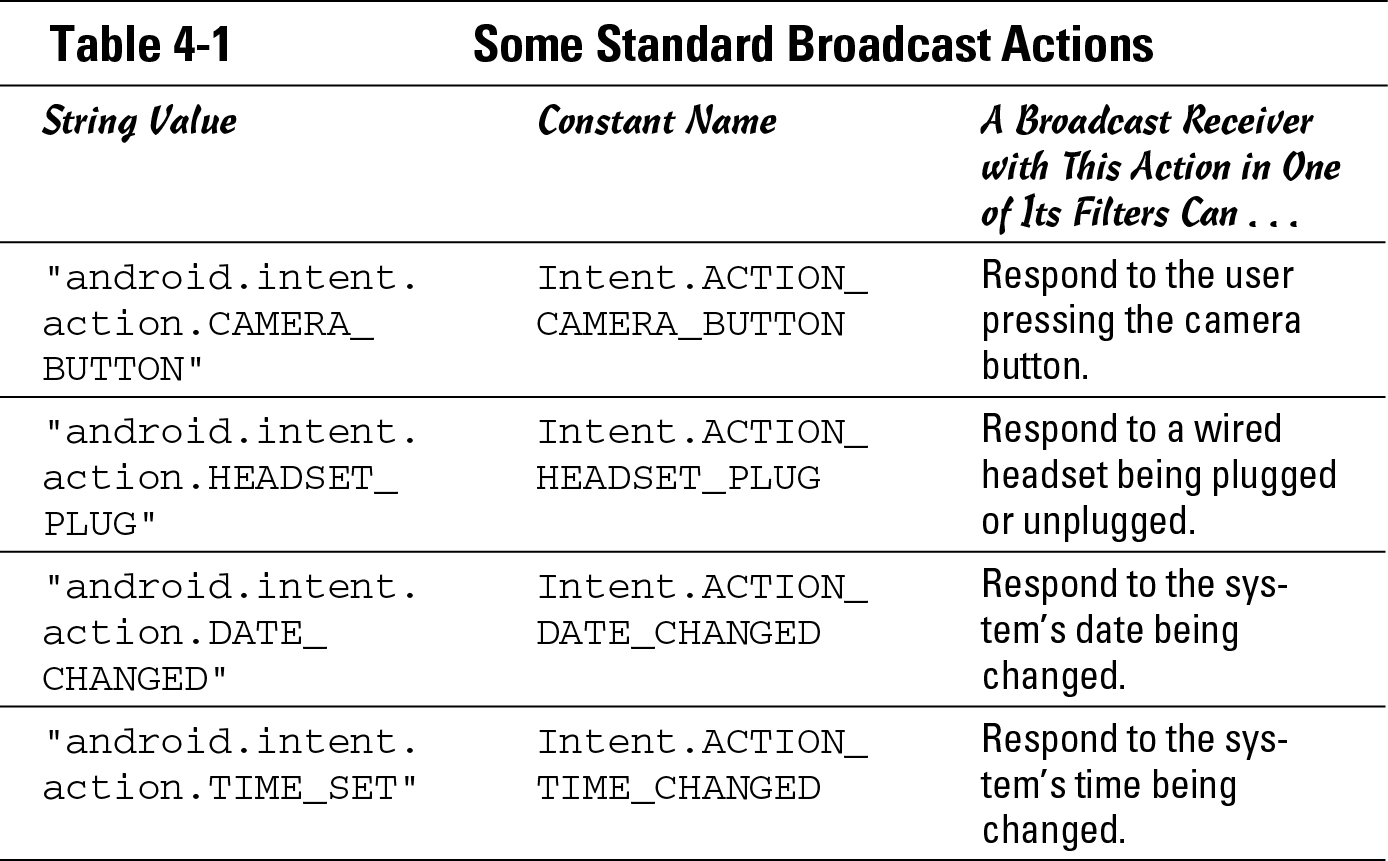
The actions in Table 4-1 are both libre and gratis. Or, to paraphrase Richard Stallman, the actions are free as in “free speech” and free as in “free beer.”* Whatever metaphor you prefer, you can broadcast or receive intents with the actions in Table 4-1.
* From “The Free Software Definition,” www.gnu.org/philosophy/free-sw.html.
The actions in Table 4-2 resemble beer more than they resemble speech. In your app’s code, a broadcast receiver’s filter can include these actions. But your app can’t broadcast an intent having any of these actions. Only the operating system can broadcast intents that include the actions in Table 4-2.
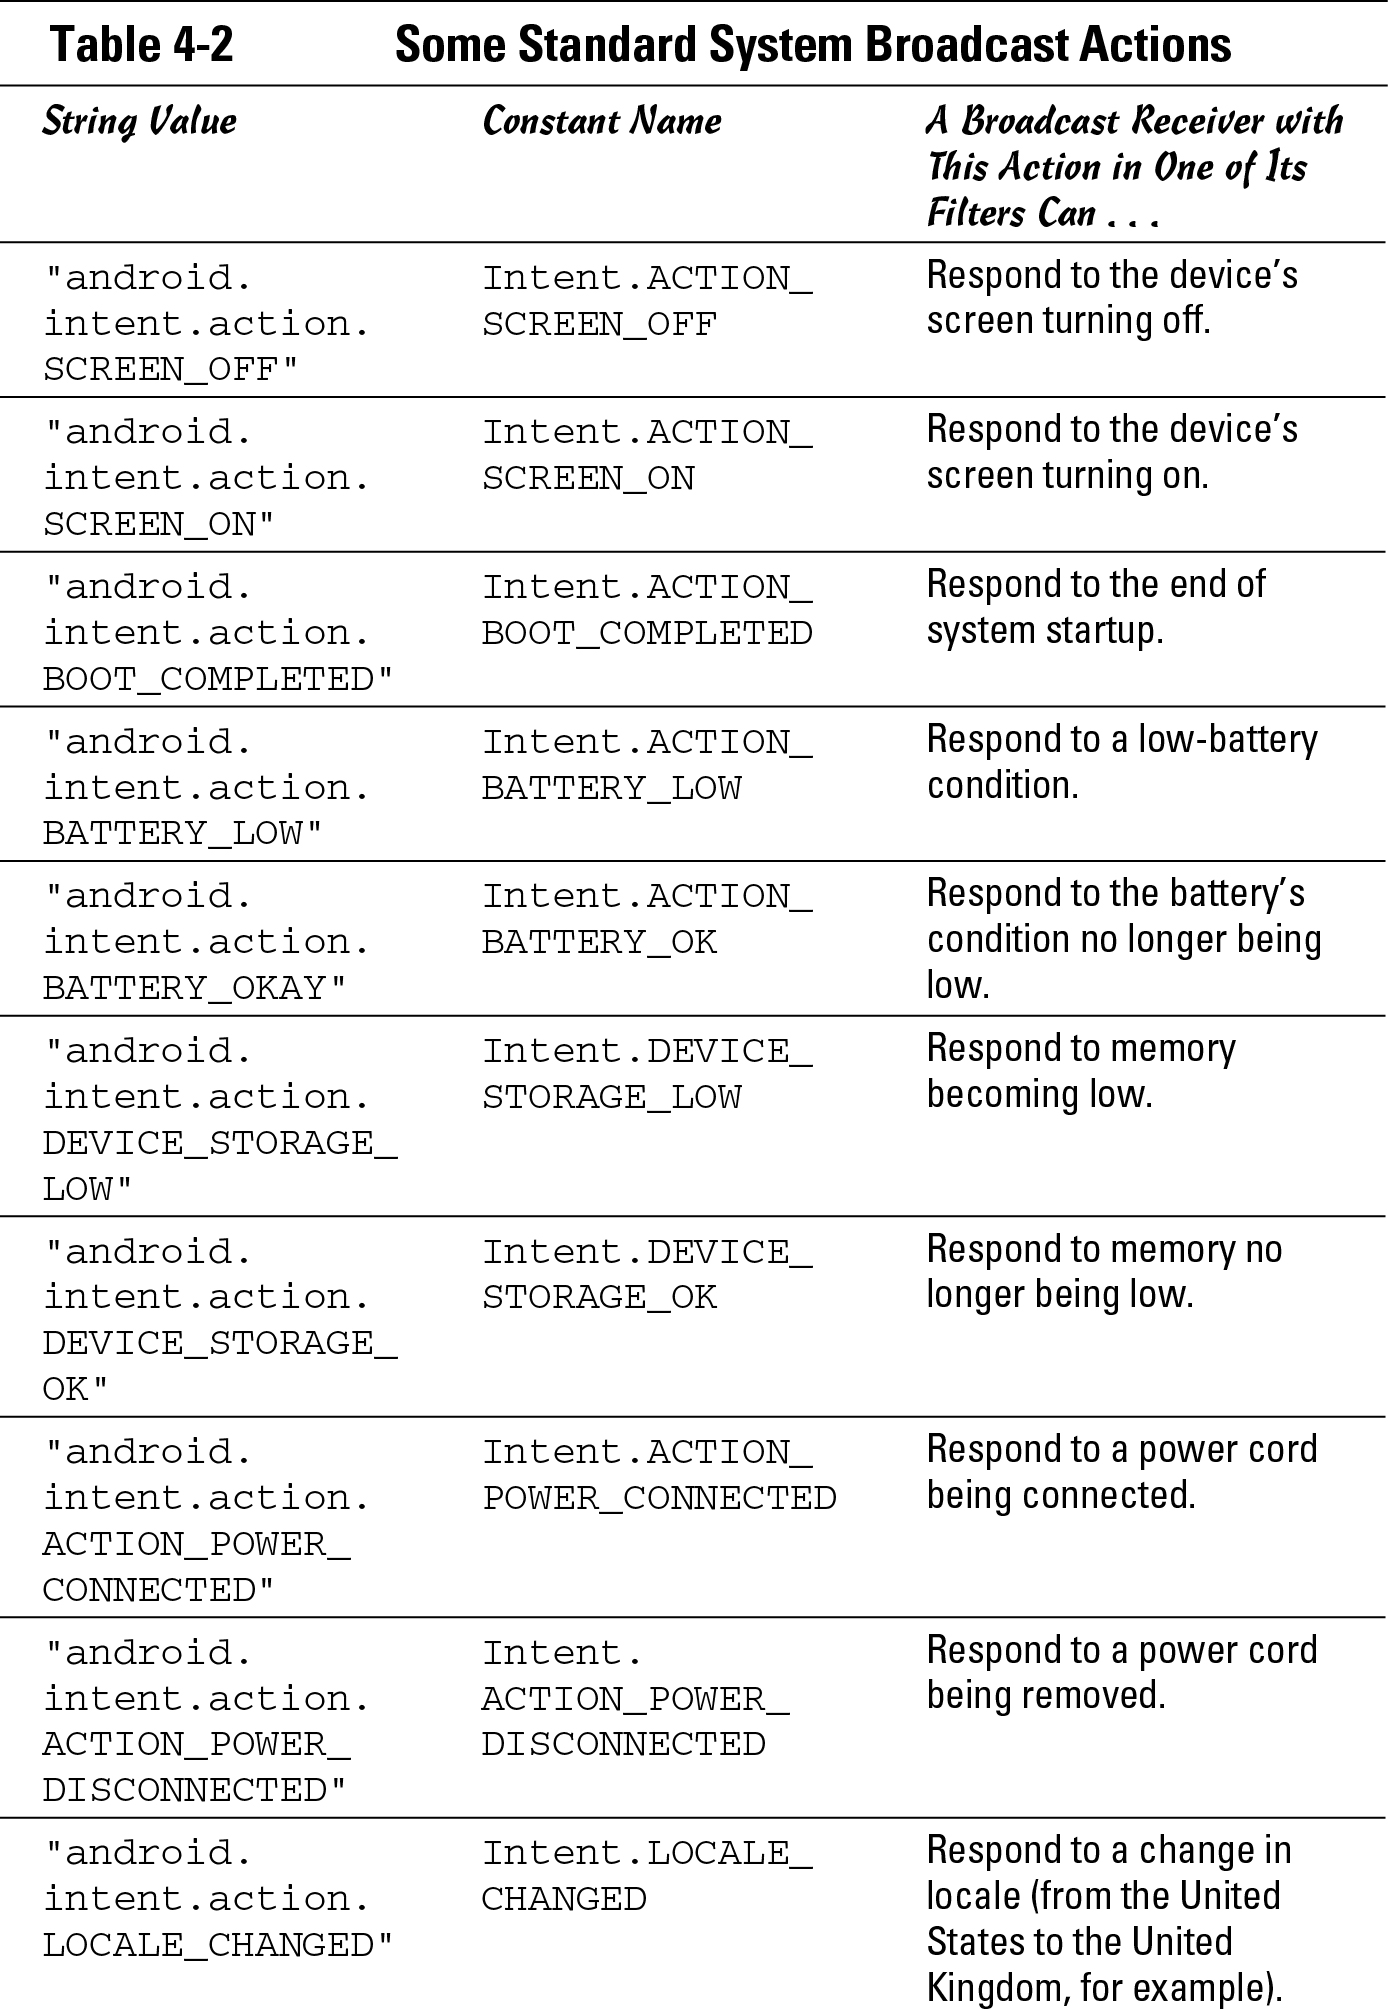
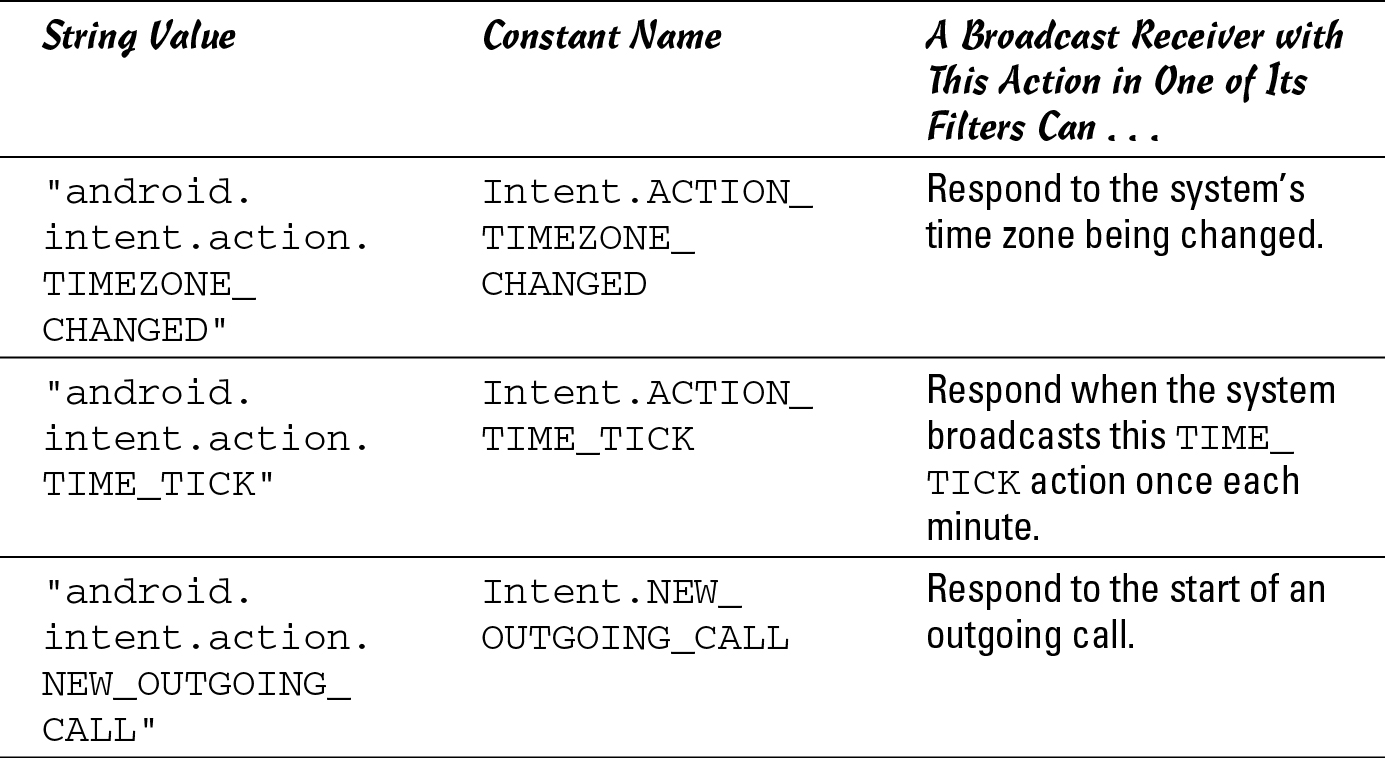
As an Android developer, you can test the effect of broadcasting any of the actions in Table 4-2. To do so, you become superuser on the Android shell and issue an am command. (In Linux, a superuser has administrative privileges. A consumer becomes superuser when he or she roots a device.) For an example of the use of the am command, see Chapter 3 of this minibook.
For a complete list of Android’s standard actions, visit http://developer. android.com/reference/android/content/Intent.html.