
Hour 3. Exploring an Android Project and Resources
In both Hour 1, “Getting Started: Creating a Simple App,” and Hour 2, “Understanding an Android Activity,” you learned how to create Android projects and update specific project resources such as the layout files. This hour reviews the components of an Android project in detail and examines some of the types of resources that can be used in an Android project. The discussion begins with a review of the resources that are included on initial project creation followed by a closer look at some additional resources.
Exploring the Android Project Files
Android applications are made up of executable code (Java code, classes) and data (including resources such as graphics, strings, and so on). Most Android application resources are stored under the /res subdirectory of the project.
In Hours 1 and 2, you used Eclipse to create a new project. This hour examines precisely what is generated during that process.
Folders and Files at Project Creation
Create Hour3App using the same process you used in Hour 1 and Hour 2. That is, you create Hour3App as a new Android Application Project that includes a Blank Activity named MainActivity.java. Figure 3.1 shows the folder structure created by Eclipse for Hour3App.
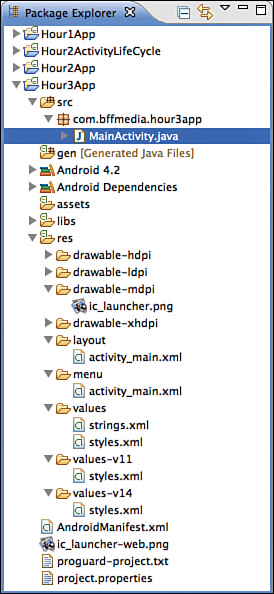
Let’s take this from the top and review each folder. When you do this yourself, you should see the Hour3App Android project in the Eclipse File Explorer. The following files and directories have been created:
![]() /src folder—Required folder for all source code.
/src folder—Required folder for all source code.
![]() /src/com.bffmedia.hour3app/MainActivity.java—The main entry point to this application, named MainActivity. This activity has been defined as the default launch activity in the Android manifest file.
/src/com.bffmedia.hour3app/MainActivity.java—The main entry point to this application, named MainActivity. This activity has been defined as the default launch activity in the Android manifest file.
![]() /gen/ com.bffmedia.hour3app /R.java—A generated resource management source file. Do not edit this file. This hour explains the role of R.java.
/gen/ com.bffmedia.hour3app /R.java—A generated resource management source file. Do not edit this file. This hour explains the role of R.java.
![]() /Android 4.2 folder—The Android platform.
/Android 4.2 folder—The Android platform.
![]() /Android dependencies folder—Includes the Android compatibility library.
/Android dependencies folder—Includes the Android compatibility library.
![]() /assets folder—A required folder where uncompiled file resources can be included in the project.
/assets folder—A required folder where uncompiled file resources can be included in the project.
![]() /libs folder—Contains any additional Java libraries that are added to the project.
/libs folder—Contains any additional Java libraries that are added to the project.
![]() /bin folder—The output directory of the build. An Android app builds an APK file. That APK will be in the Bin file.
/bin folder—The output directory of the build. An Android app builds an APK file. That APK will be in the Bin file.
![]() /res folder—A required folder where all application resources are managed. Application resources include animations, drawable graphics, layout files, data-like strings and numbers, and raw files.
/res folder—A required folder where all application resources are managed. Application resources include animations, drawable graphics, layout files, data-like strings and numbers, and raw files.
![]() /res/drawable-*—Application icon graphic resources are included in several sizes for different device screen resolutions.
/res/drawable-*—Application icon graphic resources are included in several sizes for different device screen resolutions.
![]() /res/layout/activity_main.xml—Layout resource file used by Hour3App to organize controls on the main application screen.
/res/layout/activity_main.xml—Layout resource file used by Hour3App to organize controls on the main application screen.
![]() /res/menu/activity_main.xml—A menu for the activity can be defined here. This can be used as an action bar or menu and is covered in Hour 7, “ActionBar and Menu Navigation.”
/res/menu/activity_main.xml—A menu for the activity can be defined here. This can be used as an action bar or menu and is covered in Hour 7, “ActionBar and Menu Navigation.”
![]() /res/values/strings.xml—The resource file where string resources are defined.
/res/values/strings.xml—The resource file where string resources are defined.
![]() /res/values/styles.xml—The resource file where style resources are defined.
/res/values/styles.xml—The resource file where style resources are defined.
![]() /res/values-11/styles.xml—The resource file where style resources that are used in API version 11 are defined.
/res/values-11/styles.xml—The resource file where style resources that are used in API version 11 are defined.
![]() /res/values-14/styles.xml—The resource file where style resources that are used in API version 14 are defined.
/res/values-14/styles.xml—The resource file where style resources that are used in API version 14 are defined.
![]() AndroidManifest.xml—The central configuration file for the application.
AndroidManifest.xml—The central configuration file for the application.
![]() Ic_launcher-web.png—This is a 512×512 image. It is not used directly in the app, but will be used in the Google Play Store to promote the app. It was created when you set up the project using a custom icon.
Ic_launcher-web.png—This is a 512×512 image. It is not used directly in the app, but will be used in the Google Play Store to promote the app. It was created when you set up the project using a custom icon.
![]() Proguard-project.txt—Proguard provides a mechanism to obfuscate Android binaries. ProGuard can be enabled by modifying the project.properties file. Additional options for ProGuard are added to the proguard.project.txt file.
Proguard-project.txt—Proguard provides a mechanism to obfuscate Android binaries. ProGuard can be enabled by modifying the project.properties file. Additional options for ProGuard are added to the proguard.project.txt file.
![]() project.properties—Contains project specific info. In the initial build using Eclipse it indicates that the build is being done on Android version 17.
project.properties—Contains project specific info. In the initial build using Eclipse it indicates that the build is being done on Android version 17.
Understanding the R.java File
The R.java file must never be edited. It is a generated file. This section examines the contents of the R.java file because it is the link between the resource files and the Java source code.
When you create your project using Eclipse, an XML layout and source code for the activity is created. In the onCreate() method for the activity, the layout is associated with the code with a call to setContentView():
setContentView(R.layout.activity_main);
The method called setContentView() takes a resource id as a parameter. The resource ID is an integer. You can see an association between the name of the XML layout and the resource id in the code. The name of the layout file is activity_main.xml and the resource ID is R.layout.activity_main. The way that association occurs is in the R.java file. You’ll see how.
When you build an Android project, an R.java file is generated that includes resource IDs based on the information in the /res/ folders. You are most familiar with /res/layout. The R.java file lives in the /gen/ folder.
The build process generates the R.java file based on the XML layout file and all the other resource files. The definitions for resource IDs for resources such as Buttons and TextViews are created the same way.
This snippet of the generated class R shows an inner class called layout that defines an int called activity_main. When you refer to R.layout.activity_main in the code, you are using the integer 0x7f030000:
public final class R {
. . .
public static final class layout {
public static final int activity_main=0x7f030000;
}
All the resources in the /res/ folders will be defined in the R.java file, which includes drawables and other resource types that covered in this hour.
Android Platform and Android Dependencies
Whenever you create an Android project, you must use an Android platform. The default project using the ADT sets the platform to Android 4.2. The content of the Android 4.2 folder is an Android.jar that was installed with the ADT Bundle download.
Android dependencies contain jar files that support Android. When Eclipse creates a project it includes the Android Compatibility Library.
If problems occur with Android dependencies, they can generally be fixed in Eclipse by choosing Android tools and then Fix Android properties for the project.
GO TO ![]() HOUR 4, “NOT JUST SMARTPHONES: SUPPORTING TABLETS, TVS, AND MORE,” for more information on the Android Compatibility Library.
HOUR 4, “NOT JUST SMARTPHONES: SUPPORTING TABLETS, TVS, AND MORE,” for more information on the Android Compatibility Library.
Understanding Common Resources
Common resources for a project include layout files, image drawables, string definitions, and more.
The following sections consider resources in general and then a few common resource types more closely.
Using Resources
Grouping application resources together and compiling them into the application package has the following benefits:
![]() Code is cleaner and easier to read, leading to fewer bugs.
Code is cleaner and easier to read, leading to fewer bugs.
![]() Resources are organized by type.
Resources are organized by type.
![]() Resources help in dealing with the large variety of Android devices, often automatically.
Resources help in dealing with the large variety of Android devices, often automatically.
![]() Localization and internationalization are straightforward.
Localization and internationalization are straightforward.
![]() Raw files of all types can be accessed.
Raw files of all types can be accessed.
Resource files stored within /res subdirectories must abide by the following rules:
![]() Resource filenames must be lowercase.
Resource filenames must be lowercase.
![]() Resource filenames may contain letters, numbers, underscores, and periods only.
Resource filenames may contain letters, numbers, underscores, and periods only.
Note: Resources: How They Help in the Real World
One advantage of using resources is that the appearance of the entire app you are developing can be changed easily. For example, you might have defined a resource that specifies a blue gradient as a drawable image. Several places in your app might rely on that resource. If you have a last-minute request to change to from blue gradient to red, you should be able to just change it in the resource file.
Referencing Application Resources
All application resources are stored within the /res project directory structure and are compiled into the project at build time. Application resources can be used programmatically. They can also be referenced in other application resources.
Application resources are accessed programmatically using the generated class file called R.java. To reference a resource from within your Activity class, you must retrieve the application’s Resources object using the getResources() method and then make the appropriate method call, based on the type of resource you want to retrieve.
For example, to retrieve a string named hello defined in the strings.xml resource file, use the following method call:
String greeting = getResources().getString(R.string.hello);
To reference an application resource from another compiled resource, such as a layout file, use the following format:
@[resource type]/[resource name]
For example, the same string used earlier would be referenced as follows:
@string/hello
Working with System Resources
Applications can access the Android system resources in addition to private resources.
System resources are stored within the android.R package. Classes exist for each of the major resource types. For example, the android.R.string class contains the system string resources. To retrieve a system resource string called ok from within an Activity class, you first need to use the static method of the Resources class called getSystem() to retrieve the global system Resource object. You then call the getString() method with the appropriate string resource name, like this:
String confirm = Resources.getSystem().getString(android.R.string.ok);
To reference a system resource from another compiled resource, such as a layout resource file, use the following format:
@android:[resource type]/[resource name]
For example, you could use the system string for ok by setting the appropriate string attribute as follows:
@android:string/ok
Hour 11, “App Setting: Managing Preferences,” demonstrates how to use ListViews. In a ListView, using a system resource to define the look of an item within the list is common. For example, android.R.layout.simple_list_item_1 defines a layout that displays one line of text and is appropriate for showing an item in a list.
Working with Simple Resources
Simple resources such as string, color, and dimension values should be defined in XML files under the /res/values project directory in XML files. These resource files use XML tags that represent name-value pairs. You can manage string, color, and dimension resources by using the Eclipse resource editor by editing the XML resource files directly.
Working with Strings
You can use string resources anywhere your application needs to display text. You define string resources with the <string> tag, identify them with the name property, and store them in the resource file /res/values/strings.xml.
Here is an example of the string resource file that was created when you created the Hour3App using Eclipse:
<?xml version="1.0" encoding="utf-8"?>
<resources>
<string name="app_name">Hour3App</string>
<string name="hello_world">Hello world!</string>
<string name="menu_settings">Settings</string>
</resources>
String resources have a number of formatting options. Strings that contain apostrophes or single straight quotes must be escaped or wrapped within double straight quotes. Table 3.1 shows some simple examples of well-formatted string values.

You can access a string resource programmatically in several ways. The simplest way is to use the getString() method within your Activity class:
String greeting = getResources().getString(R.string.hello);
String resources should be used in layout files. When you are putting text on a button, the text should come from a string resource. The usage is as follows:
android:text="@string/hello_world"
Working with Colors
You can apply color resources to screen controls. You define color resources with the <color> tag, identify them with the name attribute, and store them in the file /res/values/colors.xml. This XML resource file is not created by default and must be created manually.
You can add a new XML file, such as this one, by choosing File, New, Android XML File and then filling out the resulting dialog with the type of file (such as values). This automatically sets the expected folder and type of file for the Android project.
Here is an example of a color resource file:
<?xml version="1.0" encoding="utf-8"?>
<resources>
<color name="background_color">#006400</color>
<color name="app_text_color">#FFE4C4</color>
</resources>
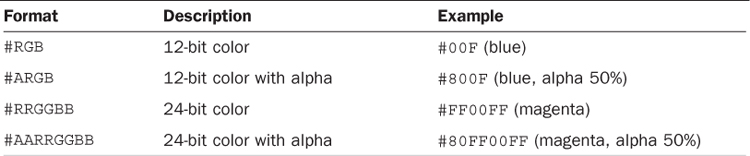
The Android system supports 12-bit and 24-bit colors in RGB format. Table 3.2 lists the color formats that the Android platform supports.
The following Activity class code snippet retrieves a color resource named app_text_color using the getColor() method:
int textColor = getResources().getColor(R.color.app_text_color);
Working with Dimensions
To specify the size of a user interface control such as a Button or TextView control, you need to specify different kinds of dimensions. Dimension resources are helpful for font sizes, image sizes and other physical or pixel-relative measurements. You define dimension resources with the <dimen> tag, identify them with the name property, and store them in the resource file /res/values/dimens.xml. This XML resource file is not created by default and must be created manually.
Here is an example of a dimension resource file:
<?xml version="1.0" encoding="utf-8"?>
<resources>
<dimen name="thumbDim">100px</dimen>
</resources>
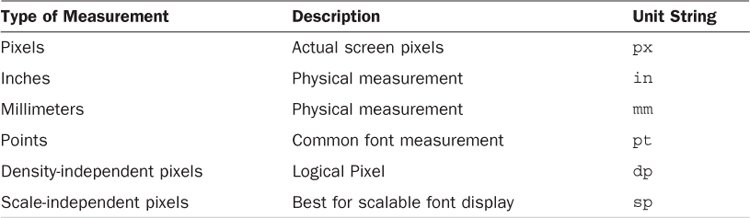
Each dimension resource value must end with a unit of measurement. Table 3.3 lists the dimension units that Android supports.
The following Activity class code snippet retrieves a dimension resource called thumbDim using the getDimension() method:
float thumbnailDim = getResources().getDimension(R.dimen.thumbDim);
The use of device independent pixels and scale independent pixels is highly recommended. In Android, there are not fixed screen sizes, so using device independent values helps to assure your layout display well on different devices.
GO TO ![]() HOUR 5, “USING LAYOUTS,” for additional information on designing a layout using device independent pixels.
HOUR 5, “USING LAYOUTS,” for additional information on designing a layout using device independent pixels.
Working with Drawable Resources
Drawable resources, such as image files, must be saved under the /res/drawable project directory hierarchy. Android devices have different sizes and different pixel density screens. Android provides a mechanism to show an appropriate image for each type of screen. When applications provide multiple versions of the same image for different pixel density screens, the appropriate image will be shown for the screen. That is, a high-density image will be shown on a high-density screen.
The Android project contains three drawable directories: drawable-ldpi (low density), drawable-mdpi (medium density), and drawable-hdpi (high density). The system picks the correct version of the resource based on the device the application is running on. All versions of a specific resource must have the same name in each of the drawable directories.
GO TO ![]() HOUR 4, “NOT JUST SMARTPHONES: SUPPORTING TABLETS, TVS, AND MORE,” for additional information on designing a layout using device independent pixels.
HOUR 4, “NOT JUST SMARTPHONES: SUPPORTING TABLETS, TVS, AND MORE,” for additional information on designing a layout using device independent pixels.
You can drag and drop image files into the /res/drawable directory by using the Eclipse Project Explorer or use the import mechanism to specify one or more files to import.
Working with Images
The most common drawable resources used in applications are bitmap-style image files, such as PNG and JPG files. These files are often used as application icons and button graphics but may be used for a number of user interface components.
As shown in Table 3.4, Android supports many common image formats.

NinePatch—What’s That?
Android includes a drawable type known as a ninepatch. The class for a ninepatch is android.graphics.drawable.NinePatchDrawable. A ninepatch is designated with the extension .9.png. Android provides a tool called the Draw 9-patch tool for creating these images.
A ninepatch is a stretchable bitmap image that has some fixed elements. Parts of the nine-patch image stretch as the image grows and some parts are left unchanged. The use of a nine-patch is best shown by example. Standard Android buttons use a ninepatch image as a background. With a button, the center stretches, but the border of the button does not.
For more information on ninepatch, see http://developer.android.com/tools/help/draw9patch.html.
Using Image Resources Programmatically
Image resources are encapsulated in the class BitmapDrawable. To access a graphic resource file called /res/drawable/logo.png within an Activity class, use the getDrawable() method, as follows:
BitmapDrawable logoBitmap =
(BitmapDrawable)getResources().getDrawable(R.drawable.logo);
You can use the resource identifier for an image directly within another control. An ImageView control displays an image. The image in an ImageView can be set by using a resource identifier for an image to the source attribute of the ImageView.
A condition in your app might cause you to change the image in an ImageView. The following Activity class code sets and loads the logo.png drawable resource into an ImageView control named LogoImageView, which must be defined in advance:
ImageView logoView = (ImageView)findViewById(R.id.LogoImageView);
logoView.setImageResource(R.drawable.logo);
Working with Other Types of Drawables
In addition to graphics files, you can also create specially formatted XML files to describe other drawable subclasses, such as ShapeDrawable. You can use the ShapeDrawable class to define different shapes, such as rectangles and ovals.
See additional documentation on drawables at http://developer.android.com/guide/topics/resources/drawable-resource.html.
You will define two simple shapes as drawable resources using XML. The goal is to create a gradient and to create shape that can be used as a background to frame an image. The gradient transitions from blue to black. The frame is a line that defines a rounded rectangle.
The gradient is a rectangle defined by the following XML. This is the content of the file gradient.xml, which is placed in a drawable folder:
<shape xmlns:android="http://schemas.android.com/apk/res/android" android:shape="rectangle">
<gradient android:startColor="#0000ff" android:endColor="#000000"
android:angle="270"/>
</shape>
The gradient has a start color (blue) and end color (black) and an angle of 270. The angle is the direction of the gradient. Zero is left to right and 90 is bottom to top. Use 270 to get blue to black and top to bottom.
Now, define shape that can act a border for images. The shape is a rectangle with rounded corners and padding. The shape is defined by the following XML. This is the contents of the file background.xml, which is placed in a drawable folder:
<shape xmlns:android="http://schemas.android.com/apk/res/android" android:shape="rectangle">
<stroke android:width="2dp" android:color="#EEEEEE" />
<padding android:left="10dp" android:top="20dp"
android:right="10dp" android:bottom="20dp" />
<corners android:bottomRightRadius="7dp"
android:bottomLeftRadius="7dp"
android:topLeftRadius="7dp"
android:topRightRadius="7dp"/>
</shape>
This XML defines a rectangle shape. Stroke indicates the width of the line to draw (like the stroke of a pen). Padding pads the shape and the corners are defined with slight rounding.
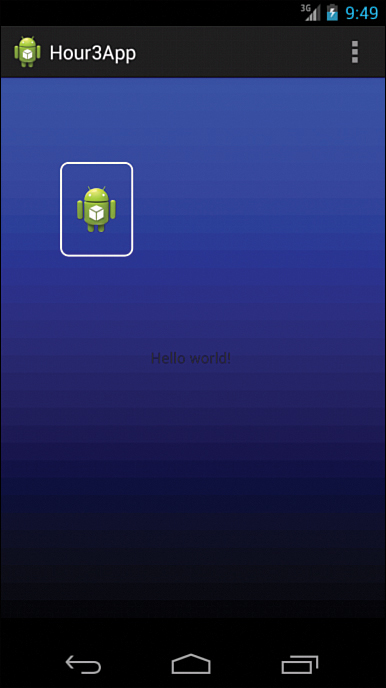
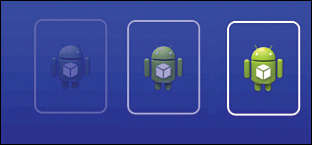
To see the gradient and background in action, Hour3App uses the gradient drawable as the background for the RelativeLayout defined in activity_main.xml.
An ImageView is added to the project that uses the ic_launcher.png image as the source value. Use the background.xml as the background for the ImageView. The result is shown in Figure 3.2.
Adding Animations
Adding animation to an application can be a fun way to add style. Animations are appropriate if your app includes a splash screen and animations might fit well into certain aspects of your design. This section looks at a simple animation that uses an animation resource file. The goal is to make the image fade in when displayed.
Under the res/ folder, create a folder called anim to hold your animation files. You then create fadein.xml in that folder.
Fadein.xml specifies that the alpha value should move from 0.0 to 1.0 (invisible to fully visible) with a duration of 2000. That is, 2,000 milliseconds, so this means you are defining a fade-in animation that takes 2 seconds to go from invisible to visible, which is shown in Figure 3.3.
<?xml version="1.0" encoding="utf-8"?>
<alpha xmlns:android="http://schemas.android.com/apk/res/android"
android:interpolator="@android:anim/accelerate_interpolator"
android:fromAlpha="0.0" android:toAlpha="1.0" android:duration="2000" />
Using Styles in Views
Android styles can be used to set a multiple attributes for a view. For example, if you want to define a TextView to use a white text color, use italic, and use a font size of 20sp, you could define each of those individual values or define a style that uses all of those characteristics and assign that style to the TextView.
Let’s look at two snippets of XML code that show the same result in regard to displaying a TextView. In the first snippet, the values are set directly in the TextView attributes:
android:text="TextView"
android:textColor="#ffffff"
android:textSize="20sp"
android:textStyle="italic"
The second case defines a style called CustomText in the styles.xml file in the res/values folder:
<style name="CustomTextStyle" >
<item name="android:textColor">#ffffff</item>
<item name="android:textSize">20sp</item>
<item name="android:textStyle">italic</item>
</style>
Then, you can apply the style you defined to a TextView with the line:
style="@style/CustomTextStyle"
The result is that the TextView controls display in an identical manner.
By defining and using styles, you can give your app a distinct look and feel. Your results will be consistent and you can change the look of the app easily by changing the contents of the style files.
Using the Raw and Assets Folders
You add raw resource files to a project by including them in the raw/ resources project directory. You can do this by creating them as a new file, dragging them in from a file management tool, or any other way you’re accustomed to adding files to Android projects in Eclipse.
Raw resources are files that are compiled into the project and accessible for your use. Because they are in the resource folder structure, they are provided with a resource id and are accessible using the R.raw. resourcename convention.
Assume that you have a raw resource file called instructions.txt. The goal is to read the file and display the contents.
To read the file, use the openRawResource() method to obtain an inputStream:
InputStream instructions = getResources().openRawResource(R.raw.instructions);
Now the inputStream can be read to get the contents of the file as a String. A number of ways exist to do this in Java. This Java method reads an InputStream and returns a String with its contents:
public String inputStreamToString(InputStream is) throws IOException {
StringBuffer sBuffer = new StringBuffer();
DataInputStream dataIO = new DataInputStream(is);
String strLine = null;
while ((strLine = dataIO.readLine()) != null) {
sBuffer.append(strLine + " n");
}
dataIO.close();
is.close();
return sBuffer.toString();
}
The assets/ folder can also be used to store files. The files are unchanged and no resource identifier is associated with them. The assets/ folder preserves the original filenames used. You use the class AssetManager (android.content.res.AssetManager) to access these files.
Summary
This hour examined the structure and contents of an Android project and took a closer look at how to create and use resources
Android applications can use many different types of resources, including application-specific resources and system-wide resources. Once defined, resources can be accessed programmatically as well as referenced, by name, by other resources. String, color, and dimension values are stored in specially formatted XML files, and graphic images are stored as individual files. Application user interfaces are defined using XML layout files. Raw files, which can include custom data formats, may also be included as resources for use by the application. Finally, applications may include numerous other types of resources as part of their packages.
Q&A
Q. Must string, color, and dimension resources be stored in separate XML files?
A. Technically, no. However, it is a good practice to follow. Keeping the resource types separate keeps them organized.
Q. What are some of the technical and practical benefits of using resources?
A. Using resources keeps your code cleaner and more readable. In practice, using resources and for colors, text, and styles allows you to consistently and quickly change the look and feel of your app just by changing the resource files.
Workshop
Quiz
1. What color formats are supported for color resources?
A. 12-bit color
B. 24-bit color
C. 64-bit color
2. True or False: You can include files of any format as a resource.
3. Which graphics formats are supported and encouraged on Android?
A. Joint Photographic Experts Group (JPG)
B. Portable Network Graphics (PNG)
C. Graphics Interchange Format (GIF)
D. Nine-Patch Stretchable Images (.9.PNG)
4. True or False: Resource filenames can be uppercase.
Answers
1. A and B. Both 12-bit and 24-bit color are supported.
2. True. Any file can be added as a raw resource.
3. B and D. Although all four formats are supported, they are not all encouraged. PNG graphics, including Nine-Patch Stretchable graphics, are highly encouraged for Android development because they are lossless and efficient. JPG files are acceptable but lossy, and GIF file use is outright discouraged.
4. False. Resource filenames may contain letters, numbers, and underscores and must be lowercase.
Exercises
1. Add a new color resource with a value of #00ff00 to your Hour3App project. Within the activity_main.xml layout file, change the textColor attribute of the TextView control to the color resource you just created. View the layout in the Eclipse and then rerun the application and view the result on an emulator or device—in all three cases, you should see green text.
2. Add a new dimension resource with a value of 22pt to your Hour3App project. Within the activity_main.xml layout file, set the textSize attribute of the TextView control to the dimension resource you just created. View the layout in the Eclipse Layout Resource Editor and then rerun the application and view the result on an emulator or device—in all three cases, you should see larger font text (22pt). What happens if you try it with different screen density settings in the emulator? What about the use of px, dp, or sp as the unit type?
3. Add a new drawable graphics file resource to your Hour3App project (for example, a small PNG or JPG file). In Eclipse, add an ImageView control to the layout. Then set the ImageView control’s src attribute to the drawable resource you just created. View the layout in the Eclipse layout resource editor and then rerun the application and view the result on an emulator or device—in all three cases, you should see an image below the text on the screen.