
Hour 2. Understanding an Android Activity
What You’ll Learn in This Hour
![]() Passing information between activities
Passing information between activities
![]() Understanding the activity lifecycle
Understanding the activity lifecycle
In Hour 1, you created an app that included an activity. In this hour, you consider activities in detail. Activities are a core component of Android. By examining activities, you can learn about both app development and how the Android system operates. This chapter covers how to launch activities and how to pass data between activities, as well as introduces Android intents by examining how they are used with activities.
Understanding an Activity
In Hour 1, “Getting Started: Creating a Simple App,” you generated a simple app using Eclipse. The generation process created a class called MainActivity, which was an activity. You’ve used an activity already, and now in this chapter you examine activities more closely.
Activities have a well-defined lifecycle. An activity is created, started, resumed, paused, and destroyed. Those are some of the events in the lifecycle. For each event, you can override a callback method of the Activity class to do something when that event occurs. That is what you are doing when you override the onCreate() method. For example, in Hour 1, you modified the onCreate() method of MainActivity to create a Button and EditText field. This hour covers the activity lifecycle in detail.
Per the Android Developer documentation, “an activity is an application component that provides a screen with which users can interact in order to do something, such as dial the phone, take a photo, send an email, or view a map. Each activity is given a window in which to draw its user interface. The window typically fills the screen, but may be smaller than the screen and float on top of other windows.” (See http://developer.android.com/guide/components/activities.html.)
Starting an Activity
You can start activities in several ways. This section first covers starting one activity from another, and then examines how the initial activity in your app is launched.
Starting One Activity from Another
In Hour 1, you created a project called Hour1App and an activity called MainActivity. Follow the same process as “Creating a New Project” to create a project called Hour2App. When it’s time to name the activity, call it ActivityA. In the example app, you’ll start by having ActivityA start ActivityB.
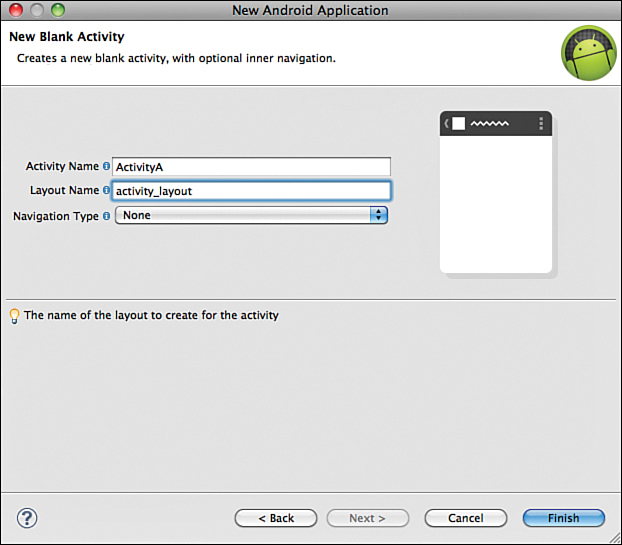
The Hour2App now contains one activity and one layout. The layout is created for you and contains a TextView that displays “Hello world!.” The goal is to create one activity that starts another. As such, you need two activities. For this demonstration app, you can use one layout for both activities.
The common layout is activity_layout. To create a second activity, you make a copy of ActivityA. In Eclipse, find ActivityA in the package you created in the /src folder. Right-click ActivityA and choose Copy. Highlight the package, right-click, and choose Paste. Eclipse provides a prompt for naming the second activity. Call the second activity ActivityB. Figure 2.2 shows a wireframe for the app you are creating. ActivityA will start ActivityB.
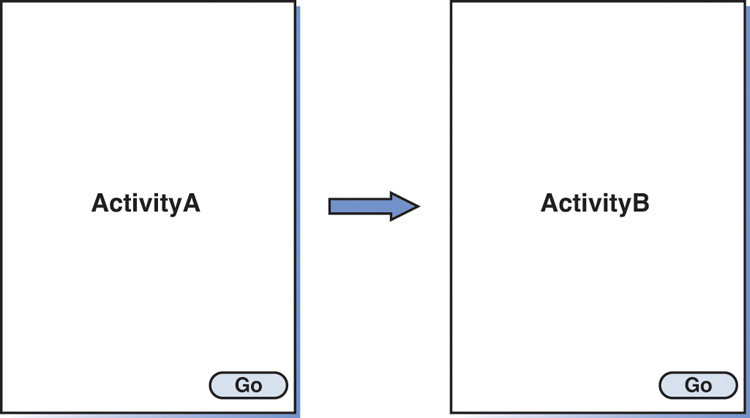
Figure 2.2 shows a button with the label Go in the activity. Create this button using the visual tools to drag as you did in Hour 1. You add the button to the activity_layout by dragging and dropping it from the palette to the layout canvas.
Now you want to change the properties for the button. After you add the button, you can use Eclipse to change the Text property of the button to contain the word Go. You might need to select the button to see the properties listed.
With the layout in place, you can examine the code for launching ActivityB from ActivityA. Listing 2.1 shows that, as in Hour 1, you override the activity’s onCreate() method and add code to handle the button click.
LISTING 2.1 Starting ActivityB from a Button Click (ActivityA.java)
1: @Override
2: protected void onCreate(Bundle savedInstanceState) {
3: super.onCreate(savedInstanceState);
4: setContentView(R.layout.activity_layout);
5: Button b = (Button)findViewById(R.id.button1);
6: b.setOnClickListener(new OnClickListener() {
7: public void onClick(View v) {
8: Intent intent = new Intent(ActivityA.this, ActivityB.class);
9: startActivity(intent);
10: }
11: });
12: }
In line 8 of Listing 2.1, you create an Intent. The first parameter for the Intent is the current activity and the second parameter is the ActivityB class. In Android, Intents contain data about operations to be performed (covered in depth later this hour). For now, consider the Intent defined in line 8 as the mechanism to tie ActivityA to ActivityB. Line 9 starts the Intent. In Line 8, ActivityA.this is passed to refer to ActivityA because if you used the this keyword, you would be referring to the OnClickListener() class that was defined in line 6.
Of course, you can keep this simple and think of the Intent defined in line 8 as the setup for starting ActivityB in line 9.
To run the app, you must add ActivityB to the project’s AndroidManifest.xml file. Every application must have an AndroidManifest.xml file. It presents essential information to the Android system about the application, including information about the available activities.
To add a reference to ActivityB to the AndroidManifest.xml file, find AndroidManifest.xml with the Hour2App project and select it. You edit the XML file directly by selecting the AndroidManifest.xml file tab, as shown in Figure 2.3.
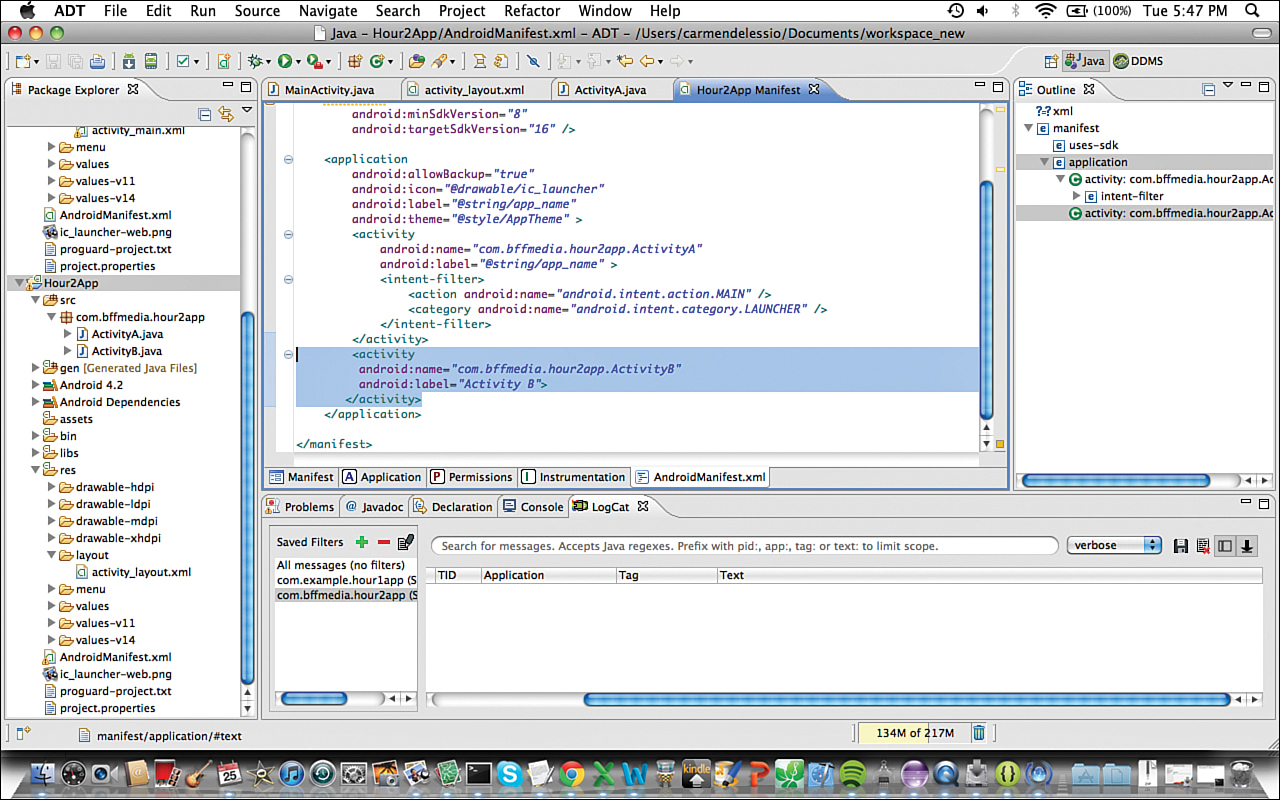
In the manifest file is an Application definition with ActivityA already defined. Add ActivityB within the Application section, as shown in Listing 2.2.
LISTING 2.2 Adding ActivityB to the Android Manifest
1: <activity
2: android:name="com.bffmedia.hour2app.ActivityB"
3: android:label="Activity B">
4: </activity>
Another way exists to add ActivityB using Eclipse. When editing the AndroidManifest.xml, choose the Application tab and then make updates in the Application Nodes section, as shown in Figure 2.4.

With the definition of ActivityB in the AndroidManifest.xml file, you have a working project. The resulting app does very little, but it does define two activities and have one activity start another.
By the Way: Don’t Forget to Add the Activity to the AndroidManifest.xml File
If you do forget to add an activity, you get this fatal error:
Unable to find explicit activity class
{com.bffmedia.hour2app/com.bffmedia.hour2app.ActivityB}; have you declared this
activity in
your AndroidManifest.xml?
This helpful message tells you that class com.bffmedia.hour2App.ActivityB cannot be found. The hint is to check the AndroidManifest.xml file to see whether this activity has been declared.
Now it’s time to expand on the code in ActivityB to have the TextView in each activity identify which activity is being displayed, and wire the Button in ActivityB to start ActivityA. Listing 2.3 shows the code for the onCreate() method of ActivityB.
LISTING 2.3 ActivityB Starting ActivityA (ActivityB.java)
1: @Override
2: protected void onCreate(Bundle savedInstanceState) {
3: super.onCreate(savedInstanceState);
4: setContentView(R.layout.activity_layout);
5: TextView t = (TextView)findViewById(R.id.textView1);
6: t.setText("This is Activity B");
7: Button b = (Button)findViewById(R.id.button1);
8: b.setOnClickListener(new OnClickListener() {
9: public void onClick(View v) {
10: Intent intent = new Intent(ActivityB.this, ActivityA.class);
11: startActivity(intent);
12: }
13:});
14: }
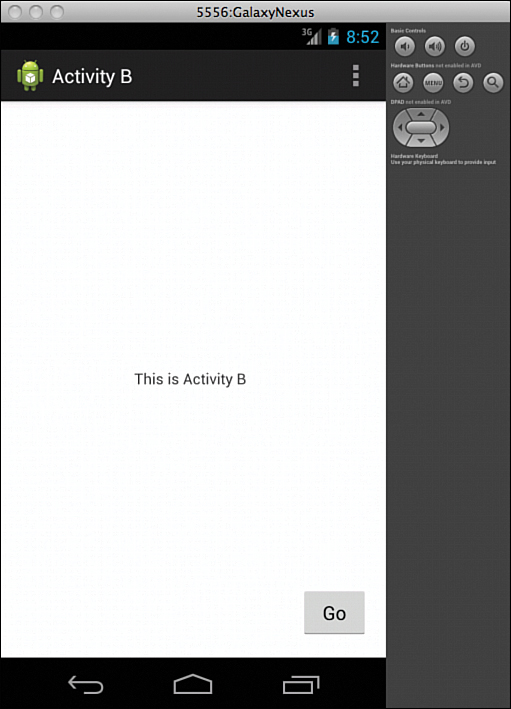
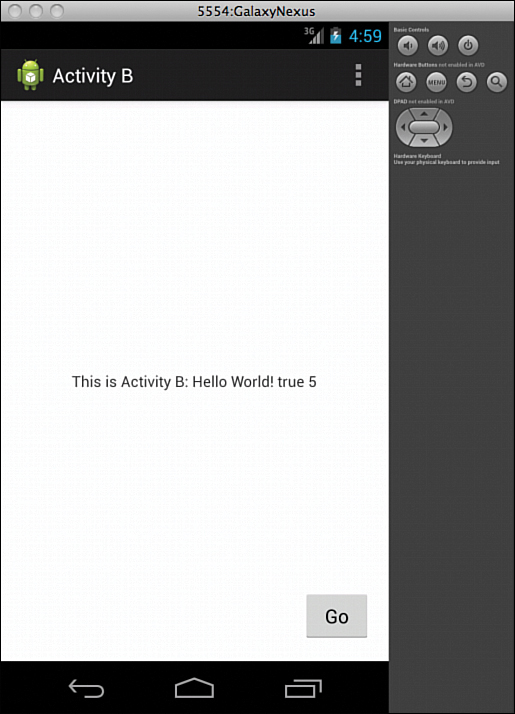
Lines 5 and 6 of Listing 2.3 define a TextView and set it to display "This is Activity B". Line 10 has ActivityB start ActivityA. The code for ActivityA is modified similarly to display "This is Activity A" in the TextView.
You can run this code in the emulator and easily switch between ActivityA and ActivityB by choosing the Go button in each activity. Figure 2.5 shows the app in the emulator.
After switching between ActivityA and ActivityB a number of times, if you use the Back button in the emulator, the app shows the activities in reverse order. That is, you will go back through each activity that you started. That might not be the behavior that you expected or wanted!
In Figure 2.5, the Back button is in the lower-left corner of the image.
Back, Back, Back: Understanding the Back Stack
The behavior of the Back button for the Hour2App is the default behavior for Android apps. As an activity is started, it is added to the “back stack” for the application. The back stack is a stack of activities. The first activity is added to the stack and all subsequent activities are added to the stack when they start.
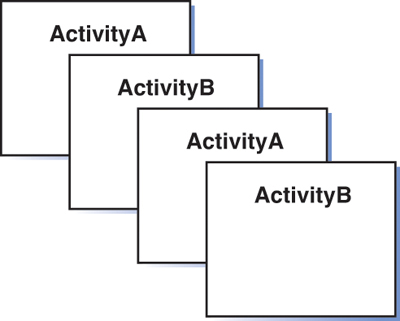
An activity may occur in the stack more than one time. In the Hour2App, ActivityA is added to the back stack when the app launches. Each time you click the Go button, you add either ActivityA or ActivityB to the stack. After clicking Go three times, the stack looks like ActivityB, ActivityA, ActivityB, ActivityA. The last ActivityA in this list was the activity started when the app launched.
Figure 2.6 shows the back stack. Thinking of each added activity as a card being added to a stack can be helpful.
For most apps, the default behavior of the back stack gives the expected result. Options are available to change this behavior. One is to use intent flags to change the standard behavior. Listing 2.4 shows updated code to set two intent flags when you start each activity.
LISTING 2.4 Adding Intent Flags
1: @Override
2: protected void onCreate(Bundle savedInstanceState) {
3: super.onCreate(savedInstanceState);
4: setContentView(R.layout.activity_layout);
5: TextView t = (TextView)findViewById(R.id.textView1);
6: t.setText("This is Actvity B");
7: Button b = (Button)findViewById(R.id.button1);
8: b.setOnClickListener(new OnClickListener() {
9: public void onClick(View v) {
10: Intent intent = new Intent(ActivityB.this, ActivityA.class);
11: intent.setFlags(Intent.FLAG_ACTIVITY_NEW_TASK|Intent.FLAG_ACTIVITY_
CLEAR_TOP);
12: startActivity(intent);
13: }
14: });
15: }
Line 11 in Listing 2.4 sets the flags Intent.FLAG_ACTIVITY_NEW_TASK and Intent.FLAG_ACTIVITY_CLEAR_TOP for the intent created in line 10. Taken together these flags effectively keep one instance of each activity in the back stack. If you think of the stack as a set of cards, in this scenario, you have one card for ActivityA and one card for ActivityB. No matter how many times you navigate between the two activities, when you choose the Back button from ActivityB, you go to ActivityA, and when you choose the Back button from ActivityA, you exit the app.
In general, the best way to handle the back stack is to use the default model. As we introduce fragments and other navigational elements, like the ActionBar, we will revisit how the back stack is handled.
Note: What Is a Task in Android?
According to Android documentation, “a task is a collection of activities that users interact with when performing a certain job.”
The activities are arranged in a stack based on the order in which they are opened. That is the back stack. Intent flags, such as Intent.FLAG_ACTIVITY_NEW_TASK, are based on this understanding of tasks. For additional information, see http://developer.android.com/guide/components/tasks-and-back-stack.html.
GO TO ![]() HOUR 7, “ACTIONBAR AND MENU NAVIGATION”
HOUR 7, “ACTIONBAR AND MENU NAVIGATION”
The Launch Activity
To start ActivityB from ActivityA, you created the ActivityB class and added it to the AndroidManifest.xml file. You then created an intent in ActivityA and started ActivityB.
That begs the question: How do you indicate that the app should start with ActivityA?
Remember that the basic code for ActivityA was generated for you. The AndroidManifest.xml file was also generated. The manifest file indicates the activity to launch when the app starts, as shown in Listing 2.5.
Lines 5 and 6 of Listing 2.5 define an action and category for ActivityA. By having the action set to MAIN and the category to LAUNCHER in the intent-filter, ActivityA is specified as the launch activity for this app. Think of the intent-filter as a set of rules that is checked when the Android system asks the question, “Is there an activity that can handle this?” In this case, the Android system is asking for a launch activity for this app. Lines 5 and 6 indicate that ActivityA can fulfill this request.
LISTING 2.5 Android Manifest for the Launch Activity
1: <activity
2: android:name="com.bffmedia.hour2app.ActivityA"
3: android:label="Activity A" >
4: <intent-filter>
5: <action android:name="android.intent.action.MAIN" />
6: <category android:name="android.intent.category.LAUNCHER" />
7: </intent-filter>
8: </activity>
Passing Information Between Activities
The app you have created does not do much, but the basics of starting one activity from another are in place. Apps get more interesting and useful when you pass data between activities. The two cases for passing data between apps are the following:
![]() Passing data from one activity to another; for example, ActivityA passes data to ActivityB.
Passing data from one activity to another; for example, ActivityA passes data to ActivityB.
![]() The first activity requests data from a second activity. So, ActivityA requests data from a new activity called ActivityC, and ActivityC returns data to ActivityA.
The first activity requests data from a second activity. So, ActivityA requests data from a new activity called ActivityC, and ActivityC returns data to ActivityA.
This section covers these two cases.
Using Extras and Bundles
To start an activity, you use an Intent(android.content.Intent). Data can be added to the intent that starts the activity. The intent and associated data is available when the new activity is started. Data is added to the intent as “extra” data. Data types such as strings, integers, and booleans can be passed as extras. A bundle of data and more complex data types can also be passed. Listing 2.6 shows ActivityA modified to add data to the intent that starts ActivityB.
Lines 6–11 in Listing 2.6 add data to the intent. In Line 6, a bundle is defined. A Bundle(android.os.Bundle) contains data defined by key-value pairs. On Line 7, the string “Hello” is added to the Bundle b and identified by the key "greeting". Line 8 adds the bundle to the intent. Lines 9–11 put additional extra data into the intent.
LISTING 2.6 Adding Extra Data to an Intent
1: Button b = (Button)findViewById(R.id.button1);
2: b.setOnClickListener(new OnClickListener() {
3: public void onClick(View v) {
4: Intent intent = new Intent(ActivityA.this, ActivityB.class);
5: intent.setFlags(Intent.FLAG_ACTIVITY_NEW_TASK|Intent.FLAG_ACTIVITY_CLEAR_
TOP);
6: Bundle b = new Bundle();
7: b.putString("greeting", "Hello");
8: intent.putExtra("greetingBundle", b);
9: intent.putExtra("message", "World!");
10: intent.putExtra("showAll", true);
11: intent.putExtra("numItems", 5);
12: startActivity(intent);
13: }
14: });
Listing 2.6 adds data to the intent that starts ActivityB. Listing 2.7 shows how that intent data is accessed and used. Line 5 of Listing 2.7 gets the intent that started ActivityB. With the intent, the bundle and other data defined in ActivityA can be accessed. Line 6 accesses the bundle, and line 7 retrieves the string from the bundle. Lines 8–10 retrieve the additional extra data from the intent. The data passed from ActivityA is displayed in ActivityB. Lines 12 and 13 display the passed data in the TextView in ActivityB (see Figure 2.7).
LISTING 2.7 Accessing Extra Data from an Intent
1: @Override
2: protected void onCreate(Bundle savedInstanceState) {
3: super.onCreate(savedInstanceState);
4: setContentView(R.layout.activity_layout);
5: Intent intent = getIntent();
6: Bundle bundle = intent.getBundleExtra("greetingBundle");
7: String greeting = bundle.getString("greeting");
8: String message = intent.getStringExtra("message");
9: Boolean showAll = intent.getBooleanExtra("showAll", false);
10: intnumItems = intent.getIntExtra("numItems",0);
11: TextView t = (TextView)findViewById(R.id.textView1);
12: t.setText("This is Activity B: " + greeting + " "
13: + message + " " + showAll + " " + numItems);
14: });
By the Way: Naming Intent Extras
To illustrate how extras are used to pass data, Listings 2.6 and 2.7 use string literals such as a “greeting” for keys. One practice for naming extra keys is to start with the package name. So, you would use “com.bffmedia.hour2app.greeting” as the key. Defining a constant value for the key is a recommended practice, as follows:
private static final String GREETING= "com.bffmedia.hour2app.greeting";
Eclipse has a convenient technique for creating constants: Highlight the string literal and choose the menu options for Refactor, Extract Constant.
Returning a Result: Using StartActivityForResult
So far, you have created activities, started activities, and passed data from one activity to another using intents. Another way that activities interact is when one activity starts another with a request to return a result. ActivityA can start ActivityC and request a result from ActivityC. In that case, ActivityA uses startActivityForResult() and must handle the result and any data provided by ActivityC. ActivityC might or might not return data, but it will generally provide a result to ActivityA.
For example, in an app that uploads photos, your main activity might use startActivityForResult() to start an activity for selecting an image from the file system.
Listing 2.8 shows ActivityC with an EditText and two Buttons. The code sets up empty onClickListener() methods for each Button. The next step is to add code for each Button.
LISTING 2.8 Starting Code for ActivityC
1: public class ActivityC extends Activity {
2: @Override
3: protected void onCreate(Bundle savedInstanceState) {
4: super.onCreate(savedInstanceState);
5: setContentView(R.layout.activity_c_layout);
6: final EditText e = (EditText)findViewById(R.id.editText1);
7: Button send = (Button)findViewById(R.id.button1);
8: send.setOnClickListener(new OnClickListener() {
9: public void onClick(View v) {
10: // Add send button code here
11: }
12: });
13: Button cancel = (Button)findViewById(R.id.button2);
14: cancel.setOnClickListener(new OnClickListener() {
15: public void onClick(View v) {
16: // Add cancel button code here
17: }
18: });
19: }
20: }
In ActivityC, the Send Data button sends data back to the calling activity. The Cancel button ends the activity without sending data.
To send data back to the calling activity, you use an intent to pass the data. Listing 2.9 shows the code for the Send Data button. In line 3, a new intent called result is instantiated. In line 4, extra data is added to the intent. The data is the contents of the EditText. Line 5 uses the setResult() method. The first parameter is Activity.RESULT_OK, which indicates that the data has been set. The second parameter is the Intent that contains the data. Line 6 is a call to the finish method to end the activity.
So, clicking the Send Data button takes the data entered in the EditText view and returns it the calling activity as an extra within an intent.
LISTING 2.9 Returning a Result from an Activity
1: send.setOnClickListener(new OnClickListener() {
2: public void onClick(View v) {
3: Intent result = new Intent();
4: result.putExtra("Data", e.getText().toString());
5: setResult (Activity.RESULT_OK, result);
6: finish();
7: }
8: });
Listing 2.10 shows the code for the Cancel button. The setResult() method is used in line 3 with the single parameter Activity.RESULT_CANCELLED.
LISTING 2.10 Returning No Result from an Activity
1: cancel.setOnClickListener(new OnClickListener() {
2: public void onClick(View v) {
3: setResult (Activity.RESULT_CANCELLED);
4: finish();
5: }
6: });
You have created ActivityC with a way to handle passing data back to a calling activity. Now you need to actually call ActivityC from somewhere. To do that, add a Get Data button to ActivityA’s layout. That button will start ActivityC. ActivityA will also need to handle the data returned from ActivityC.
Listing 2.11 shows the code for the Get Data2 button in ActivityA. Line 5 uses startActivityForResult to start ActivityC. The parameters are the intent and an integer to track the request.
LISTING 2.11 Using StartActivityForResult
1: Button getData = (Button)findViewById(R.id.button2);
2: getData.setOnClickListener(new OnClickListener() {
3: public void onClick(View v) {
4: Intent intent = new Intent(ActivityA.this, ActivityC.class);
5: startActivityForResult(intent, 0);
6: }});
You must also modify ActivityA to handle the results from ActivityC, as shown in Listing 2.12. You must override the method onActivityResult() to handle the returned data. In line 2, you can see that the parameters to this method are requestCode, resultCode, and data. The requestCode is the value you passed when you called startActivityForResult(). In line 5 of Listing 2.11, you can see that zero was passed as the requestCode. The resultCode is the result set in ActivityC. It will either be Activity.RESULT_OK or Activity.RESULT_CANCELLED. If data is available, it will be passed in the intent parameter.
Line 3 of Listing 2.12 checks for a requestCode of zero and a resultCode of Activity.RESULT_OK. If this is the request you want and the result is OK, you get the data from the passed intent in line 4 and use that data in line 5 to populate the TextView in ActivityA. The result of Activity.RESULT_CANCELLED is ignored.
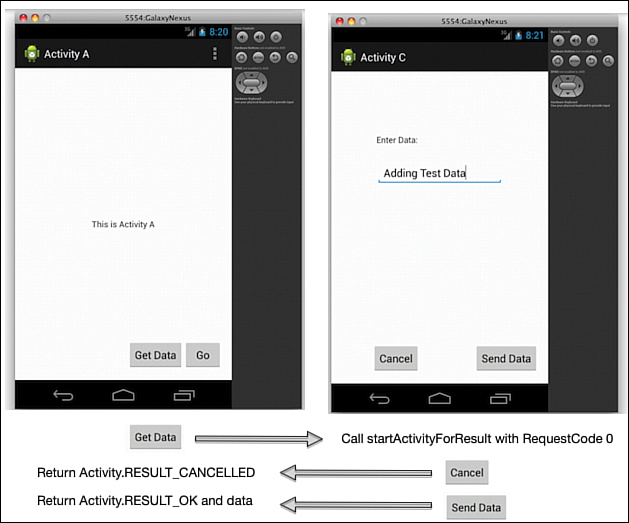
Figure 2.8 shows the relationship between ActivityA and ActivityC in the case of using startActivityForResult(). The Cancel button on ActivityC returns a result of Activity.RESULT_CANCELLED to ActivityA.
LISTING 2.12 Handling the Result
1: @Override
2: protected void onActivityResult(int requestCode, int resultCode, Intent data
) {
3: if (requestCode == 0 && resultCode == Activity.RESULT_OK){
4: String enteredData = data.getStringExtra("Data");
5: t.setText(enteredData);
6: }
7: super.onActivityResult(requestCode, resultCode, data);
8: }
Understanding Intents
Intents have been used a number of times in this hour. They have been used to start an activity, pass data to an activity, and to request a result from an activity.
So far, you have used explicit intents, which means intents that refer explicitly by class name for the activity that you want to start. In the case of explicit intents, the action to perform is specified by the activity.
There are also implicit intents. Activities can start an implicit intent that does not specify a specific activity, but rather requests an action of some kind. For example, implicit intents can retrieve an image from the file system or take a picture with the camera. The request specifies the action to take, not the activity to run.
When a request for action is made using implicit intent, the Android platform determines which activity will handle the request or presents a list of available activities to the user to select. There might be many activities that can handle an implicit intent.
This section demonstrates the use of an implicit intent by showing you how to add the ability to handle Intent.ACTION_SEND for plain text to ActivityB. That means when any activity makes a request to handle Intent.ACTION_SEND, ActivityB will be one of the options. You will be adding this as a new capability for ActivityB.
You will modify ActivityB and change the AndroidManifest.xml file to indicate that ActivityB can handle this intent. You do this by adding an intent filter. Listing 2.13 shows the changes to the AndroidManifest.xml file for ActivityB. Line 5 in Listing 2.13 indicates that ActivityB will handle the android.intent.action.SEND action. This is one of many intent actions that are defined for Android. Line 7 indicates that ActivityB will handle plain text data. As you implement the changes to ActivityB to handle the intent, you can see how action and data are used.
LISTING 2.13 Changing IntentFilter in the Manifest File
1: <activity
2: android:name="com.bffmedia.hour2app.ActivityB"
3: android:label="Activity B">
4: <intent-filter>
5: <action android:name="android.intent.action.SEND" />
6: <category android:name="android.intent.category.DEFAULT" />
7: <data android:mimeType="text/plain" />
8: </intent-filter>
9: </activity>
Recall that you added the ability for ActivityB to get data from ActivityA via an intent. Now you modify ActivityB to check the action associated with the intent. If the action equals Intent.ACTION_SEND, you’ll handle the passed data. If it does not, assume the intent came from ActivityA.
Listing 2.14 shows the updates to ActivityB to handle the ACTION_SEND intent.
LISTING 2.14 Handling Intent.ACTION_SEND
1: TextView t = (TextView)findViewById(R.id.textView1);
2: Intent intent = getIntent();
3: if (intent!=null){
4: String action = intent.getAction();
5: String type = intent.getType();
6: if (Intent.ACTION_SEND.equals(action) && "text/plain".equals(type)) {
7: t.setText(intent.getStringExtra(Intent.EXTRA_TEXT));
8: }else{
9: //handle intent data from ActivityA
Now ActivityB is ready to act on any intent for an activity that handles action Intent.ACTION_SEND with type “plain/text.” You can see this work in a number of ways. Using the browser app, you can share a URL. Figure 2.9 shows the Share Page function in the browser. When you select that option, ActivityB appears as an option, as shown in Figure 2.10. The URL provided from the browser ACTION_SEND intent will be displayed in ActivityB as the passed data.
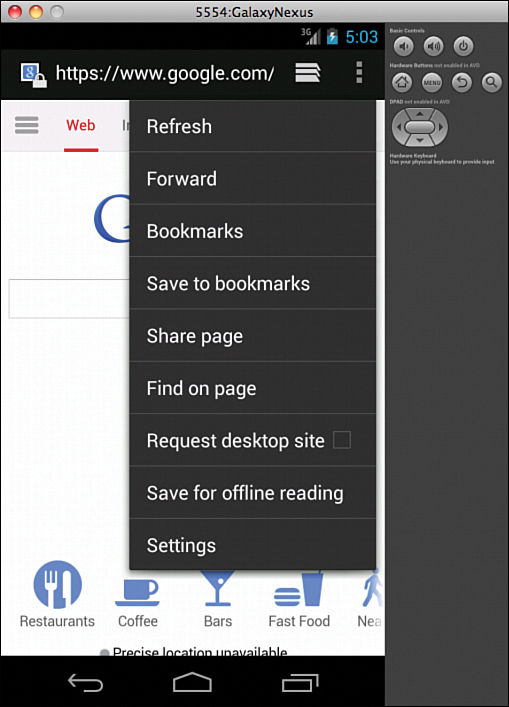
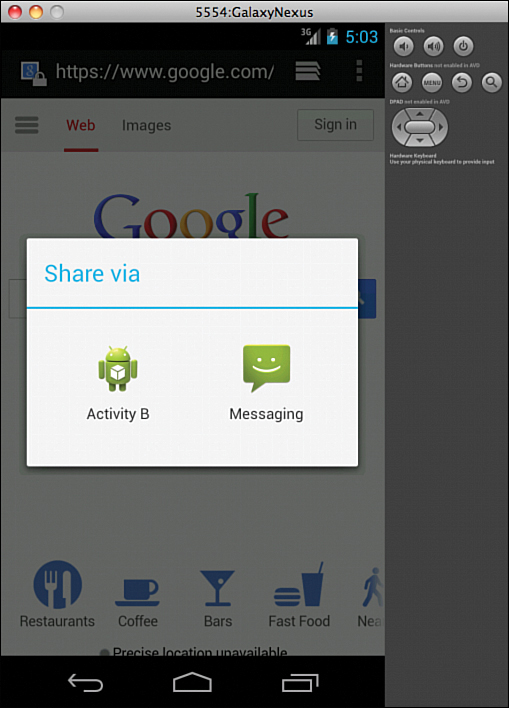
Each activity that can handle the ACTION_SEND intent is shown. Figure 2.10 shows that the available options are ActivityB and the Messaging app.
You have seen that when the startActivity() method is called with the intent parameter, the Android system matches the intent action with the appropriate activity on the Android system. The appropriate activity then launches. An intent object encapsulates a task request used by the Android operating system.
The Android system handles all intent resolution. An intent can be specific, such as a request for a specific activity to be launched, or somewhat vague, requesting that any activity matching certain criteria be launched. In this example, ActivityB launches directly from ActivityA. ActivityB also launches when it meets the criteria of handling the intent for ACTION_SEND for the specified mime type.
Passing Information with Intents
Intents can be used to pass data between activities. You use an intent in this way by including additional data, called extras, within the intent.
As you saw in Listing 2.6, to package extra pieces of data along with an intent, you use the putExtra() method with the appropriate type of object to include.
When you use the startActivityForResult() method, the result is passed in as a parameter to the onActivityResult() method with an intent parameter. The intent data can then be extracted and used by the parent activity.
Using Intents to Launch Other Applications
Apps may launch external activity classes in other applications.
There are well-defined intent actions for many common user tasks. For example, you can create intent actions to initiate applications such as the following:
![]() Launching the built-in web browser and supplying a URL address
Launching the built-in web browser and supplying a URL address
![]() Launching the web browser and supplying a search string
Launching the web browser and supplying a search string
![]() Launching the built-in Dialer application and supplying a phone number
Launching the built-in Dialer application and supplying a phone number
![]() Launching the built-in Maps application and supplying a location
Launching the built-in Maps application and supplying a location
![]() Launching Google Street View and supplying a location
Launching Google Street View and supplying a location
![]() Launching the built-in Camera application in still or video mode
Launching the built-in Camera application in still or video mode
![]() Launching a ringtone picker
Launching a ringtone picker
![]() Recording a sound
Recording a sound
Here is an example of how to create a simple intent with a predefined action (ACTION_VIEW) to launch the web browser with a specific URL:
Uri address = Uri.parse("http://developer.android.com/");
Intent androidDocs = new Intent(Intent.ACTION_VIEW, address);
startActivity(androidDocs);
This example shows an intent that has been created with an action and some data. The action, in this case, is to view something. The data is a uniform resource identifier (URI), which identifies the location of the resource to view.
For this example, the browser’s activity then starts and comes into the foreground, causing the original calling activity to pause in the background. When the user finishes with the browser and clicks the Back button, the original activity resumes.
Applications may also create their own intent types and allow other applications to call them.
Understanding the Activity Lifecycle
In this hour, you learned how to start activities and how activities pass data and work with each other. An activity also has a number of internal states. Activities are created, started, paused, resumed, and destroyed. The states that an activity goes through are known as the activity lifecycle. The activity lifecyle includes creating, starting, pausing, resuming, and destroying activities.
The activity lifecycle is important because each point in the lifecycle provides an opportunity to take an action within the activity. There may be set-up work to do when an activity is started and clean-up work to do when an activity is paused.
So far, all the activities that you developed have used the onCreate() method to set up the user interface for the app. In onCreate(), you call setContentView() to tie the activity to the layout and define all the user interface elements such as EditText and Buttons.
When an activity is created, it is being set up. When it is started, the activity is visible to the user. A resumed activity is also visible to the user. A paused activity might be partially visible, for example, such as an activity seen behind a dialog window. A stopped activity is not visible to the user. Ultimately, an activity is destroyed
An activity that is visible to the user and that the user can interact with is considered to be in the foreground.
For each of these states, a callback method exists within the activity. Callback methods exist for onCreate(), onPause(), onResume(), onStop(), and onDestroy().
Figure 2.11 shows the important methods of the activity lifecycle. In Figure 2.11, onResume() is called both when the activity is first started and when it is resumed. It is called whenever the activity comes to the foreground. That makes it a good place to do things such as get intents and read extra data.
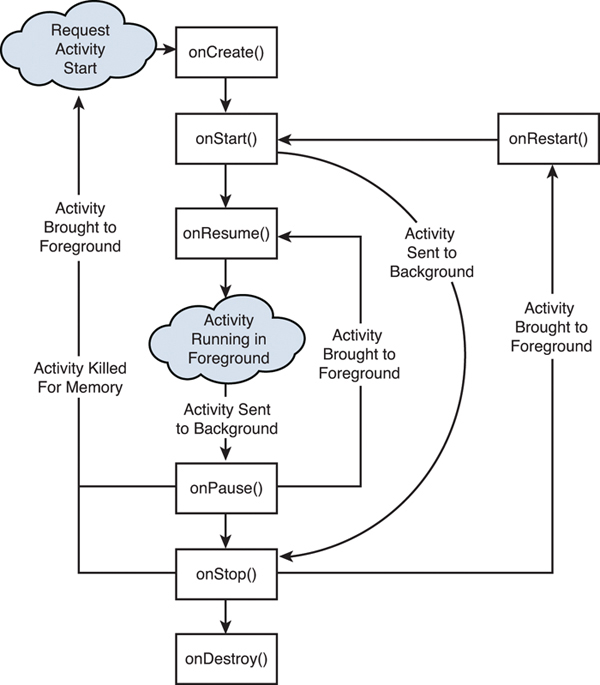
The onCreate() method is used to set up the user interface using setContentView() and to initialize any other static parts of the activity.
As shown in Figure 2.11, the onStart() method runs after an activity has been sent to the background. That makes the onStart() method a good spot to ensure that any required system resources are still available. For example, if your GPS is required, onStart() is a good place to ensure that GPS is available. The advantage of checking GPS in onStart() is that onStart() is called less frequently than onResume().
The onPause() method fires when the activity leaves the foreground. That might mean that a dialog window is showing and the activity will resume shortly, or it might mean it is the first step in the activity being stopped. This makes onPause() a good place to perform tasks such as stopping animations, saving uncommitted data, and releasing system resources. Anything released with the onPause() method should be reset in the onResume() method.
The onStop() method assures you that the activity is in the background. It is the place to release all resources that are not required for the user to interact with the activity. Killing threads in the onPause() or onStop() methods is best. Cleanup might occur in the onDestroy() method for any long-running processes that should continue after the activity is stopped.
You can match the methods for creating and cleaning up items. If something is created in onResume(), clean it up in onPause(). If something is allocated in onStart(), clean it up in onStop().
In practice, you might find yourself using onCreate(), onResume(), and onPause() for app initialization and cleanup.
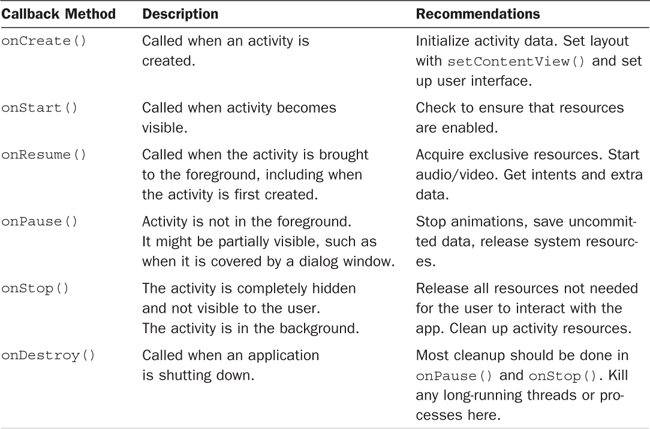
Table 2.1 shows the key callback methods for activities with recommendations on the functionality to handle in those methods.
Summary
This hour covered activities from both an implementation and technical definition perspective. On the implementation side, you saw how to start one activity from another, how to pass data between activities, how one activity can request information from another, and how an activity can handle data shared from another application.
You also learned about the relationship between intents and activities, which provided the basis for understanding explicit intents and implicit intents. Explicit intents are direct calls to specific activities. Implicit intents are general calls to action in the system that are handled by any activity with matching criteria.
Q&A
Q. What is the relationship between activities and intents?
A. Intents contain a call to action and can carry additional data. The call to action in an intent usually results in an activity being started. The data provided in the intent is made available to the activity. When activities are started, they are passed intents.
Q. What is the importance of the activity lifecycle?
A. The activity lifecycle provides an opportunity to clean up an app as it is shutting down and to efficiently start and resume apps.
Workshop
Quiz
1. What two methods are used to start activities?
2. When an activity expects a result, what method must be implemented to handle the result?
3. What is the difference between a bundle and extra data?
Answers
1. The two methods are startActivity and StartActivityForResult. An intent is passed to both. StartActivityForResult also takes an integer value to track the request.
2. The method onActivityResult must be implemented. It will be passed a result code, a request code, and any data.
3. A bundle is a collection of data. An extra is used to add data to an intent. A bundle can be an extra. That is, a bundle can be defined, populated with data, and then added to an intent.
Exercises
1. Create an activity called InputActivity. It should have two EditText fields called numEditText1 and numEditText2 that accept numbers as input. Add a Button to the activity called “Add.”
When the Add button is clicked, take the data entered in the two EditText fields and save the data in a bundle.
2. Create a second activity called AddActivity that adds two numbers passed in a bundle and displays the results in a TextView.
3. Pass the bundle from the InputActivity to the AddActivity and verify their results.
To convert the passed strings to numbers (int), use the function Integer.parseInt(string).
This is not a “real-world” example, but it shows the ability to create activities, design simple layouts, and pass data between activities in a meaningful way.