
Hour 4. Not Just Smartphones: Supporting Tablets, TVs, and More
What You’ll Learn in This Hour
![]() Handling device display and orientation
Handling device display and orientation
![]() Platform versions and the compatibility package
Platform versions and the compatibility package
Android was developed to run on different kinds of hardware and to support various screen sizes. For building a user interface for an Android app, support for multiple screen sizes and densities was included from the start. Density refers to the number of pixels in a physical area on the screen. With the capability to support multiple hardware devices and screen sizes, Android was eventually deployed on tablets and on Google TVs. This hour provides a brief history of Android, considers options for supporting multiple devices with different characteristics, reviews the SDKs that have been released, and introduces the Android Support Library. The Support Library brings some newer SDK features to older versions of Android.
A Brief History of Android
In October 2008, the HTC Dream (or G1) phone was released with the 1.0 version of the Android operating system. The phone was available to T-Mobile customers in the United States and via other providers in Europe.
At the time the G1 was released, the Android Software Development Kit (SDK) had been available to developers for a year, but few applications were available in the early days.
In March 2009, approximately 2,300 applications were in the Android market. By late 2011, the number of Android apps was more than 100,000, and by late 2012, more than 700,000 apps were available.
Android began as an independent company in 2003 and was purchased by Google in 2005. The Android operating system is based on Linux, and the development environment uses the Java language.
Android operating system releases are known by their dessert-based code names. Android 1.5, released on the G1 in 2009, was known as Cupcake. Donut, Eclair, Froyo, and Gingerbread followed Cupcake. Honeycomb was then released as a tablet-specific version of Android. Honeycomb was followed by Ice Cream Sandwich (ICS) and Jelly Bean.
In September 2011, Amazon released a seven-inch tablet known as the Kindle Fire. The first Kindle Fire ran a customized version of Gingerbread. The current generation Kindle Fire HD runs a custom version of Ice Cream Sandwich.
Google TV was originally released on the Eclair version of Android, but then received a major upgrade to Honeycomb.
That’s a lot of devices, manufacturers, and OS versions. By understanding the options for working with different devices and features, simplifying the task of supporting a large number of devices and OS versions is possible.
Handling Device Display and Orientation
When you develop an Android app, the goal is to make sure that the app looks good wherever it runs. Android devices come with a variety of display settings, including different screen sizes, densities, aspect ratios, resolutions, and default orientations. You should consider these factors when designing the app.
To simplify working with different types of screen configurations, the Android system looks at two important characteristics: screen density and screen size.
Screen Density
Screen density is the physical density of the screen. It is the dots-per-inch (dpi) displayed.
Android defines four screen densities: low density, medium density, high density, and extra high density. These densities are not device specific; they allow similar devices to be placed in the same group.
You have already encountered one way that Android provides support for devices with different screen densities: In Hour 3, you examined the structure of an Android project and saw that multiple folders were provided for drawable resources. The folders correspond to the four defined screen densities. The screen density categories are used to group devices and are approximate values:
![]() Low (ldpi): 120dpi
Low (ldpi): 120dpi
![]() Medium (mdpi): 160dpi
Medium (mdpi): 160dpi
![]() High (hdpi): 240dpi
High (hdpi): 240dpi
![]() Extra high (xhdpi): 320dpi
Extra high (xhdpi): 320dpi
Screen Size
Screen size is the actual physical size of the screen. Android characterizes screen size into four general sizes: small, normal, large, and extra large.
For each Android screen size, a range might exist of actual physical dimensions on the device. That is, two devices with normal screen size from the Android perspective might have screens with different physical dimensions. Android uses a generic screen size definition to simplify working with multiple sizes. There is a range for each size.
The minimum size of these generic screen sizes can also be considered in DIPs, or density-independent pixels (dip or dp). The screen sizes with their approximate size and minimum resolution in dips are as follows:
![]() Small (2 inches): Minimum 426dp × 320dp
Small (2 inches): Minimum 426dp × 320dp
![]() Normal (4 inches): Minimum 470dp × 320dp
Normal (4 inches): Minimum 470dp × 320dp
![]() Large (7 inches): Minimum 640dp × 480dp
Large (7 inches): Minimum 640dp × 480dp
![]() Extra large (10 inches): Minimum 960dp × 720dp
Extra large (10 inches): Minimum 960dp × 720dp
As with densities, these screen sizes allow different devices to be considered together as part of the same group.
Note: Density-Independent Pixels (DIPs or DPs)
Screens have a density expressed in dots-per-inch (DPI). A density-independent pixel has the size of one physical pixel on a device with a 160dpi screen. So, a density-independent pixel is equivalent to one physical pixel on a medium device. For higher-density screens, the number of physical pixels increases with the DPI.
One device-independent pixel equals 1 physical pixel on a 160dpi screen.
One device-independent pixel equals 1.5 physical pixels on a 240dpi screen.
Physical pixels can be determined from the DPI as follows: px = dp * (dpi / 160) where px is physical pixels, dp is the number of device-independent pixels, and dpi is the dpi of the device. Ten device-independent pixels are equivalent to 15 physical pixels on a 240dpi screen.
Handling Screen Size and Density
One option for handling devices with different screen sizes and densities is to do nothing. No, really! The Android system will adjust your user interface (UI) layouts and drawables to best match the device that the application is running on. Drawable images will be stretched based on device-independent pixels and Android will do the best it can with the layout.
Another way to look at “doing nothing” is that you are creating a device-independent UI that works well on all Android device screens.
An important caveat applies to the “doing nothing” method. You must use the layouts that support stretching and sizing. You must also specify the width and height of widgets using settings such as WRAP_CONTENT and MATCH_PARENT.
GO TO ![]() HOUR 5, “USING LAYOUTS,” for more information on using layouts.
HOUR 5, “USING LAYOUTS,” for more information on using layouts.
The key to a device-independent user interface is to use density-independent pixels in your layout! Android adjustments are based on using dp units.
Figure 4.1 shows the ic_launcher.png icons that are created by default for a project. The Android icon is shown from the extra-high density version to the low-density version. The medium-density version is 48 pixels wide and 48 pixels high (48 × 48). By understanding screen size and densities, you can figure out how to scale appropriately. A high-density screen is 240dpi and is 1.5 times denser than a medium-density screen. The high-density screen graphic is 72 pixels by 72 pixels, which is 1.5 times larger than the image for the medium screen. The other images are scaled similarly.
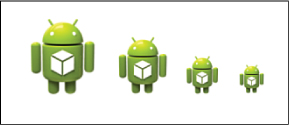
Keep in mind that the goal of having separate images like these is that the images will appear with the same proportions on devices of different densities. All four images have the same dp size. On the higher-density screens, the images will be shown more sharply.
You can use two more techniques to handle different screen sizes. One is to create alternate resource folders, and the other is to use the <supports-screens> element in your manifest. You might choose to use these options to create a pixel-perfect experience, such as in certain types of games or other applications where the visual design is the dominant factor. Using the built-in flexibility of Android usually makes it unnecessary to create many alternate resource folders. Also consider which on-screen elements should grow to fill an area and which should be fixed in place. Using device-independent pixel sizes for elements, such as borders combined with layouts where other elements fill the parent or wrap content, can make a consistent design across devices.
Alternative Resources
Providing different versions of images in different resource folders applies the concept of using alternative resources. Having a drawable-mdpi folder specifies to the system where medium density images can be found. You can extend that concept to creating folders for different types of alternative resources.
In addition to the drawable density qualifiers such as mdpi, you can use size qualifiers of small, normal, large, and xlarge.
To create an alternate layout for an extra-large screen, you append xlarge to the layout folder:
/res/layout-xlarge/activity_main.xml
You can also address screen orientation by using alternative resources. The following section covers screen orientation in more detail. To support portrait and landscape orientation, the qualifiers port and land are available.
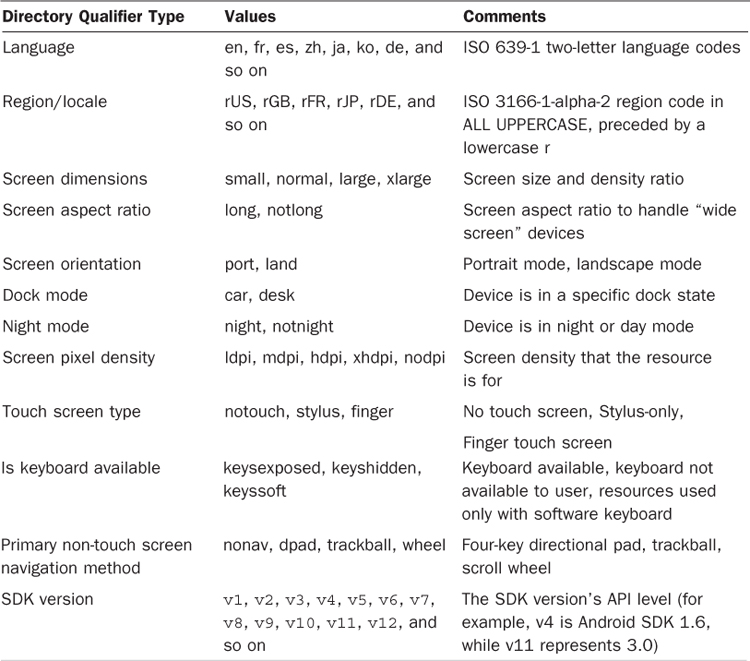
Table 4.1 shows a list of import resource directory qualifiers. Note that the Android SDK version can be directly targeted using resources.
You can combine resource qualifiers. The following is a valid resource directory for landscape orientation on an extra-large device:
res/layout-xlarge-land/my_layout.xml
Adding <supports-screens>
You can add the <supports-screens> element to the AndroidManifest.xml file. The idea is to specify which screens your application supports. This limits the number of devices that can run your app, but provides for additional control over the user experience. If your app just does not work well on small screens, then using <supports-screens> to restrict access is a good option. Later, if you decide to add a small-screen version, you can remove this element.
Values are set to true or false for attributes based on screen size; for example, android:smallScreens=false.
By the Way: More About <supports-screens>
For additional information on <supports-screens>, see the documentation on the AndroidManifest.xml file at http://developer.android.com/guide/topics/manifest/supports-screens-element.html.
Here are the techniques to support multiple screens:
![]() Use device-independent pixels in your layouts.
Use device-independent pixels in your layouts.
![]() Provide alternative graphics resources.
Provide alternative graphics resources.
![]() Provide other alternative resources (this should only be needed in rare cases).
Provide other alternative resources (this should only be needed in rare cases).
![]() Use the
Use the <uses-screens> element in the AndroidManifest.xml file.
Orientation
Android applications can run in landscape or portrait mode. For a phone or tablet, the orientation depends on how the user tilts the device screen. Google TVs are always in landscape mode. One approach to handling screen orientation is to design simple layouts that work in either portrait or landscape mode.
Another technique is to use alternative resources by specifying layout-land or layout-port resource directories.
To implement different screen orientations using alternative resources, do the following:
1. Create a new landscape-specific layout file to the /res/layout-land/ directory.
2. Make sure to include all the controls defined in default layout resources that are referenced in the Java code or other files.
3. Design a new version of the layout that meets your design expectation for landscape mode.
By the Way: Toggling the Orientation of the Emulator
On Windows, you can toggle the orientation of the emulator by pressing Ctrl+F11 and Ctrl+F12.
For Macintosh, use Ctrl+fn+F11.
Handling Orientation Changes Programmatically
An orientation change is considered to be a configuration change in Android. In each activity that you have created thus far, you have loaded a layout in the onCreate() method. An orientation change is an opportunity for a different layout to load. So, considering it a configuration change makes sense.
When a configuration change occurs, the current activity is restarted. The onDestroy() method of the activity is called followed by the onCreate() method. The application then reloads, taking the new configuration into account.
This gets complicated when the state of the activity has changed and should be retained after the configuration changes. To consider a simplified example, if you download an image and display it when you start your activity, if you do nothing, you will download the image a second time when the orientation changes.
Retaining Data Across Configuration Changes
One way to address retaining data across configuration changes is the use the onSaveInstanceState() method to save data about the application state. Considering the activity lifecycle, you would then restore the state during onCreate() or onRestoreInstanceState(). In the following example, the value 5 is stored with the key "numAttempts" during the onSaveInstanceState() method and restored during the onCreate() method:
protected void onSaveInstanceState(Bundle outState) {
super.onSaveInstanceState(outState);
outState("numAttempts", 5);
}
public void onCreate(Bundle savedInstanceState) {
if (savedInstanceState != null){
int numAttempts = savedInstanceState("numAttempts");
}
}
Tip: Saving State
Often saving state in an activity might mean saving a limited number of items. For a complex form where the user has entered data in fields, losing that data on a configuration change will certainly be an unpleasant experience. So, save the state of your UI elements! That means checkboxes, text entries, or other selections.
Using android:configChanges
What if you don’t need the activity to restart on an orientation change? If you are certain that you don’t need to load resources on certain configuration changes, you can use the Android manifest to indicate that you will handle configuration changes yourself. When you do this, the activity is not shut down and restarted on a configuration change.
You can add code to the onConfigurationChanged() method and handle everything yourself.
And, in certain cases, you can indicate that you will handle configuration changes and not implement the onConfigurationChanged() method!
You can do that when no need exists to update the application based on a configuration change. In this case, you have all the resources you did before the configuration change and have avoided restarting the activity.
Adding the following to the AndroidManifest.xml file indicates that the MyActivity activity will handle configuration changes for orientation and keyboardHidden. The keyboardHidden attribute indicates that a slideout keyboard has been used:
<activity android:name=".MyActivity"
android:configChanges="orientation|keyboardHidden"
android:label="@string/app_name">
Device Features
Different devices have different features. A particular phone or tablet might or might not have a camera. Some devices have two cameras. What about location-based services such as GPS? What about the availability of Near Field Communication (NFC) or Bluetooth? Any particular phone or device may or may not have these capabilities. Your app should check for these features before using them.
Android provides a way to specify whether a particular device feature is required or optional for your app. If a feature is optional, Android must provide a way to detect whether the feature is available.
The following sections consider the case of an app that optionally uses a camera. If a camera is available, the app would show additional options to the user.
The <uses-feature> Element in AndroidManifest.xml
The <uses-feature> element indicates that a specific device feature is used by the application. The Android system does not use this element directly, but services such as Google Play use it to determine how to interact with your app. Using the element is straightforward. You specify the feature and use an indicator for whether the feature is required. To indicate that a camera is used in the app but is not required, you would add the following:
<uses-feature android:name="android.hardware.camera" android:required="false"/>
Being accurate in the manifest is important. If the main purpose of your app is to log trip information, adding a photo using a camera would be a nice extra feature, but is not required. By indicating that the app uses the camera, but it is not required, enables users who do not have a camera on their device to use the app.
Detecting Feature Availability
If your app uses a camera, but the camera is not required, you need a way to check whether a camera is available. You do so with the android.content.pm.PackageManager class. The PackageManager class contains information about application packages that are installed on the device.
The getPackageManager() method is called from a context, so it can be called from within an activity. The following snippet instantiates a PackageManager and uses the hasSystemFeature() method to check whether a camera is available:
PackageManager pm = getPackageManager();
if (pm.hasSystemFeature(PackageManager.FEATURE_CAMERA)) {
// add camera code here
}
This PackageManager code lists the features related to a camera. The full list of possible device features is available in the documentation for PackageManager at http://developer.android.com/reference/android/content/pm/PackageManager.html:
![]()
FEATURE_CAMERA indicates the device has a camera facing away from the screen (not front-facing).
![]()
FEATURE_CAMERA_ANY indicates the device has at least one camera pointing in some direction.
![]()
FEATURE_CAMERA_AUTOFOCUS the device supports auto-focus.
![]()
FEATURE_CAMERA_FLASH the device supports flash.
![]()
FEATURE_CAMERA_FRONT indicates the device has a front-facing camera.
Platform Versions and the Compatibility Package
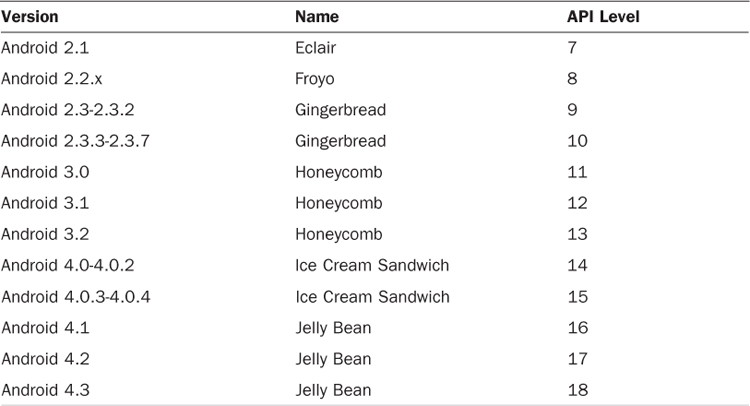
This hour began with a brief history of Android that mentioned the Android 1.5 release known as Cupcake. In fact, a name and two numbers are associated with each release of Android. One number is the version number, such as 1.5, and the other is API level. Table 4.2 shows the list, starting with Android 2.1.
Each new version of Android will have features for both users and developers. This hour covers some of these features at a high level. Though Table 4.2 shows multiple versions of Android, the effective list of versions is smaller. Some releases, such as 3.0, are quickly replaced by others and virtually no devices are running that particular version.
Honeycomb (3.0-3.2) was released as a tablet-only version. Most tablets received a fast update from 3.0 to 3.2 and have subsequently been upgraded to Ice Cream Sandwich or Jelly Bean.
At the time of this writing (June 2013), four main Android versions are in use: Froyo by 3% of users, Gingerbread by 36% of users, Ice Cream Sandwich by 25% of users, and Jelly Bean by 33% of users. This accounts for 97% of the devices in use.
The Android developer site includes information on the user and developer features that are available in each release: http://developer.android.com/about/versions/index.html.
In the AndroidManifest.xml file, you set a minimum SDK version and a target SDK version with the <uses-sdk> element. To support Ice Cream Sandwich and higher, you would set the minimum SDK versions to 14. Here’s the format:
<uses-sdk android:minSdkVersion="integer"
android:targetSdkVersion="integer"
android:maxSdkVersion="integer" />
What strategy should you use for setting SDK versions? The target SDK should be the highest version that you have tested on. The minimum API should be the lowest API level you need to run. If you use classes from API level 8, then set the minSdkVersion to 8. Setting maxSdkVersion is not typically necessary.
Introducing Fragments and the Action Bar
Honeycomb introduced fragments and the action bar to be used by developers and seen by users as an integral part of the user interface. You’ll look at both of these features in detail in this book as you design more complex user interfaces.
A fragment represents a behavior or portion of the user interface within an activity. A fragment is sort of like a modular part of an activity that can be added or removed. It is something of a “subactivity.”
One advantage of fragments is that they provide a mechanism for developing modular parts of a user interface that can be used in different ways on different devices. You can combine multiple fragments in either a tablet or phone user interface, but you can develop an app where multiple fragments are shown in the tablet design and only one in the phone design. You can use the same fragments in both devices.
The action bar is a persistent bar across the top of the screen in an app. It can provide navigation, status information, and contextual options.
Figure 4.2 shows the action bar for Gmail on a phone in landscape mode.

Fragments and the action bar are powerful features that are helpful to developers. The action bar is also highly visible to app users. Each version of Android offers other feature differences for developers, but these two are called out because fragments provide a way to create powerful user interfaces, and the action bar is central to app navigation.
Using the Support Library
The Android Compatibility package or support library provides a way to include new API features in older versions of Android. It is a library that you add to your project. The projects you have created so far using Eclipse all include the support library.
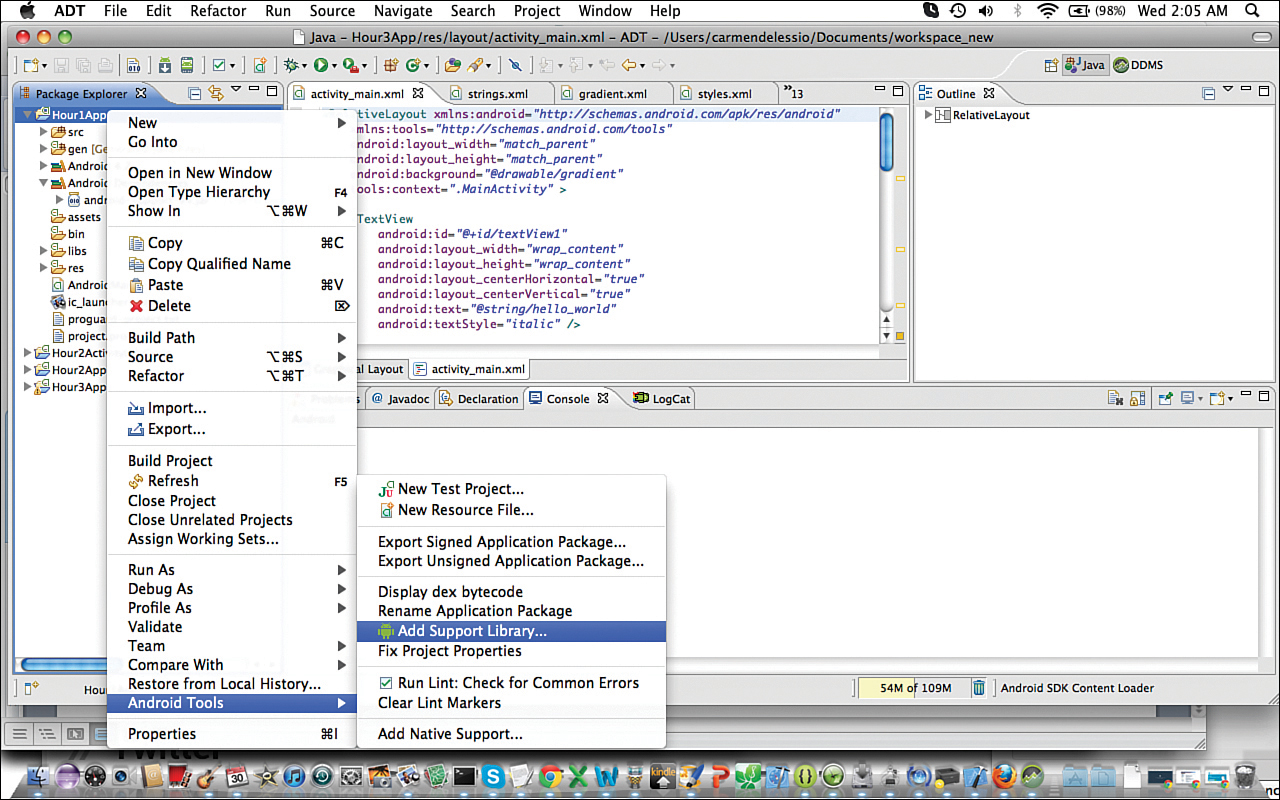
In any project, look in the Android-dependencies folder and you will see the filename android-support-v4.jar. That is the support library. Figure 4.3 shows that you can add the support library to a project by choosing Android Tools, Add Support Library.
The main advantage of the support library is that it implements a large subset of the fragments API.
The features supported by the library are listed at http://developer.android.com/tools/extras/support-library.html.
The support library does not provide an alternate action bar. For devices that do not support an action bar, the Android menu system can be used. A popular open source project called ActionBarSherlock also supports an action bar in older versions of Android.
GO TO ![]() HOUR 23, “PRO TIPS, FINISHING TOUCHES, AND NEXT STEPS,” to learn more about ActionBarSherlock.
HOUR 23, “PRO TIPS, FINISHING TOUCHES, AND NEXT STEPS,” to learn more about ActionBarSherlock.
In addition to using the support library, targeting specific versions of Android is possible. To programmatically determine the version of Android, use the Build class (android.os.Build). Specifically, check the Build.VERSION class’s SDK_INT value, as defined in android.os.Build.VERSION_CODES.
By determining specific Android versions and using the support library, using fragments for an app and including an action bar if it is supported and an alternate display if it is not is possible.
To call methods from the newer APIs and still support older versions, wrap the code in an if statement to check the version:
if (Build.VERSION.SDK_INT >= Build.VERSION_CODES. HONEYCOMB) {
// do HONEYCOMB specific work
}
Strategy for Device Support
Though many versions of Android are running on different devices, coming up with a simple device strategy that fits your application is probably possible.
You can use the support library on versions of Android back to 1.6. It has new features including fragments. If you are creating a “normal” app, then using the support library is a good starting point. Using the support library with a separate implementation of the action bar for devices that support it is a good option.
GO TO ![]() HOUR 7, “ACTIONBAR AND MENU NAVIGATION,” for more information on using the action bar.
HOUR 7, “ACTIONBAR AND MENU NAVIGATION,” for more information on using the action bar.
If your app uses any Android version–specific features, then you need to use the appropriate version. Supporting only more recent versions of Android might be a good strategy for a cutting-edge app.
Beyond which versions to support, as a developer, you must decide whether you will have multiple versions of your app or one app that handles all devices. Google and the Android system have made a clear path to create one app that runs well on all devices.
Another strategy is to create a core library of common functions and create specific app versions if needed. Android provides you the ability to make any project a library project. Creating a specific version for tablets or for the Kindle Fire might be worthwhile for a particular app.
Note: Kindle Fire
The Kindle Fire is a popular Android device from Amazon. The original Kindle Fire runs Android version 2.3.3, and the newer Kindle Fires run Android 4.03. You can find additional information at https://developer.amazon.com/sdk/fire/specifications.html.
Launching Apps on a Device
This hour is about creating apps for different devices. The emulator is great for development, but if you are going to release apps onto Google Play or other markets, testing on one or more actual devices is best.
Running from Eclipse
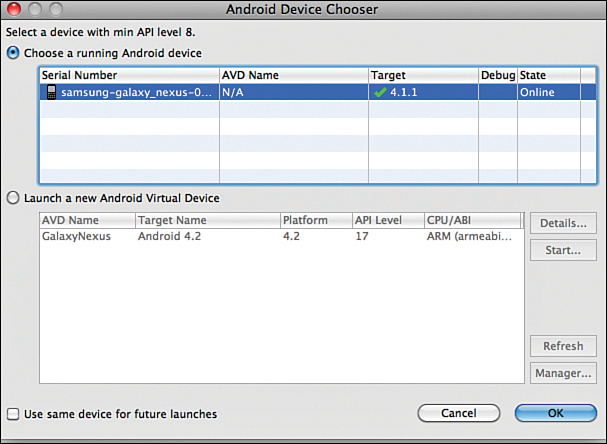
To run a specific project, select the project in Eclipse, right-click, and choose Run As Android Application. The Android Device chooser screen appears, as shown in Figure 4.4. You can choose to run on a device or an emulator.
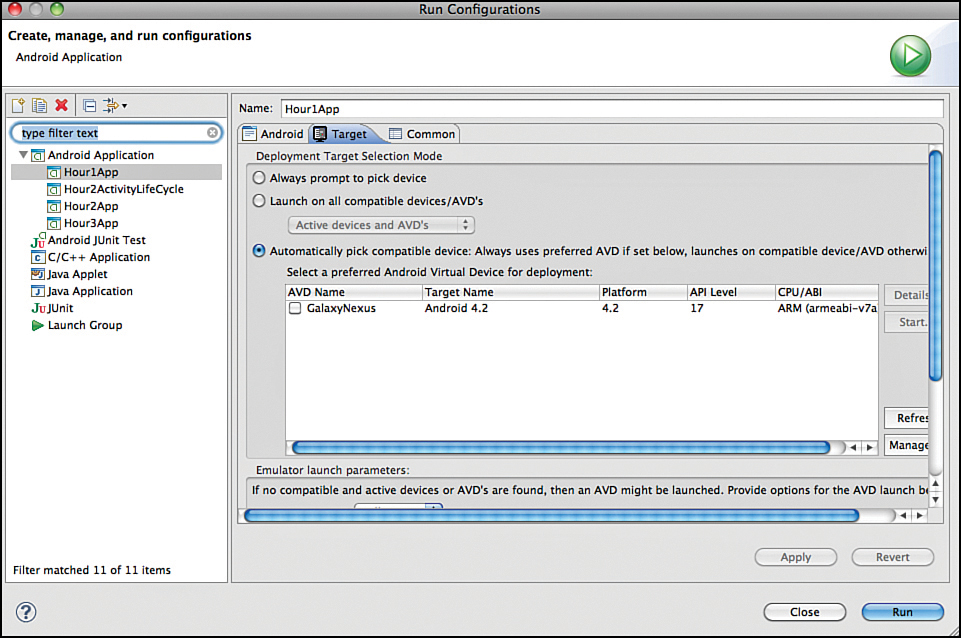
Configuring how to run a specific project is easy. You can set the project to always ask which device to use. To do that, choose Run, Configurations in the Eclipse menu to access the Run Configurations screen shown in Figure 4.5.
Summary
In this hour, you learned about screen size and resolution and how to handle creating apps for devices with different screen characteristics, including how to load alternative resources. This hour also covered how to check for device features, such as whether a camera is available. You learned about the support library as well as how to handle different Android versions.
Q&A
Q. Is the variety of devices and OS versions what people mean by Android fragmentation?
A. To some extent, yes. The Android device market includes devices of different sizes, different features, and different Android versions. A manufacturer can also add software modifications. When people started to use the word fragmentation to talk about the large variation in Android devices, Apple had one version of the iPhone. For the iPhone, Apple controls the hardware and the software. That is different from Android where multiple hardware manufacturers and multiple versions of Android exist. That said, one significant consideration for designing and developing apps on Android was handling different screen sizes. With the introduction of the iPad and the iPad-mini, the work involved in supporting multiple screen sizes is affecting the Apple world as well. Android has had screen size support built in from the beginning, and Android’s support package makes development easier across OS versions.
Workshop
Quiz
1. True or False: You can provide alternative resources for a specific version of the Android SDK, such as Honeycomb (Android 3.0).
2. Specify a resource directory for layouts that are in portrait mode and support a large screen.
3. What method can you use to preserve an object through an orientation change?
4. What is the purpose of the support library?
2. The resource directory is res/layout-large-port/.
3. The method onRetainNonConfigurationInstance() preserves the object. To retrieve it, you use getLastNonConfigurationInstance().
4. The support library brings newer Android features to older versions. You can add this library to your current project.
Exercises
1. Implement an orientation listener in one of your activity classes. You can use example code from an earlier hour in this book. Log an information message each time an orientation event occurs. You can do this using the Log class. Find out more at http://developer.android.com/reference/android/util/Log.html.
2. Create an activity that checks for the availability of a camera on a device. Display the camera information as part of the user interface. Run this on as many actual devices as possible. Try listing all camera features (front-facing, flash, and so on).
3. Provide a new landscape directory for the layout in Hour1App. You can copy the current layout directory by right-clicking and choosing Copy. Highlight the res directory and choose Paste. Give the new directory the name layout-land. Edit the activity_main.xml file to have an appropriate design for landscape mode (or just give it a blue background to make it different). Using an emulator or a device, run the app and change the orientation.