Android Patterns
We begin in Chapter 2 by looking at Android design patterns. In my mind this can mean two things, user Interface design and architecture; and we’ll look at both here. In the “UI Design Patterns” section we’ll take a look at Android UI guidelines that Google released around the time Ice Cream Sandwich was released.
You don’t have to follow the out-of-the-box programming structure when you’re coding Android applications; there are MVC, MVVM, and DI alternatives. And in the second half of this chapter, “Architectural Design Patterns,” we’re going to look at some of the alternatives to classic Android programming design.
UI Design Patterns
Before Ice Cream Sandwich, Android design was not very well defined. Many early apps looked very similar to the example shown in Figure 2-1. This app has built-in Back button functionality and iOS-like tabs because more than likely it was a port of an existing iOS app; the app even has a name, iFarmers, that belongs in the iTunes app store.
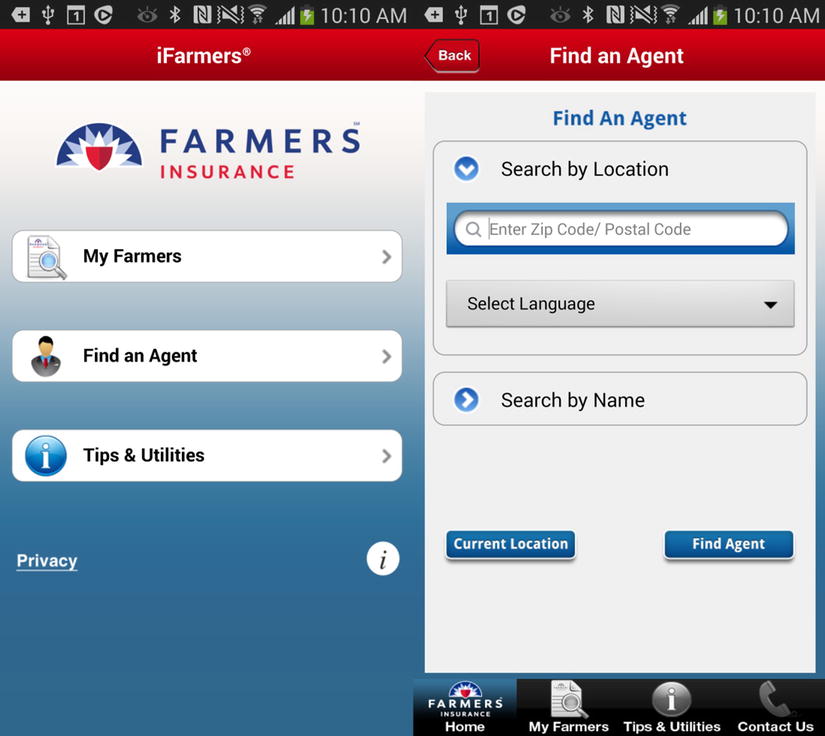
Figure 2-1. iFarmers is a typical early Android app
I don’t want to single out the iFarmers app, as there are many examples of similar apps on Google Play. I’m sure the app developers pushed for more of an Android design, and no doubt at the time they were not able to point to a design resource and say it was the industry standard way of designing an Android app; they were probably told to just get on with it.
These days, the Android platform is less about iOS conversions and more about leveraging the massive Android user base. Google has also produced a design guide, available at http://developer.android.com/design/get-started/principles.html, and those principles are what this section is going to explain.
To help demonstrate different best practices we’re going to be using a simple To Do List app throughout this book. So to begin with, let’s look at the code for the sample app; at the moment it has a splash screen, shown in Figure 2-2, and a to-do list screen to add items, shown in Figure 2-3.

Figure 2-2. The TodDoList app splash screen
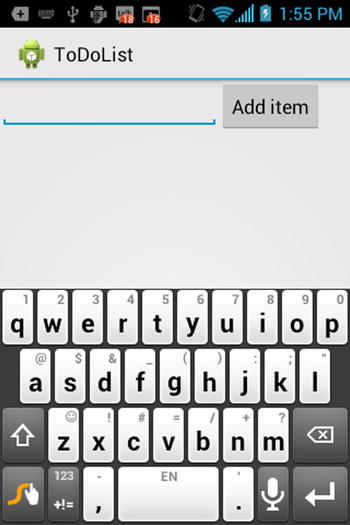
Figure 2-3. The app’s main To Do List screen
The complete code for this app is provided with the book’s downloadable source code, but for our purposes here there are two Java files we will work with, TodoActivity.java, shown in Listing 2-1, and TodoProvider.java, which you’ll see in Listing 2-2.
Listing 2-1. TodoActivity.java
package com.logicdrop.todos;

import java.util.ArrayList;
import java.util.List;

import android.app.Activity;
import android.os.Bundle;
import android.util.Log;
import android.view.View;
import android.view.View.OnClickListener;
import android.widget.AdapterView;
import android.widget.AdapterView.OnItemClickListener;
import android.widget.ArrayAdapter;
import android.widget.Button;
import android.widget.EditText;
import android.widget.ListView;
import android.widget.TextView;
import android.os.StrictMode;

public class TodoActivity extends Activity
{
   public static final String APP_TAG = "com.logicdrop.todos";

   private ListView taskView;
   private Button btNewTask;
   private EditText etNewTask;
   private TodoProvider provider;

   private OnClickListener handleNewTaskEvent = new OnClickListener()
   {

       @Override
       public void onClick(final View view)
       {
          Log.d(APP_TAG, "add task click received");

          TodoActivity.this.provider.addTask(TodoActivity.this
                 .getEditText()
                 .getText()
                 .toString());

          TodoActivity.this.renderTodos();
       }
   };

   @Override
   protected void onStart()
   {
       super.onStart();
   }

   private void createPlaceholders()
   {
       this.getProvider().deleteAll();

       if (this.getProvider().findAll().isEmpty())
       {
          List<String> beans = new ArrayList<String>();
          for (int i = 0; i < 10; i++)
          {
              String title = "Placeholder " + i;
              this.getProvider().addTask(title);
              beans.add(title);
          }
       }
   }

   EditText getEditText()
   {
       return this.etNewTask;
   }

   private TodoProvider getProvider()
   {
       return this.provider;
   }

   private ListView getTaskView()
   {
       return this.taskView;
   }

   public void onCreate(final Bundle bundle)
   {
        super.onCreate(bundle);

        this.setContentView(R.layout.main);

       this.provider = new TodoProvider(this);
       this.taskView = (ListView) this.findViewById(R.id.tasklist);
       this.btNewTask = (Button) this.findViewById(R.id.btNewTask);
       this.etNewTask = (EditText) this.findViewById(R.id.etNewTask);
       this.btNewTask.setOnClickListener(this.handleNewTaskEvent);

       this.showFloatVsIntegerDifference();

       this.createPlaceholders();

       this.renderTodos();
}

       private void renderTodos()
       {
       List<String> beans = this.getProvider().findAll();

       Log.d(APP_TAG, String.format("%d beans found", beans.size()));

       this.getTaskView().setAdapter(
              new ArrayAdapter<String>(this,
                     android.R.layout.simple_list_item_1, beans
                            .toArray(new String[]
                            {})));

       this.getTaskView().setOnItemClickListener(new OnItemClickListener()
       {
          @Override
          public void onItemClick(final AdapterView<?> parent,
                 final View view, final int position, final long id)
          {
              Log.d(APP_TAG, String.format(
                     "item with id: %d and position: %d", id, position));

              TextView v = (TextView) view;
              TodoActivity.this.getProvider().deleteTask(
                     v.getText().toString());
              TodoActivity.this.renderTodos();
          }
       });
   }

}
TodoActivity.java controls the layout of the app, and TodoProvider.java, shown in Listing 2-2, manages the data for the items you add to your list. In the app we’ve populated it with a list of initial placeholder items.
Listing 2-2. TodoProvider.java
package com.logicdrop.todos;

import java.util.ArrayList;
import java.util.List;

import android.content.ContentValues;
import android.content.Context;
import android.database.Cursor;
import android.database.sqlite.SQLiteDatabase;
import android.database.sqlite.SQLiteOpenHelper;
import android.util.Log;

import com.logicdrop.todos.TodoActivity;

public class TodoProvider
{
   private static final String DB_NAME = "tasks";
   private static final String TABLE_NAME = "tasks";
   private static final int DB_VERSION = 1;
   private static final String DB_CREATE_QUERY = "CREATE TABLE " + TABLE_NAME + " (id integer primary key autoincrement, title text not null);";

   private SQLiteDatabase storage;
   private SQLiteOpenHelper helper;

   public TodoProvider(final Context ctx)
   {
       this.helper = new SQLiteOpenHelper(ctx, DB_NAME, null, DB_VERSION)
       {
          @Override
          public void onCreate(final SQLiteDatabase db)
          {
              db.execSQL(DB_CREATE_QUERY);
          }

          @Override
          public void onUpgrade(final SQLiteDatabase db, final int oldVersion,
                 final int newVersion)
          {
              db.execSQL("DROP TABLE IF EXISTS " + TABLE_NAME);
              this.onCreate(db);
          }
       };

       this.storage = this.helper.getWritableDatabase();
   }

   public synchronized void addTask(final String title)
   {
       ContentValues data = new ContentValues();
       data.put("title", title);

       this.storage.insert(TABLE_NAME, null, data);
   }

   public synchronized void deleteAll()
   {
       this.storage.delete(TABLE_NAME, null, null);
   }

   public synchronized void deleteTask(final long id)
   {
       this.storage.delete(TABLE_NAME, "id=" + id, null);
   }

   public synchronized void deleteTask(final String title)
   {
       this.storage.delete(TABLE_NAME, "title='" + title + "'", null);
   }

   public synchronized List<String> findAll()
   {
       Log.d(TodoActivity.APP_TAG, "findAll triggered");

       List<String> tasks = new ArrayList<String>();

       Cursor c = this.storage.query(TABLE_NAME, new String[] { "title" }, null, null, null, null, null);

       if (c != null)
       {
          c.moveToFirst();

          while (c.isAfterLast() == false)
          {
              tasks.add(c.getString(0));
              c.moveToNext();
          }

          c.close();
       }

       return tasks;
   }
}
This is a very basic app, and the design and functionality are reminiscent of an early Android 2.x app, or what we can call classic Android.
The layout for the To Do List screen is defined in the Layout.xml file, which is available in the book’s resources folder and is also shown in Listing 2-3.
Listing 2-3. Layout.xml
<?xml version="1.0" encoding="utf-8"?> (change to LinearLayout)
<RelativeLayout xmlns:android="http://schemas.android.com/apk/res/android"
    android:id="@+id/widget31"
    android:layout_width="fill_parent"
    android:layout_height="fill_parent" >
    <TableRow
        android:id="@+id/row"
        android:layout_width="fill_parent"
        android:layout_height="wrap_content"
        android:layout_alignParentLeft="true"
        android:layout_below="@+id/tasklist"
        android:orientation="horizontal" >

        <EditText
            android:id="@+id/etNewTask"
            android:layout_width="200px"
            android:layout_height="wrap_content"
            android:text=""
            android:textSize="18sp" >
        </EditText>

        <Button
            android:id="@+id/btNewTask"
            android:layout_width="wrap_content"
            android:layout_height="wrap_content"
            android:text="@+string/add_button_name" >
        </Button>
    </TableRow>
    <ListView
        android:id="@+id/tasklist"
        android:layout_width="fill_parent"
        android:layout_height="wrap_content"
        android:layout_alignParentLeft="true"
        android:layout_alignParentTop="true" >
    </ListView>
</RelativeLayout>
Holo
Sometimes it’s hard to think in terms of a contrast between the classic (2.x) design style we’ve just seen and the modern Holo Android design (4.x), as the technology itself is so young. However, the changes in the phone’s UI have been significant over the last couple years, so we really do need to differentiate between the two.
And before we look at the newer approach, remember that our apps still need to account for the relatively large proportion of users who are still on the classic phones, currently around a quarter of your users (but that number is shrinking all the time; see http://developer.android.com/about/dashboards/index.html). There is also an argument that we should further separate out Android 3.x from Android 4.x phones, but based on the numbers you’ll see later in Figure 7-2 in Chapter 7, Honeycomb or Android 3.x is dead.
So what exactly does Holo Android design mean?
The following is a list of the most basic Android elements:
- Action Bar
- Navigation Drawers
- Mult Pane
We’ll focus on the Action Bar in this chapter as its changes are all-pervasive and relevant to every application you build. There has been a move away from the hardware action bars in Android 4.x to the software Action Bar, which is shown in Figure 2-4. This design pattern is becoming more and more common in Android and is a difference between Android and iOS. The less-used app settings, however, should still be found via the hardware buttons.

Figure 2-4. Action Bar
Figure 2-5 shows the Action Bar used in conjunction with tabs, which can be useful for more complex menu structures.

Figure 2-5. Action Bar with tabs
Figure 2-6 shows navigation drawers or swipe menus, which can be used as an alternative pattern to action bars.
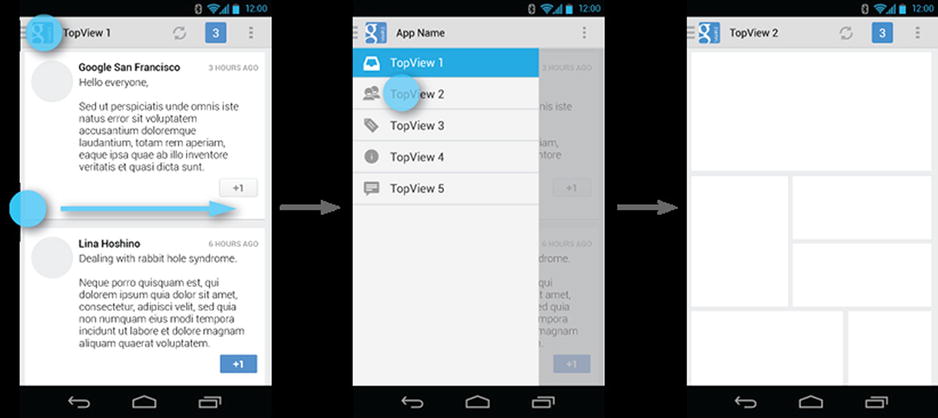
Figure 2-6. Navigation drawers
Figure 2-7 shows our TodoList app with an added Action Bar.
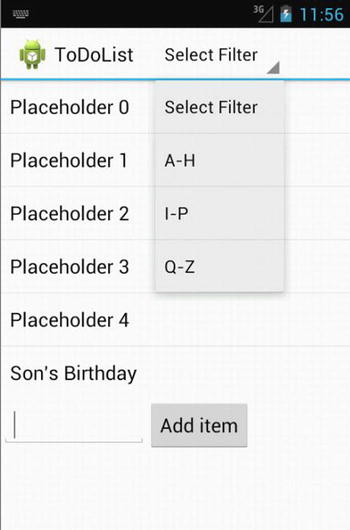
Figure 2-7. TodoList with Action Bar
The UI design patterns for Android are significantly different from those for the iOS, which often gets people into trouble who are new to Android, although there are some similarities such as the navigation drawers. There is no need for on-screen Back button or putting tabs in the bottom bar. Cross-platform HTML5 apps often suffer from this problem, as they often have a mixture of iOS and Android design patterns.
To implement the Action bar, create the strings in strings.xml, shown in Listing 2-4.
Listing 2-4. Strings.xml
<?xml version="1.0"encoding="utf-8"?>
<resources>

    <string name="app_name">ToDoList</string>
    <string name="action_settings">Settings</string>
    <string name="add_button_name">Add item</string>

    <string-array name="action_bar_action_list">
        <item>Select Filter</item>
        <item>A-H</item>
        <item>I-P</item>
        <item>Q-Z</item>
    </string-array>

</resources>
In Listing 2-5 we set up the adapter code for the Action Bar, which in this case is an Action Bar Spinner.
Listing 2-5. actionBarSpinnerAdapter
this.actionBarSpinnerAdapter = ArrayAdapter.createFromResource(this, R.array.action_bar_action_list, android.R.layout.simple_spinner_dropdown_item);
final ActionBar myActionBar = getActionBar();
myActionBar.setNavigationMode(ActionBar.NAVIGATION_MODE_LIST);
myActionBar.setListNavigationCallbacks(actionBarSpinnerAdapter, handleActionBarClick);
Add the OnNavigationListener method shown in Listing 2-6 to handle when the menu items are selected in the spinner list.
Listing 2-6. Action Bar Listener
private OnNavigationListener handleActionBarClick = new OnNavigationListener()    {

    @Override
    public boolean onNavigationItemSelected(int position, long itemId) {

        switch (position) {

            case 0:
                Log.d(APP_TAG, "Action Clear Filter selected");
                TodoActivity.this.provider.clearFilter();
                TodoActivity.this.renderTodos();
                break;
            case 1:
                Log.d(APP_TAG, "Action A-H selected");
                    TodoActivity.this.provider.setFilter('A', 'H'),
                    TodoActivity.this.renderTodos();
                break;
            case 2:
                    Log.d(APP_TAG, "Action I-P selected");
                    TodoActivity.this.provider.setFilter('I', 'P'),
                    TodoActivity.this.renderTodos();
                break;
            case 3:
                       Log.d(APP_TAG, "Action Q-Z selected");
                       TodoActivity.this.provider.setFilter('Q', 'Z'),
                       TodoActivity.this.renderTodos();
                       break;
            default:
                    break;
        }
        return true;
    }
};
There are no changes needed to the renderTodos method, as it’s already being filtered.
Now that the Action Bar has become the design pattern of choice for Android 4.0 and above, where does that leave earlier versions of Android and more specifically the folks still running 2.x? If you’re releasing a consumer app, chances are you or your business stakeholders don’t want to ignore those customers.
One option is to use the hardware buttons in earlier phones that were largely replaced by the Action Bar pattern and code around the different functionality based on the Android version or API level.
A better option is to use a library called Action Bar Sherlock, from Jake Wharton, which is available at http://actionbarsherlock.com/.
In Jake’s words, ActionBar Sherlock is a “Library for implementing the action bar design pattern using the native action bar on Android 4.0+ and a custom implementation on pre-4.0 through a single API and theme.” It allows you to code once for all versions of Android and the hardware buttons can be largely ignored. Figure 2-8 shows the ToDoList app using ActionBarSherlock.
Download and install the library in Eclipse and add the items to the resources file shown Listing 2-7.
Listing 2-7. main.xml
<?xml version="1.0" encoding="utf-8"?>
<menu xmlns:android="http://schemas.android.com/apk/res/android" >
    <item
        android:id="@+id/action_A_H"
        android:title="A-H"
        android:showAsAction="always"
        android:orderInCategory="100">
    </item>
    <item
        android:id="@+id/action_I_P"
        android:title="I-P"
        android:showAsAction="always">
    </item>
    <item
        android:id="@+id/action_Q_Z"
        android:title="Q-Z"
        android:showAsAction="always">
    </item>
</menu>
Add the onCreateOptionsMenu and onOptionsItemSelected code to ToDoActivity as shown in Listing 2-8.
Listing 2-8. OnCreateOptionsMenu and onOptionsItemSelected
public boolean onCreateOptionsMenu(Menu menu) {
   MenuInflater inflater = getSupportMenuInflater();
   inflater.inflate(R.menu.activity_itemlist, menu);
   return true;
}

@Override
public boolean onOptionsItemSelected(MenuItem item) {
   // Handle item selection
   switch (item.getItemId()) {
      case R.id.action_A_H:
         // filter & render
         return true;
      case R.id.action_I_P:
         // filter & render
         return true;
      case R.id.action_Q_Z:
         // filter & render
         return true;
      default:
         return super.onOptionsItemSelected(item);
   }
}
The Action Bar is now implemented, regardless of the Android OS version; Figure 2-8 shows it running on Android 2.1.
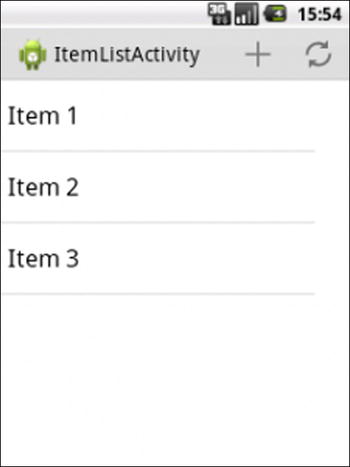
Figure 2-8. Action Bar implemented using ActionBarSherlock on Android 2.1
Designing for Different Devices
Android allows you to offer images and layouts for different generic screen sizes and screen pixel densities. There are a couple of key variables that you need to understand to create a good user experience across multiple devices. The most common screen sizes are small, normal, large, and xlarge (for tablets). As of September 4, 2013, almost 80 percent of all devices on the market were normal size; see Table 2-1.
Table 2-1. Screen Pixel Density and Screen Sizes

Also shown in Table 2-1 is our second variable, the number of pixels per square inch of the display or screen pixel density. The most common screen pixel densities are mdpi (medium), hdpi (high), xhdpi (extra high) and xxhdpi (extra extra high) density. An image or layout will have a different size based on the screen density or number of pixels in a device screen.
An up to date version of this table can always be found at http://developer.android.com/about/dashboards/index.html.
Figure 2-9 shows just the layouts in the resources directory for the open source Wordpress app. It contains all the default normal layouts in the layout folder as well as small, large, and xlarge. There are also further resources defined for portrait and landscape for some but not all screen sizes.

Figure 2-9. Wordpress layouts
But what is layout-sw720dp? In Android 3.2, new layout definitions were included to handle tablets; in this example the sw stands for smallest width and the layout targets tablets that have a minimum width of 720 density pixels for a 10" tablet. These new qualifiers also allow you to target specific widths (w) and heights (h).
Fragments
Google introduced fragments in Android 3.0 as a way to create a more modular user interface design so that the same fragments could be used in a modular fashion on Android phones and Android tablets.
An activity is now split into multiple fragments, allowing for much more complex layouts based on the device. Figure 2-10 shows a task item with the corresponding task detail on a phone.

Figure 2-10. Task Item and Task Detail on a phone
Figure 2-11 shows how this look on a tablet, where there is more real estate and the task item and detail can be viewed on a single screen.
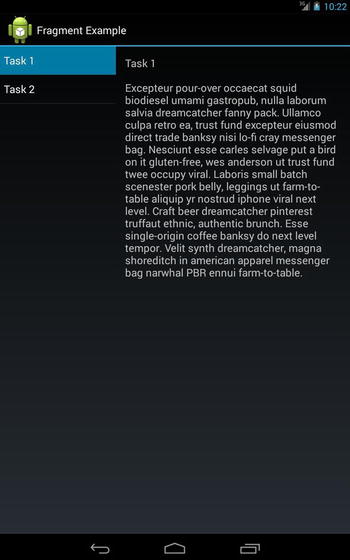
Figure 2-11. Task Item and Task Detail on a tablet
Listing 2-8 shows the updated and commented ToDoActivity.java code for the new fragment layout. ToDoActivity now extends FragmentActivity, and we create a TaskFragment and NoteFragment, which are swapped in and out depending on the device layout. The code shown in Listing 2-9 checks to see if the note fragment exists in the layout and displays it. The note fragment is only found in the layout-large/main.xml resource and not the layout/main.xml file.
Listing 2-8. ToDoActivity.java Fragment Source
public class TodoActivity extends FragmentActivity implements TaskFragment.OnTaskSelectedListener
{
    @Override
    public void onCreate(final Bundle savedInstanceState)
    {
        super.onCreate(savedInstanceState);

        this.setContentView(R.layout.main);

        // Check whether the activity is using the layout version with
        // the fragment_container FrameLayout. If so, we must add the first
        // fragment
        if (this.findViewById(R.id.fragment_container) != null)
        {
            // However, if we're being restored from a previous state,
            // then we don't need to do anything and should return or else
            // we could end up with overlapping fragments.
            if (savedInstanceState != null)
            {
                return;
            }

            final TaskFragment taskFrag = new TaskFragment();

            // In case this activity was started with special instructions
            // from an Intent,
            // pass the Intent's extras to the fragment as arguments
            taskFrag.setArguments(this.getIntent().getExtras());

            // Add the fragment to the 'fragment_container' FrameLayout
            this.getSupportFragmentManager().beginTransaction().add(R.id.fragment_container, taskFrag).commit();
        }
    }

    /**
     * User selected a task
     */
    @Override
    public void onTaskSelected(final int position)
    {
        // Capture the title fragment from the activity layout
        final NoteFragment noteFrag = (NoteFragment) this.getSupportFragmentManager()
                .findFragmentById(R.id.note_fragment);

        if (noteFrag != null)
        {
            // If note frag is available, we're in two-pane layout…
            noteFrag.updateNoteView(position);
        }
        else
        {
            // If the frag is not available, we're in the one-pane layout
            // Create fragment and give it an argument for the selected task
            final NoteFragment swapFrag = new NoteFragment();
            final Bundle args = new Bundle();
            args.putInt(NoteFragment.ARG_POSITION, position);
            swapFrag.setArguments(args);
            final FragmentTransaction fragTx = this.getSupportFragmentManager().beginTransaction();

            // Replace whatever is in the fragment_container view
            // and add the transaction to the back stack so the user can
            // navigate back
            fragTx.replace(R.id.fragment_container, swapFrag);
            fragTx.addToBackStack(null);

            // Commit the transaction
            fragTx.commit();
        }
    }
}
Listing 2-9. layout-large/main.xml
<?xml version="1.0" encoding="utf-8"?>

<LinearLayout xmlns:android="http://schemas.android.com/apk/res/android"
    android:orientation="horizontal"
    android:layout_width="match_parent"
    android:layout_height="match_parent">

    <fragment
        android:id="@+id/tasks_fragment"
        android:name="com.example.TaskFragment"
        android:layout_width="0dp"
        android:layout_height="match_parent"
        android:layout_weight="1" />

    <fragment
        android:id="@+id/note_fragment"
        android:name="com.example.NoteFragment"
        android:layout_width="0dp"
        android:layout_height="match_parent"
        android:layout_weight="2" />

</LinearLayout>
Architectural Design Patterns
One of the fundamental problems with all types of software can be summed up in the concept of entropy, which suggests that ordered code naturally becomes disordered over time. Or in other words, no matter how hard you try, your code will gradually go from an organized state to a disorganized state in what is also known as highly coupled, or perhaps more frankly, spaghetti code.
For smaller Android applications with one or two careful developers, this at first doesn’t seem to be an issue. But as new versions are released and new people join, as Bob Martin would say the code starts to smell and if you want to keep the code clean it needs to be regularly reorganized or refactored.
For larger enterprise Android applications, the way you organize your code is going to be an issue from the very beginning. And unfortunately, classic Android design doesn’t lend itself to long-term cleanliness.
In this section we’ll look at some of the frameworks or software design patterns that you might want to consider when you’re thinking about your app’s architecture.
If you want to have less coupling and greater separation in your Android app, you need to move your logic to classes other than the main Activity class. We begin with classic Android design, then look at MVC and MVVM and finish off with Dependency Injection to help you see how you can use these frameworks to better organize your code.
In classic Android design, the user interface is defined in XML layout files. Activities then use these XML files to draw the screens and load images, size information and strings for multiple screen resolutions and hardware. Any other user interface code is written in other classes outside of the main UI thread.
The code for the TodoList app, shown in Listings 2-1 and 2-2 earlier, is for a classic Android design. We’ll be using a number of different versions of this application throughout the book.
MVC (Model-View-Controller) is a software design pattern that separates the user interface (view) from the business rules and data (model) using a mediator (controller) to connect the model to the view.
The main benefit of MVC for us is separation of concerns. Each part of MVC takes care of its own job and no more: the View takes care of the user interface, the Model takes care of the data, and the Controller sends messages between the two.
The Controller provides data from the Model for the View to bind to the UI. Any changes to the Controller are transparent to the View, and UI changes won’t affect the business logic and vice-versa.
Design patterns help to enforce a structure on the developers so that the code becomes more controlled and less likely to fall into disrepair. MVC’s separation of concerns makes it much easier to add unit testing if we want to at a later stage.
There is an argument that Android already uses an MVC pattern, with the XML files acting as the View. However this does not provide us any real possibilities for separation of concerns.
In the following example the Classic Android code has been refactored into an MVC framework as follows.
The MVC Model component, shown in Listing 2-10, largely replaces the ToDoProvider.java code from before.
Listing 2-10. MVC Model code
final class TodoModel
{
    private static final String DB_NAME = "tasks";
    private static final String TABLE_NAME = "tasks";
    private static final int DB_VERSION = 1;
    private static final String DB_CREATE_QUERY = "CREATE TABLE " + TodoModel.TABLE_NAME +
" (id integer primary key autoincrement, title text not null);";

    private final SQLiteDatabase storage;
    private final SQLiteOpenHelper helper;

    public TodoModel(final Context ctx)
    {
        this.helper = new SQLiteOpenHelper(ctx, TodoModel.DB_NAME, null, TodoModel.DB_VERSION)
        {
            @Override
            public void onCreate(final SQLiteDatabase db)
            {
                db.execSQL(TodoModel.DB_CREATE_QUERY);
            }

            @Override
            public void onUpgrade(final SQLiteDatabase db, final int oldVersion,
                                  final int newVersion)
            {
                db.execSQL("DROP TABLE IF EXISTS " + TodoModel.TABLE_NAME);
                this.onCreate(db);
            }
        };

        this.storage = this.helper.getWritableDatabase();
    }

    public void addEntry(ContentValues data)
    {
        this.storage.insert(TodoModel.TABLE_NAME, null, data);
    }

    public void deleteEntry(final String field_params)
    {
        this.storage.delete(TodoModel.TABLE_NAME, field_params, null);
    }

    public Cursor findAll()
    {
        Log.d(TodoActivity.APP_TAG, "findAll triggered");

        final Cursor c = this.storage.query(TodoModel.TABLE_NAME, new String[]
                { "title" }, null, null, null, null, null);

        return c;
    }
}
The View code in MVC, shown in Listing 2-11, is a modified version of the ToDoActivity.java code from before. Any UI changes now happen here, and the control code is now moved to the ToDoController.java file.
Listing 2-11. MVC View code
public class TodoActivity extends Activity
{
    public static final String APP_TAG = "com.example.mvc";

    private ListView taskView;
    private Button btNewTask;
    private EditText etNewTask;

    /*Controller changes are transparent to the View. UI changes won't
     *affect logic, and vice-versa. See below: the TodoModel has
     * been replaced with the TodoController, and the View persists
     * without knowledge that the implementation has changed.
     */
    private TodoController provider;

    private final OnClickListener handleNewTaskEvent = new OnClickListener()
    {
        @Override
        public void onClick(final View view)
        {
            Log.d(APP_TAG, "add task click received");

            TodoActivity.this.provider.addTask(TodoActivity.this
                    .etNewTask
                    .getText()
                    .toString());

            TodoActivity.this.renderTodos();
        }
    };

    @Override
    protected void onStop()
    {
        super.onStop();
    }

    @Override
    protected void onStart()
    {
        super.onStart();
    }

    @Override
    public void onCreate(final Bundle bundle)
    {
        super.onCreate(bundle);

        this.setContentView(R.layout.main);

        this.provider = new TodoController(this);
        this.taskView = (ListView) this.findViewById(R.id.tasklist);
        this.btNewTask = (Button) this.findViewById(R.id.btNewTask);
        this.etNewTask = (EditText) this.findViewById(R.id.etNewTask);
        this.btNewTask.setOnClickListener(this.handleNewTaskEvent);

        this.renderTodos();
    }

    private void renderTodos()
    {
        final List<String> beans = this.provider.getTasks();

        Log.d(TodoActivity.APP_TAG, String.format("%d beans found", beans.size()));

        this.taskView.setAdapter(new ArrayAdapter<String>(this,
                android.R.layout.simple_list_item_1,
                beans.toArray(new String[]
                        {})));

        this.taskView.setOnItemClickListener(new OnItemClickListener()
        {
            @Override
            public void onItemClick(final AdapterView<?> parent, final View view, final int position, final long id)
            {
                Log.d(TodoActivity.APP_TAG, String.format("item with id: %d and position: %d", id, position));

                final TextView v = (TextView) view;
                TodoActivity.this.provider.deleteTask(v.getText().toString());
                TodoActivity.this.renderTodos();
            }
        });
    }
}
Shown in Listing 2-12, the controller binds the UI to the data but also creates a layer of separation between the model and view code above. This interface between the two layers provides a framework for the code to expand and for new developers to follow the MVC pattern to know what new code belongs where.
Listing 2-12. MVC Controller code
public class TodoController {
    /*The Controller provides data from the Model for the View
     *to bind to the UI.
     */

    private TodoModel db_model;
    private List<String> tasks;

    public TodoController(Context app_context)
    {
        tasks = new ArrayList<String>();
        db_model = new TodoModel(app_context);
    }

    public void addTask(final String title)
    {
        final ContentValues data = new ContentValues();
        data.put("title", title);
        db_model.addEntry(data);
    }

    //Overrides to handle View specifics and keep Model straightforward.
    public void deleteTask(final String title)
    {
        db_model.deleteEntry("title='" + title + "'");
    }

    public void deleteTask(final long id)
    {
        db_model.deleteEntry("id='" + id + "'");
    }

    public void deleteAll()
    {
        db_model.deleteEntry(null);
    }

    public List<String> getTasks()
    {
        Cursor c = db_model.findAll();
        tasks.clear();

        if (c != null)
        {
            c.moveToFirst();

            while (c.isAfterLast() == false)
            {
                tasks.add(c.getString(0));
                c.moveToNext();
            }

            c.close();
        }

        return tasks;
    }
}
The MVVM (Model-View-ViewModel) pattern comes from the Microsoft world. It’s a specialized case of MVC that deals with UI development platforms like Silverlight, and although its origins are in .Net, it might also be applicable to Android. The difference between MVC and MVVM is that the Model should contain no logic specific to the view—only logic necessary to provide a minimal API to the ViewModel.
The Model only needs to add/delete, and the ViewModel handles the specific needs of the View. All event logic and delegation is handled by the ViewModel, and the View handles UI setup only.
In our example the Model component largely stays the same, as you can see in Listing 2-13. The ViewModel, shown in Listing 2-15 acts as a delegate between the ToDoActivity (View) and the ToDoProvider (Model). The ViewModel receives references from the View and uses them to update the UI. The ViewModel handles rendering and changes to the view’s data and the View, shown in Listing 2-14, simply provides a reference to its elements.
Shown in Listing 2-13, the Model largely stays the same in MVVM as it was in the MVC version.
Listing 2-13. MVVM Model Code
package com.example.mvvm;

import java.util.ArrayList;
import java.util.List;

import android.content.ContentValues;
import android.content.Context;
import android.database.Cursor;
import android.database.sqlite.SQLiteDatabase;
import android.database.sqlite.SQLiteOpenHelper;
import android.util.Log;

final class TodoModel

{

    //The Model should contain no logic specific to the view - only
    //logic necessary to provide a minimal API to the ViewModel.
  private static final String DB_NAME = "tasks";
  private static final String TABLE_NAME = "tasks";
  private static final int DB_VERSION = 1;
  private static final String DB_CREATE_QUERY = "CREATE TABLE " + TodoModel.TABLE_NAME + " (id integer primary key autoincrement, title text not null);";

  private final SQLiteDatabase storage;
  private final SQLiteOpenHelper helper;
  public TodoModel(final Context ctx)

  {
    this.helper = new SQLiteOpenHelper(ctx, TodoModel.DB_NAME, null, TodoModel.DB_VERSION)
    {
       @Override
       public void onCreate(final SQLiteDatabase db)
       {
         db.execSQL(TodoModel.DB_CREATE_QUERY);
       }
       @Override
       public void onUpgrade(final SQLiteDatabase db, final int oldVersion,
           final int newVersion)
       {
         db.execSQL("DROP TABLE IF EXISTS " + TodoModel.TABLE_NAME);
         this.onCreate(db);
       }
    };
    this.storage = this.helper.getWritableDatabase();
  }

    /*Overrides are now done in the ViewModel. The Model only needs
     *to add/delete, and the ViewModel can handle the specific needs of the View.
     */
  public void addEntry(ContentValues data)
  {
    this.storage.insert(TodoModel.TABLE_NAME, null, data);
  }

  public void deleteEntry(final String field_params)
  {
    this.storage.delete(TodoModel.TABLE_NAME, field_params, null);
  }

  public Cursor findAll()
  {
        //Model only needs to return an accessor. The ViewModel will handle
         //any logic accordingly.
        return this.storage.query(TodoModel.TABLE_NAME, new String[]
    { "title" }, null, null, null, null, null);
  }
}
The View, shown in Listing 2-14, in MVVM simply provides a reference to its elements.
Listing 2-14. MVVM View Code
package com.example.mvvm;
import android.app.Activity;
import android.os.Bundle;
import android.view.View;
import android.widget.Button;
import android.widget.EditText;
import android.widget.ListView;

public class TodoActivity extends Activity
{
  public static final String APP_TAG = "com.logicdrop.todos";

  private ListView taskView;
  private Button btNewTask;
  private EditText etNewTask;
    private TaskListManager delegate;

    /*The View handles UI setup only. All event logic and delegation
     *is handled by the ViewModel.
     */

    public static interface TaskListManager
    {
        //Through this interface the event logic is
        //passed off to the ViewModel.
        void registerTaskList(ListView list);
        void registerTaskAdder(View button, EditText input);
    }

  @Override
  protected void onStop()
  {
    super.onStop();
  }

  @Override
  protected void onStart()
  {
    super.onStart();
  }

  @Override
  public void onCreate(final Bundle bundle)
  {
    super.onCreate(bundle);

    this.setContentView(R.layout.main);

        this.delegate = new TodoViewModel(this);
        this.taskView = (ListView) this.findViewById(R.id.tasklist);
        this.btNewTask = (Button) this.findViewById(R.id.btNewTask);
        this.etNewTask = (EditText) this.findViewById(R.id.etNewTask);
        this.delegate.registerTaskList(taskView);
        this.delegate.registerTaskAdder(btNewTask, etNewTask);
  }
}
The ViewModel component, shown in Listing 2-15, acts as a delegate between the ToDoActivity (View) and the ToDoProvider (Model). The ViewModel handles rendering and changes to the View’s data; it receives references from the View and uses them to update the UI.
Listing 2-15. MVVM View-Model Code
package com.example.mvvm;
import android.content.ContentValues;
import android.content.Context;
import android.database.Cursor;
import android.view.View;
import android.widget.AdapterView;
import android.widget.ArrayAdapter;
import android.widget.EditText;
import android.widget.ListView;
import android.widget.TextView;

import java.util.ArrayList;
import java.util.List;

public class TodoViewModel implements TodoActivity.TaskListManager
{
    /*The ViewModel acts as a delegate between the ToDoActivity (View)
     *and the ToDoProvider (Model).
     * The ViewModel receives references from the View and uses them
     * to update the UI.
     */

    private TodoModel db_model;
    private List<String> tasks;
    private Context main_activity;
    private ListView taskView;
    private EditText newTask;

    public TodoViewModel(Context app_context)
    {
        tasks = new ArrayList<String>();
        main_activity = app_context;
        db_model = new TodoModel(app_context);
    }

    //Overrides to handle View specifics and keep Model straightforward.

    private void deleteTask(View view)
    {
        db_model.deleteEntry("title='" + ((TextView)view).getText().toString() + "'");
    }

    private void addTask(View view)
    {
        final ContentValues data = new ContentValues();

        data.put("title", ((TextView)view).getText().toString());
        db_model.addEntry(data);
    }

    private void deleteAll()
    {
        db_model.deleteEntry(null);
    }

    private List<String> getTasks()
    {
        final Cursor c = db_model.findAll();
        tasks.clear();
        if (c != null)
        {
            c.moveToFirst();
            while (c.isAfterLast() == false)
            {
                tasks.add(c.getString(0));
                c.moveToNext();
            }

            c.close();
        }
        return tasks;
    }

    private void renderTodos()
    {
        //The ViewModel handles rendering and changes to the view's
        //data. The View simply provides a reference to its
        //elements.
        taskView.setAdapter(new ArrayAdapter<String>(main_activity,
                android.R.layout.simple_list_item_1,
                getTasks().toArray(new String[]
                        {})));
    }

    public void registerTaskList(ListView list)
    {
        this.taskView = list; //Keep reference for rendering later
        if (list.getAdapter() == null) //Show items at startup
        {
            renderTodos();
        }
        list.setOnItemClickListener(new AdapterView.OnItemClickListener()
        {
            @Override
            public void onItemClick(final AdapterView<?> parent, final View view, final int position, final long id)
            { //Tapping on any item in the list will delete that item from the database and re-render the list
                deleteTask(view);
                renderTodos();
            }
        });
    }

    public void registerTaskAdder(View button, EditText input)
    {
        this.newTask = input;
        button.setOnClickListener(new View.OnClickListener()
        {
            @Override
            public void onClick(final View view)
            { //Add task to database, re-render list, and clear the input
                addTask(newTask);
                renderTodos();
                newTask.setText("");
            }
        });
    }
}
If our aim is to move away from highly coupled code, then the Dependency Injection pattern probably allows a greater degree of separation across the application than MVC or MVVM. It removes any hard-coded dependencies between classes and allows you to plug in different classes at compile-time. This is very useful for multiple developers working in teams because it can enforce a much stricter framework to follow.
Just as important is that dependency injection also facilitates the writing of testable code, which we’ll see more of in Chapter 4, on Agile Android.
Dependency Injection or DI has been around for many years in Java development. It usually comes in two flavors, compile-time DI (such as Guice) or run-time DI (such as Spring). In compile-time DI, the injections are known at compile time and are controlled by a mapping file. Run-time DI takes more of an aspect oriented programming approach, where classes are injected while the app is running.
There are a number of DI frameworks available in Android such as Roboelectric and Dagger, all of them are compile time DI.
In the following example we’re going to look at using Dagger to mock out a database connection. Often you want to test the app and not the database.
There are four pieces in this example that we need to wire together. The ToDoModule.java contains the injection map that tells the app whether to use the ToDoProvider stub file or the ToDoProvider2 file that connects to the database. ToDoProvider.java contains the stub file that returns a fake task list, ToDoProvider2.java contains the real database connection, and ToDoApplication.java contains a currentChoice Boolean flag that tells the app whether to use the stub or the real connection.
Listing 2-16 shows how the ToDoModule wires in the two database providers; the first is the real database and the second is a stub function.
Listing 2-16. Dagger ToDoModule.java
import dagger.Module;
import dagger.Provides;
import android.content.Context;
import android.database.sqlite.SQLiteDatabase;
import android.database.sqlite.SQLiteOpenHelper;
import android.util.Log;

@Module(complete = true, injects = { TodoActivity.class })
public class TodoModule {

   static final String DB_NAME = "tasks";
   static final String TABLE_NAME = "tasks";
   static final int DB_VERSION = 1;
   static final String DB_CREATE_QUERY = "CREATE TABLE "
          + TodoModule.TABLE_NAME
          + " (id integer primary key autoincrement, title text not null);";

   private final Context appContext;
   public static boolean sourceToggle = false;
   private TodoApplication parent;

   /** Constructs this module with the application context. */
   public TodoModule(TodoApplication app) {
       this.parent = app;
       this.appContext = app.getApplicationContext();

   }

   @Provides
   public Context provideContext() {
       return appContext;
   }

   /**
    * Needed because we need to provide an implementation to an interface, not a
    * class.
    *

    * @return
    */
   @Provides
   IDataProvider provideDataProvider(final SQLiteDatabase db) {
       //Here we obtain the boolean value for which provider to use
       boolean currentChoice = parent.getCurrentSource();
       if(currentChoice == true){
          //Here is a log message to know which provider has been chosen
          Log.d(TodoActivity.APP_TAG, "Provider2");
          return new TodoProvider2(db);
       }else{
          Log.d(TodoActivity.APP_TAG, "Provider");
          return new TodoProvider(db);
       }
   }

   /**
    * Needed because we need to configure the helper before injecting it.
    *
    * @return
    */
   @Provides
   SQLiteOpenHelper provideSqlHelper() {
       final SQLiteOpenHelper helper = new SQLiteOpenHelper(this.appContext,
              TodoModule.DB_NAME, null, TodoModule.DB_VERSION) {
          @Override
          public void onCreate(final SQLiteDatabase db) {
              db.execSQL(TodoModule.DB_CREATE_QUERY);
          }

          @Override
          public void onUpgrade(final SQLiteDatabase db,
                 final int oldVersion, final int newVersion) {
              db.execSQL("DROP TABLE IF EXISTS " + TodoModule.TABLE_NAME);
              this.onCreate(db);
          }
       };

       return helper;
   }

   @Provides
   SQLiteDatabase provideDatabase(SQLiteOpenHelper helper) {
       return helper.getWritableDatabase();
   }
}
The Boolean currentChoice tells the code which database provider to use; we can connect either to the real database, ToDoProvider2, as shown in Listing 2-17, or the stub, ToDoProvider, as shown in Listing 2-18.
Listing 2-17. Dagger ToDoProvider2.java
package com.example.dagger;

import java.util.ArrayList;
import java.util.List;

import javax.inject.Inject;
import android.content.ContentValues;
import android.database.Cursor;
import android.database.sqlite.SQLiteDatabase;
import android.util.Log;

class TodoProvider2 implements IDataProvider {

   private final SQLiteDatabase storage;

   @Inject
   public TodoProvider2(SQLiteDatabase db)
   {
       this.storage = db;
   }

   @Override
   public void addTask(final String title) {
       final ContentValues data = new ContentValues();
       data.put("title", title);
       this.storage.insert(TodoModule.TABLE_NAME, null, data);
   }

   @Override
   public void deleteAll() {
       this.storage.delete(TodoModule.TABLE_NAME, null, null);
   }

   @Override
   public void deleteTask(final long id) {
       this.storage.delete(TodoModule.TABLE_NAME, "id=" + id, null);
   }

   @Override
   public void deleteTask(final String title) {
       this.storage.delete(TodoModule.TABLE_NAME, "title='" + title + "'",
              null);
   }

   @Override
   public List<String> findAll() {
       Log.d(TodoActivity.APP_TAG, "findAll triggered");
       final List<String> tasks = new ArrayList<String>();

       final Cursor c = this.storage.query(TodoModule.TABLE_NAME,
              new String[] { "title" }, null, null, null, null, null);

       if (c != null) {
          c.moveToFirst();

          while (c.isAfterLast() == false) {
              tasks.add(c.getString(0));
              c.moveToNext();
          }

          c.close();
       }

       return tasks;
   }
}
Listing 2-18 shows the fake or stubbed out database; we include this to make sure we’re only testing our code and not the database connections.
Listing 2-18. ToDoProvider.java
package com.example.dagger;

import java.util.ArrayList;
import java.util.List;

import javax.inject.Inject;

import android.content.ContentValues;
import android.database.Cursor;
import android.database.sqlite.SQLiteDatabase;
import android.util.Log;

class TodoProvider implements IDataProvider {

   private final SQLiteDatabase storage;

   @Inject
   public TodoProvider(SQLiteDatabase db)
   {
       this.storage = db;
   }

   @Override
   public void addTask(final String title) {
       final ContentValues data = new ContentValues();
       data.put("title", title);
       this.storage.insert(TodoModule.TABLE_NAME, null, data);
   }

   @Override
   public void deleteAll() {
       this.storage.delete(TodoModule.TABLE_NAME, null, null);
   }

   @Override
   public void deleteTask(final long id) {
       this.storage.delete(TodoModule.TABLE_NAME, "id=" + id, null);
   }

   @Override
   public void deleteTask(final String title) {
       this.storage.delete(TodoModule.TABLE_NAME, "title='" + title + "'",
              null);
   }

   @Override
   public List<String> findAll() {
       Log.d(TodoActivity.APP_TAG, "findAll triggered");

       final List<String> tasks = new ArrayList<String>();

       final Cursor c = this.storage.query(TodoModule.TABLE_NAME,
              new String[] { "title" }, null, null, null, null, null);

       if (c != null) {
          c.moveToFirst();

          while (c.isAfterLast() == false) {
              tasks.add(c.getString(0));
              c.moveToNext();
          }

          c.close();
       }

       return tasks;
   }
}
Finally we need to tell the code what code to inject. We do this in the getCurrentSource method of ToDoApplcation.java, shown in Listing 2-19. Ideally, we’d like to set this in a config file somewhere, but here it is hard-coded in a file.
Listing 2-19. ToDoApplication.java
package com.example.dagger;
import android.app.Application;
import android.content.SharedPreferences;
import android.content.SharedPreferences.Editor;
import dagger.ObjectGraph;

public class TodoApplication extends Application {

   private ObjectGraph objectGraph;
   SharedPreferences settings;

   @Override
   public void onCreate()
   {
       super.onCreate();

       //Initializes the settings variable
       this.settings = getSharedPreferences("Settings", MODE_PRIVATE);
       Object[] modules = new Object[] {
              new TodoModule(this)
       };

       objectGraph = ObjectGraph.create(modules);
   }

   public ObjectGraph getObjectGraph() {
       return this.objectGraph;
   }

   //Method to update the settings
   public void updateSetting(boolean newChoice){
       Editor editor = this.settings.edit();
       editor.putBoolean("CurrentChoice", TodoModule.sourceToggle);
       editor.commit();
   }

   //Method to obtain the value of the provider setting
   public boolean getCurrentSource(){
       return this.settings.getBoolean("CurrentChoice", false);
   }
}
Summary
In this chapter we looked at the Holo GUI design pattern to see best practices for GUIs as well as the MVC, MVVM and DI architectural design patterns using Dagger to see how to best organize or separate your code so that it’s got some room for growth. We’ll return to Dagger in Chapter 4, on Agile Android, to show how we can use DI for mock testing. All the code for the examples in this chapter and the book is available on the Apress website if you want to investigate it further.
