Figure 5-1: Graphic for title screen for Crazy Eights.
Chapter 5
Creating a Simple Title Screen
In This Chapter
![]() Handling graphics for backgrounds
Handling graphics for backgrounds
![]() Making functional buttons
Making functional buttons
![]() Transitioning between screens
Transitioning between screens
What will be the first thing your game’s players see when they launch your game? Some games go straight into play mode, but most commonly the player sees a title screen or splash page. Sometimes the game shows credits preceding a title screen, or credits listed right on the title page. Either way, almost all games (including the very first video games) have some sort of initial screen that gives the player a place to start a new game, resume an old game, change options, and/or view high scores.
This common feature of games — including mobile games — is a logical place to start building your own version of Crazy Eights. You’ll want a screen that looks good on as many different devices as possible, displays the name of the game, and includes buttons for starting or resuming a game.
 You can download sample files for this chapter at
 www.dummies.com/go/androidgameprogramming.
Creating a Custom View
The title screen needs a custom view. To create that view, first you create a new class that extends view:
1. Right-click the package name in your Crazy Eights project and select New⇒Class.
2. Name the new class TitleView and click Finish.
3. Modify the contents of the new file so that it matches the code in Listing 5-1.
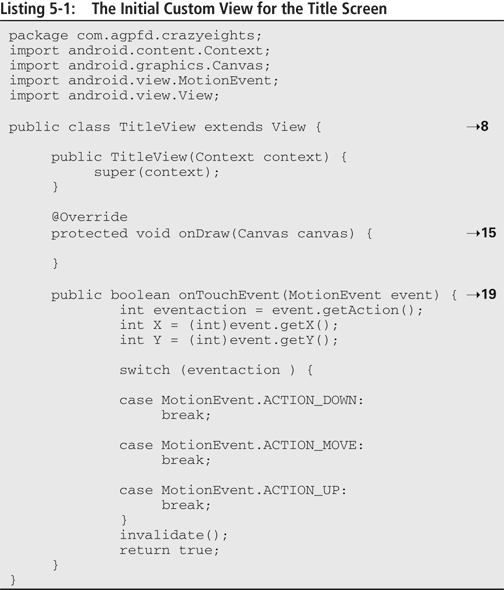
Here is a brief explanation of what the various lines do:
→8 The class has to extend View because you’re making your own custom view.
→15 Here you override the onDraw() method. That’s because you’ll be adding the logic to draw your title graphic and buttons a little later on.
→19 This logic is for handling cases where the player touches the screen. It’s empty for now, but you add some logic later on to handle interactions with the button.
Before loading and drawing any graphics to the screen, you need to add a couple of other important pieces of logic to your fledgling game:
![]() How the game handles screen orientations
How the game handles screen orientations
![]() How the game handles idle time (that is, what happens if the player doesn’t interact with the device for a while)
How the game handles idle time (that is, what happens if the player doesn’t interact with the device for a while)
You also see how to make your game full-screen to maximize space.
Loading the Title Graphic
You’ll have to load and draw graphics, and to do that you need some images! You can make your own, of course. But I’ve provided some default images for you.
The res directory of your project might or might not have a default drawable directory. If it doesn’t, add one:
1. Right-click the res directory.
2. Select New⇒Folder.
3. Name the new folder drawable.
Put your graphical resources there.
 A common problem with loading and drawing bitmaps in Android is the dreaded
 Out of memory error, which occurs while an app is running on a device or emulator. If you make any number of games for Android, you will probably encounter this error at some point, especially if you’re attempting to load and draw very large images, draw a lot of images, or both. There are many potential solutions to this problem, but it’s best to try to prevent it in the first place by not going overboard with your graphical resources. Try to load and draw only what you need at the time.
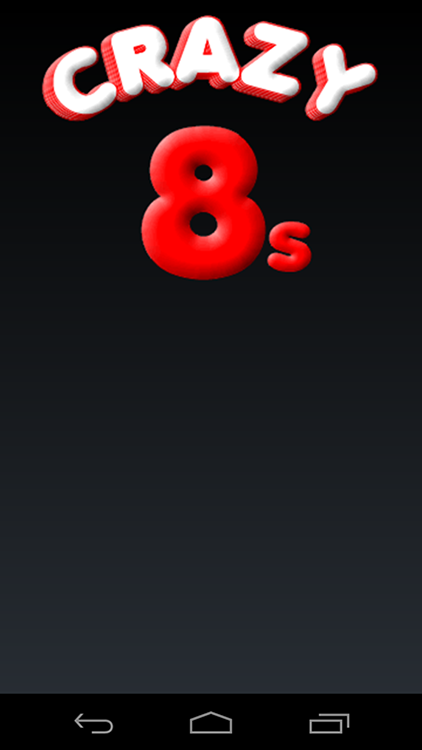
Figure 5-1 shows the graphic that appears on the title screen.

Now modify your TitleView file to look like Listing 5-2.

Here is a brief explanation of what the various lines do:
→6 Here you declare the bitmap object for your title graphic.
→10 This line actually loads the bitmap into memory so that you can draw it to the screen. You’re loading it in the constructor for the view. BitmapFactory creates bitmaps from various sources. In this case, the bitmap is being decoded from the file you just put in your drawable directory.
Keep in mind that you’re not supposed to touch the R.java file (described earlier) that’s automatically generated by the Android SDK. Whenever you place a file in one of your resource directories, when the project is built, it looks in those directories and creates references to your resources. That’s how you can pass in the parameter that tells BitmapFactory which image to load — namely, R.drawable.title_graphic.
Because you’re only loading a few images in this view, you load them all in the constructor. Games often have lots of graphical resources, so you might end up writing a separate method or class to handle the loading.
Drawing the Title Graphic
Here’s where you draw the graphic to the screen; it works much like drawing a circle to the screen (described in Chapter 4), except what you’re drawing this time is your loaded bitmap.
Modify your onDraw() method to look like Listing 5-3.
Listing 5-3: Drawing a Bitmap to the Screen
@Override
protected void onDraw(Canvas canvas) {
canvas.drawBitmap(titleGraphic, (0, 0, null);
}
The coordinate system in Android places the origin in the upper-left corner of the screen. For now, all you draw is the graphic with x and y coordinates (0,0) — which places it in the upper-left corner.
![]() Edit the CrazyEightsActivity.java to replace the lines:
Edit the CrazyEightsActivity.java to replace the lines:
CrazyEightsView myView = new CrazyEightsView(this);
with:
TitleView tView = new TitleView(this);
![]() Replace:
Replace:
SetContentView(myView);
With:
SetContentView(tView);
Once you’ve modified your TitleView and CrazyEightsActivity based on the previous two sections of this chapter, launch the game in an emulator or on a device.
What you see onscreen should look something like Figure 5-2.
Figure 5-2: Title graphic drawn in the upper-left corner of the screen.

Okay, this doesn’t look all that great, but don’t worry — you’ll get to improve it in a minute. First you center the graphic horizontally. Then, in the next few sections of the chapter, you make sure the screen appears in your preferred orientation, maximize the screen space by making the game full-screen, and (eventually) update the game with your own custom icon. For now, you’ve got a handle on loading and drawing your own images to the screen.
The first item of business is to figure out how to center the graphic horizontally on the screen. If you were using one of Android’s default views, of course, the SDK would provide some built-in functionality for centering elements onscreen. Because this is your own custom view, however, you get to wrestle those elements into place on your own.
Okay, get a grip: Modify your TitleView to look like Listing 5-4.

Here is a brief explanation of what the various lines do:
→4 These lines add variable declarations to keep track of the width and height of the screen.
→14 Here you’re overriding the onSizeChanged method, which is called by a view after the constructor but before anything is drawn. All you’re doing is grabbing the values of the width and height of the screen. Don’t use the height yet; just grab it for future reference anyway.
→22 Now, when you draw your graphic, you replace the x position with a little math. First, you subtract the width of the graphic from the screen width, to find out how much space is available. Then you divide that by two to put equal amounts of space on either side of your graphic.
Run the game again. This time it should look something like Figure 5-3.
Figure 5-3: Title graphic drawn on the screen, centered horizontally.

Getting better. At least now the graphic is centered horizontally.
 For practice, you might want to figure out how to center the graphic vertically on the screen. Just make sure you change it back before you add the buttons later in the chapter!
Handling Screen Orientation
Because the vast majority of Android devices are handheld, they can be easily reoriented by the player (either on purpose or accidentally!). You need to think about how your game will handle this. The two orientations are
![]() Portrait (the longer edge of the screen is vertical)
Portrait (the longer edge of the screen is vertical)
![]() Landscape (the shorter edge is vertical)
Landscape (the shorter edge is vertical)
One approach is to make your game compatible with both orientations, which involves adding logic for laying out UI elements for both orientations. Also, when the screen orientation changes in Android, the current activity is destroyed and restarted — requiring additional logic to handle those tasks.
Right now your game allows the screen orientation to change when the device is rotated. Launch the game on either a device or emulator and rotate the device (whether in hand or onscreen).
You can switch between orientations in the emulator by pressing Ctrl+F11 (on a PC) or Ctrl+Fn+F11 (on a Mac).
When you rotate the device, you should see the title graphic displayed upright to be consistent with the new orientation. But if you did allow this orientation to occur, if UI elements were laid out below the title graphic, you’d need to provide logic to draw them to the right of the title graphic or they wouldn’t be visible.
 Often games have their best playability in a particular orientation. Handling orientation changes makes your code more complex and might even be more frustrating and confusing for your users. So to keep things as simple as possible for your first game, you add logic that specifies a particular screen orientation and disables the ability to change it.
Crazy Eights will be fixed in portrait orientation, so that when the player rotates the device, no orientation changes occur. Okay, equal time here: You get to design the second game in this book (Whack-a-Mole) in landscape mode.
You can accomplish what you want with only two lines of code. Open the AndroidManifest.xml file and modify it to look like the code in Listing 5-5.

Two lines added in this code — 15 and 16 — keep the game in portrait orientation:
![]() Line 15 specifies the screen orientation for the app.
Line 15 specifies the screen orientation for the app.
![]() Line 16 makes sure that screen orientations do not occur when either
Line 16 makes sure that screen orientations do not occur when either
• The hardware keyboard is slid open or closed on a device
• The software keyboard is enabled or disabled.
Android devices with hardware keyboards typically treat the opening or closing of the keyboard the same as an orientation change. With these two lines of code, you’re cementing your game in portrait mode no matter what the users do with their devices.
Once you’ve made these changes to your game’s manifest file, launch the game once more and rotate the screen. This time you should notice that the title graphic launches in portrait orientation, and stays in that orientation no matter which way you orient the device. Cool, huh?
Controlling Screen Timeout
If you own an Android device, you may have noticed that after a certain period of inactivity, the screen times out and the device goes to sleep. The interval for this timeout is modifiable in the OS settings.
Many of the people who play your games might not even be aware that the timeout interval is something they can change. What they will care about is the hassle if they’re concentrating on making a play or in the middle of an exciting point in your game and the screen goes dark because they haven’t touched it lately.
 This little surprise happened with my word game WordWise. Players would be studying the tiles in their rack, trying to think up a great word to play, and the screen would go dark. The default setting for my own device is five minutes (I was annoyed at the small default interval of time, so I changed it). In testing, this was something I overlooked, since my own timeout interval was so large.
This isn’t as big an issue with games where the player is constantly interacting with the screen, but it can be annoying when the screen darkens in the middle of a game, so you’ll want to mull your options.
Luckily, the Android SDK gives us the option of toggling whether or not the screen timeout kicks in. One line of code and two new imports will do it.
Modify your CrazyEightsActivity file to look like Listing 5-6.

Line 14 toggles the KeepScreenOn setting for a particular view. In this case, you’re setting KeepScreenOn to true for your title view. You can go ahead and delete the CrazyEightsView. You won’t need it anymore. Just right-click the file name and select Delete.
Try it out with and without this line of code by launching the app and waiting for the screen to time out. Set your screen time out to something low like 30 seconds (Settings⇒Display⇒Sleep). If the screen stays active after your timeout setting, you know it’s working.
This approach has its tradeoffs, of course. For a lot of people, the display is what uses up the most battery life. When you disable the timeout for an app, you’re also effectively draining the user’s battery faster. No matter how you design and develop your game, you’re likely to get some negative feedback. You can’t please all the people all the time. Sometimes you just need to do what you think is best and what will generate the fewest negative e-mails.
Making the Game Full-Screen
Games designed for consoles and PCs have the luxury of space. Most are played on large displays with either keyboards and mice or game controllers with fine-grained controls. Most games on Android devices are played on a very small screen, using fingers or thumbs (not very fine-grained) for input. Space is at a premium in mobile games, so I try to maximize available screen space by making most games full-screen. As with the timeout issue, some players won’t be happy, but most probably will, and many won’t even notice.
If you decide to make your game full-screen, here’s how you do it. Modifying the code of your CrazyEightsActivity to look like Listing 5-7.

Line 15 tells the activity not to show the title of the app, and lines 16-17 set the window to full-screen. After you make these changes, launch the game. It should look something like Figure 5-4.
Figure 5-4: Title screen without app title, set to full-screen.
Adding buttons
Displaying non-interactive graphics is great and all, but at some point you need to let the player actually click the screen and do things. So here’s the drill on how to add a button to your title screen. There are three important tasks:
![]() Draw the button where you want it to be.
Draw the button where you want it to be.
![]() Handle the down state when the user touches it.
Handle the down state when the user touches it.
The up state is when the button is not being interacted with; the down state is what the button looks like while it is being pressed.
Websites often have an over state as well, but that’s not generally relevant for a touchscreen.
![]() Actually perform a relevant function when touched. In this case, launch another view where the game will be played.
Actually perform a relevant function when touched. In this case, launch another view where the game will be played.
Figure 5-5 shows the default state of the button you use.
Figure 5-5: Default state of the Play button for the title screen.

The steps to load and draw the button graphics are similar to those you take for loading and drawing the title graphic:
1. Add the following line along with your other variable declarations in TitleView:
private Bitmap playButtonUp;
2. Load the bitmap by adding the following line in the TitleView constructor:
playButtonUp = BitmapFactory.decodeResource(getResources(), R.drawable.play_button_up);
3. Draw the button on the screen by adding the following line of code to your onDraw() method:
canvas.drawBitmap(playButtonUp, (screenW-playButtonUp.getWidth())/2, (int)(screenH*0.7), null);
Here you used the same logic as you did when drawing the title image to center the image horizontally. With the height, you draw the top of the image at a height that is 70 percent of the screen height, so no matter what display you’re using, the button will always be about three quarters from the top of the screen.
When you run the game, it should now resemble Figure 5-6.
Figure 5-6: Title screen with the Play button added.

Throughout this book, you use relative placement for graphics like this one. If you place graphics by hard-coding pixel values (for example, 500 pixels from the top of the screen), you’ll get radically different results on different devices. If you don’t like where you’ve placed the button, feel free to experiment by modifying the percentage value. For example, try 0.6 or 0.8 instead of 0.7. Just remember to always try to use relative positioning.
Handling Button States
A good practice in UI design is to provide the users with feedback when they are interacting with a UI element.
You’ve got the button where you want it, but right now it doesn’t do anything.
In the case of a button, you’d like the users to know they’ve successfully touched the button by providing an alternate state when the button is pressed. That’s what you’ll do here.
Figure 5-7 shows the graphic for the down state of the button you’ll be using.
Figure 5-7: Down state of the Play button.

The steps that load the graphic for the down state of the button are similar to those for loading the up state:
1. Add the following line along with your other variable declarations to TitleView.
private Bitmap playButtonDown;
2. Load the bitmap by adding the following line to the TitleView constructor.
playButtonDown = BitmapFactory.decodeResource(getResources(), R.drawable.play_button_down);
Now you’ve got the bitmap loaded and you’re ready to draw it, and you know where you want to draw it. But you only want to draw this state when the user is actually clicking the button. Here’s how to do that:
1. Add in a boolean variable to keep track of whether the button is currently being pressed. Add the following line along with your other variable declarations:
private boolean playButtonPressed;
2. In the onTouchEvent() method, modify the case of MotionEvent.ACTION_DOWN to look like Listing 5-8.
Listing 5-8: Detecting a Button Press
case MotionEvent.ACTION_DOWN:
if (X > (screenW-playButtonUp.getWidth())/2 &&
X < ((screenW-playButtonUp.getWidth())/2) +
playButtonUp.getWidth()) &&
Y > (int)(screenH*0.7) &&
Y < (int)(screenH*0.7) +
playButtonUp.getHeight()) {
playButtonPressed = true;
}
break;
The conditional checks to see whether the player is touching the screen within the bounds of the Play-button graphic
• The first two conditions check for the horizontal bounds.
• The last two conditionals check for the vertical bounds.
If you determine that the touch event is within the bounds of the graphic, you set your boolean to true.
3. Set the same boolean to false when the user lifts the fingertip from the screen. Add the following line to the MotionEvent.ACTION_UP case:
playButtonPressed = false;
4. Draw the up state if the boolean is false and the down state if the boolean is true. Modify your onDraw() method to look like Listing 5-9.
Listing 5-9: Drawing Button States
@Override
protected void onDraw(Canvas canvas) {
canvas.drawBitmap(titleGraphic, (screenW-
titleGraphic.getWidth())/2, 0, null);
if (playButtonPressed) {
canvas.drawBitmap(playButtonDown,
(screenW-playButtonUp.getWidth())/2,
(int)(screenH*0.7), null);
} else {
canvas.drawBitmap(playButtonUp,
(screenW-playButtonUp.getWidth())/2,
(int)(screenH*0.7), null);
}
}
Here you’re drawing both graphics in the same location, but which one you draw depends on whether the button is being pressed.
Now launch the game and try out your new button! It still doesn’t do much when pressed, but it should at least change states.
Launching the Play Screen
If you want the Play button on your title screen to launch the play screen, you need a game screen to launch! So before you add functionality to your button, create an empty game screen:
1. Create a new class by right-clicking the package and selecting New⇒Class.
2. Enter GameView for the name, then click Finished.
3. Modify the contents of this new class to match Listing 5-10.
You need all the same methods here as in your TitleView, but for now they won’t do anything meaningful. Without anything to draw, this view displays a blank screen — which is fine as a placeholder for now.

You have a couple of choices about how you display this view:
![]() Replace the current content view with the GameView instead of the TitleView
Replace the current content view with the GameView instead of the TitleView
![]() Launch a new activity for the game.
Launch a new activity for the game.
What’s the difference? If you launch a new activity, it will go on a stack above the main activity. If the player is in a game, when they hit the back button on their device, instead of the game closing, the game activity will be destroyed. But since the main activity is still running, the player will simply return to the title screen. You’ll go with this implementation to show you how to launch multiple activities within your game.
There’s almost always more than one way to do things.
If you’re going to launch a new activity, you have to create it first:
1. Right-click the package.
2. Select New⇒Class.
3. Enter “GameActivity” as the name of the new class
4. Click Finished.
Modify the contents of this class to look like Listing 5-11.
Listing 5-11: The Initial Game Activity
package com.agpfd.crazyeights;
import android.app.Activity;
import android.os.Bundle;
import android.view.Window;
import android.view.WindowManager;
public class GameActivity extends Activity {
/** Called when the activity is first created. */
@Override
public void onCreate(Bundle savedInstanceState) {
super.onCreate(savedInstanceState);
GameView gView = new GameView(this);
gView.setKeepScreenOn(true);
requestWindowFeature(Window.FEATURE_NO_TITLE);
getWindow().setFlags(WindowManager.LayoutParams.FLAG_FULLSCREEN,
WindowManager.LayoutParams.FLAG_FULLSCREEN);
setContentView(gView);
}
}
This should look familiar. The contents are almost the same as your main activity, but instead of creating a TitleView and setting it as the content view, you’re creating a GameView and setting that as the content view instead. You’ve also got the logic here for keeping the screen on and setting the view to full-screen.
Every activity in your app must be declared in the manifest; if you tried to launch this activity now, you’d get an error. So open the AndroidManifest.xml file for your game and add the declaration for the new activity, as seen in Listing 5-12.

Lines 23 – 29 are the declaration for your new activity. Notice that you’ve added the proper lines for fixing the orientation in portrait mode. You’ll need to do this for each activity you add.
When you’ve got a new GameView and GameActivity, and the manifest is squared away, you’re ready to launch your new activity when the Play button is clicked.
Intents
An intent is a request from an app to the Android system to perform an operation. It’s most commonly used to launch a new activity, which is what you’ll be using them for.
An intent takes in the current context as a parameter, so you’ll need to store a copy of the context in TitleView:
1. Add the following declaration to your variable declarations:
private Context myContext;
2. Modify the constructor of TitleView to assign the context to your new local copy, so that it looks like Listing 5-13.
Listing 5-13: Holding a Reference to Context
public TitleView(Context context) {
super(context);
myContext = context;
titleGraphic = BitmapFactory.decodeResource(getResources(), R.drawable.title_graphic);
playButtonUp = BitmapFactory.decodeResource(getResources(), R.drawable.play_button_up);
playButtonDown = BitmapFactory.decodeResource(getResources(), R.drawable.play_button_down);
}
Now that you have a copy of the context, you can create and fire your intent to start a new activity. You want to do that when the player has clicked the Play button, so modify the ACTION_UP case of your onTouch() method to look like Listing 5-14.

Lines 69-70 are only executed if the Play button has been determined to have been pressed in the ACTION_DOWN case:
![]() Line 69 creates the new intent, passing in the local copy of the context and the class name of the activity you want to launch (
Line 69 creates the new intent, passing in the local copy of the context and the class name of the activity you want to launch (GameActivity.class).
![]() Line 70 calls
Line 70 calls startActivity() and passes in the intent you just created, which will launch the new activity.
After adding these lines, you’ll need a new import along with the others in this file; it looks like this:
import android.content.Intent;
When you’ve made these changes, launch the game and click the Play button. When you let your finger up from the button, you should be taken to a new blank screen: your empty GameView. It’s blank because you haven’t put anything there yet! Click the back button on whatever devices you’re using and you should be returned to the title screen.
Now you’ve got a functional title page that launches a new activity holding the view where all of game play will take place. In the next chapter, you build the interface for playing the game; first, however, here’s a quick word about bundles and their relationship to intents.
Bundles
When you launched your new activity and its associated view, you didn’t pass any information between the old activity and the new one; you can do that when you need to:
![]() Before you launch the new activity, you can simply call the
Before you launch the new activity, you can simply call the putExtras() method on the new intent and pass in a key-value pair.
![]() When the new activity is created, you can then call
When the new activity is created, you can then call getExtras() to extract the information.
It isn’t time yet to use this technique, since you have no need to pass information between your title screen and game screen, but it’s worth mentioning because at some point you will probably want to do this. Consult the official Android documentation for examples and more information if you find that this technique is something you need to do.
..................Content has been hidden....................
You can't read the all page of ebook, please click here login for view all page.