
Figure 8-1: Mock-up of the play screen in Whack-a-Mole.
Chapter 8
Creating a Complex Title Screen
In This Chapter
![]() Starting Whack-a-Mole
Starting Whack-a-Mole
![]() Implementing a title screen with
Implementing a title screen with SurfaceView
![]() Adding options menus to your games
Adding options menus to your games
![]() Enabling and disabling sound
Enabling and disabling sound
This chapter sets you on your way toward making an arcade-style game with animations and sounds: a mobile-game version of the classic carnival game Whack-a-Mole. In case you’ve never heard of the game or played it yourself, it typically has a play area littered with a series of holes. When the game starts, a pesky mole pops up from one or more of the holes. The player’s task is to whack the mole on the head as fast as possible, using a hand or a striking object, such as a mallet. The game ends after a set time limit expires or when the player doesn’t whack the moles fast enough.
In your digital version, the play screen displays a field of seven holes, with moles popping up at random locations. You start slowly and then increase the rate at which the moles appear. Figure 8-1 shows a mock-up of the play screen.
When a mole pops up from a hole, the player’s score is rendered in the lower left corner; the game timer, in the lower right corner. Like Crazy Eights, this game is simple, but implementing it introduces you to some vital programming concepts. Unlike Crazy Eights, this game has animation, so it needs a more efficient drawing process. If you were to implement this game using the approach presented in the first half of this book, the game’s performance would be quite choppy.

You also implement important sound and menu options in this game. Between the two games, you should be able to glean enough information to jump-start your own game.
 You can download sample files for this chapter at
www.dummies.com/go/androidgameprogramming
Using SurfaceView
The official Android documentation for 2-D graphics is at the Android Developers’ site:
http://developer.android.com/guide/topics/graphics/2d-graphics.html
The “Canvas and Drawables” overview page notes that if your app or game doesn’t require a high frame rate (a chess game is used as an example), the recommended practice is to extend the View class and call draws on the Canvas via the onDraw() method — which is exactly what you do with the Crazy Eights game. A card game isn’t particularly graphics-intensive, and you don’t implement animation (though you certainly could, to give it polish).
You might be perfectly content to implement your game using only View. If you’re making a board game, card game, or even a word game, the programming approach you take to Crazy Eights in this book will probably work just fine. However, if you want to make a side-scroller (such as Super Mario Bros.) or a shoot-’em-up (like Asteroids), or even a pinball game, the standard View isn’t likely to work well for you.
One common problem with using View in fast-paced games is that it handles user interaction in the same thread it uses for drawing graphics. Therefore, if a player touches the screen (for example, to whack a mole on the head), the interaction is handled in the same thread that’s drawing. Suppose that you want to draw an Ouch! word balloon over the mole’s head and animate him withdrawing into his hole after he gets whacked. With View, all that logic is queued up in the same thread. The result is either a delayed effect in the intended action or “laggy” rendering of the animation — or both. Overall, the experience is likely to be choppy and unappealing (and not fun).
However, the SurfaceView subclass of View handles drawing to canvas in a separate thread, so user interaction (such as touching the screen) happens in one thread and drawing happens in another. This arrangement makes the process more efficient and leads to a smoother game experience.
Using SurfaceView is quite a bit more complicated than View, but it’s vital if you want to make games that provide a satisfying user experience. Don’t worry: I’ll walk you through it.
Before you start working with SurfaceView, create a new project and all its relevant infrastructure for your new game.
To create a new Android project for your Whack-a-Mole game, follow these steps:
1. Select File⇒New⇒Android Project.
The New Android Project Window appears.
2. In the Project Name field, type WhackAMole and then click Next.
3. Select Android 4.0 as the target name and then click Next.
4. In the Package Name field, type this line, and then click Finish:
com.agpfd.whackamole
First, modify the manifest. For Crazy Eights, the layout is in portrait mode. In this game, however, you fix the screen in landscape mode because you’ll be laying out game elements more along the horizontal axis.
Open the AndroidManifest.xml file in your new WhackAMole project and modify it to look like Listing 8-1.

Listing 8-1 controls the screen orientation:
![]() Line 14 specifies landscape as the screen orientation.
Line 14 specifies landscape as the screen orientation.
![]() Line 15 prevents the screen from reorienting when the device is rotated or the physical keyboard opens or closes.
Line 15 prevents the screen from reorienting when the device is rotated or the physical keyboard opens or closes.
Next, you implement WhackAMoleView, the primary class for handling interactions and drawing to the screen. You have to handle these tasks differently from the way they work in Crazy Eights (which has two activities, each with its own view). Here, you take an alternative approach: You have only one activity and one view, so you need a variable to keep track of them.
To create the WhackAMoleView, follow these steps:
1. Right-click the package in Eclipse.
2. Select New⇒Class.
3. Enter WhackAMoleView as the name.
4. Click Finish.
The contents of this class should match Listing 8-2. It’s long, so bear with me!

Here’s a brief explanation of various lines in this listing:
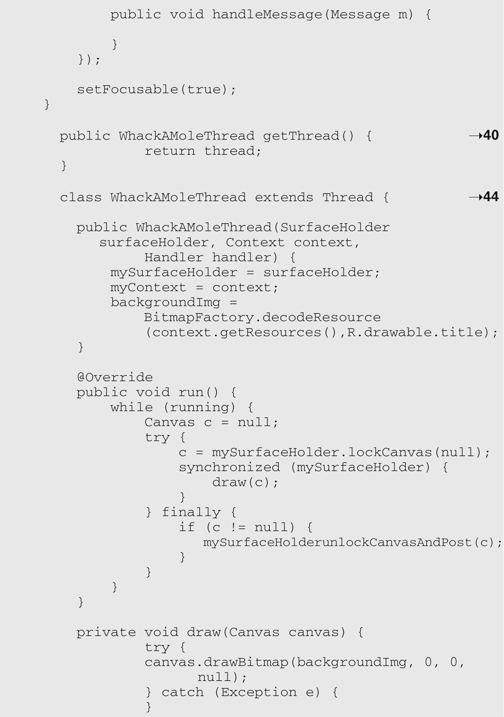
→16-23 Declare all variables here. You need a local reference to the context for tasks such as loading images. You have a handle to the surface manager object, which lets you interact with important elements of the SurfaceView. You also have variables to hold the screen width and height, a boolean to track whether the thread that’s drawing is running, a boolean to track whether you’re on the title screen, and a reference to the thread that draws everything.
→25 Your constructor gets the surface holder, assigns a callback, and creates an instance of the thread.
→40 This method returns the thread in case you need to control it from the activity.
→44 This line holds the main thread. In the constructor, you load the title screen image, which renders when the game starts up. The run() method calls draw(). The draw() method, which now draws only the background image, is surrounded by a try/catch statement, in case there are any issues creating or destroying the canvas.
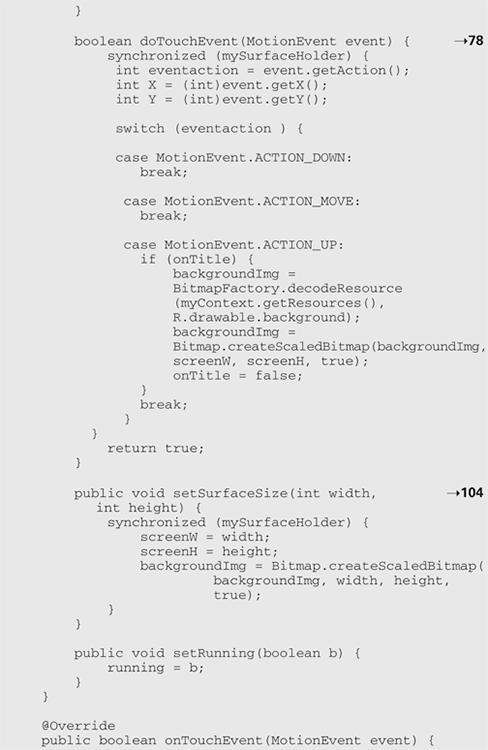
→78 The doTouchEvent() method is the same as onTouchEvent() in Crazy Eights. Here, the only event you’re handling is when the user lifts their finger from the screen (ACTION_UP). You’re simply loading the game screen background, setting it as the default background, and then toggling the boolean to indicate that the player is no longer on the title screen.
→104 This line, which is invoked when the surface dimensions change, is initially used to get and set the width and height of the screen.
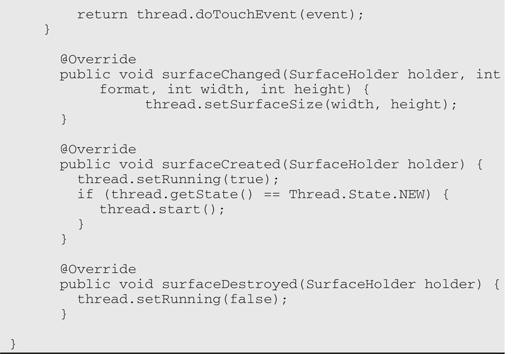
The remaining methods are used to handle changes in the state of the surface. The code may look daunting, but in the end, its effects are worth your time and trouble.
Whew! You’ve set up the view, which is one difficult task, and now you need to declare a layout to hold this view and implement the activity to run it.
To create the XML layout file that will hold your view, follow these steps:
1. Right-click the res>layout directory in your project
2. Select New⇒File.
3. Name the file whackamole_layout.xml.
4. Click Finish.
5. Edit the contents of the file to match Listing 8-3.
Listing 8-3: Layout File for WhackAMoleView
<?xml version=”1.0” encoding=”utf-8”?>
<LinearLayout xmlns:android=”http://schemas.android.com/apk/res/android”
android:layout_width=”fill_parent”
android:layout_height=”fill_parent”
android:orientation=”vertical” >
<com.agpfd.whackamole.WhackAMoleView
android:id=”@+id/mole”
android:layout_width=”fill_parent”
android:layout_height=”fill_parent”/>
</LinearLayout>
This listing embeds your custom view in a LinearLayout. You reference this XML from your activity when you load your custom view.
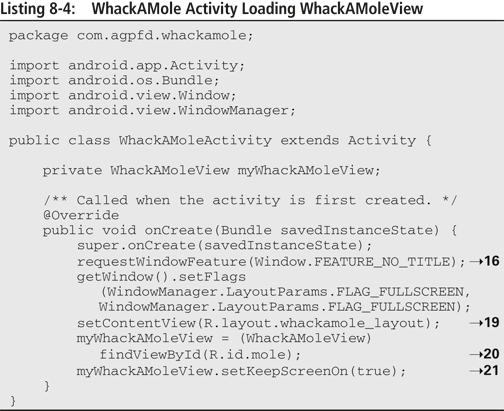
Open your WhackAMoleActivity file and modify its contents to match Listing 8-4.
Here’s a brief explanation of various lines in this listing:
→16-17 You remove the title bar from the window to maximize screen space and make the app appear in full-screen mode.
→19 Set the content view to the XML layout file you just defined.
→20 This line gets a handle to the view defined in your XML layout file.
→21 You’re disabling the screen time-out while the game is being played.
At this point, you’re ready to run the game for the first time. It simply displays the title screen and, when you touch the screen, toggles to the empty game screen. Figure 8-2 shows the title screen in your game.
Make sure that all appropriate graphics files are in your res>drawable directory. Feel free to design your own graphics, or see the link in the section “Using SurfaceView,” at the beginning of this chapter.
Figure 8-2: Title screen in Whack-a-Mole.

If you run the game and then touch the screen, the initial game screen appears, showing only a field with seven holes, as shown in Figure 8-3.
Figure 8-3: Empty game screen in Whack-a-Mole.

You’re on your way to producing a fast-paced arcade game! Because this game has sound, I show you how to add an options menu to let the user toggle the sound option.
Adding an Options Menu
You have a few choices in the design of the Options menu. You can make your own button and draw the Options button on one or more screens using the canvas.
After a player clicks the Options button, your own, custom Options menu appears. Figure 8-4 shows what it might look like.
Figure 8-4: Mock-up of the Options button and Options menu.
The Options button is drawn in the upper left corner as a gear icon. Clicking the Options menu opens it with whatever options you want to provide. In this example, it has only a check box for toggling the sound on or off.
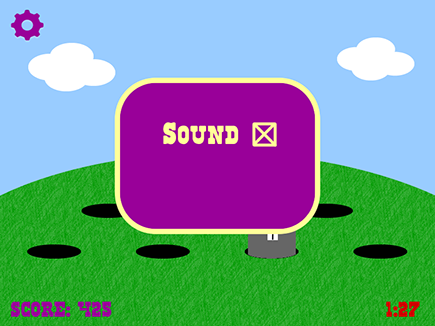
Another approach, if the menu shows sound as the only configurable option, is to display the speaker icon on the screen and allow the user to toggle the sound on and off without having to open a secondary menu. This concept might look like Figure 8-5.
When the sound is toggled on, the screen appears as shown earlier, in Figure 8-4. If the user clicks the speaker icon, you can then draw the same icon with a slash through it to indicate that the sound is turned off, and toggle it back on after every click.
Another approach, the preferred one in this example, is to use the default menu functionality of Android.
Figure 8-5: Mock-up of the game screen with the Sound option visible directly onscreen.

Toggling the Sound Option
Older Android devices had a hardware Menu button that launched any menus defined by an app. Newer devices and versions of Android have generally done away with the hardware Menu button in favor of software menu buttons. You create your menu options in the WhackAMoleActivity. Open that file and add the two following variable declarations:
private static final int TOGGLE_SOUND = 1;
private boolean soundEnabled = true;
Then add the two methods shown in Listing 8-5.


Here’s a brief explanation of various lines in the listing:
→2 Override the onCreateOptionsMenu() method, and define a menu item for toggling the sound. To keep it simple, simply insert text in the button — later, you can add icons or other images and fully customize the menu options.
→6 The onOptionsItemSelected() method handles the selection of menu items. In this example, you have only one option, so you have only one case in your switch. If you had more options, you would add more cases.
→9–16 When the user toggles the sound option, a toast is displayed that indicates a change; default to a string with the text “Sound On”. If the sound is enabled, you toggle off both the boolean and the text. Otherwise, you toggle both of them on. Then you display the toast.
You’ll also need the following import statements:
import android.view.Menu;
import android.view.MenuItem;
import android.widget.Toast;
Don’t do anything with the sound setting yet. When you add sounds, you’ll have the infrastructure in place.
Figure 8-6 shows how the menu looks in Android 4.0.
The menu is designated by the three dots in the upper right corner (though the appearance of menus may vary depending on Android version or device). Clicking those dots makes the menu appear. In this case, a player has only one option. When the player clicks the option, a toast appears, indicating whether the sound is now on or off. Give it a try.
Figure 8-6: The Sound option menu running in Android 4.0.

Your nonfunctional game screen already appears when the title screen is clicked. Now you simply implement the logic for playing the game.
One other thing you need to do before you move on, though, is to update the launcher icons for your new game. Figure 8-7 shows the four screen density icons.
Figure 8-7: Icons in Whack-a-Mole.

Here are the screen density sizes, from left to right:
![]() xhdpi: 96 x 96 pixels
xhdpi: 96 x 96 pixels
![]() hdpi: 72 x 72 pixels
hdpi: 72 x 72 pixels
![]() mdpi: 48 x 48 pixels
mdpi: 48 x 48 pixels
![]() ldpi: 32 x 32 pixels
ldpi: 32 x 32 pixels
Each image needs to be in its corresponding folder in the res directory of your project. For example, the 72 x 72 icon needs to be in the res/drawable-hdpi folder. They all should have the same name, ic_launcher.png, and you should delete the default icon image used for starter Android projects. You can find the image files, along with all code referenced in this section, at the link in this chapter’s introduction.
..................Content has been hidden....................
You can't read the all page of ebook, please click here login for view all page.