Figure 6-1: Mock-up of the play screen for Crazy Eights.
Chapter 6
Creating a Basic Play Screen
In This Chapter
![]() Loading multiple images
Loading multiple images
![]() Handling logic, taking turns, and advancing the game
Handling logic, taking turns, and advancing the game
![]() Making a simple computer opponent
Making a simple computer opponent
After the title screen is functional, it’s time to build the meat of the game — the play screen. You need images for each of the cards in the deck. I’ve provided the images for you in the digital resources. You can see how to load them in bulk, shuffle, and deal.
Picking up, moving, and dropping cards in the right spots are all important tasks, as is displaying the current game state. You’ll also implement a random AI to test against initially, and then refine it later to provide more of a challenge to players.
 You can download sample files for this chapter at
www.dummies.com/go/androidgameprogramming
Displaying Cards
To make your game realistic, players need to see the cards in their own hands and in the discard pile. This requires several steps of programming.
Loading the card images
Before you load the card images, you have to create a new class for cards. Follow these steps:
1. Right-click the package and then select New⇒Class.
2. Name the new class Card and click Finish.
3. Modify the contents of the new class to look like Listing 6-1.

Here’s a brief explanation of various lines of code in this listing:
→10–12 The constructor takes in the unique id for the card.
Suits are ranked in order by suit, and the numbering system for card ids consists of a base value for the suit plus the value of the rank of each card, as shown in this list:
* Diamonds (100)
* Clubs (200)
* Hearts (300)
* Spades (400)
The cards are ranked from 2 to 14, from the deuce to the ace (high): The id for the deuce of diamonds is 102, the three of diamonds is 103, the ace of spades is 414, and so on.
When you name your own image files, follow this convention: card102.png. You’re using the prefix “card” because Android doesn’t allow only numeric values for the names of resource files.
→14–20 You have set and get methods for the bitmap image for a particular card.
→22–25 These lines return the id of the card.
The Card class becomes a little more complex later in this chapter. All you need to do now is pass in the id when you create a card to be able to set/get the bitmap associated with it.
Now you’re ready to add the logic to create a deck and load all cards with their associated images in GameView. You can start by adding new variable declarations (as shown in Listing 6-2).
Listing 6-2: New Variable Declarations for GameView
private Context myContext;
private List<Card> deck = new ArrayList<Card>();
private int scaledCardW;
private int scaledCardH;
Here are the functions of Listing 6-2:
![]() The first line is a local copy of the context, which you need in order to load bitmaps.
The first line is a local copy of the context, which you need in order to load bitmaps.
![]() The second line is a list of
The second line is a list of Card objects that will hold your deck.
![]() The last two lines are variables for the scaled width and height for each card.
The last two lines are variables for the scaled width and height for each card.
The card images that are provided are rather large. You scale them to fit the game display size.
To store a local copy of the context, add the following line to the GameView constructor:
myContext = context;
Now you’re ready to create a new method in GameView that creates a deck of 52 playing cards and loads their associated images. Add the method in Listing 6-3 to your GameView.
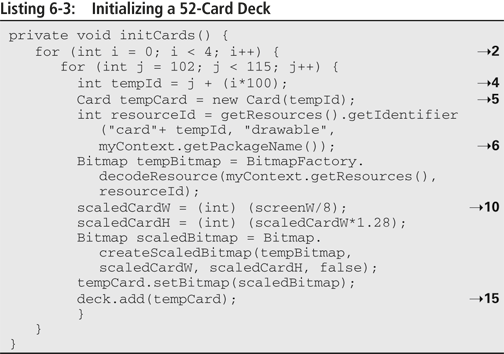
Here’s a brief explanation of various lines in this listing:
→2 The outer loop cycles through the four suits (diamonds, clubs, hearts, spades), and the inner loop cycles through each of the card ranks (deuce through ace).
→4 You get the id for a particular card based on the convention mentioned earlier in this section.
→5 You create a new card and pass in its id.
→6 You get the resource id of your image based on the filename and then load the bitmap.
→10 The scaled width is 1⁄8 the screen width, allowing seven cards to fit comfortably side by side horizontally.
The height of each card is 1.28 times the width. You use these scaled values to create a scaled bitmap and then set that bitmap for your card.
→15 Finally, you add the newly created card to your deck.
You’ll also need to add the following imports:
import android.graphics.Bitmap;
import android.graphics.BitmapFactory;
This code cycles through all 52 cards, loads their images, and adds them to the deck.
 If the cycling is processor-intensive on your test device, use smaller images to reduce the load time. (On higher-resolution devices, the images may not be as clear.)
Call your new method by adding the following line to your onSizeChanged() method:
initCards();
To test whether the cards are loaded correctly, you can temporarily add the following line to the onDraw() method:
canvas.drawBitmap(deck.get(0).getBitmap(), 0, 0, null);
The get() method on an ArrayList retrieves the object at that index, so you can load any of the 52 cards by passing an index value of 0 through 51. The preceding line loads the deuce of diamonds and draws it in the upper left corner of the screen. Give it a try, but delete this line of code before you move on.
Dealing the cards
After the deck is initialized, you’re ready to deal the cards to each player’s hand and draw the cards to the screen. You create two new ArrayLists, one for each player’s hand.
Add the following variable declarations to GameView:
private List<Card> myHand = new ArrayList<Card>();
private List<Card> oppHand = new ArrayList<Card>();
Private List<Card> discardPile = new ArrayList<Card>();
In the preceding declarations
![]() The first declaration is used to hold the human player’s cards.
The first declaration is used to hold the human player’s cards.
![]() The second declaration is for the computer opponent’s hand.
The second declaration is for the computer opponent’s hand.
![]() The third declaration is for the discard pile.
The third declaration is for the discard pile.
Now you add two new methods to GameView, each with its own task:
![]() A method that deals the first seven cards to each player
A method that deals the first seven cards to each player
![]() A reusable method for drawing a single card from the deck and adding it to the hand
A reusable method for drawing a single card from the deck and adding it to the hand
Add the two methods shown in Listing 6-4 to GameView.

Here’s a brief explanation of various lines in this listing:
→1 This is the method for drawing a single card from the deck and adding it to a particular list of cards. The method passes in the hand to which the card will be added. The card at index 0 of the deck is then added to the hand in line 92 and removed from the deck in line 93.
→4 In Crazy Eights, when the draw pile is empty, you shuffle back into it all cards of the discard pile, except for the top one. If the deck is empty after a draw, you loop through all cards except the first one in the discard pile, add the first one to the deck, and then remove it from the discard pile.
→14 Java provides a utility function for collections to randomize the order of a list, so you’re using this function to shuffle the deck.
→15 You loop seven times to add a card to each player’s hand, calling the method you just created.
You’ll also need the following import:
import java.util.Random;
Call your new method by added the following line to your onSizeChanged() method:
dealCards();
Each player’s opening hand now has seven cards, though you can’t see them.
Next, you display the state of the game and then handle control interactions.
Displaying the game state
Chapter 1 presents a mock-up of the play screen. Figure 6-1 revisits that screen as a starting point.
Keep the background black for now. Rather than display both scores at the top, orient the scores with the top and bottom of the screen so that the opponent’s score is at the top and your score is at the bottom.
Before you display the scores, you have to add in another variable to help scale the UI elements. Add the following variable declaration to your GameView:
private float scale;
This variable lets you scale elements on the screen, such as the text size. You can set the value in your constructor by using this line:
scale = myContext.getResources().getDisplayMetrics().density;
This line sets the scaling factor to the density settings you’ve chosen for whatever device the game appears on. You use this line to scale such onscreen elements as text size.
First things first: Draw some text on your canvas. You need a Paint object, which defines the properties for drawing the text to the screen:
![]() Add the following variable declaration to
Add the following variable declaration to GameView:
private Paint whitePaint;
![]() You’ll also need the following import:
You’ll also need the following import:
import android.graphics.Paint;
Next, in your constructor, you have to define the properties of the Paint object. Modify your GameView constructor to look like Listing 6-5.

Here’s a brief explanation of various lines in this listing:
→5 This line creates the new Paint object.
→6-9 Anti-aliasing attempts to make the text look smoother. You’re setting the color to white and aligning it to the left of wherever you start drawing the text.
→10 This is the line where you use your scale variable. You set the text size to 15 times the scaling factor. On displays with a density of 1, the font appears in size 15. When the density changes, so does the font size, to maintain a consistent look across devices.
You’ll also need to add the following import:
import android.graphics.color
Now you add the code for drawing the scores to the screen:
![]() Add declarations for the variables to hold scores:
Add declarations for the variables to hold scores:
private int oppScore;
private int myScore;
![]() Modify the
Modify the onDraw() method to include the code in Listing 6-6.
Listing 6-6: Drawing Scores to the Screen
@Override
protected void onDraw(Canvas canvas) {
canvas.drawText(“Computer Score: “ + Integer.toString(oppScore), 10,whitePaint.getTextSize()+10, whitePaint);
canvas.drawText(“My Score: “ + Integer.toString(myScore), 10, screenH-whitePaint.getTextSize()-10, whitePaint);
You use the drawText() method of canvas to draw text, passing in the parameters you want to use:
![]() In the case of the computer’s score, you’re drawing it 10 pixels from the left of the screen and 10 pixels from the top, which you get by adding the size of the text to 10.
In the case of the computer’s score, you’re drawing it 10 pixels from the left of the screen and 10 pixels from the top, which you get by adding the size of the text to 10.
![]() You pass in the
You pass in the Paint object that you defined in your constructor.
With your score, everything is much the same as drawing the opponent’s score, except that you’re drawing on the bottom of the screen and subtracting the text size and 10 pixels from the height of the screen.
After you add the code in this section, run the game to see how it appears. It should look similar to Figure 6-2.
Figure 6-2: The game screen displays players’ scores.

You’ve started displaying the game state on your screen, so now you display the respective hands. Modify the onDraw() method to include the code in Listing 6-7.
Listing 6-7: Drawing Cards in a Hand
for (int i = 0; i < myHand.size(); i++) {
if (i < 7) {
canvas.drawBitmap(myHand.get(i).getBitmap(),
i*(scaledCardW+5),
screenH-scaledCardH-
whitePaint.getTextSize()-(50*scale),
null);
}
}
}
These lines display your hand. Loop through the first seven cards, and lay them out horizontally, 5 pixels apart. The y position of each card subtracts
![]() The height of the card
The height of the card
![]() The height of your score text
The height of your score text
![]() 50 scaled pixels from the bottom edge of the screen
50 scaled pixels from the bottom edge of the screen
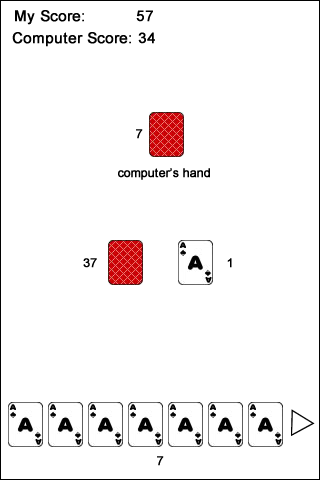
Run the game. It should look similar to Figure 6-3.
Now you display the computer opponent’s hand. Because the game’s player can’t see an opponent’s cards, there’s no need to lay out those cards in the same way. You can let them overlap much more than the player’s cards do, because the player sees only the backs of the opponent’s cards.
First, you load the graphical image for the back of the card. Create a local Bitmap variable in GameView by adding the following line to your variable declarations:
private Bitmap cardBack;
You load this bitmap in the onSizeChanged() method to take advantage of the screen width and height information updated at run time.
Figure 6-3: The game screen displays the player’s hand.

Modify the onSizeChanged() method to include the code in Listing 6-8.
Listing 6-8: Loading the Card Back Graphic
Bitmap tempBitmap = BitmapFactory.decodeResource(myContext.getResources(),R.drawable.card_back);
scaledCardW = (int) (screenW/8);
scaledCardH = (int) (scaledCardW*1.28);
cardBack = Bitmap.createScaledBitmap(tempBitmap, scaledCardW, scaledCardH,false);
Just as you load the original graphic for each card front and scale it based on the dimensions of the current screen, you load and scale it for the card-back graphic.
Now modify the onDraw() method to include the code in Listing 6-9.
Listing 6-9: Drawing the Opponent’s Hand
for (int i = 0; i < oppHand.size(); i++) {
canvas.drawBitmap(cardBack,
i*(scale*5),
whitePaint.getTextSize()+(50*scale),
null);
}
You add these lines to draw the card-back graphic for each card in the opponent’s hand:
![]() You space them only 5 pixels apart so that they overlap.
You space them only 5 pixels apart so that they overlap.
![]() You draw them at the height of your text plus 50 pixels from the top of the screen.
You draw them at the height of your text plus 50 pixels from the top of the screen.
When you run the game, it should look like Figure 6-4.
Next, you show the draw and discard piles. You can represent the draw pile with a single card-back image. Simply add the following line to your onDraw() method:
canvas.drawBitmap(cardBack, (screenW/2)-cardBack.getWidth()-10, (screenH/2)-(cardBack.getHeight()/2), null);
You’re drawing the draw pile roughly centered on the screen, so the x position starts with half the screen width, minus the width of the card and another slight offset of 10 pixels.
You’re doing this because you want to draw the discard pile next to the draw pile with a little space between them. The y coordinate is half the screen height minus half the height of the card image.
When you run the game, it should look like Figure 6-5.
Figure 6-4: The game screen displays the opponent’s hand.

Figure 6-5: The game screen displays the draw pile.

Drawing the discard pile is slightly trickier. Add the lines in Listing 6-10 to your onDraw() method.
Listing 6-10: Drawing the Discard Pile
if (!discardPile.isEmpty()) {
canvas.drawBitmap(discardPile.get(0).getBitmap(),(screenW/2)+10,(screenH/2)-(cardBack.getHeight()/2),null);
}
You’re checking to see whether the discard pile contains cards. If it does, you display the top card (index 0) slightly to the right of the draw pile and at the same height.
 If you were to run this code now, you wouldn’t see anything, because you haven’t added cards to the discard pile. In Crazy Eights, you start the discard pile by adding the top card from the draw pile, after both players have been dealt their cards.
To add a card to the discard pile, you can reuse the method for drawing cards. You deal both players their cards in the onSizeChanged() method. After the dealCards() call, add this line:
drawCard(discardPile);
This line moves the top card from the draw pile to the discard pile. When you run the game now, you should see a screen similar to Figure 6-6.
Figure 6-6: The game screen displays the discard pile.

Taking Your Turn
After you display the vital game elements displayed on the play screen (both scores, both hands, the draw pile, and the discard pile), you can move on to handling the game logic, such as determining who plays first and how to alternate turns.
Handling turns
To handle turns, you
![]() Add a
Add a boolean variable to GameView that keeps track of the player’s turn.
![]() Enable or disable certain logic based on the value of that
Enable or disable certain logic based on the value of that boolean.
Add the following declaration to your other variable declarations:
private boolean myTurn;
Then, in the constructor, add this line:
myTurn = new Random().nextBoolean();
This value randomly decides who goes first — the computer opponent or the player. You toggle this value every time either player makes a valid play.
The next couple of sections show you how to
![]() Enable players to draw and pick up cards to make valid plays.
Enable players to draw and pick up cards to make valid plays.
![]() Enable the computer opponent to make valid plays.
Enable the computer opponent to make valid plays.
Crazy Eights has only two valid plays:
![]() Play a card that matches either the suit or rank of the card on top of the discard pile (or an eight).
Play a card that matches either the suit or rank of the card on top of the discard pile (or an eight).
![]() Draw a card.
Draw a card.
Before you move on, make a simple computer opponent that returns legal moves. Later in this chapter, I show you how to make the opponent more sophisticated.
Because you need to get both the rank and suit from a card to evaluate valid plays, you need to modify the Card class. Modify its code to look like Listing 6-11.

In Listing 6-11, you’ve added
![]() Integer variables to hold both the rank and suit
Integer variables to hold both the rank and suit
![]() Logic to determine the values of these variables from the
Logic to determine the values of these variables from the id of the card
The value of the card is calculated from the id:
![]() Line 14 rounds the
Line 14 rounds the id to the nearest hundred to get the suit.
For example, if the card id were 309 (the nine of hearts), line 14 would round it to 300 to get the suit (hearts, in this case).
![]() Line 15 subtracts the rounded value from the
Line 15 subtracts the rounded value from the id to get the rank.
If the card id were 309, Line 15 would subtract the suit value from the id (309–300) to get the rank value of 9.
You’ve also added a getSuit() and getRank() method to return these values.
When you have the right logic in the Card class, you’re ready to create the computer player. Here’s how:
1. Right-click the package in Eclipse and select New⇒Class.
2. Enter ComputerPlayer for the class name and click OK.
3. Modify the contents of your newly created class to match Listing 6-12.


You have only two methods for now:
![]()
makePlay():
• Takes in the computer player’s hand and the valid suit and/or rank to play
• Returns the id for a valid play from its hand
![]()
chooseSuit(): Is called only if the computer opponent plays an 8.
 Eights are wild. When one is played, its owner gets to name a suit that the opponent also must then play.
Lines 9–21 loop through each card in the computer player’s hand:
1. Lines 10–12 determine the rank and suit of each card.
2. Line 13 checks to see whether the rank of the top card of the discard pile is an 8.
If so, it checks for the suit to be played. If a card in the computer player’s hand matches the valid suit, the id of that card is set as the card to be played.
3. If the top card isn’t an 8, lines 17–20 check to see whether each card in the computer player’s hand matches either the rank or suit of the card that’s played.
If it matches, that card’s id is set to return as the one to play.
4. If none of the conditions in either loop is met, there’s no valid play among the cards in the computer opponent’s hand.
By setting the default value of the play variable to 0, when a valid play isn’t found, 0 is returned when this method is called, indicating that a card must be drawn.
For the chooseSuit() method, for now you always return 100 (diamonds). This value is sufficient only to produce a playable computer opponent. In Chapter 7, you can see how to analyze the game state and make the computer player a little more sophisticated — and challenging.
Now your game has a playable opponent. Before you begin alternating plays between the player and the opponent, you must ensure that you’ve handled all logic for the human player interacting with cards and making valid plays, as explained in the following three sections.
Picking up cards
Because you’re working on the human side of the game’s turns while you implement and test this code, you set the myTurn variable to true rather than let it be set randomly:
![]() Comment out the following line (the following sidebar shows you how):
Comment out the following line (the following sidebar shows you how):
myTurn = new Random().nextBoolean();
![]() Insert the following line:
Insert the following line:
myTurn = true;
It ensures that the game screen always starts with the human player’s turn active.
Now the game should detect whether the user touches the screen in an area that contains a playable card. First you add a few more variables to draw the card as it’s being moved across the screen. Add the following lines to your variable declarations in GameView:
private int movingCardIdx = -1;
private int movingX;
private int movingY;
The preceding code has these functions:
![]() The first variable keeps track of the index of the card that’s being moved.
The first variable keeps track of the index of the card that’s being moved.
![]() The other two variables
The other two variables
• Keep track of the user’s finger on the screen.
• Make that information available to all methods in GameView.
Now modify the onTouchEvent() method to look like Listing 6-13.

Here’s a brief explanation of various lines in this listing:
→8 A player should be able to pick up and move cards only on their turn.
→9 Loop through the first seven cards in the player’s hand (the ones being displayed), and check to see whether the player has touched the screen on a card that’s being displayed. If so, you assign the index of that card to movingCardIdx as well as to the current x and y positions to the movingX and movingY variables.
→24 As the player moves his or her finger across the screen, you keep track of the x and y. You use this information when drawing the bitmap for the card being moved.
→29 When the player lifts the finger from the screen, you reset the movingCardIdx to indicate that no cards are being moved.
The previous logic keeps track of picked-up and moving cards, but has no visual impact until you update the onDraw() method. Modify this method to look like Listing 6-14.

Note that you’ve moved to the end of the method the code for drawing your own hand. Why? Because the order in which items are drawn in this method determines whether they’re drawn above or below other items. The reason didn’t matter when you weren’t moving elements around, but now that you’re moving a card that you’ve picked up, you want it to appear above all other elements on the screen. In other words, you don’t want a card that you’re dragging across the screen to appear underneath the draw pile. Experiment with the order in which items are drawn to get a feel for what I’m talking about. Trust me — this particular ordering works best.
Here’s a brief description of a couple of lines in this listing:
→22 You check to see whether the index of a given card in your hand matches the movingCardIdx. If so, you draw the card at the current x and y position of the player’s finger.
→27 If the movingCardIdx doesn’t match any index values for cards in your hand (for example, when it’s –1), you draw the rest of your hand as you did before.
Run the game, and try picking up and moving cards around the screen. You’ll probably notice that the picked-up card is drawn with the upper left corner of the card at the position where your finger is touching the screen. So the card is drawn under your finger, obscuring it.
This is an issue when displaying UI elements in a touchscreen environment. You can improve this aspect of the UI by modifying the movingX and movingY values. Though you can center the bitmap on the point where the player is touching the screen, I like for the element offset to appear above and to the left of the point that’s touched.
 Test on a real device. Testing your game only on an emulator can give you a false sense of screen interaction using touch:
![]() When you run a game on an emulator, you interact with the UI elements using your mouse and the pointer icon, which is much smaller and finer-grained than interacting with a screen using your finger.
When you run a game on an emulator, you interact with the UI elements using your mouse and the pointer icon, which is much smaller and finer-grained than interacting with a screen using your finger.
![]() When you’re picking up and moving UI elements, the mouse pointer typically doesn’t obscure whatever element you’re moving, and your finger does.
When you’re picking up and moving UI elements, the mouse pointer typically doesn’t obscure whatever element you’re moving, and your finger does.
Have a look at Listing 6-15, where I’ve added offsets to the x and y positions for the card being picked up and moved.
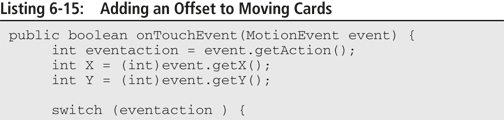
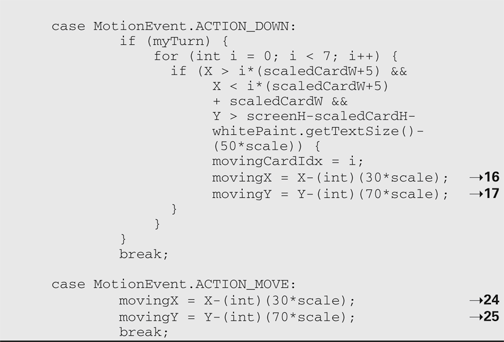
I’ve only modified four lines here, 16–17 and 24–25. I’ve added a 30-pixel offset to the left and a 70-pixel offset up. This way, the card is generally
![]() Centered horizontally at the point of touch
Centered horizontally at the point of touch
![]() Offset vertically so that the user can see the rank and suit of the card as it moves
Offset vertically so that the user can see the rank and suit of the card as it moves
You can use different offset values, but do not draw the card completely under the player’s finger as the card moves. Experiment with offset values that you like until they feel intuitive and user-friendly to you. Then you can move on to handling the logic for playing valid cards on the discard pile.
Playing cards
Before allowing a dragged card to be played on the discard pile, you need to know whether it’s a valid play.
To keep track of valid plays, add these two variables to your variable declarations.
private int validRank = 8;
private int validSuit = 0;
You initialize the valid rank as an 8 because an 8 is always legal to play. These values are updated every time a card is played. You get the initial values from the first card that’s placed face-up in the discard pile, which is done with the initialization of the deck and hands in the onSizeChanged() method. Modify that method to look like Listing 6-16.

Lines 15–16 get the suit and rank of the first card placed on the discard pile. With that information in hand, you’re ready to see whether a dragged card is a valid play:
![]() A valid play: Add it to the discard pile.
A valid play: Add it to the discard pile.
![]() Not a valid play: Do nothing, “returning” it to the player’s hand.
Not a valid play: Do nothing, “returning” it to the player’s hand.
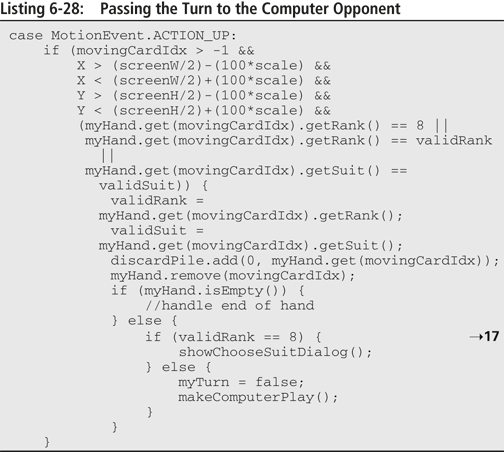
You check in the ACTION_UP case of onTouchEvent(). Modify the ACTION_UP case to look like Listing 6-17.

Here’s a brief explanation of various lines in this listing:
→2 This line checks to see whether a card is being moved.
→3–6 The only action the player can take with a card in hand is to play it on the discard pile, so you don’t have to worry about accuracy. You’re simply verifying that the player has dropped the card within an area of 200 x 200 pixels in the center of the screen. If you want to adjust the drop area by changing these values, go for it.
→8–9 These lines check to see whether the card being dragged is a valid rank or suit.
→10–11 If the dragged card meets the right conditions, you get the rank and suit of the card and set the current valid values.
→12–13 Then you add the dragged card to the discard pile at index 0 and remove it from the player’s hand.
Try it out. You should be able to
![]() Drag cards that match either the suit or the rank of the top card in the discard pile.
Drag cards that match either the suit or the rank of the top card in the discard pile.
![]() Drop cards in the middle of the screen, adding them to the discard pile.
Drop cards in the middle of the screen, adding them to the discard pile.
Playing an 8 requires special handling because you get to choose the valid suit. You can set the valid rank as 8 because it’s always playable, but you need a way for the player to choose a particular valid suit: the dialog box.
Showing dialog boxes (and toasts)
The dialog box (also known as a dialog) is an onscreen element that offers choices to the user; it’s among the most common and widely used UI elements in games.
In your game, you use dialog boxes to
![]() Display end-of-hand and end-of-game states
Display end-of-hand and end-of-game states
![]() Let players choose the suit when an 8 is played, which is what you’re using one for now
Let players choose the suit when an 8 is played, which is what you’re using one for now
The dialog box will contain three elements:
![]() Some text
Some text
![]() A spinner (or drop-down menu, in Android),
A spinner (or drop-down menu, in Android),
The spinner is populated with four values — strings for the four suits.
![]() A button
A button
Before you do anything else, create a new file in your resource folder from which you can reference the names of the suits. They’re held in a string array, so you need to create a new file for it.
1. Right-click the res>values folder in your project and select New⇒File.
2. Name the new file arrays.xml.
3. Click Finished.
Modify the contents of your newly created file to match Listing 6-18.
Listing 6-18: The arrays.xml File
<resources>
<string-array name=”suits”>
<item>Diamonds</item>
<item>Clubs</item>
<item>Hearts</item>
<item>Spades</item>
</string-array>
</resources>
This file is straightforward. You’re naming the array “suits,” and each item is the name of a suit.
The next file you need to create is a layout file for the dialog box:
1. Right-click the res>layout folder.
2. Choose New⇒File.
3. Name the new file choose_suit_dialog.xml.
4. Click Finished.
Modify the contents of the new file to match Listing 6-19.
Listing 6-19: The choose_suits_dialog.xml File
<?xml version=”1.0” encoding=”utf-8”?>
<LinearLayout
android:id=”@+id/chooseSuitLayout”
android:layout_width=”275dp”
android:layout_height=”wrap_content”
android:orientation=”vertical”
android:layout_gravity=”top”
xmlns:android=”http://schemas.android.com/apk/res/android”
>
<TextView
android:id=”@+id/chooseSuitText”
android:layout_width=”wrap_content”
android:layout_height=”wrap_content”
android:text=”Choose a suit.”
android:textSize=”16sp”
android:layout_marginLeft=”5dp”
android:textColor=”#FFFFFF”
>
</TextView>
<Spinner
android:id=”@+id/suitSpinner”
android:layout_width=”fill_parent”
android:layout_height=”wrap_content”
android:drawSelectorOnTop=”true”
/>
<Button
android:id=”@+id/okButton”
android:layout_width=”125dp”
android:layout_height=”wrap_content”
android:text=”OK”
>
</Button>
</LinearLayout>
As mentioned, the layout contains three UI elements: text, spinner, and button. All three are contained in a LinearLayout (the simplest layout format in Android), which lays out elements in a straight line. In this case, you’ve set the orientation for the layout as “vertical”, so the elements are laid out from top to bottom.
Note that each element has an id, which is how you reference them from the Java files. Also note the use of dp for pixel dimensions and sp for text size. These density-independent units scale with the size of the display. You can preview a layout on the Graphical Layout tab. Yours should look similar to Figure 6-7.
Figure 6-7: Graphical preview of the Choose Suits dialog box.

Though you can customize dialog boxes, don’t do anything fancy with this one. For your own game, experiment with themes and styles to make your dialog boxes more visually appealing. For now, simply implement the basics so that you can get a playable game up and running.
When you have the proper resource files, you can add code to display your dialog box at the right time (when the human player plays an 8). In your GameView, add the new method showChooseSuitDialog() with the content shown in Listing 6-20.

Here’s a brief explanation of various lines in this listing:
→2 First you create a final instance of a dialog box. Then you set the attribute of having no title before setting the content view to the choose_suit_dialog.xml file you just created.
→5 This line creates a final instance of a spinner, referencing the id of the spinner in your layout file.
→7 An ArrayAdapter supplies data to a view and determines its format. This line creates an ArrayAdapter using the suits array in your resource directory. You use default layout parameters for spinner items (how items are displayed when the spinner hasn’t been clicked) and for spinner drop-down items (how items are displayed when the spinner has been clicked). Then you set this new adapter as the one for your spinner.
→11 You reference the button in your layout file and set an onClickListener(), which performs whatever logic you designate when onClick() is called by the user clicking the button. Line 168 sets the validSuit by getting the index of the selected spinner item, adding 1, and multiplying by 100. This provides the proper value for the suit based on the selected item. The suit names in the suit array must be in the proper order, or else this process doesn’t work correctly.
→27 To reinforce the player’s choice, a Toast (a brief system message) flashes on the screen. You can use a Toast to display certain types of information that require neither a dedicated dialog box nor a player’s selection.
In this case, you display the chosen suit:
![]() The lines immediately preceding line 27 declare a text variable to hold the text for the chosen suit. The
The lines immediately preceding line 27 declare a text variable to hold the text for the chosen suit. The if statements
• Check the validSuit variable.
• Assign the proper text to the suitText variable.
![]() Line 26 dismisses the dialog box. You can control the display time of the Toast by using the last parameter. In this case, the Toast flashes on the screen for a couple of seconds.
Line 26 dismisses the dialog box. You can control the display time of the Toast by using the last parameter. In this case, the Toast flashes on the screen for a couple of seconds.
You’ll also need the following import statements:
import android.widget.ArrayAdapter;
import android.widget.button;
You should show the dialog box only when the player has just played an 8 and needs to choose which suit the opponent must play. To do so, modify the ACTION_UP case of onTouchEvent() (see Listing 6-21).

You’ve added lines 14–16. If an 8 has been played, call your new method for displaying the Choose Suits dialog box. As always, give it a try. The dialog box, when launched, should look similar to Figure 6-8.
When you click the spinner, the list of items should open, as shown in Figure 6-9.
If you want to test without having to play an 8, simply comment out that condition so that the dialog box displays for all valid plays. In the following section, you handle an important case: a player who cannot make a valid play having to draw until a valid play is possible.
Figure 6-8: Displaying the Choose a Suit dialog box.

Figure 6-9: List items for the Choose a Suit spinner.

Taking cards from the draw pile
Adding a card from the draw pile to the human player’s hand is simple enough. After all, you already have a simple drawCard() method. But you have a number of other issues to consider in addition to adding a card to the player’s hand.
In Crazy Eights, a player who can’t make a valid play must continue drawing until they can make one — which means that the player may have seven cards or more. In your initial game screen mock-up, you use an arrow key to rotate through the hand, displaying only seven cards at a time. From a UI perspective, you can handle this task in many different ways; in this instance, you implement an arrow key.
Add the following bitmap to your variable declarations:
private Bitmap nextCardButton;
Now you need to load it, so add the following line of code to the onSizeChanged() method:
nextCardButton = BitmapFactory.decodeResources()(getResources(),
R.drawable.arrow_next);
Now you need to modify the part of the onDraw() method that draws your hand. Replace the code that draws your hand with the contents of Listing 6-22.


Here’s a brief explanation of most of the lines in this listing:
→1–6 This block of code draws the next button, but only if your hand size is greater than 7.
→7–12 Loop through all cards in your hand. If the index value matches the moving card index, you draw that moving card.
→14–19 Otherwise, the card is drawn in its normal position in the hand, but only if its index value is one of the first seven cards.
Now you can visually handle a hand holding more than seven cards. Before you enable the drawing functionality, however, you need a way to determine whether the player should be allowed to draw a card.
In your GameView, add the method shown in Listing 6-23.
Listing 6-23: Checking for Valid Draws
private boolean checkForValidDraw() {
boolean canDraw = true;
for (int i = 0; i < myHand.size(); i++) {
int tempId = myHand.get(i).getId();
int tempRank = myHand.get(i).getRank();
int tempSuit = myHand.get(i).getSuit();
if (validSuit == tempSuit || validRank == tempRank ||
tempId == 108 || tempId == 208 ||
tempId == 308 || tempId == 408) {
canDraw = false;
}
}
return canDraw;
}
This chunk of code should look familiar — similar logic is used in your simple computer opponent to check for valid plays. This method is checking to see whether the player’s hand contains a card that either matches the current rank or suit or contains an 8:
![]() If so, it returns true.
If so, it returns true.
![]() If not, it returns false.
If not, it returns false.
Now add the code, shown in Listing 6-24, for drawing a card to the ACTION_UP case of your onTouchEvent() method.
Listing 6-24: Drawing a Card Into a Hand
if (movingCardIdx == -1 && myTurn &&
X > (screenW/2)-(100*scale) &&
X < (screenW/2)+(100*scale) &&
Y > (screenH/2)-(100*scale) &&
Y < (screenH/2)+(100*scale)) {
if (checkForValidDraw()) {
drawCard(myHand);
} else {
Toast.makeText(myContext, “You have a valid play.”, Toast.LENGTH_SHORT).show();
}
}
If the player has no card in hand, they click the draw pile (or anywhere near it). As with playing, you’re detecting only whether the player clicks in the middle of the screen, near the draw pile:
![]() When they do, you call your
When they do, you call your checkForValidDraw() method
![]() If it returns true, you draw a card and add it to the hand.
If it returns true, you draw a card and add it to the hand.
![]() If the player has a valid play, you inform them with a Toast.
If the player has a valid play, you inform them with a Toast.
Finally, you add the logic for rotating the cards displayed in the player’s hand if it contains more than seven cards. Luckily, Collections in Java provide a built-in method for rotating lists. You call this method when the player holds more than seven cards and clicks the Next Card button.
Add the code in Listing 6-25 to the ACTION_UP case of your onTouchEvent() method.
Listing 6-25: Cycling Through Cards in a Large Hand
if (myHand.size() > 7 &&
X > screenW-nextCardButton.getWidth()-(30*scale) &&
Y > screenH-nextCardButton.getHeight()-scaledCardH-(90*scale) &&
Y < screenH-nextCardButton.getHeight()-scaledCardH-(60*scale)) {
Collections.rotate(myHand, 1);
}
The conditional statement determines whether the player has more than seven cards and is clicking the button.
If so, the indices of the cards are shifted upward by 1, and the last card in the list is moved to the front. Try it out. You should now be able to make valid plays, and when you can’t, you should be able to draw. When your hand size is larger than seven, you should be able to use the Next button to cycle through the cards.
In previous sections, you leave the turn toggled to the human player while you implement all possible actions they can take. After you have that logic implemented, you can see in the following section how to alternate turns so that you can feel like you’re playing an actual game.
Advancing play
Though earlier sections show you how to work on the functionality for playing and drawing cards for the human player, you’ve left the myTurn variable toggled to true. It’s time to return it to initialize randomly. You handle the initialization in the onSizeChanged() method — the same place you initialize nearly everything else.
Modify your onSizeChanged() method to match the contents of Listing 6-26.


You see in line 19 that you’ve returned to randomizing the myTurn variable:
![]() If that value is false, you call the new method
If that value is false, you call the new method makeComputerPlay().
![]() If the value is true, you simply wait for user input.
If the value is true, you simply wait for user input.
We commented out the line initializing myTurn in the constructor. To keep the code clean, you can delete that commented line from the constructor.
To implement the new method for making computer plays, you add the method in Listing 6-27 to your GameView. First you’ll need to add a variable for the computer player along with your other variable declarations at the top of the file:
private ComputerPlayer computerPlayer = new ComputerPlayer();


Here’s a brief explanation of various lines in this listing:
→2 You initialize a temporary variable to hold the id of the played card.
→3 A value of 0 for the id indicates no matching cards. The computer player needs to draw a card, so you set up a while loop. As long as the computer player indicates that it needs to draw, you draw a card into its hand. A valid id for a card to be played escapes the loop.
→12 If the computer chooses to play an 8, you call its chooseSuit() method, which for now is set to always return diamonds. You then notify the user of the chosen suit via a Toast. Though you may want to always display the current valid suit on the screen, for now, stick with a temporary notification.
→26–27 If the computer player doesn’t play an 8, you simply reset the valid rank and valid suit to whatever the played cards’ values are.
→29 Loop through the opponent’s hand, adding the played card to the discard pile and removing it from their hand.
→36 Finally, you toggle the turn back to the human player.
You need to add a last bit of code before turns are properly alternated throughout a game. When the human player makes a move, you call the method you just made. The human player makes a move after dropping a card on the discard pile; that’s what you need to modify.
Modify the section of code in the ACTION_UP case of onTouchEvent(va), as shown in Listing 6-28.
In Lines 17–19, you simply check to see whether the player played an 8.
![]() If so, you call the
If so, you call the showChooseSuitsDialog() method.
![]() If not, you toggle the turn variable and call the method for the computer to play.
If not, you toggle the turn variable and call the method for the computer to play.
If the human player plays an 8 and the Choose Suits dialog box is displayed, the computer should play only after the dialog box is dismissed, so you need to update the showChooseSuitsDialog() method.
Modify your showChooseSuitsDialog() method to match Listing 6-29.
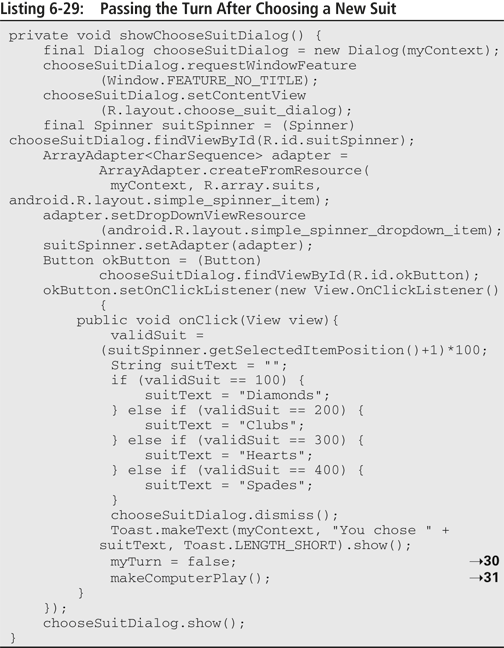
Lines 30–31 are added, toggling the turn variable and making the computer play.
Now, whenever you launch the game screen, the player who goes first is chosen randomly, and you can make plays with the computer player responding. You may notice that the opponent plays instantly after the human player makes a move. Of course, computers are fast, so they don’t need much time to think about plays (especially your rather unsophisticated player). Because it doesn’t feel much like players’ turns are alternating when the computer responds so quickly, consider implementing either
![]() A Toast indicating the played card
A Toast indicating the played card
![]() A delay between the human player’s play and the computer’s play
A delay between the human player’s play and the computer’s play
Also, you’re not handling the case of either player running out of cards, in which case the hand should end. I tell you how to handle this task, and how to improve your computer opponent and scoring, in Chapter 7.
..................Content has been hidden....................
You can't read the all page of ebook, please click here login for view all page.