
It should go without saying that if you plan on developing a game, casual or otherwise, you need to work with images. Everything from the backgrounds and characters to the menus and text is made up of images. Android can use different methods to serve up these images to the screen. This chapter will help to solve any problems that you have had retrieving, storing, and serving images within Android.
There are two distinct ways to serve up an image in Android, and each has its place in game development. The first way to serve up an image in Android is to use core Android methods—or those methods that do not involve the direct use of OpenGL ES. These core methods require little to no code to use, but they are slow and definitely not flexible enough to be used in the main, action-oriented parts of the game.
The second way to serve up images within Android is to use OpenGL ES. OpenGL ES is fast, flexible, and perfect for use within a game; however, it requires substantially more code than the core Android methods do. We will look at both of these in this chapter.
So when would you use one method over the other?
Images loaded using the core Android methods are perfect for splash screens, title screens, and even menus. Given the architecture of Android activities, it is very easy to create an activity using core Android methods, that contains a menu system for the game. Menus can include items that are easier accomplished before launching your game thread, such as checking scores, visiting an online shop, or viewing preloaded level information. The menu can then be used to launch the main game thread when the player chooses to enter the game. Once in the main game thread, OpenGL ES can take over the duties of working with the more graphic-intense gameplay. The solutions in this chapter will help you work around many common problems loading images in both OpenGL ES and using core Android methods.
2.1 Loading an Image Using Core Android Methods
Problem
There are times in a game when you might not need to use OpenGL ES for displaying images; for example, the title and menu screens. However, after you have decided to use either core Android methods or OpenGL ES, how do you store the images in your project so that Android can access them?
Solution
Image files are stored in the res folder prior to being used within Android. The res folder—or resource folder—is where all of the resources for your Android project are stored. There is a set of subdirectories for the res folder named drawable*. All of your images should be placed in a drawable folder. The Android ImageView node is then used to display these images to the screen. This is a perfect solution for game splash screens or any part of your game that displays an image before the actual gameplay starts.
How It Works
One of the good things about this solution is that it can be accomplished with no manual coding whatsoever. Some drag-and-drop action will set this solution up for you in an instant. Since this solution has two parts (storing and displaying images), let’s take a look at each part separately.
The first part of the problem is where you store images for use within Android. All of the resource files that you use in your Android projects are kept in a project directory named res. If you open your project, and expand the file system under the Project Explorer, you will see a root level folder named res; this is where all of your in-app resources, such as strings and images, are stored.
Note If you are using Eclipse (the latest version as of the writing of this book is Juno) then you will see the res folder in the Package Explorer. However, if you are using a different IDE, or no IDE at all, then locate the file exploring equivalent to see the res folder.
If you are using an IDE, open the res folder and you should find a number of subfolders. Some of these subfolders should start with the word drawable-. All of the subfolders that are meant for storing images within your app will start with this word. You will also notice a notation at the end of the name of each folder, from -ldpi to -xhdpi. What does this mean?
Android supports a number of different screen sizes and pixel densities. Because you might want to have different resolution images for different screen sizes or pixel densities, Android provides different subfolders for these images. The notation in the folder name indicates screen size from small (drawable-small)to extra large(drawable-xlarge), and indicates pixel densities from low density(drawable-ldpi) to extra-high density(drawable-xhdpi).
Tip If you do not care about the pixel density of the screen used to display your images, then you can put all of your files in the default drawable folder. If your IDE did not create this folder by default, feel free to add it. Android will look here when you have not specified a pixel density to use.
The image that we will use in this example is the splash screen to our fictitious game Super Bandit Guy, as shown in Figure 2-1.

Figure 2-1. Super Bandit Guy splash screen image
Simply drag and drop this image from your working folder, wherever that may be, to the correct drawable dpi folder, as shown in Figure 2-2. In this case, I used the drawable-xhdpi to test on a tablet.
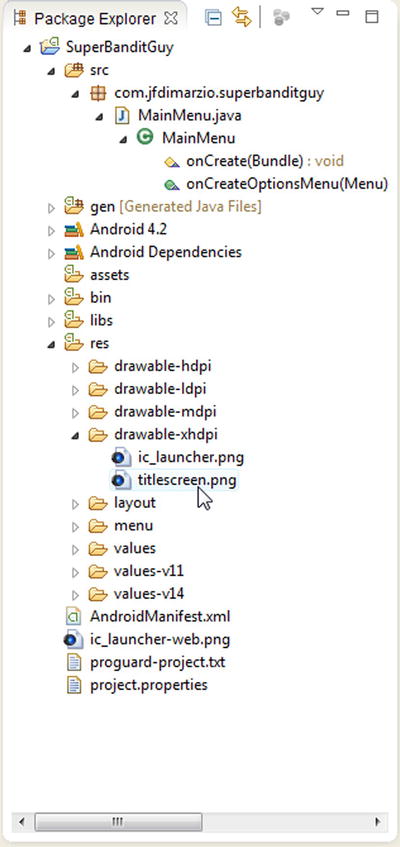
Figure 2-2. Dragging an image to the res/drawable-xhdpi folder
That is all there is to getting the image into Android.
Loading and Displaying Images
The image is now ready to use. To display this image to the screen, you need to create an ImageView.
Note Again, if you are using Eclipse, a generic layout should have been created for you just for this purpose. If you are not using Eclipse, please follow your IDE’s instructions for creating a main screen layout.
Expand the layout root folder, and open the activity_main_menu.xml file. With the layout open, expand the Images & Media palette and locate the ImageView, as shown in Figure 2-3.
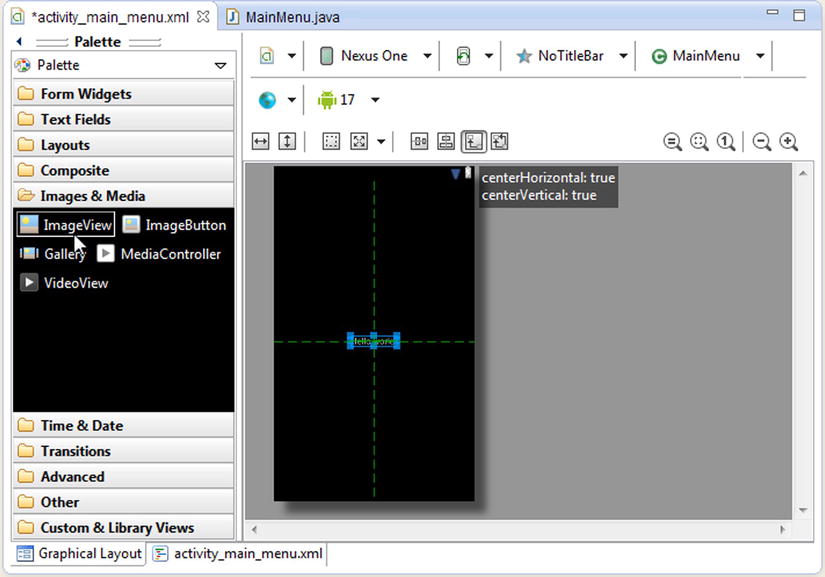
Figure 2-3. Locating the ImageView
Now drag the image from the palette to the layout in the work area. At the top of the working area (again reference Figure 2-3), you will see a row of menu icons. Selecting the state menu icon will allow you to change the orientation of the screen layout from portrait to landscape. I have seen games played in either orientation; however, for this example, Super Bandit Guy is played in landscape. Therefore, a change in orientation will be noticeable in future screen shots.With the ImageView added to your layout, expand the ImageView properties and select the Src property. Clicking on the ellipsis next to the Src property will bring up a list of drawable resources.
Select the correct image, as shown in Figure 2-4.
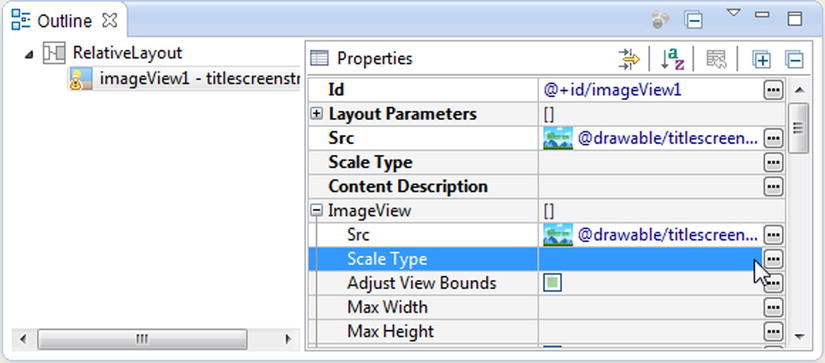
Figure 2-4. Selecting the correct image using the ImageView properties
Compile and run your project. The result should appear as shown in Figure 2-5.
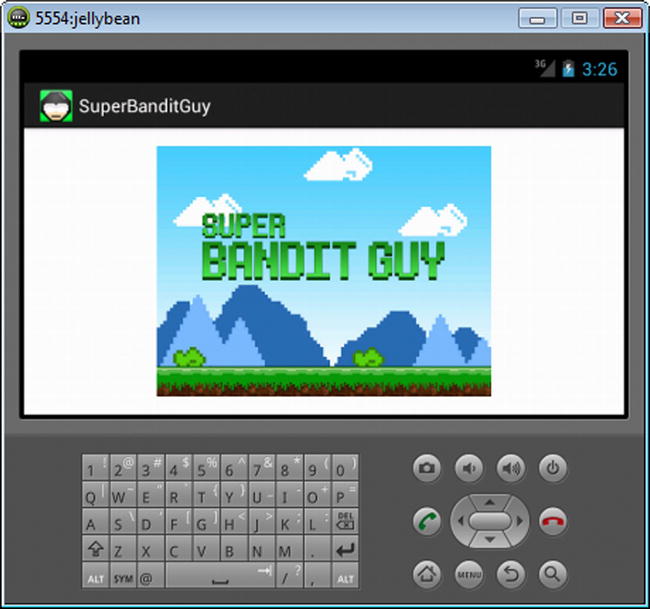
Figure 2-5. Displaying the splash image
There is one piece of business that you might want to take care of before calling this one finished. Notice in Figure 2-5 that there is an action bar menu above the image. This is added by default (in Android version 3.0 and higher) in some IDEs depending on the Android theme that is selected when creating your project. Getting rid of this action bar is easy.
Returning to the Project Explorer, within the res folder, you should be able to locate a folder named values. Inside this folder is a file named styles.xml. Add the following line to the styles.xml file, between the style tags of the style that your app is using.
<item name="android:windowActionBar">false</item>
2.2 Loading an Image Using OpenGL ES
In this recipe, I present two problems and two solutions. You’ll first correct ImageView image calls to run properly in a game. Then you’ll see how to ensure OpenGL ES displays the correct image when using an Android device.
Solution 1
Use OpenGL ES to write your images to the screen. You must create an OpenGL ES renderer, a GLSurfaceView, and a set of vertices and textures. Although this solution might sound like a lot of work, you will only need to do much of the work once, and then you can reuse the same classes throughout your project.
That is, the renderer and the GLSurfaceView need to be created only once for your game. They are reused over and over again. The only parts of the solution that you will need to re-create for every image you want to display are the vertices and textures that define the image.
How It Works
We are going to break this solution up into three parts: creating the vertices and textures, creating the renderer, and finally creating the GLSurfaceView. Let’s start with creating the vertices and textures.
Create Vertices and Textures
This is the most complicated part of the process, and the one that requires the most code. But if you take it slow, it should be no problem. Also, given that creating the vertices and textures is the one part that will be repeated throughout your game in some form, you will get a lot of practice with the code. It will get easier the more you use it.
As far as OpenGL ES is concerned, all images are textures. Textures are meant to be mapped onto a shape. You will be creating a primitive square to map your image (or texture) onto and display it to the screen through the renderer and the GLSurfaceView.
To do so, you need to create a new class, SBGSplash, which involves the following steps, all of which will be described shortly:
- Create some buffers.
- Create the constructor.
- Create the loadTexture() method.
- Create the draw() method.
The constructor for the SBGSplash class is going to set up all of the variables that you need to interact with OpenGL ES (see Listing 2-1). You need an array to hold the mapping coordinates of your texture, an array to hold the coordinates of your vertices, and an array to hold the indices of the vertices. Finally, you create an array of resource identifiers that refer to your textures.
Listing 2-1. SBGSplash (OpenGL ES 1)
public class SBGSplash {
private int[] textures = new int[1];

private float[]vertices = {
0f, 1f, 0f,
0f, 0f, 0f,
1f, 0f, 0f,
1f, 1f, 0f,
};
private float[] texture = {
1f, 0f,
1f, 1f,
0f, 1f,
0f, 0f,
};
private byte[] indices = {
0,1,2,
0,2,3,
};
public SBGSplash() {
//empty constructor
}
}
The textures array holds an identifier to each texture that you are loading. You are hard-coding this to 1 because you will only be loading one image, but we are leaving this flexible enough for you to reuse in the future without much rewriting.
The vertices array lists a series of points. Each row here represents the x, y, and z value of a corner of a square. This square is the primitive shape that the image will be textured to in order to be displayed. In this case, you are making a square that is the full size of the screen, ensuring that the image covers the entire screen.
The texture array represents where the corners of the image (or texture) will line up with the corners of the square you created. Again, in this case, you want the texture to cover the entire square, which in turn is covering the entire background.
Finally, the indices array holds the definition for the face of the square. The face of the square is broken into two triangles. The values in this array are the corners of those triangles in counterclockwise order. Notice that one line (two points) overlap (0 and 3).
If you are using OpenGL ES 3, you need to add your shader code here, as shown in Listing 2-2.
Listing 2-2. SBGSplash (OpenGL ES 2/3)
public class SBGSplash {
private final String vertexShaderCode =
"uniform mat4 uMVPMatrix;" +
"attribute vec4 vPosition;" +
"attribute vec2 TexCoordIn;" +
"varying vec2 TexCoordOut;" +
"void main() {" +
"  gl_Position = uMVPMatrix * vPosition;" +
"  TexCoordOut = TexCoordIn;" +
"}";
private final String fragmentShaderCode =
"precision mediump float;" +
"uniform vec4 vColor;" +
"uniform sampler2D TexCoordIn;" +
"uniform float scroll;" +
"varying vec2 TexCoordOut;" +
"void main() {" +
" gl_FragColor = texture2D(TexCoordIn, vec2(TexCoordOut.x + scroll,TexCoordOut.y));"+
"}";
private int[] textures = new int[1];

private float[]vertices = {
0f, 1f, 0f,
0f, 0f, 0f,
1f, 0f, 0f,
1f, 1f, 0f,
};
private float[] texture = {
1f, 0f,
1f, 1f,
0f, 1f,
0f, 0f,
};
private byte[] indices = {
0,1,2,
0,2,3,
};
public SBGSplash() {
//empty constructor
}
}
It is time to create the buffers that are also used in the class constructor. Because the buffers, like the variables in the previous code listing, are used in multiple methods in the class, we will set them up in the body of the class.
Create Buffers
Now, create some buffers that we can use to hold these arrays (see Listing 2-3). The buffers are what will then be loaded into OpenGL ES 1.
Listing 2-3. Buffers (OpenGL ES 1)
importjava.nio.ByteBuffer;
importjava.nio.FloatBuffer;

public class SBGSplash {

private FloatBuffervertexBuffer;
private FloatBuffertextureBuffer;
private ByteBufferindexBuffer;

private int[] textures = new int[1];

private float[]vertices = {
0f, 1f, 0f,
0f, 0f, 0f,
1f, 0f, 0f,
1f, 1f, 0f,
};
private float[] texture = {
1f, 0f,
1f, 1f,
0f, 1f,
0f, 0f,
};
private byte[] indices = {
0,1,2,
0,2,3,
};
public SBGSplash() {
}
}
OpenGL ES 2 and 3 require a few extra variables with the buffers, as show in Listing 2-4.
Listing 2-4. Buffers and Variables (OpenGL ES 2/3)
public class SBGSplash {
private final FloatBuffer vertexBuffer;
private final ShortBuffer indexBuffer;
private final FloatBuffer textureBuffer;
private final int mProgram;
private int mPositionHandle;
private int mMVPMatrixHandle;

static final int COORDS_PER_VERTEX = 3;
static final int COORDS_PER_TEXTURE = 2;
private final int vertexStride = COORDS_PER_VERTEX * 4;
public static int textureStride = COORDS_PER_TEXTURE * 4;
private final String vertexShaderCode =
"uniform mat4 uMVPMatrix;" +
"attribute vec4 vPosition;" +
"attribute vec2 TexCoordIn;" +
"varying vec2 TexCoordOut;" +
"void main() {" +
"  gl_Position = uMVPMatrix * vPosition;" +
"  TexCoordOut = TexCoordIn;" +
"}";
private final String fragmentShaderCode =
"precision mediump float;" +
"uniform vec4 vColor;" +
"uniform sampler2D TexCoordIn;" +
"uniform float scroll;" +
"varying vec2 TexCoordOut;" +
"void main() {" +
" gl_FragColor = texture2D(TexCoordIn, vec2(TexCoordOut.x + scroll,TexCoordOut.y));"+
"}";
private int[] textures = new int[1];

private float[]vertices = {
0f, 1f, 0f,
0f, 0f, 0f,
1f, 0f, 0f,
1f, 1f, 0f,
};
private float[] texture = {
1f, 0f,
1f, 1f,
0f, 1f,
0f, 0f,
};
private byte[] indices = {
0,1,2,
 0,2,3,
};
public SBGSplash() {
//empty constructor
}
}
The buffers are filled in the class’s constructor. Right now, the constructor is empty. The next section describes what code is needed to complete the constructor.
Create the Constructor
Now populate the appropriate buffers with the appropriate arrays in the SBGSplash constructor, as shown in Listings 2-5 and 2-6.
Listing 2-5. Constructor (OpenGL ES 1)
import java.nio.ByteOrder;
import java.nio.ByteBuffer;
import java.nio.FloatBuffer;

public class SBGSplash {

...

public SBGSplash() {

ByteBufferbyteBuf = ByteBuffer.allocateDirect(vertices.length * 4);
byteBuf.order(ByteOrder.nativeOrder());
vertexBuffer = byteBuf.asFloatBuffer();
vertexBuffer.put(vertices);
vertexBuffer.position(0);

byteBuf = ByteBuffer.allocateDirect(texture.length * 4);
byteBuf.order(ByteOrder.nativeOrder());
textureBuffer = byteBuf.asFloatBuffer();
textureBuffer.put(texture);
textureBuffer.position(0);

indexBuffer = ByteBuffer.allocateDirect(indices.length);
indexBuffer.order(ByteOrder.nativeOrder());
indexBuffer.put(indices);
indexBuffer.position(0);
}
}
Listing 2-6. Constructor (OpenGL ES 2/3)
public class SBGSplash {

...

public SBGSplash() {

ByteBuffer byteBuf = ByteBuffer.allocateDirect(vertices.length * 4);
byteBuf.order(ByteOrder.nativeOrder());
vertexBuffer = byteBuf.asFloatBuffer();
vertexBuffer.put(vertices);
vertexBuffer.position(0);

byteBuf = ByteBuffer.allocateDirect(texture.length * 4);
byteBuf.order(ByteOrder.nativeOrder());
textureBuffer = byteBuf.asFloatBuffer();
textureBuffer.put(texture);
textureBuffer.position(0);

indexBuffer = ByteBuffer.allocateDirect(indices.length);
indexBuffer.order(ByteOrder.nativeOrder());
indexBuffer.put(indices);
indexBuffer.position(0);

int vertexShader = GLES20.glCreateShader(GLES20.GL_VERTEX_SHADER);
GLES20.glShaderSource(vertexShader, vertexShaderCode);
GLES20.glCompileShader(vertexShader);

int fragmentShader = GLES20.glCreateShader(GLES20.GL_FRAGMENT_SHADER);
GLES20.glShaderSource(fragmentShader, fragmentShaderCode);
GLES20.glCompileShader(fragmentShader);

mProgram = GLES20.glCreateProgram();
GLES20.glAttachShader(mProgram, vertexShader);
GLES20.glAttachShader(mProgram, fragmentShader);
GLES20.glLinkProgram(mProgram);
}
}
The code here should be pretty self-explanatory. You are creating a ByteBuffer with the values of the vertex and texture arrays. Notice that the number of values in each of these arrays is multiplied by 4 to allocate space in the ByteBuffer. This is because the values in the arrays are floats, and floats are 4 times the size of bytes. The index array is integers and it can be loaded directly into the indexBuffer.
The only difference between the OpenGL ES 1 code and the OpenGL ES 2/3 code is that OpenGL ES 2/3 requires that the shaders be attached to the program. Three lines of code compile each shader and attach it to the program.
Create the loadTexture() Method
Next, you need to create the loadTexture() method (see Listings 2-7 and 2-8). The loadTexture() method will take in an image identifier and then load the image into a stream. The stream will then be loaded as a texture into OpenGL ES. During the drawing process you will map this texture onto the vertices.
Listing 2-7. loadTexture() (OpenGL ES 1)
public class SBGSplash {

...

public SBGSplash() {
...

}

public void loadTexture(GL10 gl,int texture, Context context) {
InputStreamimagestream = context.getResources().openRawResource(texture);
      Bitmap bitmap = null;
android.graphics.Matrix flip = new android.graphics.Matrix();
flip.postScale(-1f, -1f);
try {

bitmap = BitmapFactory.decodeStream(imagestream);

}catch(Exception e){
//handle your exception here
}finally {
//Always clear and close
try {
imagestream.close();
imagestream = null;
} catch (IOException e) {
}
}

gl.glGenTextures(1, textures, 0);
gl.glBindTexture(GL10.GL_TEXTURE_2D, textures[0]);

gl.glTexParameterf(GL10.GL_TEXTURE_2D, GL10.GL_TEXTURE_MIN_FILTER, GL10.GL_NEAREST);
gl.glTexParameterf(GL10.GL_TEXTURE_2D, GL10.GL_TEXTURE_MAG_FILTER, GL10.GL_LINEAR);

GLUtils.texImage2D(GL10.GL_TEXTURE_2D, 0, bitmap, 0);

bitmap.recycle();
   }

}
Listing 2-8. loadTexture() (OpenGL ES 2/3)
public class SBGSplash {

...

public SBGSplash() {
...

}

public void loadTexture(int texture, Context context) {
InputStream imagestream = context.getResources().openRawResource(texture);
Bitmap bitmap = null;

android.graphics.Matrix flip = new android.graphics.Matrix();
flip.postScale(-1f, -1f);

try {

bitmap = BitmapFactory.decodeStream(imagestream);
imagestream.close();
imagestream = null;

}catch(Exception e){

//handle your exception here

}

GLES20.glGenTextures(1, textures, 0);
GLES20.glBindTexture(GLES20.GL_TEXTURE_2D, textures[0]);

GLES20.glTexParameterf(GLES20.GL_TEXTURE_2D, GLES20.GL_TEXTURE_MIN_FILTER, GLES20.GL_NEAREST);
GLES20.glTexParameterf(GLES20.GL_TEXTURE_2D, GLES20.GL_TEXTURE_MAG_FILTER, GLES20.GL_LINEAR);

GLES20.glTexParameterf(GLES20.GL_TEXTURE_2D, GLES20.GL_TEXTURE_WRAP_S, GLES20.GL_REPEAT);
GLES20.glTexParameterf(GLES20.GL_TEXTURE_2D, GLES20.GL_TEXTURE_WRAP_T, GLES20.GL_REPEAT);

GLUtils.texImage2D(GLES20.GL_TEXTURE_2D, 0, bitmap, 0);

bitmap.recycle();

   }

}
The first part of loadTexture() is pretty easy. It takes in the identifier and loads the resulting image into a bitmap stream. The texture that is passed into openRawResource() is the resource ID for an image in your res folder. You will pass this later in the solution. The stream is then closed. Also, because OpenGL ES displays images in a first in/last out byte order, by default images will appear upside down. Therefore, you use a Matrix to flip the image by calling postScale().
The second part of loadTexture(), however, is fairly heavy in OpenGL ES. The first line generates a texture pointer. This pointer is structured like a dictionary.
gl.glGenTextures(1, textures, 0);
...
GLES20.glGenTextures(1, textures, 0);
The first parameter is the number of texture names that you need generated. When it comes time to bind the textures to a set of vertices, you will call them out of OpenGL ES by name. Here, you are only loading one texture; therefore, you need only one texture name generated. The second parameter is the array of int that you created to hold the number for each texture. Again, there is only one value in this array right now. Finally, the last parameter holds the offset for the pointer into the array. Because your array is 0-based, the offset is 0.
The second line binds the texture into OpenGL ES.
gl.glBindTexture(GL10.GL_TEXTURE_2D, textures[0]);
...
GLES20.glBindTexture(GLES20.GL_TEXTURE_2D, textures[0]);
If you were to have two textures that you were loading together, you would have two each of these first two lines—one to load the first image and one to load the second.
The next two lines deal with how OpenGL is to map the texture onto the vertices. You want the mapping to take place quickly, but produce sharpened pixels.
gl.glTexParameterf(GL10.GL_TEXTURE_2D, GL10.GL_TEXTURE_MIN_FILTER, GL10.GL_NEAREST);
gl.glTexParameterf(GL10.GL_TEXTURE_2D, GL10.GL_TEXTURE_MAG_FILTER, GL10.GL_LINEAR);
...
GLES20.glTexParameterf(GLES20.GL_TEXTURE_2D, GLES20.GL_TEXTURE_MIN_FILTER, GLES20.GL_NEAREST);
GLES20.glTexParameterf(GLES20.GL_TEXTURE_2D, GLES20.GL_TEXTURE_MAG_FILTER, GLES20.GL_LINEAR);
Finally, in the last two lines of the loadTexture() method, you associate the bitmap input stream that you created with the number 1 texture. The bitmap stream is then recycled.
GLUtils.texImage2D(GL10.GL_TEXTURE_2D, 0, bitmap, 0);

bitmap.recycle();
...
GLUtils.texImage2D(GLES20.GL_TEXTURE_2D, 0, bitmap, 0);
bitmap.recycle();
Create the draw() Method
The last piece of code you need to write to complete your SBGSplash class is the method that will draw( ) the texture onto the vertices (Listings 2-9 and 2-10).
Listing 2-9. draw() (OpenGL ES 1)
...
public class SBGSplash {
...
public void draw(GL10 gl) {

gl.glBindTexture(GL10.GL_TEXTURE_2D, textures[0]);

gl.glFrontFace(GL10.GL_CCW);
gl.glEnable(GL10.GL_CULL_FACE);
gl.glCullFace(GL10.GL_BACK);

gl.glEnableClientState(GL10.GL_VERTEX_ARRAY);
gl.glEnableClientState(GL10.GL_TEXTURE_COORD_ARRAY);

gl.glVertexPointer(3, GL10.GL_FLOAT, 0, vertexBuffer);
gl.glTexCoordPointer(2, GL10.GL_FLOAT, 0, textureBuffer);

gl.glDrawElements(GL10.GL_TRIANGLES, indices.length, GL10.GL_UNSIGNED_BYTE, indexBuffer);

gl.glDisableClientState(GL10.GL_VERTEX_ARRAY);
gl.glDisableClientState(GL10.GL_TEXTURE_COORD_ARRAY);
gl.glDisable(GL10.GL_CULL_FACE);

}

public SBGSplash() {
...

}
public void loadTexture(GL10 gl,int texture, Context context) {
...
   }

}
Listing 2-10. draw() (OpenGL ES 2/3)
public class SBGSplash {
...
public void draw(GL10 gl) {
GLES20.glUseProgram(mProgram);

mPositionHandle = GLES20.glGetAttribLocation(mProgram, "vPosition");

GLES20.glEnableVertexAttribArray(mPositionHandle);

int vsTextureCoord = GLES20.glGetAttribLocation(mProgram, "TexCoordIn");

GLES20.glVertexAttribPointer(mPositionHandle, COORDS_PER_VERTEX,
GLES20.GL_FLOAT, false,
vertexStride, vertexBuffer);
GLES20.glVertexAttribPointer(vsTextureCoord, COORDS_PER_TEXTURE,
GLES20.GL_FLOAT, false,
textureStride, textureBuffer);
GLES20.glEnableVertexAttribArray(vsTextureCoord);
GLES20.glActiveTexture(GLES20.GL_TEXTURE0);
GLES20.glBindTexture(GLES20.GL_TEXTURE_2D, textures[0]);
int fsTexture = GLES20.glGetUniformLocation(mProgram, "TexCoordOut");
GLES20.glUniform1i(fsTexture, 0);

mMVPMatrixHandle = GLES20.glGetUniformLocation(mProgram, "uMVPMatrix");

GLES20.glUniformMatrix4fv(mMVPMatrixHandle, 1, false, mvpMatrix, 0);

GLES20.glDrawElements(GLES20.GL_TRIANGLES, drawOrder.length,
GLES20.GL_UNSIGNED_SHORT, drawListBuffer);

GLES20.glDisableVertexAttribArray(mPositionHandle);

}

public SBGSplash() {
...

}
public void loadTexture(GL10 gl,int texture, Context context) {
...
   }

}
The draw() method is going to be called every time you want to draw this image to the screen, as opposed to the loadTexture() method, which will only be called when you initialize the game.
This first line of this method binds the texture to your target. The texture is loaded up and ready to be used.
gl.glBindTexture(GL10.GL_TEXTURE_2D, textures[0]);
The next three lines in the draw() method tell OpenGL ES to enable culling and basically not deal with any vertices that are not on the front face. Because you are rendering the game in 2D orthogonal view, you don’t want OpenGL ES to spend precious processor time dealing with vertices that the player will never see. Right now, all of your vertices are front facing, but this is good code to have in there anyway.
gl.glFrontFace(GL10.GL_CCW);
gl.glEnable(GL10.GL_CULL_FACE);
gl.glCullFace(GL10.GL_BACK);
The next four lines enable the vertex and texture states, and then the vertices and texture buffers are loaded into OpenGL ES.
gl.glEnableClientState(GL10.GL_VERTEX_ARRAY);
gl.glEnableClientState(GL10.GL_TEXTURE_COORD_ARRAY);
gl.glVertexPointer(3, GL10.GL_FLOAT, 0, vertexBuffer);
gl.glTexCoordPointer(2, GL10.GL_FLOAT, 0, textureBuffer);
Finally, the texture is drawn onto the vertices, and the all of the states that were enabled are disabled.
gl.glDrawElements(GL10.GL_TRIANGLES, indices.length, GL10.GL_UNSIGNED_BYTE, indexBuffer);
gl.glDisableClientState(GL10.GL_VERTEX_ARRAY);
gl.glDisableClientState(GL10.GL_TEXTURE_COORD_ARRAY);
gl.glDisable(GL10.GL_CULL_FACE);
The SBGSplash class is now finished. All you need to do is create the supporting classes that will aid in displaying SBGSplash to the screen. This is done via the render.
Create the Renderer
Create a new class, SBGGameRenderer.
public class SBGGameRenderer{

}
Now you need to implement the GLSurfaceView’s Renderer.
importandroid.opengl.GLSurfaceView.Renderer;

public class SBGGameRenderer implements Renderer{

}
Be sure to add in the unimplemented methods.
Listing 2-11. SBGGameRenderer()
importjavax.microedition.khronos.egl.EGLConfig;
import javax.microedition.khronos.opengles.GL10;

importandroid.opengl.GLSurfaceView.Renderer;

public class SBGGameRenderer implements Renderer{

@Override
public void onDrawFrame(GL10 gl) {
//TODO Auto-generated method stub

}

@Override
public void onSurfaceChanged(GL10 gl, int width, int height) {

}

@Override
public void onSurfaceCreated(GL10 gl, EGLConfigconfig) {

}
}
The function of these methods should be fairly self-explanatory. The onSurfaceCreated() method is called when the GLSurface is created. The onSurfaceChanged() method is called when the size of the View has changed (including the initial load). Finally, the onDrawFrame() method is call when the Renderer draws a frame to the screen.
Let’s start coding them in the order that they are called. First up is the onSurfaceCreated() method.
The onSurfaceCreated() Method
In the onSurfaceCreated() method, you are going to initialize your OpenGL ES and load your textures, as shown in Listing 2-12.
Listing 2-12. onSurfaceCreated()
public class SBGGameRenderer implements Renderer{

private SBGSplashsplashImage = new SBGSplash();

@Override
public void onDrawFrame(GL10 gl) {
}
@Override
public void onSurfaceChanged(GL10 gl, int width, int height) {
}

@Override
public void onSurfaceCreated(GL10 gl, EGLConfigconfig) {
gl.glEnable(GL10.GL_TEXTURE_2D);
}
}
Notice that the onSurfaceCreated() method takes an instance of OpenGL ES (GL10 gl) as a parameter. This will get passed into the method by the GLSurfaceView when the Renderer is called. It is only used if you are using OpenGL ES 1; otherwise, it is ignored. You do not have to worry about creating an instance of GL10 for this process; it will be done for you automatically.
Next, you want to tell OpenGL ES to test the depth of all of the objects in your surface. This will need some explaining. Even though you are creating a 2D game, you will need to think in 3D terms.
Imagine that the OpenGL ES environment is a stage. Everything that you want to draw in your game is an actor on this stage. Now, imagine that you are filming the actors as they move around on the stage. The resulting movie is a 2D representation of what is happening on the stage. If one actor moves in front of another actor, the actor in the back will not be visible on the film. However, if you are watching these actors live in a theater, depending on where you are sitting, you might still be able to see the actor in the back.
This is the same idea as to how OpenGL ES is working under the hood. Even though you are making a 2D game, OpenGL ES is going to treat everything as if it were a 3D object in 3D space. In fact, one of the only differences to developing in 2D and developing in 3D in OpenGL ES is how you tell OpenGL ES to render the final scene. Therefore, you need to be mindful of where your objects are placed in the 3D space to make sure they render properly as a 2D game. By enabling OpenGL ES depth testing next (see Listing 2-13), you give OpenGL ES a means by which to test your textures and determine how they should be rendered.
Listing 2-13. Depth test
public class SBGBameRenderer implements Renderer{

private SBGSplashsplashImage = new SBGSplash();

@Override
public void onDrawFrame(GL10 gl) {
}
@Override
public void onSurfaceChanged(GL10 gl, int width, int height) {
}

@Override
public void onSurfaceCreated(GL10 gl, EGLConfigconfig) {
gl.glEnable(GL10.GL_TEXTURE_2D);
gl.glClearDepthf(1.0f);
gl.glEnable(GL10.GL_DEPTH_TEST);
gl.glDepthFunc(GL10.GL_LEQUAL);

}
}
The two last lines of code that you will add to this method concern blending. The two bold lines of code in Listing 2-14 will set OpenGL’s blending feature to create transparency.
Listing 2-14. Blending
import javax.microedition.khronos.egl.EGLConfig;
import javax.microedition.khronos.opengles.GL10;
import android.opengl.GLSurfaceView.Renderer;

public class SBGGameRenderer implements Renderer{

private SBGSplashsplashImage = new SBGSplash();

@Override
public void onDrawFrame(GL10 gl) {
}
@Override
public void onSurfaceChanged(GL10 gl, int width, int height) {
}

@Override
public void onSurfaceCreated(GL10 gl, EGLConfigconfig) {
gl.glEnable(GL10.GL_TEXTURE_2D);
gl.glClearDepthf(1.0f);
gl.glEnable(GL10.GL_DEPTH_TEST);
gl.glDepthFunc(GL10.GL_LEQUAL);

gl.glEnable(GL10.GL_BLEND);
gl.glBlendFunc(GL10.GL_ONE, GL10.GL_ONE);
}
}
The next thing you should do in the onSurfaceCreated() method is load your textures. Call SGBSplash’s loadTexture() in the onSurfaceChanged() method. Pass the loadTexture() method the resource identifier of the image you want to load. In Listing 2-15, I am using an image in the res/drawable folder named titlescreen.
Listing 2-15. onSurfaceCreated
public class SBGGameRenderer implements Renderer{
private SBGSplashsplashImage = new SBGSplash();

@Override
public void onDrawFrame(GL10 gl) {
}
@Override
public void onSurfaceChanged(GL10 gl, int width, int height) {
}

@Override
public void onSurfaceCreated(GL10 gl, EGLConfigconfig) {
gl.glEnable(GL10.GL_TEXTURE_2D);
gl.glClearDepthf(1.0f);
gl.glEnable(GL10.GL_DEPTH_TEST);
gl.glDepthFunc(GL10.GL_LEQUAL);

gl.glEnable(GL10.GL_BLEND);
gl.glBlendFunc(GL10.GL_ONE, GL10.GL_ONE);

splashImage.loadTexture(gl, R.drawable.titlescreen, context);
}
}
Notice that the loadTexture() method takes a context argument. Let’s modify the constructor for SBGGameRenderer to allow for the passing of the application’s context (see Listing 2-16). When the renderer is initiated, the context can be passed into the constructor and used throughout.
Listing 2-16. Modified constructor
public class SBGGameRenderer implements Renderer{

private SBGSplashsplashImage = new SBGSplash();

private Context context;

public SBGGameRenderer(Context appContext){
context = appContext;
}

@Override
public void onDrawFrame(GL10 gl) {
}
@Override
public void onSurfaceChanged(GL10 gl, int width, int height) {
}

@Override
public void onSurfaceCreated(GL10 gl, EGLConfigconfig) {
gl.glEnable(GL10.GL_TEXTURE_2D);
gl.glClearDepthf(1.0f);
gl.glEnable(GL10.GL_DEPTH_TEST);
gl.glDepthFunc(GL10.GL_LEQUAL);

gl.glEnable(GL10.GL_BLEND);
gl.glBlendFunc(GL10.GL_ONE, GL10.GL_ONE);

splashImage.loadTexture(gl, R.drawable.titlescreen, context);
}
}
The onSurfaceCreated() method for using OpenGL ES 2/3 is a bit lighter on code.
@Override
public void onSurfaceCreated(GL10 unused, EGLConfig config) {

GLES20.glClearColor(0.0f, 0.0f, 0.0f, 1.0f);

}
In OpenGL ES 2/3, the background color is being cleared out. This is really an optional step, as the entire screen area should be filled with game graphics anyway.
The onSurfacedChanged() Method
The onSurfacedChanged() method is going to handle all of the setup that is needed to display your images. Every time the screen is resized, the orientation is changed, and on the initial startup, this method is called.
You need to setup the glViewport() and then call the rendering routine to complete the onSurfacedChanged() method.
The glViewport() method takes four parameters. The first two parameters are the x and y coordinates of the lower left-hand corner of the screen. Typically, these values will be (0,0) because the lower left corner of the screen will be where the x and y axes meet; therefore, it is the 0 coordinate of each. The next two parameters of the glViewport() method are the width and the height of your viewport. Unless you want your game to be smaller than the device’s screen, these should be set to the width and the height of the device. See Listing 2-17.
Listing 2-17. glViewport
public class SBGGameRenderer implements Renderer{

private SBGSplashsplashImage = new SBGSplash();

private Context context;

public SBGGameRenderer(Context appContext){
context = appContext;
}

@Override
public void onDrawFrame(GL10 gl) {
}
@Override
public void onSurfaceChanged(GL10 gl, int width, int height) {

gl.glViewport(0, 0, width,height);
}

@Override
public void onSurfaceCreated(GL10 gl, EGLConfigconfig) {

...

}
}
The calling GLSurfaceView will send in a width and height parameter to the onSurfacedChanged() method. You can simply set the width and the height of the glViewport() to the corresponding width and height sent in by the GLSurfaceView. See Listing 2-18.
Listing 2-18. width and height
public class SBGGameRenderer implements Renderer{

private SBGSplashsplashImage = new SBGSplash();

private Context context;

public SBGGameRenderer(Context appContext){
context = appContext;
}

@Override
public void onDrawFrame(GL10 gl) {
}
@Override
public void onSurfaceChanged(GL10 unused, int width, int height) {
GLES20.glViewport(0, 0, width, height);
float ratio = (float) width / height;
Matrix.frustumM(mProjMatrix, 0, -ratio, ratio, -1, 1, 3, 7);
}
@Override
public void onSurfaceCreated(GL10 gl, EGLConfigconfig) {

...

}
}
Note The width and height sent in by the GLSurfaceView will represent the width and height of the device minus the notification bar at the top of the screen.
If the glViewport() method represents the lens through which your scene is filmed, then the glOrthof() method is the image processor. With the viewport set, all you have to do now is use glOrth0f() to render the surface.
To access glOrthof(), you need to put OpenGL ES 1 into projection matrix mode. OpenGL ES 1 has different matrix modes that let you access different parts of the stack. Throughout this book, you will access most, if not all, of them. This is the first one you will work with. Projection matrix mode gives you access to the way in which your scene is rendered.
To access projection matrix mode, you need to set the glMatrixMode() to GL_PROJECTION, as shown in Listing 2-19.
Listing 2-19. glMatrixMode
public class SBGGameRenderer implements Renderer{

private SBGSplashsplashImage = new SBGSplash();

private Context context;

public SBGGameRenderer(Context appContext){
context = appContext;
}

@Override
public void onDrawFrame(GL10 gl) {
}
@Override
public void onSurfaceChanged(GL10 gl, int width, int height) {

gl.glViewport(0, 0, width, height);
gl.glMatrixMode(GL10.GL_PROJECTION);

}

@Override
public void onSurfaceCreated(GL10 gl, EGLConfigconfig) {

...

}
}
Now that OpenGL ES is in projection matrix mode, you need to load the current identity (see Listing 2-20). Think of the identity as the default state of OpenGL ES 1.
Listing 2-20. loading the identity
public class SBGGameRenderer implements Renderer{

private SBGSplashsplashImage = new SBGSplash();

private Context context;

public SBGGameRenderer(Context appContext){
context = appContext;
}

@Override
public void onDrawFrame(GL10 gl) {
}
@Override
public void onSurfaceChanged(GL10 gl, int width, int height) {

gl.glViewport(0, 0, width, height);

gl.glMatrixMode(GL10.GL_PROJECTION);
gl.glLoadIdentity();

}

@Override
public void onSurfaceCreated(GL10 gl, EGLConfigconfig) {

...

}
}
Now that the identity is loaded, you can set up glOrthof()(see Listing 2-21).
Listing 2-21. glOrthof
public class SBGGameRenderer implements Renderer{

private SBGSplashsplashImage = new SBGSplash();

private Context context;

public SBGGameRenderer(Context appContext){
context = appContext;
}

@Override
public void onDrawFrame(GL10 gl) {
}
@Override

public void onSurfaceChanged(GL10 gl, int width, int height) {

gl.glViewport(0, 0, width,height);

gl.glMatrixMode(GL10.GL_PROJECTION);
gl.glLoadIdentity();
gl.glOrthof(0f, 1f, 0f, 1f, -1f, 1f);

}

@Override
public void onSurfaceCreated(GL10 gl, EGLConfigconfig) {

...

}
}
The glOrthof() method is going to set up an orthogonal, two-dimensional rendering of your scene. This call takes six parameters, each of which defines a clipping plane.
The clipping planes indicate to the renderer where to stop rendering. In other words, any images that fall outside of the clipping planes will not be picked up by glOrthof(). The six clipping planes are the left, right, bottom, top, near, and far. These represent points on the x, y, and z axes.
This method will contain calls to methods that you have already used in this solution, so it should be easy to understand. However, it will also contain a call to the draw() method of the SBGSplash class. See Listing 2-22.
Listing 2-22. onDrawFrame
public void onDrawFrame(GL10 unused) {
GLES20.glClear(GLES20.GL_COLOR_BUFFER_BIT);
Matrix.setLookAtM(mVMatrix, 0, 0, 0, -3, 0f, 0f, 0f, 0f, 1.0f, 0.0f);
Matrix.multiplyMM(mMVPMatrix, 0, mProjMatrix, 0, mVMatrix, 0);
}
The final step in this solution is to set up the GLSurfaceView and call it from the main activity.
Create the GLSurfaceView
Create a new class called SBGGameView, as shown in Listing 2-23.
Listing 2-23. SBGGameView Class
importandroid.content.Context;
importandroid.opengl.GLSurfaceView;

public class SBGGameView extends GLSurfaceView {

public SBGGameView(Context context) {
super(context);

setRenderer(new SBGGameRenderer(context));

}
}
Notice that the only function of the GLSurfaceView is to set the Renderer to an instance of the Renderer that you created. Now you can set the GLSurfaceView as the main content view of your activity, as demonstrated in Listing 2-24.
Listing 2-24. Setting the GLSurfaceView
import com.jfdimarzio.superbanditguy.SBGGameView;
import android.os.Bundle;
import android.app.Activity;

public class MainActivity extends Activity {

private SBGGameViewgameView;

@Override
protected void onCreate(Bundle savedInstanceState) {
super.onCreate(savedInstanceState);
gameView = new SBGGameView(this);
setContentView(gameView);
}
}
You should now be able to compile and run your activity. The image should appear as shown in Figure 2-6.
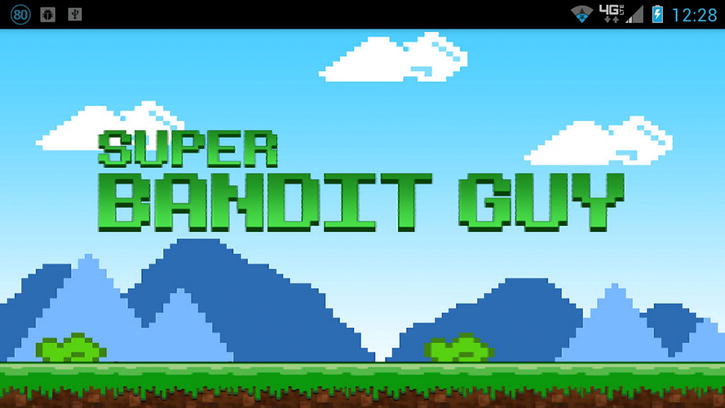
Figure 2-6. Splash screen displayed using OpenGL ES
Now let’s make sure the image shown using the emulator works the same way in the device.
Problem 2
OpenGL ES only displays a white image when using an Android device, but works fine when you are using the emulator.
Solution 2
Make sure the image resolution is a power of two.
How It Works
This is a fairly common problem, and luckily one that is easy to solve.
To avoid this white box, you must ensure that the resolutions of your images are a derivative of 2. The image for the splash (Figure 2-6) is 512 x 512. However I have found that 128 x 128 and 64 x 64 work as well.
Editing your images and resaving them in the proper resolution will fix this problem quickly.
2.3 Storing Images for Different Screen Resolutions
Problem
You have different images for different screen resolutions in your game.
Solution
Use the multiple drawable- folders in the res folder to store the correct resolution images.
How It Works
Android, as a platform, can support a myriad of different device screen resolutions. If you are creating different images for use on different devices screens, you will need to store those images in the correct place.
Table 2-1 offers some guidelines for where to store images, based on the intended device’s screen resolution.
Table 2-1. Recommended Image Storage Locations
Folder |
Resolution |
|---|---|
| res/drawable-ldpi | Up to 120 dpi |
| res/drawable-mdpi | From 120 to 160 dpi |
| res/drawable-hdpi | From 160 to 240 dpi |
| res/drawable-xhdpi | From 240 to 320 dpi |
| res/drawable-xxhdi | Over 320 dpi |
| res/drawable-nodpi | Any (non-specified) dpi |