
Building a Level Using Tiles
In this chapter, you will be presented with two solutions for building a level out of tiles. Many 2D games (specifically, side-scrolling platform and top-down adventure/RTS-style games), implement levels that are built with repeatable tiles.
If you have had trouble building levels from tiles, this chapter should help. The first recipe will look at loading up the tiles from a sprite sheet and creating a level map. The second recipe will use the sprite sheet and the level map to then create a full level from the tiles.
10.1 Load Tiles from a Sprite Sheet
Problem
The tiles used to create a level are stored in a sprite sheet, and there is no way to determine which tile to use in which position.
Solution
Use a texture loader to map the tile texture to a set of vertices, and use a level map to dictate which tiles to place where.
How It Works
This solution requires the use of two classes. The first class holds the information for creating the vertices and indexes, and a method for drawing the tiles. The second class holds the texture information.
In Chapter 6, solutions were provided for loading sprite sheets. These solutions separated the texture loading method from the object class to allow for multiple sprite sheets to be loaded and held in one place. This solution will expand on that texture class to hold the new tile sprite sheet. As always, start by copying your sprite sheet into the project. The sprite sheet for this example, shown in Figure 10-1, has two tiles in it. One tile is a ground tile, with some grass and a bit of sky; and the second tile is a sky tile. Keep in mind, yours could have hundreds.
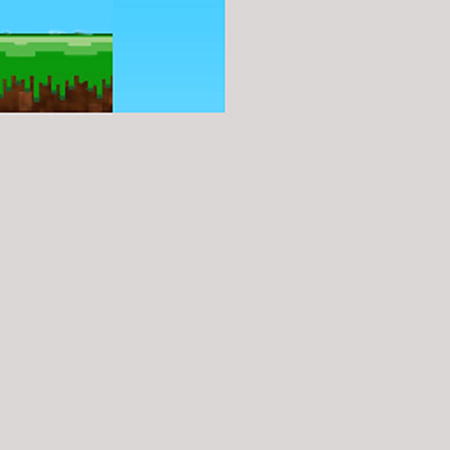
Figure 10-1. A sprite sheet with two tiles
With the image added to the project, create a new class, SBGTile(). The SBGTile() class will set up your vertices and indexes (see Listings 10-1 and 10-2). The structure of the class should look very familiar, as it has now been used in several other solutions; however, the bolded code has been changed to allow for the loading of multiple sprite sheets.
Listing 10-1. SBGTile()(OpenGL ES 1)
public class SBGTile {

private FloatBuffer vertexBuffer;
private FloatBuffer textureBuffer;
private ByteBuffer indexBuffer;

private float vertices[] = {
0.0f, 0.0f, 0.0f,
1.0f, 0.0f, 0.0f,
1.0f, 1.0f, 0.0f,
0.0f, 1.0f, 0.0f,
};

private float texture[] = {
0.0f, 0.0f,
.25f, 0f,
.25f, .25f,
0f, .25f,
};

private byte indices[] = {
0,1,2,
0,2,3,
};

public SBGTile() {
ByteBufferbyteBuf = ByteBuffer.allocateDirect(vertices.length * 4);
byteBuf.order(ByteOrder.nativeOrder());
vertexBuffer = byteBuf.asFloatBuffer();
vertexBuffer.put(vertices);
vertexBuffer.position(0);

byteBuf = ByteBuffer.allocateDirect(texture.length * 4);
byteBuf.order(ByteOrder.nativeOrder());
textureBuffer = byteBuf.asFloatBuffer();
textureBuffer.put(texture);
textureBuffer.position(0);

indexBuffer = ByteBuffer.allocateDirect(indices.length);
indexBuffer.put(indices);
indexBuffer.position(0);
}

public void draw(GL10gl,int[] spriteSheet,int currentSheet) {
gl.glBindTexture(GL10.GL_TEXTURE_2D, spriteSheet[currentSheet - 1]);

gl.glFrontFace(GL10.GL_CCW);
gl.glEnable(GL10.GL_CULL_FACE);
gl.glCullFace(GL10.GL_BACK);

gl.glEnableClientState(GL10.GL_VERTEX_ARRAY);
gl.glEnableClientState(GL10.GL_TEXTURE_COORD_ARRAY);

gl.glVertexPointer(3, GL10.GL_FLOAT, 0, vertexBuffer);
gl.glTexCoordPointer(2, GL10.GL_FLOAT, 0, textureBuffer);

gl.glDrawElements(GL10.GL_TRIANGLES, indices.length, GL10.GL_UNSIGNED_BYTE, indexBuffer);

gl.glDisableClientState(GL10.GL_VERTEX_ARRAY);
gl.glDisableClientState(GL10.GL_TEXTURE_COORD_ARRAY);
gl.glDisable(GL10.GL_CULL_FACE);
}

}
Listing 10-2. SBGTile()(OpenGL ES 2/3)
class SBGBackground{
private final String vertexShaderCode =
"uniform mat4 uMVPMatrix;" +
"attribute vec4 vPosition;" +
"attribute vec2 TexCoordIn;" +
"varying vec2 TexCoordOut;" +
"void main() {" +
"  gl_Position = uMVPMatrix * vPosition;" +
"  TexCoordOut = TexCoordIn;" +
"}";
private final String fragmentShaderCode =
"precision mediump float;" +
"uniform vec4 vColor;" +
"uniform sampler2D TexCoordIn;" +
"uniform float posX;" +
"uniform float posY;" +
"varying vec2 TexCoordOut;" +
"void main() {" +
" gl_FragColor = texture2D(TexCoordIn, vec2(TexCoordOut.x+
posX,TexCoordOut.y + posY));"+
"}";
private float texture[] = {
0f, 0f,
.25f, 0f,
.25f, .25f,
0f, .25f,
};

private int[] textures = new int[1];
private final FloatBuffer vertexBuffer;
private final ShortBuffer drawListBuffer;
private final FloatBuffer textureBuffer;
private final int mProgram;
private int mPositionHandle;
private int mMVPMatrixHandle;

static final int COORDS_PER_VERTEX = 3;
static final int COORDS_PER_TEXTURE = 2;
static float squareCoords[] = { -1f,  1f, 0.0f,
-1f, -1f, 0.0f,
1f, -1f, 0.0f,
1f,  1f, 0.0f };

private final short drawOrder[] = { 0, 1, 2, 0, 2, 3 };

private final int vertexStride = COORDS_PER_VERTEX * 4;
public static int textureStride = COORDS_PER_TEXTURE * 4;

public SBGBackground() {
ByteBuffer bb = ByteBuffer.allocateDirect(

bb.order(ByteOrder.nativeOrder());
vertexBuffer = bb.asFloatBuffer();
vertexBuffer.put(squareCoords);
vertexBuffer.position(0);

bb = ByteBuffer.allocateDirect(texture.length * 4);
bb.order(ByteOrder.nativeOrder());
textureBuffer = bb.asFloatBuffer();
textureBuffer.put(texture);
textureBuffer.position(0);

ByteBuffer dlb = ByteBuffer.allocateDirect(
dlb.order(ByteOrder.nativeOrder());
drawListBuffer = dlb.asShortBuffer();
drawListBuffer.put(drawOrder);
drawListBuffer.position(0);

int vertexShader = SBGGameRenderer.loadShader(
GLES20.GL_VERTEX_SHADER,vertexShaderCode);
int fragmentShader = SBGGameRenderer.loadShader(
GLES20.GL_FRAGMENT_SHADER,fragmentShaderCode);

mProgram = GLES20.glCreateProgram();
GLES20.glAttachShader(mProgram, vertexShader);
GLES20.glAttachShader(mProgram, fragmentShader);
GLES20.glLinkProgram(mProgram);
}

public void draw(float[] mvpMatrix, float posX, float posY,
int[] spriteSheet, int currentSheet)   {
GLES20.glUseProgram(mProgram);
GLES20.glBindTexture(GLES20.GL_TEXTURE_2D, spriteSheet[currentSheet - 1]);
mPositionHandle = GLES20.glGetAttribLocation(mProgram, "vPosition");
GLES20.glEnableVertexAttribArray(mPositionHandle);
int vsTextureCoord = GLES20.glGetAttribLocation(mProgram, "TexCoordIn");
GLES20.glVertexAttribPointer(mPositionHandle, COORDS_PER_VERTEX,
GLES20.GL_FLOAT, false,
vertexStride, vertexBuffer);
GLES20.glVertexAttribPointer(vsTextureCoord, COORDS_PER_TEXTURE,
GLES20.GL_FLOAT, false,
textureStride, textureBuffer);
GLES20.glEnableVertexAttribArray(vsTextureCoord);
GLES20.glActiveTexture(GLES20.GL_TEXTURE0);
int fsTexture = GLES20.glGetUniformLocation(mProgram, "TexCoordOut");
int fsPosX = GLES20.glGetUniformLocation(mProgram, "posX");
int fsPosY = GLES20.glGetUniformLocation(mProgram, "posY");
GLES20.glUniform1i(fsTexture, 0);
GLES20.glUniform1f(fsPosX, posX);
GLES20.glUniform1f(fsPosY, posY);
mMVPMatrixHandle = GLES20.glGetUniformLocation(mProgram, "uMVPMatrix");

GLES20.glUniformMatrix4fv(mMVPMatrixHandle, 1, false, mvpMatrix, 0);

GLES20.glDrawElements(GLES20.GL_TRIANGLES, drawOrder.length,
GLES20.GL_UNSIGNED_SHORT, drawListBuffer);

GLES20.glDisableVertexAttribArray(mPositionHandle);
}
}
Pay particular attention to the bolded lines. These lines take in an int array representing the multiple sprite sheet textures, and an int that indicates which sprite sheet to use for the specific draw operation.
Now you need a class to handle the loading of the multiple sprite sheets. Create a new class named SBGTextures(), as shown in Listings 10-3 and 10-4.
Listing 10-3. SBGTextures()(OpenGL ES 1)
public class SBGTextures {

private int[] textures = new int[2];

public SBGTextures(GL10gl){

gl.glGenTextures(2, textures, 0);

}
public int[] loadTexture(GL10gl,int texture, Context context,int textureNumber) {
InputStream imagestream = context.getResources().openRawResource(texture);
Bitmap bitmap = null;
Bitmap temp = null;

Matrix flip = new Matrix();
flip.postScale(-1f, -1f);

try {

temp = BitmapFactory.decodeStream(imagestream);
bitmap = Bitmap.createBitmap(temp, 0, 0, temp.getWidth(), temp.getHeight(), flip, true);
}catch(Exception e){

}finally {
//Always clear and close
try {
imagestream.close();
imagestream = null;
} catch (IOException e) {
}
}

gl.glBindTexture(GL10.GL_TEXTURE_2D, textures[textureNumber - 1]);

gl.glTexParameterf(GL10.GL_TEXTURE_2D, GL10.GL_TEXTURE_MIN_FILTER, GL10.GL_NEAREST);
gl.glTexParameterf(GL10.GL_TEXTURE_2D, GL10.GL_TEXTURE_MAG_FILTER, GL10.GL_LINEAR);

gl.glTexParameterf(GL10.GL_TEXTURE_2D, GL10.GL_TEXTURE_WRAP_S, GL10.GL_CLAMP_TO_EDGE);
gl.glTexParameterf(GL10.GL_TEXTURE_2D, GL10.GL_TEXTURE_WRAP_T, GL10.GL_CLAMP_TO_EDGE);

GLUtils.texImage2D(GL10.GL_TEXTURE_2D, 0, bitmap, 0);

bitmap.recycle();

return textures;
}
}
Listing 10-4. SBGTextures()(OpenGL ES 2/3)
public class SBGTextures {

private int[] textures = new int[2];

public SBGTextures(){
}

public void loadTexture(int texture, Context context, int textureNumber) {
InputStream imagestream = context.getResources().openRawResource(texture);
Bitmap bitmap = null;

android.graphics.Matrix flip = new android.graphics.Matrix();
flip.postScale(-1f, -1f);

try {

bitmap = BitmapFactory.decodeStream(imagestream);

}catch(Exception e){
//Handle your exceptions here
}finally {
try {
imagestream.close();
imagestream = null;
} catch (IOException e) {
//Handle your exceptions here
}
}

GLES20.glGenTextures(2, textures, 0);
GLES20.glBindTexture(GLES20.GL_TEXTURE_2D, textures[textureNumber - 1]);

GLES20.glTexParameterf(GLES20.GL_TEXTURE_2D, GLES20.GL_TEXTURE_MIN_FILTER, GLES20.GL_NEAREST);
GLES20.glTexParameterf(GLES20.GL_TEXTURE_2D, GLES20.GL_TEXTURE_MAG_FILTER, GLES20.GL_LINEAR);

GLES20.glTexParameterf(GLES20.GL_TEXTURE_2D, GLES20.GL_TEXTURE_WRAP_S, GLES20.GL_REPEAT);
GLES20.glTexParameterf(GLES20.GL_TEXTURE_2D, GLES20.GL_TEXTURE_WRAP_T, GLES20.GL_REPEAT);

GLUtils.texImage2D(GLES20.GL_TEXTURE_2D, 0, bitmap, 0);

bitmap.recycle();
}
}
Again, pay attention to the bolded line in each listing. The int array used here means that you can expand the number of separate sprite sheets that you can hold, as you need to.
Instantiate the required classes, and create a sprite sheet array, in your Renderer.
private SBGTile tiles = new SBGTile();
private SBGTextures textureloader;
private int[] spriteSheets = new int[2];
Then, in the onSurfaceCreated() method of the Renderer, set the textureloader, and use it to load the tiles sprite sheet.
textureloader = new SBGTextures(gl);
spriteSheets = textureloader.loadTexture(gl, R.drawable.tiles, context, 1);
Now the tiles (as a texture) are ready to use. But how does the game know where to put the tiles? For this, you need to create a level map.
A level map is a representation of where the game should place each tile. The map will be a two-dimensional array of ints.
The map is built like a matrix of int values. Each int value represents a specific tile. The example in this solution has only two different tiles; therefore, the level map would be made of only 0s and 1s. The 0s would represent the ground tile, and the 1s would represent the sky tiles.
Creating these level maps as two-dimensional arrays is a quick and easy way for storing the architecture of many levels. Here is an example of the two-dimensional array level map for this solution.
int map[][] = {
{0,0,0,0,0,0,0,0,0,0},
{1,1,1,1,1,1,1,1,1,1},
{1,1,1,1,1,1,1,1,1,1},
{1,1,1,1,1,1,1,1,1,1},
{1,1,1,1,1,1,1,1,1,1},
{1,1,1,1,1,1,1,1,1,1},
{1,1,1,1,1,1,1,1,1,1},
{1,1,1,1,1,1,1,1,1,1},
{1,1,1,1,1,1,1,1,1,1},
{1,1,1,1,1,1,1,1,1,1},
};
Here we have created a 10x10array of 0s and 1s to represent where the tiles should be placed on the screen. In the next solution, you will write a tiles engine that will read this array and actually place the tiles on the screen in the correct places.
10.2 Create a Level from Tiles
Solution
Create a tile engine that reads in the array and writes out tiles in the desired locations.
How It Works
This solution takes you through building a tile engine. A tile engine reads in a level map array, one dimension at a time, and then draws tiles based on the value in the array.
In the previous solution, we created an array of only two values, 0 and 1. These values correspond to the two tiles in the sprite sheet. Keep in mind that you could easily have many more tiles, giving you a much more elaborate-looking level.
Tip If you use more tiles, and thus have more ints in your array, the only change you will have to make to this tile engine is to add more cases to the switch...case statement.
The first step is to create a drawTiles() method in your Renderer.
For OpenGL ES 1:
private void drawtiles(GL10 gl, int[][] map){

}
For OpenGL ES 2/3:
private void drawtiles(int[][] map){

}
The drawTiles() method will take in your two-dimensional array map and loop through it. However, before you can loop through the array, you need to set up two variables.
The purpose of these variables will be to translate the model matrix when you are setting the tiles in place. The concept here is that you read in the first element of the map array, then set and draw the corresponding tile. Then you have to translate the model matrix to the next position on the screen in order to place the next tile.
float tileLocY = 0f;
float tileLocX = 0f;
Now, create a nested for loop that will iterate the two dimensions of the map array.
for(int x=0; x<10; x++){
for(int y=0; y<10; y++){

}
}
The first order of business, if you are using OpenGL ES 1, is to scale and translate the model matrix, then set up the texture matrix.
for(int x=0; x<10; x++){
for(int y=0; y<10; y++){

gl.glMatrixMode(GL10.GL_MODELVIEW);
gl.glLoadIdentity();
gl.glPushMatrix();
gl.glScalef(.20f, .20f, 1f);
gl.glTranslatef(tileLocY, tileLocX, 0f);

gl.glMatrixMode(GL10.GL_TEXTURE);
gl.glLoadIdentity();
}
}
Notice in the bolded code that the model matrix is being translated by the tileLocY and tileLocX values that were set earlier. As the loop progress, these variables will be incremented so that the next tile will be placed in the correct location.
The next step is to set up a simple switch...case statement to read the current element of the map array.
for(int x=0; x<10; x++){
for(int y=0; y<10; y++){

gl.glMatrixMode(GL10.GL_MODELVIEW);
gl.glLoadIdentity();
gl.glPushMatrix();
gl.glScalef(.20f, .20f, 1f);
gl.glTranslatef(tileLocY, tileLocX, 0f);

gl.glMatrixMode(GL10.GL_TEXTURE);
gl.glLoadIdentity();

switch(map[x][y]){
case 1:
break;
case 0:
break;
}
}
}
Because, at this point, the matrix mode is already set to texture, the only thing you have to do in the switch...case statement is translate the sprite sheet to the correct tile image.
switch(map[x][y]){
case 1:
gl.glTranslatef(.75f,.75f, 0f);
break;
case 0:
gl.glTranslatef(.75f,1f, 0f);
break;
}
Tip For more information about working with sprite sheets, see Chapter 6, “Loading a Sprite Sheet.”
The tile is in place, and the texture is set to the correct image. Now draw the tile and increment the tileLocY variable to move to the next position.
switch(map[x][y]){
case 1:
gl.glTranslatef(.75f,.75f, 0f);
break;
case 0:
gl.glTranslatef(.75f,1f, 0f);
break;
}
tiles.draw(gl, spriteSheets, SBG_TILE_PTR);
tileLocY += .50;
The remainder of the nested loops pop the matrix on each new row, and the advance the tileLocX variable as needed.
If you are using OpenGL ES 2/3, the concept remains the same, but the process is slightly different. You still need to loop through each value of the map, and use a switch statement to act upon each case. The difference is that rather than translate the matrix, as in OpenGL ES 1, you can simply pass the location of each tile to the drawtiles() method. This is the same process that you use to work with a sprite sheet (see Chapter 6 for a more in-depth discussion of sprite sheets). Listing 10-5 shows what the completed method should look like. The completed OpenGL ES 2/3 version of drawtiles() is shown in Listing 10-6.
Listing 10-5. drawtiles()(OpenGL ES 1)
private void drawtiles(GL10gl){
float tileLocY = 0f;
float tileLocX = 0f;
for(int x=0; x<10; x++){
for(int y=0; y<10; y++){

gl.glMatrixMode(GL10.GL_MODELVIEW);
gl.glLoadIdentity();
gl.glPushMatrix();
gl.glScalef(.20f, .20f, 1f);
gl.glTranslatef(tileLocY, tileLocX, 0f);

gl.glMatrixMode(GL10.GL_TEXTURE);
gl.glLoadIdentity();

switch(map[x][y]){
case 1:
gl.glTranslatef(.75f,.75f, 0f);
break;
case 0:
gl.glTranslatef(.75f,1f, 0f);
break;
}
tiles.draw(gl, spriteSheets, SBG_TILE_PTR);
tileLocY += .50;
}
gl.glPopMatrix();
gl.glLoadIdentity();
tileLocY = 0f;
tileLocX += .50;
}
}
Listing 10-6. drawtiles()(OpenGL ES 2/3)
private void drawtiles(){
float tileLocY = 0f;
float tileLocX = 0f;
Matrix.translateM(mTMatrix, 0, tileLocX, tileLocT, 0);
Matrix.multiplyMM(mMVPMatrix, 0, mTMatrix, 0, mMVPMatrix, 0) ;
for(int x=0; x<10; x++){
for(int y=0; y<10; y++){

switch(map[x][y]){
case 1:
tiles.draw(mMPVMatrix, .75f, .75, spriteSheets, SBG_TILE_PTR);
break;
case 0:
tiles.draw(mMPVMatrix, .75f, .75, spriteSheets, SBG_TILE_PTR);
break;
}

tileLocY += .50;
}
tileLocY = 0f;
tileLocX += .50;
}
}
If you are using OpenGL ES 2/3, be sure to set up a new translation matrix (mTMatrix in Listing 10-6) in your Renderer. The job of the translation matrix is to move the location of the tile. It is the OpenGL ES 2/3 equivalent of glTranslatef(). The code that follows shows the translation matrix.
public class SBGGameRenderer implements GLSurfaceView.Renderer {
...
private final float[] mTMatrix = new float[16];
...
@Override
public void onDrawFrame(GL10 unused) {
GLES20.glClear(GLES20.GL_COLOR_BUFFER_BIT);
Matrix.setLookAtM(mVMatrix, 0, 0, 0, -3, 0f, 0f, 0f, 0f, 1.0f, 0.0f);
Matrix.multiplyMM(mMVPMatrix, 0, mProjMatrix, 0, mVMatrix, 0);
drawtiles();

...

}
}
The level produced by this map array and sprite sheet combination is shown in Figure 10-2.
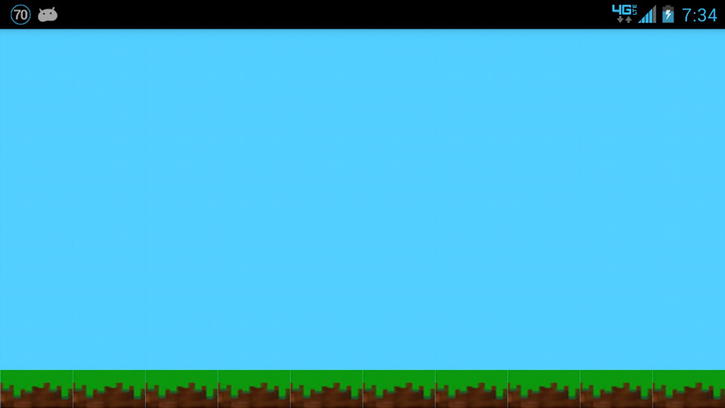
Figure 10-2. A simple level built with a level map and tiles
Remember, to utilize more tiles, simply expand the scope of your switch...case statement.