
Chapter 10: Object-Oriented Programming
In this chapter, we will discover that in Java, classes are fundamental to just about everything. We will also begin to understand why the software engineers at Sun Microsystems back in the early 1990s made Java the way they did.
We have already talked about reusing other people's code, specifically the Android API, but in this chapter, we will really get to grips with how this works and learn about object-oriented programming and how to use it.
In summary, we will cover the following topics:
- What object-oriented programming is, including encapsulation, inheritance, and polymorphism
- Writing and using our first class in an app
Technical requirements
You can find the code files present in this chapter on GitHub at https://github.com/PacktPublishing/Android-Programming-for-Beginners-Third-Edition/tree/main/chapter%2010.
Important memory management warning
I'm referring to our brains' memories for a change. If you tried to memorize this chapter (or the next), you would have to make a lot of room in your brain and you would probably forget something really important – like going to work or thanking the author for telling you not to try and memorize this stuff.
A good goal will be to try and just-about get it. This way, your understanding will become more rounded. You can then refer to this chapter (or the next) for a refresher when needed.
Tip
It doesn't matter if you don't completely understand everything in this chapter straight away! Keep on reading and make sure to complete all the apps.
Object-oriented programming
In Chapter 1, Beginning Android and Java, we mentioned that Java was an object-oriented language. An object-oriented language requires us to use object-oriented programming (OOP). It isn't an optional extra like a racing spoiler on a car or pulsating LEDs in a gaming PC. It's part of Java and therefore Android as well.
Let's find out a little bit more.
What is OOP exactly?
OOP is a way of programming that involves breaking our requirements down into chunks that are more manageable than the whole.
Each chunk is self-contained yet potentially reusable by other programs, while working together as a whole with the other chunks.
These chunks are what we refer to as objects. When we plan/code an object, we do so with a class. A class can be thought of as the blueprint of an object.
We implement an object of a class. This is called an instance of a class. Think about a house blueprint. You can't live in it, but you can build a house from it; you build an instance of it. Often when we design classes for our apps, we write them to represent real-world things.
However, OOP is more than this. It is also a way of doing things – a methodology that defines best practices.
The three core principles of OOP are encapsulation, polymorphism, and inheritance. This might sound complex but, when taken a step at a time, is reasonably straightforward.
Encapsulation
Encapsulation means keeping the internal workings of your code safe from interference from the code that uses it, by allowing only the variables and methods you choose to be accessed.
This means your code can always be updated, extended, or improved without affecting the programs that use it, as long as the exposed parts are still accessed in the same way.
Remember this line of code from Chapter 1, Beginning Android and Java?
locationManager.getLastKnownLocation(LocationManager.GPS_PROVIDER)
With proper encapsulation, it doesn't matter if the satellite company or the Android API team needs to update the way their code works. Provided the getLastKnownLocation method signature remains the same, we don't have to worry about what goes on inside. Our code written before the update will still work after the update.
If the manufacturer of a car gets rid of the wheels and makes it an electrically powered hovercar, as long as it still has a steering wheel, accelerator, and brake pedal, driving it should not be too challenging.
Important Note
When we use the classes of the Android API, we are doing so in the way the Android developers designed their classes to allow us to.
Polymorphism
Polymorphism allows us to write code that is less dependent on the types we are trying to manipulate, making our code clearer and more efficient. Polymorphism means different forms. If the objects that we code can be more than one type of thing, then we can take advantage of this. Some examples in the next chapter will make this clear, and the analogy coming next will give you a real-world perspective.
If we have a car factory that can make vans and small trucks just by changing the instructions given to the robots and the parts that go onto the production line, then the factory is using polymorphism.
Wouldn't it be useful if we could write code that could handle different types of data without starting again? We will see some examples of this in Chapter 11, More Object-Oriented Programming.
Inheritance
Just like it sounds, inheritance means we can harness all the features and benefits of other peoples' classes, including the encapsulation and polymorphism, while further refining their code specifically to our situation. Actually, we have done this already, every time we have used the extends keyword:
public class MainActivity extends AppCompatActivity {
The AppCompatActivity class itself inherits from Activity. So, we inherited from Activity every time we created a new Android project. We can go further than this and see how it is useful.
Imagine if the strongest man in the world gets together with the smartest woman in the world. There is a good chance that their children will have serious benefits from gene inheritance. Inheritance in Java lets us do the same thing with another person's code and our own, creating a class more specific to our needs.
Why do it like this?
When written properly, all this OOP allows you to add new features without worrying as much about how they interact with existing features. When you do have to change a class, its self-contained (encapsulated) nature means fewer or perhaps even zero consequences for other parts of the program. This is the encapsulation part.
You can use other people's code (such as the Android API) without knowing or perhaps even caring how it works: think about the Android lifecycle, Toast, Log, all the UI widgets, listening to satellites, and so on. For example, the Button class has nearly 50 methods – do we really want to write all that ourselves, just for a button? Much better to use someone else's Button class.
OOP allows you to write apps for highly complex situations without breaking a sweat.
You can create multiple similar-yet-different versions of a class without starting the class from scratch, by using inheritance; and you can still use the methods intended for the original type of object with your new object because of polymorphism.
It makes sense really. And Java was designed from the start with all of this in mind, so we are forced into using all this OOP; however, this is a good thing.
Let's have a quick class recap.
Class recap
A class is a collection of lines of code that can contain methods, variables, loops, and all the other Java syntax we have learned about. A class is part of a Java package and most packages will normally have multiple classes. Usually, although not always, each new class will be defined in its own .java code file with the same name as the class – as with all of our Activity classes so far.
Once we have written a class, we can use it to make as many objects from it as we want. Remember, the class is the blueprint and we make objects based on the blueprint. The house isn't the blueprint just as the object isn't the class; it is an object made from the class. An object is a reference variable, as is a String variable, and later we will discover exactly what being a reference variable means. For now, let's look at some actual code.
Looking at the code for a class
Let's say we are making an app for the military. It is for use by senior officers to micro-manage their troops in battle. Among others, we would probably need a class to represent a soldier.
Class implementation
Here is the real code for our hypothetical class. We call it a class implementation. As the class is called Soldier, if we implement this for real, we would do so in a file called Soldier.java:
public class Soldier {
// Member variables
int health;
String soldierType;
// Method of the class
void shootEnemy(){
// Bang! Bang!
}
}
The preceding is a class implementation for a class called Soldier. There are two member variables, or fields, an int variable called health, and a String variable called soldierType.
There is also a method called shootEnemy. The method has no parameters and a void return type, but class methods can be of any shape or size that we discussed in Chapter 9, Learning Java Methods.
To be precise about member variables and fields, when the class is instantiated into a real object, the fields become variables of the object itself and we call them instance or member variables.
They are just variables of the class, whatever fancy name they are referred to by. However, the difference between fields and variables declared in methods (called local variables) does become more important as we progress.
We briefly discussed variable scope at the end of Chapter 9, Learning Java Methods We will look at all types of variables again later in the next chapter. Let's concentrate on coding and using a class.
Declaring, initializing, and using an object of the class
Remember that Soldier is just a class, not an actual usable object. It is a blueprint for a soldier, not an actual soldier object, just as int, String, and boolean are not variables; they are just types we can make variables of. This is how we make an object of type Soldier from our Soldier class:
Soldier mySoldier = new Soldier();
In the first part of the code, Soldier mySoldier declares a new variable of type Soldier called mySoldier. The last part of the code, new Soldier(), calls a special method called a constructor that is automatically made for all classes by the compiler.
It is this constructor method that creates an actual Soldier object. As you can see, the constructor method has the same name as the class. We will look at constructors in more depth later in this chapter.
And of course, the assignment operator = in the middle of the two parts assigns the result of the second part to that of the first. The next figure summarizes all this information:

Figure 10.1 – Declaring, initializing, and using an object of the class
This is not far from how we deal with a regular variable except for the constructor/method call instead of a value on the end of the line of code. To create and use a very basic class, we have done enough.
Important Note
As we will see when we explore further, we can write our own constructors rather than relying on the auto-generated constructor. This gives us lots of power and flexibility, but we will just continue to explore the simplest case for now.
Just like regular variables, we could also have done it in two parts like this.
Soldier mySoldier;
mySoldier = new Soldier();
This is how we might assign to and use the variables of our hypothetical class:
mySoldier.health = 100;
mySoldier.soldierType = "sniper";
// Notice that we use the object name mySoldier.
// Not the class name Soldier.
// We didn't do this:
// Soldier.health = 100;
// ERROR!
Here, the dot operator . is used to access the variables of the class. And this is how we would call the method – again, by using the object name, not the class name, followed by the dot operator:
mySoldier.shootEnemy();
We can summarize the use of the dot operator with a diagram:
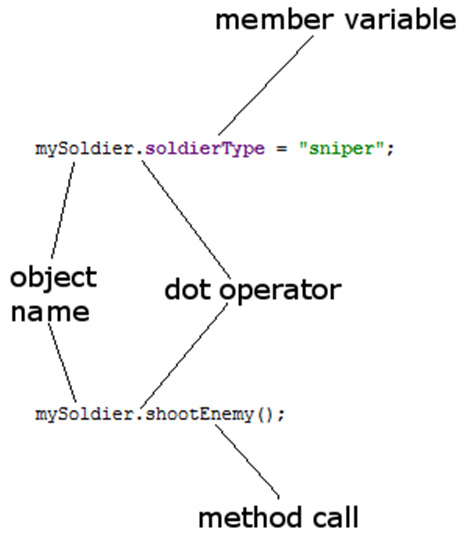
Figure 10.2 – dot operator
Tip
We can think of a class' method as what it can do and its instance/member variables as what it knows about itself.
We can also go ahead and make another Soldier object and access its methods and variables:
Soldier mySoldier2 = new Soldier();
mySoldier2.health = 150;
mySoldier2.soldierType = "special forces";
mySoldier2.shootEnemy();
It is important to realize that mySoldier2 is a totally separate object with completely distinct instance variables to mySoldier:

Figure 10.3 – Soldier object
What is also key here is that this preceding code would not be written within the class itself. For example, we could create the Soldier class in an external file called Soldier.java and then use the code that we have just seen, perhaps in the MainActivity class.
This will become clearer when we write our first class in an actual project in a minute.
Also notice that everything is done on the object itself. We must create objects of classes to make them useful.
Important Note
As always, there are exceptions to this rule. But they are in the minority, and we will look at the exceptions in the next chapter. In fact, we have already seen two exceptions in the book so far. The exceptions we have seen are the Toast and Log classes. Exactly what is going on with them will be explained soon.
Let's explore basic classes a little more deeply by writing one for real.
Basic classes app
The generals who will be using our app will need more than one Soldier object. In the app that we are about to build, we will instantiate and use multiple objects. We will also demonstrate using the dot operator on variables and methods to show that different objects have their very own instance variables.
You can get the completed code for this example in the code download. It is in the Chapter 10/Basic Classes folder. But it is most useful to read on to create your own working example.
Create a project with the Empty Activity template. Call the application Basic Classes. Now we will create a new class called Soldier:
- Right-click the com.yourdomain.basicclasses (or whatever your package name is) folder in the project explorer window.
- Select New | Java Class.
- In the Name: field, type Soldier and press the Enter key.
The new class is created for us with a code template ready to put our implementation within, just as the next code shows.
package com.yourdomain.basicclasses;
public class Soldier {
}
Notice that Android Studio has put the class in the same package/folder as the rest of our app's Java files.
And now we can write its implementation.
Write the following class implementation code within the opening and closing curly braces of the Soldier class as shown. The new code to type is highlighted:
public class Soldier {
int health;
String soldierType;
void shootEnemy(){
//let's print which type of soldier is shooting
Log.i(soldierType, " is shooting");
}
}
Now that we have a class, a blueprint for our future objects of type Soldier, we can start to build our army. In the editor window, left-click the MainActivity.java tab. We will write this next code, as so often, within the onCreate method just after the call to the setContentView method. Type this code:
// First, we make an object of type soldier
Soldier rambo = new Soldier();
rambo.soldierType = "Green Beret";
rambo.health = 150;
// It takes a lot to kill Rambo
// Now we make another Soldier object
Soldier vassily = new Soldier();
vassily.soldierType = "Sniper";
vassily.health = 50;
// Snipers have less health
// And one more Soldier object
Soldier wellington = new Soldier();
wellington.soldierType = "Sailor";
wellington.health = 100;
// He's tough but no green beret
Now we have our extremely varied and unlikely army, we can use it and verify the identity of each object.
Type this code below the code in the previous step:
Log.i("Rambo's health = ", "" + rambo.health);
Log.i("Vassily's health = ", "" + vassily.health);
Log.i("Wellington's health = ", "" + wellington.health);
rambo.shootEnemy();
vassily.shootEnemy();
wellington.shootEnemy();
Now we can run our app. All the output will be in the logcat window.
This is how it works. First, we created our new Soldier class. Then we implemented our class including declaring two fields (member variables), an int variable and a String variable called health and soldierType.
We also have a method in our class called shootEnemy. Let's look at it again and examine what is going on:
void shootEnemy(){
//let's print which type of soldier is shooting
Log.i(soldierType, " is shooting");
}
In the body of the method, we print to the logcat window: first soldierType and then the text " is shooting". What's neat here is that the string soldierType will be different depending on which object we call the shootEnemy method on.
Next, we declared and created three new objects of type Soldier. They were rambo, vassily, and wellington.
Finally, we initialized each with a different value for health as well as soldierType.
Here is the output:
Rambo's health =: 150
Vassily's health =: 50
Wellington's health =: 100
Green Beret: is shooting
Sniper: is shooting
Sailor: is shooting
Notice that each time we access the health variable of each Soldier object, it prints the value we assigned it, proving that although the three objects are of the same type, they are completely separate, individual instances/objects.
Perhaps more interesting is the three calls to shootEnemy. One by one, each of our Soldier object's shootEnemy methods is called and we print the soldierType variable to the logcat window. The method has the proper value for each individual object, further proving that we have three distinct objects (instances of the class), albeit created from the same Soldier class.
We saw how each object is completely independent of the other objects. However, if we imagine whole armies of Soldier objects in our app, then we realize that we are going to need to learn new ways of handling large numbers of objects (and regular variables too).
Think about managing just 100 separate Soldier objects. What about when we have thousands of objects? In addition, this isn't very dynamic. The way we are writing the code now relies on us (the developers) knowing the exact details of the soldiers that the generals (the user) will be commanding. We will see the solution for this in Chapter 15, Arrays, Maps, and Random Numbers.
More things we can do with our first class
We can treat a class much as we can other variables. We can use a class as a parameter in a method signature, as here:
public void healSoldier(Soldier soldierToBeHealed){
// Use soldierToBeHealed here
// And because it is a reference the changes
// are reflected in the actual object passed into
// the method.
// Oops! I just mentioned what
// a reference variable can do
// More info in the FAQ, chapter 11, and onwards
}
And when we call the method we must of course pass an object of that type. Here is a hypothetical call to the healSoldier method:
healSoldier(rambo);
Of course, the preceding example might raise questions, such as, should the healSoldier method be a method of a class?
fieldhospital.healSoldier(rambo);
It could be or it could not. It would depend on what the best solution for the situation was. We will look at more OOP, and then the best solutions for lots of similar conundrums should present themselves more easily.
And, as you might guess, we can also use an object as the return value of a method. Here is what the updated hypothetical healSoldier signature and implementation might look like now:
Soldier healSoldier(Soldier soldierToBeHealed){
soldierToBeHealed.health++;
return soldierToBeHealed;
}
In fact, we have already seen classes being used as parameters. For example, here is our topClick method from Chapter 2, First Contact: Java, XML, and the UI Designer. It receives an object called v of type View:
public void topClick(View v){
However, in the case of the topClick method we didn't do anything with the passed-in object of type View. Partly, this was because we didn't need to, and partly it was because we don't know what we can do with an object of type View – yet.
As I mentioned at the start of the chapter, you don't need to understand or remember everything in this chapter. The only way to get good at OOP is to keep using it. Like learning a spoken language – studying it and poring over grammatical rules will help but nowhere near as much as having a conversation verbally (or in writing). If you just about get it, move on with the next chapter.
Frequently asked questions
- I just can't wait any longer. What is a reference already!?
It literally is the same thing as a reference in normal (non-programming) language. It is a value that identifies/points to data rather than the actual data itself. One way of thinking about it is that a reference is a memory location/address. It identifies and gives access to the actual data at that location/address in memory.
- If it is not the actual object but just a reference, how come we can do things like call methods on it, such as mySoldier.shootEnemy()?
Java works out the exact details under the hood, but you can think of a reference as being the controller of an object, and anything you want to do to the object you must do through the controller, because the actual object/memory itself cannot be directly accessed. More on this in Chapter 12, The Stack, the Heap, and the Garbage Collector.
Summary
We have at last written our first class. We have seen that we can implement a class in a Java file of the same name as the class. The class itself doesn't do anything until we instantiate an object/instance of the class. Once we have an instance of the class, we can use its variables and methods. As we proved in the basic classes app, each and every instance of a class has its own distinct variables, just as when you buy a car made in a factory, you get your very own steering wheel, satnav, and go-faster stripes.
All this information will raise more questions. OOP is like that. So, let's try and consolidate all this class stuff by taking another look at variables and encapsulation, polymorphism, and inheritance in action in the next chapter. We can then go further with classes and explore topics such as static classes (such as Log and Toast) as well as the more advanced concepts of abstract classes and interfaces.