
Chapter 22: Particle Systems and Handling Screen Touches
We already have the real-time system that we implemented in the previous chapter using a thread. In this chapter, we will create the entities that will exist and evolve in this real-time system as if they have a mind of their own; they will form the appearance of the drawings that the user can achieve.
We will also see how the user implements these entities by learning how to respond to interaction with the screen. This is different to interacting with a widget in a UI layout.
Here is what is coming up in this chapter:
- Adding custom buttons to the screen
- Coding the Particle class
- Coding the ParticleSystem class
- Handling screen touches
- The Android Studio Profiler tool
We will start by adding a custom UI to our app.
This app produces bright flashing colors. It may cause discomfort or seizures for people with photosensitive epilepsy. Reader discretion is advised. You might like to simply read the theory for this project and not run the completed project.
Technical requirements
You can find the code files present in this chapter on GitHub at https://github.com/PacktPublishing/Android-Programming-for-Beginners-Third-Edition/tree/main/chapter%2022.
Adding custom buttons to the screen
We need to let the user control when to start another drawing and clear the screen of their previous work. We need the user to be able to decide if and when to bring the drawing to life. To achieve this, we will add two buttons to the screen, one for each of the tasks.
Add the members highlighted next in the LiveDrawingView class:
// These will be used to make simple buttons
private RectF mResetButton;
private RectF mTogglePauseButton;
We now have two RectF instances. These objects hold four floating-point coordinates each, one coordinate for each corner of our two proposed buttons.
Initialize the positions in the constructor of LiveDrawingView:
// Initialize the two buttons
mResetButton = new RectF(0, 0, 100, 100);
mTogglePauseButton = new RectF(0, 150, 100, 250);
Add the import for the RectF class:
import android.graphics.RectF;
Now we have added actual coordinates for the buttons. If you visualize the coordinates on the screen, then you will see they are in the top left-hand corner with the pause button just below the reset/clear button.
Now we can draw the buttons. Add these two lines of code in the draw method of the LiveDrawingView class:
// Draw the buttons
mCanvas.drawRect(mResetButton, mPaint);
mCanvas.drawRect(mTogglePauseButton, mPaint);
The new code uses an overridden version of the drawRect method, and we simply pass our two RectF instances straight in alongside the usual Paint instance. Our buttons will now be drawn to the screen.
We will see how we interact with these slightly crude buttons later in the chapter.
Implementing a particle system effect
A particle system is a system that controls particles. In our case, ParticleSystem is a class we will write that will spawn instances (lots of instances) of the Particle class (also a class we will write) that will create a simple explosion-like effect.
Here is an image of some particles controlled by a particle system:

Figure 22.1 – Particle system effect
Just for clarification, each of the colored squares is an instance of the Particle class and all the Particle instances are controlled and held by the ParticleSystem class. In addition, the user will create multiple (hundreds) of ParticleSystem instances by drawing with their finger. The particles will appear as dots or blocks until the user taps the pause button, when they will come to life. We will examine the code closely enough that you will be able to set, in code, the size, color, speed, and quantity of Particle and ParticleSystem instances.
Note
It is left as an exercise for the reader to add additional buttons to the screen to allow the user to change these properties as a feature of the app.
We will start by coding the Particle class.
Coding the Particle class
Add the import statement, the member variables, and the constructor method, as shown in the following code:
import android.graphics.PointF;
class Particle {
PointF mVelocity;
PointF mPosition;
Particle(PointF direction)
{
mVelocity = new PointF();
mPosition = new PointF();
// Determine the direction
mVelocity.x = direction.x;
mVelocity.y = direction.y;
}
}
We have two members: one for velocity and one for position. They are both PointF objects. PointF holds two float values. The position is simple; it is just a horizontal and vertical value. The velocity is worth explaining a little more. Each of the two values in PointF will be a speed, one horizontal and the other vertical. It is the combination of these two speeds that will imply a direction.
Note
In the constructor, the two new PointF objects are instantiated and the x and y values of mVeleocity are initialized with the values passed in by the PointF direction parameter. Notice the way in which the values are copied from direction to mVelocity. Now, PointF mVelocity is not a reference to PointF passed in as a parameter. Each Particle instance will copy the values from direction (and they will be different for each instance), but mVelocity has no lasting connection to direction.
Next, add these three methods, and then we can then talk about them:
void update(float fps)
{
// Move the particle
mPosition.x += mVelocity.x;
mPosition.y += mVelocity.y;
}
void setPosition(PointF position)
{
mPosition.x = position.x;
mPosition.y = position.y;
}
PointF getPosition()
{
return mPosition;
}
Perhaps unsurprisingly, there is an update method. Each Particle instance's update method will be called each frame of the app by the ParticleSystem class' update method, which in turn will be called by the LiveDrawingView class (again in the update method), which we will code later in the chapter.
Inside the update method, the horizontal and vertical values of mPosition are updated using the corresponding values of mVelocity.
Note
Notice that we don't bother using the current frame rate in the update. You could amend this if you want to be certain that your particles will all fly at exactly the correct speed. But all the speeds are going to be random anyway. There is not much to gain from adding this extra calculation (for every particle). As we will soon see, however, the ParticleSystem class will need to take account of the current frames per second to measure how long it should run for.
Next, we coded the setPosition method. Notice that the method receives PointF, which is used to set the initial position. The ParticleSystem class will pass this position in when the effect is triggered.
Finally, we have the getPosition method. We need this method so that the ParticleSystem class can draw all the particles in the correct position. We could have added a draw method to the Particle class instead of the getPosition method and had the Particle class draw itself. In this implementation, there is no particular benefit to either option.
Now we can move on to the ParticleSysytem class.
Coding the ParticleSystem class
The ParticleSystem class has a few more details than the Particle class, but it is still reasonably straightforward. Remember what we need to achieve with this class: hold, spawn, update, and draw a bunch (quite a big bunch) of Particle instances.
Add the following members and import statements:
import android.graphics.Canvas;
import android.graphics.Color;
import android.graphics.Paint;
import android.graphics.PointF;
import java.util.ArrayList;
import java.util.Random;
class ParticleSystem {
private float mDuration;
private ArrayList<Particle> mParticles;
private Random random = new Random();
boolean mIsRunning = false;
}
We have four member variables: first, a float variable called mDuration that will be initialized to the number of seconds we want the effect to run for. The ArrayList instance called mParticles holds Particle instances and will hold all the Particle objects we instantiate.
The Random instance called random is created as a member because we need to generate so many random values that creating a new object each time would be sure to slow us down a bit.
Finally, the mIsRunning Boolean will track whether the particle system is currently being shown (updating and drawing).
Now we can code the init method. This method will be called each time we want a new ParticleSystem. Notice that the one and only parameter is an int parameter called numParticles.
When we call init, we can have some fun initializing crazy amounts of particles. Add the init method and then we will look more closely at the code:
void init(int numParticles){
mParticles = new ArrayList<>();
// Create the particles
for (int i = 0; i < numParticles; i++){
float angle = (random.nextInt(360)) ;
angle = angle * 3.14f / 180.f;
// Option 1 - Slow particles
//float speed = (random.nextFloat()/10);
// Option 2 - Fast particles
float speed = (random.nextInt(10)+1);
PointF direction;
direction = new PointF((float)Math.cos(angle) *
speed, (float)Math.sin(angle) *
speed);
mParticles.add(new Particle(direction));
}
}
The init method consists of just one for loop that does all the work. The for loop runs from zero to numParticles-1.
First, a random number between zero and 359 is generated and stored in the float variable called angle. Next, there is a little bit of math and we multiply angle by 3.14/180. This turns the angle in degrees to radian measurements, which are required by the Math class we will use in a moment.
Then we generate another random number between 1 and 10 and assign the result to a float variable called speed.
Note
I have added comments to suggest different options for values in this part of the code. I do this in several places in the ParticleSystem class and when we get to the end of the chapter, we will have some fun altering these values to see what effect it has on the drawing app.
Now that we have a random angle and speed, we can convert and combine them into a vector that can be used inside the update method of the Particle class to update its position each frame.
Note
A vector is a value that determines both direction and speed. Our vector is stored in the direction object until it is passed into the Particle constructor. Vectors can be of many dimensions. Ours is of two dimensions and therefore defines a heading between zero and 359 degrees and a speed between 1 and 10. You can read more about vectors, headings, sine, and cosine on my website here: http://gamecodeschool.com/essentials/calculating-heading-in-2d-games-using-trigonometric-functions-part-1/.
The single line of code that uses Math.sin and Math.cos to create a vector I have decided not to explain in full, because the magic occurs partly in the following formulas:
- Cosine of an angle * speed
- Sine of an angle * speed
It also happens partly in the hidden calculations within the cosine and sine functions provided by the Math class. If you want to know their full details, see the previous tip box.
Finally, a new Particle is created and then added to the mParticles ArrayList instance.
Next, we will code the update method. Notice that the update method does need the current frame rate as a parameter. Code the update method shown next:
void update(long fps){
mDuration -= (1f/fps);
for(Particle p : mParticles){
p.update(fps);
}
if (mDuration < 0)
{
mIsRunning = false;
}
}
The first thing that happens inside the update method is that the elapsed time is taken off mDuration. Remember that the fps parameter is the frames per second, so 1/fps gives a value as a fraction of a second.
Next, there is an enhanced for loop that calls the update method for every Particle instance in the mParticles ArrayList instance.
Finally, the code checks to see if the particle effect has run its course with if(mDuration < 0), and if it has, it sets mIsRunning to false.
Now we can code the emitParticles method, which will set each Particle instance running. This is not to be confused with init, which creates all the new particles and gives them their velocities. The init method will be called once before the user gets to interact, while the emitParticles method will be called each time the effect needs to be started as the user draws on the screen.
Add the emitParticles method:
void emitParticles(PointF startPosition){
mIsRunning = true;
// Option 1 - System lasts for half a minute
//mDuration = 30f;
// Option 2 - System lasts for 2 seconds
mDuration = 3f;
for(Particle p : mParticles){
p.setPosition(startPosition);
}
}
First, notice that a PointF reference for where all the particles will start is passed in as a parameter. All the particles will start at exactly the same position and then fan out each frame based on their individual velocities.
The mIsRunning Boolean is set to true and mDuration is set to 1f, so the effect will run for one second, and the enhanced for loop calls setPosition for every particle to move them to the starting coordinates.
The final method for our ParticleSysytem class is the draw method, which will reveal the effect in all its glory. The method receives a reference to a Canvas instance and a Paint instance, so it can draw to the same canvas that the LiveDrawingView class has just locked in its draw method.
Add the draw method:
void draw(Canvas canvas, Paint paint){
for (Particle p : mParticles) {
// Option 1 - Coloured particles
//paint.setARGB(255, random.nextInt(256),
//random.nextInt(256),
//random.nextInt(256));
// Option 2 - White particles
paint.setColor(
Color.argb(255,255,255,255));
// How big is each particle?
float sizeX = 0;
float sizeY = 0;
// Option 1 - Big particles
//sizeX = 25;
//sizeY = 25;
// Option 2 - Medium particles
sizeX = 10;
sizeY = 10;
// Option 3 - Tiny particles
//sizeX = 1;
//sizeY = 1;
// Draw the particle
// Option 1 - Square particles
//canvas.drawRect(p.getPosition().x,
//p.getPosition().y,
//p.getPosition().x + sizeX,
//p.getPosition().y + sizeY,
//paint);
// Option 2 - Circle particles
canvas.drawCircle(p.getPosition().x,
p.getPosition().y,
sizeX, paint);
}
}
An enhanced for loop steps through each of the Particle instances in the mParticles ArrayList instance. Each Particle, in turn, is drawn using the drawRect method and the getPosition method. Notice the call to the paint.setARGB method. You will see that we generate each of the color channels randomly.
Note
Notice in the comments that I have suggested different options for code changes so we can have some fun when we have finished coding.
We can now start to put the particle system to work.
Spawning particle systems in the LiveDrawingView class
Add an ArrayList instance full of systems and some more members to keep track of things. Add the highlighted code in the positions indicated by the existing comments:
// The particle systems will be declared here later
private ArrayList<ParticleSystem>
mParticleSystems = new ArrayList<>();
private int mNextSystem = 0;
private final int MAX_SYSTEMS = 1000;
private int mParticlesPerSystem = 100;
Import the ArrayList class as follows:
import java.util.ArrayList;
We can now keep track of up to 1,000 particle systems with 100 particles in each. Feel free to play with these numbers.
Note
On a modern device, you can run particles into the millions without any trouble, but on the emulator, it will struggle with just hundreds of thousands.
Initialize the systems in the constructor by adding this highlighted code:
// Initialize the particles and their systems
for (int i = 0; i < MAX_SYSTEMS; i++) {
mParticleSystems.add(new ParticleSystem());
mParticleSystems.get(i).init(mParticlesPerSystem);
}
The code loops through the ArrayList instance, calling the constructor and then the init method on each of the ParticleSystem instances.
Update the systems for each frame of the loop by adding this highlighted code in the update method:
private void update() {
// Update the particles
for (int i = 0; i < mParticleSystems.size(); i++) {
if (mParticleSystems.get(i).mIsRunning) {
mParticleSystems.get(i).update(mFPS);
}
}
}
The previous code loops through each of the ParticleSystem instances, first checking if they are active and then calling the update method and passing in the current frames per second.
Draw the systems for each frame of the loop by adding this highlighted code to the draw method:
// Choose a color to paint with
mPaint.setColor(Color.argb(255, 255, 255, 255));
// Choose the font size
mPaint.setTextSize(mFontSize);
// Draw the particle systems
for (int i = 0; i < mNextSystem; i++) {
mParticleSystems.get(i).draw(mCanvas, mPaint);
}
// Draw the buttons
mCanvas.drawRect(mResetButton, mPaint);
mCanvas.drawRect(mTogglePauseButton, mPaint);
The previous code loops through mParticleSystems, calling the draw method on each. Of course, we haven't actually spawned any instances yet. For that, we will need to learn how to respond to screen interactions.
Handling touches
To get started, add the OnTouchEvent method to the LiveDrawingView class:
@Override
public boolean onTouchEvent(MotionEvent motionEvent) {
return true;
}
This is an overridden method and it is called by Android every time the user interacts with the screen. Look at the one and only parameter of the OnTouchEvent method.
Import the MotionEvent class with this line of code:
import android.view.MotionEvent;
It turns out that motionEvent has a whole bunch of data tucked away inside of it and this data contains the details of the touch that just occurred. The operating system sent it to us because it knows we will probably need some of it.
Notice that I said some of it. The MotionEvent class is quite extensive. It contains within it dozens of methods and variables.
Note
We will uncover a few details of the MotionEvent class in this project. You can explore the MotionEvent class in full here: https://stuff.mit.edu/afs/sipb/project/android/docs/reference/android/view/MotionEvent.html. Note that it is not necessary to do further research to complete this project.
For now, all we need to know is the screen coordinates at the precise moment when the player's finger moves across the screen, touches the screen, or is removed from the screen.
Some of the variables and methods contained within motionEvent that we will use include the following.
- The getAction method, which unsurprisingly "gets" the action that was performed. Unfortunately, it supplies this information in a slightly encoded format, which explains the need for some of these other variables.
- The ACTION_MASK variable, which provides a value known as a mask, which with the help of a little bit more Java trickery can be used to filter the data from getAction.
- The ACTION_UP variable, which we can use to compare and see if the action performed is the one we want to respond to (removing a finger from the screen).
- The ACTION_DOWN variable, which we can use to compare and see if the action performed is the one we want to respond to.
- The ACTION_MOVE variable, which we can use to compare and see if the action performed is a move/drag.
- The getX method, which tells us a horizontal floating-point coordinate of where the event happened.
- The getY method, which tells us a vertical floating-point coordinate of where the event happened.
As a specific example, say we need to filter the data returned by the getAction method using ACTION_MASK and see if the result is the same as ACTION_UP. If it is, then we know that the user has just removed their finger from the screen, perhaps because they just tapped a button. Once we are sure the event is of the correct type, we will need to find out where it happened using the getX and getY methods.
There is one final complication. The "Java trickery" I referred to is the & bitwise operator, not to be confused with the logical && operator we have been using in conjunction with the if keyword.
The & bitwise operator checks to see if each corresponding parts in two values are true. This is the filter that is required when using ACTION_MASK with getAction.
Note
Sanity check. I was hesitant to go into detail about MotionEvent and bitwise operators. It is possible to complete this entire book and even a professional-quality interactive app without ever needing to fully understand them. If you know that the line of code we write in the next section determines the event type the player has just triggered, that is all you need to know. I just guessed that a discerning reader such as yourself would like to know the ins and outs. In summary, if you understand bitwise operators, great, you are good to go. If you don't, it doesn't matter, you are still good to go. If you are curious about bitwise operators (there are quite a few), you can read more about them here: https://en.wikipedia.org/wiki/Bitwise_operation.
Now we can code the onTouchEvent method and see all the MotionEvent stuff in action.
Coding the onTouchEvent method
Handle the user moving their finger on the screen by adding this highlighted code inside the onTouchEvent method to the code we already have:
// User moved a finger while touching screen
if ((motionEvent.getAction() &
MotionEvent.ACTION_MASK)
== MotionEvent.ACTION_MOVE) {
mParticleSystems.get(mNextSystem).emitParticles(
new PointF(motionEvent.getX(),
motionEvent.getY()));
mNextSystem++;
if (mNextSystem == MAX_SYSTEMS) {
mNextSystem = 0;
}
}
return true;
Add the following line of code to import the PointF class:
import android.graphics.PointF;
The if condition checks to see if the type of event was the user moving their finger. If it was, then the next particle system in mParticleSystems has its emitParticles method called. Afterward, the mNextSystem variable is incremented and a test is done to see if it was the last particle system. If it was, then mNextSystem is set to zero, ready to start reusing existing particle systems the next time one is required.
Handle the user pressing one of the buttons by adding this highlighted code right after the code we just discussed and before the return statement we have already coded:
// Did the user touch the screen
if ((motionEvent.getAction() &
MotionEvent.ACTION_MASK)
== MotionEvent.ACTION_DOWN) {
// User pressed the screen see if it was in a
button
if (mResetButton.contains(motionEvent.getX(),
motionEvent.getY())) {
// Clear the screen of all particles
mNextSystem = 0;
}
// User pressed the screen see if it was in a
button
if (mTogglePauseButton.contains
(motionEvent.getX(), motionEvent.getY())) {
mPaused = !mPaused;
}
}
return true;
The condition of the if statement checks to see if the user has tapped the screen. If they have, then the contains method of the RectF class is used in conjunction with the getX and getY methods to see if that press was inside one of our custom buttons. If the reset button was pressed, all the particles will disappear because mNextSystem is set to zero. If the paused button is pressed, then the value of mPaused is toggled, causing the update method to stop/start being called in the thread.
Finishing the HUD
Add the highlighted code to the printDebuggingText method:
// We will add more code here in the next chapter
mCanvas.drawText("Systems: " + mNextSystem,
10, mFontMargin + debugStart + debugSize * 2,
mPaint);
mCanvas.drawText("Particles: " + mNextSystem * mParticlesPerSystem,
10, mFontMargin + debugStart + debugSize * 3,
mPaint);
This code will print some interesting statistics to the screen to tell us how many particles and systems are currently being drawn.
WARNING
This app produces bright flashing colors. It may cause discomfort or seizures for people with photosensitive epilepsy. Reader discretion is advised. You might like to simply read the theory for this project and not run the completed project.
Running the app
Now we get to see the live drawing app in action and play with some of the different options we commented out in the code.
Run the app with small, round, colorful, fast particles. Just tap the screen in a few places:
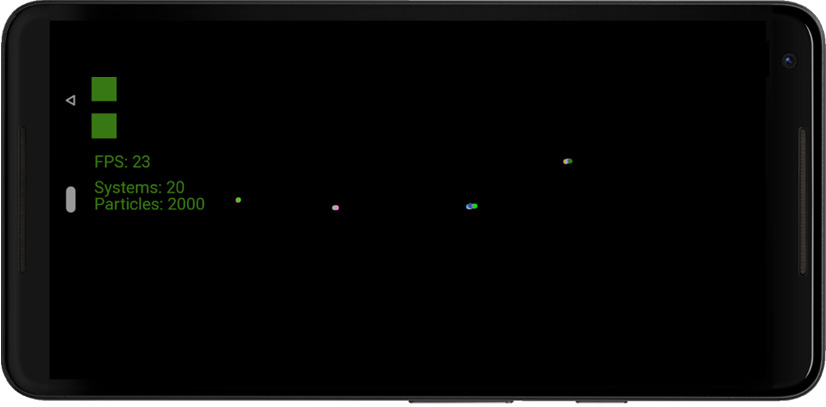
Figure 22.2 – Tap the screen
Then resume drawing:

Figure 22.3 – Tap results
Do a kid's-style drawing with small, white, square, slow, long-duration particles:
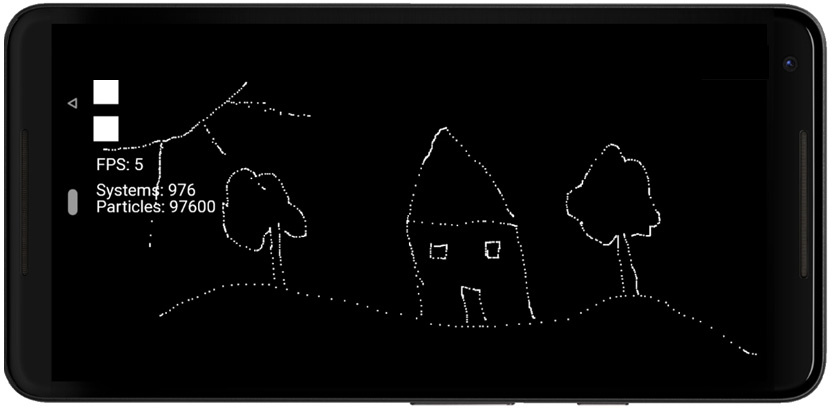
Figure 22.4 – The kid's-style drawing
Then un-pause the drawing and wait for 20 seconds while the drawing comes to life and changes:
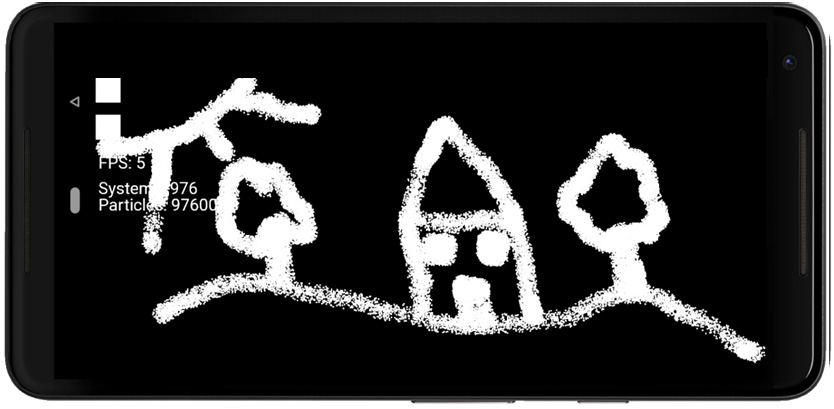
Figure 22.5 – The kid's-style drawing result
Before we move on to our next project, the Live Drawing app gives us an excellent opportunity to explore another feature of Android Studio.
The Android Studio Profiler tool
The Android Studio Profiler tool is quite complex and deep. But it is very simple to use it to do some really significant measurements with our app. We can see how much of the device's resources our app is using and therefore attempt to improve the efficiency of our app to make it run more efficiently and use less in the way of resources. By resources, I am talking about CPU and memory usage.
Code optimization is beyond the scope of the book, but a look at how we begin to monitor our app's performance is a good introduction. Select View from the main Android Studio menu and then select Tool Windows | Profiler.
You will see the following window in the lower area of Android Studio:

Figure 22.6 – Android Studio window
To get started using the Profiler tool, run the Live Drawing app. The Profiler tool should begin to display graphs and data as shown in the next figure.
Depending on the configuration of your PC firewall software, you might have to allow access for the Profiler tool to run. In addition, it is possible, but not certain, that you will have to left-click the + icon in the top left of the Profiler window, as highlighted in the preceding figure, and then select your AVD for the Profiler tool to connect to:
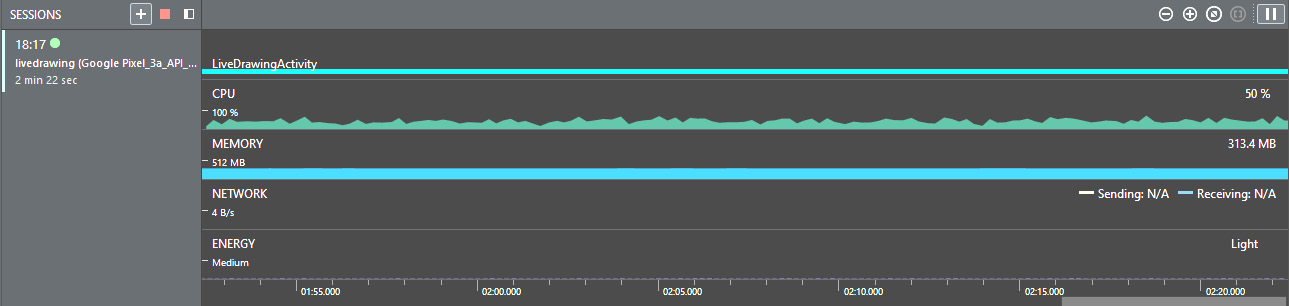
Figure 22.7 – live graph data
In the preceding figure, we can see live graph data for CPU usage, memory usage, network usage, and energy/battery usage. We will focus on CPU and memory usage.
Hover your mouse over the CPU row and then the MEMORY row to see pop-up details for each of these metrics. This next figure shows the details on my PC for these two metrics, photoshopped together:
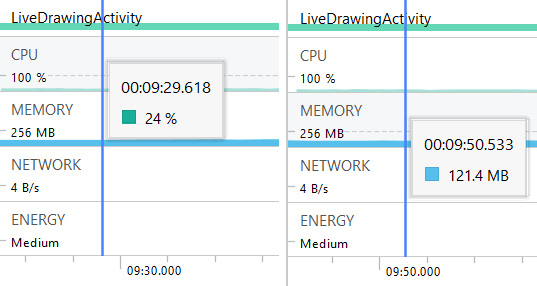
Figure 22.8 – Pop-up details for each metric
It is possible, even likely, that you will see different values to me. The previous figure shows that roughly a quarter of the CPU is in use and around 121 MB of RAM is in use.
Next, let's alter our code a little and observe the effect. In the LiveDrawingView class, edit the initialization of the mParticlesPerSystem member variable:
private int mParticlesPerSystem = 100;
Change it to this:
private int mParticlesPerSystem = 1000;
We have now increased the particle count per system by 10x. We did this to get a spike in our profiler data, as we will now use the app to draw some particle systems.
When you run the app again, draw a large number of particle systems by moving your finger/pointer across the screen. Notice that the CPU usage spikes when you draw some particle systems on the screen, though perhaps not as much as you expected. Mine spiked to just under 40% while the particles were moving and then settled back down to just over 25%. What might be more surprising if you have never played with a tool like a profiler before is that the memory usage barely changes at all.
The reason we got the results that we did is that the calculations of thousands of particles take up quite significant amounts of CPU. However, drawing particles on the screen does not require increased memory. The reason for this is that the memory for the app is all allocated near the start of the execution. Whether or not the particles are currently being shown to the user is not significant.
This short section was not intended to even scratch the surface of how we might optimize our graphics or CPU-intensive apps; it was just meant to introduce the idea that you might like to add optimization to your list of things to investigate further.
Summary
In this chapter, we saw how we can add thousands of self-contained entities to our real-time system. The entities were controlled by the ParticleSystem class, which in turn interacted with, and was controlled by, the game loop. As the game loop was running in a thread, we saw that the user can still interact seamlessly with the screen, and the operating system sends us the details of these interactions via the onTouchEvent method.
In the next chapter, our apps will finally get a bit noisier when we explore how to play sound effects; we'll also learn how to detect different versions of Android.