
Smart Android developers deliver their apps to market faster by taking advantage of libraries, which reduce development time by providing previously created and tested code. Developers may create and use their own libraries, use libraries created by others, or do both.
This chapter's initial recipes introduce you to creating and using your own libraries. Subsequent recipes introduce you to Kidroid'skiChart charting library for presenting bar charts and line charts, and to IBM's MQTT library for implementing lightweight push messaging in your apps.
Tip
OpenIntents.org publishes a list of libraries from various vendors that you might find helpful in your app development (www.openintents.org/en/libraries).
You want to create a library that stores Android-agnostic code, and which can be used in your Android and non-Android projects.
Create a JAR-based library that accesses only Java 5 (and earlier) APIs via JDK command-line tools or Eclipse.
Suppose you plan to create a simple library of math-oriented utilities. This library will consist of a single MathUtils class with various static methods. Listing 7-1 presents an early version of this class.
Example 7.1. MathUtils Implementing Math-Oriented Utilities via static Methods
// MathUtils.java

package com.apress.mathutils;

public class MathUtils
{
   public static long factorial(long n)
   {
      if (n <= 0)
         return 1;
      else
         return n*factorial(n-1);
   }
}
MathUtils currently consists of a single static factorial() method for computing and returning factorials (perhaps for use in calculating permutations and combinations). You might eventually expand this class to support fast Fourier transforms and other math operations not supported by the java.lang.Math class.
Warning
When creating a library that stores Android-agnostic code, make sure to access only standard Java APIs (such as the collections framework) that are supported by Android – don't access unsupported Java APIs (such as Swing) or Android-specific APIs (such as Android widgets). Also, don't access any standard Java APIs more recent than Java version 5.
Developing a JAR-based library with the JDK is trivial. Perform the following steps to create a mathutils.jar file that contains the MathUtils class:
Within the current directory, create a package directory structure consisting of a
comsubdirectory that contains anapresssubdirectory that contains amathutilssubdirectory.Copy Listing 7-1's
MathUtils.javasource code to aMathUtils.javafile stored inmathutils.Assuming that the current directory contains the
comsubdirectory, executejavac com/apress/mathutils/MathUtils.javato compileMathUtils.java. AMathUtils.classfile is stored incom/apress/mathutils.Create
mathutils.jarby executingjar cf mathutils.jar com/apress/mathutils/*.class. The resultingmathutils.jarfile contains acom/apress/mathutils/MathUtils.classentry.
Developing a JAR-based library with Eclipse is a bit more involved. Perform the following steps to create a mathutils.jar file that contains the MathUtils class:
Assuming that you've installed the Eclipse version discussed in Chapter 1, start this IDE if not already running.
Select New from the File menu and Java Project from the resulting pop-up menu.
On the resulting New Java Project dialog box, enter
mathutilsinto the Project name textfield and click the Finish button.Right-click the src node (underneath mathutils) and select New, followed by Package from the resulting pop-up menus.
On the resulting New Java Package dialog box, enter
com.apress.mathutilsinto the Name field and click Finish.Right-click the resulting com.apress.mathutils node and select New, followed by Class on the resulting pop-up menus.
On the resulting New Java Class dialog box, enter
MathUtilsinto the Name field and click Finish.Replace the skeletal contents in the resulting MathUtils.java editor window with Listing 7-1.
Right-click the mathutils project node and select Build Project from the resulting pop-up menu. (You might have to deselect Build Automatically from the project menu first.)
Right-click the mathutils project node and select Export from the resulting pop-up menu.
On the resulting Export dialog box, select JAR file under the Java node and click the Next button.
On the resulting JAR Export pane, keep the defaults but enter
mathutils.jarin the JAR file textfield. Click Finish. The resultingmathutils.jarfile is created in your Eclipse workspace's root directory.
You've successfully built mathutils.jar and want to learn how to integrate this JAR file into your Eclipse-based Android projects.
You'll create your Eclipse-based Android project with a libs directory and copy mathutils.jar into this directory.
Note
It's common practice to store libraries (.jar files and Linux shared object libraries, .so files) in a libs subdirectory of the Android project directory. The Android build system automatically takes files found in libs and integrates them into APKs. If the library is a shared object library, it is stored in the .apk file with an entry starting with lib (not libs).
Now that you've created mathutils.jar, you'll need an Android app to try out this library. Listing 7-2 presents the source code to a UseMathUtils single-activity-based app that computes 5-factorial, which the activity subsequently outputs.
Example 7.2. UseMathUtils Invoking MathUtil's factorial() Method to Compute 5-factorial
// UseMathUtils.java package com.apress.usemathutils; import android.app.Activity; import android.os.Bundle; import android.widget.TextView;import com.apress.mathutils.MathUtils;public class UseMathUtils extends Activity { @Override public void onCreate(Bundle savedInstanceState) { super.onCreate(savedInstanceState); TextView tv = new TextView(this); tv.setText("5! ="+MathUtils.factorial(5));setContentView(tv); } }
Assuming that Eclipse is running, complete the following steps to create a UseMathUtils project:
Select New from the File menu, and select Project from the resulting pop-up menu.
On the New Project dialog box, expand the Android node in the wizard tree, select the Android Project branch below this node, and click the Next button.
On the resulting New Android Project dialog box, enter
UseMathUtilsinto the Project name textfield. This entered name identifies the folder/directory in which theUseMathUtilsproject is stored.Select the "Create new project in workspace" radio button if it's not selected.
Under Build Target, check the checkbox of the appropriate Android target to be used as
UseMathUtils's build target. This target specifies which Android platform you'd like your application to be built against. Assuming that you've installed only the Android 2.3 platform, only this build target should appear and should already be checked.Under Properties, enter
Use MathUtilsinto the Application name textfield. This human-readable title will appear on the Android device. Continuing, entercom.apress.usemathutilsinto the Package name textfield. This value is the package namespace (following the same rules as for packages in the Java programming language) where all your source code will reside. Check the Create Activity checkbox if it's not checked, and enterUseMathUtilsas the name of the app's starting activity in the textfield that appears beside this checkbox. The textfield is disabled when this checkbox is not checked. Finally, enter integer9into the Min SDK Version textfield to identify the minimum API Level required to properly runUseMathUtilson the Android 2.3 platform.Click Finish.
Eclipse creates a UseMathUtils node in the Package Explorer window. Complete the following steps to set up all files:
Expand the UseMathUtils node, followed by the
srcnode, followed by thecom.apress.usemathutilsnode.Double-click the UseMathUtils.java node (underneath com.apress.usemathutils) and replace the skeletal contents in the resulting window with Listing 7-2.
Right-click the UseMathUtils node and select New followed by Folder on the resulting pop-up menu. On the resulting New Folder dialog box, enter
libsinto the Folder name textfield and click the Finish button.Use your platform's file manager program (such as Windows XP's Windows Explorer) to select and drag the previously created
mathutils.jarfile to the libs node. If a File Operation dialog box appears, keep the Copy files radio button selected and click the OK button.Right-click mathutils.jar and select Build Path followed by Configure Build Path on the resulting pop-up menus.
On the resulting Properties for UseMathUtils dialog box, select the Libraries tab and click the Add Jars button.
On the resulting JAR Selection dialog box, expand the UseMathUtils node followed by the libs node. Select mathutils.jar and click OK to close JAR Selection. Click OK a second time to close Properties for UseMathUtils.
You're now ready to run this project. Select Run from the menubar followed by Run from the dropdown menu. If a Run As dialog box appears, select Android Application and click OK. Eclipse starts the emulator, installs this project's APK, and runs the app, whose output appears in Figure 7-1.
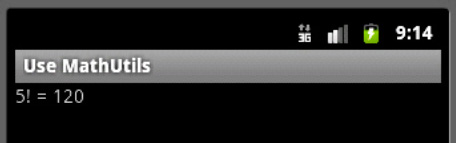
Figure 7.1. UseMathUtils's simple user interface could be expanded to let the user enter an arbitrary number.
Note
Examine this application's UseMathUtils.apk file (jar tvf UseMathUtils.apk), and you won't find a mathutils.jar entry. Instead, you'll find classes.dex, which contains the app's Dalvik-executable bytecode. classes.dex also contains the Dalvik equivalent of the MathUtils classfile, because the Android build system unpacks JAR files, processes their contents with the dx tool to convert their Java bytecodes to Dalvik bytecodes, and merges the equivalent Dalvik code into classes.dex.
You want to create a library that stores Android-specific code, such as custom widgets or activities with or without resources.
Android 2.2 and successors let you create Android library projects, which are Eclipse projects describing libraries that incorporate Android-specific code and even resources.
Suppose you want to create a library that contains a single reusable custom widget describing a game board (for playing chess, checkers, or even tic-tac-toe). Listing 7-3 reveals this library's GameBoard class.
Example 7.3. GameBoard Describing a Reusable Custom Widget for Drawing Different Game Boards
// GameBoard.java

package com.apress.gameboard;

import android.content.Context;

import android.graphics.Canvas;
import android.graphics.Paint;

import android.view.View;

public class GameBoard extends View
{
   private int nSquares, colorA, colorB;

   private Paint paint;
   private int squareDim;

   public GameBoard(Context context, int nSquares, int colorA, int colorB)
   {
      super(context);
      this.nSquares = nSquares;
      this.colorA = colorA;
      this.colorB = colorB;
      paint = new Paint();
   }

   @Override
   protected void onDraw(Canvas canvas)
   {
      for (int row = 0; row < nSquares; row++)
      {
paint.setColor(((row & 1) == 0) ? colorA : colorB);
for (int col = 0; col < nSquares; col++)
{
int a = col*squareDim;
int b = row*squareDim;
canvas.drawRect(a, b, a+squareDim, b+squareDim, paint);
paint.setColor((paint.getColor() == colorA) ? colorB : colorA);
}
}
}
@Override
protected void onMeasure(int widthMeasuredSpec, int heightMeasuredSpec)
{
// keep the view squared
int width = MeasureSpec.getSize(widthMeasuredSpec);
int height = MeasureSpec.getSize(heightMeasuredSpec);
int d = (width == 0) ? height : (height == 0) ? width :
(width < height) ? width : height;
setMeasuredDimension(d, d);
squareDim = width/nSquares;
}
}Android custom widgets are based on views that subclass android.view.View or one of its subclasses (such as android.widget.TextView). GameBoard subclasses View directly because it doesn't need any subclass functionality.
GameBoard provides several fields, including the following:
nSquaresstores the number of squares on each side of the game board. Typical values include 3 (for a 3-by-3 board) and 8 (for an 8-by-8 board).colorAstores the color of even-numbered squares on even-numbered rows, and the color of odd-numbered squares on odd-numbered rows – row and column numbering starts at 0.colorBstores the color of odd-numbered squares on even-numbered rows, and the color of even-numbered squares on odd-numbered rows.paintstores a reference to anandroid.graphics.Paintobject that is used to specify the square color (colorAorcolorB) when the game board is drawn.squareDimstores the dimension of a square – the number of pixels on each side.
GameBoard's constructor initializes this widget by storing its nSquares, colorA, and colorB arguments in same-named fields, and also instantiates the Paint class. Before doing so, however, it passes its context argument to its View superclass.
Note
View subclasses are required to pass an android.content.Context instance to their View superclass. Doing so identifies the context (an activity, for example) in which the custom widget is running. Custom widget subclasses can subsequently call View's Context getContext() method to return this Context object, so that they can call Context methods to access the current theme, resources, and so on.
Android tells a custom widget to draw itself by calling the widget's overriding protected void onDraw(Canvas canvas) method. GameBoard's onDraw(Canvas) method responds by invoking android.graphics.Canvas's void drawRect(float left, float top, float right, float bottom, Paint paint) method to paint each square for each row/column intersection. The final paint argument determines the color of that square.
Before Android invokes onDraw(Canvas), it must measure the widget. It accomplishes this task by invoking the widget's overriding protected void onMeasure(int widthMeasureSpec, int heightMeasureSpec) method, where the passed arguments specify the horizontal and vertical space requirements that are imposed by the parent view. The widget typically passes these arguments to the View.MeasureSpec nested class's static int getSize(int measureSpec) method to return the exact width or height of the widget based on the passed measureSpec argument. The returned values or a modified version of these values must then be passed to View's void setMeasuredDimension(int measuredWidth, int measuredHeight) method to store the measured width and height. Failure to call this method results in a thrown exception at runtime. Because game boards should be square, GameBoard's onMeasure(int, int) method passes the minimum of the width and height to setMeasuredDimension(int, int) to ensure a square game board.
Now that you know how GameBoard works, you're ready to create a library that stores this class. You'll create this library by creating an Android library project. The nice thing about such a project is that it's a standard Android project, so you can create a new Android library project in the same way as you would create a new app project.
Complete the following steps to create the GameBoard project:
Select New from the File menu, and select Project from the resulting pop-up menu.
On the New Project dialog box, expand the Android node in the wizard tree, select the Android Project branch below this node, and click the Next button.
On the resulting New Android Project dialog box, enter
GameBoardinto the Project name textfield. This entered name identifies the folder in which theGameBoardproject is stored.Select the "Create new project in workspace" radio button if it's not selected.
Under Build Target, check the checkbox of the appropriate Android target to be used as the
GameBoardbuild target. This target specifies which Android platform you'd like your application to be built against. Assuming that you've installed only the Android 2.3 platform, only this build target should appear and it should already be checked.Under Properties, leave the Application name textfield blank – the library isn't an app, so there's no point in entering a value in this field. Continuing, enter
com.apress.gameboardinto the Package name textfield. This value is the package namespace (following the same rules as for packages in the Java programming language) where all your library source code will reside. Uncheck the Create Activity checkbox if it's checked. The textfield is disabled when this checkbox is not checked. Finally, enter integer9into the Min SDK Version textfield to identify the minimum API Level required to properly runGameBoardon the Android 2.3 platform.Click Finish.
Although you create an Android library project in the same fashion as creating a regular app project, you must adjust some of GameBoard's project properties to indicate that it is a library project:
The new GameBoard project is now marked as an Android library project. However, it doesn't yet contain a GameBoard.java source file containing Listing 7-3's contents. Create this source file under Package Explorer's GameBoard/src/com/apress/gameboard node.
You can build this library if you want to (right-click the GameBoard node and select Build Project from the pop-up menu, for example). However, it isn't necessary to do so. The project will be built automatically when you build a project that uses this library. You'll learn how to do this in the next recipe.
Note
If you build the GameBoard library, you'll discover a com/apress/gameboard directory structure where gameboard contains GameBoard.class and several resource-oriented classfiles (even though GameBoard.java doesn't reference resources). This is the essence of what constitutes a library based on an Android library project.
You've successfully built the GameBoard library and want to learn how to integrate this library into your Eclipse-based Android projects.
Identify the GameBoard library to Eclipse in the properties of the app project being built, and build the app.
Now that you've created GameBoard, you'll need an Android app to try out this library. Listing 7-4 presents the source code to a UseGameBoard single-activity-based app that instantiates this library's GameBoard class and places it in the activity's view hierarchy.
Example 7.4. UseGameBoard Placing the GameBoard Widget into the Activity's View Hierarchy
// UseGameBoard.java package com.apress.usegameboard; import android.app.Activity; import android.graphics.Color; import android.os.Bundle;import com.apress.gameboard.GameBoard;public class UseGameBoard extends Activity { @Override public void onCreate(Bundle savedInstanceState) { super.onCreate(savedInstanceState);GameBoard gb = new GameBoard(this, 8, Color.BLUE, Color.WHITE);setContentView(gb);} }
Assuming that Eclipse is running, complete the following steps to create a UseGameBoard project:
Select New from the File menu, and select Project from the resulting pop-up menu.
On the New Project dialog box, expand the Android node in the wizard tree, select the Android Project branch below this node, and click the Next button.
On the resulting New Android Project dialog box, enter
UseGameBoardinto the Project name textfield. This entered name identifies the folder in which theUseGameBoardproject is stored.Select the "Create new project in workspace" radio button if it's not selected.
Under Build Target, check the checkbox of the appropriate Android target to be used as
UseGameBoard's build target. This target specifies which Android platform you'd like your app to be built against. Assuming that you've installed only the Android 2.3 platform, only this build target should appear and it should already be checked.Under Properties, enter
Use GameBoardinto the Application name textfield. This human-readable title will appear on the Android device. Continuing, entercom.apress.usegameboardinto the Package name textfield. This value is the package namespace (following the same rules as for packages in the Java programming language) where all your source code will reside. Check the Create Activity checkbox if it's not checked, and enterUseGameBoardas the name of the app's starting activity in the textfield that appears beside this checkbox. The textfield is disabled when this checkbox is not checked. Finally, enter integer9into the Min SDK Version textfield to identify the minimum API Level required to properly runUseGameBoardon the Android 2.3 platform.Click Finish.
Eclipse creates a UseGameBoard node in the Package Explorer window. Complete the following steps to set up all files:
Expand the UseGameBoard node, followed by the
srcnode, followed by thecom.apress.usegameboardnode.Double-click the UseGameBoard.java node (underneath com.apress.usegameboard) and replace the skeletal contents in the resulting window with Listing 7-4.
Right-click the UseGameBoard node and select Properties from the resulting pop-up menu.
On the resulting Properties for UseGameBoard dialog box, select the Android category and click the Add button.
On the resulting Project Selection dialog box, select GameBoard and click OK.
Click Apply, and then OK to close Properties for UseGameBoard.
You're now ready to run this project. Select Run from the menubar, followed by Run from the dropdown menu. If a Run As dialog box appears, select Android Application and click OK. Eclipse starts the emulator, installs this project's APK, and runs the app, whose output appears in Figure 7-2.
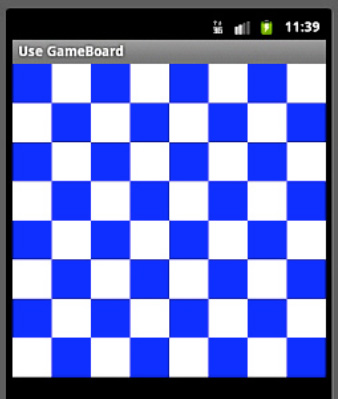
Figure 7.2. UseGameBoard reveals a blue-and-white checkered game board that could be used as the background for a game such as checkers or chess.
Note
If you're interested in creating and using an Android library project-based library that incorporates an activity, check out Google's TicTacToe example library project (http://developer.android.com/guide/developing/projects/projects-eclipse.html#SettingUpLibraryProject).
Although several Android libraries exist for generating charts, you might prefer the simplicity of Kidroid.com's kiChart product (www.kidroid.com/kichart/). Version 0.1 supports bar charts and line charts, and Kidroid promises to add new chart types in subsequent releases.
The link to kiChart's home page presents links for downloading kiChart-0.1.jar (the library) and kiChart-Help.pdf (documentation describing the library).
kiChart's documentation states that bar and line charts support multiple series of data. Furthermore, it states that charts can be exported to image files, and that you can define chart parameters (such as font color, font size, margin, and so on).
The documentation then presents a pair of screenshots to the sample line and bar charts rendered by a demo app. These screenshots are followed by a code exert from this demo – specifically, the LineChart chart activity class.
LineChart's source code reveals the basics of establishing a chart, explained here:
Create an activity that extends the
com.kidroid.kichart.ChartActivityclass. This activity renders either a bar chart or a line chart.Within the activity's
onCreate(Bundle)method, create aStringarray of horizontal axis labels, and create a floating-point array of data for each set of bars or each line.Create an array of
com.kidroid.kichart.model.Aitem(axis item) instances and populate this array withAitemobjects that store the data arrays. EachAitemconstructor call requires you to pass anandroid.graphics.Colorvalue to identify the color associated with the data array (whose displayed values and bars or lines are displayed in that color), aStringvalue that associates a label with the color and data array, and the data array itself.Instantiate the
com.kidroid.kichart.view.BarViewclass if you want to display a bar chart, or thecom.kidroid.kichart.view.LineViewclass if you want to display a line chart.Call the class's
public void setTitle(String title)method to specify a title for the chart.Call the class's
public void setAxisValueX(String[] labels)method to specify the chart's horizontal labels.Call the class's
public void setItems(Aitem[] items)method to specify the chart's arrays of data items.Call
setContentView()with the chart instance as its argument to display the chart.You don't have to worry about selecting a range of values for the vertical axis because kiChart takes care of this task on your behalf.
A class diagram that presents kiChart's classes and shows their relationships follows the source code. For example, com.kidroid.kichart.view.ChartView is the superclass of com.kidroid.kichart.view.AxisView, which superclasses BarView and LineView.
Each class's properties and ChartView's public boolean exportImage(String filename) method are then documented. This method lets you output a chart to a file, returning true if successful and false if unsuccessful.
Tip
To influence the range of values displayed on the vertical axis, you will need to work with AxisView's intervalCount, intervalValue, and valueGenerate properties.
In practice, you'll find kiChart easy to use. For example, consider a ChartDemo app whose main activity (also named ChartDemo) presents a user interface that lets the user enter quarterly sales figures for each of the years 2010 and 2011 via its eight textfields. The main activity also presents a pair of buttons that let the user view this data in the context of a bar chart or in the context of a line chart via separate BarChart and LineChart activities.
Listing 7-5 presents ChartDemo's source code.
Example 7.5. ChartDemo Describing an Activity for Entering Chart Data Values and Launching the Bar Chart or Line Chart Activity
// ChartDemo.java

package com.apress.chartdemo;

import android.app.Activity;

import android.content.Intent;

import android.os.Bundle;

import android.view.View;

import android.widget.AdapterView;
import android.widget.Button;
import android.widget.EditText;

public class ChartDemo extends Activity
{
   @Override
   public void onCreate(Bundle savedInstanceState)
   {
      super.onCreate(savedInstanceState);
      setContentView(R.layout.main);

      Button btnViewBC = (Button) findViewById(R.id.viewbc);
      AdapterView.OnClickListener ocl;
      ocl = new AdapterView.OnClickListener()
      {
         @Override
         public void onClick(View v)
         {
            final float[] data2010 = new float[4];
            int[] ids = { R.id.data2010_1, R.id.data2010_2, R.id.data2010_3,
                          R.id.data2010_4 };
            for (int i = 0; i < ids.length; i++)
            {
               EditText et = (EditText) findViewById(ids[i]);
               String s = et.getText().toString();
               try
               {
                  float input = Float.parseFloat(s);
                  data2010[i] = input;
               }
               catch (NumberFormatException nfe)
               {
                  data2010[i] = 0;
               }
            }
            final float[] data2011 = new float[4];
            ids = new int[] { R.id.data2011_1, R.id.data2011_2,
                              R.id.data2011_3, R.id.data2011_4 };
            for (int i = 0; i < ids.length; i++)
            {
               EditText et = (EditText) findViewById(ids[i]);
               String s = et.getText().toString();
               try
               {
                  float input = Float.parseFloat(s);
                  data2011[i] = input;
               }
               catch (NumberFormatException nfe)
               {
                  data2011[i] = 0;
               }
            }
            Intent intent = new Intent(ChartDemo.this, BarChart.class);
            intent.putExtra("2010", data2010);
            intent.putExtra("2011", data2011);
            startActivity(intent);
         }
      };
btnViewBC.setOnClickListener(ocl);
Button btnViewLC = (Button) findViewById(R.id.viewlc);
ocl = new AdapterView.OnClickListener()
{
@Override
public void onClick(View v)
{
final float[] data2010 = new float[4];
int[] ids = { R.id.data2010_1, R.id.data2010_2, R.id.data2010_3,
R.id.data2010_4 };
for (int i = 0; i < ids.length; i++)
{
EditText et = (EditText) findViewById(ids[i]);
String s = et.getText().toString();
try
{
float input = Float.parseFloat(s);
data2010[i] = input;
}
catch (NumberFormatException nfe)
{
data2010[i] = 0;
}
}
final float[] data2011 = new float[4];
ids = new int[] { R.id.data2011_1, R.id.data2011_2,
R.id.data2011_3, R.id.data2011_4 };
for (int i = 0; i < ids.length; i++)
{
EditText et = (EditText) findViewById(ids[i]);
String s = et.getText().toString();
try
{
float input = Float.parseFloat(s);
data2011[i] = input;
}
catch (NumberFormatException nfe)
{
data2011[i] = 0;
}
}
Intent intent = new Intent(ChartDemo.this, LineChart.class);
intent.putExtra("2010", data2010);
intent.putExtra("2011", data2011);
startActivity(intent);
}
};
btnViewLC.setOnClickListener(ocl);
}
}ChartDemo implements all of its logic in its onCreate(Bundle) method. This method largely concerns itself with setting its content view and attaching a click listener to each of the view's two buttons.
Because these listeners are nearly identical, we'll consider only the code for the listener attached to the viewbc (view bar chart) button. In response to this button being clicked, the listener's onClick(View) method is called to perform the following tasks:
Populate a
data2010floating-point array with the values from the four textfields corresponding to 2010 data.Populate a
data2011floating-point array with the values from the four textfields corresponding to 2011 data.Create an
Intentobject that specifiesBarChart.classas the classfile of the activity to launch.Store the
data2010anddata2011arrays in this object so that they can be accessed from theBarChartactivity.Launch the
BarChartactivity.
Listing 7-6 presents BarChart's source code.
Example 7.6. BarChart Describing the Bar Chart Activity
// BarChart.java package com.apress.chartdemo;import com.kidroid.kichart.ChartActivity;import com.kidroid.kichart.model.Aitem;import com.kidroid.kichart.view.BarView;import android.graphics.Color; import android.os.Bundle; public class BarChart extends ChartActivity { @Override public void onCreate(Bundle savedInstanceState) { super.onCreate(savedInstanceState); Bundle bundle = getIntent().getExtras(); float[] data2010 = bundle.getFloatArray("2010"); float[] data2011 = bundle.getFloatArray("2011"); String[] arrX = new String[4]; arrX[0] = "2010.1"; arrX[1] = "2010.2"; arrX[2] = "2010.3"; arrX[3] = "2010.4";Aitem[] items = new Aitem[2];items[0] = new Aitem(Color.RED, "2010", data2010);items[1] = new Aitem(Color.GREEN, "2011", data2011);BarView bv = new BarView(this);bv.setTitle("Quarterly Sales (Billions)");bv.setAxisValueX(arrX);
bv.setItems(items);
      setContentView(bv);
   }
}
BarChart first obtains a reference to the Intent object passed to it by calling its inherited Intent getIntent() method. It then uses this method to retrieve a reference to the Intent object's Bundle object, which stores the floating-point arrays of data items. Each array is retrieved by invoking Bundle's float[] getFloatArray(String key) method.
BarChart next builds a String array of labels for the chart's X-axis and creates an Aitem array populated with two Aitem objects. The first object stores the 2010 data values and associates these values with the color red and 2010 as the legend value; the second object stores 2011 data values with color green and legend value 2011.
After instantiating BarView, BarChart calls this object's setTitle(String) method to establish the chart's title, setAxisValueX(String[]) method to pass the array of X-axis labels to the object, and setItems(Aitem[]) method to pass the Aitem array to the object. The BarView object is then passed to setContentView() to display the bar chart.
Note
Because LineChart is nearly identical to BarChart, this class's source code isn't presented in this chapter. You can easily create LineChart by changing the line that reads BarView bv = new BarView(this); to LineView bv = new LineView(this); Also, you should probably rename the variable bv to lv for best practices. And don't forget to change import com.kidroid.kichart.view.BarView; to import com.kidroid.kichart.view.LineView;.
Listing 7-7 presents main.xml, which describes the layout and widgets that comprise ChartDemo's user interface.
Example 7.7. main.xml Describing the Chart Demo Activity's Layout
<?xml version="1.0" encoding="utf-8"?>
<TableLayout xmlns:android="http://schemas.android.com/apk/res/android"
             android:layout_width = "fill_parent"
             android:layout_height="fill_parent"
             android:stretchColumns="*">
  <TableRow>
    <TextView android:text=""/>
    <TextView android:text="2010"
              android:layout_gravity="center"/>
    <TextView android:text="2011"
              android:layout_gravity="center"/>
  </TableRow>

  <TableRow>
    <TextView android:text="1st Quarter"/>
    <EditText android:id="@+id/data2010_1"
              android:inputType="numberDecimal"
              android:maxLines="1"/>
<EditText android:id="@+id/data2011_1"
android:inputType="numberDecimal"
android:maxLines="1"/>
</TableRow>
<TableRow>
<TextView android:text="2nd Quarter"/>
<EditText android:id="@+id/data2010_2"
android:inputType="numberDecimal"
android:maxLines="1"/>
<EditText android:id="@+id/data2011_2"
android:inputType="numberDecimal"
android:maxLines="1"/>
</TableRow>
<TableRow>
<TextView android:text="3rd Quarter"/>
<EditText android:id="@+id/data2010_3"
android:inputType="numberDecimal"
android:maxLines="1"/>
<EditText android:id="@+id/data2011_3"
android:inputType="numberDecimal"
android:maxLines="1"/>
</TableRow>
<TableRow>
<TextView android:text="4th Quarter"/>
<EditText android:id="@+id/data2010_4"
android:inputType="numberDecimal"
android:maxLines="1"/>
<EditText android:id="@+id/data2011_4"
android:inputType="numberDecimal"
android:maxLines="1"/>
</TableRow>
<TableRow>
<TextView android:text=""/>
<Button android:id="@+id/viewbc"
android:text="View Barchart"/>
<Button android:id="@+id/viewlc"
android:text="View Linechart"/>
</TableRow>
</TableLayout>main.xml describes a tabular layout via the <TableLayout> tag, where the user interface is laid out in six rows and three columns. The "fill_parent" assignment to each of this tag's layout_width and layout_height attributes tells this layout to occupy the activity's entire screen. The "*" assignment to this tag's stretchColumns attribute tells this layout to give each column an identical width.
Note
A stretchable column is a column that can expand in width to fit any available space. To specify which columns are stretchable, assign a comma-delimited list of 0-based integers to stretchColumns. For example, "0, 1" specifies that column 0 (the leftmost column) and column 1 are stretchable. The "*" assignment indicates that all columns are equally stretchable, which gives them identical widths.
Nested inside <TableLayout> and its </TableLayout> partner are a series of <TableRow> tags. Each <TableRow> tag describes the contents of a single row in the tabular layout, and these contents are a variety of zero or more views (such as TextView and EditText), where each view constitutes one column.
Note
For brevity, string values are stored directly in main.xml instead of being stored in a separate strings.xml file. Consider it an exercise to introduce strings.xml and replace these literal strings with references to strings stored in strings.xml.
Listing 7-8 presents this app's AndroidManifest.xml file, which describes the app and its activities.
Example 7.8. AndroidManifest.xml Pulling Everything Together for the ChartDemo App
<?xml version="1.0" encoding="utf-8"?>
<manifest xmlns:android="http://schemas.android.com/apk/res/android"
          package="com.apress.chartdemo"
          android:versionCode="1"
          android:versionName="1.0">
   <application android:icon="@drawable/icon" android:label="@string/app_name">
      <activity android:name=".ChartDemo"
                android:label="@string/app_name">
         <intent-filter>
            <action android:name="android.intent.action.MAIN" />
            <category android:name="android.intent.category.LAUNCHER" />
         </intent-filter>
      </activity>
      <activity android:name=".BarChart"/>
      <activity android:name=".LineChart"/>
   </application>
   <uses-sdk android:minSdkVersion="9" />
</manifest>
It's important to include <activity> tags for each of the BarChart and LineChart activities in the manifest. Failure to do so results in a runtime dialog box that displays the following message: "The application Chart Demo (process com.apress.chartdemo) has stopped unexpectedly. Please try again."
Figure 7-3 reveals ChartDemo's main activity with sample values entered for each quarter.

Figure 7.3. ChartDemo lets you enter eight data values and choose to display these values via a bar chart or a line chart.
Clicking the View Barchart button after entering the aforementioned data values launches the BarChart activity, which displays the bar chart shown in Figure 7-4.
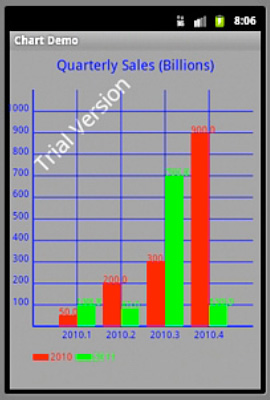
In addition to presenting a barchart, Figure 7-4 reveals that a trial version of kiChart is being used. You'll need to contact Kidroid.com and find out about licensing and how to obtain a version of kiChart that doesn't display this message.
Google's Cloud-To-Device Messaging (C2DM) framework (http://code.google.com/android/c2dm/index.html), which is designed to implement push messaging to the device, has a number of drawbacks that can impact it as a practical solution for push messaging. Your app needs a more universal push solution.
Utilize IBM's MQTT library to implement lightweight push messaging in your apps. The MQTT client library is offered from IBM in a pure Java implementation, meaning it can be utilized on any Android device, without limitation on specific API Levels.
An MQTT system consists of three main components:
Client app: Runs on the device, and registers with the message broker for a given set of "topics" on which to receive messages.
Message broker: Handles registration of clients, and distributes incoming messages from the server app to each client based on its "topic."
Server application: Responsible for publishing messages to the broker.
Messages are filtered by topic. Topics are defined in a tree format, represented by a path string. Clients may subscribe to specific topics, or sub-topic groups by providing the appropriate path. For example, suppose we define two topics for our app like so:
examples/one
examples/two
A client may subscribe to either topic by subscribing to the exact full path string. However, if the client prefers to subscribe to both topics (and any others that may be created later in this group), it may conveniently do so by subscribing as follows:
examples/#
The '#' wildcard character indicates that all topics in the examples group are of interest to this client.
In this recipe we'll focus on implementing the client app using the MQTT library on the Android device. IBM provides excellent tools for development and testing of the other components, which we'll expose here as well.
The MQTT Java library may be freely downloaded from IBM at the following location: www-01.ibm.com/support/docview.wss?uid=swg24006006. The download archive contains sample code, API Javadoc, and usage documentation, in addition to the library JAR.
Locate the wmqtt.jar file from within the download archive. This is the library that must be included into the Android project. By convention, this means a /libs directory should be created in your project directory, and this JAR should be inserted there.
For testing your client implementation, IBM provides the Really Small Message Broker (RSMB). RSMB may be downloaded at the following location: www.alphaworks.ibm.com/tech/rsmb.
RSMB is a multi-platform download that includes command-line tools for both the message broker and an application to publish messages. The license provided by IBM for this tool forbids it from being used in a production environment; at that point you will need to roll your own or use one of the many open source implementations available. However, for development of the mobile client, RSMB couldn't be more perfect.
Since monitoring for incoming push messages is an indefinite, long-standing operation, let's take a look at an example that puts the basic functionality into a service.
Note
As a reminder, you should have libs/wmqtt.jar in your project directory and referenced in your project build path.
Listing 7-9 presents the source code to an example MQTT service.
Example 7.9. MQTT Example Service
//ClientService.java
package com.apress.pushclient;

import android.app.AlarmManager;
import android.app.PendingIntent;
import android.app.Service;
import android.content.BroadcastReceiver;
import android.content.Context;
import android.content.Intent;
import android.content.IntentFilter;
import android.os.Handler;
import android.os.IBinder;
import android.os.Message;
import android.widget.Toast;
//Imports required from the MQTT Library JAR
import com.ibm.mqtt.IMqttClient;
import com.ibm.mqtt.MqttClient;
import com.ibm.mqtt.MqttException;
import com.ibm.mqtt.MqttPersistenceException;
import com.ibm.mqtt.MqttSimpleCallback;

public class ClientService extends Service implements MqttSimpleCallback {

    //Location where broker is running
    private static final String HOST = HOSTNAME_STRING_HERE;
    private static final String PORT = "1883";
    //30 minute keep-alive ping
    private static final short KEEP_ALIVE = 60 * 30;
    //Unique identifier of this device
    privatestaticfinal String CLIENT_ID = "apress/"+System.currentTimeMillis();
    //Topic we want to watch for
    private static final String TOPIC = "apress/examples";

    private static final String ACTION_KEEPALIVE =
"com.examples.pushclient.ACTION_KEEPALIVE";

    private IMqttClient mClient;
    private AlarmManager mManager;
    private PendingIntent alarmIntent;

    @Override
    public void onCreate() {
        super.onCreate();
        mManager = (AlarmManager)getSystemService(Context.ALARM_SERVICE);

        Intent intent = new Intent(ACTION_KEEPALIVE);
        alarmIntent = PendingIntent.getBroadcast(this, 0, intent, 0);
registerReceiver(mReceiver, new IntentFilter(ACTION_KEEPALIVE));
try {
//Format: tcp://hostname@port
String connectionString = String.format("%s%s@%s", MqttClient.TCP_ID, HOST,
PORT);
mClient = MqttClient.createMqttClient(connectionString, null);
} catch (MqttException e) {
e.printStackTrace();
//Can't continue without a client
stopSelf();
}
}
@Override
public void onStart(Intent intent, int startId) {
//Callback on Android devices prior to 2.0
handleCommand(intent);
}
@Override
publicint onStartCommand(Intent intent, int flags, int startId) {
//Callback on Android devices 2.0 and later
handleCommand(intent);
//If Android kills this service, we want it back when possible
return START_STICKY;
}
private void handleCommand(Intent intent) {
try {
//Make a connection
mClient.connect(CLIENT_ID, true, KEEP_ALIVE);
//Target MQTT callbacks here
mClient.registerSimpleHandler(this);
//Subscribe to a topic
String[] topics = new String[] { TOPIC };
//QoS of 0 indicates fire once and forget
int[] qos = newint[] { 0 };
mClient.subscribe(topics, qos);
//Schedule a ping
scheduleKeepAlive();
} catch (MqttException e) {
e.printStackTrace();
}
}
@Override
public void onDestroy() {
super.onDestroy();
unregisterReceiver(mReceiver);
unscheduleKeepAlive();
if(mClient != null) {
try {
mClient.disconnect();
mClient.terminate();} catch (MqttPersistenceException e) {
e.printStackTrace();
}
mClient = null;
}
}
//Handle incoming message from remote
private Handler mHandler = new Handler() {
@Override
public void handleMessage(Message msg) {
String incoming = (String)msg.obj;
Toast.makeText(ClientService.this, incoming, Toast.LENGTH_SHORT).show();
}
};
//Handle ping alarms to keep the connection alive
private BroadcastReceiver mReceiver = new BroadcastReceiver() {
@Override
public void onReceive(Context context, Intent intent) {
if(mClient == null) {
return;
}
//Ping the MQTT service
try {
mClient.ping();
} catch (MqttException e) {
e.printStackTrace();
}
//Schedule the next alarm
scheduleKeepAlive();
}
};
private void scheduleKeepAlive() {
long nextWakeup = System.currentTimeMillis() + (KEEP_ALIVE * 1000);
mManager.set(AlarmManager.RTC_WAKEUP, nextWakeup, alarmIntent);
}
private void unscheduleKeepAlive() {
mManager.cancel(alarmIntent);
}
/* MqttSimpleCallback Methods */
@Override
public void connectionLost() throws Exception {
mClient.terminate();
mClient = null;
stopSelf();
}
@Override
public void publishArrived(String topicName, byte[] payload, int qos, boolean
retained) throws Exception {
//Be wary of UI related code here!
//Best to use a Handler for UI or Context operationsStringBuilder builder = new StringBuilder();
builder.append(topicName);
builder.append('
'),
builder.append(new String(payload));
//Pass the message up to our handler
Message receipt = Message.obtain(mHandler, 0, builder.toString());
receipt.sendToTarget();
}
/*Unused method*/
//We are not using this service as bound
//It is explicitly started and stopped with no direct connection
@Override
public IBinder onBind(Intent intent) { return null; }
}Note
This Service will most likely be communicating with a remote server, so you must declare android.permission.INTERNET in the application manifest, as well as the Service itself with a <service> tag.
In order to subclass Service, an implementation of onBind() must be provided. In this case, our example does not need to provide a Binder interface because activities will never need to hook directly into call methods. Therefore, this required method simply returns null. This Service is designed to receive explicit instructions to start and stop, running for an indeterminate amount of time in between.
When the Service is created, an MqttClient object is also instantiated using createMqttClient(); this client takes the location of the message broker host as a string. The connection string is in the format of tcp://hostname@port. In the example, the chosen port number is 1883, which is the default port number for MQTT communication. If you choose a different port number, you should verify that your server implementation is running on a port to match.
From this point forward, the Service remains idle until a start command is issued. Upon receipt of a start command (issued externally by a call to Context.startService()), either onStart() or onStartCommand() will be called (depending on the version of Android running on the device). In the latter case, the service returns START_STICKY, a constant telling the system that it should leave this service running, and restart it if it's prematurely killed for memory reasons.
Once started, the service will register with the MQTT message broker, passing a unique client ID and a keep-alive time. For simplicity, this example defines the client ID in terms of the current time when the service was created. In production, a more unique identifier such as the Wi-Fi MAC Address or TelephonyManager.getDeviceId() might be more appropriate, keeping in mind that neither of those choices is guaranteed to appear on all devices.
The keep-alive parameter is the time (in seconds) that the broker should use to time-out the connection to this client. In order to avoid this time-out, clients should post a message or regularly ping the broker. We will shortly discuss this task more fully.
During startup, the client is also subscribed to a single topic. Notice that the subscribe() method takes arrays as parameters; a client may subscribe to multiple topics within a single method call. Each topic is also subscribed with a requested quality of service (QoS) value. The most tactful value to request for mobile devices is zero, telling the broker to only send a message once without requiring confirmation. Doing so reduces the amount of handshaking required between the broker and the device.
With the connection live and registered, any incoming messages from the remote broker will result in a call to publishArrived(), with the data about the message passed in. This method may be called on any of the background threads that MqttClient creates and maintains, so it's important to not do anything related to the main thread directly here. In the example's case, all incoming messages are passed to a local Handler, to guarantee that the resulting Toast is posted on the main thread for display.
There's one upkeep task required when implementing an MQTT client, and that is pinging the broker to keep the connection alive. To accomplish this task, the Service registers with the AlarmManager to trigger a broadcast on a schedule matching the keep-alive parameter. This task must be done even if the device is currently asleep, so the alarm is set each time with AlarmManager.RTC_WAKEUP. When each alarm triggers, the Service simply calls MqttClient.ping() and schedules the next keep-alive update.
Due to the persistent nature of this requirement, it is prudent to select a low-frequency interval for the keep-alive timer; we chose 30 minutes in this example. This timer value represents a balance between reducing the frequency of required updates on the device (to save power and bandwidth), and the latency before the remote broker becomes aware that a remote device is no longer there and times it out.
When the push service is no longer required, an external call to Context.stopService() will result in a call to onDestroy(). Here, the Service tears down the MQTT connection, removes any pending alarms, and releases all resources. The second callback implemented as part of the MqttSimpleCallback interface is onConnectionLost(), indicating an unexpected disconnect. In these cases, the Service stops itself much in the same way as a manual stop request.
In order to test messaging with the device, you will need to start up an instance of RSMB on your machine. From the command line, navigate into the location where you unarchived the download, and then into the directory that matches your computer's platform (Windows, Linux, Mac OS X). From here, simply execute the broker command and the broker service will begin running on your machine, located at localhost:1883:
CWNAN9999I Really Small Message Broker
CWNAN9997I Licensed Materials - Property of IBM
CWNAN9996I Copyright IBM Corp. 2007, 2010 All Rights Reserved
...
CWNAN0014I MQTT protocol starting, listening on port 1883
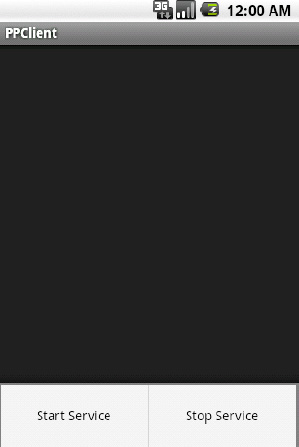
At this point, you may connect to the service and publish messages or register to receive messages. To put this Service to the test, Listings 7-10 and 7-11 create a simple Activity that may be used to start and stop the service.
Example 7.10. res/menu/home.xml
<?xml version="1.0" encoding="utf-8"?>
<menu xmlns:android="http://schemas.android.com/apk/res/android">
  <item
    android:id="@+id/menu_start"
    android:title="Start Service" />
  <item
    android:id="@+id/menu_stop"
    android:title="Stop Service" />
</menu>
Example 7.11. Activity Controlling MQTT Service
//ClientActivity.java
package com.apress.pushclient;

import android.app.Activity;
import android.content.Intent;
import android.os.Bundle;
import android.view.Menu;
import android.view.MenuItem;

public class ClientActivity extends Activity {

    private Intent serviceIntent;

    @Override
    public void onCreate(Bundle savedInstanceState) {
        super.onCreate(savedInstanceState);

        serviceIntent = new Intent(this, ClientService.class);
    }

    @Override
    public boolean onCreateOptionsMenu(Menu menu) {
        getMenuInflater().inflate(R.menu.home, menu);
        return true;
    }

    @Override
    public boolean onOptionsItemSelected(MenuItem item) {
        switch(item.getItemId()) {
        case R.id.menu_start:
            startService(serviceIntent);
            return true;
        case R.id.menu_stop:
            stopService(serviceIntent);
            return true;
        }
return super.onOptionsItemSelected(item);
}
}Listing 7-11 creates an Intent that will be used by two menu options to start and stop the service at will (see Figure 7-5). By pressing the MENU button and selecting "Start Service," the MQTT connection will start up and register the device for messages with the topic "apress/examples."
Note
The HOST value in the example service needs to point to the machine where your RSMB instance is running. Even if you are testing in the emulator on the same machine, this value is NOT localhost! At the very least, you must point the emulator or device to the IP address of the machine where your broker is running.
With the Android device successfully registered for push messages from the broker, open up another command line window and navigate to the same directory from where broker was executed. Another command, stdinpub, can be used to connect to the broker instance and publish messages down to the device. From the command line type the following command:
stdinpub apress/examples
This command will register a client to publish messages with a topic matching our example. You will see the following as a result:
Using topic apress/examples
Connecting
Now you may type any message you like, followed by Enter. Upon pressing Enter, the message will be sent to the broker, and pushed out to the registered device. Do this as many times as you like, and then use CTRL-C to break out of the program. CTRL-C will also work to terminate the broker service.
Tip
RSMB also includes a third command, stdoutsub, to subscribe to a set of topics with your local broker service. This command lets you completely close the loop, and test whether problems are occurring in the test suite or in your Android app.
Smart Android developers deliver their apps to market faster by taking advantage of libraries, which reduce development time by providing previously created and tested code.
This chapter's initial recipes introduced you to the topics of creating and using your own libraries. Specifically, you learned how to create and use Java library JARs whose code was restricted to Java 5 (or earlier) APIs, and Android library projects.
Although you'll probably create your own libraries to save yourself from reinventing the wheel, you might also need to use someone else's library. For example, if you need a simple charting library, you might want to look at kiChart, which facilitates the display of bar and line charts.
If you're working with the cloud, you might decide to use Google's C2DM framework. However, because this framework has a number of drawbacks (such as requiring a minimum of API level 8), you might consider utilizing IBM's MQTT library to implement lightweight push messaging in your apps.