
Integrating application software with device hardware presents opportunities to create unique user experiences that only the mobile platform can provide. Capturing media using the microphone and camera allows applications to incorporate a personal touch through a photo or recorded greeting. Integration of sensor and location data can help you develop applications to answer relevant questions such as, "Where am I?" and, "What am I looking at?"
In this chapter, we are going to investigate how the location, media, and sensor APIs provided by Android can be used to add that unique value the mobile brings into your applications.
You want to leverage the device's ability to report its current physical position in an application.
(API Level 1)
Utilize the background services provided by the Android LocationManager. One of the most powerful benefits that a mobile application can often provide to the user is the ability to add context by including information based on where they are currently located. Applications may ask the LocationManager to provide updates of a device's location either regularly, or just when it is detected that the device has moved a significant distance.
When working with the Android location services, some care should be taken to respect both the device battery and the user's wishes. Obtaining a fine-grained location fix using a device's GPS is a power-intensive process, and can quickly drain the battery in the user's device if left on continuously. For this reason, among others, Android allows the user to disable certain sources of location data, such as the device's GPS. These settings must be observed when your application decides how it will obtain location.
Each location source also comes with a tradeoff degree of accuracy. The GPS will return a more exact location (within a few meters), but take longer to fix and use more power; whereas the Network location will usually be accurate to a few kilometers, but is returned much faster and uses less power. Consider the requirements of the application when deciding which sources to access; if your application only wishes to display information about the local city, perhaps GPS fixes are not necessary.
Note
When using location services in an application, keep in mind that android.permission.ACCESS_COARSE_LOCATION or android.permission.ACCESS_FINE_LOCATION must be declared in the application manifest. If you declare android.permission.ACCESS_FINE_LOCATION, you do not need both as it includes coarse permissions as well.
When creating a simple monitor for user location in an Activity or Service, there are a few actions that we need to consider:
Determine if the source we want to use is enabled. If it's not, decide whether to ask the user to enable it or try another source.
Register for updates using reasonable values for minimum distance and update interval.
Unregister for updates when they are no longer needed to conserve device power.
In Listing 4-1, we register an Activity to listen for location updates while it is visible to the user, and display that location onscreen.
Example 4.1. Activity Monitoring Location Updates
publicclass MyActivity extends Activity {

    LocationManager manager;
    Location currentLocation;

    TextView locationView;

    @Override
    public void onCreate(Bundle savedInstanceState) {
        super.onCreate(savedInstanceState);
locationView = new TextView(this);
setContentView(locationView);
manager = (LocationManager)getSystemService(Context.LOCATION_SERVICE);
}
@Override
public void onResume() {
super.onResume();
if(!manager.isProviderEnabled(LocationManager.GPS_PROVIDER)) {
//Ask the user to enable GPS
AlertDialog.Builder builder = new AlertDialog.Builder(this);
builder.setTitle("Location Manager");
builder.setMessage("We want to use your location, but GPS is currently disabled.
"
+"Would you like to change these settings now?");
builder.setPositiveButton("Yes", new DialogInterface.OnClickListener() {
@Override
public void onClick(DialogInterface dialog, int which) {
//Launch settings, allowing user to make a change
Intent i = new Intent(Settings.ACTION_LOCATION_SOURCE_SETTINGS);
startActivity(i);
}
});
builder.setNegativeButton("No", new DialogInterface.OnClickListener() {
@Override
public void onClick(DialogInterface dialog, int which) {
//No location service, no Activity
finish();
}
});
builder.create().show();
}
//Get a cached location, if it exists
currentLocation = manager.getLastKnownLocation(LocationManager.GPS_PROVIDER);
updateDisplay();
//Register for updates
int minTime = 5000;
float minDistance = 0;
manager.requestLocationUpdates(LocationManager.GPS_PROVIDER,
minTime, minDistance, listener);
}
@Override
public void onPause() {
super.onPause();
manager.removeUpdates(listener);
}
//Update text view
privatevoid updateDisplay() {
if(currentLocation == null) {
locationView.setText("Determining Your Location...");
} else {
locationView.setText(String.format("Your Location:
%.2f, %.2f",
currentLocation.getLatitude(),currentLocation.getLongitude()));
}
}
//Handle location callback events
private LocationListener listener = new LocationListener() {
@Override
public void onLocationChanged(Location location) {
currentLocation = location;
updateDisplay();
}
@Override
public void onProviderDisabled(String provider) { }
@Override
public void onProviderEnabled(String provider) { }
@Override
public void onStatusChanged(String provider, int status, Bundle extras) { }
};
}This example chooses to work strictly with the device's GPS to get location updates. Because it is a key element to the functionality of this Activity, the first major task undertaken after each resume is to check if the LocationManager.GPS_PROVIDER is still enabled. If, for any reason, the user has disabled this feature, we give them the opportunity to rectify this by asking if they would like to enable GPS. An application does not have the ability to do this for the user, so if they agree we launch an Activity using the Intent action Settings.ACTION_LOCATION_SOURCE_SETTINGS, which brings up the device settings so the user may enable GPS.
Once GPS is active and available, the Activity registers a LocationListener to be notified of location updates. The LocationManager.requestLocationUpdates() method takes two major parameters of interest in addition to the provider type and destination listener:
minTimeThe minimum time interval between updates, in milliseconds.
Setting this to non-zero allows the location provider to rest for approximately the specified period before updating again.
This is a parameter to conserver power, and should not be set to a value any lower than the minimum acceptable update rate.
minDistanceThe distance the device must move before another update will be sent, in meters.
Setting this to non-zero will block updates until it is determined that the device has moved at least this much.
In the example, we request that updates be sent no more often than every five seconds, with no regard for whether the location has changed significantly or not. When these updates arrive, the onLocationChanged() method of the registered listener is called. Notice that a LocationListener will also be notified when the status of different providers changes, although we are not utilizing those callbacks here.
Note
If you are receiving updates in a Service or other background operation, Google recommends that the minimum time interval should be no less than 60,000 (60 seconds).
The example keeps a running reference to the latest location it received. Initially, this value is set to the last known location that the provider has cached by calling getLastKnownLocation(), which may return null if the provider does not have a cached location value. With each incoming update, the location value is reset and the user interface display is updated to reflect the new change.
(API Level 1)
The simplest way to show the user a map is to create an Intent with the location data and pass it to the Android system to launch in a mapping application. We'll look more in-depth at this method for doing a number of different tasks in a later chapter. In addition, maps can be embedded within your application using the MapView and MapActivity provided by the Google Maps API SDK add-on.
The Maps API is an add-on module to the core SDK, although they are still bundled together. If you do not already have the Google APIs SDK, open the SDK manager and you will find a package for each API level listed under "Third-party Add-ons."
In order to use the Maps API in your application, an API key must first be obtained from Google. This key is built using the private key that your application is signed with. Without an API key, the mapping classes may be utilized, but no map tiles will be returned to the application.
Note
For more information on the SDK, and to obtain an API key, visit http://code.google.com/android/add-ons/google-apis/mapkey.html. Notice also that Android uses the same signing key for all applications run in debug mode (such as when they are run from the IDE), so one key can serve for all applications you develop while in the testing phase.
If you are running code in an emulator to test, that emulator must be built with an SDK target that includes the Google APIs for mapping to operate properly. If you create emulators from the command line, these targets are named "Google Inc.:GoogleAPIs:X," where "X" is the API version indicator. If you create emulators from inside an IDE (such as Eclipse), the target has a similar naming convention of "Google APIs (Google Inc.) – X," where "X" is the API version indicator.
With the API key in hand and a suitable test platform in place, you are ready to begin.
To display a map, simply create an instance of MapView inside a MapActivity. One of the required attributes that must be passed to the MapView in your XML layout is the API key that you obtained from Google. See Listing 4-2.
Example 4.2. Typical MapView in a Layout
<com.google.android.maps.MapView
  android:layout_width="fill_parent"
  android:layout_height="fill_parent"
  android:enabled="true"
  android:clickable="true"
  android:apiKey="API_KEY_STRING_HERE"
/>
Note
When adding MapView to an XML layout, the fully qualified package name must be included, because the class does not exist in android.view or android.widget.
Although, MapView may be instantiated from code as well, the API key is still required as a constructor parameter:
MapView map = new MapView(this, "API_KEY_STRING_HERE");
In addition, the application manifest must declare its use of the Maps library, which dually acts as an Android Market filter to remove the application from devices that don't have this capability.
Now, let's look at an example that puts the last known user location on a map and displays it. See Listing 4-3.
Example 4.3. AndroidManifest.xml
<?xml version="1.0" encoding="utf-8"?>
<manifest xmlns:android="http://schemas.android.com/apk/res/android"
    package="com.examples.mapper"
    android:versionCode="1"
    android:versionName="1.0">
    <uses-sdk android:minSdkVersion="3" />
    <uses-permission android:name="android.permission.ACCESS_FINE_LOCATION" />
    <uses-permission android:name="android.permission.INTERNET" />

    <application android:icon="@drawable/icon" android:label="@string/app_name">
        <activity android:name=".MyActivity"
            android:label="@string/app_name">
            <intent-filter>
                <action android:name="android.intent.action.MAIN" />
                <category android:name="android.intent.category.LAUNCHER" />
            </intent-filter>
        </activity>

        <uses-library android:name="com.google.android.maps"></uses-library>

    </application>
</manifest>
Notice the permissions declared for INTERNET and ACCESS_FINE_LOCATION. The latter is only required because this example is hooking back up to the LocationManager to get the cached location value. The other key ingredient that must be present in the manifest is the <uses-library> tag referencing the Google Maps API. Android requires this item to properly link the external library into your application build, but it also serves another purpose. The library declaration is used by Android Market to filter out the application so it cannot be installed on devices that are not equipped with the proper mapping library. See Listing 4-4.
Example 4.4. res/layout/main.xml
<?xml version="1.0" encoding="utf-8"?>
<LinearLayout xmlns:android="http://schemas.android.com/apk/res/android"
  android:orientation="vertical"
  android:layout_width="fill_parent"
  android:layout_height="fill_parent">
  <TextView
    android:layout_width="fill_parent"
    android:layout_height="wrap_content"
    android:gravity="center_horizontal"
    android:text="Map Of Your Location"
  />
  <com.google.android.maps.MapView
    android:id="@+id/map"
    android:layout_width="fill_parent"
    android:layout_height="fill_parent"
    android:enabled="true"
    android:clickable="true"
    android:apiKey="YOUR_API_KEY_HERE"
  />
</LinearLayout>
Note the location of the required API key that you must enter. Also, notice that the MapView does not have to be the only thing in the Activity layout, despite the fact that it must be inflated inside of a MapActivity. See Listing 4-5.
Example 4.5. MapActivity Displaying Cached Location
publicclass MyActivity extends MapActivity {

    MapView map;
    MapController controller;

    @Override
    public void onCreate(Bundle savedInstanceState) {
        super.onCreate(savedInstanceState);
        setContentView(R.layout.main);

        map = (MapView)findViewById(R.id.map);
        controller = map.getController();

        LocationManager manager =
            (LocationManager)getSystemService(Context.LOCATION_SERVICE);
        Location location = manager.getLastKnownLocation(LocationManager.GPS_PROVIDER);
        int lat, lng;
        if(location != null) {
            //Convert to microdegrees
            lat = (int)(location.getLatitude() * 1000000);
            lng = (int)(location.getLongitude() * 1000000);
        } else {
            //Default to Google HQ
            lat = 37427222;
            lng = −122099167;
        }
        GeoPoint mapCenter = new GeoPoint(lat,lng);
        controller.setCenter(mapCenter);
        controller.setZoom(15);
    }

    //Required abstract method, return false
    @Override
    protectedboolean isRouteDisplayed() {
        return false;
    }
}
This Activity takes the latest user location, and centers the map on that point. All control of the map is done through a MapController instance, which we obtain by calling MapView.getController(); the controller can be used to pan, zoom, and otherwise adjust the map on screen. In this example, we use the controller's setCenter() and setZoom() methods to adjust the map display.
MapController.setCenter() takes a GeoPoint as its parameter, which is slightly different than the Location we receive from the Android services. The primary difference is that GeoPoint expresses latitude and longitude in terms of microdegrees (or degrees * 1E6) instead of a decimal value representing whole degrees. Therefore, we must convert the Location values before applying them to the map.
MapController.setZoom() allows the map to be programmatically zoomed to a specified level, between 1 and 21. By default, the map will zoom to level 1, which the SDK documentation defines as being a global view, with each increasing level magnifying the map by two. See Figure 4-1.
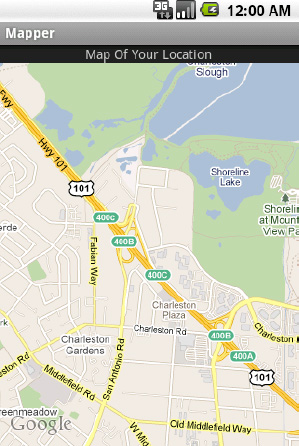
The first thing you will probably notice is that the map doesn't display any indicator on the location point (such as a pin). In Recipe 4-3 we will create these annotations, and describe how to customize them.
In addition to displaying a map centered on a specific location, your application needs to put an annotation down to more visibly mark the location.
(API Level 1)
Create a custom ItemizedOverlay for the map, which includes all of the points to mark. ItemizedOverlay is an abstract base class that handles all the drawing of the individual items on a MapView. The items themselves are instances of OverlayItem, which is a model class that defines the name, subtitle, and drawable marker to describe the point on the map.
Let's create an implementation of ItemizedOverlay that will take an array of GeoPoints and draw them on the map using the same drawable marker for each. See Listing 4-6.
Example 4.6. Basic ItemizedOverlay Implementation
public class LocationOverlay extends ItemizedOverlay<OverlayItem> {
    private List<GeoPoint> mItems;

    public LocationOverlay(Drawable marker) {
        super( boundCenterBottom(marker) );
    }

    public void setItems(ArrayList<GeoPoint> items) {
        mItems = items;
        populate();
    }

    @Override
    protected OverlayItem createItem(int i) {
        returnnew OverlayItem(mItems.get(i), null, null);
    }

    @Override
    publicint size() {
        return mItems.size();
    }

    @Override
    protected boolean onTap(int i) {
        //Handle a tap event here
        return true;
    }
}
In this implementation, the constructor takes a Drawable to represent the marker placed on the map at each location. Drawables that are used in overlays must have proper bounds applied to them, and boundCenterBottom() is a convenience method that handles this for us. Specifically, it applies bounds, such that the point on the Drawable that touches the map location will be in the center of the bottom row of pixels.
ItemizedOverlay has two abstract methods that must be overridden: createItem(), which must return an object of the declared type, and size(), which returns the number of items managed. This example takes a list of GeoPoints and wraps them all into OverlayItems. The populate() method should be called on the overlay as soon as all the data is present and ready for display, which in this case is at the end of setItems().
Let's apply this overlay to a map to draw three custom locations around Google HQ, using the default app icon as the marker. See Listing 4-7.
Example 4.7. Activity Using Custom Map Overlay
public class MyActivity extends MapActivity {

    MapView map;
    MapController controller;

    @Override
    public void onCreate(Bundle savedInstanceState) {
        super.onCreate(savedInstanceState);
        setContentView(R.layout.main);

        map = (MapView)findViewById(R.id.map);
        controller = map.getController();

        ArrayList<GeoPoint> locations = new ArrayList<GeoPoint>();
        //Google HQ @ 37.427,-122.099
        locations.add(new GeoPoint(37427222,-122099167));
        //Subtract 0.01 degrees
        locations.add(new GeoPoint(37426222,-122089167));
        //Add 0.01 degrees
        locations.add(new GeoPoint(37428222,-122109167));

        LocationOverlay myOverlay =
            new LocationOverlay(getResources().getDrawable(R.drawable.icon));
        myOverlay.setItems(locations);
        map.getOverlays().add(myOverlay);
        controller.setCenter(locations.get(0));
        controller.setZoom(15);

    }
    //Required abstract method, return false
    @Override
    protected boolean isRouteDisplayed() {
        return false;
    }

}
When run, this Activity produces the display shown in Figure 4-2.

Notice how the drawing of the drop shadow on the marker was handled for us by MapView and the ItemizedOverlay.
But, what if we want to customize each item so it displays a different marker image? How would we do that? By explicitly setting the item's marker, a custom Drawable can be returned for each item. In this case, the Drawable provided to the ItemizedOverlay constructor is just a default value to be used if no custom override exists. Consider a modification to the implementation, shown in Listing 4-8.
Example 4.8. ItemizedOverlay with Custom Markers
public class LocationOverlay extends ItemizedOverlay<OverlayItem> {
    private List<GeoPoint> mItems;
    private List<Drawable> mMarkers;

    public LocationOverlay(Drawable marker) {
        super( boundCenterBottom(marker) );
    }

    public void setItems(ArrayList<GeoPoint> items, ArrayList<Drawable> drawables) {
        mItems = items;
        mMarkers = drawables;
        populate();
    }

    @Override
    protected OverlayItem createItem(int i) {
        OverlayItem item = new OverlayItem(mItems.get(i), null, null);
item.setMarker( boundCenterBottom(mMarkers.get(i)) );
return item;
}
@Override
publicint size() {
return mItems.size();
}
@Override
protected boolean onTap(int i) {
//Handle a tap event here
return true;
}
}With this modification, the OverlayItems created now receive a custom marker image in the form of a bounded Drawable matching the item's index in a list of images. If the Drawable that you set has states, the pressed and focused states will display when the item is selected or touched. Our example modified to use the new implementation looks like Listing 4-9.
Example 4.9. Example Activity Providing Custom Markers
public class MyActivity extends MapActivity {

    MapView map;
    MapController controller;

    @Override
    public void onCreate(Bundle savedInstanceState) {
        super.onCreate(savedInstanceState);
        setContentView(R.layout.main);

        map = (MapView)findViewById(R.id.map);
        controller = map.getController();

        ArrayList<GeoPoint> locations = new ArrayList<GeoPoint>();
        ArrayList<Drawable> images = new ArrayList<Drawable>();

        //Google HQ 37.427,-122.099
        locations.add(new GeoPoint(37427222,-122099167));
        images.add(getResources().getDrawable(R.drawable.logo));
        //Subtract 0.01 degrees
        locations.add(new GeoPoint(37426222,-122089167));
        images.add(getResources().getDrawable(R.drawable.icon));
        //Add 0.01 degrees
        locations.add(new GeoPoint(37428222,-122109167));
        images.add(getResources().getDrawable(R.drawable.icon));

        LocationOverlay myOverlay =
            new LocationOverlay(getResources().getDrawable(R.drawable.icon));
        myOverlay.setItems(locations, images);
        map.getOverlays().add(myOverlay);
        controller.setCenter(locations.get(0));
        controller.setZoom(15);
}
//Required abstract method, return false
@Override
protected boolean isRouteDisplayed() {
return false;
}
}Now our example provides a discrete image for each item it wants to display on the map. Specifically, we have decided to represent the actual Google HQ location by a version of the Google logo, while keeping the other two points with the same marker. See Figure 4-3.

Perhaps you noticed the onTap() method that was defined in the LocationOverlay, but never mentioned. Another nice feature of the ItemizedOverlay base implementation is that it handles hit testing and has a convenience method when a specific item it tapped, referencing that item's index. From this method, you can raise a toast, show a dialog, start a new Activity, or any other action that fits the context of the user tapping on the annotation for more information.
The Maps API for Android also includes a special overlay to draw the user location, the MyLocationOverlay. This overlay is very straightforward to use, but it should only be enabled while the Activity it is present on is visible. Otherwise, unnecessary resource usage will cause poor performance and battery life on the device. See Listing 4-10.
Example 4.10. Adding a MyLocationOverlay
public class MyActivity extends MapActivity {
MapView map;
MyLocationOverlay myOverlay;
@Override
public void onCreate(Bundle savedInstanceState) {
super.onCreate(savedInstanceState);
setContentView(R.layout.main);
map = (MapView)findViewById(R.id.map);
myOverlay = new MyLocationOverlay(this, map);
map.getOverlays().add(myOverlay);
}
@Override
public void onResume() {
super.onResume();
myOverlay.enableMyLocation();
}
@Override
public void onPause() {
super.onResume();
myOverlay.disableMyLocation();
}

    //Required abstract method, return false
    @Override
    protected boolean isRouteDisplayed() {
        return false;
    }
}This will display a standard dot or arrow marker (depending on whether the compass is in use) on the user's latest location, and will track as the user moves as long as the overlay is enabled.
They key to using the MyLocationOverlay is to disable its features when they are not in use (when the Activity is not visible), and re-enable them when they are needed. Just as with using the LocationManager, this ensures these services are not draining unnecessary power.
Your application needs to make use of the device's camera in order to capture media, whether it be still images or short video clips.
(API Level 3)
Send an Intent to Android to transfer control to the Camera application, and return the image the user captured. Android does contain APIs for directly accessing the camera hardware, previewing, and taking snapshots or videos. However, if your only goal is to simply get the media content using the camera with an interface the user is familiar with, there is not better solution than a handoff.
Let's take a look at how to use the Camera application to take both still images and video clips.
Let's take a look at an example Activity that will activate the camera application when the "Take a Picture" button is pressed, and receive the result of this operation as a Bitmap. See Listings 4-11 and 4-12.
Example 4.11. res/layout/main.xml
<?xml version="1.0" encoding="utf-8"?>
<LinearLayout xmlns:android="http://schemas.android.com/apk/res/android"
  android:orientation="vertical"
  android:layout_width="fill_parent"
  android:layout_height="fill_parent">
  <Button
    android:id="@+id/capture"
    android:layout_width="fill_parent"
    android:layout_height="wrap_content"
    android:text="Take a Picture"
  />
  <ImageView
    android:id="@+id/image"
    android:layout_width="fill_parent"
    android:layout_height="fill_parent"
    android:scaleType="centerInside"
  />
</LinearLayout>
Example 4.12. Activity to Capture an Image
public class MyActivity extends Activity {

    privatestaticfinalintREQUEST_IMAGE = 100;

    Button captureButton;
    ImageView imageView;

    @Override
    public void onCreate(Bundle savedInstanceState) {
        super.onCreate(savedInstanceState);
        setContentView(R.layout.main);

        captureButton = (Button)findViewById(R.id.capture);
        captureButton.setOnClickListener(listener);

        imageView = (ImageView)findViewById(R.id.image);
    }

    @Override
    protected void onActivityResult(int requestCode, int resultCode, Intent data) {
        if(requestCode == REQUEST_IMAGE&& resultCode == Activity.RESULT_OK) {
            //Process and display the image
            Bitmap userImage = (Bitmap)data.getExtras().get("data");
            imageView.setImageBitmap(userImage);
        }
    }

    private View.OnClickListener listener = new View.OnClickListener() {
        @Override
        public void onClick(View v) {
            Intent intent = new Intent(MediaStore.ACTION_IMAGE_CAPTURE);
            startActivityForResult(intent, REQUEST_IMAGE);
        }
    };
}
This method captures the image and returns a scaled-down Bitmap as an extra in the "data" field. If you need to capture an image and need the full-sized image to be saved somewhere, insert a Uri for the image destination into the MediaStore.EXTRA_OUTPUT field of the Intent before starting the capture. See Listing 4-13.
Example 4.13. Full-Size Image Capture to File
public class MyActivity extends Activity {

    private static final int REQUEST_IMAGE = 100;

    Button captureButton;
    ImageView imageView;
    File destination;

    @Override
    public void onCreate(Bundle savedInstanceState) {
        super.onCreate(savedInstanceState);
        setContentView(R.layout.main);
captureButton = (Button)findViewById(R.id.capture);
captureButton.setOnClickListener(listener);
imageView = (ImageView)findViewById(R.id.image);
destination = new File(Environment.getExternalStorageDirectory(),"image.jpg");
}
@Override
protected void onActivityResult(int requestCode, int resultCode, Intent data) {
if(requestCode == REQUEST_IMAGE&& resultCode == Activity.RESULT_OK) {
try {
FileInputStream in = new FileInputStream(destination);
BitmapFactory.Options options = new BitmapFactory.Options();
options.inSampleSize = 10; //Downsample by 10x
Bitmap userImage = BitmapFactory.decodeStream(in, null, options);
imageView.setImageBitmap(userImage);
} catch (Exception e) {
e.printStackTrace();
}
}
}
private View.OnClickListener listener = new View.OnClickListener() {
@Override
public void onClick(View v) {
Intent intent = new Intent(MediaStore.ACTION_IMAGE_CAPTURE);
//Add extra to save full-image somewhere
intent.putExtra(MediaStore.EXTRA_OUTPUT, Uri.fromFile(destination));
startActivityForResult(intent, REQUEST_IMAGE);
}
};
}This method will instruct the camera application to store the image elsewhere (in this case, on the device's SD card as "image.jpg") and the result will not be scaled down. When going to retrieve the image after the operation returns, we now go directly to the file location where we told the camera to store.
Using BitmapFactory.Options, however, we do still scale the image down prior to displaying to the screen to avoid from loading the full-size Bitmap into memory at once. Also note that this example chose a file location that was on the device's external storage, which requires the android.permission.WRITE_EXTERNAL_STORAGE permission to be declared in API Levels 4 and above. If your final solution writes the file elsewhere, this may not be necessary.
Capturing video clips using this method is just as straightforward, although the results produced are slightly different. There is no case under which the actual video clip data is returned directly in the Intent extras, and it is always saved to a destination file location. The following two parameters may be passed along as extras:
MediaStore.EXTRA_VIDEO_QUALITYInteger value to describe the quality level used to capture the video.
Allowed values are 0 for low quality and 1 for high quality.
MediaStore.EXTRA_OUTPUTUri destination of where to save the video content.
If this is not present, the video will be saved in a standard location for the device.
When the video recording is complete, the actual location where the data was saved is returned as a Uri in the data field of the result Intent. Let's take a look at a similar example that allows the user to record and save their video, and then displays the saved location back to the screen. See Listings 4-14 and 4-15.
Example 4.14. res/layout/main.xml
<?xml version="1.0" encoding="utf-8"?>
<LinearLayout xmlns:android="http://schemas.android.com/apk/res/android"
  android:orientation="vertical"
  android:layout_width="fill_parent"
  android:layout_height="fill_parent">
  <Button
    android:id="@+id/capture"
    android:layout_width="fill_parent"
    android:layout_height="wrap_content"
    android:text="Take a Video"
  />
  <TextView
    android:id="@+id/file"
    android:layout_width="fill_parent"
    android:layout_height="fill_parent"
  />
</LinearLayout>
Example 4.15. Activity to Capture a Video Clip
public class MyActivity extends Activity {

    private static final int REQUEST_VIDEO = 100;

    Button captureButton;
    TextView text;
    File destination;

    @Override
    public void onCreate(Bundle savedInstanceState) {
        super.onCreate(savedInstanceState);
        setContentView(R.layout.main);

        captureButton = (Button)findViewById(R.id.capture);
        captureButton.setOnClickListener(listener);

        text = (TextView)findViewById(R.id.file);
destination = new File(Environment.getExternalStorageDirectory(),"myVideo");
}
@Override
protected void onActivityResult(int requestCode, int resultCode, Intent data) {
if(requestCode == REQUEST_VIDEO&& resultCode == Activity.RESULT_OK) {
String location = data.getData().toString();
text.setText(location);
}
}
private View.OnClickListener listener = new View.OnClickListener() {
@Override
public void onClick(View v) {
Intent intent = new Intent(MediaStore.ACTION_VIDEO_CAPTURE);
//Add (optional) extra to save video to our file
intent.putExtra(MediaStore.EXTRA_OUTPUT, Uri.fromFile(destination));
//Optional extra to set video quality
intent.putExtra(MediaStore.EXTRA_VIDEO_QUALITY, 0);
startActivityForResult(intent, REQUEST_VIDEO);
}
};
}This example, like the previous example saving an image, puts the recorded video on the device's SD card (which requires the android.permission.WRITE_EXTERNAL_STORAGE permission for API Levels 4+). To initiate the process, we send an Intent with the MediaStore.ACTION_VIDEO_CAPTURE action string to the system. Android will launch the default camera application to handle recording the video and return with an OK result when recording is complete. We retrieve the location where the data was stored as a Uri by calling Intent.getData() in the onActivityResult() callback method, and then display that location to the user.
This example requests explicitly that the video be shot using the low quality setting, but this parameter is optional. If MediaStore.EXTRA_VIDEO_QUALITY is not present in the request Intent, the device will usually choose to shoot using high quality.
In cases where MediaStore.EXTRA_OUTPUT is provided, the Uri returned should match the location you requested, unless an error occurs that keeps the application from writing to that location. If this parameter is not provided, the returned value will be a content://Uri to retrieve the media from the system's MediaStore Content Provider.
Later on, in Recipe 4-8, we will look at practical ways to play this media back in your application.
Many applications need more direct access to the camera, either for the purposes of overlaying a custom UI for controls or to display metadata about what is visible through information based on location and direction sensors (augmented reality).
(API Level 5)
Attach directly to the camera hardware in a custom Activity. Android provides APIs to directly access the device's camera for the purposes of obtaining the preview feed and taking photos. We can access these when the needs of the application grow beyond simply snapping and returning a photo for display.
Note
Because we are taking a more direct approach to the camera here, it is required that the android.permission.CAMERA permission be declared in the manifest.
We start by creating a SurfaceView, a dedicated view for live drawing where we will attach the camera's preview stream. This provides us with a live preview inside a view that we can lay out any way we choose inside an Activity. From there, it's simply a matter of adding other views and controls that suit the context of the application. Let's take a look at the code (see Listings 4-16 and 4-17).
Note
The Camera class used here is android.hardware.Camera, not to be confused with android.graphics.Camera. Ensure you have imported the correct reference in your application.
Example 4.16. res/layout/main.xml
<?xml version="1.0" encoding="utf-8"?>
<RelativeLayout xmlns:android="http://schemas.android.com/apk/res/android"
  android:layout_width="fill_parent"
  android:layout_height="fill_parent">
  <SurfaceView
    android:id="@+id/preview"
    android:layout_width="fill_parent"
    android:layout_height="fill_parent"
  />
</RelativeLayout>
Example 4.17. Activity Displaying Live Camera Preview
import android.hardware.Camera;

publicclass PreviewActivity extends Activity implements SurfaceHolder.Callback {

    Camera mCamera;
    SurfaceView mPreview;

    @Override
    public void onCreate(Bundle savedInstanceState) {
        super.onCreate(savedInstanceState);
        setContentView(R.layout.main);

        mPreview = (SurfaceView)findViewById(R.id.preview);
        mPreview.getHolder().addCallback(this);
        mPreview.getHolder().setType(SurfaceHolder.SURFACE_TYPE_PUSH_BUFFERS);

        mCamera = Camera.open();
    }

    @Override
    public void onPause() {
        super.onPause();
        mCamera.stopPreview();
    }

    @Override
    public void onDestroy() {
        super.onDestroy();
        mCamera.release();
    }

    //Surface Callback Methods
    @Override
    public void surfaceChanged(SurfaceHolder holder, int format, int width, int height)
    {
        Camera.Parameters params = mCamera.getParameters();
        //Get all the devices's supported sizes and pick the first (largest)
        List<Camera.Size> sizes = params.getSupportedPreviewSizes();
        Camera.Size selected = sizes.get(0);
        params.setPreviewSize(selected.width,selected.height);
        mCamera.setParameters(params);

        mCamera.startPreview();
    }

    @Override
    public void surfaceCreated(SurfaceHolder holder) {
        try {
            mCamera.setPreviewDisplay(mPreview.getHolder());
        } catch (Exception e) {
            e.printStackTrace();
        }
    }

    @Override
    public void surfaceDestroyed(SurfaceHolder holder) { }
}
Note
If you are testing on an emulator, there is no camera to preview. What the emulator displays to fake a preview depends on the version you are running. To verify that this code is working properly, open the Camera application on your specific emulator and take note of what the preview looks like. The same display should appear in this sample.
In the example, we create a SurfaceView that fills the window, and tell it that our Activity is to be notified of all the SurfaceHolder callbacks. The camera cannot begin displaying preview information on the surface until it is fully initialized, so we wait until surfaceCreated() gets called to attach the SurfaceHolder of our view to the Camera instance. Similarly, we wait to size the preview and start drawing until the surface has been given its size, which occurs when surfaceChanged() is called.
Calling Parameters.getSupportedPreviewSizes() returns a list of all the sizes the device will accept, and they are typically ordered largest to smallest. In the example, we pick the first (and, thus, largest) preview resolution and use it to set the size.
Note
In versions earlier than 2.0 (API Level 5), it was acceptable to directly pass the height and width parameters from this method as to Parameters.setPreviewSize(); but in 2.0, and later, the Camera will only set its preview to one of the supported resolutions of the device. Attempts otherwise will result in an Exception.
Camera.startPreview() begins the live drawing of camera data on the surface. Notice that the preview always displays in a landscape orientation. Prior to Android 2.2 (API Level 8), there was no official way to adjust the rotation of the preview display. For that reason, it is recommended that an Activity using the camera preview have its orientation fixed with android:screenOrientation="landscape" in the manifest to match.
The Camera service can only be accessed by one application at a time. For this reason, it is important that you call Camera.release() as soon as the camera is no longer needed. In the example, we no longer need the camera when the Activity is finished, so this call takes place in onDestroy().
There were two additions to later versions of the API that can also be made useful if your application targets them:
Camera.setDisplayOrientation(int degrees)Available with API Level 8 (Android 2.2).
Enables the live preview to be set to 0, 90, 180, or 270 degrees. 0 maps to the default landscape orientation.
Camera.open(int which)Available with API Level 9 (Android 2.3).
Enabled support of multiple cameras (mainly front and back-facing).
Takes a parameter from 0 to
getNumberOfCameras()−1.
We can now add on to the previous example any controls or views that are appropriate to display on top of the camera preview. Let's modify the preview to include a Cancel and Snap Photo button. See Listings 4-18 and 4-19.
Example 4.18. res/layout/main.xml
<?xml version="1.0" encoding="utf-8"?>
<RelativeLayout xmlns:android="http://schemas.android.com/apk/res/android"
  android:layout_width="fill_parent"
  android:layout_height="fill_parent">
  <SurfaceView
    android:id="@+id/preview"
    android:layout_width="fill_parent"
    android:layout_height="fill_parent"
  />
  <RelativeLayout
    android:layout_width="fill_parent"
    android:layout_height="100dip"
    android:layout_alignParentBottom="true"
    android:gravity="center_vertical"
    android:background="#A000">
    <Button
      android:layout_width="100dip"
      android:layout_height="wrap_content"
      android:text="Cancel"
      android:onClick="onCancelClick"
    />
    <Button
      android:layout_width="100dip"
      android:layout_height="wrap_content"
      android:layout_alignParentRight="true"
      android:text="Snap Photo"
      android:onClick="onSnapClick"
    />
  </RelativeLayout>
</RelativeLayout>
Example 4.19. Activity with Photo Controls Added
public class PreviewActivity extends Activity implements
                SurfaceHolder.Callback, Camera.ShutterCallback, Camera.PictureCallback {

    Camera mCamera;
    SurfaceView mPreview;

    @Override
public void onCreate(Bundle savedInstanceState) {
super.onCreate(savedInstanceState);
setContentView(R.layout.main);
mPreview = (SurfaceView)findViewById(R.id.preview);
mPreview.getHolder().addCallback(this);
mPreview.getHolder().setType(SurfaceHolder.SURFACE_TYPE_PUSH_BUFFERS);
mCamera = Camera.open();
}
@Override
public void onPause() {
super.onPause();
mCamera.stopPreview();
}
@Override
public void onDestroy() {
super.onDestroy();
mCamera.release();
Log.d("CAMERA","Destroy");
}
public void onCancelClick(View v) {
finish();
}
public void onSnapClick(View v) {
//Snap a photo
mCamera.takePicture(this, null, null, this);
}
//Camera Callback Methods
@Override
public void onShutter() {
Toast.makeText(this, "Click!", Toast.LENGTH_SHORT).show();
}
@Override
public void onPictureTaken(byte[] data, Camera camera) {
//Store the picture off somewhere
//Here, we chose to save to internal storage
try {
FileOutputStream out = openFileOutput("picture.jpg", Activity.MODE_PRIVATE);
out.write(data);
out.flush();
out.close();
} catch (FileNotFoundException e) {
e.printStackTrace();
} catch (IOException e) {
e.printStackTrace();
}
//Must restart preview
camera.startPreview();}
//Surface Callback Methods
@Override
public void surfaceChanged(SurfaceHolder holder, int format, int width, int height) {
Camera.Parameters params = mCamera.getParameters();
List<Camera.Size> sizes = params.getSupportedPreviewSizes();
Camera.Size selected = sizes.get(0);
params.setPreviewSize(selected.width,selected.height);
mCamera.setParameters(params);
mCamera.setDisplayOrientation(90);
mCamera.startPreview();
}
@Override
public void surfaceCreated(SurfaceHolder holder) {
try {
mCamera.setPreviewDisplay(mPreview.getHolder());
} catch (Exception e) {
e.printStackTrace();
}
}
@Override
public void surfaceDestroyed(SurfaceHolder holder) { }
}Here we have added a simple, partially transparent overlay to include a pair of controls for camera operation. The action taken by cancel is nothing to speak of; we simply finish the Activity. However, Snap Photo introduces more of the Camera API in manually taking a returning a photo to the application. A user action will initiate the Camera.takePicture() method, which takes a series of callback pointers.
Notice that the Activity in this example implements two more interfaces: Camera.ShutterCallback and Camera.PictureCallback. The former is called as near as possible to the moment when the image is captured (when the "shutter" closes), while the latter can be called at multiple instances when different forms of the image are available.
The parameters of takePicture() are a single ShutterCallback, and up to three PictureCallback instances. The PictureCallbacks will be called at the following times (in the order they appear as parameters):
After the image is captured with RAW image data
This may return null on devices with limited memory.
After the image is processed with scaled image data (known as the POSTVIEW image)
This may return null on devices with limited memory.
After the image is compressed with JPEG image data
This example only cares to be notified when the JPEG is ready. Consequently, that is also the last callback made and the point in time when the preview must be started back up again. If startPreview() is not called again after a picture is taken, then preview on the surface will remain frozen at the captured image.
MediaRecorder is quite simple to use. All you need to provide is some basic information about the file format to use for encoding and where to store the data. Listings 4-20 and 4-21 provide an example that records an audio file to the device's SD card monitoring user actions for when to start and stop.
Note
In order to use MediaRecorder to record audio input, you must also declare the android.permission.RECORD_AUDIO permission in the application manifest.
Example 4.20. res/layout/main.xml
<?xml version="1.0" encoding="utf-8"?>
<LinearLayout xmlns:android="http://schemas.android.com/apk/res/android"
  android:orientation="vertical"
  android:layout_width="fill_parent"
  android:layout_height="fill_parent">
  <Button
    android:id="@+id/startButton"
    android:layout_width="fill_parent"
    android:layout_height="wrap_content"
    android:text="Start Recording"
  />
  <Button
    android:id="@+id/stopButton"
    android:layout_width="fill_parent"
    android:layout_height="wrap_content"
    android:text="Stop Recording"
    android:enabled="false"
  />
</LinearLayout>
Example 4.21. Activity for Recording Audio
public class RecordActivity extends Activity {

    private MediaRecorder recorder;
    private Button start, stop;
    File path;

    @Override
    public void onCreate(Bundle savedInstanceState) {
        super.onCreate(savedInstanceState);
        setContentView(R.layout.main);

        start = (Button)findViewById(R.id.startButton);
        start.setOnClickListener(startListener);
        stop = (Button)findViewById(R.id.stopButton);
        stop.setOnClickListener(stopListener);

        recorder = new MediaRecorder();
        path = new File(Environment.getExternalStorageDirectory(),"myRecording.3gp");

        resetRecorder();
    }

    @Override
    public void onDestroy() {
        super.onDestroy();
        recorder.release();
    }

    private void resetRecorder() {
        recorder.setAudioSource(MediaRecorder.AudioSource.MIC);
        recorder.setOutputFormat(MediaRecorder.OutputFormat.THREE_GPP);
        recorder.setAudioEncoder(MediaRecorder.AudioEncoder.DEFAULT);
        recorder.setOutputFile(path.getAbsolutePath());
        try {
            recorder.prepare();
        } catch (Exception e) {
            e.printStackTrace();
        }
    }

    private View.OnClickListener startListener = new View.OnClickListener() {
        @Override
        public void onClick(View v) {
            try {
                recorder.start();

                start.setEnabled(false);
                stop.setEnabled(true);
            } catch (Exception e) {
                e.printStackTrace();
            }
        }
    };

    private View.OnClickListener stopListener = new View.OnClickListener() {
        @Override
public void onClick(View v) {
recorder.stop();
resetRecorder();
start.setEnabled(true);
stop.setEnabled(false);
}
};
}The user interface for this example is very basic. There are two buttons, which alternate which the user can access based on the recording state. When the user presses start, we enable the stop button and begin recording. When the user presses stop, we re-enable the start button and reset the recorder to run again.
MediaRecorder setup is just about as straightforward. We create a file on the SD card entitled "myRecording.3gp" and pass the path in setOutputFile(). The remaining setup methods tell the recorder to use the device microphone as input (AudioSource.MIC), and create a 3GP file format for the output using the default encoder.
For now, you could play this audio file using any of the device's file browser or media player application. Later on, in Recipe 4-8, we will point out how to play audio back through the application as well.
(API Level 3)
Use the classes of the android.speech package to leverage the built-in speech recognition technology of every Android device. Every Android device that is equipped with voice search (available since Android 1.5) provides applications the ability to use the built-in SpeechRecognizer to process voice input.
To activate this process, the application need only to send a RecognizerIntent to the system, where the recognition service will handle recording the voice input and processing it; returning to you a list of strings indicating what the recognizer thought it heard.
Let's examine this technology in action. See Listing 4-22.
Example 4.22. Activity Launching and Processing Speech Recognition
public class RecognizeActivity extends Activity {

    private static final int REQUEST_RECOGNIZE = 100;

    TextView tv;

    @Override
    public void onCreate(Bundle savedInstanceState) {
        super.onCreate(savedInstanceState);
        tv = new TextView(this);
        setContentView(tv);

        Intent intent = new Intent(RecognizerIntent.ACTION_RECOGNIZE_SPEECH);
        intent.putExtra(RecognizerIntent.EXTRA_LANGUAGE_MODEL,
                        RecognizerIntent.LANGUAGE_MODEL_FREE_FORM);
        intent.putExtra(RecognizerIntent.EXTRA_PROMPT, "Tell Me Your Name");
        try {
            startActivityForResult(intent, REQUEST_RECOGNIZE);
        } catch (ActivityNotFoundException e) {
            //If no recognizer exists, download one from Android Market
            AlertDialog.Builder builder = new AlertDialog.Builder(this);
            builder.setTitle("Not Available");
            builder.setMessage("There is currently no recognition application installed."
                +"  Would you like to download one?");
            builder.setPositiveButton("Yes", new DialogInterface.OnClickListener() {
                @Override
                public void onClick(DialogInterface dialog, int which) {
                    //Download, for example, Google Voice Search
                    Intent marketIntent = new Intent(Intent.ACTION_VIEW);
                    marketIntent.setData
                        (Uri.parse("market://details?id=com.google.android.voicesearch"));
                }
            });
            builder.setNegativeButton("No", null);
            builder.create().show();
        }
    }

    @Override
    protected void onActivityResult(int requestCode, int resultCode, Intent data) {
        if(requestCode == REQUEST_RECOGNIZE&& resultCode == Activity.RESULT_OK) {
            ArrayList<String> matches =
                data.getStringArrayListExtra(RecognizerIntent.EXTRA_RESULTS);
            StringBuilder sb = new StringBuilder();
            for(String piece : matches) {
                sb.append(piece);
                sb.append('
'),
            }
            tv.setText(sb.toString());
        } else {
            Toast.makeText(this, "Operation Canceled", Toast.LENGTH_SHORT).show();
        }
    }
}
Note
If you are testing your application in the emulator, beware that neither Android Market nor any voice recognizers are likely installed. It is best to test the operation of this example on a device.
This example automatically starts the speech recognition Activity on launch of the application and asks the user to "Tell Me Your Name". Upon receiving speech from the user and processing the result, the Activity returns with a list of possible items the user could have said. This list is in order of probability, and so in many cases it would be prudent to simply call matches.get(0) as the best possible choice and move on. However, this activity takes all the returned values and displays them on the screen for entertainment purposes.
When starting up the SpeechRecognizer, there are a number of extras that can be passed in the Intent to customize the behavior. This example uses the two that are most common:
EXTRA_LANGUAGE_MODEL
EXTRA_PROMPT
A string value that displays as the prompt for user speech.
In addition to these, a handful of other parameters may be useful to pass along:
(API Level 1)
Use the MediaPlayer to play local or streamed media. Whether the content is audio or video, local or remote, MediaPlayer will connect, prepare, and play the associated media efficiently. In this recipe, we will also explore using MediaController and VideoView as simple ways to include interaction and video play into an Acitivity layout.
Note
Before expecting a specific media clip or stream to play, please read the "Android Supported Media Formats" section of the developer documentation to verify support.
Let's look at a simple example of just using MediaPlayer to play a sound. See Listing 4-23.
Example 4.23. Activity Playing Local Sound
public class PlayActivity extends Activity implements MediaPlayer.OnCompletionListener {

    Button mPlay;
    MediaPlayer mPlayer;

    @Override
    public void onCreate(Bundle savedInstanceState) {
        super.onCreate(savedInstanceState);

        mPlay = new Button(this);
        mPlay.setText("Play Sound");
        mPlay.setOnClickListener(playListener);

        setContentView(mPlay);
    }

    @Override
    public void onDestroy() {
        super.onDestroy();
        if(mPlayer != null) {
            mPlayer.release();
        }
    }

    private View.OnClickListener playListener = new View.OnClickListener() {

        @Override
        public void onClick(View v) {
            if(mPlayer == null) {
                try {
                    mPlayer = MediaPlayer.create(PlayActivity.this, R.raw.sound);
mPlayer.start();
} catch (Exception e) {
e.printStackTrace();
}
} else {
mPlayer.stop();
mPlayer.release();
mPlayer = null;
}
}
};
//OnCompletionListener Methods
@Override
public void onCompletion(MediaPlayer mp) {
mPlayer.release();
mPlayer = null;
}
}This example uses a Button to start and stop playback of a local sound file that is stored in the res/raw directory of a project. MediaPlayer.create() is a convenience method with several forms, intended to construct and prepare a player object in one step. The form used in this example takes a reference to a local resource ID, but create() can also be used to access and play a remote resource using
MediaPlayer.create(Context context, Uri uri);
Once created, the example starts playing the sound immediately. While the sound is playing, the user may press the button again to stop play. The Activity also implements the MediaPlayer.OnCompletionListener interface, so it receives a callback when the playing operation completes normally.
In either case, once play is stopped, the MediaPlayer instance is released. This method allows the resources to be retained only as long as they are in use, and the sound may be played multiple times. To be sure resources are not unnecessarily retained, the player is also released when the Activity is destroyed if it still exists.
If your application has a need to playing many different sounds, you may consider calling reset() instead of release() when playback is over. Remember, though, to still call release() when the player is no longer needed (or the Activity goes away).
Beyond just simple playback, what if the application needs to create an interactive experience for the user to be able to play, pause, and seek through the media? There are methods available on MediaPlayer to implement all these functions with custom UI elements, but Android also provides the MediaController view so you don't have to. See Listings 4-24 and 4-25.
Example 4.24. res/layout/main.xml
<?xml version="1.0" encoding="utf-8"?>
<LinearLayout xmlns:android="http://schemas.android.com/apk/res/android"
  android:id="@+id/root"
  android:orientation="vertical"
  android:layout_width="fill_parent"
  android:layout_height="fill_parent">
  <TextView
    android:layout_width="wrap_content"
    android:layout_height="wrap_content"
    android:layout_gravity="center_horizontal"
    android:text="Now Playing..."
  />
  <ImageView
    android:id="@+id/coverImage"
    android:layout_width="fill_parent"
    android:layout_height="fill_parent"
    android:scaleType="centerInside"
  />
</LinearLayout>
Example 4.25. Activity Playing Audio with a MediaController
public class PlayerActivity extends Activity implements
            MediaController.MediaPlayerControl, MediaPlayer.OnBufferingUpdateListener {

    MediaController mController;
    MediaPlayer mPlayer;
    ImageView coverImage;

    int bufferPercent = 0;

    @Override
    public void onCreate(Bundle savedInstanceState) {
        super.onCreate(savedInstanceState);
        setContentView(R.layout.main);

        coverImage = (ImageView)findViewById(R.id.coverImage);

        mController = new MediaController(this);
        mController.setAnchorView(findViewById(R.id.root));
    }

    @Override
    public void onResume() {
        super.onResume();
        mPlayer = new MediaPlayer();
        //Set the audio data source
        try {
            mPlayer.setDataSource(this, Uri.parse("URI_TO_REMOTE_AUDIO"));
            mPlayer.prepare();
        } catch (Exception e) {
            e.printStackTrace();
        }
        //Set an image for the album cover
        coverImage.setImageResource(R.drawable.icon);
mController.setMediaPlayer(this);
mController.setEnabled(true);
}
@Override
public void onPause() {
super.onPause();
mPlayer.release();
mPlayer = null;
}
@Override
public boolean onTouchEvent(MotionEvent event) {
mController.show();
return super.onTouchEvent(event);
}
//MediaPlayerControl Methods
@Override
public int getBufferPercentage() {
return bufferPercent;
}
@Override
public int getCurrentPosition() {
return mPlayer.getCurrentPosition();
}
@Override
public int getDuration() {
return mPlayer.getDuration();
}
@Override
public boolean isPlaying() {
return mPlayer.isPlaying();
}
@Override
public void pause() {
mPlayer.pause();
}
@Override
public void seekTo(int pos) {
mPlayer.seekTo(pos);
}
@Override
public void start() {
mPlayer.start();
}
//BufferUpdateListener Methods
@Override
public void onBufferingUpdate(MediaPlayer mp, int percent) {
bufferPercent = percent;}
//Android 2.0+ Target Callbacks
public boolean canPause() {
return true;
}
public boolean canSeekBackward() {
return true;
}
public boolean canSeekForward() {
return true;
}
}This example creates a simple audio player that displays an image for artist or cover art associated with the audio being played (we just set it to the application icon here). The example still uses a MediaPlayer instance, but this time we are not creating it using the create() convenience method. Instead we use setDataSource() after the instance is created to set the content. When attaching the content in this manner, the player is not automatically prepared so we must also call prepare() to ready the player for use.
At this point, the audio is ready to start. We would like the MediaController to handle all playback controls, but MediaController can only attach to objects that implement the MediaController.MediaPlayerControl interface. Strangely, MediaPlayer alone does not implement this interface so we appoint the Activity to do that job instead. Six of the seven method included in the interface are actually implemented by MediaPlayer, so we just call down to those directly.
Note
If your application is targeting API Level 5 or later, there are three additional methods to implement in the MediaController.MediaPlayerControl interface:
canPause()
canSeekBackward()
canSeekForward()
These methods simply tell the system whether we want to allow these operations to occur inside of this control, so our example returns true for all three. These methods are not required if you target a lower API Level (which is why we didn't provide @Override annotations above them), but you may implement them for best results when running on later versions.
The final method required to use MediaController is getBufferPercentage(). To obtain this data, the Activity is also tasked with implementing MediaPlayer.OnBufferingUpdateListener, which updates the buffer percentage as it changes.
MediaController has one trick to its implementation. It is designed as a widget that floats above an active view in its own Window and is only visible for a few seconds at a time. As a result, we do not instantiate the widget in the XML layout of the content view, but rather in code. The link is made between the MediaController and the content view by calling setAnchorView(), which also determines where the controller will show up onscreen. In this example, we anchor it to the root layout object, so it will display at the bottom of the screen when visible. If the MediaController is anchored to a child view in the hierarchy, it will display next to that child instead.
Also, due to the controller's separate window, MediaController.show() must not be called from within onCreate(), and doing so will cause a fatal exception. MediaController is designed to be hidden by default and activated by the user. In this example, we override the onTouchEvent() method of the Activity to show the controller whenever the user taps the screen. Unless show() is called with a parameter of 0, it will fade out after the amount of time noted by the parameter. Calling show() without any parameter tells it to fade out after the default timeout, which is around three seconds. See Figure 4-4.

Now all features of the audio playback are handled by the standard controller widget. The version of setDataSource() used in this example takes a Uri, making is suitable for loading audio from a ContentProvider or a remote location. Keep in mind that all of this works just as well with local audio files and resources using the alternate forms of setDataSource().
When playing video, typically a full set of playback controls is required to play, pause, and seek the content. In addition, MediaPlayer must have a reference to a SurfaceHolder onto which it can draw the frames of the video. As we mentioned in the example previous, Android provides APIs to do all of this and create a custom video playing experience. However, in many cases the most efficient path forward is to let the classes provided with the SDK, namely MediaController and VideoView, do all the heavy lifting.
Let's take a look at an example of creating a video player in an Activity. See Listing 4-26.
Example 4.26. Activity to Play Video Content
public class VideoActivity extends Activity {

    VideoView videoView;
    MediaController controller;

    @Override
    public void onCreate(Bundle savedInstanceState) {
        super.onCreate(savedInstanceState);
        videoView = new VideoView(this);

        videoView.setVideoURI( Uri.parse("URI_TO_REMOTE_VIDEO") );
        controller = new MediaController(this);
        videoView.setMediaController(controller);
        videoView.start();

        setContentView(videoView);
    }

    @Override
    public void onDestroy() {
        super.onDestroy();
        videoView.stopPlayback();
    }
}
This example passes the URI of a remote video location to VideoView and tells it to handle the rest. VideoView can be embedded in larger XML layout hierarchies as well, although often it is the only thing and is displayed full-screen, so setting is in code as the only view in the layout tree is not uncommon.
With VideoView, interaction with MediaController is much simpler. VideoView implements the MediaController.MediaPlayerControl interface, so no additional glue logic is required to make the controls functional. VideoView also internally handles the anchoring of the controller to itself, so it displays on screen in the proper location.
We have one final note about using the MediaPlayer classes to handle remote content. Many media content servers on the Web today do not publicly expose a direct URL to the video container. Either for the purposes of tracking or security, public media URLs can often redirect one or more times before ending up at the true media content.
MediaPlayer does not handle this redirect process, and will return an error when presented with a redirected URL.
If you are unable to directly retrieve locations of the content you want to display in an application, that application must trace the redirect path before handing the URL to MediaPlayer. Listing 4-27 is an example of a simple AsyncTask tracer that will do the job.
Example 4.27. RedirectTracerTask
public class RedirectTracerTask extends AsyncTask<Uri, Void, Uri> {

    private VideoView mVideo;
    private Uri initialUri;

    public RedirectTracerTask(VideoView video) {
        super();
        mVideo = video;
    }

    @Override
    protected Uri doInBackground(Uri... params) {
        initialUri = params[0];
        String redirected = null;
        try {
          URL url = new URL(initialUri.toString());
          HttpURLConnection connection = (HttpURLConnection)url.openConnection();
          //Once connected, see where you ended up
          redirected = connection.getHeaderField("Location");

          return Uri.parse(redirected);
        } catch (Exception e) {
          e.printStackTrace();
          return null;
        }
    }

    @Override
    protected void onPostExecute(Uri result) {
        if(result != null) {
            mVideo.setVideoURI(result);
        } else {
            mVideo.setVideoURI(initialUri);
        }
    }

}
This helper class tracks down the final location by retrieving it out of the HTTP headers. If there were no redirects in the supplied Uri, the background operation will end up returning null, in which case the original Uri is passed to the VideoView. With this helper class, you can now pass the locations to the view as follows:
VideoView videoView = new VideoView(this);
RedirectTracerTask task = new RedirectTracerTask(videoView);
Uri location = Uri.parse("URI_TO_REMOTE_VIDEO");

task.execute(location);Your application requires feedback from the device's accelerometer that goes beyond just understanding whether the device is oriented in portrait or landscape.
(API Level 3)
Use SensorManager to receive constant feedback from the accelerometer sensor. SensorManager provides a generic abstracted interface for working with sensor hardware on Android devices. The accelerometer is just one of many sensors that an application can register to receive regular updates from.
Note
Device sensors, such as the accelerometer, do not exist in the emulator. If you cannot test SensorManager code on an Android device, you will need to use a tool such as SensorSimulator to inject sensor events into the system. SensorSimulator requires modifying this example to use a different SensorManager interface for testing; see "Useful Tools To Know: SensorSimulator" at the end of this chapter for more information.
This example Activity registers with SensorManager for accelerometer updates and displays the data on screen. The raw X/Y/Z data is displayed in a TextView at the bottom of the screen, but in addition the device's "tilt" is visualized through a simple graph of four views in a TableLayout. See Listings 4-28 and 4-29.
Note
It is also recommended that you add android:screenOrientation="portrait" or android:screenOrientation="landscape" to the application's manifest to keep the Activity from trying to rotate as you move and tilt the device.
Example 4.28. res/layout/main.xml
<?xml version="1.0" encoding="utf-8"?>
<RelativeLayout xmlns:android="http://schemas.android.com/apk/res/android"
  android:layout_width="fill_parent"
  android:layout_height="fill_parent">
  <TableLayout
    android:layout_width="fill_parent"
    android:layout_height="fill_parent"
    android:stretchColumns="0,1,2">
    <TableRow
      android:layout_weight="1">
<View
android:id="@+id/top"
android:layout_column="1"
/>
</TableRow>
<TableRow
android:layout_weight="1">
<View
android:id="@+id/left"
android:layout_column="0"
/>
<View
android:id="@+id/right"
android:layout_column="2"
/>
</TableRow>
<TableRow
android:layout_weight="1">
<View
android:id="@+id/bottom"
android:layout_column="1"
/>
</TableRow>
</TableLayout>
<TextView
android:id="@+id/values"
android:layout_width="fill_parent"
android:layout_height="wrap_content"
android:layout_alignParentBottom="true"
/>
</RelativeLayout>Example 4.29. Tilt Monitoring Activity
public class TiltActivity extends Activity implements SensorEventListener {

    private SensorManager mSensorManager;
    private Sensor mAccelerometer;
    private TextView valueView;
    private View mTop, mBottom, mLeft, mRight;

    public void onCreate(Bundle savedInstanceState) {
        super.onCreate(savedInstanceState);
        setContentView(R.layout.main);

        mSensorManager = (SensorManager)getSystemService(SENSOR_SERVICE);
        mAccelerometer = mSensorManager.getDefaultSensor(Sensor.TYPE_ACCELEROMETER);

        valueView = (TextView)findViewById(R.id.values);
        mTop = findViewById(R.id.top);
        mBottom = findViewById(R.id.bottom);
        mLeft = findViewById(R.id.left);
        mRight = findViewById(R.id.right);
    }

    protected void onResume() {
        super.onResume();
mSensorManager.registerListener(this, mAccelerometer,
SensorManager.SENSOR_DELAY_UI);
}
protected void onPause() {
super.onPause();
mSensorManager.unregisterListener(this);
}
public void onAccuracyChanged(Sensor sensor, int accuracy) { }
public void onSensorChanged(SensorEvent event) {
float[] values = event.values;
float x = values[0]/10;
float y = values[1]/10;
int scaleFactor;
if(x > 0) {
scaleFactor = (int)Math.min(x*255, 255);
mRight.setBackgroundColor(Color.TRANSPARENT);
mLeft.setBackgroundColor(Color.argb(scaleFactor, 255, 0, 0));
} else {
scaleFactor = (int)Math.min(Math.abs(x)*255, 255);
mRight.setBackgroundColor(Color.argb(scaleFactor, 255, 0, 0));
mLeft.setBackgroundColor(Color.TRANSPARENT);
}
if(y > 0) {
scaleFactor = (int)Math.min(y*255, 255);
mTop.setBackgroundColor(Color.TRANSPARENT);
mBottom.setBackgroundColor(Color.argb(scaleFactor, 255, 0, 0));
} else {
scaleFactor = (int)Math.min(Math.abs(y)*255, 255);
mTop.setBackgroundColor(Color.argb(scaleFactor, 255, 0, 0));
mBottom.setBackgroundColor(Color.TRANSPARENT);
}
//Display the raw values
valueView.setText(String.format("X: %1$1.2f, Y: %2$1.2f, Z: %3$1.2f",
values[0], values[1], values[2]));
}
}The orientation of the three axes on the device accelerometer are as follows, from the perspective of looking at the device screen, upright in portrait:
X: Horizontal axis with positive pointing to the right
Y: Vertical axis with positive pointing up
Z: Perpendicular axis with positive pointing back at you
When the Activity is visible to the user (between onResume() and onPause()), it registers with SensorManager to receive updates about the acclerometer. When registering, the last parameter to registerListener() defines the update rate. The chosen value, SENSOR_DELAY_UI, is the fastest recommended rate to receive updates and still directly modify the user interface with each update.
With each new sensor value, the onSensorChanged() method of our registered listener is called with a SensorEvent value; this event contains the X/Y/Z acceleration values.
Note
An accelerometer measures the acceleration due to forces applied. When a device is at rest, the only force operating on it is the force of gravity (~9.8 m/s2). The output value on each axis is the product of this force (pointing down to the ground), and each orientation vector. When the two are parallel, the value will be at its maximum (~9.8-10). When the two are perpendicular, the value will be at its minimum (~0.0). Therefore, a device laying flat on a table will read ~0.0 for both X and Y, and ~9.8 for Z.
The example application displays the raw acceleration values for each axis in the TextView at the bottom of the screen. In addition, there is a grid of four Views arranged in a top/bottom/left/right pattern, and we proportionally adjust the background color of this grid based on the orientation. When the device is perfectly flat, both X and Y should be close to zero and the entire screen will be black. As the device tilts, the squares on the low side of the tilt will start to glow red until they are completely red once the device orientation reaches upright in either position.
Tip
Try modifying this example with some of the other rate values, like SENSOR_DELAY_NORMAL. Notice how the change affects the update rate in the example.
In addition, you can shake the device and see alternating grid boxes highlight as the device accelerates in each direction.
Your application wants to know which major direction the user is facing by monitoring the device's compass sensor.
(API Level 3)
SensorManager comes to the rescue once again. Android doesn't provide a "compass" sensor exactly, but rather includes the necessary methods to gather where the device is pointing based on other sensor data. In this case, the device's magnetic field sensor will be used in conjunction with the accelerometer to ascertain where the user is facing.
We can then ask SensorManager for the user's orientation with respect to the Earth using getOrientation().
Note
Device sensors such as the accelerometer do not exist in the emulator. If you cannot test SensorManager code on an Android device, you will need to use a tool such as SensorSimulator to inject sensor events into the system. SensorSimulator requires modifying this example to use a different SensorManager interface for testing; see "Useful Tools to Know: SensorSimulator" at the end of this chapter for more information.
As with the previous accelerometer example, we use SensorManager to register for updates on all sensors of interest (in this case, there are two), and process the results in onSensorChanged(). This example calculates and displays the user orientation from the device camera's point-of-view, as it would be required for an application such as augmented reality. See Listings 4-30 and 4-31.
Example 4.30. res/layout/main.xml
<?xml version="1.0" encoding="utf-8"?>
<RelativeLayout xmlns:android="http://schemas.android.com/apk/res/android"
  android:layout_width="fill_parent"
  android:layout_height="fill_parent">
  <TextView
    android:id="@+id/direction"
    android:layout_width="wrap_content"
    android:layout_height="wrap_content"
    android:layout_centerInParent="true"
    android:textSize="64dip"
    android:textStyle="bold"
  />
  <TextView
    android:id="@+id/values"
    android:layout_width="wrap_content"
    android:layout_height="wrap_content"
    android:layout_alignParentBottom="true"
  />
</RelativeLayout>
Example 4.31. Activity Monitoring User Orientation
public class CompassActivity extends Activity implements SensorEventListener {

    private SensorManager mSensorManager;
    private Sensor mAccelerometer, mField;
    private TextView valueView, directionView;

    privatefloat[] mGravity;
    privatefloat[] mMagnetic;

    public void onCreate(Bundle savedInstanceState) {
        super.onCreate(savedInstanceState);
        setContentView(R.layout.main);

        mSensorManager = (SensorManager)getSystemService(SENSOR_SERVICE);
        mAccelerometer = mSensorManager.getDefaultSensor(Sensor.TYPE_ACCELEROMETER);
mField = mSensorManager.getDefaultSensor(Sensor.TYPE_MAGNETIC_FIELD);
valueView = (TextView)findViewById(R.id.values);
directionView = (TextView)findViewById(R.id.direction);
}
protected void onResume() {
super.onResume();
mSensorManager.registerListener(this, mAccelerometer,
SensorManager.SENSOR_DELAY_UI);
mSensorManager.registerListener(this, mField, SensorManager.SENSOR_DELAY_UI);
}
protected void onPause() {
super.onPause();
mSensorManager.unregisterListener(this);
}
privatevoid updateDirection() {
float[] temp = newfloat[9];
float[] R = newfloat[9];
//Load rotation matrix into R
SensorManager.getRotationMatrix(temp, null, mGravity, mMagnetic);
//Map to camera's point-of-view
SensorManager.remapCoordinateSystem(temp, SensorManager.AXIS_X,
SensorManager.AXIS_Z, R);
//Return the orientation values
float[] values = newfloat[3];
SensorManager.getOrientation(R, values);
//Convert to degrees
for (int i=0; i < values.length; i++) {
Double degrees = (values[i] * 180) / Math.PI;
values[i] = degrees.floatValue();
}
//Display the compass direction
directionView.setText( getDirectionFromDegrees(values[0]) );
//Display the raw values
valueView.setText(String.format("Azimuth: %1$1.2f, Pitch: %2$1.2f, Roll: %3$1.2f",
values[0], values[1], values[2]));
}
private String getDirectionFromDegrees(float degrees) {
if(degrees >= −22.5 && degrees < 22.5) { return "N"; }
if(degrees >= 22.5 && degrees < 67.5) { return "NE"; }
if(degrees >= 67.5 && degrees < 112.5) { return "E"; }
if(degrees >= 112.5 && degrees < 157.5) { return "SE"; }
if(degrees >= 157.5 || degrees < −157.5) { return "S"; }
if(degrees >= −157.5 && degrees < −112.5) { return "SW"; }
if(degrees >= −112.5 && degrees < −67.5) { return "W"; }
if(degrees >= −67.5 && degrees < −22.5) { return "NW"; }
return null;
}
public void onAccuracyChanged(Sensor sensor, int accuracy) { }public void onSensorChanged(SensorEvent event) {
switch(event.sensor.getType()) {
case Sensor.TYPE_ACCELEROMETER:
mGravity = event.values.clone();
break;
case Sensor.TYPE_MAGNETIC_FIELD:
mMagnetic = event.values.clone();
break;
default:
return;
}
if(mGravity != null&& mMagnetic != null) {
updateDirection();
}
}
}This example Activity displays the three raw values returned by the sensor calculation at the bottom of the screen in real time. In addition, the compass direction associated with where the user is currently facing is converted and displayed center-stage. As updates are received from the sensors, local copies of the latest values from each is maintained. As soon as we have received at least one reading from both sensors of interest, we allow the UI to begin updating.
updateDirection() is where all the heavy lifting takes place. SensorManager.getOrientation() provides the output information we require to display direction. The method returns no data, and instead an empty float array is passed in for the method to fill in three angle values, and they represent (in order):
Azimuth
Angle of rotation about an axis pointing directly into the Earth.
This is the value of interest to the example.
Pitch
Angle of rotation about an axis pointing West.
Roll
Angle of rotation about and axis pointing at magnetic North.
One of the parameters passed to getOrientation() is a float array representing a rotation matrix. The rotation matrix is a representation of how the current coordinate system of the devices is oriented, so the method may provide appropriate rotation angles based on its references coordinates. The rotation matrix for the device orientation is obtained using getRotationMatrix(), which takes the latest values from the accelerometer and magnetic field sensor as input. Like getOrientation(), it also returns void; and empty float array of length 9 or 16 (to represent a 3×3 or 4×4 matrix) must be passed in as the first parameter for the method to fill in.
Finally, we want the output of the orientation calculation to be specific to the camera's point-of-view. To further transform the obtained rotation, we use the remapCoordinateSystem() method. This method takes four parameters (in order):
Input array representing the matrix to transform
How to transform the device's X-axis with respect to world coordinates
How to transform the device's Y-axis with respect to world coordinates
Empty array to fill in the result
In our example, we want to leave the X-axis untouched, so we map X to X. However, we would like to align the device's Y-axis (vertical axis) to the world's Z-axis (the one pointing into the Earth). This orients the rotation matrix we receive to match up with the device being held vertically upright as if the user is using the camera and looking at the preview on the screen.
With the angular data calculated, we do some data conversion and display the result on the screen. The unit output of getOrientation() is radians, so we first have to convert each result to degrees before displaying it. In addition, we need to convert the azimuth value to a compass direction; getDirectionFromDegrees() is a helper method to return the proper direction based on the range the current reading falls within. Going full-circle clockwise, the azimuth will read from 0 to 180 degrees from North to South. Continuing around the circle, the azimuth will read −180 to 0 degrees rotating from South to North.
Google's Android emulator doesn't support sensors because most computers don't have compasses, accelerometers, or even light sensors that the emulator can leverage. Although this limitation is problematic for apps that need to interact with sensors, and where the emulator is the only viable testing option, it can be overcome by working with Sensor Simulator.
Sensor Simulator (http://code.google.com/p/openintents/wiki/SensorSimulator) is an open source tool that lets you simulate sensor data and make this data available to your apps for testing purposes. It currently supports accelerometer, magnetic field (compass), orientation, temperature, and barcode reader sensors; the behavior of these sensors can be customized through various configuration settings.
Note
Sensor Simulator is one of several projects made available to Android developers by OpenIntents (http://code.google.com/p/openintents/wiki/OpenIntents), a Google-hosted project for creating reusable components and tools for the Android platform.
Sensor Simulator is distributed in a single ZIP archive. Point your browser to http://code.google.com/p/openintents/downloads/list?q=sensorsimulator and click the sensorsimulator-1.1.0-rc1.zip link followed by the sensorsimulator-1.1.0-rc1.zip link on the subsequent page to download this 284Kb file.
After unzipping this archive, you'll discover a sensorsimulator-1.1.0-rc1 home directory with the following subdirectories:
bin: Contains thesensorsimulator-1.1.0-rc1.jar(Sensor Simulator standalone Java application that lets you generate test data) andSensorSimulatorSettings-1.1.0-rc1.apk(Android app to set default IP address/port settings and to test the connection to the Sensor Simulator Java application) executables along with readme files for these executables.lib: Contains thesensorsimulator-lib-1.1.0-rc1.jarlibrary, which your Android apps use to access sensor settings from the Sensor Simulator Java application.release: Contains the Apache Ant build script to assemble thesensorsimulator-1.1.0-rc1.ziprelease.samples: Contains aSensorDemoAndroid app example on how to access Sensor Simulator from an Android app.SensorSimulator: Contains the source code for the Sensor Simulator Java application.SensorSimulatorSettings: Contains the source code for the Sensor Simulator Settings Android app and project settings for building its APK and the library file.
Now that you've downloaded and unarchived the Sensor Simulator distribution, you'll want to launch this software. Complete the following steps to accomplish this task:
Start the Android emulator if not already running; for example, execute
emulator -avdtest_AVDat the command line. This example assumes that you've previously createdtest_AVDin Chapter 1.Install
SensorSimulatorSettings-1.1.0-rc1.apkon the emulator; for example, executeadb install SensorSimulatorSettings-1.1.0-rc1.apk. This example assumes that theadbtool is accessible via yourPATHenvironment variable, and that thebindirectory is current. It outputs a success message when the APK is successfully installed on the emulator.Click the app launcher screen's Sensor Simulator icon to start the Sensor Simulator app.
Start the
bindirectory's Sensor Simulator Java application, which is located insensorsimulator-1.1.0-rc1.jar. For example, under Windows, double-click this filename.
Figure 4-5 reveals the emulator's app launcher screen with the Sensor Simulator icon highlighted.

Click the Sensor Simulator icon. Figure 4-6 reveals the Sensor Simulator Settings screen divided into two activities: Settings and Testing.

The Settings activity prompts you to enter the IP address and socket port number of the Sensor Simulator Java application, whose user interface appears in Figure 4-7.
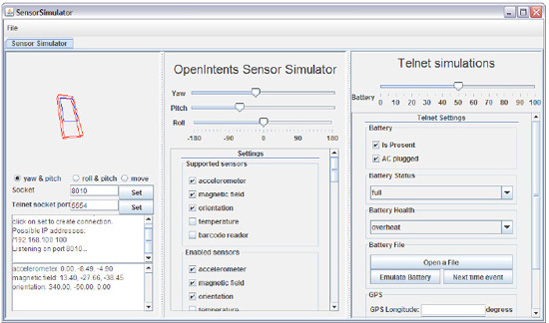
Figure 4.7. Use the Sensor Simulator application's user interface to send sensor data to Sensor Simulator Settings and your own apps.
Sensor Simulator presents a tabbed user interface, where each tab lets you send test data to a different emulator instance. At present, there is only a single default Sensor Simulator tab, but you can add more tabs and remove them by selecting the New Tab and Close Tab menu items from the File menu.
Each tab is divided into three panes:
The left-hand pane displays a graphic of a device that shows its orientation and position. It also lets you select a socket port and Telnet socket port, displays connection information, and (by default) displays only accelerometer, magnetic field, and orientation sensor data.
The middle pane lets you adjust the device's yaw, pitch, and roll, choose which sensors are supported, enable appropriate sensors for testing, and choose additional sensor data (such as choosing the current temperature value) as well as how often sensor data is sent to the emulator.
The right-hand pane lets you communicate with the emulator instance via Telnet. You can communicate battery state (such as whether a battery is present and the battery's health – is it overheating?) along with GPS data to the emulator instance.
The left-hand pane displays the IP address (192.168.100.100 in this example) that's to be entered in the Settings activity's IP address textfield. Because Sensor Simulator uses the same port number (8010) as the number appearing in the Settings activity's Socket textfield, you don't need to change this field's value.
Note
You might need to change the port number in both the Settings activity's Socket textfield and Sensor Simulator's Socket textfield if 8010 is being used by some other application running on your computer.
After entering this IP address in the Settings activity's IP address field (see Figure 4-6), select the Testing activity by clicking the Testing tab. Figure 4-8 shows the results.

According to this screen, you must click the Connect button to establish a connection with the Sensor Simulator Java application, which must be running at this point. (You later click Disconnect to break the connection.)
After clicking Connect, the Testing tab reveals accelerometer, magnetic field, and orientation checkboxes with labels underneath to show test values. It doesn't show checkboxes for temperature and barcode reader because these sensors are not supported nor enabled (see the Sensor Simulator application's middle panel).
Check the acclerometer checkbox and, as Figure 4-9 shows, the label underneath the checkbox reveals to you the current yaw, pitch, and roll values obtained from Sensor Simulator.
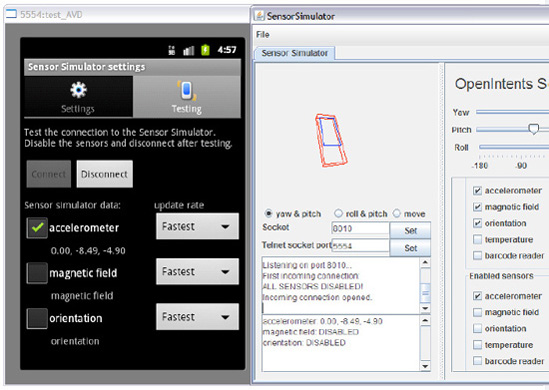
Although Sensor Simulator Settings helps you learn how to use Sensor Simulator to send test data to an app, it's no substitute for your own apps. At some point, you'll want to incorporate code into your activities that accesses this tool. Google provides the following guidelines for modifying your app to access Sensor Simulator:
Add the
libdirectory's JAR file (sensorsimulator-lib-1.1.0-rc1.jar, for example) to your project.Import the following Sensor Simulator types from this library into your source code:
import org.openintents.sensorsimulator.hardware.Sensor;
import org.openintents.sensorsimulator.hardware.SensorEvent;
import org.openintents.sensorsimulator.hardware.SensorEventListener;
import org.openintents.sensorsimulator.hardware.SensorManagerSimulator;
Replace your activity's
onCreate()method's existingSensorManager.getSystemService()method calls with equivalentSensorManagerSimulator.getSystemService()method calls. For example, you might replacemSensorManager = (SensorManager) getSystemService(SENSOR_SERVICE);withmSensorManager = SensorManagerSimulator.getSystemService(this, SENSOR_SERVICE);.Connect to the Sensor Simulator Java application using the settings that have been set previously with
SensorSimulatorSettings:mSensorManager.connectSimulator();, for example.All other code remains untouched. However, remember to register the sensors in
onResume()and unregister them inonStop():@Override protected void onResume() { super.onResume(); mSensorManager.registerListener(this, mSensorManager.getDefaultSensor(Sensor.TYPE_ACCELEROMETER), SensorManager.SENSOR_DELAY_FASTEST); mSensorManager.registerListener(this, mSensorManager.getDefaultSensor(Sensor.TYPE_MAGNETIC_FIELD), SensorManager.SENSOR_DELAY_FASTEST); mSensorManager.registerListener(this, mSensorManager.getDefaultSensor(Sensor.TYPE_ORIENTATION), SensorManager.SENSOR_DELAY_FASTEST); mSensorManager.registerListener(this, mSensorManager.getDefaultSensor(Sensor.TYPE_TEMPERATURE), SensorManager.SENSOR_DELAY_FASTEST); } @Override protected void onStop() { mSensorManager.unregisterListener(this); super.onStop(); }Finally, you must implement the
SensorEventListenerinterface:class MySensorActivity extends Activity implements SensorEventListener { public void onAccuracyChanged(Sensor sensor, int accuracy) { } public void onSensorChanged(SensorEvent event) { int sensor = event.type; float[] values = event.values; // do something with the sensor data } }
Note
OpenIntents' SensorManagerSimulator class is derived from the Android SensorManager class, and implements exactly the same functions as SensorManager. For the callback, the new SensorEventListener interface has been implemented to resemble the standard Android SensorEventListener interface.
Whenever you are not connected to the Sensor Simulator Java application, you'll get real device sensor data: the org.openintents.hardware.SensorManagerSimulator class transparently calls the SensorManager instance that's returned by the system service to make this happen.
This collection of recipes exposed how to use Android to use maps, user location, and device sensor data to integrate information about the user's surroundings into your applications. We also discussed how to utilize the device's camera and microphone, allowing the user to capture, and sometimes interpret, what's around them. Finally, using the media APIs you learned how to take media content, either captured locally by the user or downloaded remotely from the Web, and play it back from within your applications. In the next chapter, we will discuss how to use Android's many persistence techniques to store nonvolatile data on the device.