
Android is hot, and many people are developing Android applications (apps for short). Perhaps you too would like to develop apps but are unsure about how to get started. Although you could study Google’s online Android Developer’s Guide (http://developer.android.com/index.html) to acquire the needed knowledge, you might be overwhelmed by the guide’s vast amount of information. In contrast, this chapter presents just enough theory to help you grasp the basics. Following this theory are recipes that teach you how to develop apps and prepare them for publication on Google Play (https://play.google.com/store).
1-1. What Is Android?
The Android Developer’s Guide formally defines Android as a software stack—a set of software subsystems needed to deliver a fully functional solution—for mobile devices. This stack includes an operating system (a modified version of the Linux kernel), middleware (software that connects the low-level operating system to high-level apps) that’s partly based on Java, and key apps (written in Java) such as a web browser (known as Browser) and a contact manager (known as Contacts).
Android offers the following features:
- Application framework enabling reuse and replacement of app components (discussed later in this chapter)
- Bluetooth, EDGE, 3G, and WiFi support (hardware dependent)
- Camera, GPS, compass, and accelerometer support (hardware dependent)
- Dalvik virtual machine optimized for mobile devices
- GSM telephony support (hardware dependent)
- Integrated browser based on the open source WebKit engine
- Media support for common audio, video, and still-image formats (MPEG-4, H.264, MP3, AAC, AMR, JPG, PNG, GIF)
- Optimized graphics powered by a custom 2D graphics library; 3D graphics based on the OpenGL ES 1.0, 1.1, or 2.0 specification (hardware acceleration optional)
- SQLite for structured data storage
Although not part of an Android device’s software stack, Android’s rich development environment—including a device emulator and plug-ins for many mainstream integrated development environments (IDEs)—could also be considered an Android feature.
1-2. Exploring the History of Android
Contrary to what you might expect, Android did not originate with Google. Instead, Android was initially developed by Android, Inc., a small Palo Alto, California–based startup company. Google bought this company in the summer of 2005 and released a beta version of the Android Software Development Kit (SDK) in November 2007.
On September 23, 2008, Google released Android 1.0, whose core features included a web browser, camera support, Google Search, and more. Table 1-1 outlines subsequent releases. (Starting with version 1.5, each major release comes under a code name that’s based on a dessert item.)
Table 1-1. Android Releases
1-3. Installing the Android SDK
Problem
You’ve read the previous introduction to Android and are eager to develop your first Android app. However, you must install the Android SDK before you can develop apps.
Solution
Google provides the latest release of an Android SDK distribution file for each of the Windows, Intel-based Mac OS X, and i386-based Linux operating systems. Download and unarchive the appropriate file for your platform and move its unarchived home directory to a convenient location. You might also want to update your PATH environment variable so that you can access the SDK’s command-line tools from anywhere in your filesystem.
Before downloading and installing this file, you must be aware of SDK requirements. You cannot use the SDK when your development platform doesn’t meet these requirements.
The Android SDK supports the following operating systems:
- Windows XP (32-bit), Vista (32- or 64-bit), or Windows 7 (32- or 64-bit).
- Mac OS X 10.5.8 or later (x86 only).
- Linux (tested on Ubuntu Linux, Lucid Lynx). GNU C Library (glibc) 2.7 or later is required. On Ubuntu Linux, version 8.04 or later is required. 64-bit distributions must be able to run 32-bit applications. To learn how to add support for 32-bit applications, see the Ubuntu Linux installation notes at http://developer.android.com/sdk/installing/index.html#Troubleshooting.
You’ll quickly discover that the Android SDK is organized into various separately downloadable components, which are known as packages. You will need to ensure that you have enough disk storage space to accommodate the various packages that you want to install. Plan for around 2 gigabytes of free storage. This figure takes into account the Android API documentation and multiple Android platforms (also known as Android software stacks).
Finally, you should ensure that the following additional software is installed:
- JDK 6 or JDK 7: You need to install one of these Java Development Kits (JDKs) to compile Java code. It’s not sufficient to have only a Java Runtime Environment (JRE) installed.
- Apache Ant: You need to install Ant version 1.8 or later so that you can build Android projects from the command line using the current build system.
- Gradleware Gradle: Although it’s currently in beta, you may need to install Gradle version 1.6 or later to experiment with the new command-line build system that will be replacing Ant.
Note If a JDK is already installed on your development platform, take a moment to ensure that it meets the previously listed version requirement (6 or 7). Some Linux distributions may include JDK 1.4, which is not supported for Android development. Also, GNU Compiler for Java is not supported.
How It Works
Point your browser to http://developer.android.com/sdk/index.html and download one of the android-sdk_r22-windows.zip (Windows), android-sdk_r22-macosx.zip (Mac OS X), or android-sdk_r22-linux.tgz (Linux) distribution archives for Release 22 of the Android SDK. (Release 22 is the latest release at the time of this writing.)
Note Windows developers have the option of downloading and running installer_r20-windows.exe. This tool automates most of the installation process.
For example, if you run Windows (the assumed platform in this chapter), you might choose to download android-sdk_r22-windows.zip. After unarchiving this file, move the unarchived android-sdk-windows home directory to a convenient location in your filesystem; for example, you might move the unarchived C:unzippedandroid-sdk_r22-windowsandroid-sdk-windows home directory to the root directory on your C: drive, resulting in C:android-sdk-windows.
Note It is recommended that you rename android-sdk-windows to android to avoid a potential emulator crash when attempting to run an app from within Eclipse. Although this problem may no longer exist, it has been encountered in the past, and it most likely results from the hyphen (-) between android and sdk, and between sdk and windows.
To complete the installation, add the tools and platform-tools subdirectories to your PATH environment variable so that you can access the SDK’s command-line tools from anywhere in your filesystem.
A subsequent examination of android-sdk-windows (or android) shows that this home directory contains the following subdirectories and files:
- add-ons: This initially empty directory stores add-ons (additional SDKs beyond the core platform that apps can target) from Google and other vendors; for example, the Google APIs add-on is stored here.
- platforms: This initially empty directory stores Android platforms in separate subdirectories. For example, Android 4.1 would be stored in one platforms subdirectory, whereas Android 2.3.4 would be stored in another platforms subdirectory.
- tools: This directory contains a set of platform-independent development tools, such as the emulator. The tools in this directory, known as basic tools, may be updated at any time and are independent of Android platform releases.
- platform-tools: This directory contains the Android Debug Bridge (ADB), the utility used to connect to a device or emulator for the purposes of installing applications, pushing/pulling files, and accessing the device shell.
- AVD Manager.exe: This tool is used to manage Android Virtual Devices (AVDs), device configurations that are run with the Android emulator.
- SDK Manager.exe: This tool is used to manage SDK packages and runs AVD Manager in response to a menu selection.
- SDK Readme.txt: This text file welcomes you to the Android SDK and tells you that, in order to start developing apps, you need to use SDK Manager to install platform tools and at least one Android platform.
The tools directory contains various useful basic tools, including the following:
- android: Creates and updates Android projects; updates the Android SDK with new Android platforms and more; and creates, deletes, and views AVDs.
- emulator: Runs a full Android software stack down to the kernel level; includes a set of preinstalled apps (such as Browser) that you can access.
- hierarchyviewer: Provides a visual representation of a layout’s view hierarchy (the Layout view) and a magnified inspector of the display (the Pixel Perfect view) so that you can debug and optimize your activity screens.
- sqlite3: Manages SQLite databases created by Android apps.
- zipalign: Performs archive alignment optimization on APK files.
You will look at many of these tools in greater detail throughout the book.
1-4. Installing an Android Platform
Problem
Installing the Android SDK is insufficient for developing Android apps; you must also install at least one Android platform.
Solution
Use the SDK Manager tool to install an Android platform. If SDK Manager doesn’t display its Android SDK Manager dialog box, you probably need to create a JAVA_HOME environment variable that points to your JDK’s home directory (for example, set JAVA_HOME=C:Program FilesJavajdk1.7.0_04) and try again.
Alternatively, you can use the android tool to install an Android platform. If android shows Failed to convert path to a short DOS path: C:Windowssystem32java.exe, locate a file named find_java.bat (see C:android oolslibfind_java.bat) and remove -s from each of the following lines:
for /f %%a in ('%∼dps0find_java.exe -s') do set java_exe=%%a
for /f %%a in ('%∼dps0find_java.exe -s -w') do set javaw_exe=%%a
How It Works
Run SDK Manager or android. Either tool presents the Android SDK Manager dialog box that is shown in Figure 1-1.
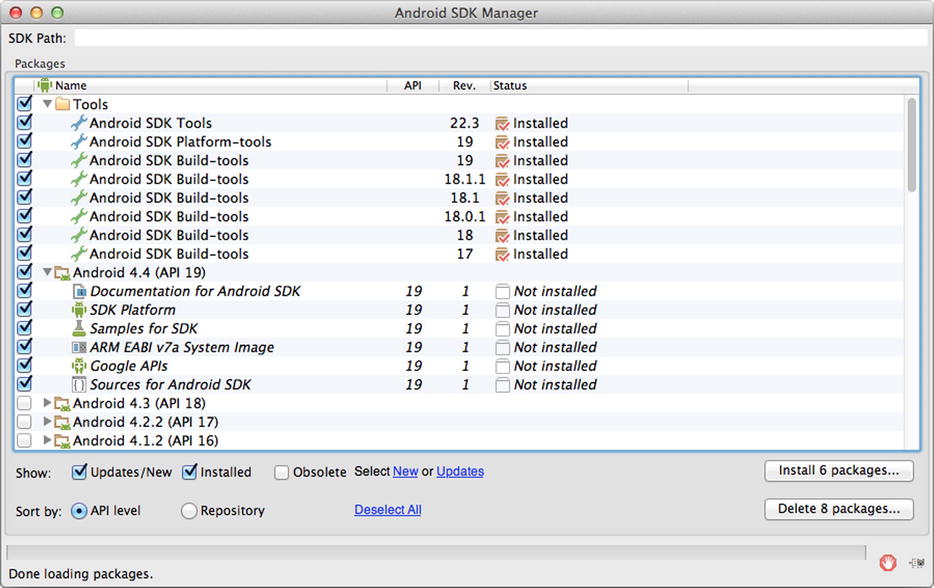
Figure 1-1. Use this dialog box to install, update, and remove Android packages and to access the AVD Manager
The Android SDK Manager dialog box presents a menu bar and a content area. The menu bar presents Packages and Tools menus:
- Packages: Use this menu to display a combination of updates/new packages, installed packages, and obsolete packages; to show archive details (or not); to sort packages by API level or repository; and to reload the list of packages shown in the content area.
- Tools: Use this menu to manage AVDs and add-on sites, to specify the proxy server and other options, and to display an About dialog box.
The content area shows you the path to the SDK, a table of information on packages, check boxes for choosing which packages to display, radio buttons for sorting packages by API level or repository, buttons for installing and deleting packages, and a progress bar that shows the progress of a scan of repositories for package information.
The Packages table classifies packages as tools, specific Android platforms, or extras. Each of these categories is associated with a check box that, when checked, selects all of the items in the category. Individual items can be deselected by unchecking their corresponding check boxes.
Tools are classified as SDK tools or SDK platform tools:
- SDK tools are the basic tools that are included in the SDK distribution file and that are stored in the tools directory. This fact is borne out by the Installed message in the status column for the Android SDK Tools item.
- SDK platform tools are platform-dependent tools for developing apps. These tools support the latest features of the Android platform and are typically updated only when a new platform becomes available. They are always backward-compatible with older platforms, but you must make sure that you have the latest version of these tools when you install a new platform. If you don’t select the Android SDK Platform tools item (which is not selected by default), the platform tools will be installed automatically.
The only platform that you need to install for this book is Android 4.4 (Level 19). This category and all of its items are selected, so leave them as is. As well as this platform, you will install the documentation, samples, ARM and/or x86 system image (for creating emulator instances), Google APIs, and source code.
Finally, you can install extras, which are external libraries or tools that can be included or used when building an app. For example, the Google USB Driver item is already selected in the Extras section. However, you need to install this component only when developing on a Windows platform and testing your apps on an actual Android device.
Click the Install Packages button (the number will differ should you choose to install more or fewer packages). You’ll encounter the Choose Packages to Install dialog box shown in Figure 1-2.
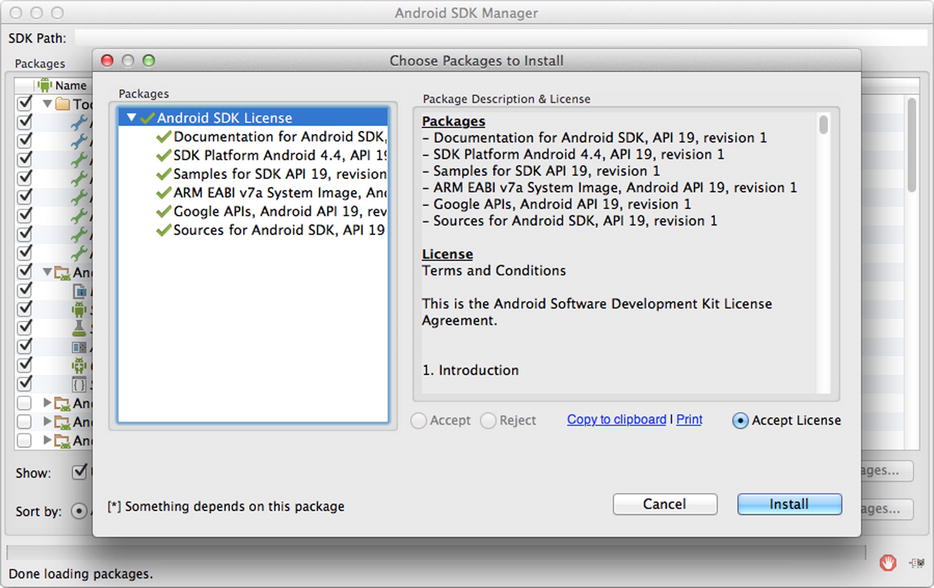
Figure 1-2. The Packages list identifies those packages that can be installed
The Choose Packages to Install dialog box shows a Packages list that identifies those packages that can be installed. It displays green check marks beside packages that have been accepted for installation, and it displays question marks beside those packages that have not yet been selected.
Note Although Google APIs and Google USB Driver were initially selected, they are indicated as not having been selected. (Perhaps this is an example of a bug, where information is not being carried forward.) You will need to highlight and accept these packages if you still want them.
For the highlighted package, Package Description & License presents a package description, a list of other packages that are dependent on this package being installed, information on the archive that houses the package, and additional information. Click the Accept or Reject radio button to accept or reject the package.
Note A red X appears beside the package name in the Packages list when you reject the package. Click the Accept All radio button to accept all packages.
In some cases, an SDK component may require a specific minimum revision of another component or SDK tool. In addition to Package Description & License documenting these dependencies, the development tools will notify you with debug warnings when there is a dependency that you need to address.
Click the Install button to begin installation. Android proceeds to download and install the chosen packages; you may also track the download progress by using the Android SDK Manager Log dialog box, which is accessible using the icon on the far right of the progress bar at the bottom of the window. This dialog box appears in Figure 1-3.

Figure 1-3. The log window reveals the progress of downloading and installing each selected package archive
Upon completion, you should observe a “Done loading packages” message at the bottom of the Android SDK Manager Log and Android SDK Manager dialog boxes. Click the Close button on the former dialog box; the Status column in the Packages table on the latter dialog box will tell you which packages have been installed.
You should also observe several new subdirectories of the home directory, including the following:
- platform-tools (in android)
- android-19 (in android/platforms)
1-5. Creating an Android Virtual Device
Problem
After installing the Android SDK and an Android platform, you’re ready to start creating Android apps. However, you won’t be able to run those apps via the emulator tool until you create an Android Virtual Device (AVD), a device configuration that represents an Android device.
Solution
Use the AVD Manager or android tool to create an AVD.
How It Works
Run AVD Manager (or select Manage AVDs from the Android SDK Manager dialog box’s Tools menu). Figure 1-4 shows the Android Virtual Device Manager dialog box.

Figure 1-4. No AVDs are initially installed
Click the New button. Figure 1-5 shows the resulting Create New Android Virtual Device (AVD) dialog box.

Figure 1-5. An AVD consists of a name, a target Android platform, and more
Figure 1-5 reveals that an AVD has a name, targets a specific Android platform, targets a specific CPU/ABI (Application Binary Interface, such as ARM/armeabi-v7a), can emulate an SD card, provides a skin with a certain screen resolution, and has various hardware properties.
Enter a name, target device, target platform (you may have only one choice), and any other device options you would like. If your machine has an attached or built-in webcam, this can be used to emulate the device’s front or rear cameras as well.
Tip You can select the Enabled check box in the Use Host GPU section to enable hardware acceleration of graphics. This will greatly improve the animations in the UI, but it is not supported on all system images.
After making all the appropriate selections, finish the AVD creation by clicking Create AVD. Figure 1-4’s AVD pane now includes an entry for your new AVD.
Caution When creating an AVD that you plan to use to test compiled apps, make sure that the target platform has an API level greater than or equal to the API level required by your app. In other words, if you plan to test your app on the AVD, your app typically cannot access platform APIs that are more recent than those APIs supported by the AVD’s API level.
Although it’s easier to use AVD Manager to create an AVD, you can also accomplish this task via the android tool by specifying android create avd -nname-ttargetID[-optionvalue].... Given this syntax, name identifies the device configuration (such as target_AVD), targetID is an integer ID that identifies the targeted Android platform (you can obtain this integer ID by executing android list targets), and [-optionvalue]... identifies a series of options (such as SD card size).
If you don’t specify sufficient options, android prompts to create a custom hardware profile. Press the Enter key when you don’t want a custom hardware profile and prefer to use the default hardware emulation options. For example, the android create avd -n AVD1 -t 1 command line causes an AVD named AVD1 to be created. This command line assumes that 1 corresponds to the Android 4.1 platform and prompts to create a custom hardware profile.
Note Each AVD functions as an independent device with its own private storage for user data, its own SD card, and so on. When you launch the emulator tool with an AVD, this tool loads user data and SD card data from the AVD’s directory. By default, emulator stores user data, SD card data, and a cache in the directory assigned to the AVD.
Problem
You must start the emulator with the AVD so that you can install and run apps. You want to know how to accomplish this task.
Solution
Use the AVD Manager tool to start the AVD. Or start the AVD by using the emulator tool.
How It Works
Refer to Figure 1-4 and you’ll notice a disabled Start button. This button is no longer disabled after an AVD entry is created (and highlighted). Click Start to run the emulator tool with the highlighted AVD entry as the emulator’s device configuration.
A Launch Options dialog box appears. This dialog box identifies the AVD’s skin and screen density. It also provides unchecked check boxes for scaling the resolution of the emulator’s display to match the physical device’s screen size, for wiping user data, for launching from a previously saved snapshot, and for saving device state to a snapshot upon device exit.
Note As you update your apps, you’ll periodically package and install them on the emulator, which preserves the apps and their state data across AVD restarts in a user-data disk partition. To ensure that an app runs properly as you update it, you might need to delete the emulator’s user-data partition, which is accomplished by selecting Wipe User Data.
Click the Launch button to launch the emulator with AVD1. AVD Manager responds by briefly displaying a Starting Android Emulator dialog box followed by the emulator window. See Figure 1-6.
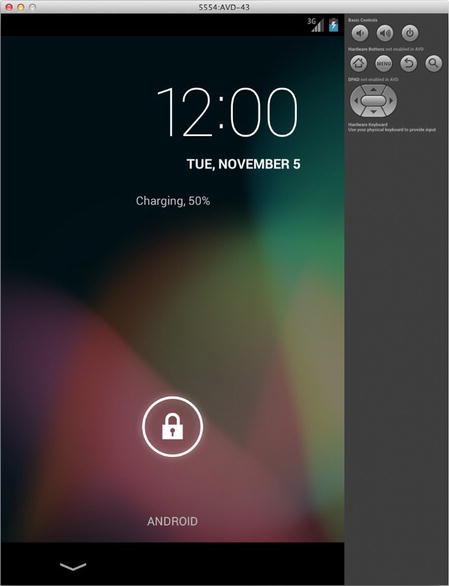
Figure 1-6. The emulator window presents the home screen on its left, and it presents phone controls on its right
Figure 1-6 shows that the emulator window is divided into a left pane, which displays the Android logo on a black background followed by the home screen, and a right pane, which displays phone controls. If, when creating the AVD, you unchecked the box for including hardware controls, the emulator will start up showing just the device display.
A status bar appears above the home screen (and every app screen). The status bar presents the current time, amount of battery power remaining, and other information; it also provides access to notifications.
The home screen initially appears in locked mode. To unlock this screen, drag the lock icon to its right until it touches an unlock icon. You should end up with the unlocked home screen shown in Figure 1-7.

Figure 1-7. The home screen now reveals the app launcher and more
The home screen presents the following items:
- Wallpaper background: Wallpaper appears behind everything else and can be dragged to the left or right. To change this background, press and hold down the left mouse button over the wallpaper, which causes a wallpaper-oriented pop-up menu to appear.
- Widgets: The Google Search widget appears near the top, the Clock widget appears upper-centered, and the Camera widget appears near the bottom left. A widget is a miniature app view that can be embedded in the home screen and other apps, and receives periodic updates.
- App launcher: The app launcher (along the bottom) presents icons for launching the commonly used Browser, Contacts, Messaging, and Phone apps; it also displays a rectangular grid of all installed apps, which are subsequently launched by single-clicking their icons. Figure 1-8 shows some of these icons.

Figure 1-8. Drag this screen to the left to reveal more icons
The app launcher organizes apps and widgets according to the tabs near the top left of the screen. You can run apps from the APPS tab, and select additional widgets to display on the home screen from the WIDGETS tab. (If you need more room for widgets on the home screen, drag its wallpaper in either direction.)
Tip The API Demos app demonstrates a wide variety of Android APIs. If you are new to Android app development, you should run the individual demos to acquaint yourself with what Android has to offer. You can view each demo’s source code by accessing the source files that are located in the android/samples/android-19/ApiDemos folder.
The phone controls include the following commonly used buttons:
- The house icon phone control button takes you from wherever you are to the home screen.
- The MENU phone control button presents a menu of app-specific choices for the currently running app.
- The curved arrow icon phone control button takes you back to the previous activity in the activity stack.
While the AVD is running, you can interact with it by using your mouse to “touch” the touch screen, and your keyboard to “press” the AVD keys. Table 1-2 shows you the mappings between AVD keys and keyboard keys.
Table 1-2. Mappings Between AVD Keys and Keyboard Keys
AVD Key |
Keyboard Key |
|---|---|
Home |
Home |
Menu (left softkey) |
F2 or Page Up |
Star (right softkey) |
Shift-F2 or Page Down |
Back |
Esc |
Call/dial button |
F3 |
Hang up/end call button |
F4 |
Search |
F5 |
Power button |
F7 |
Audio volume up button |
Keypad_Plus, Ctrl-5 |
Audio volume down button |
Keypad_Minus, Ctrl-F6 |
Camera button |
Ctrl-Keypad_5, Ctrl-F3 |
Switch to previous layout orientation (for example, portrait or landscape) |
Keypad_7, Ctrl-F11 |
Switch to next layout orientation |
Keypad_9, Ctrl-F12 |
Toggle cell networking on/off |
F8 |
Toggle code profiling |
F9 (only with -trace startup option) |
Toggle full-screen mode |
Alt-Enter |
Toggle trackball mode |
F6 |
Enter trackball mode temporarily (while key is pressed) |
Delete |
DPad left/up/right/down |
Keypad_4/8/6/2 |
DPad center click |
Keypad_5 |
Onion alpha increase/decrease |
Keypad_Multiply (*) / Keypad_Divide (/) |
Tip You must first disable NumLock on your development computer before you can use keypad keys.
Table 1-2 refers to the -trace startup option in the context of toggle code profiling. This option lets you store profiling results in a file when starting the AVD via the emulator tool.
For example, emulator -avd AVD1 -trace results.txt starts the emulator for device configuration AVD1, and it also stores profiling results in results.txt when you press F9—press F9 again to stop code profiling.
Figure 1-6 displays 5554:AVD on the title bar. The 5554 value identifies a console port that you can use to dynamically query and otherwise control the environment of the AVD.
Note Android supports up to 16 concurrently executing AVDs. Each AVD is assigned an even-numbered console port number starting with 5554.
You can connect to the AVD’s console by specifying telnet localhostconsole-port. For example, specify telnet localhost 5554 to connect to AVD1’s console. Listing 1-1 shows you the resulting commands.
Listing 1-1. Typing a Command Name by Itself for Command-Specific Help
Android Console: type 'help' for a list of commands
OK
help
Android console command help:

    help|h|?         print a list of commands
    event            simulate hardware events
    geo              Geo-location commands
    gsm              GSM related commands
    cdma             CDMA related commands
    kill             kill the emulator instance
    network          manage network settings
    power            power related commands
    quit|exit        quit control session
    redir            manage port redirections
    sms              SMS related commands
    avd              control virtual device execution
    window           manage emulator window
    qemu             QEMU-specific commands
    sensor           manage emulator sensors

try 'help <command>' for command-specific help
OK
Tip The telnet command is disabled on Windows 7 by default (to help make the OS more secure). To enable telnet on Windows 7, start the Control Panel, select Programs and Features, select Turn Windows Features On or Off, and (from the Windows Features dialog box), select the Telnet Client check box.
Problem
You prefer to develop apps by using the Eclipse IDE.
Solution
To develop apps with Eclipse, you need to install an IDE such as Eclipse Classic 4.2. Furthermore, you need to install the Android Development Tools (ADT) plug-in.
How It Works
Before you can develop Android apps with Eclipse, you must complete at least the first two of the following three tasks:
- Install the Android SDK and at least one Android platform. JDK 6 or JDK 7 must also be installed.
- Install a version of Eclipse that’s compatible with the Android SDK and the ADT plug-in for the Eclipse IDE.
- Install the ADT plug-in.
You should complete these tasks in the order presented. You cannot install the ADT plug-in before installing Eclipse, and you cannot configure or use the ADT plug-in before installing the Android SDK and at least one Android platform.
THE BENEFICIAL ADT PLUG-IN
Although you can develop Android apps in Eclipse without using the ADT plug-in, it’s much faster and easier to create, debug, and otherwise develop these apps with this plug-in. The ADT plug-in offers the following features:
- It gives you access to other Android development tools from inside the Eclipse IDE. For example, ADT lets you access the many capabilities of the Dalvik Debug Monitor Server (DDMS) tool, allowing you to take screenshots, manage port-forwarding, set breakpoints, and view thread and process information directly from Eclipse.
- It provides a New Project Wizard, which helps you quickly create and set up all of the basic files you’ll need for a new Android app.
- It automates and simplifies the process of building your Android app.
- It provides an Android code editor that helps you write valid XML for your Android manifest and resource files.
- It lets you export your project into a signed APK, which can be distributed to users.
You’ll learn how to install the ADT plug-in after learning how to install Eclipse.
The Eclipse.org website makes available for download several IDE packages that meet different requirements. Google places the following stipulations on which IDE package you should download and install:
- Install an Eclipse 3.6.2 (Helios) or greater IDE package.
- Make sure that the Eclipse package being downloaded includes the Eclipse Java Development Tools (JDT) plug-in. Most packages include this plug-in.
Complete the following steps to install Eclipse Classic 4.2, which is the latest version of this IDE at the time of this writing:
- Point your browser to the Eclipse Classic 4.2 page at http://eclipse.org/downloads/packages/eclipse-classic-42/junor.
- Select the appropriate distribution file by clicking one of the links in the Download Links box on the right side of this page. For example, you might click Windows 64-bit platform.
- Click a download link and save the distribution file to your hard drive. For example, you might save eclipse-SDK-4.2-win32-x86_64.zip to your hard drive.
- Unarchive the distribution file and move the eclipse home directory to a convenient location. For example, on 64-bit Windows 7, you would move eclipse to your C:Program Files directory, which organizes 64-bit programs.
- You might also want to create a desktop shortcut to the eclipse application located in the eclipse home directory.
Complete the following steps to install the latest revision of the ADT plug-in:
- Start Eclipse.
- The first time you start Eclipse, you will discover a Workspace Launcher dialog box following the splash screen. You can use this dialog box to select a workspace folder in which to store your projects. You can also tell Eclipse to not display this dialog box on subsequent startups. Change or keep the default folder setting and click OK.
- Once Eclipse displays its main window, select Install New Software from the Help menu.
- Click the Add button in the resulting Install dialog box’s Available Software pane.
- In the resulting Add Repository dialog box, enter a name for the remote site (for example, Android Plugin) in the Name field, and enter
https://dl-ssl.google.com/android/eclipse/ into the Location field. Click OK. - You should now see Developer Tools and NDK Plugins in the list that appears in the middle of the Install dialog box.
- Select the check box next to these categories, which will automatically select the nested items underneath. Click Next.
- The resulting Install Details pane lists Android DDMS, Android Development Tools, Android Hierarchy Viewer, Android Native Development Tools, Android Traceview, and Tracer for OpenGL ES. Click Next to read and accept the various license agreements, and then click Finish.
- An Installing Software dialog box appears and takes care of installation. If you encounter a Security Warning dialog box, click OK.
- Finally, Eclipse presents a Software Updates dialog box that prompts you to restart this IDE. Click Yes to restart.
Tip If you have trouble acquiring the plug-in in step 5, try specifying http instead of https (https is preferred for security reasons) in the Location field.
To complete the installation of the ADT plug-in, you may have to configure it by modifying the ADT preferences in Eclipse to point to the Android SDK home directory. Accomplish this task by completing the following steps:
- Select Preferences from the Window menu to open the Preferences dialog box. For Mac OS X, select Preferences from the Eclipse menu.
- Select Android from the left panel.
- If the SDK Location text field presents the SDK’s home directory (such as C:android), close the Preferences dialog box. You have nothing further to do.
- If the SDK Location text field does not present the SDK’s home directory, click the Browse button beside this text field and locate your downloaded SDK’s home directory on the resulting Browse For Folder dialog box. Select this location, click OK to close this dialog box, and click Apply in the Preferences dialog box to confirm this location, which should result in a list of SDK Targets (such as Android 4.1) appearing below the text field.
Note For more information on installing the ADT plug-in, which includes helpful information in case of difficulty, check out the “Installing the Eclipse Plugin” page (http://developer.android.com/sdk/installing/installing-adt.html) in Google’s online Android documentation.
1-8. Creating Java Library JARs
You want to create a library that stores Android-agnostic code and that can be used in your Android and non-Android projects.
Solution
Create a JAR-based library that accesses only Java 5 (and earlier) APIs via JDK command-line tools or Eclipse.
How It Works
Suppose you plan to create a simple library of math-oriented utilities. This library will consist of a single MathUtils class with various static methods. Listing 1-2 presents an early version of this class.
Listing 1-2. MathUtils Implementing Math-Oriented Utilities via static Methods
package com.androidrecipes.lib;

public class MathUtils {
   public static long factorial(long n) {
      if (n <= 0)
         return 1;
      else
         return n*factorial(n-1);
   }
}
MathUtils currently consists of a single long factorial(long n) class method for computing and returning factorials (perhaps for use in calculating permutations and combinations). You might eventually expand this class to support fast Fourier transforms and other math operations not supported by the java.lang.Math class.
Caution When creating a library that stores Android-agnostic code, make sure to access only standard Java APIs (such as the collections framework) that are supported by Android. Don’t access unsupported Java APIs (such as Swing) or Android-specific APIs (such as Android widgets).
Creating MathUtils with the JDK
Developing a JAR-based library with the JDK is easy. Complete the following steps to create a mathutils.jar file that contains the MathUtils class:
- Within the current directory, create a package directory structure consisting of a com subdirectory that contains an androidrecipes subdirectory that contains a lib subdirectory.
- Copy Listing 1-2’s MathUtils.java source code to a MathUtils.java file stored in lib.
- Assuming that the current directory contains the com subdirectory, execute javac com/androidrecipes/lib/MathUtils.java to compile MathUtils.java. A MathUtils.class file is stored in com/androidrecipes/lib.
- Create mathutils.jar by executing jar cfv mathutils.jar com/androidrecipes/lib/*.class. The resulting mathutils.jar file contains a com/androidrecipes/lib/MathUtils.class entry.
Note If you’re using JDK 7, execute one of the following command lines to compile MathUtils.java:
javac -source 1.5 -target 1.5 com/androidrecipes/lib/MathUtils.java
javac -source 1.6 -target 1.6 com/androidrecipes/lib/MathUtils.java
Each command line results in a harmless “bootclasspath” warning message that is explained at https://blogs.oracle.com/darcy/entry/bootclasspath_older_source.
Fail to do this and you will see the following warning messages when executing ant debug to build an APK that references this library:
[dx] trouble processing:
[dx] bad class file magic (cafebabe) or version (0033.0000)
[dx] ...while parsing com/androidrecipes/lib/MathUtils.class
[dx] ...while processing com/androidrecipes/lib/MathUtils.class
[dx] 1 warning
Creating MathUtils with Eclipse
Developing a JAR-based library with Eclipse is a bit more involved. Complete the following steps to create a mathutils.jar file that contains the MathUtils class:
- Assuming that you’ve installed the Eclipse version discussed previously in this chapter, start this IDE if it is not already running.
- From the File menu, choose New
 Java Project.
 - In the resulting New Java Project dialog box, enter mathutils into the Project name text field. If the execution environment JRE setting (in the JRE section) is set to JavaSE-1.7, change this setting to JavaSE-1.6. Click the Finish button.
- Expand Package Explorer’s mathutils node. Then right-click the src node (underneath mathutils) and choose New Package.
- In the resulting New Java Package dialog box, enter com.androidrecipes.lib into the Name text field and click Finish.
- Right-click the resulting com.androidrecipes.lib node and choose New Class.
- In the resulting New Java Class dialog box, enter MathUtils into the Name field and click Finish.
- Replace the skeletal contents in the resulting MathUtils.java editor window with Listing 1-2.
- Right-click the mathutils project node and choose Build Project. (You might have to deselect Build Automatically from the project menu first.) Ignore any “Build path specifies execution environment JavaSE-1.6. There are no JREs installed in the workspace that are strictly compatible with this environment” warning message.
- Right-click the mathutils project node and choose Export.
- In the resulting Export dialog box, select JAR file under the Java node (if not selected), and click the Next button.
- In the resulting JAR Export dialog box, keep the defaults but enter mathutils.jar into the JAR file text field. Click Finish. (At this point, you will see a Save Modified Resources dialog box if you have not saved the source code entered in step 8. Click OK to dismiss this dialog box.) The resulting mathutils.jar file is created in your Eclipse workspace’s root directory.
1-9. Creating Android LibraryProjects
Problem
You want to create a library that stores Android-specific code, such as custom widgets or activities with or without resources.
Solution
You can create Android library projects, which are projects containing shareable Android source code and resources and which you can reference in other Android projects. This is useful when you want to reuse common code. Library projects cannot be installed onto a device. They are pulled into the APK file at build time.
Note The Android 4.0 SDK (r14) includes changes to Android library projects. Previously, library projects were handled as extra resource and source code folders for use when compiling the resources and the app’s source, respectively. Because developers wanted to distribute a library as one JAR file of compiled code and resources, and because library project implementations were extremely fragile in Eclipse, r14 based Android library projects on a compiled-code library mechanism.
Check out the “Changes to Library Projects in Android SDK Tools, r14” blog post (http://android-developers.blogspot.ca/2011/10/changes-to-library-projects-in-android.html) for more information.
How It Works
Suppose you want to create a library that contains a single reusable custom view describing a game board (for playing chess, checkers, or even tic-tac-toe). Listing 1-3 reveals this view’s GameBoard class.
Listing 1-3. GameBoard Describing a Reusable Custom View for Drawing Different Game Boards
public class GameBoard extends View {
   private int nSquares, colorA, colorB;

   private Paint paint;
   private int squareDim;

   public GameBoard(Context context, int nSquares, int colorA,
         int colorB) {
      super(context);
      this.nSquares = nSquares;
      this.colorA = colorA;
      this.colorB = colorB;
      paint = new Paint();
   }

   @Override
   protected void onDraw(Canvas canvas) {
      for (int row = 0; row < nSquares; row++) {
         paint.setColor(((row & 1) == 0) ? colorA : colorB);
         for (int col = 0; col < nSquares; col++) {
            int a = col*squareDim;
            int b = row*squareDim;
            canvas.drawRect(a, b, a+squareDim, b+squareDim,
                  paint);
            paint.setColor(
                  (paint.getColor() == colorA) ? colorB : colorA);
         }
      }
   }

   @Override
   protected void onMeasure(int widthMeasuredSpec,
         int heightMeasuredSpec) {
      // keep the view squared
      int width = MeasureSpec.getSize(widthMeasuredSpec);
      int height = MeasureSpec.getSize(heightMeasuredSpec);
      int d = (width == 0) ? height : (height == 0) ? width :
              (width < height) ? width : height;
      setMeasuredDimension(d, d);
      squareDim = width/nSquares;
   }
}
In Android, a custom view extends android.view.View or one of its subclasses (such as android.widget.TextView). GameBoard extends View directly because it doesn’t need any subclass functionality. We'll talk more about creating custom views in Chapter 2.
GameBoard declares the following fields:
- nSquares stores the number of squares on each side of the game board. Typical values include 3 (for a 3-by-3 board) and 8 (for an 8-by-8 board).
- colorA stores the color of even-numbered squares on even-numbered rows, and the color of odd-numbered squares on odd-numbered rows—row and column numbering starts at 0.
- colorB stores the color of odd-numbered squares on even-numbered rows, and the color of even-numbered squares on odd-numbered rows.
- paint stores a reference to an android.graphics.Paint object that is used to specify the square color (colorA or colorB) when the game board is drawn.
- squareDim stores the dimension of a square—the number of pixels on each side.
GameBoard’s constructor initializes this widget by storing its nSquares, colorA, and colorB arguments in same-named fields, and it also instantiates the Paint class for use in drawing.
Creating GameBoard with the Android SDK
You create an Android library project in much the same way as you create a standard app project. However, instead of specifying a command line beginning with android create project, you specify a command line starting with android create lib-project, according to the following syntax:
android create lib-project --targettarget_ID
                     --nameyour_project_name
                     --path /path/to/your/project/project_name
                     --packageyour_library_package_namespace
This command creates a standard project structure, adding the following line to the project’s project.properties file to indicate that the project is a library:
android.library=true
Once the command completes, the library project is created, and you can begin moving source code and resources into it.
Tip To convert an existing app project to a library project for other apps to use, add the android.library=true property to the app’s project.properties file.
Execute the following command (spread across two lines for readability) to create a GameBoard library project:
android create lib-project -t 1 -p <path/to/project/directory>
                           -k com.androidrecipes.gameboard
Continue by creating a com/androidrecipes/gameboard hierarchy under the src directory, and store a GameBoard.java source file containing Listing 1-3’s code in this directory.
Although you can build the library by executing ant debug or ant release (it doesn’t matter which command you use, because the same classes.jar file is created in the bin directory), there is no need to do so because this library will be built automatically when referenced from another project (as demonstrated in the next recipe).
Creating GameBoard with Eclipse
Complete the following steps to create the GameBoard project in Eclipse:
- Assuming that you’ve installed the Eclipse version discussed earlier in this chapter, start this IDE if it is not already running.
- Select New from the File menu, and select Project from the resulting pop-up menu.
- In the resulting New Project dialog box, expand the Android node in the wizard tree (if not expanded), select the Android Application Project branch below this node (if not selected), and click the Next button.
- In the resulting New Android App dialog box, enter GameBoard into the Application Name text field. This entered name also appears in the Project Name text field, and it identifies the folder/directory in which the GameBoard project is stored.
- Enter com.androidrecipes.gameboard into the Package Name text field.
- Via Build SDK, select the appropriate Android SDK to target. This selection identifies the Android platform you’d like your library to be built against. Assuming that you’ve installed only the Android 4.1 platform, only this choice should appear and be selected.
- Via Minimum SDK, select the minimum Android SDK on which your library runs, or keep the default setting.
- Uncheck the Create Custom Launcher Icon check box, because a custom launcher icon is not used with a library.
- Select the Mark This Project as a Library check box.
- Leave the Create Project in Workspace check box selected, and click Next.
- In the resulting Create Activity pane, uncheck the Create Activity check box and click Finish.
The GameBoard project is marked as an Android library project. However, it doesn’t yet contain a GameBoard.java source file containing Listing 1-3’s contents.
Introduce a com.androidrecipes.gameboard node under Package Explorer’s GameBoard/src node (right-click src, choose New ![]() Package from the resulting pop-up menus, enter com.androidrecipes.gameboard into the Name text field in the resulting New Java Package dialog box, and click the Finish button). Introduce a GameBoard.java node under com.androidrecipes.gameboard (right-click com.androidrecipes.gameboard, choose New
Package from the resulting pop-up menus, enter com.androidrecipes.gameboard into the Name text field in the resulting New Java Package dialog box, and click the Finish button). Introduce a GameBoard.java node under com.androidrecipes.gameboard (right-click com.androidrecipes.gameboard, choose New ![]() Class from the resulting pop-up menus, enter GameBoard into the Name text field on the resulting New Java Class dialog box, and click the Finish button). Double-click the GameBoard.java node, and replace its skeletal contents with Listing 1-3.
Class from the resulting pop-up menus, enter GameBoard into the Name text field on the resulting New Java Class dialog box, and click the Finish button). Double-click the GameBoard.java node, and replace its skeletal contents with Listing 1-3.
Although you can build the library by right-clicking the GameBoard node and selecting Build Project from the pop-up menu (a gameboard.jar file is created in the bin directory), there is no need to do so because this library will be built automatically when referenced from another project (as demonstrated in the next recipe).
1-10. Using Core Libraries in Applications
Problem
Google keeps improving Android by offering new features (such as fragments) in SDK upgrades. Furthermore, Google lets you use some of these features on older Android platforms where they are not supported. You want to use Google’s solution to retrofit your apps to support fragments and/or other previously unsupported features.
Solution
Android Support Library
Google has anticipated the need for apps to access newer Android features on older versions of Android by introducing the Support Library. This collection of static support libraries can be added to an app to use APIs that are not available on older Android platforms or to use utility APIs that are not part of the framework APIs.
The Support Library introduces various new capabilities, including the following:
- Fragments
- Recommended Android user-interface navigation patterns
- Support classes that ease the implementation of Android Dreams in a backward-compatible fashion. First introduced in Android 4.0 (Ice Cream Sandwich), Android Dreams (also known as Rocket Launcher) is a new screen-saver feature.
Google discusses the Support Library on its page at http://developer.android.com/tools/extras/support-library.html. This page points out that each of the static support libraries has a specific minimum API level. (An app using a specific library will not work on Android platforms with a lower API level.)
Three libraries are currently targeted:
- Level 4: This level corresponds to Android 1.6 (Donut). An app including this library has access to all capabilities except for those belonging to Level 7 and Level 13.
- Level 7: This level corresponds to Android 2.1 (Éclair). An app including this library has access to an equivalent android.widget.GridLayout class, which was introduced in Level 14.
- Level 13: This level corresponds to Android 3.2 (Honeycomb). An app including this library has access to fragment features introduced after Level 13 and Android Dreams.
Google Play Services
Google provides developer access to many of their proprietary technology APIs through Google Play Services, an additional application running on devices with Google Play that exposes services to third-party applications, such as Maps or Google+.
The Services application on the device is regularly updated via Google Play, so new APIs can be added to users’ devices immediately as they are released by Google. Similar to the Support Library, this means that new features can be included in Android applications regardless of the platform version that device may be running.
Google further discusses how Google Play Services works on its page at http://developer.android.com/google/play-services/index.html.
Installation
You need to run the SDK Manager tool to download and install the Support Library and Google Play Services. Run this tool from the command line (as shown earlier in this chapter) or from within Eclipse (by selecting Android SDK Manager from the Window menu). Figure 1-9 shows the Android Support Library and Google Play Services entries selected in the Extras section.
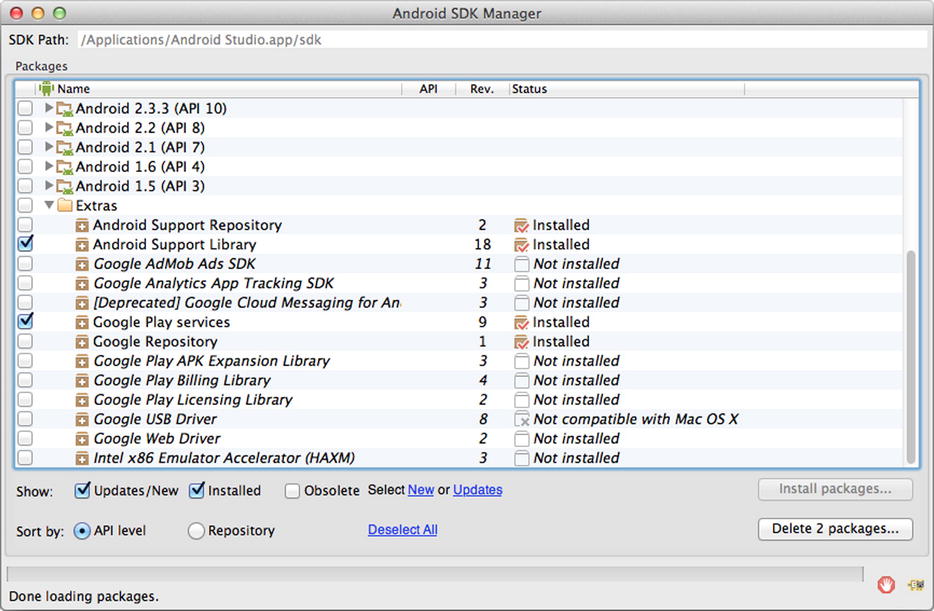
Figure 1-9. Android Support Library and Google Play Services
Click the Install 2 Packages button, followed by the Install button in the subsequent Choose Packages to Install dialog box. The Support Library revision 18 (current at the time of this writing) is installed to the <Android_home_directory>/extras/android/support directory, which includes text files along with samples, v4, v7, and v13 directories. The v4 directory contains an android-support-v4.jar file. Similarly, the v13 directory contains an android-support-v13.jar file. In contrast, the v7 directory contains a series of library projects whose libs subdirectories contain the core library and whose res subdirectory contains accompanying required resource files.
Google Play Services revision 9 (current at the time of this writing) is installed to <Android_home_directory>/extras/google/google_play_services, which includes documentation along with samples and libproject directories. Similar to v7 of the Support Library, the libproject directory contains a library project whose libs subdirectory contains the core libraries and whose res subdirectory contains accompanying required resource files.
How It Works
JAR Libraries
To incorporate JAR libraries in your application, simply copy the JAR file to your project’s libs directory. If that directory does not already exist in your project, then create it first. If you are using a recent version of the SDK tools (r17 or later, including the ADT plug-in if you are using Eclipse), the tools will handle integrating the JAR files into the build path as long as they are in the libs directory.
Important If you are using the new beta build system based on Gradle to build your application, you will need to add the JAR files as dependencies in your project’s build.gradle file. Something like the following will be necessary:
dependencies {
compile files("libs/library1.jar",
"libs/library2.jar")
}
Library Projects
Integrating a library project is a bit more involved. For this reason, we'll focus a bit more on referencing one from a command line–based and Eclipse-based project. We will use the GridLayout project from the v7 Support Library for this example.
Listing 1-4 presents the source code to this project’s UseGridLayout.java file. (For brevity, there are no other files except for AndroidManifest.xml.)
Listing 1-4. UseGridLayout Presenting a Grid of Buttons
public class UseGridLayout extends Activity {
    @Override
    public void onCreate(Bundle savedInstanceState) {
        super.onCreate(savedInstanceState);

        GridLayout gl = new GridLayout(this);
        gl.setRowCount(2);
        gl.setColumnCount(2);

        Button btn = new Button(this);
        btn.setText("1");
        gl.addView(btn);

        btn = new Button(this);
        btn.setText("2");
        gl.addView(btn);

        btn = new Button(this);
        btn.setText("3");
        gl.addView(btn);

        btn = new Button(this);
        btn.setText("4");
        gl.addView(btn);

        setContentView(gl);
    }
}
Also for brevity, Listing 1-4 hard-codes the layout and includes literal text. After instantiating GridLayout, it invokes this class’s void setRowCount(int rowCount) and void setColumnCount(int columnCount) methods to establish the grid dimensions. Finally, it sets the activity’s view hierarchy to the grid layout and its child view.
Creating and Running UseGridLayout with the Android SDK
Execute the following command (spread across two lines for readability) to create a UseGridLayout project:
android create project -t 2 -p <path/to/project/directory>
-a UseGridLayout -k com.androidrecipes.usegridlayout
This command assumes an Android 2.3.3 target identified as ID 2. It is also assumed that you have created an AVD2 device with Android 2.3.3 as the target platform.
Now replace the skeletal src/com/androidrecipes/usegridlayout/UseGridLayout.java source file with the contents of Listing 1-4.
Continue by executing the following command (spread across two lines for readability) to reference the GridLayout library project:
android update project -t 2 -p <path/to/project/directory>
-l <path/to/android-sdk>/extras/android/support/v7/gridlayout
At this point, execute the following command to build this project in debug mode:
ant debug
The output should reveal the following error message:
Invalid file: <androidsdk>/extras/android/support/v7/gridlayout/build.xml
The error message results from the absence of a build.xml file in the directory of the Support Library’s project.
To create this file, switch to this directory and execute the following command:
android update lib-project -t 2 -p.
You could replace lib-project with project for this example. Assuming that build.xml is created, re-execute ant debug.
Assuming success, execute the following command from the project’s bin subdirectory to install the UseGridLayout-debug.apk file onto AVD2, which should be running:
adb install UseGridLayout-debug.apk
Finally, launch the app. You should see the output shown in Figure 1-10.
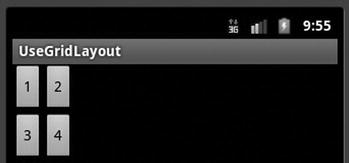
Figure 1-10. The buttons appear small because the default values of gridlayout's width and height properties are each set to WRAP_CONTENT
Creating and Running UseGridLayout with Eclipse
Complete the following steps to create the UseGridLayout project that references the GridLayout library project in Eclipse:
- Assuming that you’ve installed the Eclipse version discussed earlier in this chapter, start this IDE if it is not already running.
- Select Import from the File menu, followed by Existing Android Code Into Workspace in the resulting Import dialog box. Click Next.
- In the resulting dialog box, click the Browse button and locate your Android SDK directory, then extras/android/support/v7/gridlayout. Exit these dialog boxes by clicking OK, followed by Finish.
- From the File menu, choose New Project.
- In the resulting New Project dialog box, expand the Android node in the wizard tree (if not expanded), select the Android Application Project branch below this node (if not selected), and click the Next button.
- In the resulting New Android App dialog box, enter UseGridLayout into the Application Name text field. This entered name also appears in the Project Name text field, and it identifies the folder/directory in which the UseGridLayout project is stored.
- Enter com.androidrecipes.usegridlayout into the Package Name text field.
- Via Build SDK, select the appropriate Android SDK to target. This selection identifies the Android platform you’d like your app to be built against. Assuming that you’ve installed Android 2.3.3, select this platform.
- Via Minimum SDK, select the minimum Android SDK on which your app runs, or keep the default setting. (Do not select an SDK whose API level is less than Level 10.)
- Leave the Create Custom Launcher Icon check box checked if you want a custom launcher icon to be created. Otherwise, uncheck this check box when you supply your own launcher icon.
- Leave the Mark This Project as a Library check box unchecked because you are not creating a library.
- Leave the Create Project in Workspace check box checked, and click Next.
- In the resulting Configure Launcher Icon pane, make suitable adjustments to the custom launcher icon; click Next.
- In the resulting Create Activity pane, leave the Create Activity check box checked, make sure that BlankActivity is selected, and click Next.
- In the resulting New Blank Activity pane, enter UseGridLayout into the Activity Name text field. Keep all other settings and click Finish.
Eclipse creates a UseGridLayout node in the Package Explorer window. Complete the following steps to set up all files:
- Expand the UseGridLayout node (if not expanded), followed by the src node, followed by the com.androidrecipes.usegridlayout node.
- Double-click the UseGridLayout.java node (underneath com.androidrecipes.usegridlayout) and replace the skeletal contents in the resulting window with Listing 1-4. Ignore any error messages; they will disappear shortly.
- Right-click the UseGridLayout node and select Properties from the resulting pop-up menu.
- In the resulting Properties for UseGridLayout dialog box, select the Android category and click the Add button.
- In the resulting Project Selection dialog box, select gridlayout and click OK.
- Click Apply, and then OK to close Properties for UseGridLayout.
To build and run this project, select Run from the menu bar, followed by Run from the drop-down menu. (Click OK if the Save Resources dialog box appears.) If a Run As dialog box appears, select Android Application and click OK. Eclipse starts the emulator, installs this project’s APK, and runs the app, whose output appears in Figure 1-11.

Figure 1-11. UseGridLayout's user interface looks different because of an Eclipse-generated custom theme
Summary
Android has excited many people who are developing (and even selling) apps for this platform. It’s not too late to join in the fun, and this chapter got you started.
You first learned that Android is a software stack for mobile devices and that this stack consists of apps, middleware, and the Linux operating system. You also learned about Android’s history, including the various SDK updates that have been made available.
You then focused on installing the Android SDK and an Android platform, creating an AVD, and starting the emulator with this AVD.
Finally, you learned how to create and use external libraries in an Android application. Specifically, you were exposed to the Android Support Library and Google Play Services, both of which you will use throughout this book in a number of recipes.
In Chapter 2, you will learn how to begin crafting your application's user interface by looking at how Android handles views, graphics, and drawing.