
7-13. Interacting with the Calendar
Problem
Your application needs to interact directly with the ContentProvider exposed by the Android framework to add, view, change, or remove calendar events on the device.
Solution
(API Level 14)
Use the CalendarContract interface to read/write data to the system’s ContentProvider for event data. CalendarContract exposes the API that is necessary to gain access to the device’s calendars, events, attendees, and reminders. Much like ContactsContract, this interface defines mostly the data that is necessary to perform queries. The methods used will be the same as when working with any other system ContentProvider.
How It Works
Working with CalendarContract is very similar to working with ContactsContract; they both provide identifiers for the Uri and column values you will need to construct queries through the ContentResolver. Listing 7-36 illustrates an activity that obtains and displays a list of the calendars present on the device.
Listing 7-36. Activity Listing Calendars on the Device
public class CalendarListActivity extends ListActivity implements
        LoaderManager.LoaderCallbacks<Cursor>, AdapterView.OnItemClickListener {
    private static final int LOADER_LIST = 100;

    SimpleCursorAdapter mAdapter;

    @Override
    public void onCreate(Bundle savedInstanceState) {
        super.onCreate(savedInstanceState);
        getLoaderManager().initLoader(LOADER_LIST, null, this);

        // Display all calendars in a ListView
        mAdapter = new SimpleCursorAdapter(this,
                android.R.layout.simple_list_item_2, null,
                new String[] {
                        CalendarContract.Calendars.CALENDAR_DISPLAY_NAME,
                        CalendarContract.Calendars.ACCOUNT_NAME },
                new int[] {
                        android.R.id.text1, android.R.id.text2 }, 0);
        setListAdapter(mAdapter);
        // Listen for item selections
        getListView().setOnItemClickListener(this);
    }

    @Override
    public void onItemClick(AdapterView<?> parent, View view, int position,
            long id) {
        Cursor c = mAdapter.getCursor();
        if (c != null && c.moveToPosition(position)) {
            Intent intent = new Intent(this, CalendarDetailActivity.class);
            // Pass the _ID and TITLE of the selected calendar to the next
            // Activity
            intent.putExtra(Intent.EXTRA_UID, c.getInt(0));
            intent.putExtra(Intent.EXTRA_TITLE, c.getString(1));
            startActivity(intent);
        }
    }

    @Override
    public Loader<Cursor> onCreateLoader(int id, Bundle args) {
        // Return all calendars, ordered by name
        String[] projection = new String[] { CalendarContract.Calendars._ID,
                CalendarContract.Calendars.CALENDAR_DISPLAY_NAME,
                CalendarContract.Calendars.ACCOUNT_NAME };

        return new CursorLoader(this, CalendarContract.Calendars.CONTENT_URI,
                projection, null, null,
                CalendarContract.Calendars.CALENDAR_DISPLAY_NAME);
    }

    @Override
    public void onLoadFinished(Loader<Cursor> loader, Cursor data) {
        mAdapter.swapCursor(data);
    }

    @Override
    public void onLoaderReset(Loader<Cursor> loader) {
        mAdapter.swapCursor(null);
    }
}
In contrast to our contacts example, here we use Android’s Loader pattern to query the data and load the resulting Cursor into the list. This pattern provides a lot of benefit over managedCursor(), primarily in that all queries are automatically made on background threads to keep the UI responsive. The Loader pattern also has built-in reuse, so multiple clients wanting the same data can actually gain access to the same Loader through the LoaderManager.
With Loaders, our activity receives a series of callback methods when new data is available. Under the hood, CursorLoader also registers as a ContentObserver, so we will get a callback with a new Cursor when the underlying data set changes without even having to request a reload. But back to the calendar...
To obtain a list of the device calendars, we construct a query to the Calendars.CONTENT_URI with the column names we are interested in (here, the record ID, calendar name, and owning account name). When the query is complete, onLoadFinished() is called with a new Cursor pointing to the result data, which we then pass to our list adapter. When the user taps on a particular calendar item, a new activity is initialized to look at the specific events it contains. We will see this in more detail in the next section.
Viewing/Modifying Calendar Events
Listing 7-37 shows the contents of the second activity in this example that displays a list of all the events for the selected calendar.
Listing 7-37. Activity Listing and Modifying Calendar Events
public class CalendarDetailActivity extends ListActivity implements
        LoaderManager.LoaderCallbacks<Cursor>, AdapterView.OnItemClickListener,
        AdapterView.OnItemLongClickListener {
    private static final int LOADER_DETAIL = 101;

    SimpleCursorAdapter mAdapter;

    int mCalendarId;

    @Override
    protected void onCreate(Bundle savedInstanceState) {
        super.onCreate(savedInstanceState);

        mCalendarId = getIntent().getIntExtra(Intent.EXTRA_UID, -1);

        String title = getIntent().getStringExtra(Intent.EXTRA_TITLE);
        setTitle(title);

        getLoaderManager().initLoader(LOADER_DETAIL, null, this);

        // Display all events in a ListView
        mAdapter = new SimpleCursorAdapter(this,
                android.R.layout.simple_list_item_2, null,
                new String[] {
                        CalendarContract.Events.TITLE,
                        CalendarContract.Events.EVENT_LOCATION },
                new int[] {
                        android.R.id.text1, android.R.id.text2 }, 0);
        setListAdapter(mAdapter);
        // Listen for item selections
        getListView().setOnItemClickListener(this);
        getListView().setOnItemLongClickListener(this);
    }

    @Override
    public boolean onCreateOptionsMenu(Menu menu) {
        menu.add("Add Event")
            .setIcon(android.R.drawable.ic_menu_add)
            .setShowAsAction(MenuItem.SHOW_AS_ACTION_ALWAYS);

        return true;
    }

    @Override
    public boolean onOptionsItemSelected(MenuItem item) {
        showAddEventDialog();
        return true;
    }

    // Display a dialog to add a new event
    private void showAddEventDialog() {
        final EditText nameText = new EditText(this);
        AlertDialog.Builder builder = new AlertDialog.Builder(this);
        builder.setTitle("New Event");
        builder.setView(nameText);
        builder.setNegativeButton("Cancel", null);
        builder.setPositiveButton("Add Event",
                new DialogInterface.OnClickListener() {
                    @Override
                    public void onClick(DialogInterface dialog, int which) {
                        addEvent(nameText.getText().toString());
                    }
                });
        builder.show();
    }

    // Add an event to the calendar with the specified name
    // and the current time as the start date
    private void addEvent(String eventName) {
        long start = System.currentTimeMillis();
        // End 1 hour from now
        long end = start + (3600 * 1000);

        ContentValues cv = new ContentValues(5);
        cv.put(CalendarContract.Events.CALENDAR_ID, mCalendarId);
        cv.put(CalendarContract.Events.TITLE, eventName);
        cv.put(CalendarContract.Events.DESCRIPTION,
                "Event created by Android Recipes");
        cv.put(CalendarContract.Events.EVENT_TIMEZONE,
                Time.getCurrentTimezone());
        cv.put(CalendarContract.Events.DTSTART, start);
        cv.put(CalendarContract.Events.DTEND, end);

        getContentResolver().insert(CalendarContract.Events.CONTENT_URI, cv);
    }

    // Remove the selected event from the calendar
    private void deleteEvent(int eventId) {
        String selection = CalendarContract.Events._ID + " = ?";
        String[] selectionArgs = { String.valueOf(eventId) };
        getContentResolver().delete(CalendarContract.Events.CONTENT_URI,
                selection, selectionArgs);
    }

    @Override
    public void onItemClick(AdapterView<?> parent, View view, int position,
            long id) {
        Cursor c = mAdapter.getCursor();
        if (c != null && c.moveToPosition(position)) {
            // Show a dialog with more detailed data about the event when
            // clicked
            SimpleDateFormat sdf = new SimpleDateFormat("yyyy-MM-dd HH:mm:ss");
            StringBuilder sb = new StringBuilder();

            sb.append("Location: "
                    + c.getString(
                            c.getColumnIndex(CalendarContract.Events.EVENT_LOCATION))
                    + "

");
            int startDateIndex = c.getColumnIndex(CalendarContract.Events.DTSTART);
            Date startDate = c.isNull(startDateIndex) ? null
                    : new Date( Long.parseLong(c.getString(startDateIndex)) );
            if (startDate != null) {
                sb.append("Starts At: " + sdf.format(startDate) + "

");
            }
            int endDateIndex = c.getColumnIndex(CalendarContract.Events.DTEND);
            Date endDate = c.isNull(endDateIndex) ? null
                    : new Date( Long.parseLong(c.getString(endDateIndex)) );
            if (endDate != null) {
                sb.append("Ends At: " + sdf.format(endDate) + "

");
            }

            AlertDialog.Builder builder = new AlertDialog.Builder(this);
            builder.setTitle(
                    c.getString(c.getColumnIndex(CalendarContract.Events.TITLE)) );
            builder.setMessage(sb.toString());
            builder.setPositiveButton("OK", null);
            builder.show();
        }
    }

    @Override
    public boolean onItemLongClick(AdapterView<?> parent, View view,
            int position, long id) {
        Cursor c = mAdapter.getCursor();
        if (c != null && c.moveToPosition(position)) {
            // Allow the user to delete the event on a long-press
            final int eventId = c.getInt(
                    c.getColumnIndex(CalendarContract.Events._ID));
            String eventName = c.getString(
                    c.getColumnIndex(CalendarContract.Events.TITLE));
            AlertDialog.Builder builder = new AlertDialog.Builder(this);
            builder.setTitle("Delete Event");
            builder.setMessage(String.format(
                    "Are you sure you want to delete %s?",
                    TextUtils.isEmpty(eventName) ? "this event" : eventName));
            builder.setNegativeButton("Cancel", null);
            builder.setPositiveButton("Delete Event",
                    new DialogInterface.OnClickListener() {
                        @Override
                        public void onClick(DialogInterface dialog, int which) {
                            deleteEvent(eventId);
                        }
                    });
            builder.show();
        }

        return true;
    }

    @Override
    public Loader<Cursor> onCreateLoader(int id, Bundle args) {
        // Return all calendars, ordered by name
        String[] projection = new String[] { CalendarContract.Events._ID,
                CalendarContract.Events.TITLE, CalendarContract.Events.DTSTART,
                CalendarContract.Events.DTEND,
                CalendarContract.Events.EVENT_LOCATION };
        String selection = CalendarContract.Events.CALENDAR_ID + " = ?";
        String[] selectionArgs = { String.valueOf(mCalendarId) };

        return new CursorLoader(this, CalendarContract.Events.CONTENT_URI,
                projection, selection, selectionArgs,
                CalendarContract.Events.DTSTART + " DESC");
    }

    @Override
    public void onLoadFinished(Loader<Cursor> loader, Cursor data) {
        mAdapter.swapCursor(data);
    }

    @Override
    public void onLoaderReset(Loader<Cursor> loader) {
        mAdapter.swapCursor(null);
    }
}
You can see that the code to query the list of events and display them is very similar; in this case, you query the Events.CONTENT_URI with the ID of the selected calendar as a selection parameter. After tapping an event, the user is presented with a simple dialog box with more details about the event itself. In addition, though, this activity includes a few more methods to create and delete events on this calendar.
To add a new event, an item is added to the options menu, which will show up in the overhead Action Bar if the device has one visible. When pressed, a dialog box appears, allowing the user to enter a name for this event. If the user elects to continue, a ContentValues object is created with the bare necessities required to create a new event. Because this event is nonrecurring, it must have both start and end times, as well as a valid time zone. We must also supply the ID of the calendar we are looking at so the event is properly attached. From there, the data is handed back to ContentResolver to be inserted into the Events table.
To delete an event, the user may long-press a particular item in the list and then confirm the deletion through a dialog box. In this case, all we need is the unique record ID of the selected event to pass in a selection string to ContentResolver.
Did you notice in both of these cases that we didn’t write any code after the insert/delete to refresh the Cursor or the CursorAdapter? That’s the power of the Loader pattern! Because the CursorLoader is observing the data set, when a change occurred, it automatically refreshed itself and handed a new Cursor to the adapter, which refreshes the display.
Note Loaders were introduced in Android 3.0 (API Level 11), but they are also part of the Support Library. You can use them in your applications supporting all the way back to Android 1.6.
Problem
You need to place log statements into your code for debugging or testing purposes, and they should be removed before shipping the code to production.
Solution
(API Level 1)
Leverage the BuildConfig.DEBUG flag to protect statements in the Log class so they print only on debug builds of the application. It can be extremely convenient to keep logging statements in your code for future testing and development, even after the application has shipped to your users. But if those statements are unchecked, you might risk printing private information to the console on a user’s device. By creating a simple wrapper class around Log that monitors BuildConfig.DEBUG, you can leave log statements in place without fear of what they will show in the field.
How It Works
Listing 7-38 illustrates a simple wrapper class around the default Android Log functionality.
Listing 7-38. Logger Wrapper
public class Logger {
    private static final String LOGTAG = "AndroidRecipes";

    private static String getLogString(String format, Object... args) {
        //Minor optimization, only call String.format if necessary
        if(args.length == 0) {
            return format;
        }

        return String.format(format, args);
    }

    /* The INFO, WARNING, ERROR log levels print always */

    public static void e(String format, Object... args) {
        Log.e(LOGTAG, getLogString(format, args));
    }

    public static void w(String format, Object... args) {
        Log.w(LOGTAG, getLogString(format, args));
    }

    public static void w(Throwable throwable) {
        Log.w(LOGTAG, throwable);
    }

    public static void i(String format, Object... args) {
        Log.i(LOGTAG, getLogString(format, args));
    }

    /* The DEBUG and VERBOSE log levels are protected by DEBUG flag */

    public static void d(String format, Object... args) {
        if(!BuildConfig.DEBUG) return;

        Log.d(LOGTAG, getLogString(format, args));
    }

    public static void v(String format, Object... args) {
        if(!BuildConfig.DEBUG) return;

        Log.v(LOGTAG, getLogString(format, args));
    }
}
This class provides a few simple optimizations around the framework’s version to make logging a bit more civilized. First, it consolidates the log tag so your entire application prints under one consistent tag heading in logcat. Second, it takes input in the form of a format string so variables can be logged out cleanly without needing to break up the log string. The one additional optimization to this is that String.format() can be slow, so we want to call it only when there are actually parameters to format. Otherwise, we can just pass the raw string along directly.
Finally, it protects two of the five main log levels with the BuildConfig.DEBUG flag, so that log statements set to these levels print only in debug versions of the application. There are many cases where we want log statements to be output in the production application as well (such as error conditions), so it is prudent not to hide all the log levels behind the debug flag. Listing 7-39 quickly shows how this wrapper can take the place of traditional logging.
Listing 7-39. Activity Using Logger
public class LoggerActivity extends Activity {

    @Override
    public void onCreate(Bundle savedInstanceState) {
        super.onCreate(savedInstanceState);
        setContentView(R.layout.main);

        //This statement only printed in debug
        Logger.d("Activity Created");
    }

    @Override
    protected void onResume() {
        super.onResume();

        //This statement only printed in debug
        Logger.d("Activity Resume at %d", System.currentTimeMillis());
        //This statement always printed
        Logger.i("It is now %d", System.currentTimeMillis());
    }

    @Override
    protected void onPause() {
        super.onPause();

        //This statement only printed in debug
        Logger.d("Activity Pause at %d", System.currentTimeMillis());
        //This always printed
        Logger.w("No, don't leave!");
    }
}
7-15. Creating a Background Worker
Problem
You need to create a long-running background thread that sits waiting for work to execute and that can be terminated easily when it is no longer needed.
Solution
(API Level 1)
Let HandlerThread assist you in creating a background thread with a working Looper that can be attached to a Handler for processing work inside its MessageQueue. One of the most popular backgrounding methods in Android is AsyncTask, which is a fabulous class and should be used in your applications. However, it has some drawbacks that may make other implementations more efficient in certain cases. One of those drawbacks is that AsyncTask execution is one-shot and finite. If you want to do the same task repeatedly or indefinitely for the life cycle of a component such as an activity or service, AsyncTask can be a bit heavyweight. Often, you will need to create multiple instances to accomplish that goal.
The advantage of HandlerThread in cases like this is we can create one worker object to accept multiple tasks to handle in the background and it will process them serially through the built-in queue that Looper maintains.
How It Works
Listing 7-40 contains an extension of HandlerThread used to do some simple manipulation of image data. Because modifying images can take some time, we want to task this to a background operation to keep the application UI responsive.
Listing 7-40. Background Worker Thread
public class ImageProcessor extends HandlerThread implements Handler.Callback {
    public static final int MSG_SCALE = 100;
    public static final int MSG_CROP = 101;

    private Context mContext;
    private Handler mReceiver, mCallback;

    public ImageProcessor(Context context) {
        this(context, null);
    }

    public ImageProcessor(Context context, Handler callback) {
        super("AndroidRecipesWorker");
        mCallback = callback;
        mContext = context;
    }

    @Override
    protected void onLooperPrepared() {
        mReceiver = new Handler(getLooper(), this);
    }

    @Override
    public boolean handleMessage(Message msg) {
        Bitmap source, result;
        //Retrieve arguments from the incoming message
        int scale = msg.arg1;
        switch (msg.what) {
        case MSG_SCALE:
            source = BitmapFactory.decodeResource(mContext.getResources(),
                    R.drawable.ic_launcher);
            //Create a new, scaled up image
            result = Bitmap.createScaledBitmap(source,
                    source.getWidth() * scale, source.getHeight() * scale, true);
            break;
        case MSG_CROP:
            source = BitmapFactory.decodeResource(mContext.getResources(),
                    R.drawable.ic_launcher);
            int newWidth = source.getWidth() / scale;
            //Create a new, horizontally cropped image
            result = Bitmap.createBitmap(source,
                    (source.getWidth() - newWidth) / 2, 0,
                    newWidth, source.getHeight());
            break;
        default:
            throw new IllegalArgumentException("Unknown Worker Request");
        }

        // Return the image to the main thread
        if (mCallback != null) {
            mCallback.sendMessage(Message.obtain(null, 0, result));
        }
        return true;
    }

    //Add/Remove a callback handler
    public void setCallback(Handler callback) {
        mCallback = callback;
    }

    /* Methods to Queue Work */

    // Scale the icon to the specified value
    public void scaleIcon(int scale) {
        Message msg = Message.obtain(null, MSG_SCALE, scale, 0, null);
        mReceiver.sendMessage(msg);
    }

    //Crop the icon in the center and scale the result to the specified value
    public void cropIcon(int scale) {
        Message msg = Message.obtain(null, MSG_CROP, scale, 0, null);
        mReceiver.sendMessage(msg);
    }
}
The name HandlerThread may be a bit of a misnomer, as it does not actually contain a Handler that you can use to process input. Instead it is a thread designed to work externally with a Handler to create a background process. We have to still provide a customized implementation of Handler to execute the work we want done. In this example, our custom processor implements the Handler.Callback interface, which we pass into a new Handler owned by the thread. We do this simply to avoid the need to subclass Handler, which would have worked just as well. The receiver Handler is not created until the onLooperPrepared() callback because we need to have the Looper object that HandlerThread creates to send work to the background thread.
The external API we create to allow other objects to queue work all create a Message and send it to the receiver Handler to be processed in handleMessage(), which inspects the Message contents and creates the appropriate modified image. Any code that goes through handleMessage() is running on our background thread.
Once the work is complete, we need to have a second Handler attached to the main thread so we can send our results and modify the UI.
Reminder Any code that touches UI elements must be called from the main thread only. This cannot be overstated.
This callback Handler receives a second Message containing the Bitmap result from the image code. This is one of the great features about using the Message interface to pass data between threads; each instance can take with it two integer arguments as well as any arbitrary Object so no additional code is necessary to pass in parameters or access your results. In our case, one integer is passed in as a parameter for the scale value of the transformation, and the Object field is used to return the image as a Bitmap. To see how this is used in practice, take a look at the sample application in Listings 7-41 and 7-42.
Listing 7-41. res/layout/main.xml
<LinearLayout xmlns:android="http://schemas.android.com/apk/res/android"
    android:layout_width="match_parent"
    android:layout_height="match_parent"
    android:orientation="vertical" >

    <Button
        android:layout_width="match_parent"
        android:layout_height="wrap_content"
        android:text="Scale Icon"
        android:onClick="onScaleClick" />
    <Button
        android:layout_width="match_parent"
        android:layout_height="wrap_content"
        android:text="Crop Icon"
        android:onClick="onCropClick" />

    <ImageView
        android:id="@+id/image_result"
        android:layout_width="match_parent"
        android:layout_height="match_parent"
        android:scaleType="center" />
</LinearLayout>
Listing 7-42. Activity Interacting with Worker
public class WorkerActivity extends Activity implements Handler.Callback {

    private ImageProcessor mWorker;
    private Handler mResponseHandler;

    private ImageView mResultView;

    @Override
    public void onCreate(Bundle savedInstanceState) {
        super.onCreate(savedInstanceState);
        setContentView(R.layout.main);

        mResultView = (ImageView) findViewById(R.id.image_result);
        //Handler to map background callbacks to this Activity
        mResponseHandler = new Handler(this);
    }

    @Override
    protected void onResume() {
        super.onResume();
        //Start a new worker
        mWorker = new ImageProcessor(this, mResponseHandler);
        mWorker.start();
    }

    @Override
    protected void onPause() {
        super.onPause();
        //Terminate the worker
        mWorker.setCallback(null);
        mWorker.quit();
        mWorker = null;
    }

    /*
     * Callback method for background results.
     * This is called on the UI thread.
     */
    @Override
    public boolean handleMessage(Message msg) {
        Bitmap result = (Bitmap) msg.obj;
        mResultView.setImageBitmap(result);
        return true;
    }

    /* Action Methods to Post Background Work */

    public void onScaleClick(View v) {
        for(int i=1; i < 10; i++) {
            mWorker.scaleIcon(i);
        }
    }

    public void onCropClick(View v) {
        for(int i=1; i < 10; i++) {
            mWorker.cropIcon(i);
        }
    }
}
This sample makes use of our worker by creating a single running instance while the activity is in the foreground and passing image requests to it when the user clicks the buttons. To further illustrate the scale of this pattern, we queue up several requests with each button click. The activity also implements Handler.Callback and owns a simple Handler (which is running on the main thread) to receive result messages from the worker.
To start the processor, we just have to call start() on the HandlerThread, which sets up the Looper and Handler, and it begins waiting for input. Terminating it is just as simple; calling quit() stops the Looper and immediately drops any unprocessed messages. We also set the callback to null just so that any work that may be in process currently doesn’t try to call the activity after this point.
Run this application and you can see how the background work doesn’t slow the UI no matter how fast or how often the buttons are pressed. Each request just gets added to the queue and processed if possible before the user leaves the activity. The visible result is that each created image will be displayed below the buttons as that request finishes.
7-16. Customizing the Task Stack
Problem
Your application allows external applications to launch certain Activities directly, and you need to implement the proper BACK vs. UP navigation patterns.
Solution
(API Level 4)
The NavUtils and TaskStackBuilder classes in the Support Library allow you to easily construct and launch the appropriate navigation stacks from within your application. The functionality of both these classes is actually native to the SDK in Android 4.1 and later, but for applications that need to target earlier platform versions as well, the Support Library implementation provides a compatible API that will still call the native methods whenever they are present.
Android screen navigation provides for two specific user actions. The first is the action taken when the user presses the BACK button. The second is the action taken when the user presses the Home icon in the Action Bar, which is known as the UP action. For developers who are new to the platforms, the distinction can often be confusing, especially since in many cases both actions always perform the same function.
Conceptually, BACK should always navigate to the content screen that the user had been viewing prior to the current screen. The UP action, on the other hand, should navigate to the hierarchical parent screen of the current screen. For most applications where the user drills down from the home screen to subsequent screens with more-specific content, BACK and UP will go to the same place, and so their usefulness may be called into question.
Consider, though, an application where one or more activity elements can be launched directly by an external application. Say, for example, an activity is designed to view an image file. Or perhaps the application posts notification messages that allow the user to go directly to a lower-level activity when an event occurs. In these cases, the BACK action should take the user back to the application task he or she was using before jumping into your application. But the UP action provides a way to move back up your application’s stack if the user decides to continue using this application rather than going back to the original task. In this instance, the entire stack of activity elements that your application normally has constructed to get to this point may not exist, and that is where TaskStackBuilder and some key attributes in your application’s manifest can help.
How It Works
Let’s define two applications to illustrate how this recipe works. First, look at Listing 7-43, which shows the <application> element of the manifest.
Listing 7-43. AndroidManifest.xml Application Tag
<application
    android:icon="@drawable/ic_launcher"
    android:label="TaskStack"
    android:theme="@style/AppTheme" >
    <activity
        android:name=".RootActivity"
        android:label="@string/title_activity_root" >
        <intent-filter>
            <action android:name="android.intent.action.MAIN" />
            <category android:name="android.intent.category.LAUNCHER" />
        </intent-filter>
    </activity>
    <activity android:name=".ItemsListActivity"
        android:parentActivityName=".RootActivity">
        <!-- Parent definition for the support library -->
        <meta-data android:name="android.support.PARENT_ACTIVITY"
            android:value=".RootActivity" />
    </activity>
    <activity android:name=".DetailsActivity"
        android:parentActivityName=".ItemsListActivity">
        <!-- Parent definition for the support library -->
        <meta-data android:name="android.support.PARENT_ACTIVITY"
            android:value=".ItemsListActivity" />
        <!-- Supply a filter to allow external launches -->
        <intent-filter>
            <action android:name="com.examples.taskstack.ACTION_NEW_ARRIVAL" />
            <category android:name="android.intent.category.DEFAULT" />
        </intent-filter>
    </activity>
</application>
The first step in defining ancestral navigation is to define the parent-child relationship hierarchy between each activity. In Android 4.1, the android:parentActivityName attribute was introduced to create this link. To support the same functionality in older platforms, the Support Library defines a <meta-data> value that can be attached to each activity to define the parent. Our example defines both attributes for each lower-level activity to work with both the native API and the Support Library.
We have also defined a custom <intent-filter> on the DetailsActivity, which will allow an external application to launch this activity directly.
Note If you are supporting only Android 4.1 and later with your application, you can stop here. All the remaining functionality to build the stack and navigate are built into Activity in these versions, and the default behavior happens without any extra code. In this case, you would need to implement only TaskStackBuilder if you want to somehow customize the task stack in certain situations.
With our hierarchy defined, we can create the code for each activity. See Listings 7-44 through 7-46.
Listing 7-44. Root Activity
public class RootActivity extends Activity implements View.OnClickListener {

    @Override
    public void onCreate(Bundle savedInstanceState) {
        super.onCreate(savedInstanceState);
        Button listButton = new Button(this);
        listButton.setText("Show Family Members");
        listButton.setOnClickListener(this);

        setContentView(listButton,
                new ViewGroup.LayoutParams(LayoutParams.MATCH_PARENT,
                        LayoutParams.WRAP_CONTENT));
    }

    @Override
    public void onClick(View v) {
        //Launch the next Activity
        Intent intent = new Intent(this, ItemsListActivity.class);
        startActivity(intent);
    }
}
Listing 7-45. Second-Level Activity
public class ItemsListActivity extends Activity implements OnItemClickListener {

    private static final String[] ITEMS = {"Mom", "Dad", "Sister", "Brother", "Cousin"};

    @Override
    protected void onCreate(Bundle savedInstanceState) {
        super.onCreate(savedInstanceState);
        //Enable ActionBar home button with up arrow
        getActionBar().setDisplayHomeAsUpEnabled(true);
        //Create and display a list of family members
        ListView list = new ListView(this);
        ArrayAdapter<String> adapter = new ArrayAdapter<String>(this,
                android.R.layout.simple_list_item_1, ITEMS);
        list.setAdapter(adapter);
        list.setOnItemClickListener(this);

        setContentView(list);
    }

    @Override
    public boolean onOptionsItemSelected(MenuItem item) {
        switch (item.getItemId()) {
        case android.R.id.home:
            //Create an intent for the parent Activity
            Intent upIntent = NavUtils.getParentActivityIntent(this);
            //Check if we need to create the entire stack
            if (NavUtils.shouldUpRecreateTask(this, upIntent)) {
                //This stack doesn't exist yet, so it must be synthesized
                TaskStackBuilder.create(this)
                        .addParentStack(this)
                        .startActivities();
            } else {
                //Stack exists, so just navigate up
                NavUtils.navigateUpFromSameTask(this);
            }
            return true;
        default:
            return super.onOptionsItemSelected(item);
        }
    }

    @Override
    public void onItemClick(AdapterView<?> parent, View v, int position, long id) {
        //Launch the final Activity, passing in the selected item name
        Intent intent = new Intent(this, DetailsActivity.class);
        intent.putExtra(Intent.EXTRA_TEXT, ITEMS[position]);
        startActivity(intent);
    }
}
Listing 7-46. Third-Level Activity
public class DetailsActivity extends Activity {
    //Custom Action String for external Activity launches
    public static final String ACTION_NEW_ARRIVAL =
            "com.examples.taskstack.ACTION_NEW_ARRIVAL";

    @Override
    protected void onCreate(Bundle savedInstanceState) {
        super.onCreate(savedInstanceState);
        //Enable ActionBar home button with up arrow
        getActionBar().setDisplayHomeAsUpEnabled(true);

        TextView text = new TextView(this);
        text.setGravity(Gravity.CENTER);
        String item = getIntent().getStringExtra(Intent.EXTRA_TEXT);
        text.setText(item);

        setContentView(text);
    }

    @Override
    public boolean onOptionsItemSelected(MenuItem item) {
        switch (item.getItemId()) {
        case android.R.id.home:
            //Create an intent for the parent Activity
            Intent upIntent = NavUtils.getParentActivityIntent(this);
            //Check if we need to create the entire stack
            if (NavUtils.shouldUpRecreateTask(this, upIntent)) {
                //This stack doesn't exist yet, so it must be synthesized
                TaskStackBuilder.create(this)
                    .addParentStack(this)
                    .startActivities();
            } else {
                //Stack exists, so just navigate up
                NavUtils.navigateUpFromSameTask(this);
            }
            return true;
        default:
            return super.onOptionsItemSelected(item);
        }
    }
}
This example application consists of three screens. The root screen just has a button to launch the next activity. The second activity contains a ListView with several options to select from. When any item in the list is selected, the third activity is launched, which displays the selection made in the center of the view. As you might expect, the user can use the BACK button to navigate back through this stack of screens. However, in this case, we have also enabled the UP action to provide the same navigation.
There is some common code in the two lower-level Activities that enables the UP navigation. The first is a call to setDisplayHomeAsUpEnabled() on ActionBar. This enables the home icon in the bar to be clickable and also to display with the default back arrow that indicates an UP action is possible. Whenever this item is clicked by the user, onOptionsItemSelected() will trigger and the item’s ID will be android.R.id.home, so we use this information to filter out when the user taps requests to navigate UP.
When navigating UP, we have to determine whether the activity stack we need already exists, or we need to create it; the shouldUpRecreateTask() method does this for us. On platform versions prior to Android 4.1, it does this by checking whether the target Intent has a valid action string that isn’t Intent.ACTION_MAIN. On Android 4.1 and later, it decides this by checking the taskAffinity of the target Intent against the rest of the application.
If the task stack does not exist, primarily because this activity was launched directly rather than being navigated to from within its own application, we must create it. TaskStackBuilder contains a host of methods to allow the stack to be created in any way that fits your application’s needs. We are using the convenience method addParentStack(), which traverses all of the parentActivityName attributes (or PARENT_ACTIVITY on support platforms) and every Intent necessary to re-create the path from this activity to the root. With the stack built, we just need to call startActivities() to have it build the stack and navigate to the next level up.
If the stack already exists, we can call on NavUtils to take us up one level with navigateUpFromSameTask(). This is really just a convenience method for navigateUpTo() that constructs the target Intent by calling getParentActivityIntent() for us.
Now we have an application that is properly compliant with the BACK/UP navigation pattern, but how do we test it? Running this application as is will produce the same results for each BACK and UP action. Let’s construct a simple second application to launch our DetailsActivity to better illustrate the navigation pattern. See Listings 7-47 and 7-48.
Listing 7-47. res/layout/main.xml
<?xml version="1.0" encoding="utf-8"?>
<LinearLayout xmlns:android="http://schemas.android.com/apk/res/android"
    android:layout_width="match_parent"
    android:layout_height="match_parent"
    android:orientation="vertical" >
    <Button
        android:id="@+id/button_nephew"
        android:layout_width="match_parent"
        android:layout_height="wrap_content"
        android:text="Add a New Nephew" />
    <Button
        android:id="@+id/button_niece"
        android:layout_width="match_parent"
        android:layout_height="wrap_content"
        android:text="Add a New Niece" />
    <Button
        android:id="@+id/button_twins"
        android:layout_width="match_parent"
        android:layout_height="wrap_content"
        android:text="Add Twin Nieces!" />
</LinearLayout>
Listing 7-48. Activity Launching into the Task Stack
public class MainActivity extends Activity implements View.OnClickListener {
    //Custom Action String for external Activity launches
    public static final String ACTION_NEW_ARRIVAL =
            "com.examples.taskstack.ACTION_NEW_ARRIVAL";

    @Override
    protected void onCreate(Bundle savedInstanceState) {
        super.onCreate(savedInstanceState);
        setContentView(R.layout.main);
        //Attach the button listeners
        findViewById(R.id.button_nephew).setOnClickListener(this);
        findViewById(R.id.button_niece).setOnClickListener(this);
        findViewById(R.id.button_twins).setOnClickListener(this);
    }

    @Override
    public void onClick(View v) {
        String newArrival;
        switch(v.getId()) {
        case R.id.button_nephew:
            newArrival = "Baby Nephew";
            break;
        case R.id.button_niece:
            newArrival = "Baby Niece";
            break;
        case R.id.button_twins:
            newArrival = "Twin Nieces!";
            break;
        default:
            return;
        }

        Intent intent = new Intent(ACTION_NEW_ARRIVAL);
        intent.putExtra(Intent.EXTRA_TEXT, newArrival);
        startActivity(intent);
    }
}
This application provides a few options for name values to pass in, and it then launches our previous application’s DetailActivity directly. In this case, we see different behavior exhibited between BACK and UP. Pressing the BACK button will take the user back to the options selection screen, because that is the activity that launched it. But pressing the UP action button will launch the user into the original application’s task stack, so it will go to the screen with the ListView of items instead. From this point forward, the user’s task has changed, so BACK button actions will now also traverse the original stack, thus matching subsequent UP actions. Figure 7-7 illustrates this use case.

Figure 7-7. BACK vs. UP navigation
7-17. Implementing AppWidgets
Problem
Your application provides information that users need to quickly and consistently access. You want to add an interactive component of your application to the user’s home screen.
Solution
(API Level 3)
Build an AppWidget that users can choose to install on the home screen as part of the application. AppWidgets are core functions that make Android stand apart from other mobile operating systems. The ability for users to customize their Home experience with quick access to applications they use most is a strong draw for many.
An AppWidget is a view element that is designed to run in the Launcher application’s process but is controlled from your application’s process. Because of this, special pieces of the framework that are designed to support remote process connections must be used. In particular, the view hierarchy of the widget must be provided wrapped in a RemoteViews object, which has methods to update view elements by ID without needing to gain direct access to them. RemoteViews supports only a subset of the layouts and widgets in the framework. The following list shows what RemoteViews supports currently:
- Layouts
- FrameLayout
- GridLayout
- LinearLayout
- RelativeLayout
- Widgets
- AdapterViewFlipper
- AnalogClock
- Button
- Chronometer
- GridView
- ImageButton
- ImageView
- ListView
- ProgressBar
- StackView
- TextView
- ViewFlipper
The view for your AppWidget must be composed of these objects only, or the view will not properly display.
Working in a remote process also means that most user interaction must be handled through PendingIntent instances, rather than traditional listener interfaces. The PendingIntent allows your application to freeze Intent action along with the Context that has permission to execute it so the action can be freely handed off to another process and be run at the specified time as if it had come directly from the originating application Context.
Android Launcher screens on handsets are typically made from a 4×4 grid of spaces in which you can fit your AppWidget. While tablets will have considerably greater space, this should be the design metric to keep in mind when determining the minimum height or width of your widget. Android 3.1 introduced the ability for a user to also resize an AppWidget after it had been placed, but prior to that, a widget’s size was fixed to these values. Taken from the Android documentation, Table 7-1 defines a good rule of thumb to use in determining how many cells a given minimum size will occupy.
Table 7-1. Home Screen Grid Cell Sizes
Number of Cells |
Available Space |
|---|---|
1 |
40dp |
2 |
110dp |
3 |
180dp |
4 |
250dp |
n |
(70 x n) - 30 |
So, as an example, if your widget needed to be at least 200dp × 48dp in size, it would require three columns and one row in order to display on the Launcher.
How It Works
Let’s first take a look at constructing a simple AppWidget that can be updated from either the widget itself or the associated activity. This example constructs a random number generator (something I’m sure we all wish could be on our Launcher screen) that can be placed as an AppWidget. Let’s start with the application’s manifest in Listing 7-49.
Listing 7-49. AndroidManifest.xml
<application android:label="@string/app_name"
        android:icon="@drawable/ic_launcher">
        <!-- Simple AppWidget Components -->
        <activity android:name=".MainActivity">
            <intent-filter>
                <action android:name="android.intent.action.MAIN" />
                <category android:name="android.intent.category.LAUNCHER" />
            </intent-filter>
        </activity>

        <receiver android:name=".SimpleAppWidget">
            <intent-filter>
                <action android:name="android.appwidget.action.APPWIDGET_UPDATE" />
            </intent-filter>
            <!-- This data required to configure the AppWidget -->
            <meta-data android:name="android.appwidget.provider"
                android:resource="@xml/simple_appwidget" />
        </receiver>

        <service android:name=".RandomService" />
</application>
The only required component here to produce the AppWidget is the <receiver> marked SimpleAppWidget. This element must point to a subclass of AppWidgetProvider, which, as you might expect, is a customized BroadcastReceiver. It must register in the manifest for the APPWIDGET_UPDATE broadcast action. There are several other broadcasts that it processes, but this is the only one that must be declared in the manifest. You must also attach a <meta-data> element that points to an <appwidget-provider>, which will eventually be inflated into AppWidgetProviderInfo. Let’s have a look at that element now in Listing 7-50.
Listing 7-50. res/xml/simple_appwidget.xml
<?xml version="1.0" encoding="utf-8"?>
<appwidget-provider xmlns:android="http://schemas.android.com/apk/res/android"
    android:minWidth="180dp"
    android:minHeight="40dp"
    android:updatePeriodMillis="86400000"
    android:initialLayout="@layout/simple_widget_layout"/>
These attributes define the configuration for the AppWidget. Besides the size metrics, updatePeriodMillis defines the period on which Android should automatically call an update on this widget to refresh it. Be judicious with this value, and do not set it higher than you need to. In many cases, it is more efficient to have other services or observers notifying you of changes that require an AppWidget update. In fact, Android will not deliver updates to an AppWidget more frequently than 30 seconds. We have set our AppWidget to update only once per day. This example also defines an initialLayout attribute, which points to the layout that should be used for the AppWidget.
There are a number of other useful attributes you can apply here as well:
- android:configure provides an activity that should be launched to configure the AppWidget before it is added to the Launcher.
- android:icon references a resource to be displayed at the widget icon on the system’s selection UI.
- android:previewImage references a resource to display a full-size preview of the AppWidget in the system’s selection UI (API Level 11).
- android:resizeMode defines how the widget should be resizable on platforms that support it: horizontally, vertically, or both (API Level 12).
Listings 7-51 and 7-52 reveal what the AppWidget layout looks like.
Listing 7-51. res/layout/simple_widget_layout.xml
<?xml version="1.0" encoding="utf-8"?>
<LinearLayout xmlns:android="http://schemas.android.com/apk/res/android"
    android:layout_width="match_parent"
    android:layout_height="match_parent"
    android:background="@drawable/widget_background"
    android:orientation="horizontal"
    android:padding="10dp" >
    <LinearLayout
        android:id="@+id/container"
        android:layout_width="0dp"
        android:layout_height="wrap_content"
        android:layout_weight="1"
        android:layout_gravity="center_vertical"
        android:orientation="vertical">
        <TextView
            android:id="@+id/text_title"
            android:layout_width="wrap_content"
            android:layout_height="wrap_content"
            android:layout_gravity="center_horizontal"
            android:textAppearance="?android:attr/textAppearanceMedium"
            android:text="Random Number" />
        <TextView
            android:id="@+id/text_number"
            android:layout_width="wrap_content"
            android:layout_height="wrap_content"
            android:layout_gravity="center_horizontal"
            android:textStyle="bold"
            android:textAppearance="?android:attr/textAppearanceLarge"/>
    </LinearLayout>

    <ImageButton
        android:id="@+id/button_refresh"
        android:layout_width="55dp"
        android:layout_height="55dp"
        android:layout_gravity="center_vertical"
        android:background="@null"
        android:src="@android:drawable/ic_menu_rotate" />

</LinearLayout>
Listing 7-52. res/drawable/widget_background.xml
<?xml version="1.0" encoding="utf-8"?>
<shape xmlns:android="http://schemas.android.com/apk/res/android"
    android:shape="rectangle">
    <corners
        android:radius="10dp" />
    <solid
        android:color="#A333" />
    <stroke
        android:width="2dp"
        android:color="#333" />
</shape>
It is always good practice with an AppWidget, especially in later platform versions where they can be resized, to define layouts that easily stretch and adapt to a changing container size. In this case, we have defined the background for the widget as a semitransparent rounded rectangle in XML, which could fill any size necessary. The children of the layout are also defined by using weight, so they will fill excess space. This layout is made of two TextView elements and an ImageButton. We have applied android:id attributes to all of these views because there will be no other way to access them once wrapped in a RemoteViews instance later. Listing 7-53 reveals our AppWidgetProvider mentioned earlier.
Listing 7-53. AppWidgetProvider Instance
public class SimpleAppWidget extends AppWidgetProvider {

    /*
     * This method is called to update the widgets created by this provider.
     * Normally, this will get called:
     * 1. Initially when the widget is created
     * 2. When the updatePeriodMillis defined in the AppWidgetProviderInfo expires
     * 3. Manually when updateAppWidget() is called on AppWidgetManager
     */
    @Override
    public void onUpdate(Context context, AppWidgetManager appWidgetManager,
            int[] appWidgetIds) {
        //Start the background service to update the widget
        context.startService(new Intent(context, RandomService.class));
    }
}
The only required method to implement here is onUpdate(), which will get called initially when the user selects the widget to be added and subsequently when either the framework or your application requests another update. In many cases, you can create the views and update your AppWidget directly inside this method. Because AppWidgetProvider is a BroadcastReceiver, it is not considered good practice to do long operations inside of it. If you must do intensive work to set up your AppWidget, you should start a service instead and perhaps a background thread as well to do the work, which is what we have done here.
For convenience, this method is passed an AppWidgetManager instance, which is necessary for updating the AppWidget if you do so from this method. It is also possible to have multiple AppWidgets loaded on a single Launcher screen. The array of IDs references each individual AppWidget so you can update them all at once. Let’s have a look at that service in Listing 7-54.
Listing 7-54. AppWidget Service
public class RandomService extends Service {
    /* Broadcast Action When Updates Complete */
    public static final String ACTION_RANDOM_NUMBER =
            "com.examples.appwidget.ACTION_RANDOM_NUMBER";

    /* Current Data Saved as a static value */
    private static int sRandomNumber;
    public static int getRandomNumber() {
        return sRandomNumber;
    }

    @Override
    public int onStartCommand(Intent intent, int flags, int startId) {
        //Update the random number data
        sRandomNumber = (int)(Math.random() * 100);

        //Create the AppWidget view
        RemoteViews views = new RemoteViews(getPackageName(),
                R.layout.simple_widget_layout);
        views.setTextViewText(R.id.text_number, String.valueOf(sRandomNumber));

        //Set an Intent for the refresh button to start this service again
        PendingIntent refreshIntent = PendingIntent.getService(this, 0,
                new Intent(this, RandomService.class), 0);
        views.setOnClickPendingIntent(R.id.button_refresh, refreshIntent);

        //Set an Intent so tapping the widget text will open the Activity
        PendingIntent appIntent = PendingIntent.getActivity(this, 0,
                new Intent(this, MainActivity.class), 0);
        views.setOnClickPendingIntent(R.id.container, appIntent);

        //Update the widget
        AppWidgetManager manager = AppWidgetManager.getInstance(this);
        ComponentName widget = new ComponentName(this, SimpleAppWidget.class);
        manager.updateAppWidget(widget, views);

        //Fire a broadcast to notify listeners
        Intent broadcast = new Intent(ACTION_RANDOM_NUMBER);
        sendBroadcast(broadcast);

        //This service should not continue to run
        stopSelf();
        return START_NOT_STICKY;
    }

    /*
     * We are not binding to this Service, so this method should
     * just return null.
     */
    @Override
    public IBinder onBind(Intent intent) {
        return null;
    }
}
This RandomService does two operations when started. First, it regenerates and saves the random number data into a static field. Second, it constructs a new view for our AppWidget. In this way, we can use this service to refresh our AppWidget on demand. We must first create a RemoteViews instance, passing in our widget layout. We use setTextViewText() to update a TextView in the layout with the new number, and setOnClickPendingIntent() attaches click listeners. The first PendingIntent is attached to the Refresh button on the AppWidget, and the Intent that it is set to fire will restart this same service. The second PendingIntent is attached to the main layout of the widget, allowing the user to click anywhere inside it, and it fires an Intent to launch the application’s main activity.
The final step with our RemoteViews initialized is to update the AppWidget. We do this by obtaining the AppWidgetManager instance and calling updateAppWidget(). We do not have the ID values for each AppWidget attached to the provider here, which is one method of updating them. Instead, we can pass a ComponentName that references our AppWidgetProvider and this update will apply to all AppWidgets attached to that provider.
To finish up, we send a broadcast to any listeners that a new random number has been generated and we stop the service. At this point, we have all the code in place for our AppWidget to be live and working on a device. But let’s add one more component and include an activity that interacts with the same data. See Listings 7-55 and 7-56.
Listing 7-55. res/layout/main.xml
<?xml version="1.0" encoding="utf-8"?>
<LinearLayout xmlns:android="http://schemas.android.com/apk/res/android"
    android:layout_width="match_parent"
    android:layout_height="match_parent"
    android:orientation="vertical" >
    <Button
        android:layout_width="match_parent"
        android:layout_height="wrap_content"
        android:text="Generate New Number"
        android:onClick="onRandomClick" />
    <TextView
        android:layout_width="wrap_content"
        android:layout_height="wrap_content"
        android:layout_gravity="center_horizontal"
        android:textAppearance="?android:attr/textAppearanceLarge"
        android:text="Current Random Number" />
    <TextView
        android:id="@+id/text_number"
        android:layout_width="wrap_content"
        android:layout_height="wrap_content"
        android:layout_gravity="center_horizontal"
        android:textSize="55dp"
        android:textStyle="bold" />

</LinearLayout>
Listing 7-56. Main Application Activity
public class MainActivity extends Activity {

    private TextView mCurrentNumber;

    @Override
    protected void onCreate(Bundle savedInstanceState) {
        super.onCreate(savedInstanceState);
        setContentView(R.layout.main);

        mCurrentNumber = (TextView) findViewById(R.id.text_number);
    }

    @Override
    protected void onResume() {
        super.onResume();
        updateNumberView();
        //Register a receiver to receive updates when the service finishes
        IntentFilter filter = new IntentFilter(RandomService.ACTION_RANDOM_NUMBER);
        registerReceiver(mReceiver, filter);
    }

    @Override
    protected void onPause() {
        super.onPause();
        //Unregister our receiver
        unregisterReceiver(mReceiver);
    }

    public void onRandomClick(View v) {
        //Call the service to update the number data
        startService(new Intent(this, RandomService.class));
    }

    private void updateNumberView() {
        //Update the view with the latest number
        mCurrentNumber.setText(String.valueOf(RandomService.getRandomNumber()));
    }

    private BroadcastReceiver mReceiver = new BroadcastReceiver() {
        @Override
        public void onReceive(Context context, Intent intent) {
            //Update the view with the new number
            updateNumberView();
        }
    };
}
This activity displays the current value of the random number provided by our RandomService. It also responds to button clicks by starting the service to generate a new number. The nice side effect is that this will also update our AppWidget so the two will stay in sync. We also register a BroadcastReceiver to listen for the event when the service has finished generating new data so that we can update the user interface here as well. Figure 7-8 shows the application activity, and the corresponding AppWidget added to the home screen.
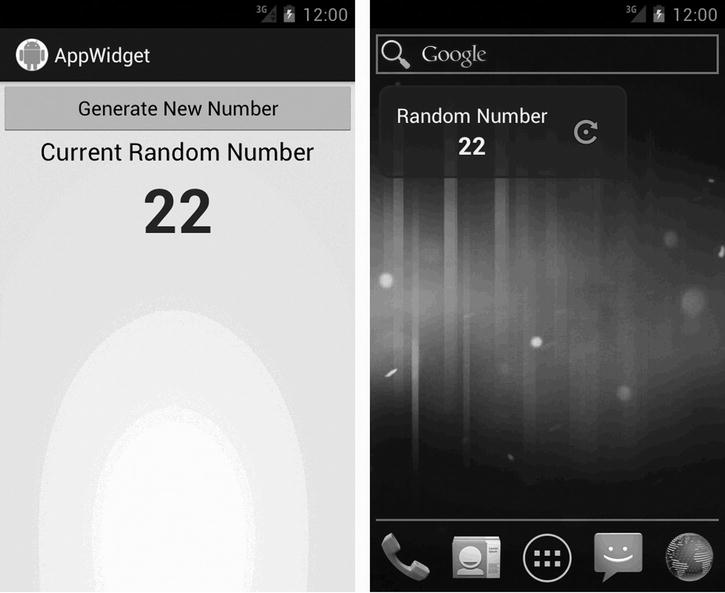
Figure 7-8. The Random Number Activity app (left) and AppWidget (right)
(API Level 12)
Starting in Android 3.0, the things an AppWidget can display got a boost when collection views were added to the AppWidget framework. This allows applications to display information in a list, grid, or stack. In Android 3.1, AppWidgets also received the ability to be resized after being placed. Let’s take a look at an example of an AppWidget that allows the user to see his or her media collection. Again, we’ll start with the manifest in Listing 7-57.
Listing 7-57. AndroidManifest.xml
<application android:label="@string/app_name"
        android:icon="@drawable/ic_launcher">
        <!-- Collection AppWidget Components -->
        <activity android:name=".ListWidgetConfigureActivity">
            <intent-filter>
                <action android:name="android.appwidget.action.APPWIDGET_CONFIGURE"/>
            </intent-filter>
        </activity>

        <receiver android:name=".ListAppWidget">
            <intent-filter>
                <action android:name="android.appwidget.action.APPWIDGET_UPDATE" />
            </intent-filter>
            <meta-data android:name="android.appwidget.provider"
                android:resource="@xml/list_appwidget" />
        </receiver>

        <service android:name=".ListWidgetService"
            android:permission="android.permission.BIND_REMOTEVIEWS" />
        <service android:name=".MediaService" />
</application>
This example has a similar definition to the AppWidgetProvider, this time named ListAppWidget. We have defined a service with the special permission BIND_REMOTEVIEWS. You will see shortly that this is actually a RemoteViewsService, which the framework will use to provide data for the AppWidget’s list, similar to how a ListAdapter works with ListView. Finally, we have defined an activity that will be used to configure the AppWidget before the user adds it. For this to take place, the activity must include an <intent-filter> for the APPWIDGET_CONFIGURE action. The AppWidgetProviderInfo attached to our AppWidget is defined in Listing 7-58.
Listing 7-58. res/xml/list_appwidget.xml
<?xml version="1.0" encoding="utf-8"?>
<appwidget-provider xmlns:android="http://schemas.android.com/apk/res/android"
    android:minWidth="110dp"
    android:minHeight="110dp"
    android:updatePeriodMillis="86400000"
    android:initialLayout="@layout/list_widget_layout"
    android:configure="com.examples.appwidget.ListWidgetConfigureActivity"
    android:resizeMode="horizontal|vertical"/>
In addition to the standard attributes we discussed in the previous example, we have added android:configure to point to our configuration activity, and android:resizeMode will enable this AppWidget to be resized in both directions. Listings 7-59 through 7-61 show the layouts we will use for both the AppWidget itself and for each row of the ListView.
Listing 7-59. res/layout/list_widget_layout.xml
<?xml version="1.0" encoding="utf-8"?>
<LinearLayout xmlns:android="http://schemas.android.com/apk/res/android"
    android:layout_width="match_parent"
    android:layout_height="match_parent"
    android:orientation="vertical"
    android:background="@drawable/list_widget_background">
    <TextView
        android:id="@+id/text_title"
        android:layout_width="match_parent"
        android:layout_height="45dp"
        android:gravity="center"
        android:textAppearance="?android:attr/textAppearanceMedium" />
    <FrameLayout
        android:layout_width="match_parent"
        android:layout_height="match_parent" >
        <ListView
            android:id="@+id/list"
            android:layout_width="match_parent"
            android:layout_height="match_parent" />
        <TextView
            android:id="@+id/list_empty"
            android:layout_width="wrap_content"
            android:layout_height="wrap_content"
            android:layout_gravity="center"
            android:text="No Items Available" />
    </FrameLayout>
</LinearLayout>
Listing 7-60. res/drawable/list_widget_background.xml
<?xml version="1.0" encoding="utf-8"?>
<shape xmlns:android="http://schemas.android.com/apk/res/android"
    android:shape="rectangle">
    <solid
        android:color="#A333" />
</shape>
Listing 7-61. res/layout/list_widget_item.xml
<?xml version="1.0" encoding="utf-8"?>
<LinearLayout xmlns:android="http://schemas.android.com/apk/res/android"
    android:id="@+id/list_widget_item"
    android:layout_width="match_parent"
    android:layout_height="?android:attr/listPreferredItemHeight"
    android:paddingLeft="10dp"
    android:gravity="center_vertical"
    android:orientation="vertical" >

    <TextView
        android:id="@+id/line1"
        android:layout_width="wrap_content"
        android:layout_height="wrap_content" />

    <TextView
        android:id="@+id/line2"
        android:layout_width="wrap_content"
        android:layout_height="wrap_content" />

</LinearLayout>
The layout of the AppWidget is a simple ListView with a TextView above it for a title. We have encapsulated the list into a FrameLayout so that we can also supply a sibling empty view as well.
Tip Try as you might, you will be unsuccessful using most of the Android standard row layouts for ListView in an AppWidget, such as android.R.id.simple_list_item_1. This is because these elements typically contain views such asCheckedTextView that are not supported by RemoteViews. You will have to create your own layout for each row.
Before we look at the AppWidgetProvider for this example, let’s first look at the configuration activity. This is the first thing the user will see after dropping the AppWidget onto the home screen, but before it is installed. The result from this activity will actually govern whether the AppWidgetProvider gets called at all! See Listings 7-62 and 7-63.
Listing 7-62. res/layout/configure.xml
<?xml version="1.0" encoding="utf-8"?>
<RelativeLayout xmlns:android="http://schemas.android.com/apk/res/android"
    android:layout_width="match_parent"
    android:layout_height="match_parent">
    <TextView
        android:id="@+id/text_title"
        android:layout_width="wrap_content"
        android:layout_height="wrap_content"
        android:textAppearance="?android:attr/textAppearanceLarge"
        android:text="Select Media Type:" />
    <RadioGroup
        android:id="@+id/group_mode"
        android:layout_width="wrap_content"
        android:layout_height="wrap_content"
        android:layout_below="@id/text_title"
        android:orientation="vertical">
        <RadioButton
            android:id="@+id/mode_image"
            android:layout_width="wrap_content"
            android:layout_height="wrap_content"
            android:text="Images"/>
        <RadioButton
            android:id="@+id/mode_video"
            android:layout_width="wrap_content"
            android:layout_height="wrap_content"
            android:text="Videos"/>
    </RadioGroup>

    <Button
        android:layout_width="match_parent"
        android:layout_height="wrap_content"
        android:layout_alignParentBottom="true"
        android:text="Add Widget"
        android:onClick="onAddClick" />

</RelativeLayout>
Listing 7-63. Configuration Activity
public class ListWidgetConfigureActivity extends Activity {

    private int mAppWidgetId;
    private RadioGroup mModeGroup;

    @Override
    protected void onCreate(Bundle savedInstanceState) {
        super.onCreate(savedInstanceState);
        setContentView(R.layout.configure);

        mModeGroup = (RadioGroup) findViewById(R.id.group_mode);

        mAppWidgetId = getIntent()
                .getIntExtra(AppWidgetManager.EXTRA_APPWIDGET_ID,
                        AppWidgetManager.INVALID_APPWIDGET_ID);

        setResult(RESULT_CANCELED);
    }

    public void onAddClick(View v) {
        SharedPreferences.Editor prefs =
                getSharedPreferences(String.valueOf(mAppWidgetId), MODE_PRIVATE)
                        .edit();
        RemoteViews views = new RemoteViews(getPackageName(),
                R.layout.list_widget_layout);
        switch (mModeGroup.getCheckedRadioButtonId()) {
        case R.id.mode_image:
            prefs.putString(ListWidgetService.KEY_MODE,
                    ListWidgetService.MODE_IMAGE).commit();
            views.setTextViewText(R.id.text_title, "Image Collection");
            break;
        case R.id.mode_video:
            prefs.putString(ListWidgetService.KEY_MODE,
                    ListWidgetService.MODE_VIDEO).commit();
            views.setTextViewText(R.id.text_title, "Video Collection");
            break;
        default:
            Toast.makeText(this, "Please Select a Media Type.",
                    Toast.LENGTH_SHORT).show();
            return;
        }

        Intent intent = new Intent(this, ListWidgetService.class);
        intent.putExtra(AppWidgetManager.EXTRA_APPWIDGET_ID, mAppWidgetId);
        intent.setData(Uri.parse(intent.toUri(Intent.URI_INTENT_SCHEME)));

        //Attach the adapter to populate the data for the list in
        //the form of an Intent that points to our RemoveViewsService
        views.setRemoteAdapter(mAppWidgetId, R.id.list, intent);
        //Set the empty view for the list
        views.setEmptyView(R.id.list, R.id.list_empty);

        Intent viewIntent = new Intent(Intent.ACTION_VIEW);
        PendingIntent pendingIntent = PendingIntent.getActivity(this, 0, viewIntent, 0);
        views.setPendingIntentTemplate(R.id.list, pendingIntent);

        AppWidgetManager manager = AppWidgetManager.getInstance(this);
        manager.updateAppWidget(mAppWidgetId, views);

        Intent data = new Intent();
        data.putExtra(AppWidgetManager.EXTRA_APPWIDGET_ID, mAppWidgetId);
        setResult(RESULT_OK, data);
        finish();
    }
}
The layout for this activity provides a single RadioGroup to choose between images and videos, which will be the selected media type that the AppWidget displays in its list and on an Add button. By convention, when we enter the activity, we immediately set the result to RESULT_CANCELED. This is because if the user ever leaves this activity without going through the process of hitting Add, we don’t want the AppWidget to show up on the screen. The framework checks the result of this activity to decide whether to add the AppWidget. We are also passed the ID of this AppWidget by the framework, which we save for later.
Once the user had made a selection and clicks Add, that selection is saved in a specific SharedPreferences instance named by the AppWidget’s ID. We want to be able to allow the application to handle multiple widgets, and we want their configuration values to be separate, so we avoid using the default SharedPreferences to persist this data.
Note In Android 4.1 the ability to pass configuration data to the AppWidget as a Bundle of options was introduced. However, to keep compatibility with previous versions, we can use the SharedPreferences approach instead.
We also can begin to construct the RemoteViews for this AppWidget, setting the title based on the user’s type selection. For a collection-based AppWidget, we must construct an Intent that will launch an instance of RemoteViewsService to act as the adapter for the collection data, similar to a ListAdapter. This is attached to the RemoteViews with setRemoteAdapter(), which also takes the ID of the ListView we want the adapter to connect with. We also use setEmptyView() to attach the ID of our sibling TextView to display when the list is empty.
Each list item must have a PendingIntent attached to fire when the user clicks it. The framework is aware that you may need to supply specific information for every item, so it uses the pattern of a PendingIntent template that gets filled in by each item. Here we are creating the base Intent for each item to fill in as a simple ACTION_VIEW, and attaching it via setPendingIntentTemplate(); the data and extras fields will be filled in later.
With all this in place, we call updateAppWidget() on the AppWidgetManager. In this case, we called a version of this method that takes a single ID rather than a ComponentName because we want to update only this specific AppWidget. We then set the result to RESULT_OK and finish, allowing the framework to add the AppWidget to the screen. Let’s look briefly now at the AppWidgetProvider, which is shown in Listing 7-64.
Listing 7-64. List AppWidgetProvider
public class ListAppWidget extends AppWidgetProvider {

    /*
     * This method is called to update the widgets created by this provider.
     * Because we supplied a configuration Activity, this method will not get called
     * for the initial adding of the widget, but will still be called:
     * 1. When the updatePeriodMillis defined in the AppWidgetProviderInfo expires
     */
    @Override
    public void onUpdate(Context context, AppWidgetManager appWidgetManager,
            int[] appWidgetIds) {
        //Update each widget created by this provider
        for (int i=0; i < appWidgetIds.length; i++) {
            Intent intent = new Intent(context, ListWidgetService.class);
            intent.putExtra(AppWidgetManager.EXTRA_APPWIDGET_ID, appWidgetIds[i]);
            intent.setData(Uri.parse(intent.toUri(Intent.URI_INTENT_SCHEME)));

            RemoteViews views = new RemoteViews(context.getPackageName(),
                    R.layout.list_widget_layout);
            //Set the title view based on the widget configuration
            SharedPreferences prefs =
                    context.getSharedPreferences(String.valueOf(appWidgetIds[i]),
                            Context.MODE_PRIVATE);
            String mode = prefs.getString(ListWidgetService.KEY_MODE,
                    ListWidgetService.MODE_IMAGE);
            if (ListWidgetService.MODE_VIDEO.equals(mode)) {
                views.setTextViewText(R.id.text_title, "Video Collection");
            } else {
                views.setTextViewText(R.id.text_title, "Image Collection");
            }

            //Attach the adapter to populate the data for the list in
            //the form of an Intent that points to our RemoveViewsService
            views.setRemoteAdapter(appWidgetIds[i], R.id.list, intent);

            //Set the empty view for the list
            views.setEmptyView(R.id.list, R.id.list_empty);

            //Set the template Intent for item clicks that each item will fill-in
            Intent viewIntent = new Intent(Intent.ACTION_VIEW);
            PendingIntent pendingIntent = PendingIntent.getActivity(context, 0,
                    viewIntent, 0);
            views.setPendingIntentTemplate(R.id.list, pendingIntent);

            appWidgetManager.updateAppWidget(appWidgetIds[i], views);
        }
    }

    /*
     * Called when the first widget is added to the provider
     */
    @Override
    public void onEnabled(Context context) {
        //Start the service to monitor the MediaStore
        context.startService(new Intent(context, MediaService.class));
    }

    /*
     * Called when all widgets have been removed from this provider
     */
    @Override
    public void onDisabled(Context context) {
        //Stop the service that is monitoring the MediaStore
        context.stopService(new Intent(context, MediaService.class));
    }

    /*
     * Called when one or more widgets attached to this provider are removed
     */
    @Override
    public void onDeleted(Context context, int[] appWidgetIds) {
        //Remove the SharedPreferences we created for each widget removed
        for (int i=0; i < appWidgetIds.length; i++) {
            context.getSharedPreferences(String.valueOf(appWidgetIds[i]),
                    Context.MODE_PRIVATE)
                .edit()
                .clear()
                .commit();
        }

    }
}
The onUpdate() method of this provider is identical to the code found in the configuration activity, except that the provider is reading the current values of the user configuration settings rather than updating them. The code must be the same because we want to have the same AppWidget result from a subsequent update.
This provider also overrides onEnabled() and onDisabled(). These methods are called when the very first widget is added to the provider and after the very last widget is removed. The provider is using them to start and stop a long-running service that we will look at in more detail shortly, but its purpose is to monitor the MediaStore for changes so we can update our AppWidget. Finally, the onDeleted() callback is called for each AppWidget that gets removed. In our example, we use this to clear out the SharedPreferences we had created when the AppWidget was added.
Now look at Listing 7-65, which defines our RemoteViewsService for serving data to the AppWidget list.
Listing 7-65. RemoteViews Adapter
public class ListWidgetService extends RemoteViewsService {

    public static final String KEY_MODE = "mode";
    public static final String MODE_IMAGE = "image";
    public static final String MODE_VIDEO = "video";

    @Override
    public RemoteViewsFactory onGetViewFactory(Intent intent) {
        return new ListRemoteViewsFactory(this, intent);
    }

    private class ListRemoteViewsFactory implements
            RemoteViewsService.RemoteViewsFactory {
        private Context mContext;
        private int mAppWidgetId;

        private Cursor mDataCursor;

        public ListRemoteViewsFactory(Context context, Intent intent) {
            mContext = context.getApplicationContext();
            mAppWidgetId = intent.getIntExtra(AppWidgetManager.EXTRA_APPWIDGET_ID,
                    AppWidgetManager.INVALID_APPWIDGET_ID);
        }

        @Override
        public void onCreate() {
            //Load preferences to get settings user set while adding the widget
            SharedPreferences prefs =
                    mContext.getSharedPreferences(String.valueOf(mAppWidgetId),
                            MODE_PRIVATE);
            //Get the user's config setting, defaulting to image mode
            String mode = prefs.getString(KEY_MODE, MODE_IMAGE);
            //Set the media type to query based on the user configuration setting
            if (MODE_VIDEO.equals(mode)) {
                //Query for video items in the MediaStore
                String[] projection = {MediaStore.Video.Media.TITLE,
                        MediaStore.Video.Media.DATE_TAKEN,
                        MediaStore.Video.Media.DATA};
                mDataCursor = MediaStore.Images.Media.query(getContentResolver(),
                        MediaStore.Video.Media.EXTERNAL_CONTENT_URI, projection);
            } else {
                //Query for image items in the MediaStore
                String[] projection = {MediaStore.Images.Media.TITLE,
                        MediaStore.Images.Media.DATE_TAKEN,
                        MediaStore.Images.Media.DATA};
                mDataCursor = MediaStore.Images.Media.query(getContentResolver(),
                        MediaStore.Images.Media.EXTERNAL_CONTENT_URI, projection);
            }
        }

        /*
         * This method gets called after onCreate(), but also if an external call
         * to AppWidgetManager.notifyAppWidgetViewDataChanged() indicates that the
         * data for a widget should be refreshed.
         */
        @Override
        public void onDataSetChanged() {
            //Refresh the Cursor data
            mDataCursor.requery();
        }

        @Override
        public void onDestroy() {
            //Close the cursor when we no longer need it.
            mDataCursor.close();
            mDataCursor = null;
        }

        @Override
        public int getCount() {
            return mDataCursor.getCount();
        }

        /*
         * If your data comes from the network or otherwise may take a while to load,
         * you can return a loading view here.  This view will be shown while
         * getViewAt() is blocked until it returns
         */
        @Override
        public RemoteViews getLoadingView() {
            return null;
        }
        /*
         * Return a view for each item in the collection.  You can safely perform long
         * operations in this method.  The loading view will be displayed until this
         * method returns.
         */
        @Override
        public RemoteViews getViewAt(int position) {
            mDataCursor.moveToPosition(position);

            RemoteViews views = new RemoteViews(getPackageName(),
                    R.layout.list_widget_item);
            views.setTextViewText(R.id.line1, mDataCursor.getString(0));
            views.setTextViewText(R.id.line2, DateFormat.format("MM/dd/yyyy",
                    mDataCursor.getLong(1)));

            SharedPreferences prefs = mContext
                .getSharedPreferences(String.valueOf(mAppWidgetId), MODE_PRIVATE);
            String mode = prefs.getString(KEY_MODE, MODE_IMAGE);
            String type;
            if (MODE_VIDEO.equals(mode)) {
                type = "video/*";
            } else {
                type = "image/*";
            }

            Uri data = Uri.fromFile(new File(mDataCursor.getString(2)));

            Intent intent = new Intent();
            intent.setDataAndType(data, type);
            views.setOnClickFillInIntent(R.id.list_widget_item, intent);

            return views;
        }

        @Override
        public int getViewTypeCount() {
            return 1;
        }

        @Override
        public boolean hasStableIds() {
            return false;
        }

        @Override
        public long getItemId(int position) {
            return position;
        }
    }
}
The RemoteViewsFactory implementation that RemoteViewsService must return looks very much like a ListAdapter. Many of the methods such as getCount() and getViewTypeCount() perform the same functions as they do for local lists. When the RemoteViewsFactory is first created, we check the setting value the user had selected during configuration, and we then retrieve the appropriate Cursor from the system’s MediaStore content provider to display either images or videos. When the factory is destroyed because it’s no longer needed, that is our opportunity to close the Cursor. When an external stimulus tells AppWidgetManager that the data need to be refreshed, onDataSetChanged() will be called. To refresh our data, all we need to do is requery() the Cursor.
The getViewAt() method is where we obtain a view for each row in the list. This method is safe to call long-running operations in (such as network I/O); the framework will display whatever is returned from getLoadingView() instead until getViewAt() returns. In the example, we update the RemoteViews version of our row layout with the title and a text representation of the date for the given item. We must then fill in the PendingIntent template that was set in our original update. We set the file path of the image or video and the appropriate MIME type as the data field. Combined with ACTION_VIEW, this will open the file in the device’s Gallery app (or any other application capable of handling the media) when the item is clicked.
You may notice in this example we didn’t use explicit column names when retrieving the Cursor data. This is primarily because the projections between the two types have different names, so it is more efficient to access them by index. Finally, look at Listing 7-66, which reveals the background service that was started and stopped by the AppWidgetProvider.
Listing 7-66. Update Monitoring Service
public class MediaService extends Service {

    private ContentObserver mMediaStoreObserver;

    @Override
    public void onCreate() {
        super.onCreate();
        //Create and register a new observer on the MediaStore when this service begins
        mMediaStoreObserver = new ContentObserver(new Handler()) {
            @Override
            public void onChange(boolean selfChange) {
                //Update all the widgets currently attached to our AppWidgetProvider
                AppWidgetManager manager =
                        AppWidgetManager.getInstance(MediaService.this);
                ComponentName provider = new ComponentName(MediaService.this,
                        ListAppWidget.class);
                int[] appWidgetIds = manager.getAppWidgetIds(provider);
                //This method triggers onDataSetChanged() in the RemoteViewsService
                manager.notifyAppWidgetViewDataChanged(appWidgetIds, R.id.list);
            }
        };
        //Register for Images and Video
        getContentResolver().registerContentObserver(
            MediaStore.Images.Media.EXTERNAL_CONTENT_URI, true, mMediaStoreObserver);
        getContentResolver().registerContentObserver(
            MediaStore.Video.Media.EXTERNAL_CONTENT_URI, true, mMediaStoreObserver);
    }

    @Override
    public void onDestroy() {
        super.onDestroy();
        //Unregister the observer when the Service stops
        getContentResolver().unregisterContentObserver(mMediaStoreObserver);
    }

    /*
     * We are not binding to this Service, so this method should
     * just return null.
     */
    @Override
    public IBinder onBind(Intent intent) {
        return null;
    }

}
The purpose of this service is to register a ContentObserver with the MediaStore while any AppWidgets are active. This way, when a photo or video is added or removed, we can update the list of our widget to reflect that. Whenever the ContentObserver triggers, we will call notifyAppWidgetViewDataChanged() on AppWidgetManager for every widget currently attached. This will trigger the onDataSetChanged() callback in the RemoveViewsService to refresh the lists. You can see the result of all this working together in Figures 7-9 and 7-10.

Figure 7-9. Configuration Activity prior to AppWidget being added
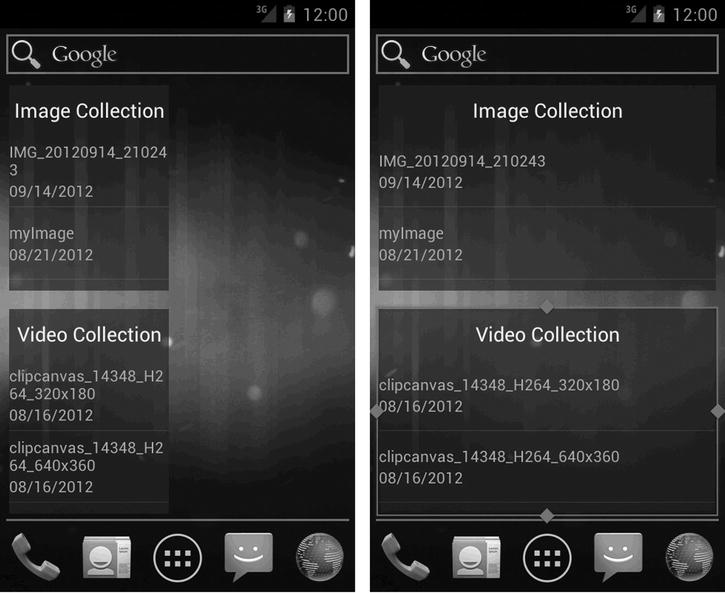
Figure 7-10. AppWidget added for both types (left) and after being resized (right)
You can see that by simply adding the resize attributes to the AppWidgetProviderInfo, the size of the AppWidget can be modified by the user. Each list can be scrolled, and a tap on any item will bring up the default viewing application to view the image or play the video.
7-18. Supporting Restricted Profiles
Problem
Your application targets an audience of various ages and abilities, and you need to provide the control to modify the app’s behavior to suit each particular user.
Solution
(API Level 18)
UserManager provides some generic information about system-level features that may be unavailable to the user profile, via getUserRestrictions(), if that profile is set up to be restricted. Furthermore, applications can define custom feature sets that should be configurable in a restricted environment, and then obtain the current settings of the device from the UserManager by calling getApplicationRestrictions().
Each application can define a set of RestrictionEntry elements that the system will present the device owner in user settings to configure the app for the Restricted Profile. Each element defines the type of setting (Boolean, single selection, or multi-selection) and the data that should be visible in settings.
Android devices that support multiple user accounts provide the ability for the device owner (which is defined as the first account set up on the device) to create additional users or Restricted Profiles. Secondary users have their own applications, data spaces, and the same ability to administer the device just as the owner, with the exception of managing other user accounts.
Restricted Profiles were introduced in Android 4.3 as a way of providing restricted access to the applications and data that are part of the owner’s account. These profiles do not have their own application space or associated data. Instead, they are a set of controls an owner can place on which of their own applications can be used and which features of those applications are accessible. The obvious use case for this is parental controls, but one could also use Restricted Profiles to put a device temporarily into a kiosk mode, for example.
Tip Multiple user accounts are not typically enabled in emulator images, and are usually supported on only tablet devices. These types of features are not common on handsets.
How It Works
To illustrate an application that takes advantage of restricted user environments, we’ve constructed a simple drawing application for children and young adults. We will use application-level restrictions to remove and modify certain application features. Listing 7-67 contains the layout of the user interface.
Listing 7-67. res/layout/activity_main.xml
<?xml version="1.0" encoding="utf-8"?>
<FrameLayout xmlns:android="http://schemas.android.com/apk/res/android"
    android:layout_width="match_parent"
    android:layout_height="match_parent" >

    <com.androidrecipes.restrictedprofiles.DrawingView
        android:id="@+id/drawing_surface"
        android:layout_width="match_parent"
        android:layout_height="match_parent"/>

    <Button
        android:id="@+id/button_purchase"
        android:layout_width="wrap_content"
        android:layout_height="wrap_content"
        android:layout_gravity="right"
        android:text="$$$$"
        android:onClick="onPurchaseClick"/>

    <SeekBar
        android:id="@+id/full_slider"
        android:layout_width="match_parent"
        android:layout_height="wrap_content"
        android:layout_gravity="bottom"
        android:max="45"/>
    <RadioGroup
        android:id="@+id/simple_selector"
        android:layout_width="match_parent"
        android:layout_height="wrap_content"
        android:layout_gravity="bottom"
        android:orientation="horizontal">
        <RadioButton
            android:id="@+id/option_small"
            android:layout_width="0dp"
            android:layout_height="wrap_content"
            android:layout_weight="1"
            android:textColor="#555"
            android:text="Small" />
        <RadioButton
            android:id="@+id/option_medium"
            android:layout_width="0dp"
            android:layout_height="wrap_content"
            android:layout_weight="1"
            android:textColor="#555"
            android:text="Medium" />
        <RadioButton
            android:id="@+id/option_large"
            android:layout_width="0dp"
            android:layout_height="wrap_content"
            android:layout_weight="1"
            android:textColor="#555"
            android:text="Big" />
        <RadioButton
            android:id="@+id/option_xlarge"
            android:layout_width="0dp"
            android:layout_height="wrap_content"
            android:layout_weight="1"
            android:textColor="#555"
            android:text="Really Big" />
    </RadioGroup>
</FrameLayout>
In this example, we have created a drawing surface where the user can paint with their finger (which is a custom view we will see shortly), a button that allows the user to purchase upgraded content (in our case, better colors) from our fake store, and some UI at the bottom of the screen to adjust the line width of the drawings (a slider and a set of radio buttons). We will be using application restrictions to control the latter two features. See Listing 7-68 for the activity element.
Listing 7-68. Restricted Profiles Activity
public class MainActivity extends Activity implements
        OnSeekBarChangeListener, OnCheckedChangeListener {

    private Button mPurchaseButton;
    private DrawingView mDrawingView;
    private SeekBar mFullSlider;
    private RadioGroup mSimpleSelector;

    /* Profile Restriction Values */
    private boolean mHasPurchases;
    private int mMinAge;
    /* Content Purchase Flags */
    private boolean mHasCanvasColors = false;
    private boolean mHasPaintColors = false;

    @Override
    protected void onCreate(Bundle savedInstanceState) {
        super.onCreate(savedInstanceState);
        setContentView(R.layout.activity_main);

        mPurchaseButton = (Button) findViewById(R.id.button_purchase);
        mDrawingView = (DrawingView) findViewById(R.id.drawing_surface);
        mFullSlider = (SeekBar) findViewById(R.id.full_slider);
        mSimpleSelector = (RadioGroup) findViewById(R.id.simple_selector);

        mFullSlider.setOnSeekBarChangeListener(this);
        mSimpleSelector.setOnCheckedChangeListener(this);

        if (Build.VERSION.SDK_INT >= Build.VERSION_CODES.JELLY_BEAN_MR2) {
            UserManager manager = (UserManager) getSystemService(USER_SERVICE);
            //Check for system-level restrictions
            Bundle restrictions = manager.getUserRestrictions();
            if (restrictions != null && !restrictions.isEmpty()) {
                showSystemRestrictionsDialog(restrictions);
            }
        }
    }

    @Override
    protected void onStart() {
        super.onStart();
        /*
         * Restrictions may change while the app is in the background so we need
         * to check this each time we return
         */
        updateRestrictions();
        // Update UI based on restriction changes
        updateDisplay();
    }

    public void onPurchaseClick(View v) {
        AlertDialog.Builder builder =
                new AlertDialog.Builder(this);
        builder.setTitle("Content Upgrades")
                .setMessage(
                        "Tap any of the following items to add them.")
                .setPositiveButton("Canvas Colors $2.99",
                        mPurchaseListener)
                .setNeutralButton("Paint Colors $2.99",
                        mPurchaseListener)
                .setNegativeButton("Both Items $4.99",
                        mPurchaseListener).show();
    }

    private DialogInterface.OnClickListener mPurchaseListener =
            new DialogInterface.OnClickListener() {
        @Override
        public void onClick(DialogInterface dialog, int which) {
            switch (which) {
                case DialogInterface.BUTTON_POSITIVE:
                    mHasCanvasColors = true;
                    break;
                case DialogInterface.BUTTON_NEUTRAL:
                    mHasPaintColors = true;
                    break;
                case DialogInterface.BUTTON_NEGATIVE:
                    mHasCanvasColors = true;
                    mHasPaintColors = true;
                    break;
            }
            Toast.makeText(getApplicationContext(), "Thank You For Your Purchase!",
                    Toast.LENGTH_SHORT).show();
            updateDisplay();
        }
    };

    private void showSystemRestrictionsDialog(Bundle restrictions) {
        StringBuilder message = new StringBuilder();
        for (String key : restrictions.keySet()) {
            //Make sure the value of the restriction is true
            if (restrictions.getBoolean(key)) {
                message.append(RestrictionsReceiver.getNameForRestriction(key));
                message.append("
");
            }
        }

        AlertDialog.Builder builder = new AlertDialog.Builder(this);
        builder.setTitle("System Restrictions")
            .setMessage(message.toString())
            .setPositiveButton("OK", null)
            .show();
    }

    @Override
    public void onCheckedChanged(RadioGroup group, int checkedId) {
        float width;
        switch(checkedId) {
            default:
            case R.id.option_small:
                width = 4f;
                break;
            case R.id.option_medium:
                width = 12f;
                break;
            case R.id.option_large:
                width = 25f;
                break;
            case R.id.option_xlarge:
                width = 45f;
                break;
        }
        mDrawingView.setStrokeWidth(width);
    }

    @Override
    public void onProgressChanged(SeekBar seekBar, int progress,
            boolean fromUser) {
        mDrawingView.setStrokeWidth(progress);
    }

    @Override
    public void onStartTrackingTouch(SeekBar seekBar) { }

    @Override
    public void onStopTrackingTouch(SeekBar seekBar) { }

    private void updateDisplay() {
        //Show/hide purchase button
        mPurchaseButton.setVisibility(
                mHasPurchases ? View.VISIBLE : View.GONE);

        //Update age-restricted content
        mFullSlider.setVisibility(View.GONE);
        mSimpleSelector.setVisibility(View.GONE);
        switch (mMinAge) {
            case 18:
                //Full-range slider
                mFullSlider.setVisibility(View.VISIBLE);
                mFullSlider.setProgress(4);
                break;
            case 10:
                //Four options
                mSimpleSelector.setVisibility(View.VISIBLE);
                findViewById(R.id.option_medium).setVisibility(View.VISIBLE);
                findViewById(R.id.option_xlarge).setVisibility(View.VISIBLE);
                mSimpleSelector.check(R.id.option_medium);
                break;
            case 5:
                //Big/small option
                mSimpleSelector.setVisibility(View.VISIBLE);
                findViewById(R.id.option_medium).setVisibility(View.GONE);
                findViewById(R.id.option_xlarge).setVisibility(View.GONE);
                mSimpleSelector.check(R.id.option_small);
                break;
            case 3:
            default:
                //No selection
                break;
        }

        //Update display with purchases
        mDrawingView.setPaintColor(mHasPaintColors ? Color.BLUE : Color.GRAY);
        mDrawingView.setCanvasColor(mHasCanvasColors ? Color.GREEN : Color.BLACK);
    }

    private void updateRestrictions() {
        // Check for restrictions
        if (Build.VERSION.SDK_INT >= Build.VERSION_CODES.JELLY_BEAN_MR2) {
            UserManager manager = (UserManager) getSystemService(USER_SERVICE);
            Bundle restrictions = manager
                    .getApplicationRestrictions(getPackageName());
            if (restrictions != null) {
                // Read restriction settings
                mHasPurchases = restrictions.getBoolean(
                        RestrictionsReceiver.RESTRICTION_PURCHASE, true);
                try {
                    mMinAge = Integer.parseInt(restrictions.getString(
                            RestrictionsReceiver.RESTRICTION_AGERANGE, "18"));
                } catch (NumberFormatException e) {
                    mMinAge = 0;
                }
            } else {
                // We have no restrictions
                mHasPurchases = true;
                mMinAge = 18;
            }
        } else {
            // We are not on a system that supports restrictions
            mHasPurchases = true;
            mMinAge = 18;
        }
    }
}
System Feature Restrictions
When the activity is created, after verifying that we are running on a device with API Level 18 or later, we determine whether there are any system-level restrictions with UserManager.getUserRestrictions(). This returns a Bundle that will be empty if there are no restrictions (that is, when running as the device owner or another full user). However, if restrictions do exist, we collect descriptions about them together and show a dialog on the screen. A unique key and a Boolean value in the Bundle describe each restriction. For each possible key, if the value is true, that restriction applies; if the restriction does not apply, the value may be false or the key may not appear in the Bundle at all. Here is a list of the possible system restrictions:
- DISALLOW_CONFIG_BLUETOOTH: This profile cannot configure Bluetooth.
- DISALLOW_CONFIG_CREDENTIALS: This profile cannot configure system user credentials.
- DISALLOW_CONFIG_WIFI: This profile cannot modify the WiFi access point configuration.
- DISALLOW_INSTALL_APPS: This profile cannot install new applications.
- DISALLOW_INSTALL_UNKNOWN_SOURCES: This profile cannot enable Unknown Sources in device settings for installing applications.
- DISALLOW_MODIFY_ACCOUNTS: This profile cannot add or remove device accounts.
- DISALLOW_REMOVE_USER: This profile cannot remove other users.
- DISALLOW_SHARE_LOCATION: This profile cannot toggle location-sharing settings.
- DISALLOW_UNINSTALL_APPS: This profile cannot uninstall applications.
- DISALLOW_USB_FILE_TRANSFER: This profile cannot transfer files over USB.
The descriptions we display are pulled from a helper utility inside RestrictionsReceiver, which is a BroadcastReceiver that we have defined in Listing 7-69.
Listing 7-69. Restrictions Receiver
public class RestrictionsReceiver extends BroadcastReceiver {

    public static final String RESTRICTION_PURCHASE = "purchases";
    public static final String RESTRICTION_AGERANGE = "age_range";

    private static final String[] AGES = {"3+", "5+", "10+", "18+"};
    private static final String[] AGE_VALUES = {"3", "5", "10", "18"};

    @Override
    public void onReceive(Context context, Intent intent) {
        ArrayList<RestrictionEntry> restrictions = new ArrayList<RestrictionEntry>();

        RestrictionEntry purchase = new RestrictionEntry(RESTRICTION_PURCHASE, false);
        purchase.setTitle("Content Purchases");
        purchase.setDescription("Allow purchasing of content in the application.");
        restrictions.add(purchase);

        RestrictionEntry ages =
                new RestrictionEntry(RESTRICTION_AGERANGE, AGE_VALUES[0]);
        ages.setTitle("Age Level");
        ages.setDescription("Difficulty level for application content.");
        ages.setChoiceEntries(AGES);
        ages.setChoiceValues(AGE_VALUES);
        restrictions.add(ages);

        Bundle result = new Bundle();
        result.putParcelableArrayList(Intent.EXTRA_RESTRICTIONS_LIST, restrictions);

        setResultExtras(result);
    }

    /*
     * Utility to get readable strings from restriction keys
     */
    public static String getNameForRestriction(String key) {
        if (UserManager.DISALLOW_CONFIG_BLUETOOTH.equals(key)) {
            return "Unable to configure Bluetooth";
        }
        if (UserManager.DISALLOW_CONFIG_CREDENTIALS.equals(key)) {
            return "Unable to configure user credentials";
        }
        if (UserManager.DISALLOW_CONFIG_WIFI.equals(key)) {
            return "Unable to configure Wifi";
        }
        if (UserManager.DISALLOW_INSTALL_APPS.equals(key)) {
            return "Unable to install applications";
        }
        if (UserManager.DISALLOW_INSTALL_UNKNOWN_SOURCES.equals(key)) {
            return "Unable to enable unknown sources";
        }
        if (UserManager.DISALLOW_MODIFY_ACCOUNTS.equals(key)) {
            return "Unable to modify accounts";
        }
        if (UserManager.DISALLOW_REMOVE_USER.equals(key)) {
            return "Unable to remove users";
        }
        if (UserManager.DISALLOW_SHARE_LOCATION.equals(key)) {
            return "Unable to toggle location sharing";
        }
        if (UserManager.DISALLOW_UNINSTALL_APPS.equals(key)) {
            return "Unable to uninstall applications";
        }
        if (UserManager.DISALLOW_USB_FILE_TRANSFER.equals(key)) {
            return "Unable to transfer files";
        }

        return "Unknown Restriction: "+key;
    }
}
Application-Specific Restrictions
Beyond hosting our description utility method, the primary purpose of RestrictionsReceiver is to define the set of custom restrictions we want to expose to the device owner explicitly for this application. When looking for restrictions that are exposed, the framework will send an ordered broadcast Intent with the android.intent.action.GET_RESTRICTION_ENTRIES action string. It is then the responsibility of any receiver that filters this action to construct a list of RestrictionEntry elements and return that list in the result Bundle.
Tip If your restriction settings are too complex to boil down to a handful of selectable items, or if you would simply prefer to better brand that experience, you may return an Intent in the receiver’s result Bundle with EXTRA_RESTRICTIONS_INTENT as the key. The Intent should reference an activity you would like the device settings to launch in order to set up restrictions for the application. In this case, the key/value data for the restrictions should be returned via the activity’s result.
We have defined two restriction settings we want to expose: one to allow the user to make purchases from within the application, and the other to modify the application experience based on the age level of the user. The first setting is created as a Boolean type with the default value of false (that is, this restriction’s value is false by default), and the second is a single selection with options for ages from 3+ to 18+. Listing 7-70 shows the <receiver> snippet that must be in the manifest for this receiver to be published correctly.
Listing 7-70. Manifest Snippet for Restrictions Receiver
<receiver android:name=".RestrictionsReceiver">
    <intent-filter>
        <action android:name="android.intent.action.GET_RESTRICTION_ENTRIES"/>
    </intent-filter>
</receiver>
With this application installed, now these two settings will show up for the device owner to configure when setting up a restricted user profile.
In Listing 7-68, we see that when the activity starts up, the current set of application restrictions is checked by calling UserManager.getApplicationRestrictions() to get another Bundle. This Bundle contains the list of key/value pairs for the settings we defined in our receiver. We use the values in this Bundle to update the internal state of the activity, which controls how the user interface is displayed. If we have no restrictions (for example, we are the device owner), this method will return null.
Because this application is shared between the device owner and the restricted profile, we have to assume that these setting values can change while the activity is in the background, so for that reason these checks are done in onStart() rather than onCreate() or some other one-shot initialization routine.
The Purchases setting controls whether the Money button in the top corner is visible. If purchases are allowed, the user can tap this button and choose from our fake storefront to get a new line color, background color, or both to spice up their drawing.
The Age Level setting controls what the user can do to update the line width. For very young children, this setting will get in the way, so we keep a fixed line width and hide all the controls. As the children move up in age, we want to give them some options, so a set of radio buttons is provided with either two or four width selections. If the minimum age is set all the way up to 18+, then we replace this UI with a full slider element for the user to choose exactly the line width they want with single-pixel precision.
To finish off the example, Listing 7-71 reveals our custom finger-drawing view.
Listing 7-71. Finger-Drawing View
public class DrawingView extends View {

    private Paint mFingerPaint;
    private Path mPath;

    public DrawingView(Context context) {
        super(context);
        init();
    }

    public DrawingView(Context context, AttributeSet attrs) {
        super(context, attrs);
        init();
    }

    public DrawingView(Context context, AttributeSet attrs,
            int defStyle) {
        super(context, attrs, defStyle);
        init();
    }

    private void init() {
        //Set up the paint brush
        mFingerPaint = new Paint(Paint.ANTI_ALIAS_FLAG);
        mFingerPaint.setStyle(Style.STROKE);
        mFingerPaint.setStrokeCap(Cap.ROUND);
        mFingerPaint.setStrokeJoin(Join.ROUND);
        //Default stroke width
        mFingerPaint.setStrokeWidth(8f);
    }

    public void setPaintColor(int color) {
        mFingerPaint.setColor(color);
    }

    public void setStrokeWidth(float width) {
        mFingerPaint.setStrokeWidth(width);
    }

    public void setCanvasColor(int color) {
        setBackgroundColor(color);
    }

    @Override
    public boolean onTouchEvent(MotionEvent event) {
        switch (event.getActionMasked()) {
            case MotionEvent.ACTION_DOWN:
                mPath = new Path();
                //Start at the touch down
                mPath.moveTo(event.getX(), event.getY());
                //Re-draw
                invalidate();
                break;
            case MotionEvent.ACTION_MOVE:
                //Add all touch points between events
                for (int i=0; i < event.getHistorySize(); i++) {
                    mPath.lineTo(event.getHistoricalX(i),
                            event.getHistoricalY(i) );
                }
                //Re-draw
                invalidate();
                break;
            default:
                break;
        }
        return true;
    }

    @Override
    protected void onDraw(Canvas canvas) {
        //Draw the background
        super.onDraw(canvas);
        //Draw the paint stroke
        if (mPath != null) {
            canvas.drawPath(mPath, mFingerPaint);
        }
    }
}
This is a basic View implementation that tracks all touch events and converts them into a Path to be drawn. On each new touch gesture, the old Path is discarded and the initial touch point is added to a new Path. On each subsequent move event, while the finger is dragging, the Path is updated with a line that follows the trail of touch events and the view is invalidated (which triggers onDraw() again). Since we are discarding the old contents on each new gesture, the view draws only the current stroke, and the existing contents will clear when the view is touched again.
Additionally, we have added external setters to update the stroke width and color parameters from the selections made in the UI. These values are simply modifications of the Paint that is used to draw the resulting line. Figure 7-11 shows the application running on the device owner’s account, with all features running unrestricted.

Figure 7-11. Drawing app UI for unrestricted user
If we create a restricted profile on this device, part of the configuration settings will be to enable our application for that profile, and then set the settings appropriately for the target user. See Figure 7-12 for an example of these settings from a Nexus 7 device.

Figure 7-12. Content settings for a Restricted Profile
Finally, with the restrictions set as shown in Figure 7-12, Figure 7-13 shows the same application running under the restricted profile.
First we see the dialog displayed with any system-level restrictions, followed by the main application UI. Notice in this case that the Purchase button is no longer visible and the stroke width control has been replaced with simpler choices.
Summary
In this chapter, you learned ways for your application to interact directly with the Android operating system. We discussed several methods of placing operations into the background for various lengths of time. You learned how applications share responsibility, launching each other to best accomplish the task at hand. Finally, we presented how the system exposes the content gathered by its core application suite for your application’s use. In the next chapter, we will look at how you can use the wide array of publicly available Java libraries to further enhance your application.