
Working with Android NDK and RenderScript
Developers typically write Android apps entirely in Java. However, situations arise where it’s desirable (or even necessary) to express at least part of the code in another language (notably C or C++). Google addresses these situations by providing the Android Native Development Kit (NDK) and RenderScript.
Android NDK
The Android NDK complements the Android SDK by providing a tool set that lets you implement parts of your app by using native code languages such as C and C++. The NDK provides headers and libraries for building native activities, handling user input, using hardware sensors, and more.
The NDK exists primarily to boost app performance, but it is not without penalty. When invoking native code, execution transitions from the Dalvik virtual machine (VM) Java bytecode to compiled native code via the Java Native Interface (JNI). Calling methods across this interface adds overhead, which impacts performance, so it is best to use native code only in situations where this overhead will be negligible. Longer operations inside native methods along with fewer requests coming from the Java layer will help reduce the penalty.
Note Code running inside Dalvik already experiences a performance boost thanks to the just-in-time compiler that was integrated with Dalvik in Android 2.2.
The NDK is used in the following scenarios:
- Your app contains CPU-intensive code that doesn’t allocate much memory. Code examples include physics simulation, signal processing, huge factorial calculations, and testing huge integers for primeness. RenderScript (discussed later in this chapter) is probably more appropriate for addressing at least some of these examples.
- You want to ease the porting of existing C/C++-based source code to your app. Using the NDK can help to speed up app development by letting you keep most or all of your app’s code in C/C++. Furthermore, working with the NDK can help you keep code changes synchronized between Android and non-Android projects.
Caution Think carefully about integrating native code into your app. Basing even part of an app on native code increases its complexity and makes it harder to debug.
If you believe that your app can benefit from being at least partly expressed in native code, you’ll need to install the NDK. Before doing so, you need to be aware of the following software and system requirements:
- A complete Android SDK installation (including all dependencies) is required. Version 1.5 or later of the SDK is supported.
- The following operating systems are supported: Windows XP (32-bit), Windows Vista (32- or 64-bit), Windows 7 (32- or 64-bit), Mac OS X 10.4.8 or later (x86 only), and Linux (32- or 64-bit; Ubuntu 8.04, or other Linux distributions using glibc 2.7 or later).
- For all platforms, GNU Make 3.81 or later is required. Earlier versions of GNU Make might work but have not been tested. Also, GNU Awk or Nawk is required.
- For Windows platforms, Cygwin (1.7 or higher) is required to support debugging. Before Revision 7 of the NDK, Cygwin was also required to build projects by supplying Make and Awk tools.
- The native libraries created by the Android NDK can be used only on devices running specific minimum Android platform versions. The minimum required platform version depends on the CPU architecture of the devices you are targeting. Table 8-1 details which Android platform versions are compatible with native code developed for specific CPU architectures.
Table 8-1. Mappings Between Native Code CPU Architectures and Compatible Android Platforms
Native Code CPU Architecture Used
Compatible Android Platforms
ARM, ARM NEON
Android 1.5 (API Level 3) and higher
x86
Android 2.3 (API Level 9) and higher
MIPS
Android 2.3 (API Level 9) and higher
- These requirements mean that you can use native libraries created via the NDK in apps that are deployable to ARM-based devices running Android 1.5 or later. If you are deploying native libraries to x86- and MIPS-based devices, your app must target Android 2.3 or later.
- To ensure compatibility, an app using a native library created via the NDK must declare a <uses-sdk> element in its manifest file, with an android:minSdkVersion attribute value of "3" or higher. For example:
<manifest>
  <uses-sdk android:minSdkVersion="3" />
  ...
</manifest> - If you use the NDK to create a native library that uses the OpenGL ES APIs, the app containing the library can be deployed only to devices running the minimum platform versions described in Table 8-2. To ensure compatibility, make sure that your app declares the proper android:minSdkVersion attribute value.
Table 8-2. Mappings Between OpenGL ES Versions, Compatible Android Platforms, and uses-sdk
OpenGL ES Version |
Compatible Android Platforms |
Required uses-sdk Attribute |
|---|---|---|
OpenGL ES 1.1 |
Android 1.6 (API Level 4) and higher |
android:minSdkVersion="4" |
OpenGL ES 2.0 |
Android 2.0 (API Level 5) and higher |
android:minSdkVersion="5" |
OpenGL ES 3.0 |
Android 4.3 (API Level 18) and higher |
android:minSdkVersion="18" |
- Additionally, an app using the OpenGL ES APIs should declare a <uses-feature> element in its manifest, with an android:glEsVersion attribute that specifies the minimum OpenGL ES version required by the app. This ensures that Google Play will show your app only to users whose devices can support your app. For example:
<manifest>
  <uses-feature android:glEsVersion="0x00020000" />
  ...
</manifest> - If you use the NDK to create a native library that uses the Android API to access android.graphics.Bitmap pixel buffers, or utilizes native activities, the app containing the library can be deployed only to devices running Android 2.2 (API level 8) or higher. To ensure compatibility, make sure that your app declares a <uses-sdk android:minSdkVersion="8" /> element in its manifest.
Point your browser to http://developer.android.com/tools/sdk/ndk/index.html and download one of the following NDK packages for your platform—Revision 9 is the latest version at the time of writing:
- android-ndk-r9d-windows.zip (Windows)
- android-ndk-r9d-darwin-x86.tar.bz2 (Mac OS X: Intel)
- android-ndk-r9d-linux-x86.tar.bz2 (Linux 32-/64-bit: x86)
After downloading your chosen package, unarchive it and move its android- ndk-r9d home directory to a more suitable location, perhaps to the same directory that contains the Android SDK’s home directory.
Exploring the NDK
Now that you’ve installed the NDK on your platform, you might want to explore its home directory to discover what the NDK offers. The following list describes those directories and files that are located in the home directory for the Windows-based NDK:
- build contains the files that compose the NDK’s build system.
- docs contains the NDK’s HTML-based documentation files.
- platforms contains subdirectories that contain header files and shared libraries for each of the Android SDK’s installed Android platforms.
- prebuilt contains binaries (notably make.exe and awk.exe) that let you build NDK source code without requiring Cygwin.
- samples contains various sample apps that demonstrate different aspects of the NDK.
- sources contains the source code and prebuilt binaries for various shared libraries, such as cpufeatures (to detect the target device’s CPU family and the optional features it supports) and stlport (multiplatform C++ standard library). Android NDK 1.5 required that developers organize their native code library projects under this directory. Starting with Android NDK 1.6, native code libraries are stored in jni subdirectories of their Android app project directories.
- tests contains scripts and sources to perform automated testing of the NDK. They are useful for testing a custom-built NDK.
- toolchains contains compilers, linkers, and other tools for generating native ARM binaries on Linux, OS X, and Windows (with Cygwin) platforms.
- documentation.html is the entry point into the NDK’s documentation.
- GNUmakefile is the default makefile used by GNU Make.
- ndk-build is a shell script that simplifies building machine code.
- ndk-gdb is a shell script that easily launches a native debugging session for your NDK-generated machine code. (Cygwin is required to run this script on Windows platforms.)
- ndk-stack.exe lets you filter stack traces as they appear in the output generated by adb logcat and replace any address inside a shared library with the corresponding values. In essence, it lets you observe more-readable crash dump information.
- README.TXT welcomes you to the NDK, and it refers you to various documentation files that inform you about changes in the current release (and more).
- RELEASE.TXT contains the NDK’s release number (r9).
Each of the platforms directory’s subdirectories contains header files that target stable native APIs. Google guarantees that all later platform releases will support the following APIs (see also http://developer.android.com/tools/sdk/ndk/overview.html#tools):
- Android logging (liblog)
- Android native app APIs
- C library (libc)
- C++ minimal support (stlport)
- JNI interface APIs
- Math library (libm)
- OpenGL ES 1.1, 2.0, and 3.0 (3D graphics libraries) APIs
- OpenSL ES native audio library APIs
- OpenMAX AL multimedia library APIs
- Pixel buffer access for Android 2.2 and above (libjnigraphics)
- Zlib compression (libz)
Caution Native system libraries that are not in this list are not stable and may change in future versions of the Android platform. Do not use them.
8-1. Developing Low-Level Native Activities
Problem
You want to learn how to develop low-level native activities, which are based on the native_activity.h header file.
Solution
Create a low-level native activity project as if it were a regular Android app project. Then modify its AndroidManifest.xml file appropriately, and introduce a jni subdirectory of the project directory that contains the native activity’s C/C++ source code along with an Android.mk makefile.
The modified AndroidManifest.xml file differs from the regular AndroidManifest.xml file in the following ways:
- A <uses-sdk android:minSdkVersion="9"/> element precedes the <application> element; native activities require at least API Level 9.
- An android:hasCode="false" attribute appears in the <application> tag because native activities don’t contain Java source code.
- The <activity> element’s android:name attribute contains the value android.app.NativeActivity. When Android discovers this value, it locates the appropriate entry point in the native activity’s library.
- A <meta-data> element specifies an android:name="android.app.lib_name" attribute and an android:value attribute whose value is the name of the native activity’s library (without a lib prefix and a .so suffix).
Your native activity’s C/C++ source file must define ANativeActivity_onCreate() as an entry point. This method declares the following parameters:
- activity: This is the address of an ANativeActivity structure. ANativeActivity is defined in the NDK’s native_activity.h header file, and it declares various members
- callbacks: An array of pointers to callback functions; you can set these pointers to your own callbacks.
- internalDataPath: The path to the app’s internal data directory.
- externalDataPath: The path to the app’s external [removable/mountable] data directory.
- sdkVersion: The platform’s SDK version number.
- assetManager: A pointer to an instance of the native equivalent of the app’s android.content.res.AssetManager class for accessing binary assets bundled into the app’s APK file.
- savedState: This is your activity’s previously saved state. If the activity is being instantiated from a previously saved instance, savedState will be non-null and will point to the saved data. You must make a copy of this data when you need to access it later, because memory allocated to savedState will be released after you return from this function.
- savedStateSize: This is the size (in bytes) of the data pointed to by savedState.
Note When you launch an app that is based on a native activity, a NativeActivity instance is created. Its onCreate() method uses the JNI to call ANativeActivity_onCreate(ANativeActivity*, void*, size_t).
ANativeActivity_onCreate() should override any needed callbacks. It must also create a thread that promptly responds to input events in order to prevent an “Application Not Responding” error from occurring.
An NDK application has one additional required file that we haven’t seen before, an Android.mk file. This is a makefile definition to tell the NDK how to build our C/C++ code into a shared library the framework can load. The components of an Android.mk are typically as follows:
- $(CLEAR_VARS): A macro that clears all the local variables from building any previous module. It is typically found as one of the first statements.
- LOCAL_MODULE: The name of the output module. Effectively, the built library files will be named as lib<LOCAL_MODULE>.so; so if the module name is “ndktest”, the output file will be libndktest.so.
- LOCAL_SRC_FILES: List of all the C/C++ files you want to compile into the shared library.
- LOCAL_LD_LIBS: Additional libraries you may need to link in. Most of the stable NDK APIs you use will require a line to be added here.
- $(BUILD_SHARED_LIBRARY): A macro that tells the build system to execute the build once all the parameters are set. This is the last statement in a typical NDK makefile.
How It Works
Consider an LLNADemo project that demonstrates low-level native activities. All native code needs to be placed in a jni directory in your application project. This directory should be at the same level as src and res. Listing 8-1 presents the contents of this project’s solitary llnademo.c source file.
Listing 8-1. jni/llnademo.c
#include <android/log.h>
#include <android/native_activity.h>
#include <pthread.h>

#define LOGI(...) ((void)  android_log_print(ANDROID_LOG_INFO, "llnademo", VA_ARGS  ))

AInputQueue* _queue;
pthread_t thread;
pthread_cond_t cond;
pthread_mutex_t mutex;


static void onConfigurationChanged(ANativeActivity* activity)
{
    LOGI("ConfigurationChanged: %p
", activity);
}

static void onDestroy(ANativeActivity* activity)
{
    LOGI("Destroy: %p
", activity);
}

static void onInputQueueCreated(ANativeActivity* activity, AInputQueue* queue)
{
    LOGI("InputQueueCreated: %p -- %p
", activity, queue);
    pthread_mutex_lock(&mutex);
    _queue = queue;
    pthread_cond_broadcast(&cond);
    pthread_mutex_unlock(&mutex);
}

static void onInputQueueDestroyed(ANativeActivity* activity, AInputQueue* queue)
{
    LOGI("InputQueueDestroyed: %p -- %p
", activity, queue);
    pthread_mutex_lock(&mutex);
    _queue = NULL;
    pthread_mutex_unlock(&mutex);
}

static void onLowMemory(ANativeActivity* activity)
{
    LOGI("LowMemory: %p
", activity);
}

static void onNativeWindowCreated(ANativeActivity* activity, ANativeWindow* window)
{
    LOGI("NativeWindowCreated: %p -- %p
", activity, window);
}

static void onNativeWindowDestroyed(ANativeActivity* activity, ANativeWindow* window)
{
    LOGI("NativeWindowDestroyed: %p -- %p
", activity, window);
}

static void onPause(ANativeActivity* activity)
{
    LOGI("Pause: %p
", activity);
}

static void onResume(ANativeActivity* activity)
{
    LOGI("Resume: %p
", activity);
}

static void* onSaveInstanceState(ANativeActivity* activity, size_t* outLen)
{
    LOGI("SaveInstanceState: %p
", activity);
    return NULL;
}

static void onStart(ANativeActivity* activity)
{
    LOGI("Start: %p
", activity);
}

static void onStop(ANativeActivity* activity)
{
    LOGI("Stop: %p
", activity);
}

static void onWindowFocusChanged(ANativeActivity* activity, int focused)
{
    LOGI("WindowFocusChanged: %p -- %d
", activity, focused);
}

static void* process_input(void* param)
{
    while (1)
    {
        pthread_mutex_lock(&mutex);
        if (_queue == NULL)
            pthread_cond_wait(&cond, &mutex);
        AInputEvent* event = NULL;
        while (AInputQueue_getEvent(_queue, &event) >= 0)
        {
            if (AInputQueue_preDispatchEvent(_queue, event))
                break;
            AInputQueue_finishEvent(_queue, event, 0);
        }
        pthread_mutex_unlock(&mutex);
    }
}

void ANativeActivity_onCreate(ANativeActivity* activity,
                              void* savedState,
                              size_t savedStateSize)
{
    LOGI("Creating: %p
", activity);
    LOGI("Internal data path: %s
", activity->internalDataPath);


    LOGI("External data path: %s
", activity->externalDataPath);
    LOGI("SDK version code: %d
", activity->sdkVersion);
    LOGI("Asset Manager: %p
", activity->assetManager);

    activity->callbacks->onConfigurationChanged = onConfigurationChanged;
    activity->callbacks->onDestroy = onDestroy;
    activity->callbacks->onInputQueueCreated = onInputQueueCreated;
    activity->callbacks->onInputQueueDestroyed = onInputQueueDestroyed;
    activity->callbacks->onLowMemory = onLowMemory;
    activity->callbacks->onNativeWindowCreated = onNativeWindowCreated;
    activity->callbacks->onNativeWindowDestroyed = onNativeWindowDestroyed;
    activity->callbacks->onPause = onPause;
    activity->callbacks->onResume = onResume;
    activity->callbacks->onSaveInstanceState = onSaveInstanceState;
    activity->callbacks->onStart = onStart;
    activity->callbacks->onStop = onStop;
    activity->callbacks->onWindowFocusChanged = onWindowFocusChanged;

    pthread_mutex_init(&mutex, NULL);
    pthread_cond_init(&cond, NULL);
    pthread_create(&thread, NULL, process_input, NULL);
}
Listing 8-1 begins with three #include directives that (before compilation) include the contents of three NDK header files for logging, native activities, and thread creation.
Listing 8-1 next declares a LOGI macro for logging information messages to the Android device’s log (you can view this log by executing adb logcat). This macro refers to the android_log_print() function (prototyped in the log.h header file) that performs the actual writing. Each logged message must have a priority (such as ANDROID_LOG_INFO), a tag (such as "llnademo"), and a format string defining the message. Additional arguments are specified when the format string contains format specifiers (such as %d).
Listing 8-1 then declares a _queue variable of type AInputQueue*. (AInputQueue is defined in the input.h header file, which is included by the native_activity.h header file.) This variable is assigned a reference to the input queue when the queue is created, or it is assigned NULL when the queue is destroyed. The native activity must process all input events from this queue to avoid an “Application Not Responding” error.
Three thread global variables are now created: thread, cond, and mutex. The variable thread identifies the thread that is created later in the listing, and the variables cond and mutex are used to avoid busy waiting and to ensure synchronized access to the shared _queue variable, respectively.
A series of ‘on’-prefixed callback functions follows. Each function is declared static to hide it from outside of its module. (The use of static isn’t essential but is present for good form.)
Each ‘on’-prefixed callback function is called on the main thread and logs some information for viewing in the device log. However, the onInputQueueCreated() and onInputQueueDestroyed() functions have a little more work to accomplish:
- onInputQueueCreated() must assign its queue argument address to the _queue variable. Because _queue is also accessed from a thread apart from the main thread, synchronization is required to ensure that there is no conflict between these threads. Synchronization is achieved by accessing _queue between pthread_mutex_lock() and pthread_mutex_unlock() calls. The former call locks a mutex (a program object used to prevent multiple threads from simultaneously accessing a shared variable); the latter call unlocks the mutex. Because the non-main thread waits until _queue contains a non-null value, a pthread_cond_broadcast() call is also present to wake up this waiting thread.
- onInputQueueDestroyed() is simpler, assigning NULL to _queue (within a locked region) when the input queue is destroyed.
The non-main thread executes the process_input() function. This function repeatedly executes AInputQueue_getEvent() to return the next input event. The integer return value is negative when no events are available or when an error occurs. When an event is returned, it is referenced by outEvent.
Assuming that an event has been returned, AInputQueue_preDispatchEvent()is called to send the event (if it is a keystroke-related event) to the current input method editor to be consumed before the app. This function returns 0 when the event was not predispatched, which means that you can process it right now.
When a nonzero value is returned, you must not process the current event so that the event can appear again in the event queue (assuming that it does not get consumed during predispatching).
At this point, you could do something with the event (when it is not predispatched). Regardless, you must finally call AInputQueue_finishEvent() to finish the dispatching of the given event. A 0 value is passed as the third parameter to indicate that the event has not been handled in your code.
Finally, Listing 8-1 declares ANativeActivity_onCreate(), which logs a message, overrides most of the default callbacks (you could also override the rest when desired), initializes the mutex and the condition variable, and finally creates and starts the thread that runs process_input().
The content of the project’s AndroidManifest.xml file can be found in Listing 8-2.
Listing 8-2. AndroidManifest.xml
<?xml version="1.0" encoding="utf-8"?>
<manifest xmlns:android="http://schemas.android.com/apk/res/android"
    package="com.androidrecipes.lowlevelnative"
    android:versionCode="1"
    android:versionName="1.0">
    <uses-sdk android:minSdkVersion="9"/>
    <application android:label="@string/app_name"android:hasCode="false">
        <activity android:name="android.app.NativeActivity"
            android:label="@string/app_name"
            android:configChanges="orientation">
            <meta-data android:name="android.app.lib_name"
                android:value="llnademo"/>
            <intent-filter>
                <action android:name="android.intent.action.MAIN" />
                <category android:name="android.intent.category.LAUNCHER"/>
            </intent-filter>
        </activity>
    </application>
</manifest>
An android:configChanges="orientation" attribute has been added to the <activity> tag so that onConfigurationChanged() is invoked when the device orientation changes (from portrait to landscape, for example). As an exercise, remove this attribute and observe how the log messages change. Listing 8-3 presents this project’s Android.mk file.
Listing 8-3. jni/Android.mk
LOCAL_PATH := $(call my-dir)
include $(CLEAR_VARS)
LOCAL_MODULE    := llnademo
LOCAL_SRC_FILES := llnademo.c
LOCAL_LDLIBS := -llog -landroid include
$(BUILD_SHARED_LIBRARY)
This makefile presents a LOCAL_LDLIBS entry, which identifies the liblog.so and libandroid.so standard libraries that are to be linked against.
In order to run our application, we must first build the native components before we can execute the example on a device or in the emulator. This must be done using the NDK command-line tool ndk-build. On the command line, navigate to the top-level directory of your project and run the command:
$ /android-ndk-r9/ndk-build "APP_ABI := all"
The APP_ABI parameter tells the NDK to build the shared library for each supported CPU application binary interface (ABI). If we leave this parameter off, by default the NDK will build for only ARMv5. Additionally, we could have passed a subset list of just the architectures we want to build (for example, "APP_ABI := armeabi x86").
Tip You can also place this command in an Application.mk file in the same jni directory and not have to pass it on the command line each time.
If all goes well, you should see the following messages:
Compile thumb  : llnademo <= llnademo.c
SharedLibrary  : libllnademo.so
Install        : libllnademo.so => libs/armeabi-v7a/libllnademo.so
Compile thumb  : llnademo <= llnademo.c
SharedLibrary  : libllnademo.so
Install        : libllnademo.so => libs/armeabi/libllnademo.so
Compile x86    : llnademo <= llnademo.c
SharedLibrary  : libllnademo.so
Install        : libllnademo.so => libs/x86/libllnademo.so
Compile mips   : llnademo <= llnademo.c
SharedLibrary  : libllnademo.so
Install        : libllnademo.so => libs/mips/libllnademo.so
You should now see a subdirectory for each ABI the NDK supports, and also observe a libllnademo.so file in each subdirectory. If you run the application, the display will simply be black. However, if you interact with the display (tap on the screen) or rotate the device, you will see the log statements coming out from the NativeActivity code.
Note When the target SDK is set to API Level 13 or higher, and you haven’t included screenSize with orientation in the value assigned to the configChanges attribute of the <activity> element (that is, "orientation|screenSize"), you will not see ConfigurationChanged messages in the log when you change the device orientation.
8-2. Developing High-Level Native Activities
Problem
You want to learn how to develop high-level native activities, which are based on the android_native_app_glue.h header file.
Solution
The development of a high-level native activity is very similar to that of a low-level native activity. However, a new source file and a new Android.mk file are required.
How It Works
Consider an HLNADemo project that demonstrates high-level native activities. Listing 8-4 presents the contents of this project’s solitary hlnademo.c source file.
Listing 8-4. jni/hlnademo.c
#include <android/log.h>
#include <android_native_app_glue.h>

#define LOGI(...) ((void)  android_log_print(ANDROID_LOG_INFO, "hlnademo", VA_ARGS))

static void handle_cmd(struct android_app* app, int32_t cmd)
{
    switch (cmd)
    {
        case APP_CMD_SAVE_STATE:
             LOGI("Save state");
             break;

        case APP_CMD_INIT_WINDOW:
             LOGI("Init window");
             break;

        case APP_CMD_TERM_WINDOW:
             LOGI("Terminate window");
             break;

        case APP_CMD_PAUSE:
             LOGI("Pausing");
             break;

        case APP_CMD_RESUME:
             LOGI("Resuming");
             break;

        case APP_CMD_STOP:
             LOGI("Stopping");
             break;

        case APP_CMD_DESTROY:
             LOGI("Destroying");
             break;

        case APP_CMD_LOST_FOCUS:
             LOGI("Lost focus");
             break;

        case APP_CMD_GAINED_FOCUS:
             LOGI("Gained focus");
    }
}

static int32_t handle_input(struct android_app* app, AInputEvent* event)
{
    if (AInputEvent_getType(event) == AINPUT_EVENT_TYPE_MOTION)
    {
        size_t pointerCount = AMotionEvent_getPointerCount(event);
        size_t i;
        for (i = 0; i < pointerCount; ++i)
        {
            LOGI("Received motion event from %zu: (%.2f, %.2f)", i,
                 AMotionEvent_getX(event, i), AMotionEvent_getY(event, i));
        }
        return 1;
    }
    else if (AInputEvent_getType(event) == AINPUT_EVENT_TYPE_KEY)
    {
        LOGI("Received key event: %d", AKeyEvent_getKeyCode(event));
        if (AKeyEvent_getKeyCode(event) == AKEYCODE_BACK)
            ANativeActivity_finish(app->activity);
        return 1;
    }
    return 0;
}

void android_main(struct android_app* state)
{
    app_dummy(); // prevent glue from being stripped state->onAppCmd = &handle_cmd;

    state->onInputEvent = &handle_input;

    while(1)
    {
        int ident;
        int fdesc;
        int events;
        struct android_poll_source* source;

        while ((ident = ALooper_pollAll(0, &fdesc, &events, (void**)&source)) >= 0)
        {
            if (source)
                source->process(state, source);

            if (state->destroyRequested)
                return;
        }
    }
}
Listing 8-4 begins in a nearly identical fashion to Listing 8-1. However, the previous native_activity.h header file has been replaced by android_native_app_glue.h, which includes native_activity.h (along with pthread.h). A similar LOGI macro is also provided.
The handle_cmd() function is called (on a thread other than the main thread) in response to an activity command. The app parameter references an android_app struct (defined in android_native_app_glue.h) that provides access to app-related data, and the cmd parameter identifies a command.
Note Commands are integer values that correspond to the low-level native activity functions that were presented earlier, such as onDestroy(). The android_native_app_glue.h header file defines integer constants for these commands (APP_CMD_DESTROY, for example).
The handle_input() function is called (on a thread other than the main thread) in response to an input event. The event parameter references an AInputEvent struct (defined in input.h) that provides access to various kinds of event-related information.
The input.h header file declares several useful input functions, beginning with AInputEvent_getType(), which returns the type of the event. The return value is one of AINPUT_EVENT_TYPE_KEY for a key event and AINPUT_EVENT_TYPE_MOTION for a motion event.
For a motion event, the AMotionEvent_getPointerCount()function is called to return the number of pointers (active touch points) of data contained in this event (this value is greater than or equal to 1). This count is repeated, with each touch point’s coordinates being obtained and logged.
Note Active touch points and AMotionEvent_getPointerCount() are related to multitouch. To learn more about this Android feature, check out “Making Sense of Multitouch” (http://android-developers.blogspot.com/2010/06/making-sense-of-multitouch.html).
For a key event, the AKeyEvent_getKeyCode()function returns the code of the physical key that was pressed. Physical key codes are defined in the keycodes.h header file. For example, AKEYCODE_BACK corresponds to the Back button on the device.
The key code is logged and is then compared with AKEYCODE_BACK to find out whether the user wants to terminate the activity (and, by extension, the single-activity app). If so, the ANativeActivity_finish() function (defined in native_activity.h) is invoked with app->activity referencing the activity to be finished.
After processing a mouse or key event, handle_input() returns 1 to indicate that it has handled the event. If the event was not handled (and should be handled by default processing in the background), this function returns 0.
Note You can modify handle_input() to simply return 0 when a key event is detected to cause the default processing to finish the activity when the Back button is pressed.
The android_main() function is the entry point. It first invokes a native glue function called app_dummy(), which does nothing. However, app_dummy() must be present to ensure that the Android build system includes the android_native_app_glue.o module in the library.
Note See http://blog.beuc.net/posts/Make_sure_glue_isn__39__t_stripped/ to learn more about this behavior.
The android_app struct provides an onAppCmd field of type void (*onAppCmd)(struct android_app* app, int32_t cmd) and an onInputEvent field of type int32_t (*onInputEvent)(struct android_app* app, AInputEvent* event). The addresses of the aforementioned functions are assigned to these fields.
A pair of nested loops is now entered. The inner loop repeatedly invokes the ALooper_pollAll() function (defined in looper.h) to return the next event; this function returns a value greater than or equal to 0 when an event is ready for processing.
The event is recorded in an android_poll_source structure, whose address is stored in outData. Assuming that outData contains a non-NULL address, the void (*process)(struct android_app* app, struct android_poll_source* source) function pointer in android_poll_source is invoked to process the event. Behind the scenes, either handle_cmd() or handle_input() is invoked; it depends on which function is appropriate for handling the event.
Finally, the destroyRequestedmember of the android_app structure is set to a nonzero value, as a result of a call to ANativeActivity_finish() (or default processing in lieu of this function). This member is checked during each loop iteration to ensure that execution exits quickly from the nested loops and android_main(), because the app is ending. Failure to exit android_main() in a timely fashion can result in an “Application Not Responding” error.
Listing 8-5 presents this project’s Android.mk file.
Listing 8-5. A Makefile for HLNADemo
LOCAL_PATH := $(call my-dir)
include $(CLEAR_VARS)
LOCAL_MODULE    := hlnademo
LOCAL_SRC_FILES := hlnademo.c
LOCAL_LDLIBS := -landroid
LOCAL_STATIC_LIBRARIES := android_native_app_glue
include $(BUILD_SHARED_LIBRARY)
$(call import-module,android/native_app_glue)
This makefile is similar to the makefile presented in Listing 8-3. However, there are some differences:
- The LOCAL_LDLIBS entry no longer contains -llog because the logging library is linked to the android_native_app_glue library when this library is built.
- A LOCAL_STATIC_LIBRARIES entry identifies android_native_app_glue as a library to be linked to the hlnademo module.
- A $(call import-module,android/native_app_glue) entry includes the Android.mk file associated with the android_native_app_glue module so that this library can be built.
Building the Native Code
Just as with the LLNADemo, we must first build the native components before we can execute the example on a device or in the emulator. This must be done using the NDK command-line tool ndk-build. On the command line, navigate to the top-level directory of your project and run the command:
$ /android-ndk-r9/ndk-build "APP_ABI := all"
If all goes well, we should see the following output:
Compile thumb  : hlnademo <= hlnademo.c
Compile thumb  : android_native_app_glue <= android_native_app_glue.c
StaticLibrary  : libandroid_native_app_glue.a
SharedLibrary  : libhlnademo.so
Install        : libhlnademo.so => libs/armeabi-v7a/libhlnademo.so
Compile thumb  : hlnademo <= hlnademo.c
Compile thumb  : android_native_app_glue <= android_native_app_glue.c
StaticLibrary  : libandroid_native_app_glue.a
SharedLibrary  : libhlnademo.so
Install        : libhlnademo.so => libs/armeabi/libhlnademo.so
Compile x86    : hlnademo <= hlnademo.c
Compile x86    : android_native_app_glue <= android_native_app_glue.c
StaticLibrary  : libandroid_native_app_glue.a
SharedLibrary  : libhlnademo.so
Install        : libhlnademo.so => libs/x86/libhlnademo.so
Compile mips   : hlnademo <= hlnademo.c
Compile mips   : android_native_app_glue <= android_native_app_glue.c
StaticLibrary  : libandroid_native_app_glue.a
SharedLibrary  : libhlnademo.so
Install        : libhlnademo.so => libs/mips/libhlnademo.so
The appropriate shared libraries should now be in placed in the libs directory of your project. Similar to the previous example, the display will be black when you run the application. However, interacting with the display and/or rotating the device will generate events that the native code can process and log out to logcat.
RenderScript
You can use the Android NDK to perform rendering and data-processing operations quickly. However, there are three major problems with this approach:
- Lack of portability: Your apps are constrained to run on only those devices that the native code targets. For example, a native library that runs on an ARM-based device won’t run on an x86-based device.
- Lack of performance: Ideally, your code should run on multiple cores, be they CPU, GPU, or DSP cores. However, identifying cores, farming out work to them, and dealing with synchronization issues isn’t easy.
- Lack of usability: Developing native code is harder than developing Java code. For example, you often need to create JNI glue code, which is a tedious process that can be a source of bugs.
Google’s Android development team created RenderScript to address these problems, starting with lack of portability, then lack of performance, and finally lack of usability.
RenderScript consists of a language based on C99 (a modern dialect of the C language), a pair of compilers, and a runtime that collectively help you achieve high performance and visually compelling graphics via native code, but in a portable manner. You get native app speed along with SDK app portability, and you don’t have to use the JNI.
RenderScript combines a graphics engine with a compute engine. The graphics engine helps you achieve fast 2D/3D rendering, and the compute engine helps you achieve fast data processing. Performance is achieved by running threads on multiple CPU, GPU, and DSP cores. (The compute engine is currently confined to CPU cores.)
Tip The compute engine is not limited to processing graphics data. For example, it could be used to model weather data.
Exploring RenderScript Architecture
RenderScript adopts an architecture in which the low-level RenderScript runtime is controlled by the higher-level Android framework. Figure 8-1 presents this architecture.

Figure 8-1. RenderScript architecture is based on the Android framework and the RenderScript runtime
The Android framework consists of Android apps running in the Dalvik VM that communicate with graphics or compute scripts running in the RenderScript runtime via instances of reflected layer classes. These classes serve as wrappers around their scripts that make this communication possible. The Android build tools automatically generate the classes for this layer during the build process. These classes eliminate the need to write JNI glue code, which is commonly done when working with the NDK.
Memory management is controlled at the VM level. The app is responsible for allocating memory and binding this memory to the RenderScript runtime so that the memory can be accessed by the script. The script can define simple (nonarray) fields for its own use, but that’s about it.)
Apps make asynchronous calls to the RenderScript runtime (via the reflected layer classes) to make allocated memory available to start executing their scripts. They can subsequently obtain results from these scripts without having to worry about whether the scripts are still running.
When you build an APK, the LLVM (Low-Level Virtual Machine) front-end compiler compiles the script into a file of device-independent bitcode that is stored in the APK. (The reflected layer class is also created.) When the app launches, a small LLVM back-end compiler on the device compiles the bitcode into device-specific code, and it caches the code on the device so that it doesn’t have to be recompiled each time you run the app. This is how portability is achieved.
Note As of Android 4.1, the graphics engine has been deprecated. App developers told the Android development team that they prefer to use OpenGL directly because of its familiarity. Although the graphics engine is still supported, it will probably be removed in a future Android release. For this reason, the rest of this chapter focuses only on the compute engine.
Exploring Compute Engine-Based App Architecture
A compute engine-based app consists of Java code and an .rs file that defines the compute script. The Java code interacts with this script by using APIs defined in the android.renderscript package. Key classes in this package are RenderScript and Allocation:
- RenderScript defines a context that is used in further interactions with RenderScript APIs (and also the compute script’s reflected layer class). A RenderScript instance is returned by invoking this class’s static RenderScript.create() factory method.
- Allocation defines the means for moving data into and out of the compute script. Instances of this class are known as allocations, where an allocation combines an android.renderscript.Type instance with the memory needed to provide storage for user data and objects.
The Java code also interacts with the compute script by instantiating a reflected layer class. The name of the class begins with ScriptC_ and continues with the name of the .rs file containing the compute script. For example, if you had a file named gray.rs, the name of this class would be ScriptC_gray.
The C99-based .rs file begins with two #pragma directives that identify the RenderScript version number (currently 1) and the app’s Java package name. Several additional items follow:
- rs_allocation directives that identify the input and output allocations created by the app and bound to the RenderScript code
- rs_script directive that provides a link to the app’s ScriptC_script instance so that compute results can be returned to this instance
- Optional simple variable declarations whose values are supplied by the app
- A root() function that is called by each core to perform part of the overall computation
- A no-argument init() function with a void return type that’s indirectly invoked from the Java code to execute root() on multiple CPU cores
At runtime, a Java-based activity creates a RenderScript context, creates input and output allocations, instantiates the ScriptC_-prefixed layer class, uses this object to bind the allocations and ScriptC_ instance, and invokes the compute script, which results in the script’s init() function being invoked.
The init() function performs additional initialization (as necessary) and executes the rsForEach() function with the rs_script value and the rs_allocation input/output allocations. rsForEach() causes the root() function to be executed on the device’s available CPU cores. Results are then sent back to the app via the output allocation.
Figure 8-2 illustrates this scenario.
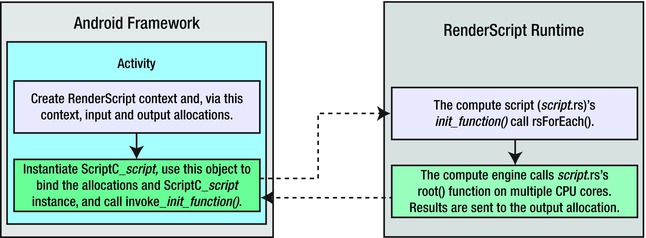
Figure 8-2. Compute engine–based app architecture can be partitioned into four major tasks
Using the RenderScript Support Package
RenderScript has been a public API only since Android 3.0 (API Level 11), but you may have noticed that the Android team at Google is fond of backporting their frameworks to allow developers to use them on older devices. The RenderScript support package allows applications to use its features on devices going back to Android 2.2 (FroYo).
To accomplish this, the build tools include a set of precompiled NDK libraries into your application’s APK to install onto devices that don’t natively support all the RenderScript features available in the support package.
Note Currently the RenderScript support package includes NDK libraries for only ARMv7, x86, and MIPS. There is no support for ARMv5 devices.
Using the RenderScript support package is a slightly different process than simply copying in additional Java libraries or resources at compile time. The build tools include hooks to copy the appropriate libraries after the build into the APK without needing to place them in your application source tree. To inform the build tools that this step needs to take place, we must add the following lines to the project.properties file:
renderscript.target=18
renderscript.support.mode=true
sdk.buildtools=18.1.0
You may set the renderscript.target and sdk.buildtools values to whatever your current version targets are, but the minimum target is API 18, and 18.1.0 is the minimum supported build tools version. Keep in mind that this doesn’t mean the application must have its minimum SDK set to Android 4.3; but it does mean your application should have its target SDK set to at least that level.
With these parameters in place, the build tools will handle all the rest of the work for you. The only additional required step is to use the classes from the android.support.v8.renderscript package in your app rather than the native versions.
Important You must import android.support.v8.renderscript.* instead of the android.renderscript package in your Java code!
The remaining sections in this chapter that deal with RenderScript are structured to make use of the RenderScript support package. However, in most cases you only need to change the import statements included to move exclusively to the native versions instead.
8-3. Filtering Images with RenderScript
Solution
RenderScript has a large collection of script intrinsics, or premade and encapsulated RenderScript kernels designed to do common tasks. You can use these intrinsics to do computation with RenderScript without even the need to write the script code! With each new Android release, new intrinsics are added, creating a library of useful functions to draw from. In this recipe, we are going to examine three of the most common intrinsics:
- ScriptInstrinsicBlur: Applies a Gaussian blur to each element in the input allocation. The radius of the blur is configurable on the script.
- ScriptIntrinsicColorMatrix: Applies a color matrix filter to each element in the input allocation. Similar to the ColorFilter applied to a Drawable. Has an additional convenience method for setting grayscale.
- ScriptIntrinsicConvolve3x3: Applies a 3×3 convolve matrix to each element in the input allocation. This matrix is commonly used to create photo filter effects such as sharpen, emboss, and edge detect.
How It Works
Let’s explore an example application that uses RenderScript to apply filters to an image resource. In Listing 8-6, we find the layout for our activity, which is a simple grid of six ImageView instances.
Listing 8-6. res/layout/activity_main.xml
<?xml version="1.0" encoding="utf-8"?>
<TableLayout xmlns:android="http://schemas.android.com/apk/res/android"
    android:layout_width="match_parent"
    android:layout_height="match_parent"
    android:stretchColumns="*">
    <TableRow>
        <ImageView
            android:id="@+id/image_normal"
            android:layout_weight="1"
            android:layout_margin="5dp"
            android:scaleType="fitCenter" />
        <ImageView
            android:id="@+id/image_blurred"
            android:layout_weight="1"
            android:layout_margin="5dp"
            android:scaleType="fitCenter" />
    </TableRow>

    <TableRow>
        <ImageView
            android:id="@+id/image_greyscale"
            android:layout_weight="1"
            android:layout_margin="5dp"
            android:scaleType="fitCenter" />
        <ImageView
            android:id="@+id/image_sharpen"
            android:layout_weight="1"
            android:layout_margin="5dp"
            android:scaleType="fitCenter" />
    </TableRow>

    <TableRow>
        <ImageView
            android:id="@+id/image_edge"
            android:layout_weight="1"
            android:layout_margin="5dp"
            android:scaleType="fitCenter" />
        <ImageView
            android:id="@+id/image_emboss"
            android:layout_weight="1"
            android:layout_margin="5dp"
            android:scaleType="fitCenter" />
    </TableRow>

</TableLayout>
Each cell in this grid will be filled in with the same image, but with a different filter applied to it. In the first cell, we will display the base image without any filtering. The next two cells will be filtered using ScriptInstrinsicBlur and ScriptIntrinsicColorMatrix. The remaining cells will be filtered using various matrices and a ScriptIntrinsicConvolve3x3. In Listing 8-7, we find the activity code.
Listing 8-7. Image Filter Activity
import android.support.v8.renderscript.*;

public class MainActivity extends Activity {

    private enum ConvolutionFilter {
        SHARPEN, LIGHTEN, DARKEN, EDGE_DETECT, EMBOSS
    };

    @Override
    protected void onCreate(Bundle savedInstanceState) {
        super.onCreate(savedInstanceState);
        setContentView(R.layout.activity_main);
        //Create the source data, and a destination for the filtered results
        Bitmap inBitmap = BitmapFactory.decodeResource(getResources(), R.drawable.dog);
        Bitmap outBitmap = inBitmap.copy(inBitmap.getConfig(), true);
        //Show the normal image
        setImageInView(outBitmap.copy(outBitmap.getConfig(), false), R.id.image_normal);

        //Create the RenderScript context
        final RenderScript rs = RenderScript.create(this);
        //Create allocations for input and output data
        final Allocation input = Allocation.createFromBitmap(rs, inBitmap,
                Allocation.MipmapControl.MIPMAP_NONE,
                Allocation.USAGE_SCRIPT);
        final Allocation output = Allocation.createTyped(rs, input.getType());

        //Run blur script
        final ScriptIntrinsicBlur script = ScriptIntrinsicBlur
                .create(rs, Element.U8_4(rs));
        script.setRadius(4f);
        script.setInput(input);
        script.forEach(output);
        output.copyTo(outBitmap);
        setImageInView(outBitmap.copy(outBitmap.getConfig(), false), R.id.image_blurred);

        //Run grayscale script
        final ScriptIntrinsicColorMatrix scriptColor = ScriptIntrinsicColorMatrix
                .create(rs, Element.U8_4(rs));
        scriptColor.setGreyscale();
        scriptColor.forEach(input, output);
        output.copyTo(outBitmap);
        setImageInView(outBitmap.copy(outBitmap.getConfig(), false), R.id.image_greyscale);

        //Run sharpen script
        ScriptIntrinsicConvolve3x3 scriptC = ScriptIntrinsicConvolve3x3
                .create(rs, Element.U8_4(rs));
        scriptC.setCoefficients(getCoefficients(ConvolutionFilter.SHARPEN));
        scriptC.setInput(input);
        scriptC.forEach(output);
        output.copyTo(outBitmap);
        setImageInView(outBitmap.copy(outBitmap.getConfig(), false), R.id.image_sharpen);

        //Run edge detect script
        scriptC = ScriptIntrinsicConvolve3x3.create(rs, Element.U8_4(rs));
        scriptC.setCoefficients(getCoefficients(ConvolutionFilter.EDGE_DETECT));
        scriptC.setInput(input);
        scriptC.forEach(output);
        output.copyTo(outBitmap);
        setImageInView(outBitmap.copy(outBitmap.getConfig(), false), R.id.image_edge);

        //Run emboss script
        scriptC = ScriptIntrinsicConvolve3x3.create(rs, Element.U8_4(rs));
        scriptC.setCoefficients(getCoefficients(ConvolutionFilter.EMBOSS));
        scriptC.setInput(input);
        scriptC.forEach(output);
        output.copyTo(outBitmap);
        setImageInView(outBitmap.copy(outBitmap.getConfig(), false), R.id.image_emboss);

        //Tear down the RenderScript context
        rs.destroy();
    }

    private void setImageInView(Bitmap bm, int viewId) {
        ImageView normalImage = (ImageView) findViewById(viewId);
        normalImage.setImageBitmap(bm);
    }

    /*
     * Helper to obtain matrix coefficients for each type of
     * convolution image filter.
     */
    private float[] getCoefficients(ConvolutionFilter filter) {
        switch (filter) {
            case SHARPEN:
                return new float[] {
                        0f, -1f, 0f,
                        -1f, 5f, -1f,
                        0f, -1f, 0f
                    };
            case LIGHTEN:
                return new float[] {
                        0f, 0f, 0f,
                        0f, 1.5f, 0f,
                        0f, 0f, 0f
                    };
            case DARKEN:
                return new float[] {
                        0f, 0f, 0f,
                        0f, 0.5f, 0f,
                        0f, 0f, 0f
                    };
            case EDGE_DETECT:
                return new float[] {
                        0f, 1f, 0f,
                        1f, -4f, 1f,
                        0f, 1f, 0f
                    };
            case EMBOSS:
                return new float[] {
                    -2f, -1f, 0f,
                    -1f, 1f, 1f,
                    0f, 1f, 2f
                };
            default:
                return null;
        }
    }
}
Before we can filter the images, we must initialize a RenderScript context with RenderScript.create(). We must also create two Allocation instances, one for the input data and one for the output result. These are the buffers that each RenderScript kernel will act on. There are convenience functions to create an Allocation from many common data structures in the framework, and in this case we have elected to make one directly from our input image Bitmap.
You can see each script follows a similar pattern. We must first create the script we want to run, initializing it with the data size to be used for the Allocation. We chose Element.U8_4() because our bitmap has ARGB pixel data, so each element (that is, pixel) is 4 unsigned bytes in size. We then must set up any parameters the script needs, and execute it by calling forEach(). Once the script execution is complete, we copy the results from the output Allocation into a new Bitmap to display in the ImageView.
For our blur filter, the radius is the only configurable parameter. The intrinsic accepts a radius value between 0 and 25. We use the color matrix filter to make a grayscale filter for our image by calling setGreyscale() during its setup. If we were to provide a distinct matrix, it would be passed using setColorMatrix() instead.
Tip ScriptIntrinsicColorMatrix is also equipped to do color conversions between YUV and RGB color space.
Finally, we apply the remaining filters by obtaining a coefficients matrix for the given filter and passing them to the script via setCoefficients(). The 3×3 matrices for these filters are well known and easily obtainable on the Web. The values in the matrix define, as the script moves over each pixel in the allocation, how the value of the output pixel should be multiplied based on the current value of the input pixel and its neighbors. The value in the center of the matrix represents the current pixel, and the surrounding values represent the neighboring pixels.
For example, the darken filter decreases the value of the current pixel by half (0.5 multiplier), but otherwise the surrounding pixels do not affect the result. The sharpen filter magnifies the initial value five times, and then subtracts the value from the pixels above, below, and on each side to achieve the effect.
You can see the results of all the filters we applied in Figure 8-3.

Figure 8-3. RenderScript image filters (top to bottom, left to right): None, Greyscale, Edge Detect, Blur, Sharpen, Emboss)
Tip When playing around with convolution matrices, the sum of all the matrix values should equal 1 to preserve the original brightness of the image. If the sum is larger, the image will be brighter, and if the sum is smaller, the image will be darker. The edge detect filter in the example has a net sum of zero, which is why that image is very dark.
8-4. Manipulating Images with RenderScript
Problem
You’re intrigued by RenderScript and want to learn more about it. For example, you want to learn how to receive rsForEach()’s usrData value in the root() function.
Solution
The following resources will help you learn more about RenderScript:
- Romain Guy’s and Chet Haase’s “Learn about RenderScript” video (http://youtube.com/watch?v=5jz0kSuR2j4). This 1.5-hour video covers the graphics and compute sides of RenderScript, and it is well worth your time.
- The Android documentation’s RenderScript page (http://developer.android.com/guide/topics/renderscript/index.html) provides access to important compute information. It also provides access to RenderScript-oriented blog posts.
- The android.renderscript package documentation (http://developer.android.com/reference/android/renderscript/package-summary.html) can help you explore the various types, with emphasis on the RenderScript and Allocation classes.
- The RenderScript reference page (http://developer.android.com/reference/renderscript/index.html) provides documentation on all of the functions that RenderScript makes available to your compute script.
Regarding root(), this function is minimally declared with two parameters that identify the input/output allocations, as in void root(const uchar4* v_in, uchar4* v_out). However, you can specify three more parameters to obtain a usrData value and the x/y coordinates of the value passed to v_in in the input allocation, as follows:
void root(const uchar4* v_in, uchar4* v_out, const void* usrData, uint32_t x,
          uint32_t y)
How It Works
Although the root() function may look a little intimidating, it’s not hard to use. For example, Listing 8-8 presents source code to a compute script that uses this expanded function to give an image a wavy appearance as if being seen in water.
Listing 8-8. Waving an Image
#pragma version(1)
#pragma rs java_package_name(com.androidrecipes.imageprocessing)

rs_allocation in;
rs_allocation out;
rs_script script;

int height;

void root(const uchar4* v_in, uchar4* v_out, const void* usrData, uint32_t x, uint32_t y)
{
    float scaledy = y/(float) height;
    *v_out = *(uchar4*) rsGetElementAt(in, x,
            (uint32_t) ((scaledy+sin(scaledy*100)*0.03)*height) );
}

void filter()
{
    rsDebug("RS_VERSION = ", RS_VERSION);
#if !defined(RS_VERSION) || (RS_VERSION < 14)
    rsForEach(script, in, out, 0);
#else
    rsForEach(script, in, out);
#endif
}
The root() function ignores usrData (which isn’t required), but it uses the values passed to x and y. It also uses the value passed to height, which represents the height of the image.
The function first uses height to scale the value passed to y to a floating-point value between 0 and 1. It then invokes RenderScript’s rsGetElementAt()function to return the input allocation element that’s located at position x and y, which is then assigned to v_out. This function takes three parameters: an input allocation, an x coordinate, and a y coordinate of the element to retrieve from the allocation.
The value passed to x, which happens to be the value in the x parameter of root(), is self-evident. However, the value passed to y may be a little harder to grasp. The idea is to vary the argument in a sinusoidal pattern so that returned pixels from the original image are chosen to yield a wavy appearance.
filter() first executes rsDebug("RS_VERSION = ", RS_VERSION) to output the value of the RS_VERSION constant to the log. You can invoke one of RenderScript’s overloaded rsDebug() functions to output debugging information.
RS_VERSIONis a special constant that is set to the SDK version number. filter() contains #if and #else directives that help the compiler choose a different version of rsForEach() to call based on this constant’s existence and value.
Assuming that RS_VERSION exists and has a value less than 14, the simplest variant of rsForEach()that can be called is as follows:
void rsForEach(rs_script script, rs_allocation input, rs_allocation output, const void* usrData)
Note usrData lets you pass a pointer to additional script-specific data to the root() function.
If RS_VERSION contains a value that is 14 or higher, the simplest variant of the rsForEach() function that can be called is as follows:
void rsForEach(rs_script script, rs_allocation input, rs_allocation output)
Note You will encounter rsForEach() call examples on the Internet that do not consult RS_VERSION. However, not testing this constant via #if and #else means that you may run into compiler warnings like the following:
note: candidate function not viable: requires 4 arguments, but
3 were provided
note: candidate function not viable: requires 5 arguments, but
3 were provided
Regardless of the rsForEach() function that is called, its first argument is a reference to the script object on the Java side; its second argument, in, corresponds to v_in; and its third argument, out, corresponds to v_out.
Listing 8-9 presents the source code to a WavyImage app that communicates with the compute script stored in wavy.rs.
Listing 8-9. Viewing Original and Watery Images of the Sun
import android.support.v8.renderscript.*;

public class WavyImage extends Activity {
    boolean original = true;

    @Override
    public void onCreate(Bundle savedInstanceState) {
        super.onCreate(savedInstanceState);
        final ImageView iv = new ImageView(this);
        iv.setScaleType(ImageView.ScaleType.CENTER_CROP);
        iv.setImageResource(R.drawable.sol);
        setContentView(iv);
        iv.setOnClickListener(
                new View.OnClickListener() {
                    @Override
                    public void onClick(View v) {
                        if (original) {
                            drawWavy(iv, R.drawable.sol);
                        } else {
                            iv.setImageResource(R.drawable.sol);
                        }
                        original = !original;
                    }
                });
    }

    private void drawWavy(ImageView iv, int imID) {
        Bitmap bmIn = BitmapFactory.decodeResource(getResources(), imID);
        Bitmap bmOut = Bitmap.createBitmap(bmIn.getWidth(), bmIn.getHeight(),
                                          bmIn.getConfig());
        RenderScript rs = RenderScript.create(this);
        Allocation allocIn;
        allocIn = Allocation.createFromBitmap(rs, bmIn,
               Allocation.MipmapControl.MIPMAP_NONE,
               Allocation.USAGE_SCRIPT);
        Allocation allocOut = Allocation.createTyped(rs, allocIn.getType());
        ScriptC_wavy script = new ScriptC_wavy(rs, getResources(), R.raw.wavy);
        script.set_in(allocIn);
        script.set_out(allocOut);
        script.set_script(script);
        script.set_height(bmIn.getHeight());
        script.invoke_filter();
        allocOut.copyTo(bmOut);

        iv.setImageBitmap(bmOut);
    }
}
In this example, the main content is set as an ImageView that we can tap on. Initially, the content is set to the unprocessed image, but when we tap on it, the drawWavy() method executes our RenderScript kernel to filter the image data.
The build tools take our wavy.rs RenderScript kernel and generate the ScriptC_wavy Java class that we will use to execute the script. Notice for each global parameter we defined in the script file (in, out, height, and so forth), a Java setter method has been reflected in the generated class. We use the set_in() and set_out() methods to apply the input and output Allocation, which are defined just as we described in the previous recipe. The set_height() method passes the bitmap’s height to the script’s height field so that the script can scale the y value.
To execute the script on our image, we then call filter() (reflected as invoke_filter() in Java), copy the results from the output Allocation into our output bitmap, and display it in the content view.
Note If you do not do version checking in the script kernel as we did, the root() function of a RenderScript kernel is reflected as forEach_root() in the Java class and can be called directly.
If you were to build and run this app, and if you were to click the image of the Sun, you would see the result that’s shown in Figure 8-4.

Figure 8-4. The Sun has a wavy (or possibly watery) appearance
8-5. Faking Translucent Overlays with Blur
Problem
You want to provide the illusion that one view is overlaying another with a partially transparent frosted or blurred effect.
Solution
We can call on ScriptIntrinsicBlur once again, along with some custom View and Drawable code to create a blurred copy of a background image, and apply that copy to provide the visual appearance of a partially transparent overlay. Rendering a live blurred overlay in real time is computationally expensive, and the performance of the application will suffer. So instead we are going to achieve the same effect by computing a blurred image of our background content ahead of time and using drawing tricks to implement the same effect while still keeping our application responsive.
How It Works
In this example, we have a ListView shown on top of a full-color background image. The ListViewis equipped with a custom header view that offsets the list content such that the first item sits most of the way down the screen when scrolled to the top. As the list scrolls up, we will demonstrate two techniques for creating a blurred overlay: the first will gradually fade the image from clear to blurred, and the second will slide the blurred overlay up along with the list until it is fully covered.
To visualize where we are headed with this, have a look at Figures 8-5 and 8-6.

Figure 8-5. Fading blur example: initially clear (left) and partially blurred as we scroll (right)

Figure 8-6. Sliding blur example: blurred overlay follows the list
You can see in the fading blur example, the background starts completely clear initially. As the list content scrolls up, the blur becomes more visible and is uniform to the entire view. In the sliding blur example, the blurred overlay always follows the list item content; as more of the list items are shown, the blur takes up more of the view. Let’s start by looking at the resources in this application. See Listings 8-10 and 8-11.
Listing 8-10. res/layout/activity_blur.xml
<?xml version="1.0" encoding="utf-8"?>
<FrameLayout xmlns:android="http://schemas.android.com/apk/res/android"
    android:layout_width="match_parent"
    android:layout_height="match_parent">
    <!-- Background Views for each blur type -->
    <com.androidrecipes.backgroundblur.BackgroundOverlayView
        android:id="@+id/background_slide"
        android:layout_width="match_parent"
        android:layout_height="match_parent"
        android:scaleType="centerCrop" />
    <ImageView
        android:id="@+id/background_fade"
        android:layout_width="match_parent"
        android:layout_height="match_parent"
        android:scaleType="centerCrop"
        android:visibility="gone" />

    <ListView
        android:id="@+id/list"
        android:layout_width="match_parent"
        android:layout_height="match_parent"
        android:cacheColorHint="@android:color/transparent"
        android:scrollbars="none"/>
</FrameLayout>
Listing 8-11. res/menu/blur.xml
<?xml version="1.0" encoding="utf-8"?>
<menu xmlns:android="http://schemas.android.com/apk/res/android" >
    <item android:id="@+id/menu_slide"
        android:title="Sliding Blur" />
    <item android:id="@+id/menu_fade"
        android:title="Fading Blur" />
</menu>
The layout for the application is simply a ListView on top of some image content. We have two views for the background to easily switch between the two blur type examples, so only one of these will be visible at any point in time. In this case, we are using the options menu to switch between the two modes, so we have also created a simple two-option <menu> element. Listing 8-12 shows our activity, where the RenderScript code will live.
Listing 8-12. Blurred Overlay Activity
public class BlurActivity extends Activity implements
        AbsListView.OnScrollListener,
        AdapterView.OnItemClickListener {

    private static final String[] ITEMS = {
            "Item One", "Item Two", "Item Three", "Item Four", "Item Five",
            "Item Six", "Item Seven", "Item Eight", "Item Nine", "Item Ten",
            "Item Eleven", "Item Twelve", "Item Thirteen", "Item Fourteen", "Item Fifteen"};

    private BackgroundOverlayView mSlideBackground;
    private ImageView mFadeBackground;
    private ListView mListView;
    private View mHeader;

    @Override
    protected void onCreate(Bundle savedInstanceState) {
        super.onCreate(savedInstanceState);
        setContentView(R.layout.activity_blur);

        mSlideBackground = (BackgroundOverlayView) findViewById(R.id.background_slide);
        mFadeBackground = (ImageView) findViewById(R.id.background_fade);
        mListView = (ListView) findViewById(R.id.list);

        //Apply a clear header view to shift the start position of the list elements down
        mHeader = new HeaderView(this);
        mListView.addHeaderView(mHeader, null, false);
        mListView.setAdapter(new ArrayAdapter<String>(this,
                android.R.layout.simple_list_item_1, ITEMS));

        mListView.setOnScrollListener(this);
        mListView.setOnItemClickListener(this);

        initializeImage();
    }

    @Override
    public boolean onCreateOptionsMenu(Menu menu) {
        getMenuInflater().inflate(R.menu.blur, menu);
        return true;
    }

    @Override
    public boolean onOptionsItemSelected(MenuItem item) {
        //Based on the selection, show the appropriate background view
        switch(item.getItemId()) {
            case R.id.menu_slide:
                mSlideBackground.setVisibility(View.VISIBLE);
                mFadeBackground.setVisibility(View.GONE);
                return true;
            case R.id.menu_fade:
                mSlideBackground.setVisibility(View.GONE);
                mFadeBackground.setVisibility(View.VISIBLE);
                return true;
            default:
                return super.onOptionsItemSelected(item);
        }
    }

    /*
     * The heart of our transparency tricks.  We obtain a normal copy
     * and a pre-blurred copy of the background image.
     */
    private void initializeImage() {
        Bitmap inBitmap = BitmapFactory.decodeResource(getResources(), R.drawable.background);
        Bitmap outBitmap = inBitmap.copy(inBitmap.getConfig(), true);

        //Create the RenderScript context
        final RenderScript rs = RenderScript.create(this);
        //Create allocations for input and output data
        final Allocation input = Allocation.createFromBitmap(rs, inBitmap,
                Allocation.MipmapControl.MIPMAP_NONE,
                Allocation.USAGE_SCRIPT);
        final Allocation output = Allocation.createTyped(rs, input.getType());
        //Run a blur at the maximum supported radius (25f)
        final ScriptIntrinsicBlur script = ScriptIntrinsicBlur.create(rs, Element.U8_4(rs));
        script.setRadius(25f);
        script.setInput(input);
        script.forEach(output);
        output.copyTo(outBitmap);

        //Tear down the RenderScript context
        rs.destroy();

        //Apply the two copies to our custom drawable for fading
        OverlayFadeDrawable drawable = new OverlayFadeDrawable(
                new BitmapDrawable(getResources(), inBitmap),
                new BitmapDrawable(getResources(), outBitmap));
        mFadeBackground.setImageDrawable(drawable);

        //Apply the two copies to our custom ImageView for sliding
        mSlideBackground.setImagePair(inBitmap, outBitmap);
    }

    @Override
    public void onItemClick(AdapterView<?> parent, View v, int position, long id) {
        //On a click event, animated scroll the list back to the top
        mListView.smoothScrollToPosition(0);
    }

    @Override
    public void onScroll(AbsListView view, int firstVisibleItem,
            int visibleItemCount, int totalItemCount) {
        //Make sure views have been measured first
        if (mHeader.getHeight() <= 0) return;

        //Adjust sliding effect clip point based on scroll position
        int topOffset;
        if (firstVisibleItem == 0) {
            //Header is still visible
            topOffset = mHeader.getTop() + mHeader.getHeight();
        } else {
            //Header has been detached, at this point we should be all the way up
            topOffset = 0;
        }
        mSlideBackground.setOverlayOffset(topOffset);

        //Adjust fading effect based on scroll position
        // Blur completely once 85% of the header is scrolled off
        float percent = Math.abs(mHeader.getTop()) / (mHeader.getHeight() * 0.85f);
        int level = Math.min((int)(percent * 10000), 10000);
        mFadeBackground.setImageLevel(level);
    }

    @Override
    public void onScrollStateChanged(AbsListView view,
            int scrollState) { }
}
When the activity is created, we apply a very simple list adapter with some static data elements inside. We also apply a custom HeaderView as the header to our list; we see this implementation in Listing 8-13, and this is what shifts the list items down in the initial view of Figures 8-5 and 8-6.
Listing 8-13. Clear List Header View
public class HeaderView extends View {

    public HeaderView(Context context) {
        super(context);
    }

    public HeaderView(Context context, AttributeSet attrs) {
        super(context, attrs);
    }

    public HeaderView(Context context, AttributeSet attrs, int defStyle) {
        super(context, attrs, defStyle);
    }

    /*
     * Measure this view's height to always be 85% of the
     * measured height from the parent view (ListView)
     */
    @Override
    protected void onMeasure(int widthMeasureSpec, int heightMeasureSpec) {
        View parent = (View) getParent();
        int parentHeight = parent.getMeasuredHeight();

        int height = Math.round(parentHeight * 0.85f);
        int width = MeasureSpec.getSize(widthMeasureSpec);

        setMeasuredDimension(width, height);
    }
}
There isn’t much to this; it is simply a view designed to measure out its height to be 85 percent of the height of its parent (which in our case is always the ListView). This allows us to use it as a measured spacer, even though it contains no real content. This approach is more flexible to device screen differences than hard-coding a fixed view height.
Back in Listing 8-12, inside initializeImage(), we use the ScriptIntrinsicBlur function to create a blurred copy of our background image. As we discussed in the previous recipes on image filters, the blur radius determines the level of distortion, and can be a value greater than 0 and up to 25.
When RenderScript has completed the blur, we take the image pair (initial and blurred) and send them two places. The first is to a custom OverlayFadeDrawable instance, which we will use for our fade example. The second is a BackgroundOverlayView, which we will use for our slide example. We will take a look at these items shortly.
The activity is responsible for monitoring list scrolling and reporting those changes to the background views. The activity is registered as the OnScrollListener for the ListView, so as the view scrolls, the onScroll() methodis called regularly. Inside this method, we calculate the offset position based on the header view, and feed that data into the two background views. Finally, the activity is also set to receive click events on individual list items. When this occurs, the list is scrolled back to the top with an animation.
To see how we draw the blur transitions, let’s first have a look at the Drawable in Listing 8-14.
Listing 8-14. Overlay Fade Drawable
public class OverlayFadeDrawable extends LayerDrawable {
    /*
     * Implementation of a Drawable container to hold our normal
     * and blurred images as layers
     */
    public OverlayFadeDrawable(Drawable base, Drawable overlay) {
        super(new Drawable[] {base, overlay});
    }

    /*
     * Force a redraw when the level value is externally changed
     */
    @Override
    protected boolean onLevelChange(int level) {
        invalidateSelf();
        return true;
    }

    @Override
    public void draw(Canvas canvas) {
        final Drawable base = getDrawable(0);
        final Drawable overlay = getDrawable(1);
        //Get the level as a percentage of the maximum value
        final float percent = getLevel() / 10000f;
        int setAlpha = Math.round(percent * 0xFF);

        //Optimize for end-cases to avoid overdraw
        if (setAlpha == 255) {
            overlay.draw(canvas);
            return;
        }
        if (setAlpha == 0) {
            base.draw(canvas);
            return;
        }

        //Draw composite if in-between
        base.draw(canvas);

        overlay.setAlpha(setAlpha);
        overlay.draw(canvas);
        overlay.setAlpha(0xFF);
    }
}
You may recall from Chapter 2 that a Drawable is just an abstraction of something to be displayed. We have chosen to extend the LayerDrawable in the framework, which is a container of N elements that are drawn in order as layers by default. We won’t be leveraging the default drawing behavior, but using LayerDrawable as our base allows the framework to handle some of the other complex logic of invalidating each layer for us.
To update the state, we use the item’s level parameter. Recall that this Drawable was set on an ImageView, and when the scroll position changed, we call setImageLevel() to update the background. That level is passed directly into this instance, and with each call to draw(), the level is inspected to determine how to blend the two images. We explicitly optimize for the two cases where the alpha is at 0 percent or 100 percent to minimize pixel overdraw (once either element is fully opaque, drawing the other is a waste). However, if the value is in the middle, we will draw the initial image first, with the partially visible blurred copy drawn on top. Now let’s have a look at the drawing tricks for the sliding blur in Listing 8-15.
Listing 8-15. Background Overlay View
public class BackgroundOverlayView extends ImageView {

    private Paint mPaint;
    private Bitmap mOverlayImage;
    private int mClipOffset;

    /*
     * Customization of ImageView to allow us to draw a
     * composite of two images, but still leverage all
     * the image scaling features of the framework.
     */
    public BackgroundOverlayView(Context context) {
        super(context);
        init();
    }

    public BackgroundOverlayView(Context context, AttributeSet attrs) {
        super(context, attrs);
        init();
    }

    public BackgroundOverlayView(Context context, AttributeSet attrs, int defStyle) {
        super(context, attrs, defStyle);
        init();
    }

    private void init() {
        mPaint = new Paint(Paint.ANTI_ALIAS_FLAG);
    }

    /*
     * Set the normal and blurred image copies in our view
     */
    public void setImagePair(Bitmap base, Bitmap overlay) {
        mOverlayImage = overlay;

        /* Apply the normal image to the base ImageView, which
         * will allow it to apply our ScaleType for us and provide
         * a Matrix we can use to draw both images scaled accordingly
         * later on. This will also invalidate the view to trigger
         * a new draw.
         */
        setImageBitmap(base);
    }

    /*
     * Adjust the vertical point where the normal and blurred
     * copy should switch.
     */
    public void setOverlayOffset(int overlayOffset) {
        mClipOffset = overlayOffset;
        invalidate();
    }

    @Override
    protected void onDraw(Canvas canvas) {
        //Draw base image first, clipped to the top section
        // We clip the base image to avoid unnecessary overdraw in
        // the bottom section of the view.
        canvas.save();
        canvas.clipRect(getLeft(), getTop(), getRight(), mClipOffset);
        super.onDraw(canvas);
        canvas.restore();

        //Obtain the matrix used to scale the base image, and apply it
        // to the blurred overlay image so the two match up
        final Matrix matrix = getImageMatrix();
        canvas.save();
        canvas.clipRect(getLeft(), mClipOffset, getRight(), getBottom());
        canvas.drawBitmap(mOverlayImage, matrix, mPaint);
        canvas.restore();
    }
}
This is an extension of ImageView that does some custom drawing. We are using ImageView because it contains a lot of image scaling logic that we want to leverage. In our layout, we set the scaleType parameter to centerCropso the view could take care of scaling and placing our background nicely. Notice when the activity sets the images on this view, the base image is passed directly to the base implementation as the main image. We do this for two reasons: primarily so the framework can do the image-scaling math, but also so we can easily draw the base image by just calling through to super.onDraw() later on.
With each scroll position change, the offset is passed into this view via setOverlayOffset(); which also invalidates the view, forcing a new draw pass. In the drawing portion of the view, we utilize that offset marker to create two clipping masks for the Canvas. The main purpose of this is to draw only the portion of the blurred overlay that we want to show to match the list position. However, we can use the same offset to clip off the base image drawing as well. This is again to eliminate pixel overdraw in our view, which will make the app perform much more smoothly. Even though the effect is that we are drawing a semitransparent overlay, we never actually draw any pixel in this view more than once.
As a final reminder of what we’ve created, Figure 8-7 shows the application with the list scrolled completely up and the blur overlay covering the complete view.

Figure 8-7. Blur overlay shown completely
Summary
The Android NDK complements the Android SDK by providing a tool set that lets you implement parts of your app by using native code languages such as C and C++. The NDK provides headers and libraries for building native activities, handling user input, using hardware sensors, and more.
RenderScript consists of a language based on C99 (a modern dialect of the C language), a collection of useful prebuilt script kernels, a pair of compilers, and a runtime that collectively help you achieve high-performance and visually compelling graphics via native code but in a portable manner. You get native app speed along with SDK app portability, and you don’t have to use the JNI.