Cryptographic security
Geronimo provides GBeans to manage the JSSE keystores and encrypt passwords. In this section, we will see how these GBeans can be used to manage the keystores and how digital certificates; encrypt passwords are saved to the config.xml file and the properties files used with security realms.
Keystores
JSSE keystores are used to store cryptographic keys and digital certificates. Geronimo provides GBeans to create and manage keystores and digital certificates. The FileKeystoreInstance class wraps a keystore file stored on a filesystem. The FileKeystoreManager class provides the ability to manage keystores in a filesystem directory. The digital certificates are used to configure SSL connectors in Geronimo.
The Keystores portlet in the Administration Console provides a convenient way to access the functionality provided by Geronimo. The functions provided are:
Locking or unlocking a keystore for editing or availability
Creating a new keystore
Viewing the contents of a keystore
Changing a keystore or key password
Adding new private keys and certificates
Generating certificate requests
Geronimo provides a default keystore named geronimo-default, which contains a self-signed certificate. The password for this keystore is secret. This default keystore contains one private key and a self-signed certificate entry with an alias of geronimo and a key password secret. Unless a new private key and certificate is generated, your server will be using the same private key and certificate that is used by a million other servers!
Keystores portlet
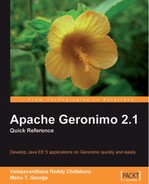
The Keystores portlet allows you to manage the JSSE keystores in order to configure SSL connectors on the Geronimo server. The portlet's initial screen is shown below:

The portlet lists the keystores in the var/security/keystores directory under <GERONIMO_HOME>. The Keystore File column shows the name of the file under the keystores directory. The Type column shows the JSSE keystore type of the keystore. The Contents column shows the content details for unlocked keystores only. Keystores start out as locked against editing and also not available for use by other components in the server. The Editable flag indicates whether the keystore has been unlocked for editing (by entering the keystore password), which lasts for the current login session. The Available flag indicates whether the keystore password has been saved in order to make the keystore available to other components on the server.
Creating a new keystore
To create a new keystore, click on the New Keystore link. This will display the screen shown in the next screenshot:

Enter the Keystore file name, Password for new keystore, select the Keystore Type, and click on the Create Keystore button. This will create a new keystore with the specified name and with no content. The newly-created keystore will automatically be unlocked for editing during the current login session.
Viewing the contents of a keystore
For all the keystores unlocked for editing, the Keystores portlet provides a link on the keystore filename to display all of the keystores that are unlocked for editing, as shown in the next screenshot, to display the contents of that keystore:
In the above screenshot, the newly-created keystore packt-keystore provides a link. Click on that link to view the contents. The following screenshot shows the portlet screen displaying the contents of the keystore:

This view provides links to add a new Private Key, add a new Trust Certificate, and Change keystore password.
Adding a private key
To add a new private key to a keystore, click on the Create Private Key link while viewing the contents of the keystore. This will display a form, as shown in the screenshot below:
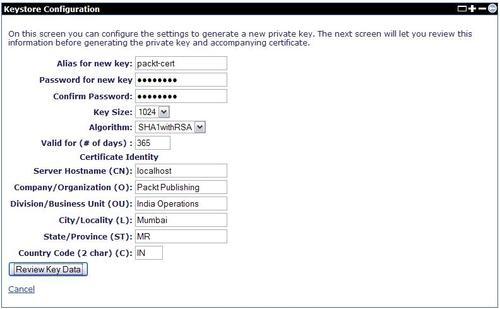
Complete the following fields:
Alias for new key: An alias name for the private key entry. This must be unique among all of the private keys and trusted certificate entries in the keystore.
Password for new key: A password to protect the newly-created private key. It is recommended that this password be same as the keystore password.
Key size: The key's size in bits, for the RSA key pair to be generated. The larger the key size, the stronger the key. The recommended key size is 1024.
Algorithm: The certificate-signing algorithm to be used to sign the self-signed certificate.
Valid for (# of days): The validity period for the self-signed certificate. The suggested validity period for a private key is 365 days.
Complete the following Certificate Identity fields:
Server Hostname (CN): This is the Common Name to be used in the certificate. Typically, this will be the DNS name of your server.
Division/Business Unit (OU), Company/Organization (O), City/Locality (L), State/Province (ST): Fields to reflect the identity of the server.
Country Code (2 char) (C): Two-character ISO 3166 country code that identifies the country.
After completing all of the above fields, click on Review Key Data. On the next screen, verify the certificate details. To edit any details, use the browser's back button. To go ahead with key generation, click on Generate Key. A new private key and self-signed certificate will be generated and saved to the keystore. The keystore details screen will now list the newly-generated private key entry, as shown in the screenshot below:

You can view the contents of the private key by clicking on the Alias (packt-cert in this case) or the View link provided against the private key.
Adding a trusted certificate
To add a new trusted certificate to a key store, click on the Add Trust Certificate link while viewing the keystore contents. On the next screen, enter the certificate text in the Trusted Certificate field, enter an Alias for the certificate, and click on the Review Certificate button. Note that the alias entered must be unique among all of the private key and trusted certificate entries in the keystore. The next screen displays the details of the certificate. Click on the Import Certificate button to add this certificate to the keystore as a trusted certificate. Once added, the keystore details screen will list the trusted certificates, as shown in the screenshot below:

You can view the contents of the trusted certificate by clicking on theAlias (packt-trust-cert in this case) or the View link provided next to the trust certificate entry.
Deleting a private key or trusted certificate
While viewing the contents of a keystore, click on the alias or the View link provided next to the private key or trusted certificate entry. The next screen will show the details of the private key or trusted certificate. This screen will include a Delete Entry link. Click on this link and confirm deletion in the popup dialogbox to delete the private key or trusted certificate from the keystore.
Changing a keystore password
To change the password of a keystore, click on the Change keystore password link while viewing the contents of the keystore. On the next screen, enter the current password of the keystore as the old password, enter the new password, and click on the Change Password button. Upon successfully changing the password, the portlet will display a message indicating that the password for the keystore has been changed.
Unlocking keystore for availability
For a keystore to be usable by server components, it must be unlocked for availability. Once the keystore is unlocked for availability, the keystore and key passwords are stored in config.xml file such that the keystore is unlocked for availability for subsequent runs of the server. For a keystore that is locked for availability, the Keystores portlet will show a lock icon under the Available column. To unlock a keystore for availability, click on the lock icon. This will show a screen similar to the one shown in the next screenshot:

Enter the keystore password and click on Unlock Keystore to go to the next screen, shown in the screenshot below:

Upon successfully unlocking the keystore, the portlet will display a message indicating success. The keystore can now be used by other server components.
Unlocking a keystore for editing
Upon accessing the Keystores portlet for the first time after logging on to the Administration Console, you will find that the keystores are locked for editing. In order to edit a keystore, you have to unlock the keystore by providing the keystore password. To do so, click on the lock icon displayed in the Editable column against the keystore name. On the next screen, enter the keystore password and click on Unlock Keystore. Upon successfully unlocking the keystore for editing, the portlet will display a message indicating success. The keystore will remain unlocked for editing for the current login session, unless explicitly locked.
Locking a keystore for editing or availability
A keystore that is unlocked for editing and/or availability is indicated by showing an 'unlocked' icon in the Editable and Availability columns against the keystore name. To lock the keystore for editing or availability, click on the corresponding unlocked icon. Attempting to lock a keystore for availability will display a dialogue to confirm the action. Once confirmed, the keystore will be locked and a lock icon will show in place of the unlocked icon. Note that locking and unlocking the keystore for editing is within the scope of the current login session, whereas locking and unlocking the keystore for availability will be persisted in the server and will immediately affect any server components using that keystore.
View private key details
While viewing the keystore contents, to view the details of a private key entry, click on the Alias or the view link shown against that private key entry. This will show a screen similar to the one shown in the screenshot below:

The Certificate Info section shows the details of the certificate stored in the keystore for that private key. The links provided above the Certificate Info section let you operate on the private key entry. Note that the Generate CSR, Import CA reply, and Change key password links will appear only when the keystore is unlocked for editing as well as availability.
Changing a Private Key password
To change the password of a Private Key, click on the Change key password link on the screen that shows Private Key details. On the next screen, enter the current key password for the Old password, enter the New password, and click on the Change Password button. If the password is changed successfully, the portlet will display a message indicating success.
Generating CSR for a Private Key
A Certificate Signing Request (CSR) for a Private Key is used to request a digital certificate from a Certification Authority (CA). To generate a CSR for the private key, click on the Generate CSR link on the screen that shows the Private Key details.
The next screen will show the base-64 encoded PKCS10 Certificate Request text, as shown in the next screenshot:

Copy the text shown under PKCS10 Certification Request into a text file, and send it to the Certificate Authority to obtain a digital certificate.
Importing the CA Reply for a Private Key
A digital certificate issued by a CA in response to the CSR sent to the CA will be in a PKCS7 encoded format. In order to use this certificate, it must be imported into the key store that contains the private key to which the certificate corresponds. The Keystores portlet provides an Import CA reply function to import the certificate issued by a CA. To import the certificate, click on the Import CA reply link on the private key details screen. On the next screen, enter the certificate text in the PKCS7 Certificate Reply field and click on Save to complete the import. The imported certificate details will show under the Certificate Info for the Private Key.
Preparing a keystore for use with SSL
We have seen the various functions provided by the Keystores portlet to manage a JSSE keystore file. In this section, we will aggregate the sequence of steps in getting a keystore ready for use with SSL configuration.
The steps involved in creating a new Private Key and certificate ready for use with SSL configuration, are as follows:
Create a new keystore—See the Create a new keystore section. The newly-created keystore will not have any private key or trusted certificate entries.
Create a new Private Key—See the Adding a Private Key section. This is done while viewing the contents of the keystore. Unlock the keystore for editing if it is not already unlocked. A self-signed certificate will be generated along with the private key.
Unlock keystore for availability.
If you intend to use a self-signed certificate and do not plan to obtain a certificate from an external CA, then you will not need to go through the next steps. Otherwise, follow the steps below:
Generate a CSR— The Certificate Signing Request text contains the Distinguished Name information and Public Key which will be used by a CA to issue a certificate. Note that the keystore needs to be unlocked for editing as well as availability, in order to generate CSR text for a Private Key.
Send the CSR to the CA and obtain a certificate. This is an offline process with regard to the Keystores portlet.
Import CA Reply—Once a reply is received from the CA, import the certificate issued by the CA into the keystore.
The keystore and Private Key are now ready for SSL configuration.
A trust store is used when you require clients using SSL to connect to the server and authenticate to the server by using digital certificates. You may use the keystore containing the private key as a trust store, but it is recommended that you use a keystore with only trusted certificates as a trust store. Follow the steps below to prepare a keystore for use as a trust store:
Create a new keystore —See the Create a new keystore section. The newly-created keystore will not have any private key or trusted certificate entries.
Unlock the keystore for availability.
Add a Trust Certificate—Repeat this step for each of the trusted certificate, you want to add to the keystore.
The key store is now ready for use as a trust store in SSL configurations enabled for client authentication.
Certificate Authority portlet
The Certificate Authority portlet allows you to create your own Certification Authority (CA) for issuing digital certificates. The portlet provides functions to create a self-signed certificate for the CA, manage certificate requests received through a CA helper web application, issue new certificates using CSR text, and search for issued certificates.
Protecting passwords
The passwords saved to the config.xml file are encrypted with a hardcoded key by default, which is created during the server build and packaged in the binary distributions. To enable the Geronimo server to generate and use a new key for encrypting passwords, Geronimo provides a ConfiguredEncryption GBean. This GBean should be added to rmi-naming configuration by adding the following XML code under the org.apache.geronimo.configs/rmi-naming/2.1.4/car module entry in the config.xml file:
<gbean name="org.apache.geronimo.configs/rmi-naming/2.1.4/car?name=ConfiguredEncryption,j2eeType=GBean" gbeanInfo="org.apache.geronimo.system.util.ConfiguredEncryption"> <attribute name="path">var/security/ConfiguredSecretKey.ser</attribute> <reference name="ServerInfo">
<pattern><name>ServerInfo</name></pattern>
</reference> </gbean>
This will create a new key when the GBean is started for the first time, and will save it to the path specified. After that, the GBean will keep using the saved key from the location specified. If you put a serialized SecretKeySpec in this location, then the GBean will use that instead of creating a new key.
HTTPS connectors
Typically, digital certificates are used to enable web server authentication and secure communication between web browser and web server. This is done by making the web container available on an HTTPS port. Geronimo provides GBeans to create and configure HTTPS connectors for both Jetty and Tomcat web containers. The HTTPS connectors can also be configured for authenticating web clients by using digital certificates.
Tomcat HTTPS connectors
The Geronimo Tomcat distribution is configured with a default HTTPS connector on port 8443. This connector uses the private key entry geronimo in the default keystore geronimo-default, and is only configured for server authentication. New HTTPS connectors can be created, and existing HTTPS connectors can be edited, by using the Web Server portlet in the Administration Console. See Chapter 10, Administration, for details on using the Web Server portlet. Apart from the common connector attributes such as uniqueName, address, and port, the important connector attributes that are relevant to HTTPS configuration are as follows:
keyStore: The location of the file that holds the keystore relative to the <GERONIMO_HOME> directory.
algorithm: The certificate-encoding algorithm to be used. Allowed values are Default, SunX509, and IbmX509. Choose Default if the connector need not be reconfigured when the server is to be started using a different JRE than Sun JRE.
ciphers: A comma-separated list of the encryption ciphers that may be used. If not specified, then any available cipher may be used. This attribute can be left blank.
clientAuth: Set this to true if you want the SSL stack to require a valid certificate chain from the client before accepting a connection.
keyAlias: The alias used for the server certificate in the keystore. If not specified, then the first key read from the keystore will be used.
keyStorePass: The password used to access the keystore file. This is also the password used to access the server private key within the keystore, so the two passwords must be set to be the same value on the keystore.
keyStoreType: Set the keystore type. There is normally no reason not to use the default (JKS).
sslProtocol: Set the HTTPS protocol. This should normally be set to TLS, although some (IBM) JVMs don't work properly with popular browsers unless it is changed to SSL.
trustStore: The location of the keystore containing the trusted certificate entries, including Certificate Authority (CA) certificates (the path specified is relative to <GERONIMO_HOME> directory). This attribute is used only if clientAuth is true.
trustStoreType: Set the trust store type. There is normally no reason not to use the default (JKS).
Jetty HTTPS connectors
The Geronimo Jetty distribution is configured with a default HTTPS connector on port 8443. This connector uses the default keystore geronimo-default, and is only configured for server authentication. New HTTPS connectors can be created, and existing HTTPS connectors can be edited, by using the Web Server portlet in the Administration Console. Apart from the common connector attributes uniqueName, host, and port, the important connector attributes that are relevant to HTTPS configuration are as follows:
keyStore: The keystore to use for accessing the server's private key.
clientAuthRequired: If this is set, then the clients connecting through this connector must supply a valid client certificate.
secureProtocol: This should normally be set to TLS, although some (IBM) JVMs don't work properly with popular browsers unless it is changed to SSL.
trustStore: The keystore containing the trusted certificate entries, including Certificate Authority (CA) certificates. This is used only when clientAuthRequired is true.
The keyStore and trustStore here use the names of the KeyStoreGBean wrapping the keystore file.