
In this chapter, we will cover:
- Creating a Maven plugin using Java
- Making your Java Maven plugin useful
- Documenting your Maven plugin
- Creating a Maven plugin using Ant
- Creating a Maven plugin using JRuby
This chapter looks at ways you can extend the current functionality of Apache Maven and its plugins by writing plugins of your own. We are not going into specific details of end-to-end implementation of one particular plugin, but will broadly look at the various ways we can extend Apache Maven and present examples for each of these methods.
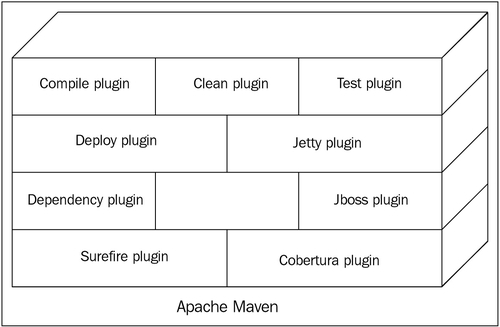
By design, Apache Maven is nothing more than a set of plugins wrapped together within a common framework. Every Maven functionality we have explored in this book from Chapter 1 to Chapter 8 has made use of one or more Apache Maven plugins. This module architecture holds true for many Java applications, including the popular JetBrains IntelliJ IDEA IDE as well.
Like Apache Maven, an Apache Maven plugin needs to be executed on the JVM (Java Virtual Machine) and hence needs to be either written in Java itself or in any other programming/scripting language that leads to compilation of artifacts compatible with the JVM. These artifacts are usually JAR files.
The following image illustrates this very structure where Apache Maven is a bundled collection of plugins:
In this chapter, we have recipes for creating these plugins in Java, Apache Ant, and JRuby. We will also look at some advanced techniques of Java plugins to make them more intuitive and usable.
Given its internal architecture, Apache Maven can be defined as no more than a framework with collections of plugins. Plugins are where the real action happens. Be it compilation of code, running of tests, creation of artifacts, and so on. A plugin can have one or more goals that can be called upon explicitly from the command line or sometimes be integrated with one of the project build phases.
In this recipe, we will create a MOJO (Maven plain Old Java Object), build it, include it in another project, and execute it from the command line.
For this recipe, you need Apache Maven 3 installed and set up correctly and you need to be familiar with Maven concepts such as archetypes, project co-ordinates, dependencies, and so on.
We start by generating an Apache Maven plugin project using an archetype. Archetypes, as discussed earlier, are project templates, and the Maven community has made an archetype available for generating a basic Maven plugin project.
- Start your console and execute the following command:
$ mvn archetype:generate -DgroupId=net.srirangan.packt.maven -DartifactId=maven-plug101-plugin -DarchetypeGroupId=org.apache.maven.archetypes -DarchetypeArtifactId=maven-archetype-mojo - Now build and install this project in your local repository with the following command:
$ mvn clean install - Open the
MyMojo.javafile in any text editor. If you are using an IDE (such as IntelliJ IDEA or Eclipse), you can start by importing the project and then openingMyMojo.javafor editing.You will see that the source code for the MOJO is already populated. We will replace that code with an even simpler example, as shown in the following code:
import org.apache.maven.plugin.AbstractMojo; import org.apache.maven.plugin.MojoExecutionException; /** * @goal helloworld */ public class MyMojo extends AbstractMojo { public void execute() throws MojoExecutionException { getLog().info("Hello, world."); } } - Let's now modify the POM file (
pom.xml) to include this plugin:... <build> <plugins> <plugin> <groupId>net.srirangan.packt.maven</groupId> <artifactId>maven-plug101-plugin</artifactId> <version>1.0-SNAPSHOT</version> </plugin> </plugins> </build> ... - We can now execute the plugin using the fully qualified goal command:
$ mvn net.srirangan.packt.maven:maven-plug101-plugin:1.0-SNAPSHOT:helloworldThe result should be:
[INFO] Scanning for projects...
[INFO] ---------------------------------------------------------
[INFO] Building maven-plug101-plugin Maven Mojo 1.0-SNAPSHOT
[INFO] ---------------------------------------------------------
[INFO] --- maven-plug101-plugin:1.0-SNAPSHOT:helloworld (default-cli) @ maven-plug101-plugin ---
[INFO] Hello, world.
[INFO] ---------------------------------------------------------
[INFO] BUILD SUCCESS
[INFO] ---------------------------------------------------------
You just executed a five step process to create your first Apache Maven plugin. Here are explanations for each step described in the preceding section:
- Here we executed an Apache Maven
archetype:generatecommand using themaven-archetype-mojoarchetype as your project template. After a successful execution, this command created a sample MOJO class file embedded inside the Apache Maven project structure. The end result should look like this:└───pom.xml └───src └───main └───java └───net └───srirangan └───packt └───maven └───MyMojo.java - Here we executed Maven
cleanandinstallon the newly-generated Apache Maven plugin project. This command cleans and builds the project and would have created thetargetfolder which contains the artifact (JAR file) along with test reports, package structures, and.classfiles. It also installs the plugin in your local repository.└───target ├───maven-plug101-plugin-1.0-SNAPSHOT.jar ├───classes │ ├───META-INF │ │ └───maven │ └───net │ └───srirangan │ └───packt │ └───maven ├───maven-archiver └───surefireNow, let's have a look at the Maven plugin project's POM file. We see that it has a dependency on the Maven plugin API along with a JUnit dependency and typical project co-ordinate information.
<project> <modelVersion>4.0.0</modelVersion> <groupId>net.srirangan.packt.maven</groupId> <artifactId>maven-plug101-plugin</artifactId> <packaging>maven-plugin</packaging> <version>1.0-SNAPSHOT</version> <name> maven-plug101-plugin Maven Mojo</name> <dependencies> <dependency> <groupId>org.apache.maven</groupId> <artifactId>maven-plugin-api</artifactId> <version>2.0</version> </dependency> <dependency> <groupId>junit</groupId> <artifactId>junit</artifactId> <version>3.8.1</version> <scope>test</scope> </dependency> </dependencies> </project> - Here we modified the source of your Maven plugin (
MyMojo.java). Do note that:- The
MyMojoclass extendsorg.apache.maven.plugin.AbstractMojo.AbstractMojois part of the Maven plugin API and it provides infrastructure required to implement a MOJO. - You are required to implement the
execute()method. - The
@goalannotation is used inside a comment which is different from typical annotation usage in Java 6.
- The
- In this step, we included our plugin into a Maven project by appending to the
<Build><Plugins>element in thepom.xml. - In the fifth step, we executed our plugin on the command line. Note that we used the fully qualified plugin name, which included the complete package structure.
You have just created your first plugin, specified a custom goal, included the plugin in a project, and executed it from the command line. Not a bad start! :-)