
Chapter 7. Android, Where’s My Car?
You parked as close to the stadium as you possibly could, but when the concert ends, you don’t have a clue where your car is. Your friends are equally clueless. Fortunately, you haven’t lost your Android phone, which never forgets anything, and you remember you have the hot new app, “Android, Where’s My Car?” With this app, you click a button when you park your car, and the Android uses its location sensor to record the car’s GPS coordinates and address. Later, when you reopen the app, it gives you directions from where you currently are to the remembered location—problem solved!

What You’ll Learn
This app covers the following concepts:
Determining the location of the Android device using the
LocationSensorcomponent.Recording data in a database directly on the device using
TinyDB.Using the
ActivityStartercomponent to open Google Maps from your app and show directions from one location to another.
Getting Started
Connect to the App Inventor website and start a new project. Name it “AndroidWhere” (project names can’t have spaces) and also set the screen’s title to “Android, Where’s My Car?” Open the Blocks Editor and connect to the phone.
Designing the Components
The user interface for “Android, Where’s My Car?” consists of
labels to show your current and remembered locations, and buttons to
record a location and show directions to it. You’ll need some labels
that just show static text; for example, GPSLabel will provide the text “GPS:” that
appears in the user interface. Other labels, such as CurrentLatLabel, will display data from the
location sensor. For these labels, you’ll provide a default value,
(0,0), which will change as the GPS acquires location
information.
You’ll also need three non-visible components: a LocationSensor for obtaining the current
location, a TinyDB for storing
locations persistently, and an ActivityStarter for launching Google Maps to
get directions between the current and stored locations.
You can build the components from the snapshot of the Component Designer in Figure 7-1.
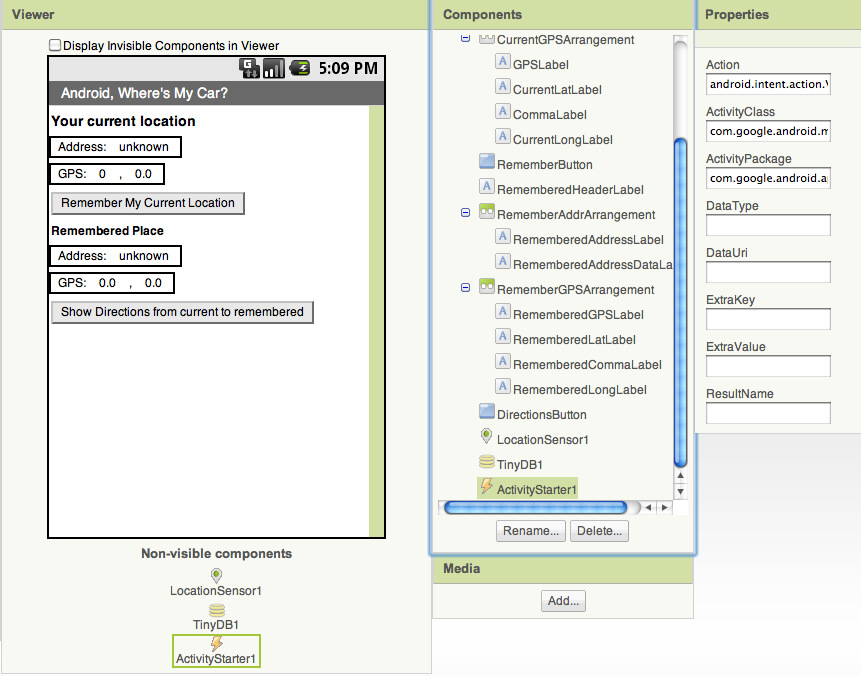
You can build the user interface shown in Figure 7-1 by dragging out the components in Table 7-1.
Component type | Palette group | What you’ll name it | Purpose |
| Basic |
| Display the header “Your current location”. |
| Screen Arrangement |
| Arrange the address info. |
| Basic |
| Display the text “Address:”. |
| Basic |
| Display dynamic data: the current address. |
| Screen Arrangement |
| Arrange the GPS info. |
| Basic |
| Display the text “GPS:”. |
| Basic |
| Display dynamic data: the current latitude. |
| Basic |
| Display “,”. |
| Basic |
| Display dynamic data: the current longitude. |
| Basic |
| Click to record the current location. |
| Screen Arrangement |
| Arrange remembered address info. |
| Basic |
| Display the text “Remembered Place”. |
| Basic |
| Display dynamic data: the remembered address. |
| Screen Arrangement |
| Arrange the remembered GPS info |
| Basic |
| Display the text “GPS”. |
| Basic |
| Display dynamic data: the remembered latitude. |
| Basic |
| Display “,”. |
| Basic |
| Display dynamic data: the remembered longitude. |
| Basic |
| Click to show the map. |
| Sensors |
| Sense GPS info. |
| Basic |
| Store the remembered location persistently. |
| Other stuff |
| Launch Maps. |
Set the properties of the components in the following way:
Set the
Textproperty for the labels with fixed text as specified in Table 7-1.Set the
Textproperty of the labels for dynamic GPS data to “0.0”.Set the
Textproperty of the labels for dynamic addresses to “unknown”.Uncheck the
Enabledproperty of theRememberButtonandDirectionsButton.Set the
ActivityStarterproperties so that ActivityStarter.StartActivity will open Google Maps. (TheActivityStarter’s properties are only partially visible in the user interface shown in Figure 7-1.) Table 7-2 describes how they should be specified; you can leave blank any properties not listed in the table.
Property | Value |
| android.intent.action.VIEW |
| com.google.android.maps.MapsActivity |
| com.google.android.apps.maps |
Note
The ActivityStarter
component lets your app open any Android app installed on the
device. The properties indicated in Table 7-2 can be used
verbatim to open Maps; to open other apps, see the App Inventor
documentation at http://beta.appinventor.mit.edu/learn/reference/other/activitystarter.html.
Adding Behaviors to the Components
You’ll need the following behaviors for this app:
When the
LocationSensorgets a reading, place the current location data into the appropriate labels of the user interface. This will let the user know the sensor has read a location and is ready to remember it.When the user clicks the
RememberButton, copy the current location data into the labels for the remembered location. You’ll also need to store the remembered location data so it will be there if the user closes and relaunches the app.When the user clicks the
DirectionsButton, launch Google Maps so it shows directions to the remembered location.When the app is relaunched, load the remembered location from the database into the app.
Displaying the Current Location
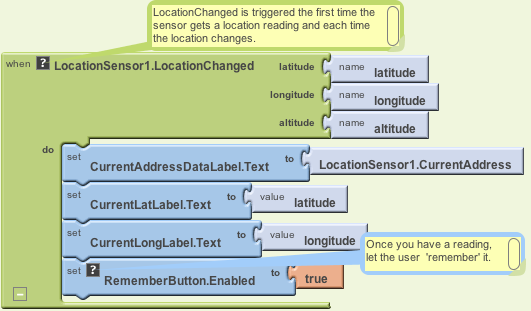
The LocationSensor.LocationChanged
event occurs not just when the device’s location changes, but also
when the sensor first gets a reading. Sometimes that first reading
will take a few seconds, and sometimes you won’t get a reading at
all if the sight lines to GPS satellites are blocked (and depending
on the device settings). For more information about GPS and LocationSensor, see Chapter 23.
When you do get a location reading, the app should place the data into the appropriate labels. Table 7-3 lists all the blocks you’ll need to do this.
Block type | Drawer | Purpose |
LocationSensor1.LocationChanged | LocationSensor | This is the event handler that is triggered when the phone receives a new GPS reading. |
set CurrentAddressDataLabel.Text to | CurrentAddressDataLabel | Place the new data into the label for the current address. |
LocationSensor1.CurrentAddress | LocationSensor | This property gives you a street address. |
set CurrentLatLabel.Text to | CurrentLatLabel | Place the latitude into the appropriate label. |
value latitude | My Definitions | Plug into set CurrentLatLabel.Text to. |
set CurrentLongLabel.Text to | CurrentLongLabel | Place the longitude into the appropriate label. |
value longitude | My Definitions | Plug into set CurrentLongLabel.Text to. |
set RememberButton.Enabled to | RememberButton | Remember the reading for current location. |
true | Logic | Plug into set RememberButton.Enabled to. |
How the blocks work
As you can see in Figure 7-2, latitude and longitude are arguments of the LocationChanged event, so you
grab references to those in the My Definitions drawer. CurrentAddress is not an argument, but
rather a property of the LocationSensor, so you grab it from
LocationSensor’s drawer. The
LocationSensor does some
additional work for you by calling Google Maps to get a street
address corresponding to the GPS location.
This event handler also enables the RememberButton. We initialized it as
disabled (unchecked) in the Component Designer because there is
nothing for the user to remember until the sensor gets a reading,
so now we’ll program that behavior.
Test your app.
Live testing—testing your app on a
phone connected to your computer—doesn’t work for
location-sensing apps. You need to package and download the app
to your phone by selecting “Package for Phone”→“Download to
Connected Phone” in the Component Designer. Some GPS data should
appear and the RememberButton
should be enabled.
If you don’t get a reading, check your Android settings for Location & Security and try going outside. For more information, see Chapter 23.
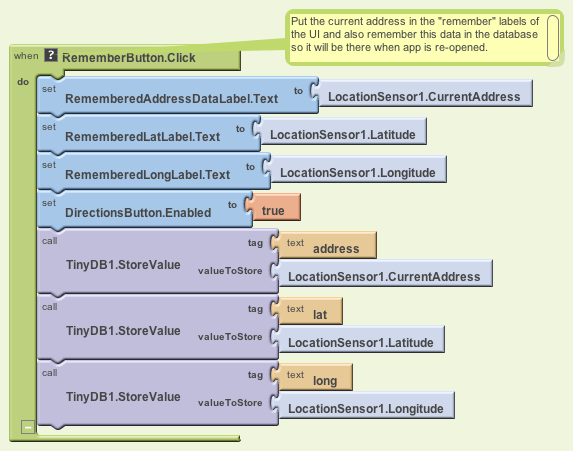
Recording the Current Location
When the user clicks the RememberButton, the most current location
data should be placed into the labels for displaying the remembered
data. Table 7-4 shows
you which blocks you’ll need for this functionality.
Block type | Drawer | Purpose |
RememberButton.Click | RememberButton | Triggered when the user clicks “Remember.” |
set RememberedAddressDataLabel.Text to | RememberedAddressDataLabel | Place the sensor’s address data into the label for the remembered address. |
LocationSensor1.CurrentAddress | LocationSensor | This property gives you a street address. |
set RememberedLatLabel.Text to | RememberedLatLabel | Place the latitude sensed into the “remembered” label. |
LocationSensor | Plug into set RememberedLatLabel.Text to. | |
set RememberedLongLabel.Text to | RememberedLongLabel | Place the longitude sensed into the “remembered” label. |
LocationSensor.Longitude | My Definitions | Plug into set RememberedLongLabel.Text to. |
set DirectionsButton.Enabled to | DirectionsButton | Map the remembered place. |
true | Logic | Plug into set DirectionsButton.Enabled to. |
How the blocks work
When the user clicks the RememberButton, the location sensor’s
current readings are put into the “remembered” labels, as shown in
Figure 7-3.
You’ll notice also that the DirectionsButton is enabled. This could
get tricky, because if the user clicks the DirectionsButton immediately, the
remembered location will be the same as the current location, so
the map that appears won’t provide much in terms of directions.
But that’s not something anyone is likely to do; after the user
moves (e.g., walks to the concert), the current location and
remembered location will diverge.
Displaying Directions to the Remembered Location
When the user clicks the DirectionsButton, you want the app to open
Google Maps with the directions from the user’s current location to
the remembered location (in this case, where the car is
parked).
The ActivityStarter
component can open any Android app, including Google Maps. You have
to set some configuration data to use it, but to open something like
a browser or map, the data you need to specify is fairly
straightforward.
To open a map, the key property to configure is the ActivityStarter.DataUri property. You can
set the property to any URL that you might enter directly in a
browser. If you want to explore this, open http://maps.google.com in your browser and ask for
directions between, say, San Francisco and Oakland. When they
appear, click the Link button at the top right of the map and check
the URL that appears. This is the kind of URL you need to build in
your app.
The difference for your app is that the directions map you’ll create will be from one specific set of GPS coordinates to another (not city to city). The URL must be in the following form:
http://maps.google.com/maps?saddr=37.82557,-122.47898&daddr=37.81079,-122.47710
Type that URL into a browser—can you tell which famous landmark it directs you across?
For this app, you need to build the URL and set its source
address (saddr) and destination
address (daddr) parameters
dynamically. You’ve put text together before in earlier chapters
using make
text; we’ll do that here as well, plugging in
the GPS data for the remembered and current locations. You’ll put
the URL you build in as the ActivityStarter.DataUri property, and then
call ActivityStarter.StartActivity.
Table 7-5 lists all
the blocks you’ll need for this.
How the blocks work
When the user clicks the DirectionsButton, the event handler
builds a URL for a map and calls ActivityStarter to launch the Maps
application and load the map, as shown in Figure 7-4. make
text is used to build the URL to send to the
Maps application.
The resulting URL consists of the Maps domain (http://maps.google.com/maps) along with two URL
parameters, saddr and daddr, which specify the source and
destination locations for the directions. For this app, the
saddr is set to the latitude
and longitude of the current location, and the daddr is set to the latitude and
longitude of the location stored for the car.
Drawer | Purpose | |
DirectionsButton.Click | DirectionsButton | Triggered when the user clicks “Directions.” |
set ActivityStarter.DataUri to | ActivityStarter | Set the URL for the map you want to bring up. |
make text | Text | Build a URL from multiple parts. |
text (”http://maps.google.com/maps?saddr=“) | Text | The fixed part of the URL, the source address. |
CurrentLatLabel.Text | CurrentLatLabel | The current latitude. |
text (“,”) | Text | Put a comma between the latitude and longitude values. |
CurrentLongLabel.Text | CurrentLongLabel | The current longitude. |
text (“&daddr=”) | Text | The second parameter of the URL, the destination address. |
RememberedLatLabel.Text | RememberedLatLabel | The remembered latitude. |
text (“,”) | Text | Put a comma between the values for latitude and longitude. |
RememberedLongLabel.Text | RememberedLongLabel | The remembered longitude. |
ActivityStarter.StartActivity | ActivityStarter | Open Maps. |

Test your app.
Download the new version of the app to your phone and test
again. When a reading comes in, click the RememberButton and then take a walk.
When you click the DirectionsButton, does the map show
you how to retrace your steps? After looking at the map, click
the back button a few times. Do you get back to your
app?
Storing the Remembered Location Persistently
So now you’ve got a fully functioning app that remembers a start location and draws a map back to that location from wherever the user is. But if the user “remembers” a location and then closes the app, the remembered data will not be available when he reopens it. Really, you want the user to be able to record the location of his car, close the app and go to some event, and then relaunch the app to get directions to the recorded location.
If you’re already thinking back to the No Texting While
Driving app (Chapter 4), you’re on
the right track here—we need to store the data
persistently in a database using TinyDB. You’ll use a scheme similar to the
one we used in that app:
When the user clicks the
RememberButton, store the location data to the database.When the app launches, load the location data from the database into a variable or property.
You’ll start by modifying the RememberButton.Click event handler so that it stores the remembered data. To store the latitude, longitude, and address, you’ll need three calls to TinyDB.StoreValue. Table 7-6 lists the additional blocks you’ll need.
Block type | Drawer | Purpose |
TinyDB1.StoreValue (3) | TinyDB | Store the data in the device database. |
text (“address”) | Text | Plug this into the “tag” slot of TinyDB1.StoreValue. |
LocationSensor.CurrentAddress | LocationSensor | The address to store persistently; plug this into the “value” slot of TinyDB1.StoreValue. |
text (“lat”) | Text | Plug this into the “tag” slot of the second TinyDB1.StoreValue. |
LocationSensor1.Latitude | LocationSensor | The latitude to store persistently; plug this into the “value” slot of the second TinyDB1.StoreValue. |
text (“long”) | Text | Plug this into the “tag” slot of the third TinyDB1.StoreValue. |
LocationSensor1.Longitude | LocationSensor | The longitude to store persistently; plug this into the “value” slot of the third TinyDB1.StoreValue. |
How the blocks work
As shown in Figure 7-5, TinyDB1.StoreValue copies the
location data from the LocationSensor properties into the
database. As you may recall from No Texting While Driving, the
StoreValue function has two
arguments, the tag and the value. The tag
identifies which data you want to store, and the
value is the actual data you want saved—in
this case, the LocationSensor
data.
Retrieving the Remembered Location When the App Launches
You store data in a database so you can recall it later. In this app, if a user stores a location and then closes the app, you want to recall that information from the database and show it to her when she relaunches the app.
As discussed in previous chapters, the Screen.Initialize event is triggered when your app launches. Retrieving data from a database is a very common thing to do on startup, and it’s exactly what we want to do for this app.
You’ll use the TinyDB.GetValue function to
retrieve the stored GPS data. Because you need to retrieve the
stored address, latitude, and longitude, you’ll need three calls to
GetValue. As with No Texting
While Driving, you’ll need to check if there is indeed data there
(if it’s the first time your app is being launched, TinyDB.GetValue will return an
empty text).
As a challenge, see if you can create these blocks and then compare your creation to the blocks shown in Figure 7-6.
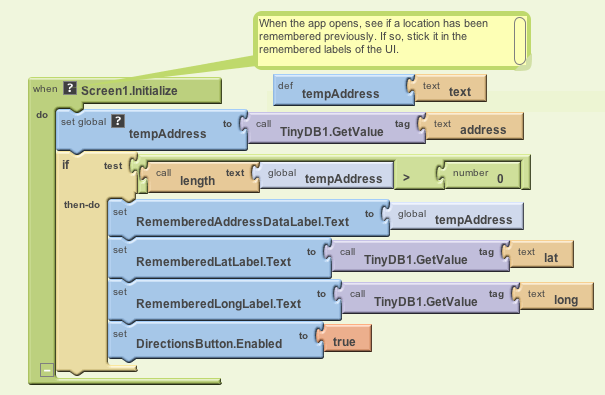
How the blocks work
To understand these blocks, you can envision a user opening
the app the first time, and opening it later after previously
recording location data. The first time the user opens the app,
there won’t be any location data in the database to load, so you
don’t want to set the “remembered” labels or enable the DirectionsButton. On successive
launches, if there is data stored, you do want to load the
previously stored location data from the database.
The blocks first call the TinyDB1.GetValue with a tag of
“address,” which is one of the tags used when you stored the
location data earlier. The retrieved value is placed in the
variable tempAddress, where it
is checked to see whether it’s empty or contains data.
The if block is necessary because
TinyDB returns an empty text if
there is no data for a particular tag; there isn’t any data the
first time the app is launched and there won’t be until the user
clicks the RememberButton.
Since the variable tempAddress
now holds the returned value, the blocks check to see if the
length of tempAddress is
greater than 0. If the length is greater than 0, the app knows
that TinyDB did return
something, and the retrieved value is placed into RememberedAddressDataLabel. The app also
knows that if an address has been stored, it has a latitude and
longitude. Thus, those values are also retrieved using TinyDB.GetValue. Finally, if
data has indeed been retrieved, the DirectionsButton is enabled.
The Complete App: Android, Where’s My Car?
Figure 7-7 shows the final blocks for the complete “Android, Where’s My Car?” app.
Variations
Here are some variations you can experiment with:
Create “Android, Where Is Everyone?”, an app that lets a group of people track one another’s whereabouts. Whether you’re hiking or at the park, this app could help save time and possibly even lives. The data for this app is shared, so you’ll need to use a web database and the
TinyWebDBcomponent instead ofTinyDB. See Chapter 22 for more information.Create a Breadcrumb app that tracks your whereabouts by recording each location change in a list. You should only record a new breadcrumb if the location has changed by a certain amount, or a certain amount of time has elapsed, because even slight movement can generate a new location reading. You’ll need to store the recorded locations in a list—see Chapter 19 for help.
Summary
Here are some of the ideas we’ve covered in this tutorial:
The
LocationSensorcomponent can report the user’s latitude, longitude, and current street address. ItsLocationChangedevent is triggered when the sensor gets its first reading and when the reading changes (the device has moved). For more information on theLocationSensor, see Chapter 23.The
ActivityStartercomponent can launch any app, including Google Maps. For Maps, you set theDataUriproperty to the URL of the map you want to display. If you want to show directions between GPS coordinates, the URL will be in the following format, but you’d replace the sample data shown here with actual GPS coordinates:http://maps.google.com/maps/?saddr=0.1,0.1&daddr=0.2,0.2
make text is used to piece together (concatenate) separate text items into a single text object. It allows you to concatenate dynamic data with static text. With the Maps URL, the GPS coordinates are the dynamic data.
TinyDBallows you to store data persistently in the phone’s database. Whereas the data in a variable or property is lost when an app closes, data stored in the database can be loaded each time the app is opened. For more information onTinyDBand databases, see Chapter 22.
