
Chapter 17. Creating Animated Apps

This chapter discusses methods for creating apps with simple animations—objects that move. You’ll learn the basics of creating two-dimensional games with App Inventor and become comfortable with image sprites and handling events like two objects colliding.
When you see an object moving smoothly along the computer screen, what you’re really seeing is a quick succession of images with the object in a slightly different place each time. It’s an illusion not much different from “flipbooks,” in which you see a moving picture by flipping quickly through the pages (and it’s also how far more sophisticated animated films are made!).
With App Inventor, you’ll define animation by placing
objects within a Canvas component and
moving those objects around the Canvas over time. In this chapter, you’ll
learn how the Canvas coordinate
system works, how the Clock.Timer event can be
used to trigger movement, how to control the speed of objects, and how
to respond to events such as two objects colliding.
Adding a Canvas Component to Your App
You can drag a Canvas
component into your app from the Basic palette. After dragging it out,
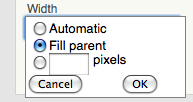
specify the Canvas’s Width and Height. Often, you’ll want the Canvas to span the width of the device
screen. To do this, choose “Fill parent” when specifying the Width, as shown in Figure 17-1.
You can do the same for the Height, but generally you’ll set it to some
number (e.g., 300 pixels) to leave room for other components above and
below the Canvas.
The Canvas Coordinate System
A drawing on a canvas is
really a table of pixels, where a pixel is the
tiniest possible dot of color that can appear on the phone (or other
device). Each pixel has a location (or table cell) on the canvas,
which is defined by an x–y coordinate system, as
illustrated in Figure 17-2. In
this coordinate system, x defines a location on
the horizontal plane (left to right), and y
defines a location on the vertical plane (up and down).

It might seem a bit counterintuitive, but the top-left cell in a
Canvas starts with 0 for both
coordinates, so this position is represented as
(x=0,y=0). (This is
different than the index you use in App Inventor for lists, which
starts at the seemingly more normal value of 1.) As you move right,
the x coordinate gets larger; as you move down,
the y coordinate gets larger. The cell to the
immediate right of the top-left corner is
(x=1,y=0). The top-right
corner has an x coordinate equal to the width of
the canvas minus 1. Most phone screens have a width close to 300, but
for the sample canvas shown here, the Width is 20, so the top-right corner is the
coordinate
(x=19,y=0).
You can change the appearance of the canvas in two ways: (1) by painting on it, or (2) by placing and moving objects within it. This chapter will focus primarily on the latter, but let’s first discuss how you “paint” and how to create animation by painting (this is also the topic of the PaintPot app in Chapter 2).
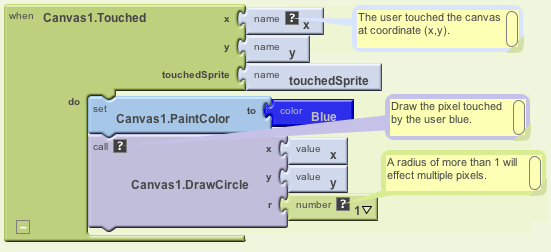
Each cell of the canvas holds a pixel defining the color that
should appear there. The Canvas
component provides the Canvas.DrawLine and Canvas.DrawCircle blocks for
painting pixels on it. You first set the Canvas.PaintColor property to the color you
want and then call one of the Draw blocks to draw in that color. With
DrawCircle, you can paint circles
of any radius, but if you set the radius to 1, as shown in Figure 17-3, you’ll paint an
individual pixel.
App Inventor provides a palette of 14 basic colors that you can use to paint pixels (or component backgrounds). You can access a wider range of colors by using the color numbering scheme explained in the App Inventor documentation at http://beta.appinventor.mit.edu/learn/reference/blocks/colors.html.
The second way to modify the appearance of a canvas is to place
Ball and ImageSprite components on it. A
sprite is a graphical object placed within a
larger scene—in this case, a canvas. Both the Ball and ImageSprite components are sprites; they are
different only in appearance. A
Ball is a circle whose appearance can only be modified by
changing its color or radius, whereas an ImageSprite can take on any appearance as
defined by an image file you upload. Image
Sprites and Balls can
only be added within a Canvas; you
can’t drag them into the user interface outside of one.
Animating Objects with Timer Events
One way to specify animation in App Inventor is to change an
object in response to a timer event. Most commonly, you’ll move
sprites to different locations on the canvas at set time intervals.
Using timer events is the most general method of defining those set
time intervals. Later, we’ll also discuss an alternative method of
programming animation using the ImageSprite and Ball components’ Speed and Heading properties.
Button clicks and other user-initiated events are simple to understand: the user does something, and the app responds by performing some operations. Timer events are different: they aren’t triggered by the end user but instead by the passing of time. You have to conceptualize the phone’s clock triggering events in the app instead of a user doing something.
To define a timer event, you first drag a Clock component into your app within the
Component Designer. The Clock
component has a TimerInterval
property associated with it. The interval is defined in terms of
milliseconds (1/1,000 of a second). If you set the TimerInterval to 500, that means a timer
event will be triggered every half-second. The smaller the TimerInterval, the faster your object will
move.
After adding a Clock and
setting a TimerInterval in the
Designer, you can drag out a Clock.Timer event in the Blocks
Editor. You can put any blocks you like in this event, and they’ll be
performed every time interval.
Creating Movement
To show a sprite moving over time, you’ll use the MoveTo
function found in both the ImageSprite and Ball components. For example, to move a
ball horizontally across the screen, you’d use
the blocks in Figure 17-4.

MoveTo moves an object to an
absolute location on the canvas, not a relative
amount. So, to move an object some amount, you set the MoveTo
arguments to the object’s current location plus an offset. Since
we’re moving horizontally, the x
argument is set to the current x location
(Ball1.X) plus the offset 20,
while the y argument is set to stay at its current setting
(Ball1.Y).
If you wanted to move the ball diagonally, you’d add an offset to both the x and y coordinates, as shown in Figure 17-5.

Speed
How fast is the ball moving in the preceding example? The
speed depends on both the Clock’s
TimerInterval property and the parameters you specify in
the MoveTo function. If the interval
is set to 1,000 milliseconds, that means an event will be triggered
every second. For the horizontal example shown in Figure 17-4, the ball will
move 20 pixels per second.
But a TimerInterval of
1,000 milliseconds doesn’t provide very smooth animation; the ball
will only move every second, and this will appear jerky. To get
smoother movement, you need a smaller interval. If the TimerInterval was set instead to 100
milliseconds, the ball would move 20 pixels every tenth of a second,
or 200 pixels per second—a rate that will appear much smoother to
anyone using your app. There’s another way to change the speed
instead of changing the timer interval—can you think of what that
is? (Hint: Speed is a function of how often you
move the ball and how far you move it each time.) You could also
alter speed by keeping a timer interval of 1,000 milliseconds and
instead changing the MoveTo operation so the ball only
moves 2 pixels every time interval—2 pixels/100ms is still 20
pixels/second.
High-Level Animation Functions
The ability to move an object across the screen is useful for things like animated ads that slide in and out, but to build games and other animated apps, you need more complex functionality. Fortunately, App Inventor provides some high-level blocks for dealing with animation events such as an object reaching the screen’s edge or two objects colliding.
In this context, high-level block means
that App Inventor takes care of the lower-level
details of determining events like when two sprites collide. You could
check for such occurrences yourself using Clock.Timer
events and checking the X,Y,
Height, and Width
properties of the sprites. Such programming would require some fairly
complex logic, however. Because these events are common to many games
and other apps, App Inventor provides them for you.
EdgeReached
Consider again the animation in which the object is moving diagonally from the top left to the bottom right of the canvas. As we programmed it, the object would move diagonally and then stop when it reached the right or bottom edge of the canvas (the system won’t move an object past the canvas boundaries).
If you instead wanted the object to reappear at the top-left corner after it reaches the bottom right, you could define a response to the Ball.EdgeReached event shown in Figure 17-6.
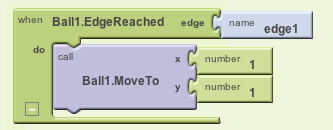
EdgeReached (an event that is
applicable only for sprites and balls) is triggered when the
Ball hits any edge of the
canvas. This event handler,
combined with the diagonal movement specified with the previously
described timer event, will cause the ball to move diagonally from
top left to bottom right, pop back up to the top left when it
reaches the edge, and then do it all over again, forever (or until
you tell it otherwise).
Note that there is an argument, edge1, with the EdgeReached event. The argument
specifies which edge the ball reached, using the following
directional numbering scheme:
North = 1
Northeast = 2
East = 3
Southeast = 4
South = −1
Southwest = −2
West = −3
Northwest = −4
CollidingWith and NoLongerCollidingWith
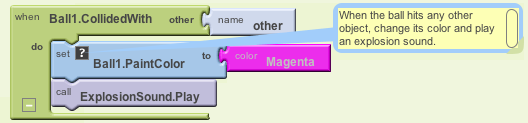
Shooting games, sports, and other animated apps often rely on activity occurring when two or more objects collide (e.g., a bullet hitting a target).
Consider a game, for instance, in which an object changes colors and plays an explosion sound when it hits another object. Figure 17-7 shows the blocks for such an event handler.
NoLongerCollidingWith provides the opposite event of CollidedWith. It is triggered only when two objects have come together and then separated. So, for your game, you might include blocks as shown in Figure 17-8.

Note that both CollidedWith and NoLongerCollidingWith have an
argument, other. other specifies
the particular object you collided with (or separated from). This
allows you to perform operations only when the object (e.g.,
Ball1) interacts with a
particular other object, as shown in Figure 17-9.
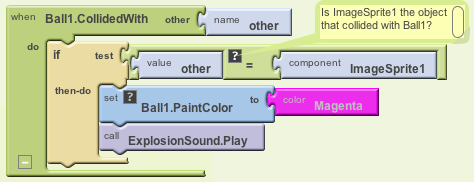
The component
ImageSprite1 block is one we haven’t yet
discussed. When you need to compare components (to know which ones
have collided), as in this example, you must have some way to refer
to a specific component. For this reason, each component has a
special block that refers to itself. So, in the drawer for ImageSprite1, you’ll find the component
ImageSprite1 block.
Interactive Animation
In the animated behaviors we’ve discussed so far, the end user isn’t involved. Of course, games are interactive, with the end user playing a central role. Often, the end user controls the speed or direction of an object with buttons or other user interface objects.
As an example, let’s update the diagonal animation by allowing the user to stop and start the diagonal movement. You can do this by programming a Button.Click event handler to disable and reenable the timer event of the clock component.
By default, the Clock
component’s timerEnabled property
is checked. You can disable it dynamically by setting it to false in
an event handler. The event handler in Figure 17-10, for example,
would stop the activity of a Clock
timer on the first click.

After the Clock1.TimerEnabled
property is set to false, the Clock1.Timer event will no longer
trigger, and the ball will stop moving.
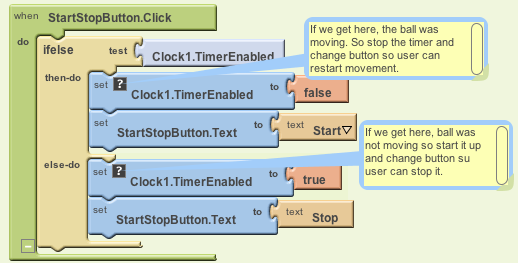
Of course, stopping the movement on the first click isn’t too interesting. Instead, you could “toggle” the movement of the ball by adding an ifelse in the event handler that either enables or disables the timer, as shown in Figure 17-11.
This event handler stops the timer on first click, and resets
the button so that it says “Start” instead of “Stop.” The second time
the user clicks the button, the TimerEnabled is false, so the “else” part is
executed. In this case, the timer is enabled, which gets the object
moving again, and the button text is switched back to “Stop.” For more
information about ifelse blocks, see Chapter 18, and for
examples of interactive animations that use the orientation sensor,
see Chapter 5 and Chapter 23.
Specifying Sprite Animation Without a Clock Timer
The animation samples described so far use a Clock component and specify that an object
should move each time the Clock’s
timer event is triggered. The Clock.Timer event scheme is the
most general method of specifying animation; other than moving an
object, you could also have it change an object’s color over time,
change some text (to appear as though the app is typing), or have the
app speak words at a certain pace.
For object movement, App Inventor provides an alternative that
doesn’t require the use of a Clock
component. As you may have noticed, the ImageSprite and Ball components have properties for Heading, Speed, and Interval. Instead of defining a Clock.Timer
event handler, you can set these properties in the Component Designer
or Blocks Editor to control how a sprite moves.
To illustrate, let’s reconsider the example that moved a ball
diagonally. The Heading property of
a sprite or ball has a range of 360 degrees, as seen in Figure 17-12.

If you set the Heading to 0,
the ball will move left to right. If you set it to 90, it will move
bottom to top. If you set it to 180, it will move right to left. If
you set it to 270, it will move top to bottom.
Of course, you can set it to any number between 0 and 360. To
move a ball diagonally from top left to bottom right, you’d set the
Heading to 315. You also need to
set the Speed property to a value
other than 0. The Speed property
works the same way as moving objects with MoveTo: it
specifies the number of pixels the object will move per time interval,
where the interval is defined by the object’s Interval property.
To try out these properties, create a test app with a Canvas and Ball and click “Connect to Phone” to see
your app. Then modify the Heading,
Speed, and Interval properties of the ball to see how
it moves.
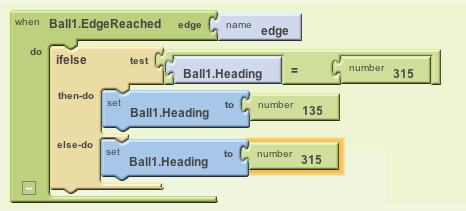
If you wanted the program to continually move from top left to
bottom right and then back, you’d initialize the ball’s Heading property to 315 in the Component
Designer. You’d then add the Ball1.EdgeReached event handler,
shown in Figure 17-13,
to change the ball’s direction when it reaches either edge.
Summary
Animation is an object being moved or otherwise transformed over
time, and App Inventor provides some high-level components and
functionality to facilitate it. By programming the Clock component’s Timer event, you can specify any type of
animation, including object movement—the fundamental activity in
almost any type of game.
The Canvas component allows
you to define a subarea of the device’s screen in which objects can
move around and interact. You can put only two types of components,
ImageSprites and Balls, within a Canvas. These components provide highlevel
functionality for handling events such as collisions and reaching a
Canvas edge. They also have
properties—Heading, Speed and Interval—that provide an alternative method
of movement.