
Chapter 11. Broadcast Hub
FrontlineSMS (http://www.frontlinesms.com) is a software tool used in developing countries to monitor elections, broadcast weather changes, and connect people who don’t have access to the Web but do have phones and mobile connectivity. It is the brainchild of Ken Banks, who has probably done more to help people using mobile technology than any other human alive.
FrontlineSMS runs on a computer with a phone plugged into it. The computer and plugged-in phone serve as a hub for SMS (short message service) text communication within a group. People who don’t have Internet access can send in a special code to join the group, after which they receive broadcast messages from the hub. For places with no Internet access, the broadcast hub can serve as a vital connection to the outside world.

With App Inventor, you can create your own SMS-processing app. The cool thing is that the people who use your app don’t need to have an Android phone. Your app will run on an Android device, but your app users can interface with it through SMS using any phone, smart or not so smart. Your app will still have a graphical user interface (GUI) as well, but that GUI will be reserved for the administrator who monitors the activity via the Android app you’re about to build.
In this chapter, you’ll create a hub that works similarly to FrontlineSMS but runs on an Android phone. Having the hub itself on a mobile device means the administrator can be on the move, something that is especially important in controversial situations like election monitoring and healthcare negotiations.
Your broadcast hub will be for the fictitious FlashMob Dance Team (FMDT), a group that uses the hub to organize flash mob dances anywhere, anytime. People will register with the group by texting “joinFMDT” to the hub, and anyone who is registered can broadcast messages to everyone else in the group.
Your app will process received text messages in the following manner:
If the text message is sent from someone not yet in the broadcast list, the app responds with a text that invites him to join the broadcast list and lets him know the code.
If the text message “joinFMDT” is received, the app adds the sender to the broadcast list.
If the text message is sent from a number already in the broadcast list, the message is broadcast to all numbers in the list.
You’ll build this app one piece of functionality at a time, starting with the first autoresponse message that invites people to join. By the time you complete this app, you’ll have a pretty good idea of how to write apps utilizing SMS text as the user interface.
What You’ll Learn
The tutorial covers the following App Inventor concepts, some of which you’re likely familiar with by now:
The
Textingcomponent for sending texts and processing received texts.List variables—in this case, to keep track of the list of phone numbers.
The foreach block to allow an app to repeat operations on a list of data. In this case, you’ll use foreach to broadcast messages to the list of phone numbers.
The
TinyDBcomponent to store data persistently. This means that if you close the app and then relaunch it, the list of phone numbers will still be there.
Getting Started
You’ll need a phone that can accept and send SMS texts to test this app, as the emulator that comes with App Inventor isn’t set up for this. You’ll also need to recruit some friends to send you texts in order to fully test the app.
Connect to the App Inventor website and start a new project. Name it “BroadcastHub” and also set the screen’s title to “Broadcast Hub”. Open the Blocks Editor and connect to the phone.
Designing the Components
Broadcast Hub facilitates communication between mobile phones. Those phones do not need to have the app installed, or even be smartphones. So, in this case, you’re not building an interface for your app’s users, but instead for the group administrator.
The user interface for the administrator is simple: it displays the current broadcast list—that is, the list of phone numbers that have registered for the service—and all of the texts it receives and broadcasts.
To build the interface, add the components listed in Table 11-1.
Component type | Palette group | What you’ll name it | Purpose |
| Basic |
| This is the header above the list of phone numbers. |
| Basic |
| Display the phone numbers that are registered. |
| Basic |
| This is the header above the log information. |
| Basic |
| Display a log of the texts received and broadcast. |
| Social |
| Process the texts. |
| Basic |
| Store the list of registered phone numbers. |
As you add the components, set the following properties:
Set the
Widthof each label to “Fill parent” so that it spans the phone horizontally.Set the
FontSizeof the header labels (Label1andLabel2) to 18 and check theirFontBoldboxes.Set the
HeightofBroadcastListLabelandLogLabelto 200 pixels. They’ll show multiple lines.Set the
Textproperty ofBroadcastListLabelto “Broadcast List...”.Set the
Textproperty ofLogLabelto blank.
Figure 11-1 shows the app layout in the Component Designer.

Adding Behaviors to the Components
The activity for Broadcast Hub is not triggered by the user entering information or clicking a button, but rather by texts coming in from other phones. To process these texts and store the phone numbers that sent them in a list, you’ll need the following behaviors:
When the text message is sent from someone not already in the broadcast list, the app responds with a text that invites the sender to join.
When the text message “joinFMDT” is received, register the sender as part of the broadcast list.
When the text message is sent from a number already in the broadcast list, the message is broadcast to all numbers in the list.
Let’s start by creating the first behavior: when you receive a text, send a message back to the sender inviting her to register by texting “joinFMDT” back to you. You’ll need the blocks listed in Table 11-2.
Drawer | Purpose | |
Texting1 | Triggered when the phone receives a text. | |
set Texting1.PhoneNumber to | Texting1 | Set the number for the return text. |
value number | My Definitions | The argument of
|
set Texting1.Message | Texting1 | Set the invite message to send. |
text (“To join this broadcast list, text ‘joinFMDT’ to this number”) | Text | The invite message. |
Texting1.SendMessage | Texting1 | Send it! |
How the Blocks Work
Based on the work you did in the No Texting While Driving app
in Chapter 4, these blocks should
look familiar. Texting1.MessageReceived is
triggered when the phone receives any text message. As shown in
Figure 11-2, the
blocks within the event handler set the PhoneNumber and Message of the Texting1 component and then send the
message.

Test your app.
You’ll need a second phone to test this behavior; you don’t want to text yourself, as it could loop forever! If you don’t have another phone, you can register with Google Voice or a similar service and send SMS texts from that service to your phone. From the second phone, send the text “hello” to the phone running the app. The second phone should then receive a text that invites it to join the group.
Adding Someone to the Broadcast List
Now let’s create the blocks for the second behavior: when the
text message “joinFMDT” is received, add the sender to the broadcast
list. First, you’ll need to define a list variable, BroadcastList, to store the phone numbers
that register. From Definitions, drag out a def var
block and name it “BroadcastList”. Initialize it to an empty list
with a make a
list block from the Lists drawer, as shown in
Figure 11-3 (we’ll
add the functionality to build this list shortly).
Next, modify the Texting1.MessageReceived event
handler so that it adds the sender’s phone number to the BroadcastList if the message received is
“joinFMDT.” You’ll need an ifelse block—which you used in
MakeQuiz in Chapter 10—within your
event handler, and an add item to list block to add the
new number to the list. The full set of blocks you’ll need is listed
in Table 11-3.
After you add the number to the list, display the new list in the
BroadcastListLabel.
Block type | Drawer | Purpose |
ifelse | Control | Depending on the message received, do different things. |
= | Math | Determine whether
|
value messageText | My Definitions | Plug this into the = block. |
text (“joinFMDT”) | Text | Plug this into the = block. |
Lists | Add the sender’s
number to | |
global BroadcastList | My Definitions | The list. |
value number | My Definitions | Plug this in as an item of add items to list. |
set BroadcastListLabel.Text to | BroadcastListLabel | Display the new list. |
global BroadcastList | My Definitions | Plug this in to set the BroadcastListLabel.Text to block. |
set Texting1.Message to | Texting1 | Prepare |
text (“Congrats, you...”) | Text | Congratulate the sender for joining the group. |
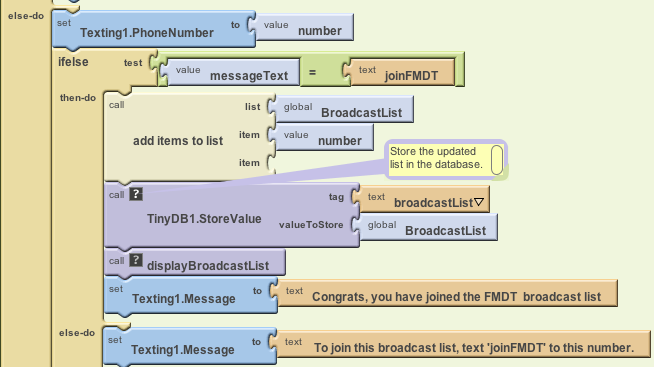
How the blocks work
The first row of blocks shown in Figure 11-4 sets
Texting1.PhoneNumber to the
phone number of the message that was just received; we know we’re
going to respond to the sender, so this sets that up. The app then
asks if the messageText was the
special code, “joinFMDT.” If so, the sender’s phone number is
added to the BroadcastList, and
a congratulations message is sent. If the messageText is something other than
“joinFMDT,” the reply message repeats the invitation message.
After the ifelse block, the reply message
is sent (bottom row of the blocks).

Test your app.
From a second phone, send the text message “joinFMDT” to the phone running the app. You should see the phone number listed in the user interface under “Registered Phone Numbers.” The second phone should also receive the Congrats message. Try sending a message other than “joinFMDT” as well to check if the invite message is still sent correctly.
Broadcasting Messages
Next, you’ll add the behavior so that the app broadcasts
received messages to the numbers in BroadcastList, but only if the message
arrives from a number already stored in that list. This additional
complexity will require more control blocks, including another
ifelse and a foreach.
You’ll need an additional ifelse block to check if the
number is in the list, and a foreach block to broadcast the
message to each number in the list. You’ll also need to move the
ifelse blocks from the previous
behavior and slot them into the “else” part of the new ifelse.
All the additional blocks you’ll need are listed in Table 11-4.
Block type | Drawer | Purpose |
Control | Depending on whether the sender is already in the list, do different things. | |
is in list? | Lists | Check to see if something is in a list. |
global BroadcastList | My Definitions | Plug this into the “list” slot of is in list?. |
value number | My Definitions | Plug this into the “thing” slot of is in list?. |
Control | Repeatedly send out a message to all members in the list. | |
global BroadcastList | My Definitions | Plug this into the “list” slot of foreach. |
set Texting1.Message to | Texting1 | Set the message. |
value messageText | My Definitions | The message that was received and will be broadcast. |
set Texting1.PhoneNumber to | Texting1 | Set the phone number. |
value var | My Definitions | Hold the current item
of the |
How the blocks work
The app has become complex enough that it requires a
nested ifelse block, as shown in Figure 11-5. A nested
ifelse block is one slotted
within the “if” or “else” part of another, outer ifelse.
In this case, the outer ifelse branch checks whether
the phone number of the received message is already in the list.
If it is, the message is relayed to everyone in the list. If the
number is not in the list, then the nested
test is performed: the blocks check if the messageText is equal to “joinFMDT” and
branches one of two ways based on the answer.
In general, if and ifelse blocks can be nested to arbitrary levels, giving you the power to program increasingly complex behaviors (see Chapter 18 for more information on conditional blocks).
The message is broadcast using a foreach
(within the outer then clause).
The foreach loops through and sends
the message to each item in the BroadcastList. As the foreach
repeats, each succeeding phone number from the BroadcastList is stored in var (var is a variable placeholder for the
current item being processed in the foreach). The blocks within the
foreach set Texting.PhoneNumber to the current item
var and then send the message.
For more information on how foreach works, see Chapter 20.

Cleaning Up Your List Display
The app can now broadcast messages, but the user interface for
the app administrator needs some work. First, the list of phone
numbers is displayed in an inelegant way. Specifically, when you
place a list variable into a label, it displays the list with spaces
between the items, fitting as much as possible on each line. So the
BroadcastListLabel might show the
BroadcastList like
this:
(+1415111-1111 +1415222-2222 +1415333-3333 +1415444-4444)
To improve this formatting, create a procedure displayBroadcastList using the blocks
listed in Table 11-5. This procedure
displays the list with each phone number on a separate line. Be sure
to call the procedure from below the add items to
list block so that the updated list is
displayed.
Block type | Drawer | Purpose |
to procedure (“displayBroadcastList”) | Definitions | Create the procedure (do not choose procedureWithResult). |
set BroadcastListLabel.Text to | BroadcastListLabel | Display the list here. |
text (“”) | Text | Click text and then click Delete to create an empty text object. |
foreach | Control | Iterate through the numbers. |
name pnumber | in the foreach | Name the foreach variable “pnumber”. This is the current item as iteration proceeds. |
global BroadcastList | My Definitions | Plug this into the “in list” slot of foreach. |
set BroadcastListLabel.Text to | BroadcastListLabel | Modify this with each of the numbers. |
make text | Text | Build a text object from multiple parts. |
BroadcastListLabel.Text | BroadcastListLabel | Add this to the label on each iteration of foreach. |
text (“ ”) | Text | Add a newline character so that the next number is on the next line. |
value pnumber | My Definitions | The current number from the list. |
How the blocks work
The foreach in displayBroadcastList successively adds a
phone number to the end of the label, as shown in Figure 11-6, placing a
newline character (
) between each item to place each number on a
new line.

Of course, this displayBroadcastList procedure will not
do anything unless you call it. Place a call to it in the
Texting1.MessageReceived event
handler, right below the call to add item to list. The call
should replace the blocks that simply set the BroadcastListLabel.Text to BroadcastList. The call
displayBroadcastList block can be found in
My Definitions.
Figure 11-7 shows how the relevant blocks within the Texting1.MessageReceived event handler should look.

For more information on using foreach to display a list, see Chapter 20. For more information about creating and calling procedures, see Chapter 21.
Logging the Broadcasted Texts
When a text is received and broadcast to the other phones, the
app should log that occurrence so the administrator can monitor the
activity. In the Component Designer, you added the label LogLabel to the user interface for this
purpose. Now, you’ll code some blocks that change LogLabel each time a new text
arrives.
You need to build a text that says something like “message
from +1415111–2222 was broadcast.” The number +1415111–2222 is not
fixed data—instead, it is the value of the argument number that comes with the MessageReceived event. So, to
build the text, you’ll concatenate the first part, “message from”,
with a value
number block and finally with the last part of
the message, the text “broadcast.”
As you’ve done in previous chapters, use make text to concatenate the parts using the blocks listed in Table 11-6.
Block type | Drawer | Purpose |
set LogLabel.Text to | LogLabel | Display the log here. |
make text | Text | Build a text object out of multiple parts. |
text (“message from”) | Text | This is the report message. |
value number | My Definitions | The sender’s phone number. |
text (“broadcast ”) | Text | Add the last part of “message from 111–2222 broadcast” and include newline. |
LogLabel.Text | LogLabel | Add a new log to the previous ones. |
How the blocks work
After broadcasting the received message to all of the
numbers in BroadcastList, the
app now modifies the LogLabel
to add a report of the just-broadcasted text, as shown in Figure 11-8. Note that
now we add the message to the beginning of the list instead of the
end, so the more recent message sent to the group shows up at the
top.
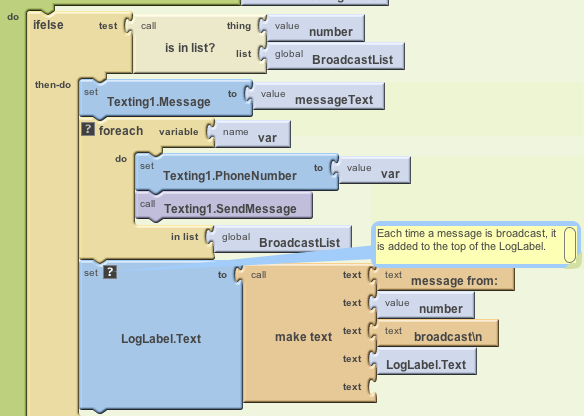
The make text block creates new entries of the form:
message from: 111-2222 broadcast
Each time a text is broadcast, the log entry is
prepended to (added to the front of) the
LogLabel.Text so that the most
recent entries will appear on top. The way you organize the
make
text block determines the ordering of the
entries. In this case, the new message is added with the top three
slots of make
text, and LogLabel.Text—which holds the existing
entries—is plugged into the last slot.
The “ ” in the text “broadcast ” is the newline character that displays each log entry on a separate line:
message from: 1112222 broadcast
message from: 555-6666 broadcast
For more information about using foreach to display a list, see Chapter 20.
Storing the BroadcastList in a Database
The app works great so far, but if you’ve completed some of
the earlier tutorials, you’ve probably guessed that there’s a
problem: if the administrator closes the app and relaunches it, the
broadcast list will be lost and everyone will have to reregister. To
fix this, you’ll use the TinyDB
component to store and retrieve the BroadcastList to and from a
database.
You’ll use a similar scheme to the one we used in the MakeQuiz app (Chapter 10):
Store the list to the database each time a new item is added.
When the app launches, load the list from the database into a variable.
Start by coding the blocks listed in Table 11-7 to store the list
in the database. With the TinyDB
component, a tag is used to identify the data and distinguish it
from other data stored in the database. In this case, you can tag
the data as “broadcastList.” You’ll add the blocks in the Texting1.MessageReceived event,
under the add items
to list block.
Block type | Drawer | Purpose |
TinyDB1.StoreValue | TinyDB1 | Store the data in the database. |
text (“broadcastList”) | Text | Plug this into the “tag” slot of StoreValue. |
global BroadcastList | My Definitions | Plug this into the “value” slot of StoreValue. |
How the blocks work
When a “joinFMDT” text comes in and the new member’s phone
number is added to the list, TinyDB1.StoreValue is called to
store the BroadcastList to the
database. The tag (a text object named “broadcastList”) is used so
that you can later retrieve the data. As shown in Figure 11-9, the value
that gets called by StoreValue is the variable
BroadcastList.
Loading the BroadcastList from a Database
Now add the blocks listed in Table 11-8 for loading the list back in each time the app launches. When the app begins, the Screen1.Initialize event is triggered, so your blocks will go in that event handler. You’ll call TinyDB.GetValue, using the same tag you used to store the list (“broadcastList”). At this point, as we’ve done in previous chapters that work with databases, we have to check if there is actually any data being returned. In this case, we’ll check if the returned value is a list, because it won’t be if there isn’t any data in the list yet.
How the blocks work
When the app begins, the Screen1.Initialize event is
triggered. The blocks shown in Figure 11-10 first
request the data from the database with TinyDB1.GetValue. The returned
data is placed in the variable valueFromDB, a variable defined to
temporarily hold it.
Block type | Drawer | Purpose |
def variable (“valueFromDB”) | Definition | A temporary variable for holding database data and checking it. |
text (“text”) | Text | An initial value
for |
Screen1.Initialize | Screen1 | Triggered when the app launches. |
set global valueFromDB to | My Definitions | Put the returned value here temporarily. |
TinyDB1.GetValue | TinyDB1 | Request the data from the database. |
text (“broadcastList”) | Text | Plug this into the “tag” slot of GetValue. |
if | Control | Check if the database had the data. |
is a list? | List | If the data returned is a list, we know it wasn’t empty. |
global valueFromDB | My Definitions | Plug this into is a list?. |
set global BroadcastList to | My Definitions | Set this to the value returned from the database. |
call displayBroadcastList | My Definitions | After loading data, display it. |
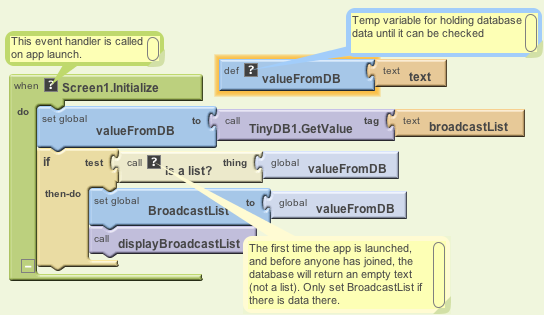
We need the if block in the event handler
because the database will return an empty text (“”) if it’s the
first time the app has been used and there isn’t yet a broadcast
list. By asking if the valueFromDB is a list, you’re making
sure there is some data actually returned. If there isn’t, you’ll
bypass the blocks that transfer the returned data (valueFromDB) into the variable BroadcastList and the blocks to display
that data.
Test your app.
You can’t use live testing for apps that modify the database because each time you click “Connect to Device,” the database starts out empty. So, to test the database storage and the Screen.Initialize event handler, you’ll need to package and download the app to a phone (you can download an app by choosing “Package for Phone”→“Download to Connected Phone” in the Component Designer). Once you’ve downloaded your app, use your second and third test phones to send a text to join the group and then close the app on your original phone. If the numbers are still listed when you relaunch the app, then the database part is working.
The Complete App: Broadcast Hub
Figure 11-11 illustrates the blocks in the completed Broadcast Hub app.

Variations
After you’ve celebrated building such a complex app, you might want to explore some variations. For example:
The app broadcasts each message to everyone, including the phone that sent the message. Modify this so that the message is broadcast to everyone but the sender.
Allow client phones to remove themselves from the list by texting “quitabc” to the app. You’ll need a remove from list block.
Let the hub administrator add and remove numbers from the broadcast list through the user interface.
Let the hub administrator specify numbers that should not be allowed into the list.
Customize the app so that anyone can join to receive messages, but only the administrator can broadcast messages.
Customize the app so that anyone can join to receive messages, but only a fixed list of phone numbers can broadcast messages to the group (this is how the Helsinki event app worked; see http://appinventorblog.com/2010/08/25/success-story-from-helsinki/).
The app stores the broadcast list persistently, but not the log. Each time you close the app and reopen it, the log starts over. Change this so that the log is persistent.
Summary
Here are some of the concepts we’ve covered in this tutorial:
Apps can react to events that are not initiated by the app user, like a text being received. That means you can build apps in which your users are on a different phone.
Nested ifelse and foreach blocks can be used to code complex behaviors. For more information on conditionals and foreach iteration, see Chapter 18 and Chapter 20, respectively.
The make text block can be used to build a text object out of multiple parts.
TinyDBcan be used to store and retrieve data from a database. A general scheme is to call StoreValue to update the database whenever the data changes and call GetValue to retrieve the database data when the app begins.