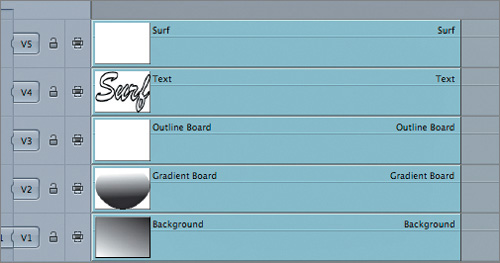
Lesson Files > Lesson 06 > Compositing.fcp | ||
Media | Surf Video | |
Time | This lesson takes approximately 90 minutes to complete. | |
Goals | Use motion parameters to transform clips | |
Create motion effects using the onscreen controls in the Canvas | ||
Reset attributes | ||
Apply composite modes to clips | ||
Copy and paste attributes from one clip to another | ||
Arrange multiple clips into a single composition | ||
Use the Crop and Distort tools | ||
Work with multilayered Photoshop files | ||
Construct Travel Matte effects |
Compositing is a general term that describes the act of combining multiple images onscreen at the same time. The result is called a composition. In Final Cut Pro, to composite images, you stack clips on multiple tracks at the same point in the Timeline. Compositing typically begins by modifying the scale, position, rotation, and other similar parameters of the clips involved.
Such parameters in Final Cut Pro geometrically transform images in your sequences. Using motion parameters such as Scale, Rotation, Center, and Crop, you can create anything from a simple split screen to a multilayered motion graphics sequence that integrates video and imported graphics. By mastering the manipulation of these parameters, you can create exciting visuals, as well as solve simple, everyday editing problems.
In this lesson, you will learn the fundamentals of motion properties and then create a finished composition—an opening sequence for a program about surfing culture. You also will learn how to quickly reshape, distort, reposition, crop, and superimpose video clips; save time by reusing motion settings; and refine your effects for professional results.
To begin, you’ll open a project file and change the window layout to one best suited for this kind of motion graphics work.
Open Lesson FIles > Lesson 06 > Compositing.fcp.
Double-click the Surf Intro sequence to open it into the Timeline, if it’s not already open.
Choose Window > Arrange > Two-Up.
By default, the Final Cut Pro standard window layout maximizes the area available for the Timeline by shrinking the Viewer and Canvas and making room for the Browser. Although this is an excellent layout for editing, you may find that the two-up window layout is more useful for working on effects because it increases the size of the Viewer and Canvas while reducing the Timeline’s width. Motion graphics and compositing tasks involve more activity in the Viewer and Canvas adjusting parameters and onscreen controls, and less activity in the Timeline. So, this redistribution of screen real estate makes sense.
If your computer’s display is big enough, you may want to increase the height of the Timeline so you can view more video tracks.
Move the playhead to the border between the Timeline and the Viewer or Canvas. When it turns into the Resize pointer, drag up the border to simultaneously resize all four windows in the interface.
You’ll find that different compositing tasks emphasize different parts of the interface. Some tasks require more room in the Canvas, others need more room in the Timeline or the Viewer. With the Final Cut Pro window resizing controls, you can quickly make room where you need it and keep your workspace organized.
To make even more room for your video clips in the Timeline, drag down the divider between the video and audio tracks.
With a few exceptions, most of the effects you’ll be using in this book will play in real time on current Macintosh systems. You should be aware, however, that Final Cut Pro includes a few options to optimize real-time playback performance on your computer. These settings are located at the top-left of the Timeline in the Real-Time Effects (RT) pop-up menu.

Clicking the RT pop-up menu reveals the following options:
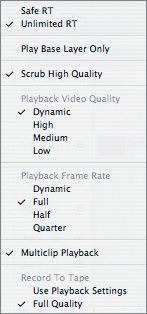
These settings allow you to maximize the real-time performance of your computer; the following settings are especially important:
Safe RT restricts Final Cut Pro to displaying only those effects that can be played in real time at the current frame rate of your project. Sections of your Timeline that exceed your computer’s capabilities are not displayed, and they are identified by a red render bar at the top of the Timeline ruler. By using Safe RT, you avoid the likelihood of your playback being interrupted by dropped frames (stuttering playback).
Unlimited RT frees Final Cut Pro to attempt the processing and playback of effects combinations that exceed the guaranteed capabilities of your computer. In other words, if you’re piling on more effects than your Mac can reasonably handle, it’ll try to process them anyway. Sections of your sequence that trigger this behavior are identified by an orange render bar at the top of the Timeline ruler. Unlimited RT playback may result in dropped frames as your Mac attempts to keep up with the processing demands placed upon it.
In both the Playback Video Quality and Playback Frame Rate sections, choosing Dynamic allows Final Cut Pro to dynamically reduce and increase the resolution and/or frame rate of the Canvas to continue real-time playback of effects. For consistency, if you want to fix the quality at which your images play back onscreen, you can choose one of the resolutions or frame rates that appear below in the RT pop-up menu. Lower resolutions and frame rates exchange image quality for increased real-time playback capabilities when you’re working with effects-intensive projects.
In the current project, the Browser contains a project file that shows Unlimited RT in action.
Double-click the Unlimited RT Demo sequence to open it into the Timeline.
Depending on your computer’s capabilities, the three sections of the sequence containing effects should have orange render bars.

Play the sequence, and watch the results in the Canvas.
As the sequence plays, you should observe that playback is smooth in the sections of the sequence with no effects, and you see varying numbers of dropped frames in each orange bar–marked Unlimited RT section. This is an exceptionally useful mode in which to work because you can see real-time previews of your compositions regardless of the type or quantity of effects you use. This defers the need to render a sequence until you have to see the final, full-resolution result.
Position your mouse over the orange area of the render bar to activate the tooltip.

The tooltip indicates what effect is requiring Final Cut Pro to activate Unlimited RT mode.
Position your mouse pointer over several areas of the render bar to see other indications that the Render Bar tooltip can display.
Raw media files are indicated as such, as are areas that have already been rendered.
In the Timeline, Control-click the Unlimited RT Demo tab and choose Close from the shortcut menu.
One last note before you get started: The image quality of effects in the Canvas will vary depending on the effects you’ve applied and your computer’s ability to keep up with the processing demands of Final Cut Pro.
Clips in the Timeline identified with green, yellow, dark yellow, or orange render bars are displaying approximations of their final appearance. This is useful for quickly seeing the results of your work, but when your project is complete you should always render these sections to verify the appearance of the final effect.
Effects in these color-identified sections of the Timeline are always rendered prior to being printed to video or edited to tape unless you override this behavior by opening the RT pop-up menu and choosing the Record to Tape > Use Playback Settings option. Video exported to QuickTime or that uses Compressor is always rendered at full quality.
Before diving into the Surf lesson, take a moment to review the most common ways you can transform clips. These techniques will be used extensively in later exercises.
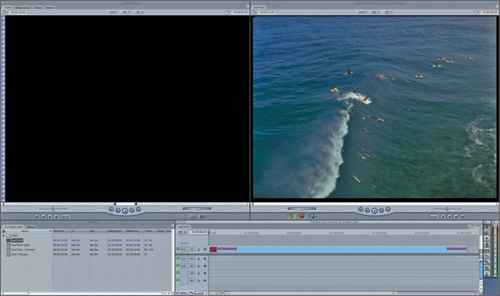
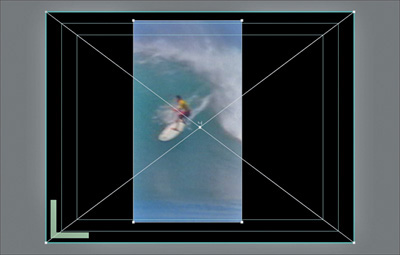
Double-click Surf_Background in the Timeline to open it into the Viewer, and click the Motion tab.
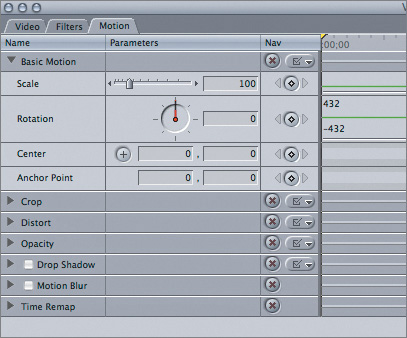
The Motion tab contains motion parameters associated with every video clip. The controls in this tab are separated into groups, which you can open or close by clicking the disclosure triangles to the right of each group name. By default, the Basic Motion parameters are exposed, revealing the Scale, Rotation, Center, and Anchor Point controls.
Drag the Scale slider to the left, until it’s set at around 60.
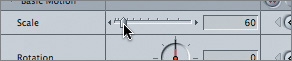
As you make this adjustment, you can see the clip shrink in the Canvas.

The Scale parameter is a simple percentage, which can be adjusted from 0 (which makes the image non-existent) to 1000. Be aware that enlarging an image beyond 100 will result in a softening of the image.
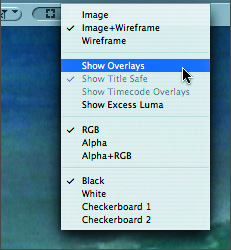
In the Canvas, click the View pop-up menu, and choose Image+Wireframe.

This option makes a wireframe appear over the selected clip in the Canvas. If you don’t see the wireframe, either the playhead isn’t over the selected clip, or no clip is selected. To select a clip, click it in the Canvas or in the Timeline.

Tip
Double-clicking a clip, either in the Canvas (in Wireframe mode) or in the Timeline, opens that clip into the Viewer.
Wireframes serve two purposes. First, they let you know which clips are selected. Second, they provide you with onscreen controls to graphically adjust most of the motion parameters (displayed in the Motion tab of the Viewer) in the Canvas.
In the Canvas, move the pointer directly over one of the corner handles of the wireframe.
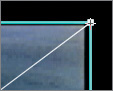
When the arrow turns into a crosshair, drag the corner point toward the center of the Canvas to shrink the clip.

Tip
If your pointer changes to the Window Resize pointer instead of the crosshairs, dragging will resize the windows rather than resize the clip. Be sure to see which pointer is active before dragging.
As you drag the clip’s corner, notice how the Scale parameter updates in the Motion tab of the Viewer. By default, resizing is done proportionally, around the center of the clip.
Shift-click one of the wireframe corners, and drag it up and to the left.
By pressing the Shift key while you resize an image in the Canvas, you can resize it freely, squeezing or stretching it out of its original proportions by simultaneously adjusting the Aspect Ratio parameter (currently hidden in the Distort parameter group in the Motion tab of the Viewer).
Position your pointer over any edge of the clip.
The Rotate pointer appears.
Drag the edge of the clip to rotate it.
Position your pointer anywhere over the body of the clip.
The Rotate arrow changes to a Move pointer (a crosshair with arrows on each end).
Drag the clip to change its position in the Canvas.
Notice that the Center Point control in the Viewer updates to reflect the new value.
Shift-drag the clip from anywhere in the body of the object, left to right or up and down.
Pressing Shift constrains clip movement to horizontal or vertical directions.
For every action you make in the Canvas, the values in the Motion tab are updated. And similarly, modifying the values in the Motion tab automatically updates the Canvas (assuming the Canvas is currently parked on the clip open in the Viewer).
Both methods have their benefits. If you want to set precise numerical values, it is far easier to use the Motion tab, but if you want to observe the intuitive feedback and get a general feel for the effect, dragging in the Canvas is superior.
Before you continue, it’s critical to know how to undo all of these changes and reset the clip to its native state. Aside from manually returning each parameter to its default settings, there are two ways you can restore a clip’s attributes.
Click the Reset button, located in the Motion tab of the Viewer to the right of the Basic Motion section header.

This button resets all the controls in the Basic Motion section. Unfortunately, it doesn’t restore the Aspect Ratio parameter located in the Distort parameter group. Fortunately, another method for resetting a clip’s parameters is more comprehensive.
In the Timeline, Control-click the Surf_Background clip, and choose Remove Attributes from the shortcut menu.

In the Remove Attributes dialog that appears, select the parameter groups you want to restore to their default settings and click OK. By default, the Distort setting is already selected.
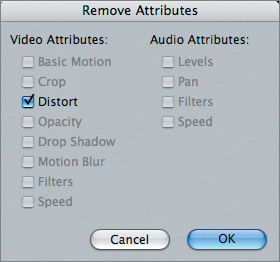
The image is now returned to its default size and position, ready for you to create your first composition.
The Remove Attributes dialog displays checkboxes for every parameter group, filter, and speed setting that can be applied to a group. If you want to immediately set a clip to its default state, this is the way to do it.
Tip
You can also use the Remove Attributes dialog to remove attributes from multiple clips at once. For instance, one clip may have a filter and another clip may have an altered motion setting. Simply select all clips with effects, Control-click, and choose Remove Attributes from the shortcut menu. Then select the attributes you want to remove from all of the clips.
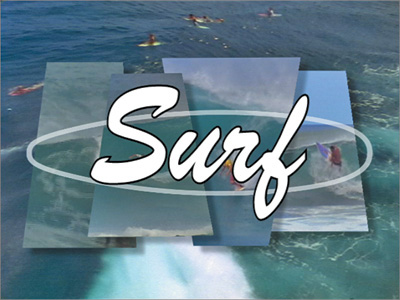
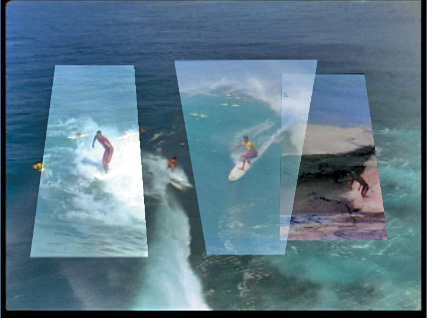
In this exercise, you’ll build on the previously described techniques to create an intro for a video program on surfing, imaginatively titled Surf. As is typical for many show opens, a wealth of unused B-roll was made available from the shoot, providing you with the opportunity to create a multilayered composition of surfing shots. A designer has also provided a multilayered Photoshop file that you will use as the actual title and logo for the show.
The final composition will consist of a background clip, four foreground clips, and four graphics layers on top of that. In the process of marrying all of these elements together, you’ll combine many compositing techniques used to create motion graphics for video.
Before you get started, take a look at the final product to orient yourself.
Double-click the Surf Intro - Finished sequence to open it into the Timeline.
Press the Spacebar to play the sequence.
Note
If your computer is dropping too many frames to keep up with all the effects in this sequence, make the Timeline or Canvas the active window, and choose Sequence > Render All > Both (Option-R) to render the sequence prior to playing it.
As you work on the exercises in this lesson, feel free to refer to the finished version of the project by clicking back and forth between the Surf Intro and Surf Intro - Finished tabs in the Timeline or Canvas. This should help guide your adjustments.
The first thing you need to do is edit in the clips you want to use in this composition. Because you’ll be superimposing clips throughout the lessons in this book, a small refresher on the subject is probably in order to ensure that you can perform this step as quickly as possible.
Click the Surf Intro tab.
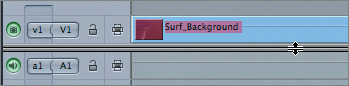
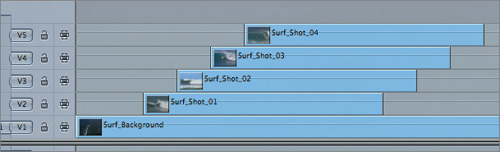
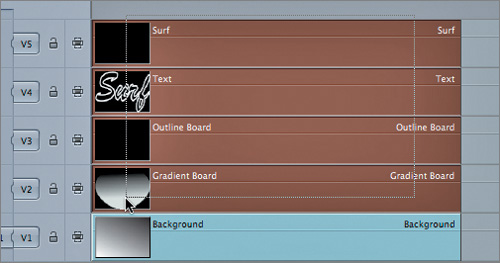
There’s a single item in the Timeline: the Surf_Background clip that happens to be the placeholder clip from your imaginary original program. You need to superimpose the clips that you’ll arrange in the middle of this composition.
In the Browser, open the Clips bin.
There are two ways to edit superimposed clips into a sequence.
Press Home to move the playhead to the beginning of the sequence, then drag the Surf_Shot_02 clip into the Canvas and drop it onto the Superimpose Edit Overlay.
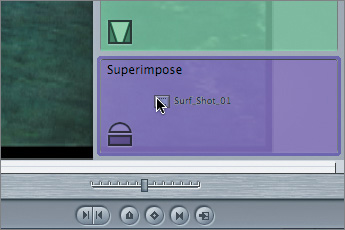
A new video track is created above track V1, and the clip is edited into it. You can also superimpose the clips by using keyboard shortcuts.
With the Timeline active, press Home to move the playhead back to the beginning of the sequence in the Timeline. Press Command-4 to make the Browser active, use the arrow keys to select the Surf_Shot_01 clip, and press the Return key to open that clip into the Viewer. Press F12 to edit the selected clip into the sequence with a superimpose edit.
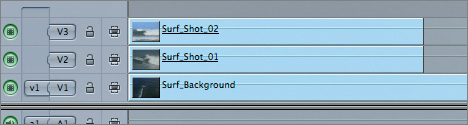
Notice that Surf_Shot_01 has been superimposed over the track indicated by the source/destination controls, which is still track V1. The first clip you edited in, Surf_Shot_02, moved up to a new video track to make room. This demonstrates that superimposed clips are always edited into a sequence above the destination track. If there are clips already in the track above, they’re all moved up one track to make room.
The second method of superimposing clips in the Timeline is a more hands-on technique (for those of you who prefer to keep your hands on the mouse).
Drag the Surf_Shot_03 clip to the beginning of the Timeline and drop it into the gray area above track V3.
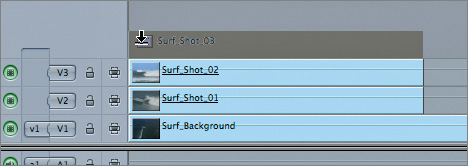
A new video track is created, and the clip is edited in above the other clips. One advantage to dragging a clip into place is that it spares you the step of changing the source/destination track pairing when you want to add a clip to the very top of a growing stack of clips.
Note
In this latest method, the clip will snap, if snapping is turned on, so you can use the beginning of the clip in the Timeline or the playhead for precise alignment. Like most of the GUI direct manipulation functions, this very intuitive method is faster if you’re using a graphics tablet as your interface.
Drag the Surf_Shot_04 clip to the top of the superimposed stack of clips. These are all of the video clips you’ll be using for this opening sequence.
Cropping allows you to cut off part of the top, bottom, and sides of an image. You might do this to hide unwanted edges of an image, to eliminate all but just the portion of a clip you want for your composition, or to open up room for other images.
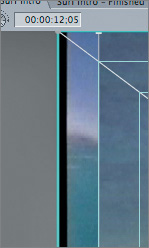
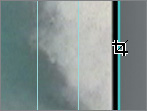
If you look closely in the Canvas in the following figure, you’ll notice a thin black border at the edges of the image.
Borders such as these along one or more edges of the frame are a common occurrence in video from a variety of sources. Many camcorders commonly record these black borders along one side of the frame. Some video capture cards introduce similar borders. In other cases, the equipment used to telecine film to video may introduce such borders.
In this exercise, you’ll trim these unwanted borders from clips that are resized and superimposed into the overall composition. You’ll also crop into some of the images to make room for other elements. Along the way, you’ll turn on features in the Canvas that make it easier for you to perform these and other compositing tasks.
Move the playhead to the beginning of the sequence, and from the View pop-up menu, choose Show Overlays. If you don’t see the title safe boundaries, choose Show Title Safe from the View pop-up menu.
The title safe boundaries appear in the Canvas.
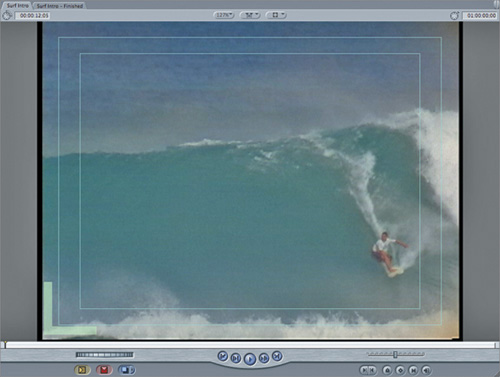
As you create compositing layouts for broadcast video programs, it’s typical to refer to the title and action safe boundaries of the picture. Most home televisions display a video image by overscanning it. In other words, approximately 10 to 20 percent of the outer parts of the image is “cut off” behind the bezel of the television, to provide a “full-screen” image. This overscan hid the fact that older television tubes had significant distortion due to the curves at the edges of the screen. These problems are less severe or alleviated altogether with modern flat-screen and flat-panel TVs.
However, to give guidance to the motion graphics designer, the outer boundary indicates the action safe area, which is the area you can reliably expect will be cut off by most televisions (consisting of the outer 10 percent). The inner boundary indicates the title safe area (which excludes the outer 20 percent of the picture) that should be visible and undistorted on virtually every television.
In this image, you can see a common aspect found in many captured clips: a thin black border. Some video clips have this along only one side, and others clips have more (such as footage that originated on film and was telecined to video). Compared to the outer action safe boundary, you can assume that this part of the picture will be outside the area that anyone will see on television. On the other hand, if you intend to resize the image to fit within a composition (as in this example), you can’t let these borders show.
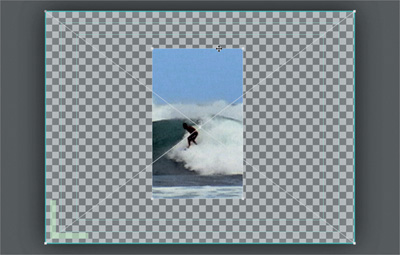
In the Timeline, double-click Surf_Shot_04 to open it into the Viewer. Click the Motion tab, and then click the disclosure triangle next to the Crop parameter group.
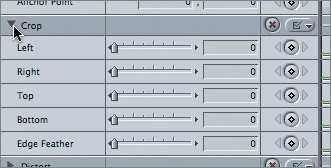
Drag the Left slider to the right until you’ve cropped the image all the way to the action safe boundary.
As you crop the top image, notice that the area being cropped is indicated by a separate crop wireframe, and the images that appear underneath start to peek through.
The sliders are really useful when you need to make precise adjustments. However, there’s a tool you can use to crop images directly in the Canvas that’s a little more interactive.
Click the Crop tool.

In the Canvas, move the pointer to the right edge of the image. When the pointer turns into the Crop pointer, drag the edge to the left, all the way to the action safe boundary, to crop it.
This would be useful if you just wanted to exclude the unwanted border around the image prior to shrinking it, but you actually want to crop in to isolate the surfer within the frame.
From the Zoom menu at the top of the Canvas, choose Fit All.
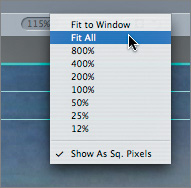
The image in the Canvas shrinks to display more gray border around the image. This makes it easier to manipulate the outer edges of wireframes located at the edge of the frame. You could also do this by reducing the magnification of the image, but Fit All is an automatic operation.
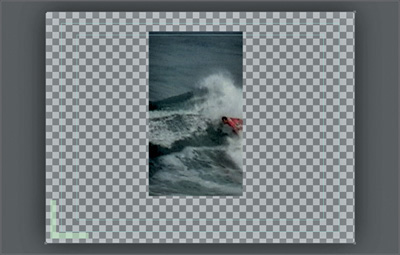
In the Canvas, scrub through Surf_Shot_04 to get a sense of where the surfer goes in the frame.
In this clip, the surfer moves from his position at the right of the frame to a point just about halfway through the frame, before he “cuts back.”
Use the Crop tool on the right edge of Surf_Shot_04 to drag the crop wireframe to touch the surfer at the beginning of this motion, and drag the crop wireframe at the left edge of the clip to touch the surfer at the end of his motion. Also, crop just a little of the top and bottom of the image to get rid of the black border.
Next, you’ll crop each superimposed clip to isolate the greatest area of motion. With so many clips in the Canvas, however, operating on the wireframe of a layer underneath can be difficult, so you should solo each video track containing the clip you want to work on.
Option-click the Track Visibility control for track V4.

This control turns off the visibility of every other video track, leaving just the clips in the track you Option-clicked visible. Option-clicking the same Track Visibility control a second time makes all of the tracks visible again.
In the Canvas, click the clip.
Notice that selecting the clip in the Canvas also highlights it in the Timeline. The opposite also works. Selecting a clip in the Timeline also highlights that clip in the Canvas. This is a good way to select clips that may appear underneath other clips in a multilayered composition, as well as to select multiple clips for simultaneous operations.
So far, you’ve been individually cropping each side of an image. You can also crop two adjacent sides at once using the corner crop handles.
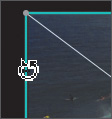
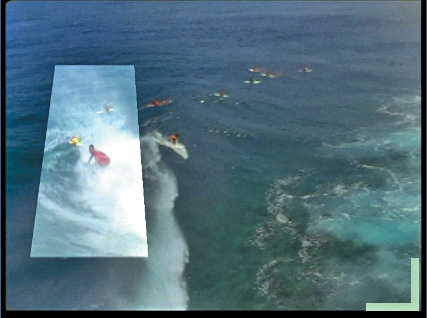
Move the Crop tool to the upper-right corner of the selected clip in the Canvas, and drag down and left to crop the top and right sides at the same time.
Using the corner crop handles, crop all four sides of Surf_Shot_03 to isolate and center the surfer within a smaller region.
Because the Surf_Background clip is also hidden, you can clearly see the background of the sequence, which defaults to black. Sometimes, to more clearly see what you’re doing, it helps to choose a different background, strictly for display purposes.
In the View pop-up menu in the Canvas, choose Checkerboard 1.
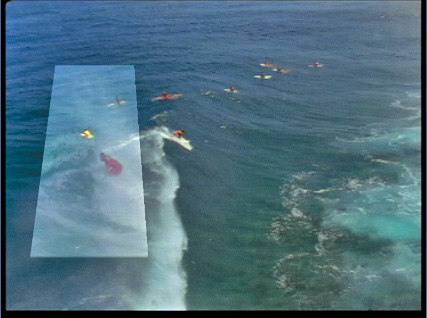
In the Canvas, click Surf_Shot_02 to display the wireframe, and crop the four sides to similarly isolate the surfer’s movement within a smaller frame. (This time, crop the top and bottom a little closer.)
As you make this adjustment, you can see the clip image against a checkered background.
As with the resizing operations you performed, there are also keyboard shortcuts you can use to alter the behavior of the Crop tool.
Option-click the Track visibility control for track V3 to return all tracks to visibility.
Another way to isolate a clip is to use the solo command.
In the Canvas, click the isolated clip to display its wireframe, then press Command while you drag the left side of the image to crop both sides evenly.
Press Command and drag down the top edge of the clip to crop the top and bottom of the clip by the same amount.
Press Control-S to unsolo the clip, re-enabling all of the clips in the Timeline.
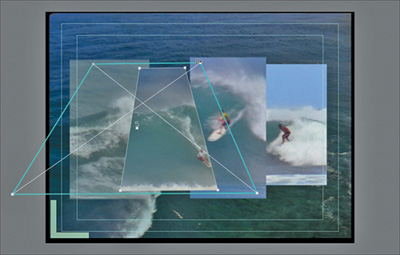
Now that you’ve cropped each of the superimposed clips, it’s time to arrange them horizontally in the Canvas. In the process, you’ll control the selection of clips using onscreen controls in the Canvas and items in the Timeline.
Press Home to return the playhead to the beginning of the sequence.
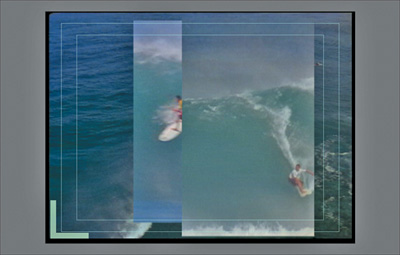
As you can see, the topmost clip is Surf_Shot_04. Clip ordering in the Canvas depends on the track order in the Timeline—clips in higher-numbered video tracks appear in front of clips in lower-numbered video tracks.
Double-click Surf_Shot_04 to open it into the Viewer, and click the Motion tab, if necessary, to view the clip’s motion parameters.
It’s not necessary to open a clip into the Viewer to transform it in the Canvas, but looking at its settings in the Motion tab while you make adjustments lets you see the numeric value of the changes you’re making.
Press the A key to switch to the default Selection tool, and drag one of the four resize handles (the outer corners, not the inner crop handles) toward the center of the clip until the value of the Scale parameter is around 56. It’s not necessary to be exact.

Double-click Surf_Shot_03 to open it into the Viewer, and drag one of its resize handles toward the center of the clip until the value of the Scale parameter is around 70. It’s not necessary to be exact.
Tip
When you open a clip into the Viewer, whichever tab was open for the previous clip remains open but it is updated to reflect the settings of the newly-opened clip.
At this point, the clips underneath the top two clips in the Timeline are getting obscured. It’s time to move the top two clips into position.
Open Surf_Shot_04 in the Viewer, then Shift-drag the clip to the left until the first value in the Center parameter is about –147.
Note
You may have to release the mouse button periodically to let the Center parameter in the Motion tab update to its current position.
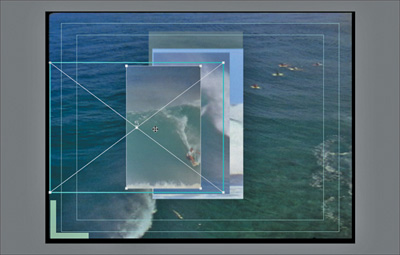
Select Surf_Shot_03 in either the Timeline or Canvas, and Shift-drag it to the right to roughly match this position:
Double-click Surf_Shot_03 to open its settings in the Viewer. If you look at the Motion tab, you’ll see that the Center parameter’s value is about 85.
At this point, the onscreen controls of the two front clips are obscuring those of the clips below them. Fortunately, you can still select any clip in the Canvas by selecting it in the Timeline.
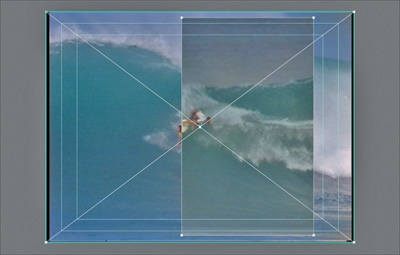
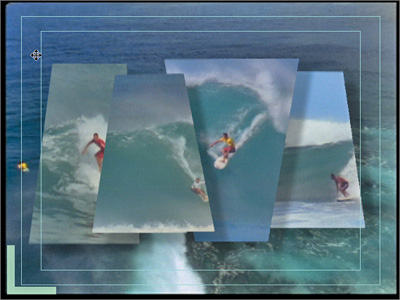
Move and resize the remaining two clips until your composition in the Canvas resembles this:
From time to time, you’ll find yourself wanting to nudge a clip’s position in the Canvas one pixel at a time. Other compositing applications typically use the arrow keys for this function. In Final Cut Pro, the arrow keys are used to navigate and position clips temporally in the Timeline. However, selecting a clip and then pressing Option with an arrow key lets you nudge a clip spatially in the Canvas.
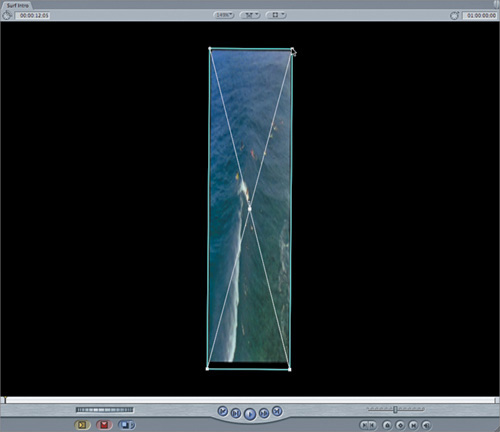
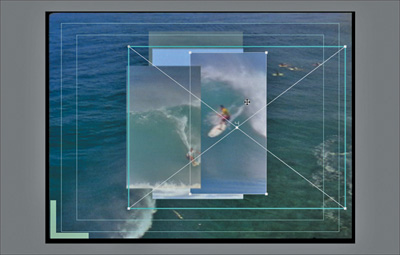
The settings in the Distort parameter group of the Motion tab are useful for many purposes. By adjusting the Aspect Ratio slider, you can mix 4:3 and 16:9 material in the same sequence. By using the corner parameters or the Distort tool in the Tool palette, you can warp an image by its corner handles to create artificial perspective, to make an image fit into a design, or to fit the clip into a composite (such as making a graphic look like a sign on a wall by matching the perspective of the wall).
In this exercise, you’ll use the Distort tool to add some angles to your design.
In the Tool palette, click the Crop icon and hold down the mouse button. When the related tools appear, select the Distort tool and release the mouse button.
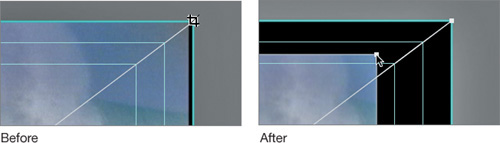
Select Surf_Shot_04, then drag each of the four corner handles (not the inner crop handles) to warp the image so that it looks like this:
Using the Distort tool, you can independently drag each corner handle to create a wide range of effects.
Select Surf_Shot_03, and Shift-drag the upper-left corner to the left using the Distort tool.
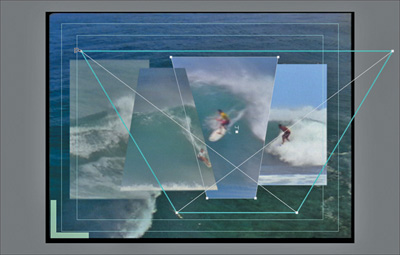
The top corners move outward simultaneously as the bottom corners move inward, simulating a perspective shift, as if the clip were tilting.
Use the Distort tool to warp Surf_Shot_02 and Surf_Shot_01 to look like this:
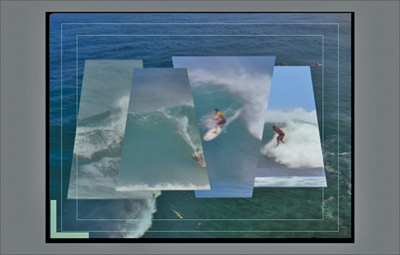
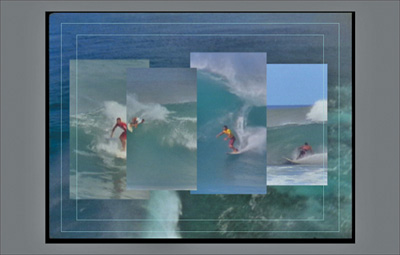
At this point, the layout is starting to take shape, but it’s a little static. An easy way to add some life to the composition is to stagger the introduction of each of the clips so they appear one at a time. You can then take advantage of their pre-edited durations to have them fade out, one at a time, making room for the title graphic to be added later.
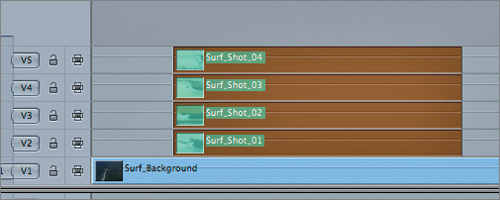
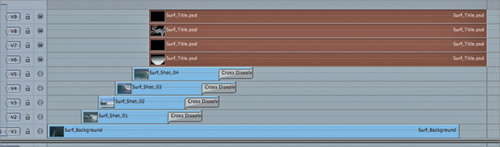
Drag to select all of the superimposed clips above the Surf_Background clip in the Timeline.

Type 1. (1 period) so that a special indicator appears at the top of the Timeline. Press Return.

The period is a placeholder for two zeros, so you’ve specified that the selected clips should move 1 second forward.
Command-click Surf_Shot_01 to deselect it while leaving the clips above selected. Then type +15 and press Return to move the selected clips forward 15 frames in the Timeline.
Keep moving the clips forward in staggered fashion, deselecting the bottom clip by Command-clicking it, and shifting the remaining selected clips forward by 15 frames until the sequence looks like this:
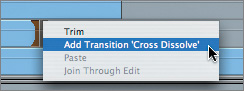
Control-click the end point of each clip, and choose Add Transition ‘Cross Dissolve’ from the shortcut menu.
Note
If your default transition is not set to Cross Dissolve, you can set it to be the default by Control-clicking on the Cross Dissolve transition in the Effects tab.
After you’ve added a dissolve to the end of each clip, your sequence should resemble this:
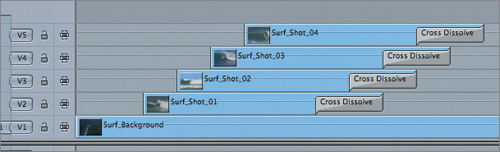
Play the sequence from the beginning.
Each clip should appear 15 frames later than the previous one, dissolving away in the same staggered order.
Whenever two objects overlap in a video composite, you can mix the images in a variety of ways. The simplest is for one image to completely obscure another, or you can attenuate the opacity of the top image to create transparency.
Additionally, you can mix the pixels of the two images together in a mathematical equation, such as adding or subtracting the values together. The results of such combinations can be significantly different than either of the images looked originally. Such operations are called composite modes, and Final Cut Pro has several to choose from.
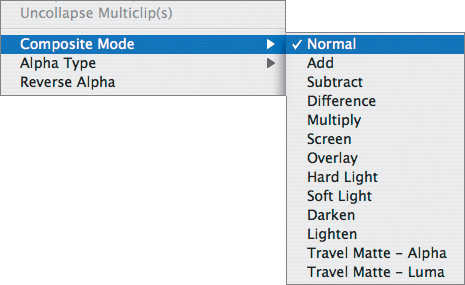
Some composite modes have an overall darkening effect, and some have an overall lightening effect. Some invert color values, and others do a combination of things. Composite mode effects tend to have seemingly unpredictable results, and in most cases the best procedure is to experiment and try different ones.
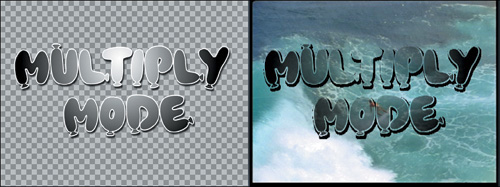
The composite modes that behave the most predictably are Multiply and Screen. A Multiply effect will only combine the dark portions of the clip, leaving the lighter areas unaffected. Drop shadows are traditionally applied using a Multiply mode, so that the shadow appears to darken the background, without having any impact on the lighter areas.
Conversely, the Screen mode adds only the lightest areas of the clip. Typically, effects like lightning bolts or explosions are combined using a Screen effect so that the background clip is illuminated without affecting the darker areas of the clip.

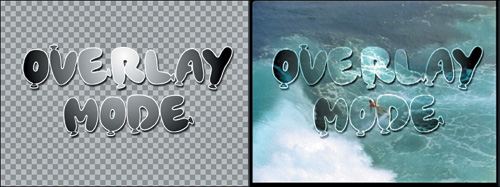
Overlay does a sort of combination of Multiply and Screen, affecting the darkest and lightest areas of an image without affecting the midrange values.
Composite modes are easy to apply and fun to experiment with.
Select Surf_Shot_01 in the Timeline.
Choose Modify > Composite Mode > Add.
The Add composite mode tends to make the composition brighter. You can moderate the effect by changing the foreground clip’s opacity.
In the Timeline, click the Clip Overlays control to display the opacity overlays.
Adjust the overlay for Surf_Shot_01 to about 50%.
Control-click Surf_Shot_02 and choose Composite Mode > Difference from the shortcut menu.

Difference is one of the most unpredictable composite modes.
Control-click Surf_Shot_03 and choose Composite Mode > Screen from the shortcut menu.
As you can see, each of the modes has a unique and interesting effect. Experiment with the different modes yourself, and don’t forget to see how opacity changes moderate the effect.
Now it’s time to add the title graphics. In this project, the title graphics have been created as a layered Adobe Photoshop file. Final Cut Pro can import files from any version of Photoshop. However, Final Cut Pro supports only those features available in Photoshop 3. Opacity settings, composite modes (only those available in Photoshop 3), layer order, and layer names are imported; but newer features appearing in versions of Photoshop 4.0 and later, such as layer effects and editable text, are not supported.
Layered Photoshop files are imported like any other media file, but the way they appear inside your project is quite different.
Choose File > Import > Files, and select Surf_Title.psd from the Media > Surf Video folder.
Note
If you have trouble finding the Surf_Title.psd file, it’s also inside the Clips bin in the Browser.
As you can see, instead of being imported as a clip, the layered Photoshop file has been imported as a sequence.
In the Browser, double-click Surf_Title.psd.
Like any sequence, it opens in the Timeline. There, each layer of the Photoshop file has been translated into a still image on an individual video track.
From the Zoom pop-up menu at the top of the Canvas, choose Fit All.
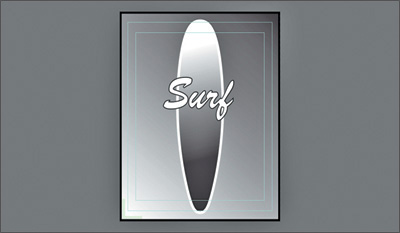
You can see that the graphic itself is quite large. It’s fairly typical for motion graphics artists to provide artwork at a larger size than it will eventually be used. That way, you don’t have to enlarge any clips beyond 100 percent and risk softening the image if it is later decided to enlarge the graphics.
Turn off the Track Visibility control for track V1, which contains the background clip.
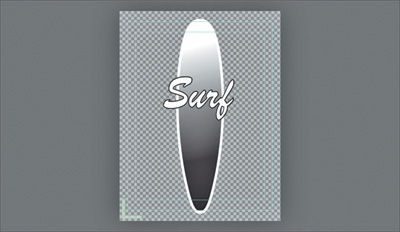
You can tell from the checkerboard background that the top four layers have a built-in alpha channel. An alpha channel is a fourth image channel—in addition to the red, green, and blue channels—that defines regions of transparency in an image.
From the View pop-up menu, choose Alpha.
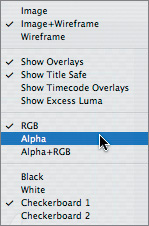
This sets the Canvas to display the alpha channel as a grayscale image.

White areas of the alpha channel are 100 percent solid; black areas are 100 percent transparent. Gray areas of an alpha channel (if there are any) represent the semi-translucent values in between, with light-gray areas being more translucent than dark-gray areas.
From the View pop-up menu, choose RGB to display the image.
In your composition, you need only the top four images, so you’ll copy and paste these into the sequence you’ve been working on.
Drag to select the clips in tracks V2 through V5, then press Command-C to copy them.
At the top of the Timeline, click the Surf Intro tab.
If you simply pasted these clips into your Timeline, the default behavior would be to paste them into the same tracks from which they originated, starting at the position of the playhead. Unfortunately, this would overwrite the existing clips in your sequence. You can override this behavior by using the Auto Select controls in the Timeline header.
The Auto Select controls let you determine which tracks in the Timeline are affected by operations such as filters, edits, and copying and pasting.
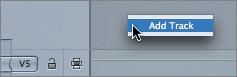
Control-click the gray area above the top video track in the Timeline and choose Add Track from the shortcut menu.
Option-click the Auto Select control for track V6.
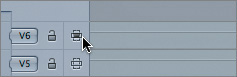
Option-clicking an Auto Select control turns on that control and turns off all the other Auto Select controls, effectively “soloing” it. Option-clicking a soloed Auto Select control turns back on all the other Auto Select controls.
Move the playhead to 01:00:03:00, and press Command-V to paste the copied clips to track V6 (and above).
All of the superimposed graphics you copied are pasted into your composition sequence, with the bottommost graphic layer appearing in the Auto Select–enabled track, and all the other superimposed graphics clips appearing above it, automatically making new video tracks.
In the Canvas, the graphics now appear superimposed over all of the other clips you’ve just placed.
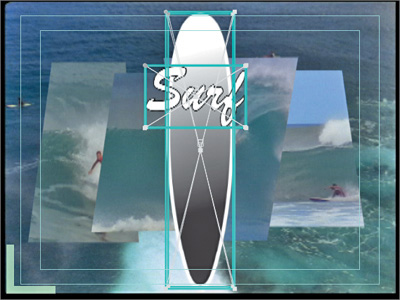
Next, you’ll want to rotate the surfboard so that it’s horizontal.
Press Shift-Command-A to deselect all the clips in the Timeline, and then select the clip in track V6 so that you’re selecting only the surfboard graphic (not the text).
Press A to switch to the Selection tool, then move the pointer to the inner corner of the upper-right wireframe handle.

When the arrow becomes the Rotate pointer, drag in a circular motion to rotate the clips in the Canvas.
You can freely rotate any clip about its anchor point, but there’s a keyboard shortcut that’s really handy when you want to rotate a clip in 45-degree increments.
Press the Shift key. With the Rotate pointer, drag the inner corner of a wireframe handle. Notice how the graphic snaps vertically, diagonally, and horizontally. Drag the surfboard logo’s gradient layer so that it’s horizontal.
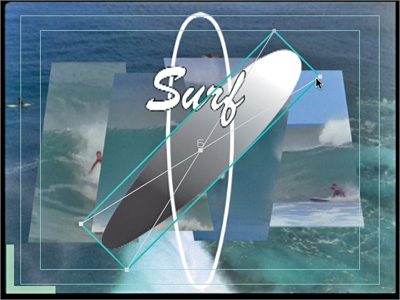
On track V7, select the surfboard outline and press the Shift key while dragging its rotation onscreen control to match the orientation of the surfboard logo gradient layer you rotated in step 4.
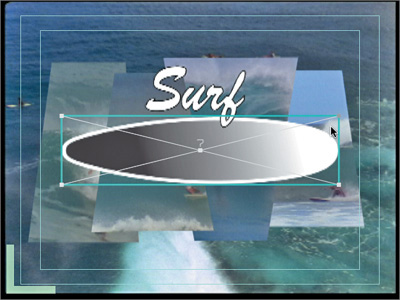
Now that the surfboard is correctly oriented, you need to make the center semitransparent to let some of the surfing action show through. Although opacity has no onscreen controls in the Canvas, there are still two ways of making opacity adjustments.
On track V6, double-click the clip to open it into the Viewer. Click the Motion tab, and click the disclosure triangle next to Opacity.
This is the Opacity slider, which lets you make uniform opacity changes to an entire clip. If the clip already has an alpha channel, the Opacity slider affects only the visible areas. Opacity is a percentage from 0 (transparent) to 100 (solid).
Drag the Opacity slider to the left until the value field reads 30.
As you drag the slider, you can see the middle of the surfboard become increasingly transparent.

Check that the Clip Overlays control is active.
The Clip Overlays control toggles the visibility of the opacity and audio level overlays that appear respectively over video and audio clips in the Timeline. The opacity overlay provides another means of controlling clip opacity.
If you look at the opacity overlay for the clip in track V6, you can see that its opacity is lower than the other clips, because you’ve already made an opacity adjustment to that clip.
Move the pointer directly over the opacity overlay for the clip in track V6. When the pointer turns into the Resize pointer, drag up until the tooltip that appears shows a value between 45 and 50.
When you release the mouse button, the Canvas updates to show the new opacity setting. Unlike the Opacity slider in the Motion tab, the opacity overlays do not allow interactive adjustments to the image in the Canvas. The overlays are generally more useful for keyframing dynamic opacity changes, which you’ll learn in a later lesson, or when you simply need to make a quick opacity change and you don’t want to open the clip in the Viewer.
The last task to complete the title is to move and resize the text component of the title graphic and add drop shadows to the four superimposed video clips. For both of these exercises, you’ll be applying the same settings to multiple clips. To make this process faster, you’ll use the Paste Attributes command.
Now that you’ve moved the surfboard, you need to transform the text of the title graphic to fit the new layout.
Select the clip in track V9, and drag it into the Canvas so that it fits at the center of the surfboard graphic.
Resize it so that it’s approximately as large as this:

When you move the top clip, you can see that the black outline was actually created with a second graphic layer underneath, which is now offset. You could copy and paste the values from the top clip’s Motion tab to the corresponding parameters in the bottom clip, or you could drag the bottom clip in the Canvas to approximate the size and position of the top clip. But there’s an easier way.
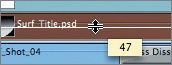
Select the clip in track V9, and press Command-C to copy it.
Control-click the clip in track V8, and choose Paste Attributes from the shortcut menu.
In the Paste Attributes dialog, select Basic Motion, then click OK.
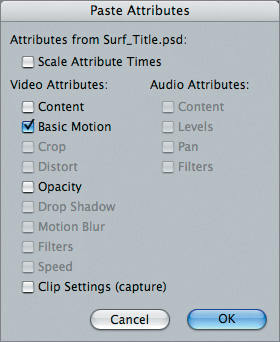
The clip in track V8 is transformed to match the scale and position of the clip you copied. As you can see, Paste Attributes is the opposite of the Remove Attributes command you learned earlier. It allows you to paste the attributes from any copied clip into the Motion parameter settings of another.
Now you’ll finish off the composition by adding drop shadows to the superimposed video clips and adding transitions to the In points of all the graphics layers in tracks V6 through V9.
Move the playhead to the beginning of Surf_Shot_04.
Double-click Surf_Shot_04 to open it into the Viewer. Click the Motion tab, and click the disclosure triangle next to the Drop Shadow parameter group.

Unlike most of the parameter groups (with the exception of Motion Blur), the Drop Shadow group can be turned on and off as a whole, because all the parameters within this group adjust the same effect.
In the parameter group header, select the Drop Shadow checkbox.
A drop shadow immediately appears underneath the selected clip. Drop shadows give the illusion of depth to objects within a composition.

To lighten the drop shadow a bit, drag the Softness slider to 50 and the Opacity slider to 30.
Now that you’ve customized the settings of one drop shadow, you don’t have to go through all of these steps for the drop shadows in the remaining three clips. You can use Paste Attributes just once.
Make sure that Surf_Shot_04 is selected in the Timeline, and press Command-C to copy it.
Select Surf_Shot_03, Surf_Shot_02, and Surf_Shot_01. Control-click them and choose Paste Attributes from the shortcut menu.
In the Paste Attributes dialog, select the Drop Shadow checkbox, and click OK. (Don’t select any other parameters.)
The drop shadow parameters are automatically copied to every selected clip in the Timeline.
In the Browser, click the Effects tab. Open the Video Transitions > Iris bin, and drag the Oval Iris transition to the beginning of every clip on tracks V6 through V9.
Press Home to move the playhead to the beginning of the sequence. Then play the sequence to see how you’ve done.
A common effect is to use the shape of one image to serve as a matte for another—for example, having the video of the surfers visible inside the letters of the text.

This effect is called a traveling matte (or shortened to travel matte in FCP parlance). It’s called traveling because the matte shape can change or move, effectively causing the video playing through it to potentially travel across the screen.
Of course the matte doesn’t have to move to be considered a travel matte; to qualify, one image must be used to limit which portion of another image is displayed.
In Final Cut Pro, travel mattes are considered a composite mode, because they are yet another way of combining two images that occur at the same time and space.
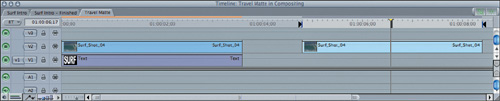
Double-click the Travel Matte sequence to open it into the Canvas and Timeline.
Track 1 contains a modified version of the Surf title, and Track 2 is disabled.
Click the Track Visibility control on Track 2 to turn on track visibility.

Control-click Surf_Shot_04 and choose Composite Mode > Travel Matte - Alpha.
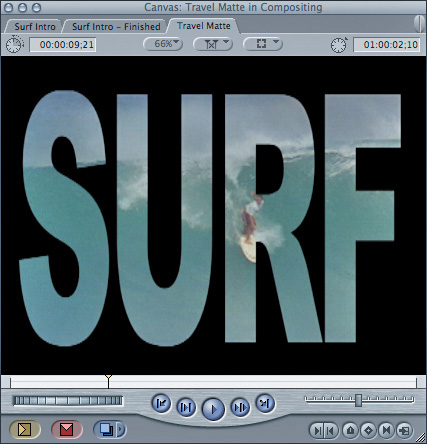
The Surf title now acts as a matte, defining which areas of the other clip are visible.
There is one tricky aspect to creating travel matte effects in Final Cut Pro: rather than applying the matte to a background image, you must apply the background image to the matte, which may seem counterintuitive.
The clip acting as the matte must be on the track below the clip that is to show through the matte, and it is the upper clip that must be set to the Travel Matte composite mode.
In the previous example, the Surf title’s alpha channel (previously created in Photoshop) is acting as the matte. Alternately, you could matte a shot with another image’s luminance (the levels of brightness or darkness). The affected clip will show through the light areas of the shot on the track below it. Every clip has some luminance values, so any clip can be used in this way. Depending on the clip you use, this can create some really bizarre effects. One great way to use this feature is to use one of the Final Cut Pro Generators as the matte.
In the Timeline, skip to the second copy of Surf_Shot_04.
Position your playhead anywhere over the clip and press X to set an In and Out point around the clip.
In the Viewer, click the Generators pop-up and choose Render > Cellular.
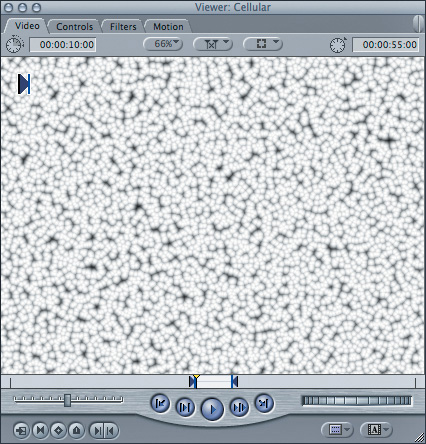
The Cellular generator is loaded into the Viewer.
Switch to the Controls tab and drag the Size slider to 64 (the maximum value).
Click the Overwrite button or press F10 to edit the generator into the sequence.
In the Timeline, Control-click Surf_Shot_04 and choose Composite Mode > Travel Matte - Luma from the shortcut menu.
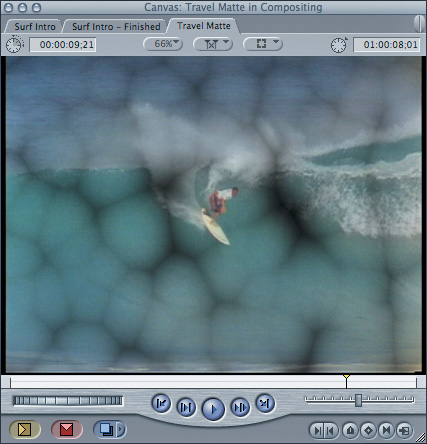
Play across the clip to see how the luminance value of the Cellular clip mattes the Surf_Shot_04 clip.