
Lesson Files > Lesson 15 > Media.fcp | ||
Media | Blind Date | |
Time | This lesson takes approximately 45 minutes to complete. | |
Goals | Use the Make Offline command | |
Resolve offline files with the Reconnect Media command | ||
Identify a clip’s media file using the Source column | ||
Use Reveal in Finder to find a clip in the Finder | ||
Consolidate media to move a project between computers | ||
Trim a sequence to delete unneeded media |
One of the most satisfying things about working in a nonlinear editing system such as Final Cut Pro is that you almost never have to think about the physical realities of film and tape. Inside Final Cut Pro, you can rename clips, reuse them, cut them up, and even combine and distort clips using special effects. Because Final Cut Pro is entirely nondestructive, nothing ever happens to the weighty media files in your Capture Scratch folder. They remain intact and safely backed up on your original source tapes.
But sooner or later you’re going to have to face those files to make room for a new show, to move your project from one system to another, or perhaps to take advantage of the offline/online model of editing.
Media files are usually just QuickTime movies stored on your hard drive. There’s nothing to stop you from moving them around or deleting them in the Finder, but it’s not a good idea to do so. Your Final Cut Pro project relies on those media files, and if you move them around or manipulate them outside of Final Cut Pro, you may be in for a surprise. Whenever Final Cut Pro opens a project (or whenever you return to an open project in Final Cut Pro from another application), the program scans your hard drive to verify that all of the files referenced by that project are available. It also verifies that those files are the same size and shape that they were in the last time you opened the project. If any files are missing or have been changed, Final Cut Pro displays a warning message:

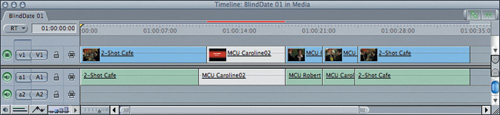
You are given the choice to ignore some files (by selecting checkboxes in the Forget Files section), reconnect the missing files, or continue with the project while the files remain offline. For clips used in a sequence, the Timeline displays offline clips in white; in the Browser, offline clips’ icons have a slash through them.
You can continue to edit your project and ignore the missing files. This is your only choice if the needed files are on a disk that is temporarily unavailable and you plan to reconnect or recapture them later. However, playing across an offline clip shows the following offline screen in the Canvas or Viewer.

You can specify folders that Final Cut Pro will search automatically whenever it can’t find a file. If you’re a mobile editor, frequently working on different systems, this may not be very helpful; but if you work mainly on one Mac and organize your media intelligently, this can keep you from seeing that Offline Files dialog.
Choose Final Cut Pro > System Settings.
Click the Search Folders tab.

Click the Set button.
Navigate to a folder where you store your media (for example, your Documents folder, or the root of your media drive) and click Choose.
You can add as many search folders as you like. Whenever you open a project and the files are not in the same locations as when you last closed the project, Final Cut Pro will search these folders first before bothering you with the Offline Files dialog.
Click OK to close the System Settings window.
There are some occasions when you will want to place clips offline deliberately. For example, if you have an effects shot that is being re-delivered from your compositor, you might want to take the previous version offline.
Open Lesson Files > Lesson 15 > Media.fcp.
Open the BlindDate 01 sequence and play it.
In the Timeline, select MCU Caroline02.
Choose Modify > Make Offline.
The Make Offline dialog appears.
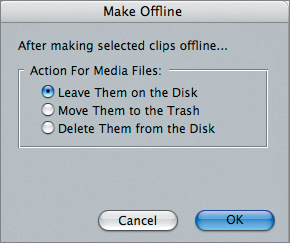
You are presented with the choices to leave the media file where it is on the disk, to move it to the Trash, or to delete it.
Select “Leave Them on the Disk” and click OK.
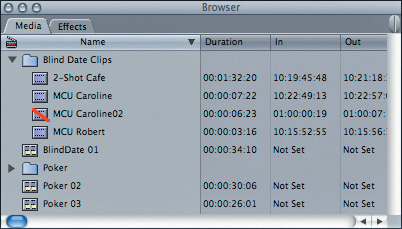
The offline clip remains selected in the Timeline, but it is now colored white, and the affiliate clip in the Browser has a red slash through it.
You can repair or reconnect an offline file at any time (provided that the corresponding media file exists on your disk) using the Reconnect Media command.
In the Browser, select the offline clip MCU Caroline02.
Choose File > Reconnect Media.
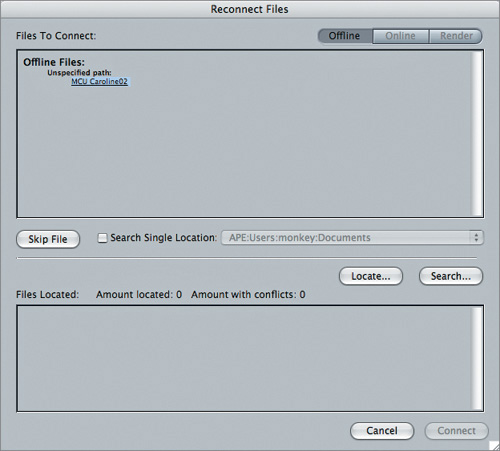
Examine the three buttons at the top of the dialog. These buttons allow you to ignore or reconnect your offline, online, and render files separately. This project doesn’t include any online or render files, so those buttons are dimmed.
The upper pane in the dialog lists the missing files, grouped by their last known locations. The first file in the list is highlighted, and you can choose to skip, locate, or search for this missing file.
If you click the Search button, Final Cut Pro will scan the disks identified in the Search Location pop-up menu and attempt to locate the missing file. If you click the Locate button, you can manually navigate to the files.
Deselect Search Single Location.
Click the Locate button.
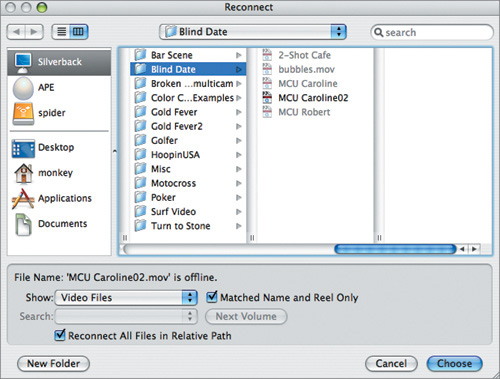
The Reconnect dialog appears, allowing you to manually search your disks for the file.
Ordinarily, the “Matched Name and Reel Only” setting is selected, so all files without identical names (and reel numbers) to the original files will be filtered out, preventing you from selecting them by mistake. But in this case, you are deliberately relinking the clip to a new piece of media with a different name—one with a graphic element added.
Deselect “Matched Name and Reel Only.”
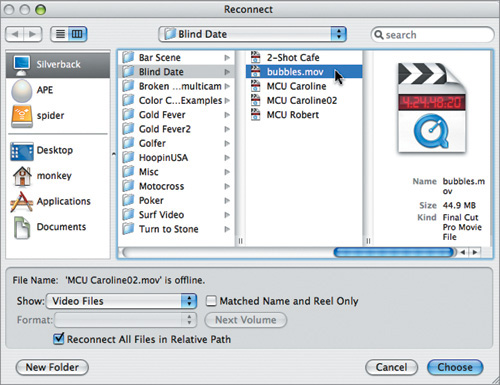
Navigate to the Blind Date folder and select the bubbles.mov file, then click Choose.
If you encounter a File Attribute Mismatch warning, click Continue, then in the Reconnect Files window, click Connect.
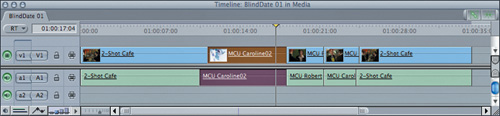
In the Browser, the offline clip MCU Caroline02 is now reconnected to the bubbles.mov clip. The red slash is gone, and the affiliate clip in the sequence BlindDate 01 is updated as well.
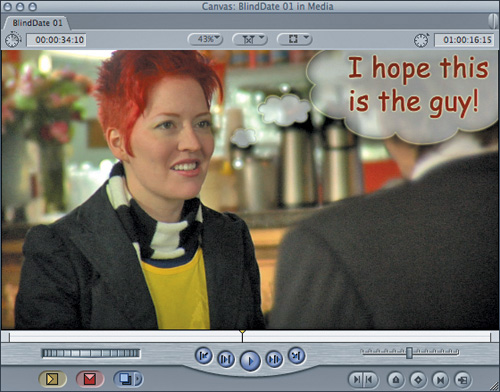
Play the sequence again.
The thought bubble graphics have been added to the clip.
Control-click the clip in the Browser and choose Rename > Clip to Match File from the shortcut menu.
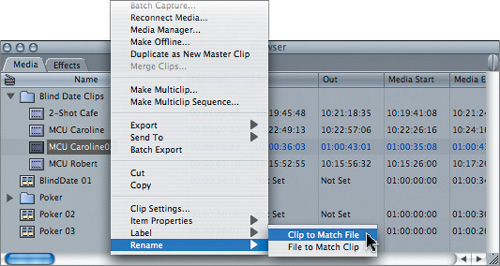
The clip name is updated to reflect the file on disk. Notice that the affiliate clip in the Timeline is also updated.
Another reason you might choose to make clips offline is to save disk space. If your project includes unused clips, you can delete the media files associated with them to recover storage space or just to tidy up your hard disk. Although you can just delete files in the Finder, it may be difficult to determine exactly which files are safe to remove. In the next exercise, you learn a procedure that prevents you from accidentally deleting a file used in your show.
Select the Poker 02 and Poker 03 sequences in the Browser.
Perform a Find by pressing Command-F or choosing Edit > Find.
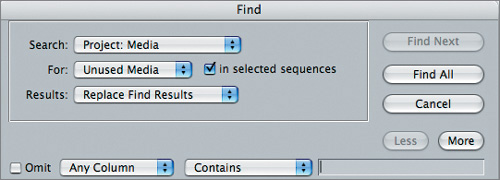
In the Find dialog, choose Unused Media from the For pop-up menu and select the “in selected sequences” checkbox. Click Find All.
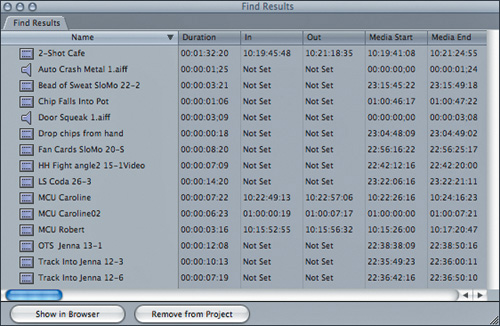
Select all of the clips in the Find Results bin.
Choose Modify > Make Offline.
To delete the clips, you could choose either Delete from Disk or Move to Trash. In either case, the offline clips remain in your project, along with the timecode information necessary to recapture the media, but attempting to play them will invoke the Offline Media screen.
Click Cancel and close the Find Results bin.
The procedures described so far have focused on modifying the relationship between a clip and its media file. Sometimes you may want to simply identify a clip’s media file on disk.
This can be useful for both offline and online clips. When you encounter offline clips in your project, you may not know why those files are not available. Sometimes, an external hard drive containing the media might not have been mounted, or a file or folder may have been renamed or moved. When moving a project from one location to another, it is fairly common to encounter clips that have lost links to their corresponding media files.
One trick that can help you track down the correct media for an offline clip is to check the Source column in the Browser.
Control-click the Browser column header area and choose Show Source from the shortcut menu.
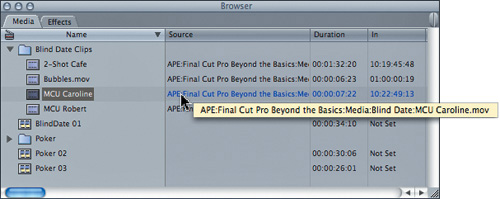
This column provides the path to the media file associated with the clip. If you pause the pointer over any clip, a tooltip displaying the entire path will appear. (You can also drag the right edge of the column header to widen it.)
If the clip is missing, this column provides the path to the last known location of the file. If you forced the clip offline manually, it will simply report that the clip is offline. Still, for missing clips, this might help identify what disk is unmounted or provide other clues to the proper media file.
If you want to find on a disk the file associated with any clip (online or offline), the Reveal in Finder command gets you there in a hurry.
In the Browser, Control-click bubbles.mov and choose Reveal in Finder from the shortcut menu, or choose View > Reveal in Finder.
The Finder window containing the selected clip is brought to the front.
This command also can be used on offline clips, but if the media file can’t be found, nothing happens at all.
The Final Cut Pro Media Manager is a versatile and comprehensive media manipulation tool.
Whether you are moving your project from one computer to another, trying to eliminate clips and files you’re not using, preparing a sequence for output, or even recompressing a group of files from one codec to another, the Media Manager is your one-stop shop.
When you need to move a project from one computer to another, you may not know where all of your media resides. Although most files are probably in your Capture Scratch folder, a graphic or still image may be in another location. Sound effects files may be stored in yet another location. Rather than manually scouring your disk for related files, you can use the Media Manager tool to be sure you won’t miss anything (and to avoid grabbing files you don’t need).
Press Command-A to select everything in your Browser.
Choose File > Media Manager.
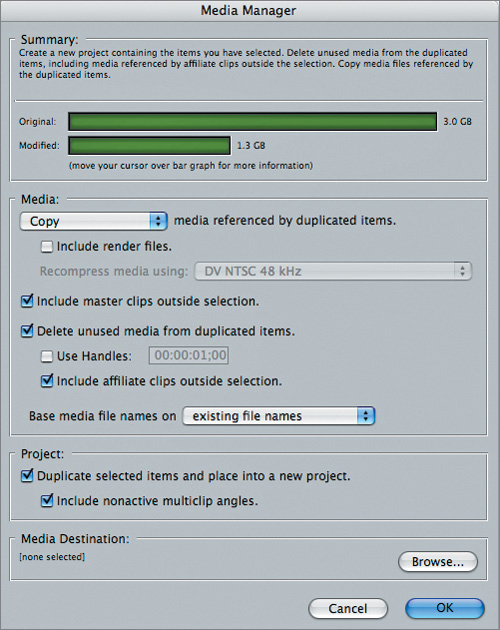
In the Media section, choose Copy from the pop-up menu.

This will duplicate all the media associated with the selected items (in this case, the entire project) and place it in a new location.
Select the “Include render files” checkbox.
In the Media Destination section, click the Browse button and select a disk location for the copied files. Create a new folder for the copied media.
To move your files from one computer to another, you typically would want to set this destination to a removable or external hard disk that you could move to a new edit station.
In the Media section, deselect “Delete unused media from duplicated items.”
This setting usually has a dramatic impact on the green bars in the Summary section. In this example, you want the project on the new computer to be identical to the previous version, so you do not want to delete anything.
The summary at the top of the window details your operation. The size of the bars indicates the relative amount of disk space your media is occupying. The top bar is the current state, and the bottom bar shows what will happen after you complete the Media Manager operation. Because in this example you are not deleting anything, the two bars are identical.
Leave the “Base media file names on” pop-up menu set to “existing file names.”
In the Project section, be sure “Duplicate selected items and place into a new project” is selected.
This last setting creates a new project on your destination volume that points to the new versions of the media files. Although this step is not required (you could manually copy your existing project file in the Finder), this ensures that the new project will not have any offline files, and you won’t have to reconnect media when the project gets to the new workstation.
Immediately, you are prompted with a Save dialog, asking you to name and save the new project file. Save it on the same disk as the new media.
Click Save.
The program will then perform the Media Manager operation and open the new project in the Browser.
In the new project, open the sequences and clips to confirm that the new project is an identical copy of the old project. Then close the new project.
If you have limited disk space, or you are consolidating media onto a single disk (as you might do when preparing a project for backup to DVD), you can choose Move instead of Copy in the Media Manager.

With this setting, all the files used in your project will be copied to a new location, and the originals will be deleted. You will not wind up with duplicate copies of your files.
This type of trimming has nothing to do with adjusting edit points, but rather it is a way to eliminate excess media after your sequence has been completed. Usually, you shouldn’t do this until you have completely finished making major editorial changes.
Select sequences Poker 02 and Poker 03.
The operation will be applied only to the media referenced in these two sequences.
Control-click the selected items and choose Media Manager from the shortcut menu.
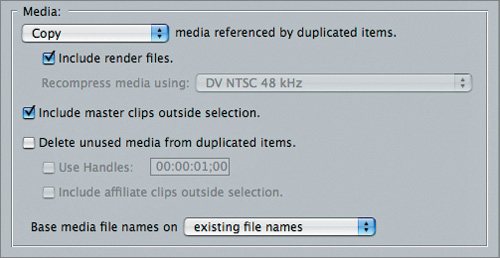
In the Media pop-up menu, choose Copy.
Warning
Although Final Cut Pro will not prevent you from choosing Move or Use Existing, doing so when trimming clips is extremely dangerous. If a power failure or crash occurs during the operation, your files could be left in an unusable state, requiring you to recapture all of your media. When trimming, always create new files. After the operation is complete, you can delete the original media manually.
Select “Delete unused media from duplicated items.”

When you select this option, the summary section at the top of the dialog changes dramatically. Now, the Modified media bar is much smaller than the Original. This difference reflects the media outside the In and Out points of the clips used in the two selected sequences.
Select Use Handles and set the value to 1:00.
Although presumably you are completely done editing, there could be an emergency or problem that might require a tiny adjustment to your edit. Adding a little bit of wiggle room is a good way to accommodate such an unforeseen issue if one should arise after this operation is completed.
Deselect “Include affiliate clips outside selection.”
If this option is selected, the Media Manager will scan the rest of your project for any other uses of the clips contained in the selected sequences. If such clips exist, and they have In or Out points set, the Media Manager will include that section in the newly created clips. This means that you will not save as much space as you would by ignoring those clips.
Because you specified Copy for this operation, there is no harm in ignoring this additional media. If you had specified Move or Use Existing (instead of Copy), then you would be permanently deleting the media that you might be planning to use in another sequence.
Select “Duplicate selected Items and place into a new project.”
This will create a new project containing only the selected sequences and pointing to the new, trimmed media.
Set your destination and click OK.
Name the new project and click Save.
After the files are processed, the new project is automatically opened. If you do not plan to make any additional changes or use any of the media from the old project, you can select all the items in the old project and use the Make Offline command to delete the media files from your disk.