
FINISHING THE CONSTRUCTION DRAWINGS
One of the most satisfying aspects of the art director’s job is to see the dressed and lit sets standing on the stage. Before this can happen though, the next step is to finish the drawings.
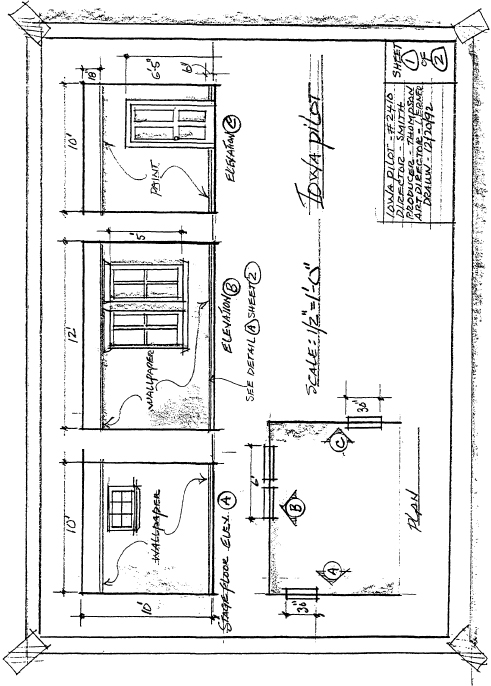
What you should have now is a row of three elevation drawings of Patty’s living room at the top of your large sheet of tracing paper, and a plan view of the room at the lower left, with a generous amount of blank space around the edges of the drawing sheet.
Now that you have traced the major outlines, remove the individual temporary drawings from under the large sheet. Save the temporary drawings just in case.
During the tracing process, some of the pencil lines from the surfaces of the individual drawings may have transferred themselves to the back of the large sheet Turn the large sheet over, erase the unwanted lines, and tape the sheet back to your drawing board.
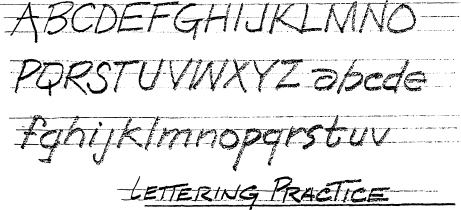
Lettering
Soon you will need to do some lettering. Practice by drawing three light guidelines on a piece of paper, and fill some practice sheets. If you have a lot of difficulty at first, buy a lettering template. As your skill improves, you will develop your own style without the template.
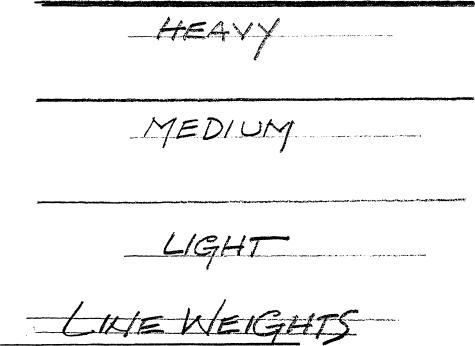
Line Weights
Use three line weights (thicknesses): heavy for the outlines of the flats, medium for the lettering and stagefloor line, and light for the dimension lines. Practice drawing the three types of lines on another sheet of paper until you can produce lines that are clearly different from one another. Remember that very light lines will not reproduce well in the blueprinting process.
Draw a medium-weight, continuous line across the bottom of the three elevation views. Letter “Stage Floor” just below the line to show that the flats will stand on the stage floor and are not suspended above it.
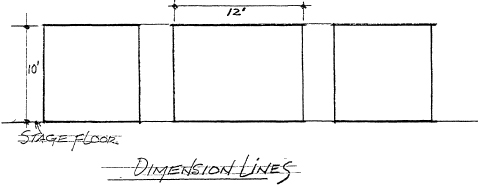
Begin drawing dimension lines with your lightweight line far enough away from the heavy outline to leave room for the height or width numbers. If the flats are all the same height, just draw the dimension line once. Indicate the ends of dimension lines with a light horizontal or vertical line and a dot or small slash where the lines cross. This little end line should not touch the outline, because carpenters may think it is a line to build.
Letter in the numbers showing the flat heights and widths. Make the numbers clear so that they stand out from the weight of the dimension lines. When you have finished the dimension lines and numbers, stand back from the drawing and see if the flat outlines stand out clearly. If not, make the outlines bolder.
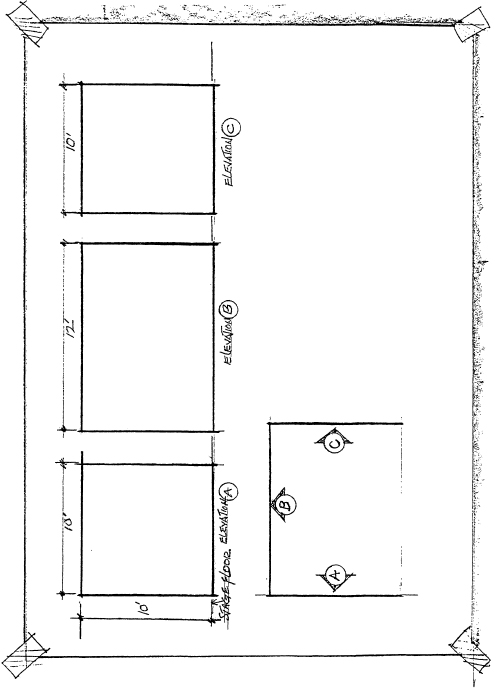
Begin Labeling the Flats
About an inch below the stagefloor line, draw light guidelines below the row of elevation drawings. On this line and centered below each of the three wall flats, draw a 1/2"-diameter circle with a circle template or compass. On the plan drawing, draw the same size circle about a half inch away from the inside of the wall lines and draw an arrow around the circle pointing at the wall line.
Beginning with the left-side flat elevation drawing, put a letter A inside the circle, a B inside the middle flat circle, and a C inside the right flat circle, and the word “Elevation.” Put the corresponding letter inside the circle-arrows on the plan view. Now, no one will have any trouble seeing which flat is which on both views.
At this point, the drawing only shows flat surfaces with dimension lines. Begin the fun part by adding elements that will give the drawing interest and life—paneled doors, door frame moldings, wall-surface treatments, windows, baseboards, and light switches. Long unbroken wall surfaces can be uninteresting unless you have a reason to make them so. Break the monotony by adding jogs in the walls. Also, when the wall run is long, it will be constructed of several pieces, which means there will be joints to cover. If the wall has a textured surface, the irregularities won’t show, but try using short flats planted on (covering) over the joints or on long wall runs. Remember that the cameras will see only portions of the set in most shots, so long blank sections may look awkward. Indicate wall-surface treatments on the elevation views. Show wallpaper pattern and paint-chip numbers and relevant information for the scenic artists who will paint the set. Provide paint-chip samples for the painters, and indicate the amount of day-to-day wear the set should reveal by showing the amount of aging: light, medium, or heavy. Detail drawings of complex moldings or other architectural features may be too small to clearly explain on a ½"- or ¼"-scale construction drawing. Indicate these by lettering “Detail A on sheet 2” with an arrow showing where the piece occurs and make a construction drawing in larger scale on another drawing sheet with appropriate labels.
If you are using some stock flats or already-built units, indicate them on the elevation and plan drawings. Be sure they will fit your plan by taking accurate measurements before you draw them to scale.
Finishing Touches
Boldly letter the word “PLAN” below the plan view, and “ELEVATIONS” below the elevation views. Near the bottom of the sheet, letter “SCALE – 1/2" = 1’ or whatever scale you are using. Draw a heavy line around the edges of the sheet about 1” in from the borders.
At the lower right corner of the border, draw a title block about 3 inches high by 5 inches wide with lines containing basic information: production title and number, set name, producer, director, art director, shooting dates, drawing scale, drawing date, approved by, budget number, sheet number, draftsperson, and total number of sheets. Whew! Lots of information, but useful and necessary.
Before you have the construction drawings printed, go over them with the director, the producer, and any other concerned people. Remember that many staff members have trouble interpreting construction drawings, so have the set sketch at hand to help explain. Try to avoid making major changes at this point. If you have to make alterations, be glad you did the drawings in pencil.
Blueprinting (all prints used to be blue) is the traditional, practical way to make many copies of drawings done on tracing paper. The print machine passes the tracing under lights that expose sensitized paper which is then developed by chemical fumes. Most shops can make prints with black, brown, or blue lines.
Print your first set with black lines. Then, if you have to make changes on the tracing sheet, have the second set printed in blue, and any successive sets in alternating colors. This makes it easier to distinguish changes to successive sets of prints. Call attention to changes by drawing a clear arrow with the word “CHANGE” and the date at the changed portion. If you do not want to change your original tracing sheet, the printer can produce a brown-line copy on translucent paper, from which you can chemically erase lines, draw new ones, and have new regular prints made.
Give the construction shop as many sets of prints as they request, and distribute other sets to the company staff – producer, director, production manager, crew chief, lighting director, director of photography, technical director, assistant director, prop master, and stage manager. In other words, everyone who needs to know what is going on.
•
When the construction drawings are finished and printed, you can easily make a simple model of the set, using prints. The next chapter shows how to make this helpful aid.