
Now that you have done the research, the producer and director have approved the sketches, and your drawing board and tools are ready, the next step is to translate the sketches into working drawings for the construction shop.
TYPES OF CONSTRUCTION DRAWINGS
Film and video drafting differs from other types. Engineering and architectural drafting require precise detail, because the products made from these types of drawings have to last a long time and are manufactured to close tolerances. Film and video drafting, however, uses many standard units, such as flats, platforms, and backings, and displays mostly surfaces instead of internal structure. Engineers and architects are horrified by what appears to be sloppy work on set construction prints, but such prints are standard to set carpenters who are not concerned with close tolerances.
This is not to say that your drawings can be sloppy, but that they should show as much precision and detail as necessary, based on standard set-construction practice. For example, you need not draw the backs of flats because set carpenters know how they should look.
Shops need specific information to determine material and labor charges. If you work for a producer who does not have studio construction facilities available, print several sets of your construction drawings for shop bids.
If you work at a studio with a construction shop, your drawings will be reviewed by an estimator to determine costs. If you have designed a set that exceeds the cost estimated in the budget, simplify the design by cutting down on the amount of detailing or changing the size of units, unless you can talk the producer into allowing more money.
Begin with temporary drawings, which you will arrange under the full sheet tracing paper in the last step. Draw a temporary plan view of Patty’s living room. The plan view shows the set from the top with no perspective. Look at your sketch and decide how wide the upstage wall should be. Remember that sets usually look larger on camera than they do to the eye. Measure a familiar room for comparison.
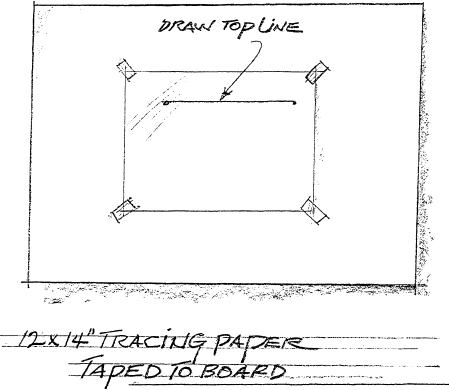
Tape a 12" x 14" piece of tracing paper to your drawing board. With your T-square head snugly against the left edge of the drawing board (if you are right-handed), slide the square in place with your left hand and draw a light line across the paper about two inches from the top. With the 1/2" equals 1’side of your architect’s scale on the light line, make a dot at the O-feet mark and another dot at the number you have determined will be the width of the upstage living room wall
Draw the right and left walls by the same method—T-square, light line, architect’s scale, dots, and heavy line – using a vertical triangle edge with the right-angle edge against the T-square.

Indicate some major pieces of furniture (as seen from above) if you wish, just to see how these objects fit into the set, but draw them to scale also. Art supply stores stock templates with shapes representing tables, chairs, sofas, and kitchen appliances in various scales.
You have now finished the temporary plan view of Patty’s living room, but without any dimension numbers or lines that you will add on the full sheet drawing. For the present, leave this temporary drawing simple, without adding windows and doors, because those will go on the full sheet.
The Elevation Views
The plan view shows the set from the top with no perspective. Now draw three temporary elevation views – just the outlines that show the walls as though you are standing in front of them. By now you are familiar with your trusty T-square, triangles, and architect’s scale, so make individual (from the front) views of the left wall, back wall, and right wall. Show the walls ten feet high and the same width of the walls shown on the plan view.
With your T-square as a guide, line up the three elevation drawings in the top third of your drawing board about three inches apart. Place the plan drawing a couple of inches below the left wall elevation drawing, and tape all in place.

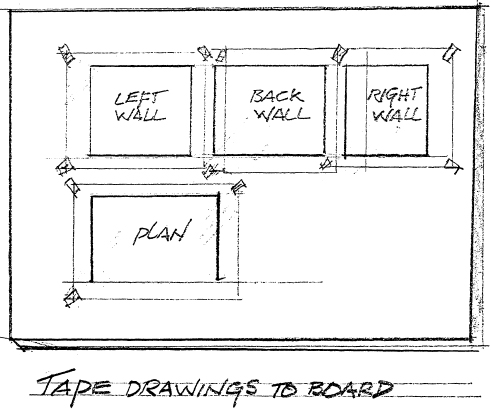
Tear off a piece of tracing paper large enough to cover all the temporary drawings and tape it in place at the corners. Allow room around the edges of the large piece of paper to draw borders and a title block at the bottom right corner. Trace the outlines of the temporary drawings on the large paper.
•
Now you have the foundation for the construction drawing. In the next chapter, we will add dimension lines, numbers, and the rest of the building information.