
1
Creating and Managing Data in Azure Data Lake
Azure Data Lake is a highly scalable and durable object-based cloud storage solution from Microsoft. It is optimized to store large amounts of structured and semi-structured data such as logs, application data, and documents.
Azure Data Lake can be used as a data source and destination in data engineering projects. As a source, it can be used to stage structured or semi-structured data. As a destination, it can be used to store the result of a data pipeline.
Azure Data Lake is provisioned as a storage account in Azure, capable of storing files (blobs), tables, or queues. This book will focus on Azure Data Lake storage accounts used for storing blobs/files
In this chapter, we will learn how to provision, manage, and upload data into Data Lake accounts and will cover the following recipes:
- Provisioning an Azure storage account using the Azure portal
- Provisioning an Azure storage account using PowerShell
- Creating containers and uploading files to Azure Blob storage using PowerShell
- Managing blobs in Azure Storage using PowerShell
- Configuring blob lifecycle management for blob objects using the Azure portal
Technical requirements
For this chapter, the following are required:
- An Azure subscription
- Azure PowerShell
The code samples can be found at https://github.com/PacktPublishing/Azure-Data-Engineering-Cookbook-2nd-edition.
Provisioning an Azure storage account using the Azure portal
In this recipe, we will provision an Azure storage account using the Azure portal. Azure Blob storage is one of the four storage services available in Azure Storage. The other storage services are Table, Queue, and File Share. Table storage is used to store non-relational structured data as key-value pairs, queue storage is used to store messages as queues, and file share is used for creating file share directories/mount points that can be accessed using the NFS/SMB protocols. This chapter will focus on storing data using the Blob storage service.
Getting ready
Before you start, open a web browser and go to the Azure portal at https://portal.azure.com. Ensure that you have an Azure subscription. Install Azure PowerShell on your machine; instructions for installing it can be found at https://docs.microsoft.com/en-us/powershell/azure/install-az-ps?view=azps-6.6.00.
How to do it…
The steps for this recipe are as follows:
- In the Azure portal, select Create a resource and choose Storage account – blob, file, table, queue (or search for storage account in the search bar; do not choose Storage accounts (classic)).
- A new page, Create a storage account, will open. There are six tabs on the Create a storage account page – Basics, Advanced, Networking, Data protection, Tags, and Review + create.
- In the Basics tab, we need to provide the Azure Subscription, Resource group, Storage account name, Region, Performance, and Redundancy values, as shown in the following screenshot:
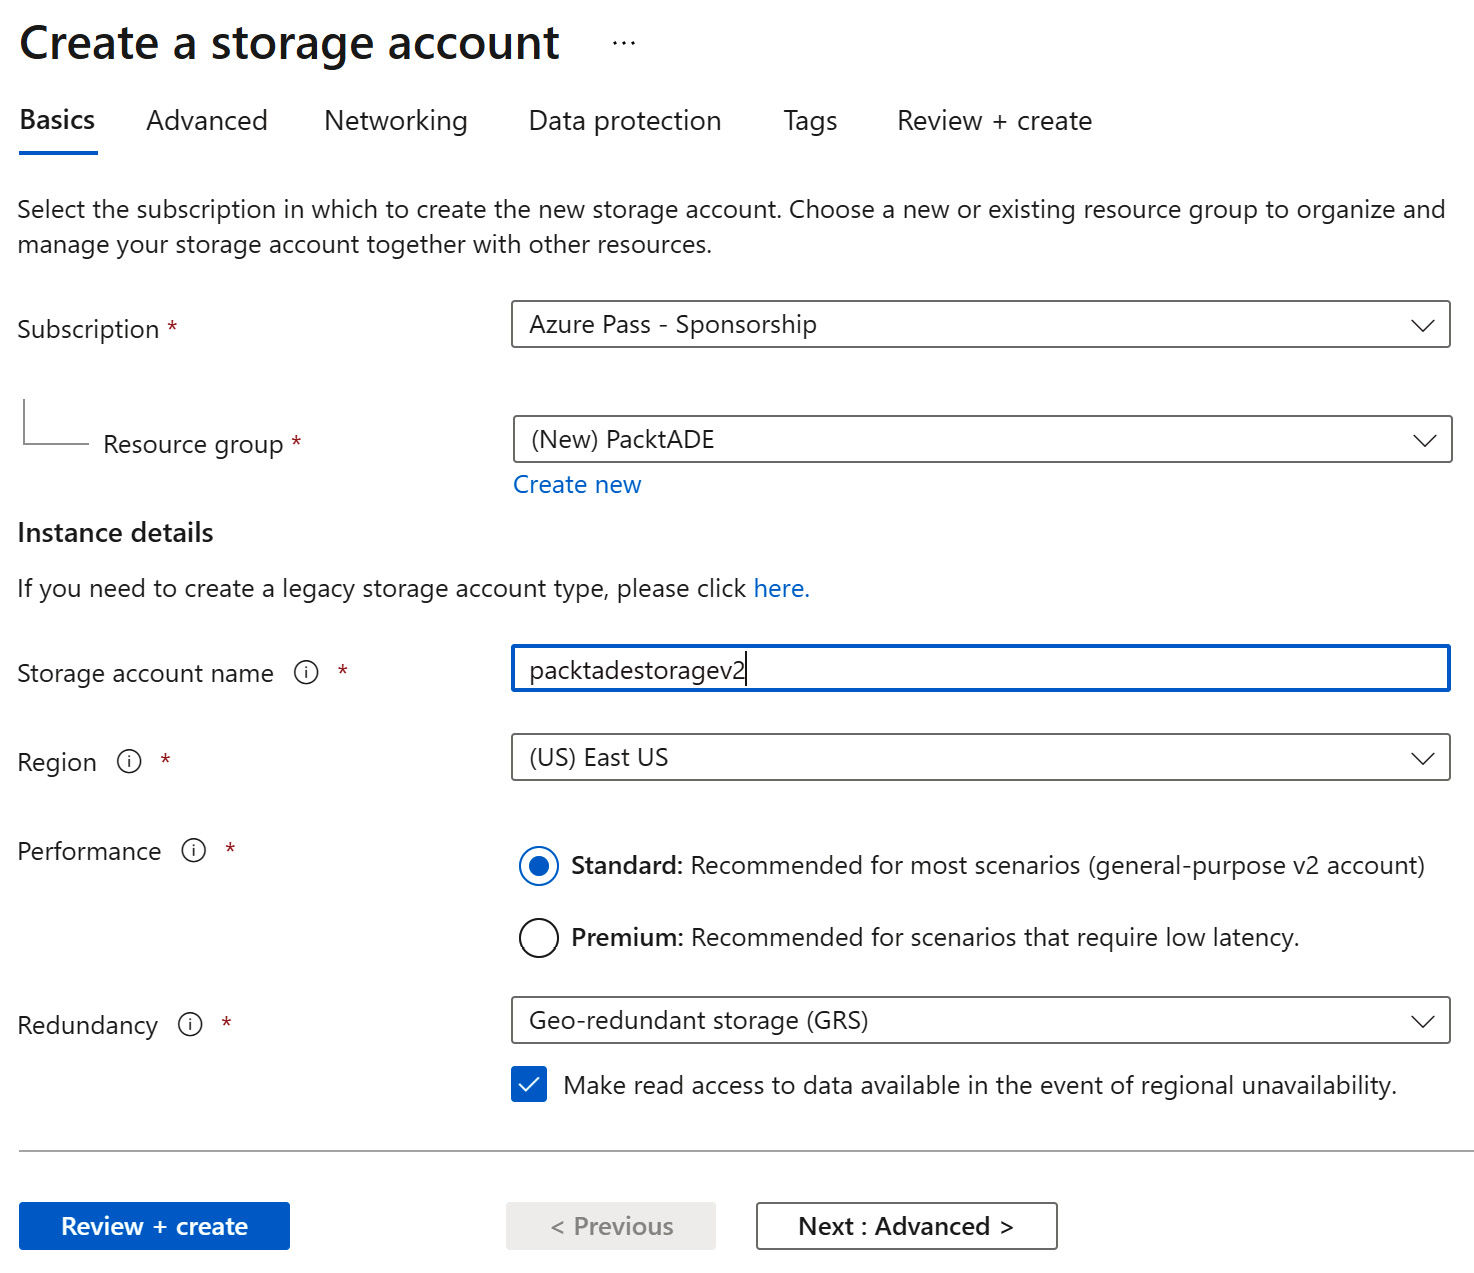
Figure 1.1 – The Create a storage account Basics tab
- In the Advanced tab, we need to select Enable hierarchical namespace under the Data Lake Storage Gen2 settings:
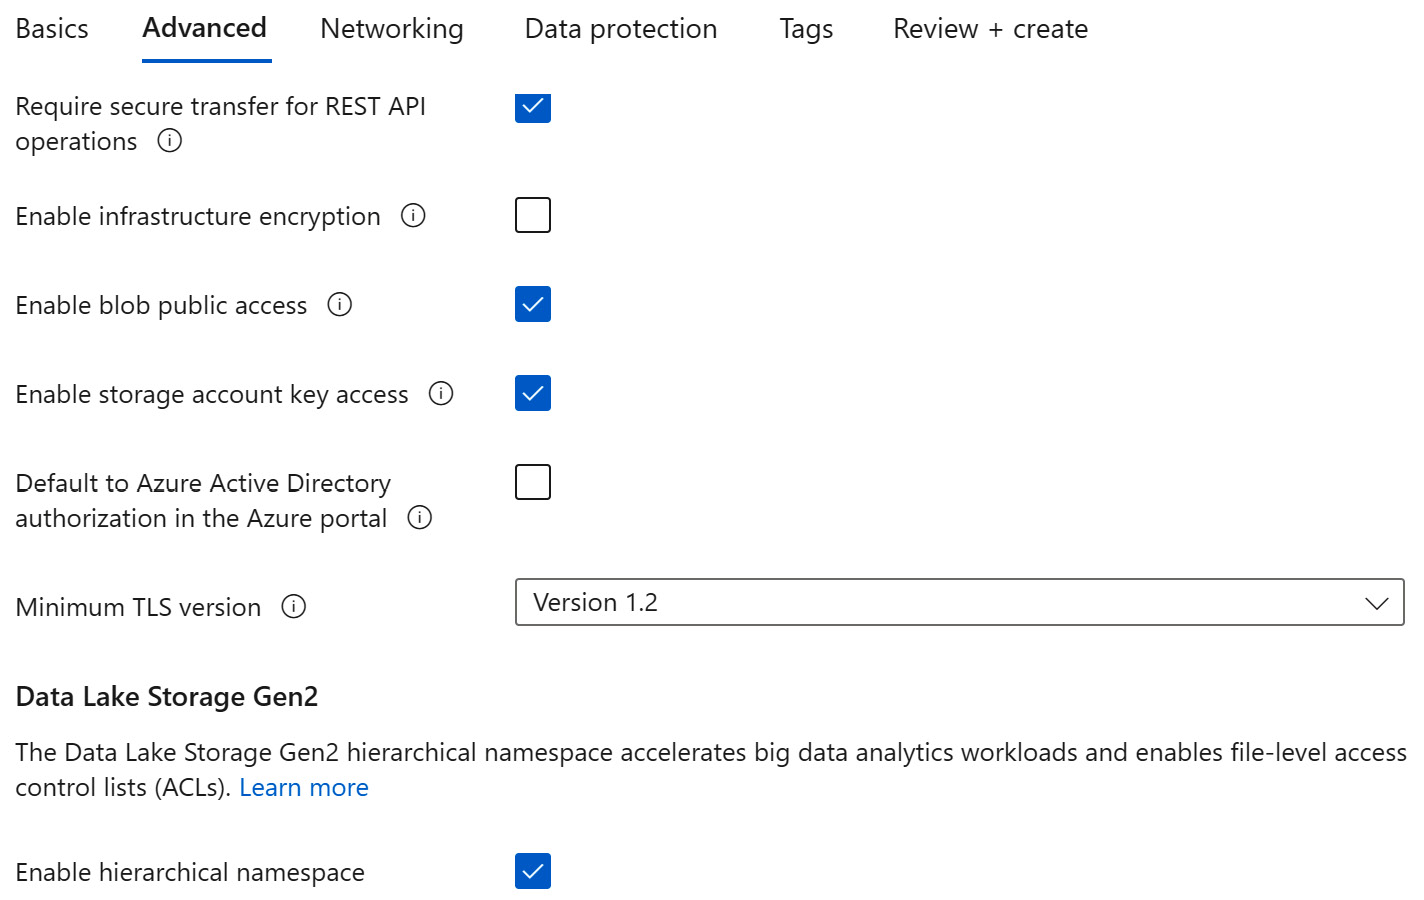
Figure 1.2 – Create a storage account – Advanced
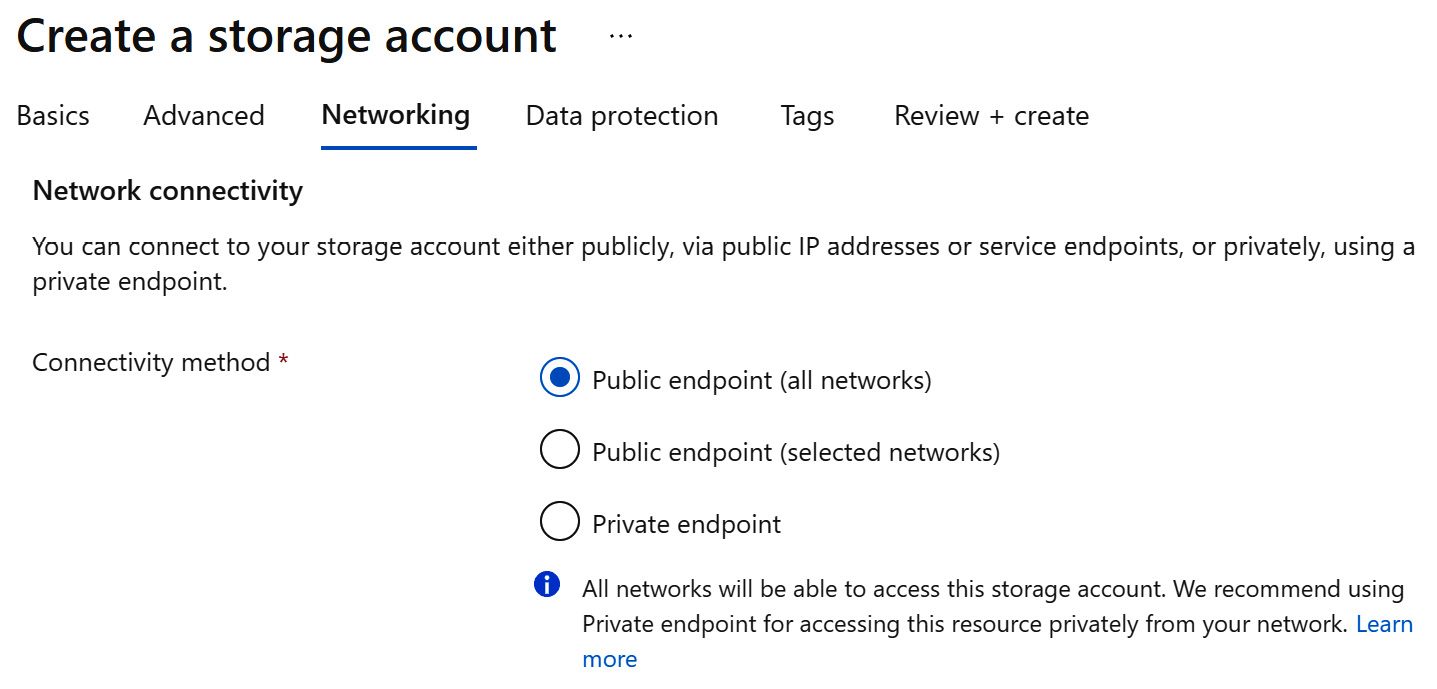
Figure 1.3 – Create a storage account – Networking
- In the Review + create tab, review the configuration settings and select Create to provision the Azure storage account:
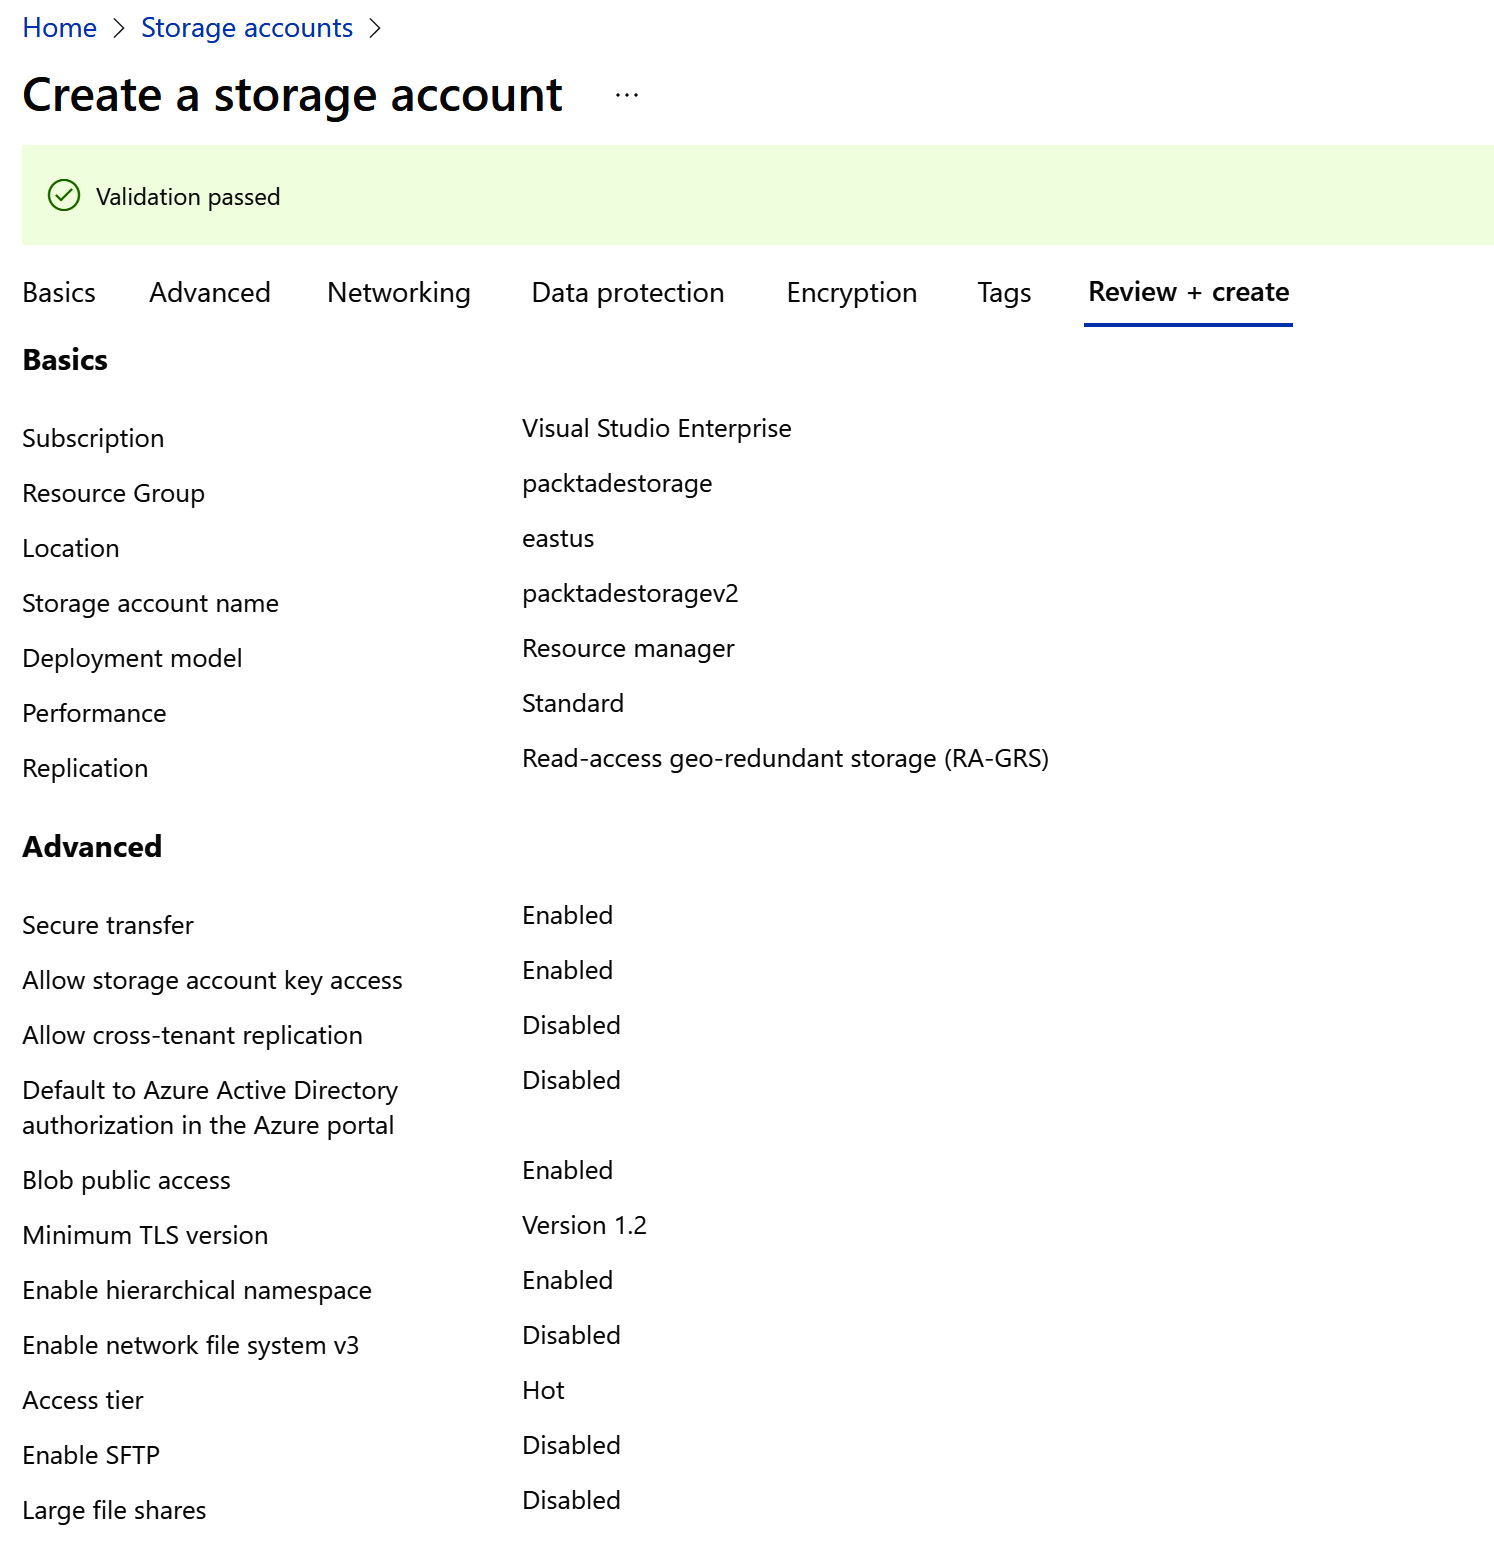
Figure 1.4 – Create a storage account – Review + create
How it works…
The Azure storage account is deployed in the selected subscription, resource group, and location. The Performance tier can be either Standard or Premium. A Standard performance tier is a low-cost magnetic drive-backed storage. It's suitable for applications such as static websites and bulk storing flat files. The Premium tier is a high-cost SSD-backed storage service. The Premium tier can only be used with Azure virtual machine disks for I/O-intensive applications.
The Replication options available are Locally-redundant storage (LRS), Zone-redundant storage (ZRS), Geo-redundant storage (GRS), and Geo-zone-redundant storage (GZRS). Local redundancy stores three local copies within the data center and provides fault tolerance for failures within it. Zone-redundant storage provides fault tolerance by copying data to additional data centers within the same region, while geo-redundant storage maintains copies across regions. Geo-zone-redundant storage combines geo- and zone-redundant features and offers the highest fault tolerance. The default Geo-redundant storage (GRS) option was selected, as it provides fault tolerance across regions.
Azure storage accounts can be accessed publicly over the internet, through selected networks (selected IPs and IP ranges), and from private endpoints.
Provisioning an Azure storage account using PowerShell
PowerShell is a scripting language used to programmatically manage various tasks. In this recipe, we will learn how to provision an Azure storage account using PowerShell.
Getting ready
Before you start, you need to log in to the Azure subscription from the PowerShell console. To do this, execute the following command in a new PowerShell window:
Connect-AzAccount
Then, follow the instructions to log in to the Azure account.
How to do it…
The steps for this recipe are as follows:
- Execute the following command in a PowerShell window to create a new resource group. If you want to create the Azure storage account in an existing resource group, this step isn't required:
New-AzResourceGroup -Name Packtade-powershell -Location 'East US'
You should get the following output:

Figure 1.5 – Creating a new resource group
- Execute the following command to create a new Azure storage account in the Packtade-powershell resource group:
New-AzStorageAccount -ResourceGroupName Packtade- powershell -Name packtstoragepowershellv2 -SkuName Standard_LRS -Location 'East US' -Kind StorageV2
You should get the following output:
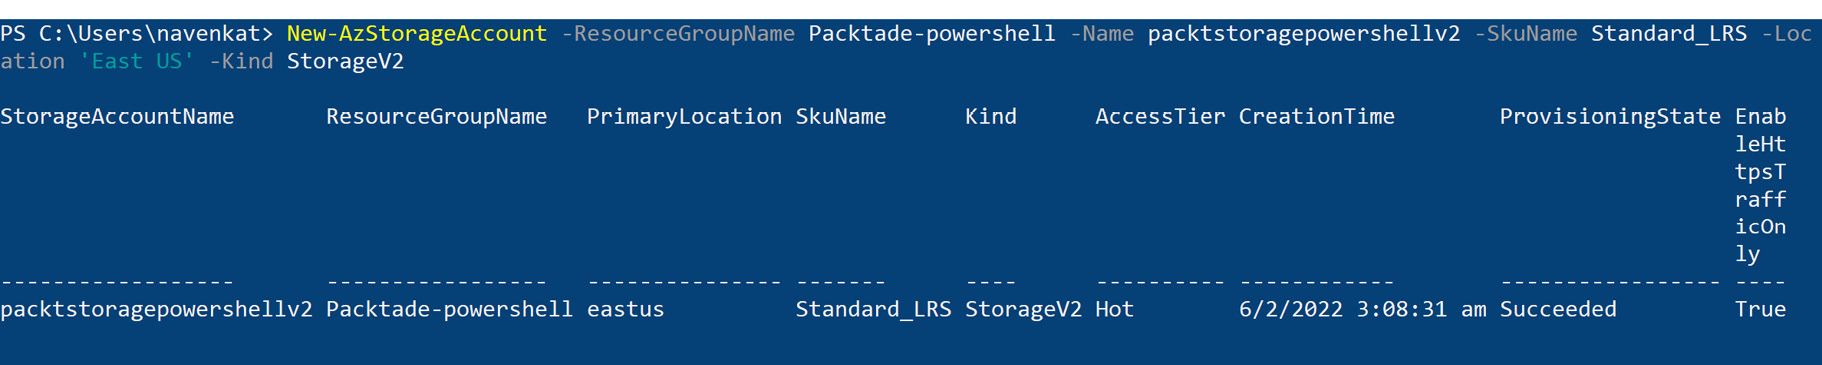
Figure 1.6 – Creating a new storage account
How it works…
There is a single command to create an Azure storage account using PowerShell – New-AzStorageAccount. The SkuName parameter specifies the performance tier, and the Kind parameter specifies the account kind.
In the later recipes, we will look at how to assign public/private endpoints to an Azure storage account using PowerShell.
Creating containers and uploading files to Azure Blob storage using PowerShell
In this recipe, we will create a new container and upload files to Azure Blob storage using PowerShell.
Getting ready
Before you start, perform the following steps:
- Make sure you have an existing Azure storage account. If not, create one by following the Provisioning an Azure storage account using the Azure portal recipe.
- Log in to your Azure subscription in PowerShell. To log in, run the Connect-AzAccount command in a new PowerShell window and follow the instructions.
How to do it…
The steps for this recipe are as follows:
- Execute the following commands to create the container in an Azure storage account:
$storageaccountname="packtadestoragev2"
$containername="logfiles"
$resourcegroup="packtadestorage"
#Get the Azure Storage account context
$storagecontext = (Get-AzStorageAccount -ResourceGroupName $resourcegroup -Name $storageaccountname).Context;
#Create a new container
New-AzStorageContainer -Name $containername -Context $storagecontext
Container creation is usually very quick. You should get the following output:
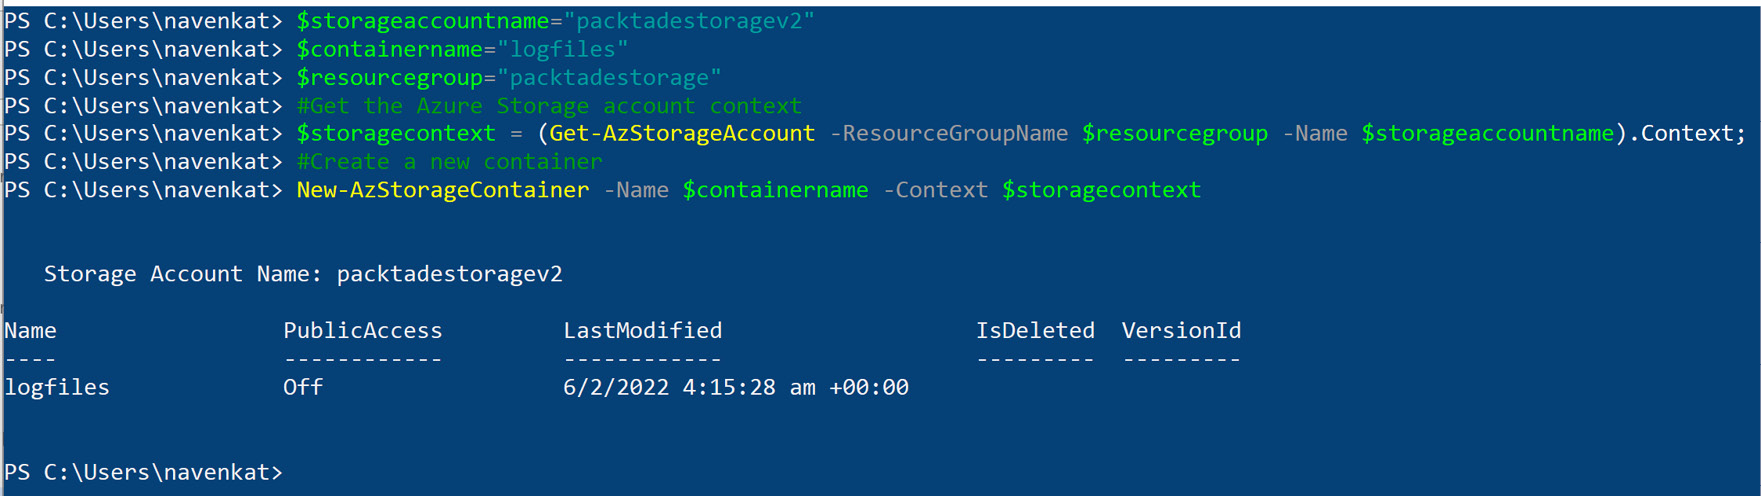
Figure 1.7 – Creating a new storage container
- Execute the following commands to upload a text file to an existing container. Ensure that you create a folder in c:ADECookbookChapter1Logfiles. Create any file inside the folder as Logfile1.txt:
#upload single file to container
Set-AzStorageBlobContent -File "C:ADECookbookChapter1LogfilesLogfile1.txt" -Context $storagecontext -Blob logfile1.txt -Container $containername
You should get an output similar to the following screenshot:

Figure 1.8 – Uploading a file to a storage container
- Execute the following commands to upload all the files in a directory to an Azure container. Create additional copies of Logfile1.txt in the same folder for testing multiple file uploads:
#get files to be uploaded from the directory
$files = Get-ChildItem -Path "C:ADECookbookChapter1Logfiles";
#iterate through each file int the folder and upload it to the azure container
foreach($file in $files){
Set-AzStorageBlobContent -File $file.FullName -Context $storagecontext -Blob $file.BaseName -Container $containername -Force
}
You should get an output similar to the following screenshot:
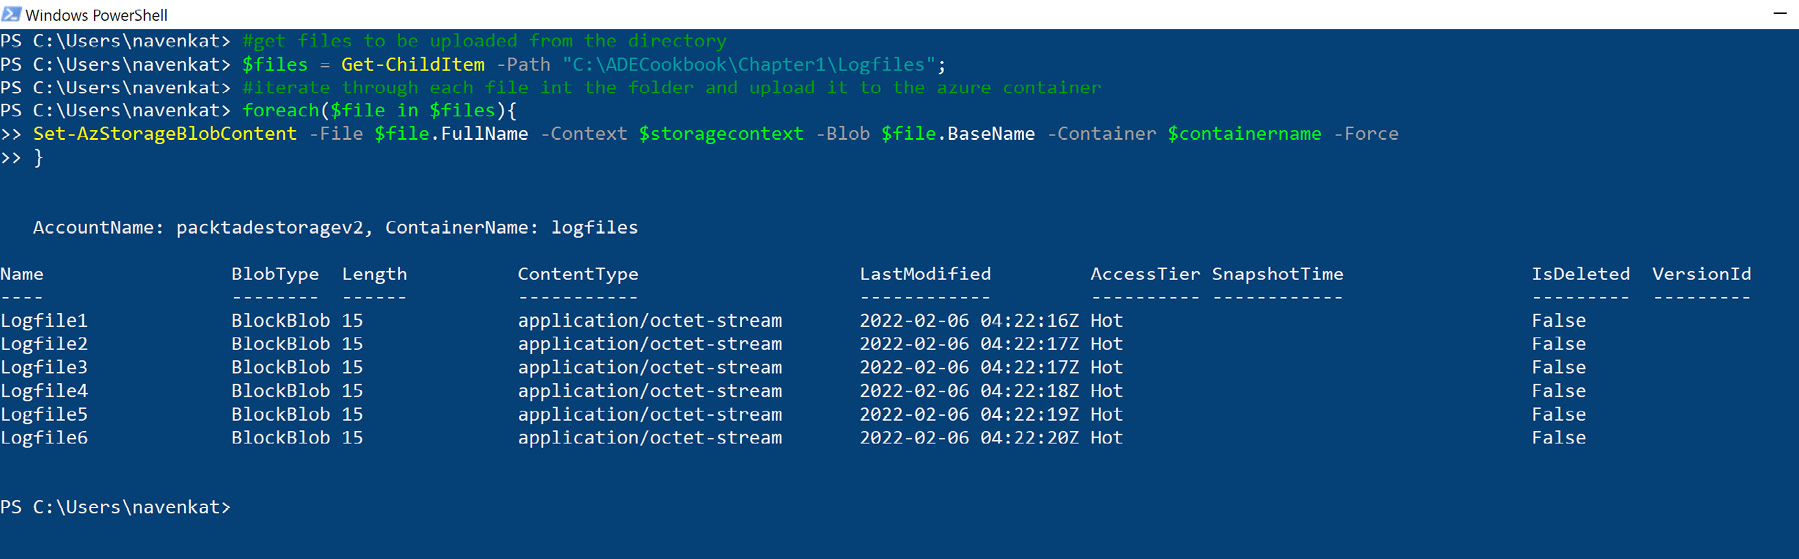
Figure 1.9 – Uploading multiple files to a storage container
How it works…
The storage container is created using the New-AzStorageContainer command. It takes two parameters – the container name and the storage context. The storage context can be set using the Get-AzStorageAccount command context property.
To upload files to the container, we used the Set-AzStorageBlobContent command. This command requires the storage context, a file path to be uploaded, and the container name. To upload multiple files, we can iterate through the folder and upload each file using the Set-AzStorageBlobContent command.
Managing blobs in Azure Storage using PowerShell
In this recipe, we will learn how to perform various management tasks on an Azure blob. We will perform operations such as copying, listing, modifying, deleting, and downloading files from Azure Blob storage.
Getting ready
Before you start, perform the following steps:
- Make sure you have an existing Azure storage account. If not, create one by following the Provisioning an Azure storage account using PowerShell recipe.
- Make sure you have an existing Azure storage container. If not, create one by following the Creating containers and uploading files to Azure Blob storage using PowerShell recipe.
- Log in to your Azure subscription in PowerShell. To log in, run the Connect- AzAccount command in a new PowerShell window and follow the instructions.
How to do it…
Let's perform the following operations in this recipe:
- Copy files/blobs between two blob storage containers.
- List files from a blob container.
- Modify the storage access tier of a blob from Hot to Cool.
- Download a file/blob from a container.
- Delete a file/blob from a container.
Let's look at each of them in detail. We'll begin by copying blobs between containers.
Copying blobs between containers
- Execute the following commands to create a new container in an Azure storage account:
#set the parameter values
$storageaccountname="packtadestoragev2"
$resourcegroup="packtadestorage"
$sourcecontainername="logfiles"
$destcontainername="textfiles"
#Get storage account context
$storagecontext = (Get-AzStorageAccount -ResourceGroupName $resourcegroup -Name $storageaccountname).Context
# create the container
$destcontainer = New-AzStorageContainer -Name $destcontainername -Context $storagecontext
$destcontainer
You should get an output similar to the following screenshot:
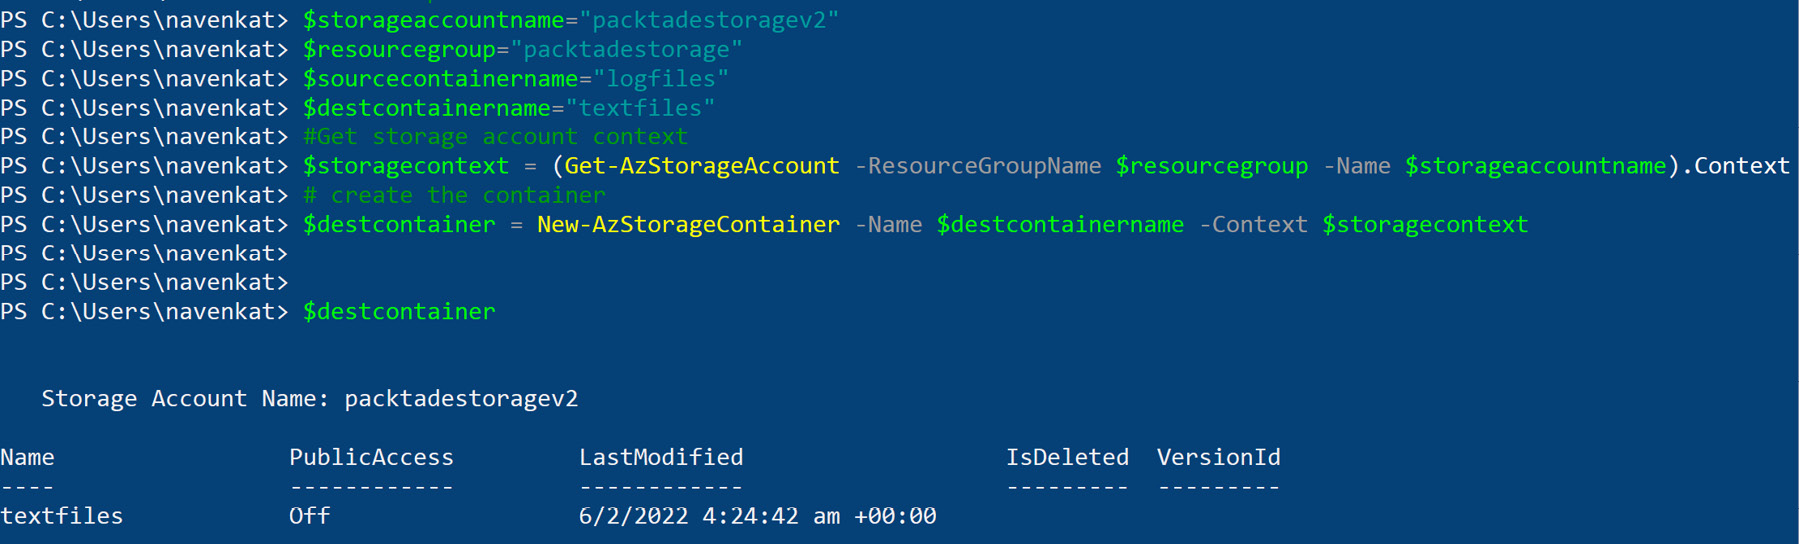
Figure 1.10 – Creating a new storage container
- Execute the following command to copy the Logfile1 blob from the source container to the destination container:
#copy a single blob from one container to another
Start-CopyAzureStorageBlob -SrcBlob "Logfile1"
-SrcContainer $sourcecontainername -DestContainer
$destcontainername -Context $storagecontext -DestContext
$storagecontext
You should get an output similar to the following screenshot:

Figure 1.11 – Copying a blob from one storage container to another
- Execute the following command to copy all the blobs from the source container to the destination container:
# copy all blobs in new container
Get-AzStorageBlob -Container $sourcecontainername
-Context $storagecontext | Start-CopyAzureStorageBlob
-DestContainer $destcontainername -DestContext
$storagecontext -force
You should get an output similar to the following screenshot:
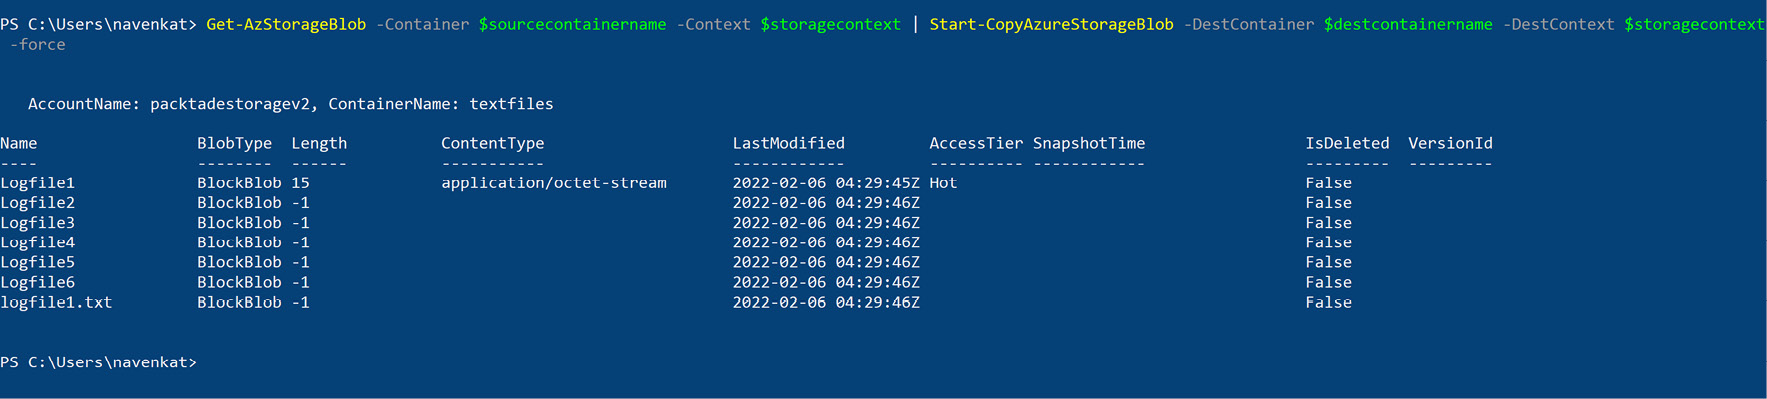
Figure 1.12 – Copying all blobs from one storage container to another
Listing blobs in an Azure storage container
Execute the following command to list the blobs from the destination container:
# list the blobs in the destination container
(Get-AzStorageContainer -Name $destcontainername -Context
$storagecontext).CloudBlobContainer.ListBlobs()
You should get an output similar to the following screenshot:
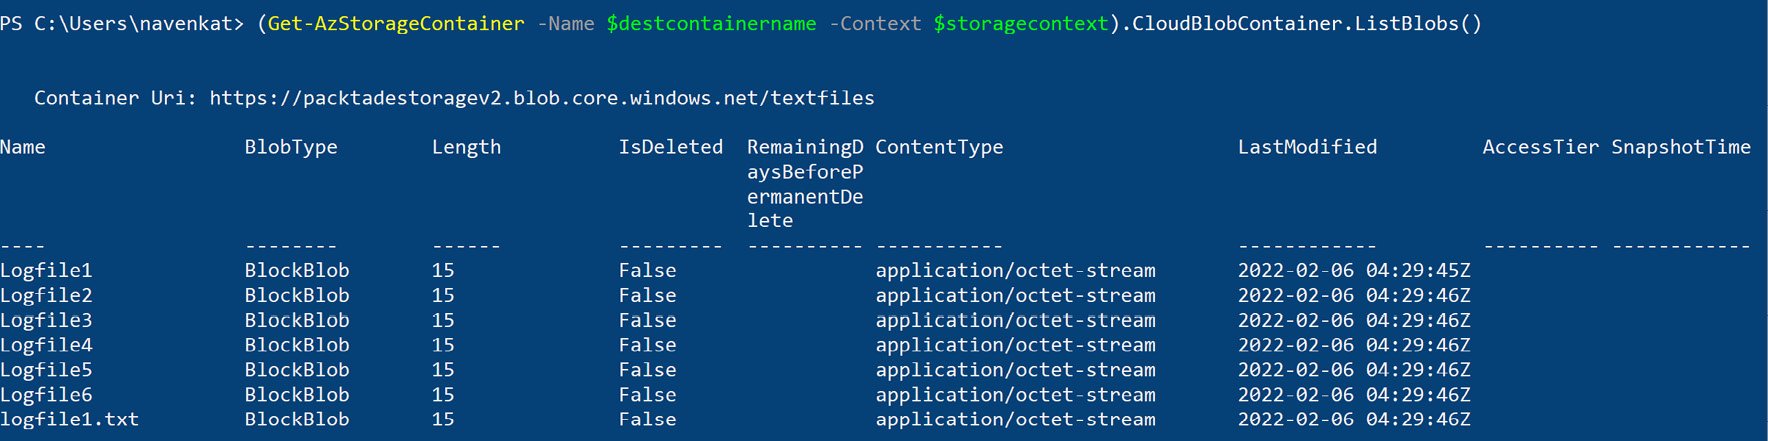
Figure 1.13 – Listing blobs in a storage container
Modifying a blob access tier
Perform the following steps:
- Execute the following commands to change the access tier of a blob:
# Get the blob reference
$blob = Get-AzStorageBlob -Blob *Logfile2* -Container $sourcecontainername -Context $storagecontext
#Get current access tier
$blob
#change access tier to cool
$blob.ICloudBlob.SetStandardBlobTier("cool")
#Get the modified access tier
Get-AzStorageBlob -Blob *Logfile2* -Container $sourcecontainername -Context $storagecontext
You should get an output similar to the following screenshot:
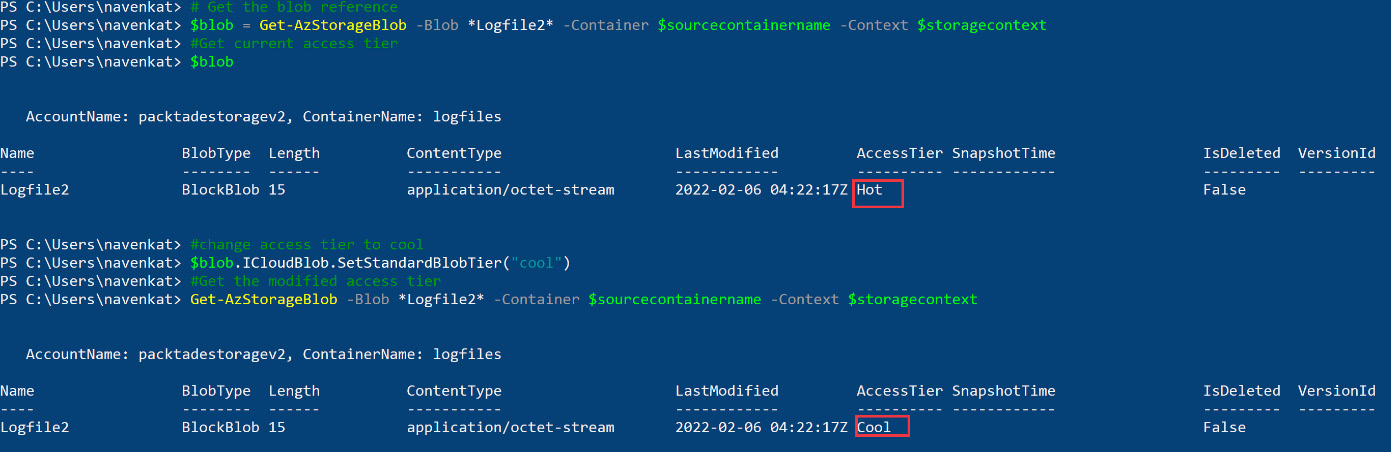
Figure 1.14 – Modifying the blob access tier
- Execute the following commands to change the access tier of all the blobs in the container:
#get blob reference
$blobs = Get-AzStorageBlob -Container $destcontainername -Context $storagecontext
#change the access tier of all the blobs in the container
$blobs.icloudblob.setstandardblobtier("Cool")
#verify the access tier
Get-AzStorageBlob -Container $destcontainername -Context $storagecontext
You should get an output similar to the following screenshot:
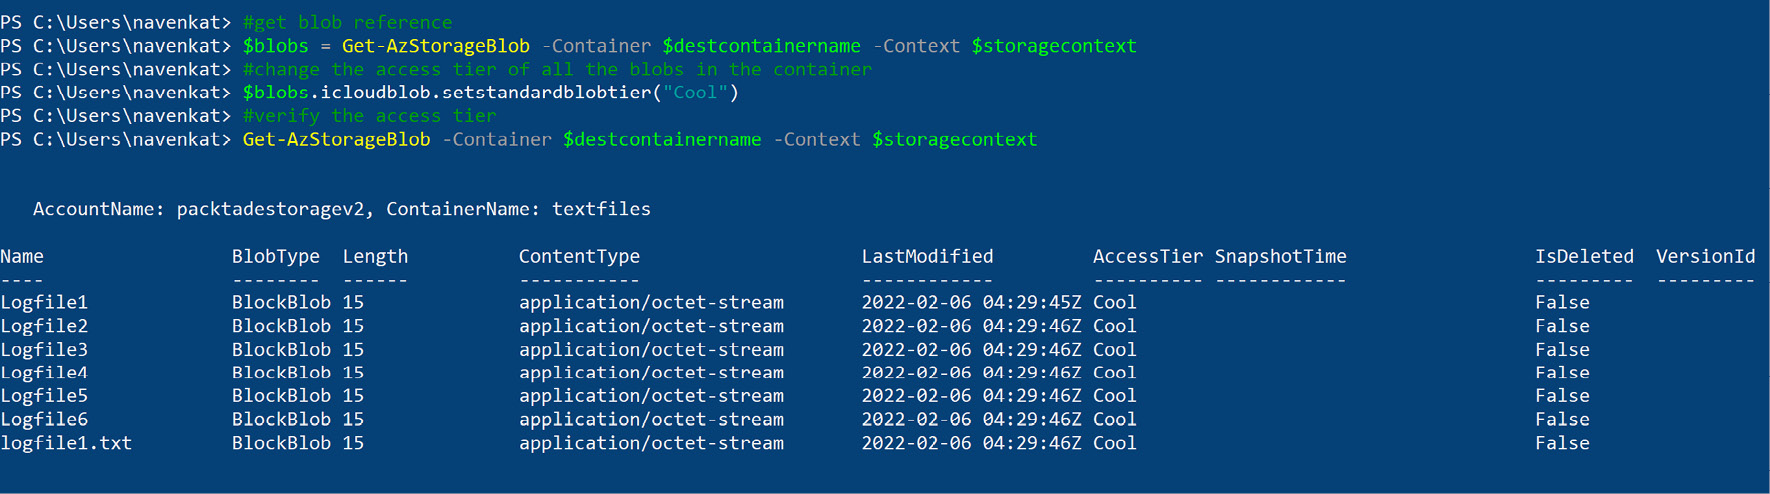
Figure 1.15 – Modifying the blob access tier of all the blobs in a storage container
Downloading a blob
Execute the following commands to download a blob from Azure Storage to your local computer:
#get the storage context
$storagecontext = (Get-AzStorageAccount -ResourceGroupName
$resourcegroup -Name $storageaccountname).Context
#download the blob
Get-AzStorageBlobContent -Blob "Logfile1" -Container
$sourcecontainername -Destination C:ADECookbookChapter1 Logfiles -Context $storagecontext -Force
Deleting a blob
Execute the following command to remove/delete a blob:
#get the storage context
$storagecontext = (Get-AzStorageAccount -ResourceGroupName
$resourcegroup -Name $storageaccountname).Context
Remove-AzStorageBlob -Blob "Logfile2" -Container
$sourcecontainername -Context $storagecontext
How it works…
Copying blobs across containers in the same storage account or a different storage account can be done easily by the PowerShell Start-CopyAzureStorageBlob command. The command takes the source and destination blobs, the source and destination containers, and the source and destination storage accounts as parameters. To copy all blobs in a container, we can run Get-AzStorageBlob to get all the blobs in the container and pipe the blobs to the Start-CopyAzureStorageBlob command.
A blob access tier can be modified by first getting the reference to the blob object using Get-AzStorageBlob and then modifying the access tier using the setstandardblobtier property. There are three access tiers – Hot, Cool, and Archive:
- The Hot tier is suitable for files that are accessed frequently. It has a higher storage cost and low access cost.
- The Cool tier is suitable for infrequently accessed files and has a lower access cost and a lower storage cost.
- The Archive tier, as the name suggests, is used for long-term archival and should be used for files that are seldom required. It has the highest access cost and the lowest storage cost.
To download a blob from Azure to a local system, we use Get-AzStorageBlobContent. The command accepts the blob name, the container name, the local file path, and the storage context.
To delete a blob, run Remove-AzStorageBlob. Provide the blob name, the container name, and the storage context.
Configuring blob lifecycle management for blob objects using the Azure portal
Azure Storage provides different blob access tiers such as Hot, Cool, and Archive. Each access tier has a different storage and data transfer cost. Applying a proper lifecycle rule to move a blob among different access tiers helps optimize the cost. In this recipe, we will learn how to apply a lifecycle rule to a blob using the Azure portal.
Getting ready
Before you start, perform the following steps:
- Make sure you have an existing Azure storage account. If not, create one by following the Provisioning an Azure storage account using PowerShell recipe.
- Make sure you have an existing Azure storage container. If not, create one by following the Creating containers and uploading files to Azure Blob storage using PowerShell recipe.
- Make sure you have existing blobs/files in an Azure storage container. If not, you can upload blobs in accordance with the previous recipe. Then, log in to the Azure portal at https://portal.azure.com.
How to do it…
Follow the given steps to configure a blob lifecycle:
- In the Azure portal, find and open the Azure Storage case. In our case, it is packtadestoragev2.
- In the packtadestoragev2 window, search for Data management and select Lifecycle Management under Data management, as shown in the following screenshot:
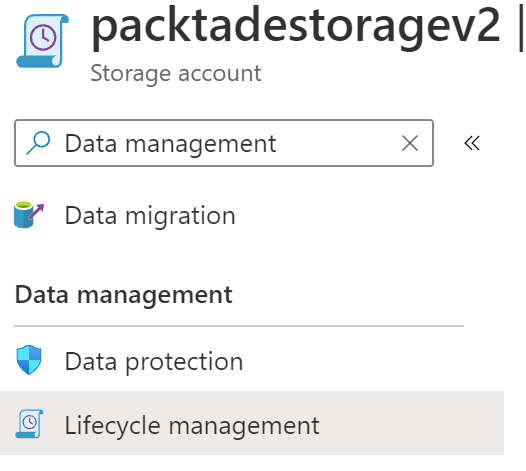
Figure 1.16 – Opening Lifecycle management
- On the Add a rule page, create a rule to provide the lifecycle configuration. A lifecycle defines when to move a blob from a Hot to a Cool access tier, when to move a blob from a Cool to a Storage access tier, and when to delete the blob. Select Limit blobs with filters to create a lifecycle policy for a particular container. Click Next:
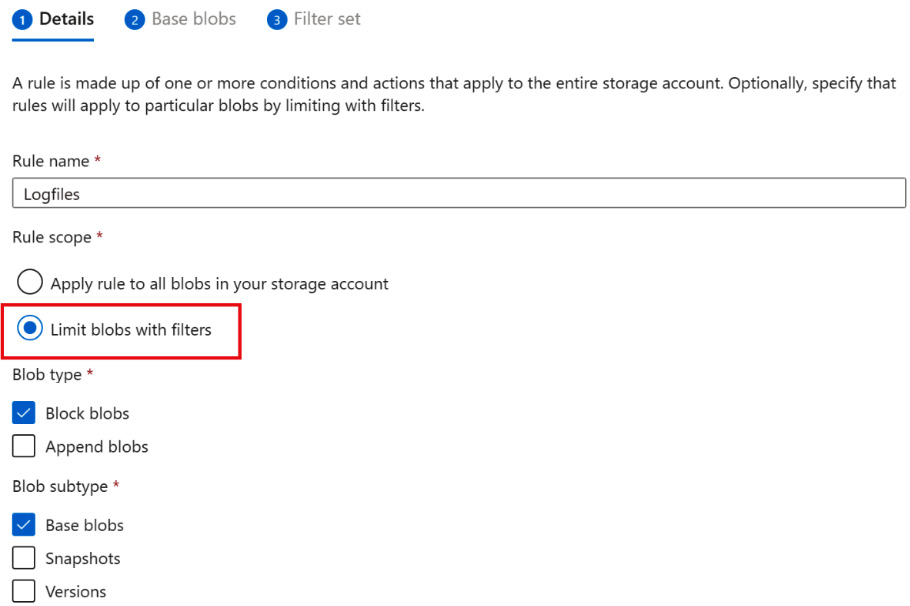
Figure 1.17 – Lifecycle management – the action set
- Specify the condition you would like to use as a lifecycle policy. For example, the following rule moves the blobs that haven't been modified in the last 30 days to Cool storage and 60 days to Archive storage:

Figure 1.18 – Lifecycle management – the filter set
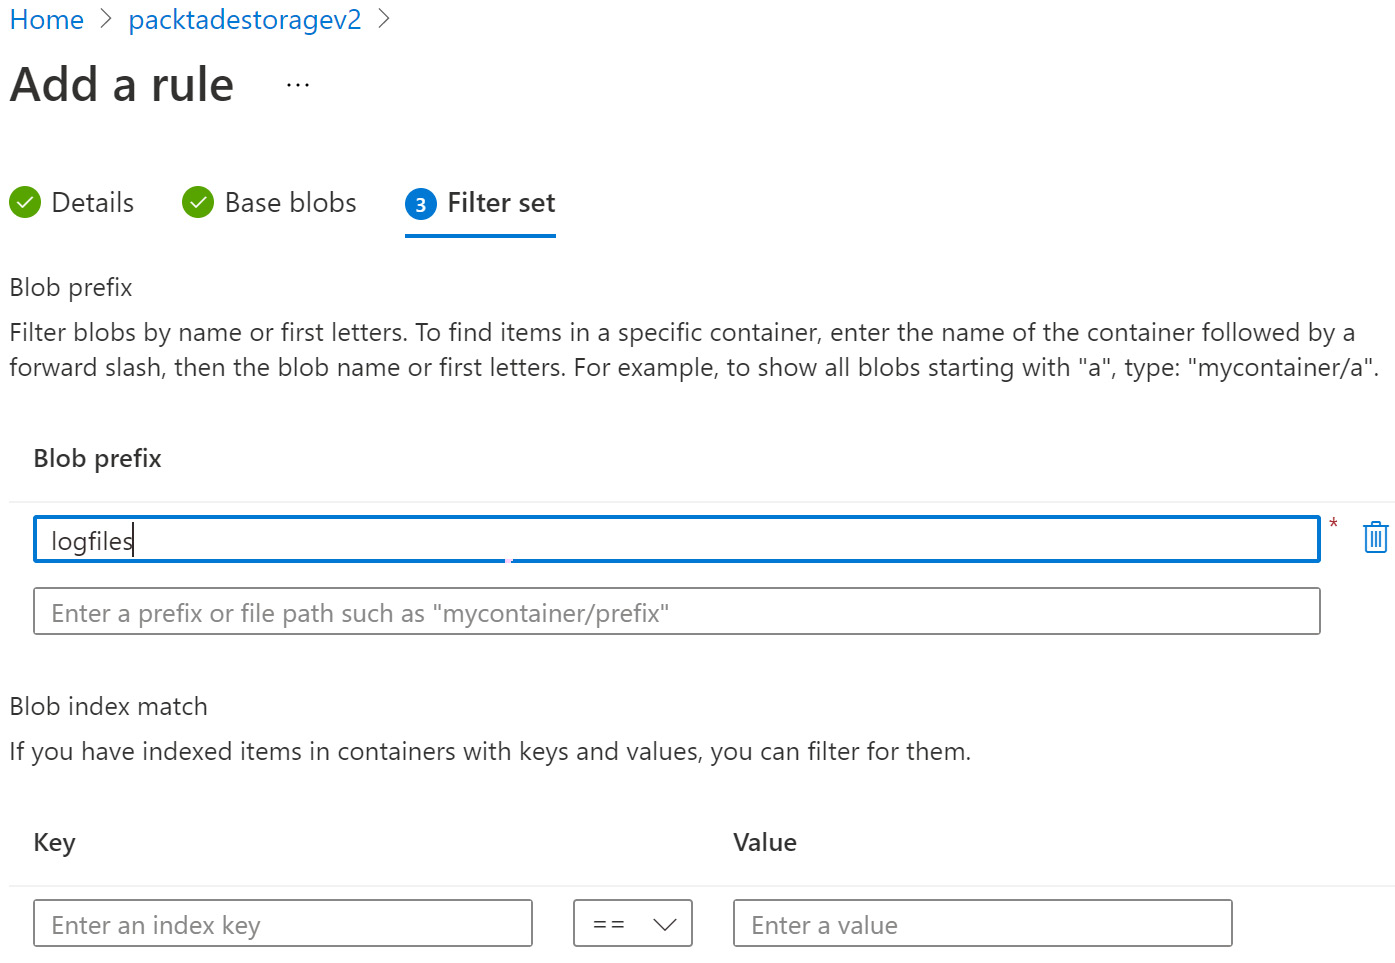
Figure 1.19 – Lifecycle management – reviewing and adding
How it works…
A blob lifecycle management rule helps in managing storage costs by modifying the access tier of blobs as per the specified rule. Consider a log processing application that reads the log file from Azure Storage, analyzes it, and saves the result in a database. As the log file is read and processed, it may not be needed any further. Therefore, moving it to a Cool access tier from a Hot access tier will save on storage costs.
Blob lifecycle management helps in automating the access tier modification as per the application requirement and is, therefore, a must-have for any storage-based application.