Chapter 7: Data Migration – Azure Data Factory and Other Cloud Services
When your business needs to move data between cloud providers, Azure Data Factory presents a convenient and robust interface for this task. Microsoft provides connectors to integrate the data factory with multiple third-party services, including Amazon Web Services (AWS) and Google Cloud. In this chapter, we will walk though several illustrative examples on migrating data from these two cloud providers. In addition, you will learn how to use Azure Data Factory's Custom Activity to work with providers who are not supported by Microsoft's built-in connectors.
In this chapter, we will cover the following recipes:
- Copying data from Amazon S3 to Azure Blob storage
- Copying large datasets from S3 to ADLS
- Copying data from Google Cloud Storage to Azure Data Lake
- Copying data from Google BigQuery to Azure Data Lake Store
- Migrating data from Google BigQuery to Azure Synapse
- Moving data to Dropbox
Technical requirements
All recipes in this chapter assume that you have a Microsoft Azure account and an instance of a data factory. Refer to Chapter 1, Getting Started with ADF, for instructions on how to set up your Azure account and create a data factory.
For the recipes in this chapter, you will need accounts with sufficient permissions on third-party services. For recipes 1 and 2, you will need to set up an account with AWS. For recipes 3, 4, and 5, you will need a Google Cloud account. For recipe 6, you will require a Dropbox account.
If you do not have accounts already set up with the aforementioned services, you can do this for free:
- Go to https://aws.amazon.com/console/ to sign up for a free AWS account.
- You will need to know this account's access key ID and secret access key. How you get this information will depend on how your account is set up (in other words, is this a root account or an IAM user?). Refer to https://aws.amazon.com/blogs/security/wheres-my-secret-access-key/ for instructions on how to obtain this information.
- Go to https://cloud.google.com/ to sign up for a free Google Cloud account and create your first project.
- The steps to create and configure a Dropbox account are described in the corresponding recipe.
Copying data from Amazon S3 to Azure Blob storage
In this recipe, you will learn how to copy data from an AWS S3 bucket to the Azure Blob storage container using a data factory.
Getting ready
This recipe requires you to have an AWS account and an S3 bucket. Refer to the Technical requirements section to find out how to set up a new AWS account if you do not have one. Once you have your AWS account set up, go to https://s3.console.aws.amazon.com/s3/ to create a bucket. Upload the sample CSV files from https://github.com/PacktPublishing/Azure-Data-Factory-Cookbook/tree/master/data to your bucket.
How to do it…
Rather than designing the pipeline in the Author tab, we will use the Copy Data Wizard. The Copy Data Wizard will walk you through pipeline creation step by step, and will create and run the pipeline for you:
- Go to the Author and Monitor portal in your instance of Azure Data Factory. In the Data Factory Overview tab, select Copy data from the list of tools.
- In the first step, you will need to provide a name for your pipeline and, optionally, a description. For the purposes of this example, we will name the pipeline pl_copy_data_from_s3. Leave all the other values default as they are and hit Next.
- The Copy Data Wizard will help us define properties of the source (connection and the dataset). We will start by configuring the connection properties. In the interface, select Create New Connection and then, in the New linked service blade, select Amazon S3 as the connector. Then, fill in the name for your connector as well as the access key ID and secret access key. Refer to the Getting ready section on how to obtain the credentials if you do not have them to hand.
Your New linked service blade should look like this:

Figure 7.1 – Creating a linked service for AWS S3
- Test the connection and create the linked service. Hit Next to move to the next step.
- Now we need to configure the dataset for our source. In the interface presented, enter the name of your S3 bucket (adf-migration-to-azure in our example). Use the Browse button to visualize the folder structure. Leave the recursive checked (we do want to copy the contents of the directory recursively), and set Max concurrent connections to 1. Then, hit Next.
- The Copy Data Wizard will test the connection and will present you with the File format settings interface. Click on Detect text format and then check the First row as header checkbox to allow the Copy Data Wizard to configure the dataset for you:

Figure 7.2 – Configuring the file format in the Copy Data Wizard
With the source dataset formatted, we are ready to go to the next step.
- Now we need to configure the Destination properties (as with source, both for the connection and the dataset). Let's configure the connection. Select a linked service for the Azure blob where you intend to store the data from your S3 bucket. You may have one already available if you followed one of the recipes in previous chapters. If you do not have one configured, follow the instructions in the Using parameters and built-in functions recipe in Chapter 2, Orchestration and Control Flow, for detailed instructions on how to create a linked service for an Azure blob.
- After you have selected your connection, you will see an interface to choose the output location, as shown in the following screenshot. Type in the full path to the folder within your Azure Storage account where you want to import the files. Again, use the Browse button for ease of navigation:

Figure 7.3 – Specifying the location for your files
- You have set up the connection. The Copy Data Wizard will verify the connection and present you with two consecutive screens – File Format Settings and Settings. Click through both. No additional configuration is needed.
- We have filled in the connection and dataset information for both the source (Amazon S3 bucket) and destination (Azure Blob storage) of our pipeline. Review the summary that the Copy Data Wizard presents, and verify that all the settings are correct:
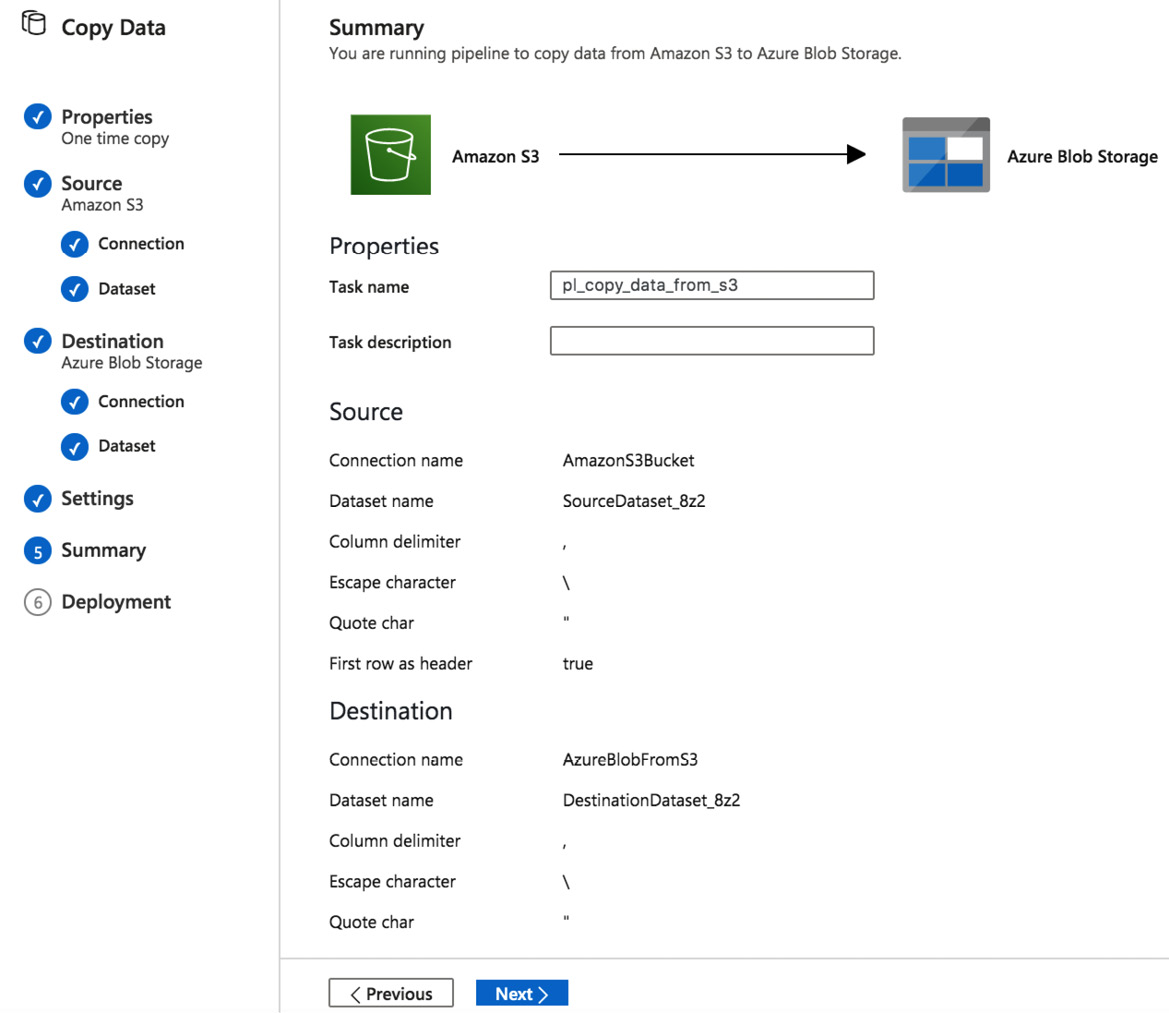
Figure 7.4 – Copy Data Wizard – Summary
- When you go to the next step, the Copy Data Wizard will run the validation to ensure that all the configurations are correct, and then run the pipeline. Click on the Monitor button to see your pipeline status. Once the pipeline completes execution, you should see the files in your Azure Blob storage.
How it works…
The Copy Data Wizard is simply an application that assists you in designing a simple data movement pipeline. It presents you with a series of steps, and once you have filled them all in, it creates and publishes the pipeline for you. After you have gone through the steps in this recipe, go to the Author tab and find the pipeline. It consists of a single copy activity that we configured with the Copy Data Wizard.
Copying large datasets from S3 to ADLS
Azure Data Factory can help you move very large datasets into the Azure ecosystem with speed and efficiency. The key to moving large datasets is data partitioning. The way you partition depends heavily on the nature of your data.
In the following recipe, we will illustrate a methodology to utilize a data partitioning table for moving a large dataset. We will use a public Common Crawl dataset, which contains petabytes of web crawl data from 2008 to the present day. It is a public dataset hosted on the AWS S3 platform. We will only use a small subset of this data for our example, enough to illustrate the power of data factory parallel processing.
Getting ready
In order to access Amazon Web Services, such as an S3 bucket, you need to have proper credentials. These credentials consist of an access key ID (for example, AKFAGOKFOLNN7EXAMPL8) and the secret access key itself (for example, pUgkrUXtPFEer/PO9rbNG/bPxRgiMYEXAMPLEKEY). In this book, we will refer to these credentials as your AWS Account key and Secret.
Even though Common Crawl data is hosted in a public repository, you will still need an AWS account and your own Account key and Secret. Refer to the instructions in the Technical requirements section at the beginning of the chapter on how to obtain these credentials.
We will need to create a partition table in our SQL database. Download the script to create the partitions from https://github.com/PacktPublishing/Azure-Data-Factory-Cookbook/blob/master/Chapter07/sql-scripts/CreateCommon CrawlPartitionsTable.sql.
You will also need access to an Azure Gen2 storage account where you plan to copy the data. Refer to this document at https://docs.microsoft.com/azure/storage/common/storage-account-create?tabs=azure-portal if you need to create one.
Finally, we will need an instance of the Azure SQL database, and the linked service for this instance. Refer to the Using parameters and built-in functions recipe in Chapter 2, Orchestration and Control Flow, for detailed instructions on how to create this resource and configure the connection.
Note that moving large datasets can be very expensive. We suggest that you opt for local redundancy when you create your Azure Data Lake account, and delete data that is not required as a cost-saving measure. Once you construct your pipeline and verify that it works as expected, do not run it repeatedly: you might incur considerable charges.
How to do it…
In order to copy the large dataset, we will first create a database table that will define how we partition our data. Then, we will create an outer pipeline, which will read information from the partition table and pass it to a ForEach activity. The ForEach activity will invoke an inner pipeline that will perform the data movement:
- In The Azure portal, go to your Azure SQL database and open Query Editor, logging in with the credentials you specified when you were creating the resource. In the Query window, enter the following query. The text of this query is available in the CreateCommon CrawlPartitionsTable.sql file that you downloaded in the Getting ready section. We strongly advise you to copy text from the file downloaded from GitHub:
CREATE TABLE [dbo].[Common CrawlPartitions](
[YearAndMonth][varchar](255) NULL,
[Path] [varchar](255) NULL,
[UpdatedAt] [Datetime]
)
INSERT INTO Common CrawlPartitions (YearAndMonth,
Path, UpdatedAt)
VALUES
('01-2019', 'cc-index/collections/CC-MAIN-2019-04/indexes', GetDate()),
('02-2019', 'cc-index/collections/CC-MAIN-2019-09/indexes', GetDate()),
('03-2019', 'cc-index/collections/CC-MAIN-2019-13/indexes', GetDate()),
('04-2019', 'cc-index/collections/CC-MAIN-2019-18/indexes', GetDate()),
('05-2019', 'cc-index/collections/CC-MAIN-2019-22/indexes', GetDate()),
('06-2019', 'cc-index/collections/CC-MAIN-2019-26/indexes', GetDate()),
('07-2019', 'cc-index/collections/CC-MAIN-2019-30/indexes', GetDate()),
('08-2019', 'cc-index/collections/CC-MAIN-2019-35/indexes', GetDate()),
('09-2019', 'cc-index/collections/CC-MAIN-2019-39/indexes', GetDate()),
('10-2019', 'cc-index/collections/CC-MAIN-2019-43/indexes', GetDate()),
('11-2019', 'cc-index/collections/CC-MAIN-2019-47/indexes', GetDate()),
('12-2019', 'cc-index/collections/CC-MAIN-2019-51/indexes', GetDate());
Run the query to create and populate the dbo.Common CrawlPartitions table.
Creating the linked services and dataset for the pipeline
Once we have created the dbo.Common CrawlPartitions table, we are ready to create the linked services and dataset for our pipeline. Perform the following steps to do so:
- You can reuse the Azure SQL linked service and dataset that you created in one of the previous recipes. If you have not created any, or do not wish to reuse them, create a new one.
Go to your Data Factory instance and open the Author and Monitor interface. Create a dataset to store the data from the partition table. From Factory Resources (on the left), select New Dataset. In the New Dataset blade, select Azure SQL. Select the appropriate subscription and test connection, and then click on Create.
- Create a linked service to connect to S3: from the Manage tab, select Linked Services, and then click on New. This step is similar to step 3 in the previous recipe (Copying data from Amazon S3 to Azure Blob storage), and you may reuse that connection here as well.
- Create a dataset to refer to the S3 Common Crawl repository. Specify S3 as a data store and Binary as a file format. Select the S3 linked service we created in the previous step as a linked service. For the file path, enter Common Crawl as a bucket. Do not enter anything in the folder or file text fields:

Figure 7.5 – S3 Common Crawl dataset configuration
- Create a linked service and a dataset for the ADLS account to which you will be moving data. The steps are similar to those that you perform when creating a linked service and dataset for a common Azure Blob storage account, but instead of DelimitedText, select Binary for Format Type. Make the dataset parameterized (refer to the Using parameters and built-in functions recipe in Chapter 2, Orchestration and Control Flow, for instructions on how to create a parameterized dataset). Specify a single parameter, DirName, of the String type. In the Connection tab, enter the following text in the Directory part of the file path:
@dataset().DirName
The Connection tab for your dataset configuration window should look similar to the following screenshot:
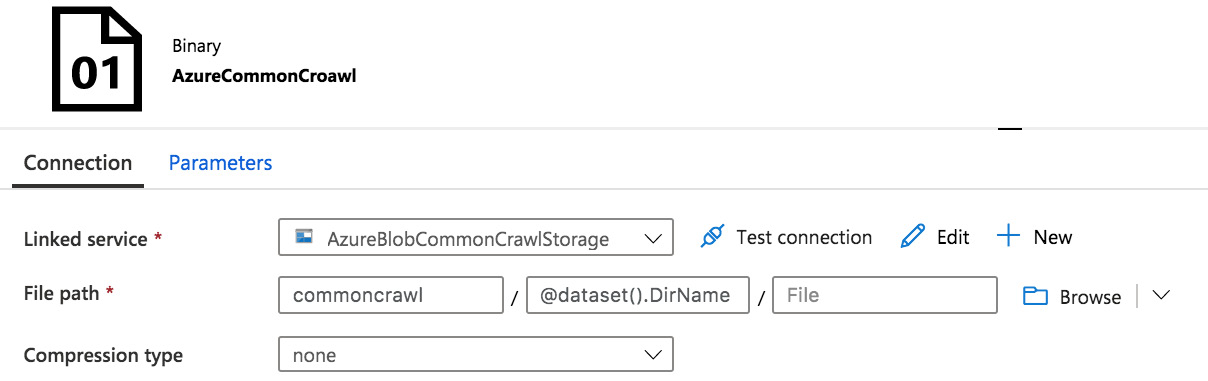
Figure 7.6 – Azure ADLS dataset configuration
Creating the inner pipeline
We now have all the components to design the inner pipeline, the pipeline that will actually copy chunks of data (defined in our partition table) from the S3 Common Crawl dataset into our Azure Storage account:
- Create a new pipeline. For this example, we will call this pipeline pl_Common Crawl_data_inner.
- Add the Path parameter to the inner pipeline. Click anywhere on the white canvas, and in the Parameters tab at the bottom, add a new parameter with the name Path of the String type.
Your inner pipeline Parameters tab should look similar to the following screenshot:

Figure 7.7 – Adding a path parameter to the inner pipeline
- Add a copy activity to this pipeline and name it Copy Common Crawl from S3 to ADLS. Next, configure the source for this copy activity. Specify the S3 Common Crawl dataset we created in step 3 as the data source. In the File Path Type section, select the Wildcard file path radio button.
In the Wildcard Paths section, fill in the value using the dynamic content interface. Click inside the Wildcard folder path text field and then select the Add dynamic content link to bring up the interface. In that interface, scroll down to find the Parameters section and select the Path parameter. Click the Finish button to finalize your choice.
Finally, in the Wildcard file name text field, enter *.gz.
- Configure the sink for the copy activity. Select ADLS dataset from step 4 of the previous recipe. Then, follow the instructions from step 3 to use dynamic content to fill in the Path parameter text field.
Creating the outer pipeline
Next, we will build the outer pipeline. The outer pipeline reads the data partitions from the table and invokes the inner pipeline:
- Create one more pipeline. In this example, we will refer to it by the name pl_Common Crawl_data_outer.
- Add a Lookup activity from the Activities pane on the main canvas, and name it Get Partitions. In Settings, specify the Source dataset that we created in step 1 of the Creating the linked services and dataset for the pipeline section (which represents the Azure SQL table). In the Query section, check the Query radio button and enter the following query:
select top 2 Path from [dbo].[Common CrawlPartitions]
Make sure the First Row only checkbox is not checked.
- Add a ForEach activity from the Activities pane and name it For Each Partition. In the Settings tab, set the batch count as 12 (the number of months), and enter the following text in the Items text field:
@activity('Get Partitions').output.value
Make sure that the Sequential checkbox is not checked
- Click inside the ForEach activity to open the ForEach activity canvas. Place an Execute Pipeline activity on this canvas and configure it to call the pl_Common Crawl_data_inner pipeline. Use the dynamic content interface to fill in the Path parameter value. Click inside the Value text field for the Path parameter, and select the Add dynamic content link. In the interface, scroll down to see the ForEach Iterator section. Select Current item. This will place the word @item() in the textbox on top of the dynamic content interface. Append the word Path to it. As a result, the text in the dynamic content textbox should read @item().Path. Click Finish to finalize your choice.
Your Execute Pipeline activity configuration settings should look similar to the following screenshot:

Figure 7.8 – Executing the pipeline activity configuration
- Connect the Lookup activity and the ForEach activity.
- Publish your pipelines and run the outer pipeline. Click on Add trigger and select the Trigger Now option. If you run it in debug mode, you will not see parallelism.
- Go to the Monitor tab and verify that you have one instance of the outer pipeline and two instances of the inner pipeline running, similar to in the following screenshot:

Figure 7.9 – Monitor tab
How it works…
In this recipe, we have constructed a pipeline that is capable of moving very large datasets from S3 to an Azure Storage account. For our example, we used 1 year of Common Crawl data, although we only copied over 2 months of this data (enough to validate our approach while saving the considerable cost of moving even more data). We then created the Common CrawlPartitions table in which we listed our partitions. This table also contained paths to the data locations.
Next, we created the inner and outer pipelines to ingest this data from locations provided in the Common CrawlPartitions table and copy it over to the Azure Data Lake storage. The key to parallel execution is the design of the outer pipeline: it is the ForEach activity that allows us to execute activities in parallel by allowing us to specify the batch count. Note that there is a limitation in terms of the degree of parallelism. If your batch count is more than 40, it is better to enhance the design by further partitioning the data and having multiple ForEach activities, each executing a subset of parallel sub-pipelines.
One thing to notice is that we have limited our dataset further by specifying the query in LookupActivity as a select top 2 path from [dbo][Common CrawlPartitioning]. We can regulate the size of our data pull by tweaking this query and, of course, by adding data to our data partitioning table.
See also
If you are interested in the Common Crawl dataset, which contains web crawl data from 2008, you can obtain more information at https://Common Crawl.org/the-data/.
Microsoft offers guidance on pricing for Azure Data Factory. We strongly suggest that you familiarize yourself with this information before copying large datasets: https://docs.microsoft.com//azure/data-factory/pricing-concepts.
Copying data from Google Cloud Storage to Azure Data Lake
In this recipe, we will use the in-built Microsoft connectors to copy the data from Google Cloud Storage to an Azure Storage account. You will learn how to configure the Google Storage account and grant permissions to allow your data factory to connect and import the files.
Getting ready
For this recipe, you will need to have a Google Cloud account and at least one Google Storage bucket:
- To set up a free Google Cloud account and create your first project, refer to the Technical requirements section. Once your project is set up, go to your dashboard and copy your project ID.
- Then, go to the Google Storage browser. It can be accessed at this URL: https://console.cloud.google.com/storage/browser?<your-project-id>. Be sure to replace the your-project-id field in the URL with the correct value.
- In the Google Storage browser, create a new bucket. Once the bucket is created, upload the CSV files from the GitHub account (https://github.com/PacktPublishing/Azure-Data-Factory-Cookbook/tree/master/data) to your bucket.
- If you do not have an Azure Storage account already available, follow the instructions at https://docs.microsoft.com/azure/storage/common/storage-account-create?tabs=azure-portal to set one up.
How to do it…
In order to import the data, we will first set up the Google Storage account with the correct permissions and then use the built-in data factory connectors to configure the linked services and datasets to connect to both the Google Cloud Storage bucket and the Azure Storage account:
- Start by generating credentials to access your Google Storage bucket. The credentials are called Access Key and Secret.
Log in to your Google Cloud Storage account and select the bucket that you want to export to Azure Storage. Select Settings from the menu on the left, and then go to the Interoperability tab in the main blade. In the Interoperability tab, click on the CREATE A KEY FOR A SERVICE ACCOUNT button:
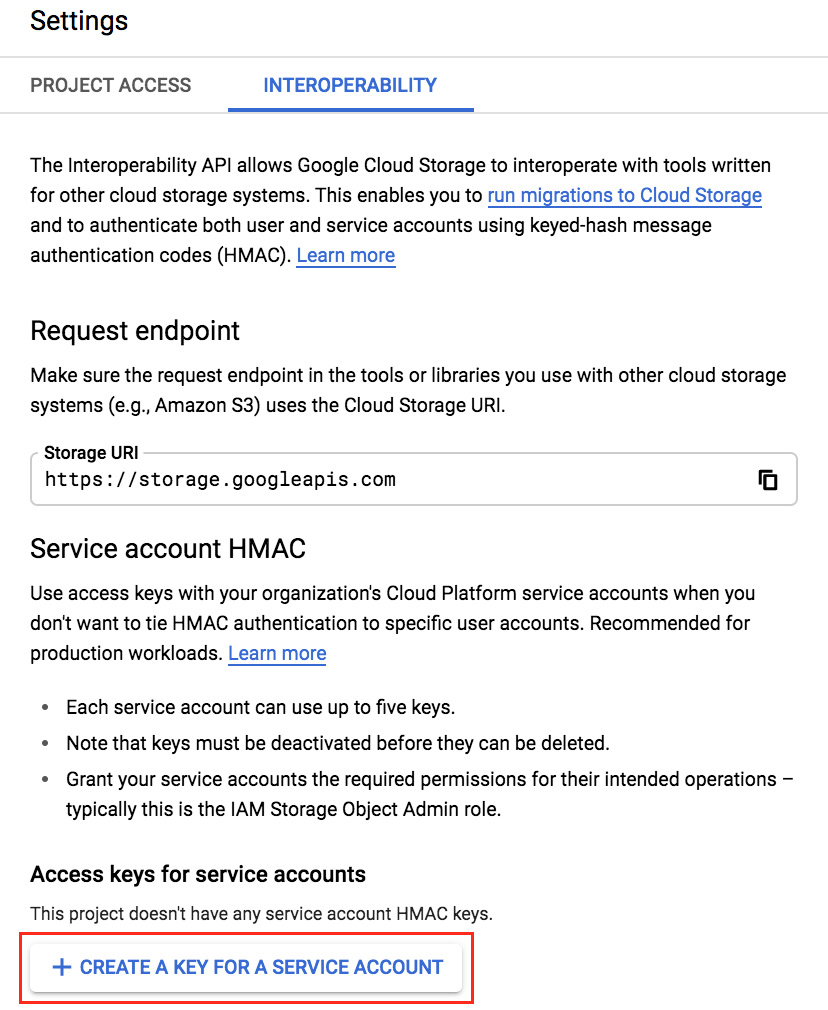
Figure 7.10 – Settings menu
- If you do not have a service account available, you have an option to create one at this point. Make sure to assign the Storage Admin role to this service account to grant permissions to transfer data.
If you have an existing service account, you can view and change its access permissions here: https://console.cloud.google.com/iam-admin/serviceaccounts?project=<your-project-id> (replace <your-project-id> with the correct value for your project).
Select your desired service account and then click on CREATE KEY:

Figure 7.11 – Creating an access key and secret
Make a note of your account key and secret; you will need these values later to create a linked service.
We have set up the access policies on the Google Cloud service account to allow the data factory to perform a data pull. Now we can design the pipeline.
- In The Azure portal, open the Author and Monitor interface of your data factory. Start by creating a linked service and the dataset for the Google Cloud Storage Bucket.
- In the Manage tab, add a new linked service. Specify its type as Google Cloud Storage (S3 API). Fill in the next blade, using the access key ID and secret access key values you obtained in step 3. In the service URL, enter https://storage.googleapis.com.
- The following is an example of a filled-out Google Cloud Storage linked service creation blade:
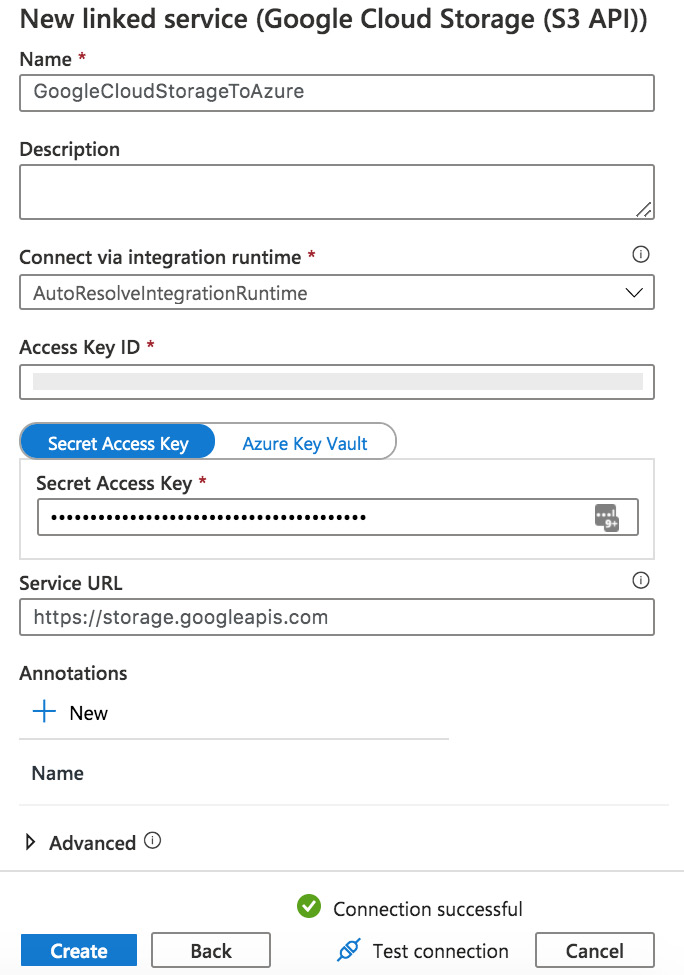
Figure 7.12 – Google Cloud linked service
- In the Author tab, create a new dataset. Select Google Storage (S3 API) as the type, DelimitedText as the format, and specify the Google Storage linked service we just created as the linked service. In the File path text field, specify the Google Storage bucket name.
- Create a linked service and a dataset for the Azure Blob storage account where you want to store the data from Google Cloud bucket. In the File path section of the dataset, specify a container where you want to transfer the files. We'll call it datafromgoogle. If the container does not exist, it will be created during the transfer. Your resulting dataset should look similar to Figure 7.13:
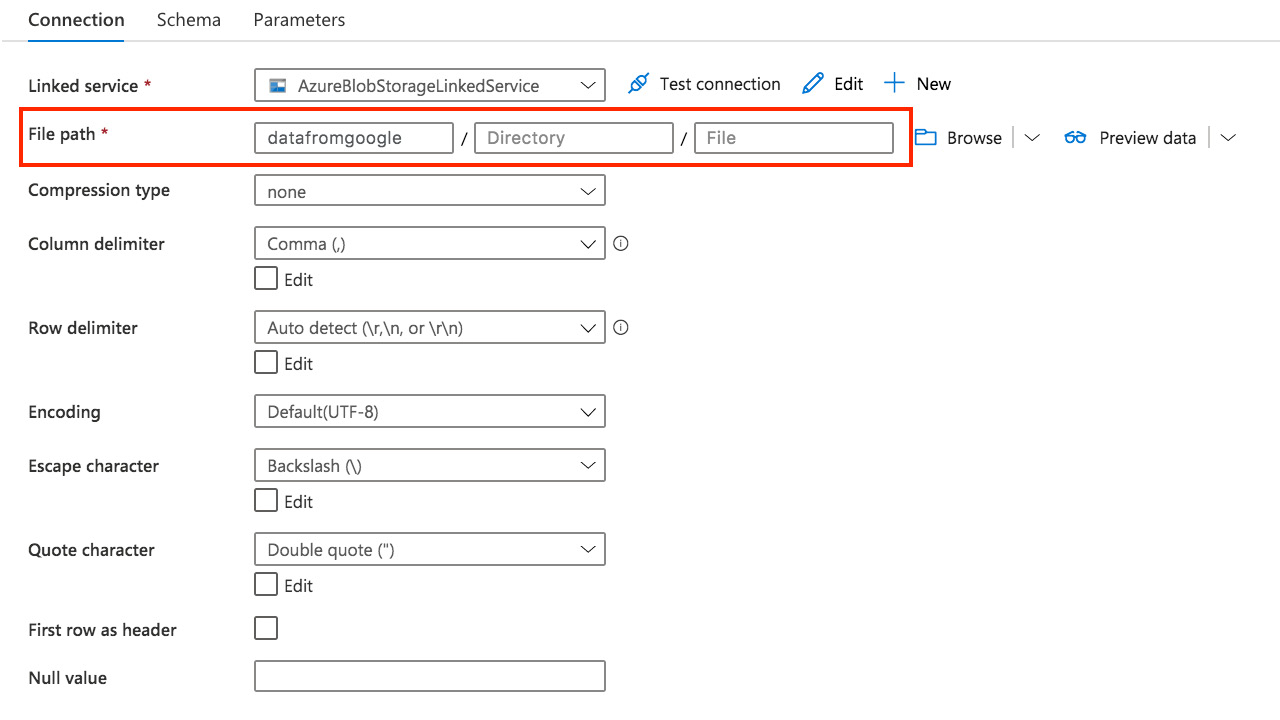
Figure 7.13 – Dataset for the Azure Storage account
- Refer to the Using parameters and built-in functions recipe in Chapter 2, Orchestration and Control Flow, for detailed instructions.
Note
You can also use an Azure Data Lake Storage V2 (ADLS) account for this recipe. If you choose to do that (for example, if you want to reuse the ADLS account from the previous Copying large datasets from S3 to ADLS recipe), you will have to create a linked service and dataset with corresponding connectors. Refer to the previous recipe for detailed instructions on how to do that.
- In the Author tab, create a new pipeline. We will call it pl_transfer_from_gcs. Add a copy activity to it and name this activity Copy From GC To Azure Storage. Configure Source and Sink. In Source, select the Google Storage dataset we created in step 6. For File path type, select Wildcard file path to copy all the files in the dataset. In Sink, select the Azure Blob dataset we created in step 7. In the Sink tab, make sure that the File Extension text field is empty. Leave all the other options as their default settings.
- Run your pipeline in debug mode. Once it is done, you should see that the CSV files were copied from your Google bucket to the Azure Storage account.
- Publish your changes to save them.
How it works…
In this recipe, the main challenge is to configure the Google Storage access permissions correctly. The pipeline is simple and follows all the pipeline design principles we have covered in previous recipes.
See also
Google Cloud is a vast and nimble ecosystem. To learn more about Google Cloud Storage and access management on this platform, refer to the current Google documentation at https://cloud.google.com/iam/docs/granting-changing-revoking-access?.
Copying data from Google BigQuery to Azure Data Lake Store
In this recipe, we will use Azure Data Factory to import a subset of a public fdic_banks.locations dataset from the Google BigQuery service (a cloud data warehouse) into an Azure Data Lake store. We will write the data into destination storage in Parquet format for convenience.
Getting ready
For this recipe, we assume that you have a Google Cloud account and a project, as well as an Azure account and a Data Lake storage account (ADLS Gen2). The following is a list of additional preparatory work:
- You need to enable the BigQuery API for your Google Cloud project. You can enable this API here: https://console.developers.google.com/apis/api/bigquery.googleapis.com/overview.
- You will require information for the Project ID, Client ID, Client Secret, and Refresh Token fields for the BigQuery API app. If you are not familiar on how to set up a Google Cloud app and obtain these tokens, you can find detailed instructions at the following community blog: https://jpda.dev/getting-your-bigquery-refresh-token-for-azure-datafactory-f884ff815a59.
Note that these instructions include consent given by the Azure Data Factory user. Make sure that this user (the Data Factory user, the account that is signed into the The Azure portal) has correct permissions to run BigQuery user jobs. Azure Data Factory will not be able to access data in Google Cloud otherwise. To assign the correct permissions, perform the following steps:
- Go to https://console.cloud.google.com/iam-admin/iam?project=<your-project-name>.
- In the Permissions tab, click on Add and fill in the necessary information (email and role):
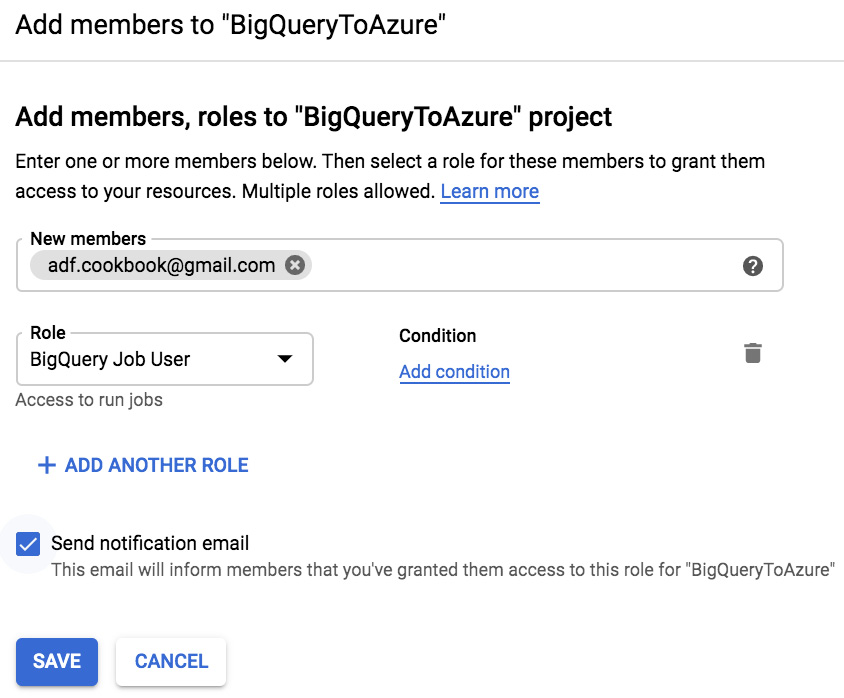
Figure 7.14 – Adding a BigQuery Job User role
- Save the assignment.
How to do it…
Microsoft provides connectors to both Google BigQuery and Azure Data Lake storage. We will create a simple pipeline with a copy activity utilizing these built-in connectors:
- Create a linked service for BigQuery Connection.
From the Manage tab, select Linked Services and then click on New. In the new Linked Service blade, search for BigQuery and then enter the Project ID, Client ID, Client Secret, and Refresh Token information that you obtained previously (refer to the Getting ready section) in the blade presented. The blade should look similar to the following screenshot:
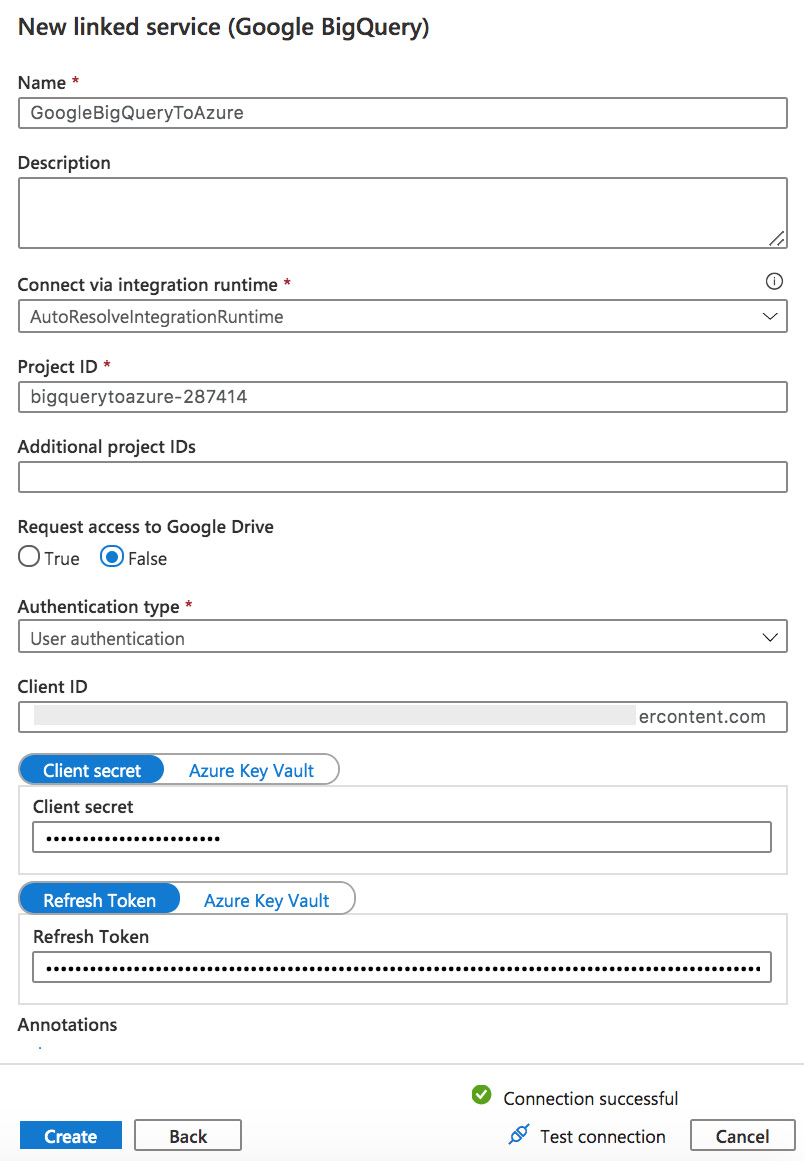
Figure 7.15 – Creating a BigQuery linked service
Test your connection and click on Create to save the linked service
- Create the BigQuery dataset. From the Author tab, select Datasets and then click on New. In the New Dataset blade, search for BigQuery. Finally, enter a name for your dataset (for this example, we named it GoogleBigQueryDS) and select the BigQuery linked service we created in the previous step in the dropdown.
- Create a linked service and the dataset for the ADLS Gen 2 account where you intend to store the data. In Select format blade, choose Parquet. You can find detailed instructions on creating linked services and datasets in the Using parameters and built-in functions recipe in Chapter 2, Orchestration and Control Flow.
- We have all the components necessary to design the pipeline. Now, create a new pipeline, pl_bigquery_to_storage. Add a single Copy activity to this pipeline and rename it to Copy from BigQuery To Storage.
Configure Source and Sink for the copy activity. In Source, select the GoogleBigQueryDS dataset we created in step 2. Check the Query radio button in the Use Query section, and enter the following query:
select * from bigquery-public-data.fdic_banks.locations LIMIT 3000
In Sink, select the ADLS2 Parquet dataset we created in step 3. Leave all the other options as their default settings.
Run your pipeline in debug mode. Once the run is complete, you will see new Parquet files in your ADLS account. You can use a tool such as http://Parquet-viewer-online.com/ to verify that this is the data from the BigQuery dataset.
- Publish your pipeline to save the changes.
Migrating data from Google BigQuery to Azure Synapse
In this recipe, we will import a public dataset, github_repo.files, from Google BigQuery into Azure Synapse – formerly Azure Data Warehouse. We will create a SQL data pool, create the table to store our imported data, and configure the pipeline to migrate data from a public dataset hosted at Google BigQuery.
Getting ready
To complete this recipe, you will need a Google Cloud project with the BigQuery API enabled. Refer to the Getting ready section in the previous recipe for instructions on how to set those up and obtain your Project ID, Client ID, Client Secret, and Refresh Token fields.
You will also need an instance of an Azure Synapse SQL pool to import the data. Refer to the chapter on Azure Synapse on how to create and configure a SQL pool. Have the login credentials for this SQL pool to hand.
You will also need to create a table in your database to store the data we import. Download the script to create the table from https://github.com/PacktPublishing/Azure-Data-Factory-Cookbook/blob/master/Chapter07/sql-scripts/CreateGithubRepoTable.sql.
How to do it…
We will create a simple pipeline consisting of just one copy activity, which will use the BigQuery connector and Azure Synapse connector (both provided by Microsoft) to migrate the data from one cloud provider to the other:
- First, let's create a table to hold the data. From The Azure portal, go to your Azure Synapse account and find the SQL pool where you intend to store the data. From the menu on the left, select Query Editor (preview), and, when prompted, log in with your credentials.
- In Query Editor, execute the following script (you downloaded it from the GitHub repo in the Getting ready section):
CREATE SCHEMA github_repo
GO
CREATE TABLE github_repo.files(
repo_name VARCHAR(200) NOT NULL
,ref VARCHAR(17) NULL
,path VARCHAR(200) NULL
,mode INTEGER NULL
,id VARCHAR(64) NOT NULL
,symlink_target VARCHAR(200) NULL
);
This will create a table with an appropriate schema to load data from BigQuery data.
- Create a linked service for the BigQuery connection. Refer to the previous recipe (step 1) tor detailed instructions on how to configure a linked service for BigQuery. We named our linked service GoogleBigQueryToAzure2.
- Create a dataset that uses this linked service and name it GoogleBigQueryDataSet. When specifying the table, check the Edit checkbox and then enter bigquery-public-data.github_repos.sample_files as the table name.
Your dataset connection configuration should look similar to the following screenshot:

Figure 7.16 – Configuration for the BigQuery dataset
Create a linked service to connect to Azure Synapse SQL pool. Refer to Chapter 3, Setting Up a Cloud Data Warehouse, on how to obtain credentials and create the linked service. Name your linked service AzureSynapseLinkedService.
- Create a dataset using AzureSynapseLinkedService and name it AzureSynapseDataset. Specify github_repo.files for Table.
- We are ready to create the pipeline. Create a new pipeline, name it pl_bigquery_to_synapse, and then add a copy activity to it. Specify the GoogleBigQueryDataSet dataset as the source and check the Query radio button. Enter the following query in the textbox:
select * from bigquery-public-data.github_repos.sample_files limit 30
Important note
In order to configure and test our pipeline, we will limit the import to 30 records. Once we are sure that the pipeline works correctly, we can expand our selection.
- Configure Sink. Select AzureSynapseDataset for the dataset. Select Bulk Insert as the copy method, leaving all the other fields blank.
Important note
Copy Activity supports three methods for copying data to Azure Synapse Analytics: PolyBase, Copy Command (preview), and Bulk Insert. PolyBase and Copy Command are much more efficient options, although only a limited number of services support them at the time of writing. For our use case (loading data from Google BigQuery), Bulk Insert is the most straightforward option. It will work out of the box; no additional setup is necessary.
In a production environment, where efficiency is of paramount importance, you will want to explore the PolyBase and Copy options. References to resources are included in the See also section of this recipe.
- In the Mapping tab, click on Import Schema and verify that the mappings are correct.
- Run the pipeline in debug mode. Once it completes, you should see 30 records in your Azure Synapse table.
- We have built the pipeline and verified that it works, loading 30 records. If desired, we can now load the full dataset. To do this, just replace the query in the Source tab with the following:
select * from bigquery-public-data.github_repos.sample_files
However, this is optional and can be done at your discretion.
- Publish your pipeline to save it.
See also
To learn more about the copy methods supported by the data factory's Azure Synapse connector, refer to the following resources:
- https://docs.microsoft.com/en-us/azure/data-factory/connector-azure-sql-data-warehouse#use-polybase-to-load-data-into-azure-synapse-analytics
- https://docs.microsoft.com/en-us/azure/data-factory/connector-azure-sql-data-warehouse#use-copy-statement
- https://docs.microsoft.com/en-us/azure/data-factory/load-azure-sql-data-warehouse
Moving data to Dropbox
As we described in previous chapters, Azure Data Factory provides many out-of-the-box connectors that integrate with various data sources both within the Azure ecosystem and outside of it (such as Amazon Web Services and Google Cloud). Sometimes, however, you need to have a destination for the reports or other data files that are not supported by Microsoft-provided connectors. How can we do that?
In this chapter, we will build a pipeline that exports the data from a table in an Azure Blob storage account into a folder in Dropbox. Currently, Microsoft does not have a preconfigured Dropbox connector. We will use Azure Data Factory Custom Activity, Azure Batch service, and a simple Python client to achieve our goals.
Getting ready
This recipe assumes that you have a Dropbox account. If this is not the case, go to www.dropbox.com and sign up for a free account.
Create an Azure Storage account, which will serve as a source storage account. In the recipe, we will refer to this account as batchservicedata.
How to do it…
In this recipe, we will work with Azure Data Factory Custom Activity and a simple Python client application running on Azure Batch service to copy files from an Azure Storage account to Dropbox. We'll begin by setting up a Dropbox app to enable API access, and then we'll create an Azure Batch account and a batch pool to host the Python client. Only after these steps are complete will we design a pipeline to export our data from an Azure Storage account to Dropbox.
Creating a Dropbox app and enabling API access
In order to access Dropbox folders from the Python client (and ultimately, from the ADF pipeline), we need to create a Dropbox app and generate the authentication token:
- Log in to your Dropbox account and go to the following URL: https://www.dropbox.com/developers/apps/create.
Fill in the Create a new app form, as shown in the following screenshot (make sure the name of your app is unique):

Figure 7.17 – Creating a Dropbox app
- Once the app is created, click on it to see the settings and configurations. In the Permissions tab, check the file permissions, as shown in the following screenshot, and then save your changes:
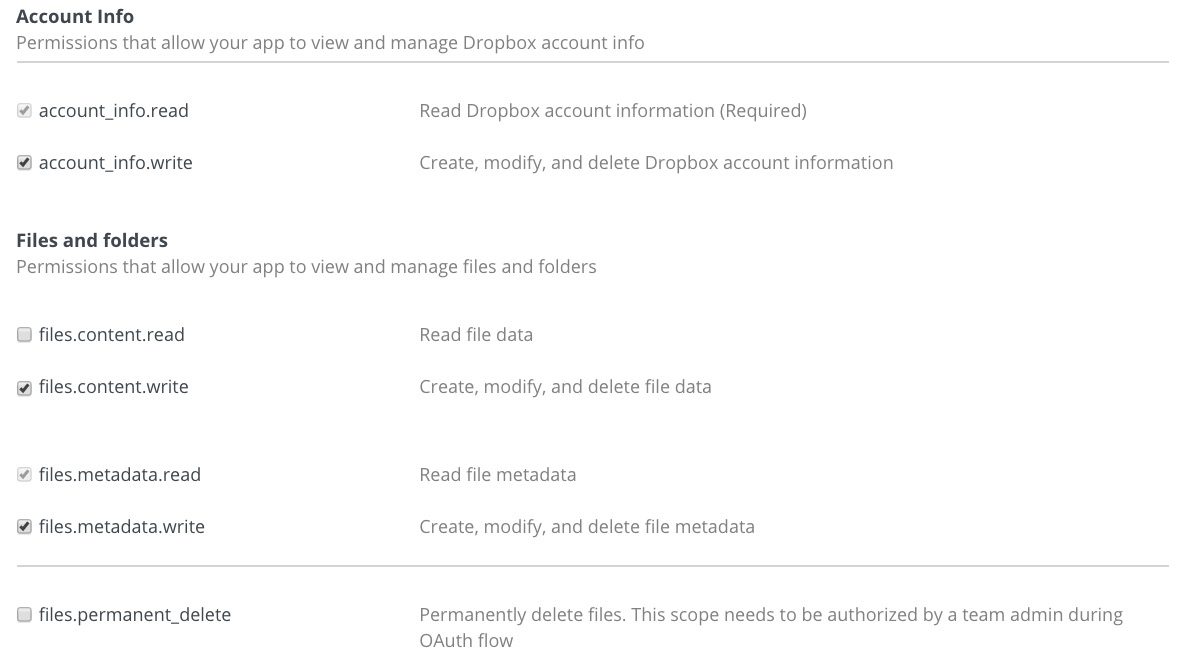
Figure 7.18 – Edit permissions
- In the Settings tab, find the Oauth2 section, Generated access token. Then, click on the Generate button:

Figure 7.19 – Generating an access token
Copy and keep the value of the generated token: we will use it later in the Python client.
Customizing the Python client and setting up a storage account
The next step is to upload our Python client script and the data we intend to copy into the storage account:
- Download the Python client from GitHub:
Open the script and edit it by replacing the words <enter your generated access token> with the token you generated in step 3.
- In The Azure portal, find the storage account you created for this recipe (refer to the Getting ready section). In this example, we named this service account batchservicedata. In this storage account, create a new container (we named it data). Upload the script to this container using the The Azure portal interface.
- In the same container, upload the CSV data that we will be copying (we used the airlines.csv and airports.csv files; you can download these from Packt's GitHub account at https://github.com/PacktPublishing/Azure-Data-Factory-Cookbook/tree/master/data):
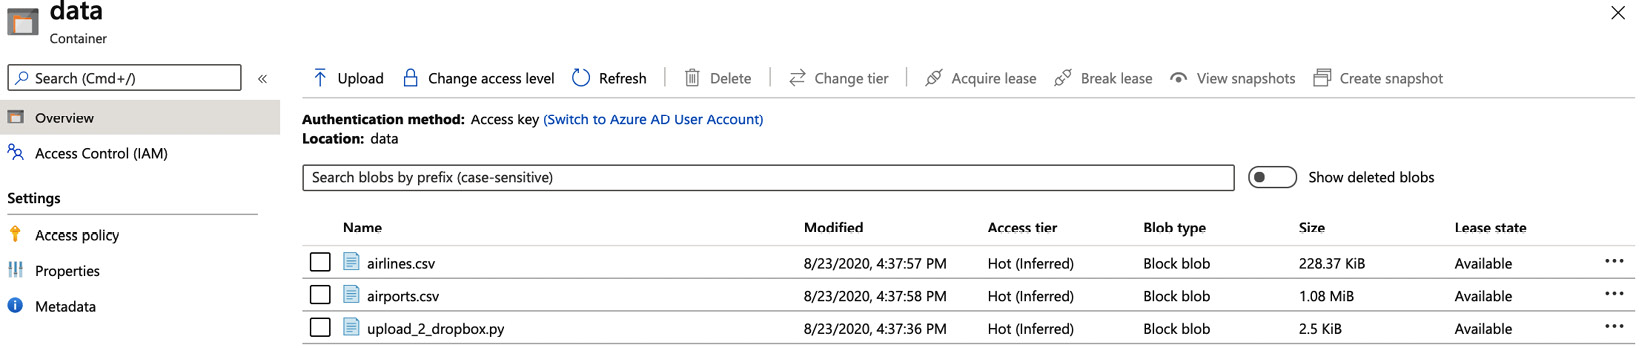
Figure 7.20 – Contents of the batchservicedata data container
- Create a linked service for this storage account. We named our linked service BatchServiceStorageLinkedService. Refer to the Using parameters and built-in functions recipe in Chapter 2, Orchestration and Control Flow, for detailed instructions.
Setting up the batch account and a batch pool
Important note
Azure Batch service is a service that allows you to utilize the compute power of virtual machines to perform custom operations. In this recipe, we will use the DSVM configuration (which stands for Data Science Virtual Machine) for the batch pool. Although it is a more expensive option, this will simplify installation and deployment for our client. These virtual machines are already configured with Python.
Now we will create a batch account with a pool of DSVMs from an ARM template.
- Download the BatchServiceSqlPoolDSVM.json file from GitHub at https://github.com/PacktPublishing/Azure-Data-Factory-Cookbook/blob/master/Chapter07/templates/BatchServiceSqlPoolDSVM/BatchServiceSqlPoolDSVM.json.
Open the https://portal.azure.com/#create/Microsoft.Template URL.
- From the selection, choose Build your own template in the editor, as shown in the following screenshot:
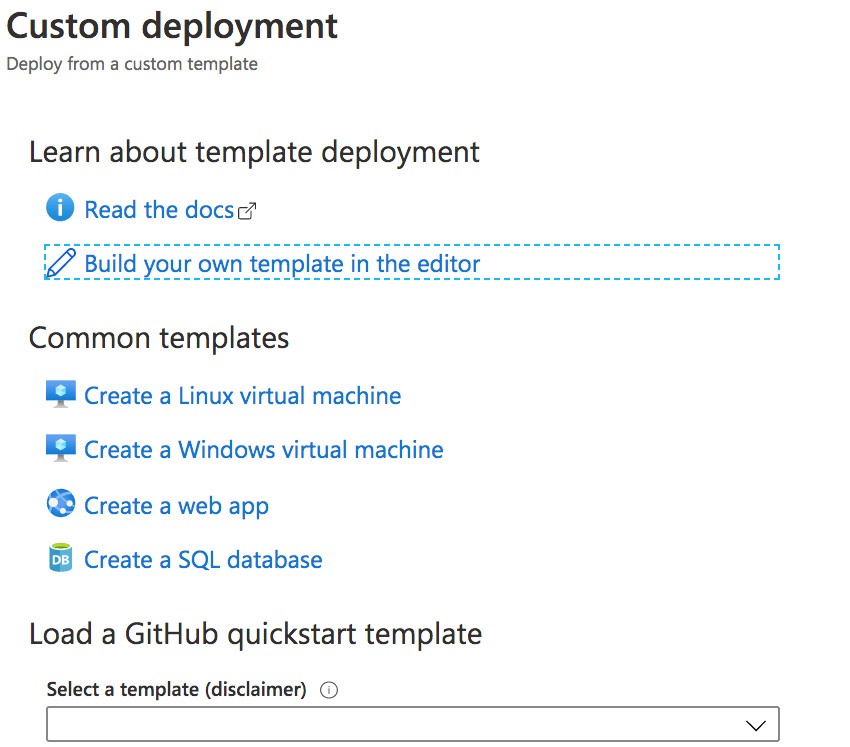
Figure 7.21 – Deploying from the ARM template
- You will see a JSON editor that allows you to enter or upload an ARM template. In this editor, choose the Load File button, upload the BatchServiceSqlPoolDSVM.json file, and then click the Save button. This will bring up the Custom deployment interface, shown as follows:
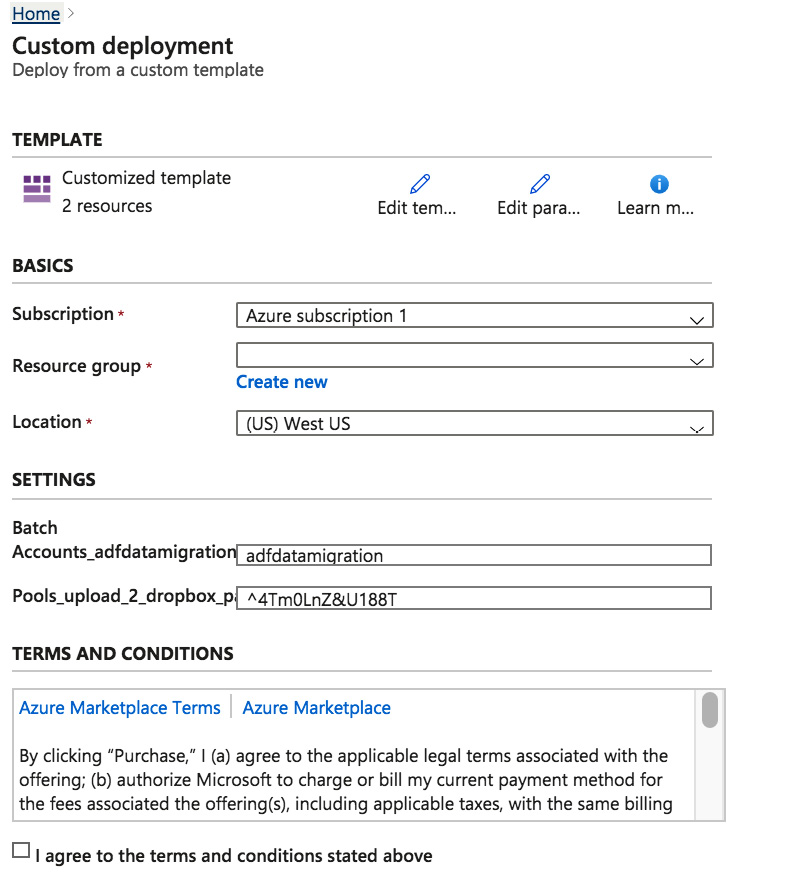
Figure 7.22 – Finalizing the batch service account
- In the Custom deployment interface, fill in the required values – make sure to replace the hardcoded password with one of your own, which must be a strong and unique password, and then click Purchase. This will initiate the process of account creation and deployment of the pool nodes. This will take several minutes.
- Verify that the batch account has been created successfully. In The Azure portal, search for Batch Accounts. You should be able to locate your newly created account, adfdatamigration. When you go to it, select Pools from the menu on the left to see the compute resources allocated. You should see one pool allocated:

Figure 7.23 – adfdatamigration batch account and an upload-2-dropbox pool
Go into the pool. You should see that one node is allocated. It usually takes several minutes to start. Wait until it starts and verify that it is in the running or idle state:

Figure 7.24 – Batch pool with a node in an idle state
- Once you have verified that the account has been created, go to the main batch account interface and choose Keys from menu on the left. Note down both the account key and account URL fields. We will need both of those when we create a linked service in the data factory:

Figure 7.25 – Batch account keys and URL
Designing the data factory pipeline
We have configured the batch service, created a pool of virtual machines to serve our computing needs, and set up our Python client. All that is left now is to design the ADF pipeline and run it:
- In Azure Data Factory's Author and Monitor interface, create a new linked service to connect to the batch account and the pool we created in steps 8–11 of the Copying data from Amazon S3 to Azure Blob storage recipe. Go to the Manage tab and add a new linked service. In the New linked service blade, select Compute and Azure Batch:

Figure 7.26 – New linked service blade
- In the next blade, enter the required information, including the access key and the batch URL. The pool name in our example is upload-2-dropbox.
- Add the BatchServiceStorageLinkedService linked service, which we created in the Setting up the batch account and a batch pool recipe in the Storage linked service name dropdown. Your Azure Batch configurations screen should look similar to the following screenshot:
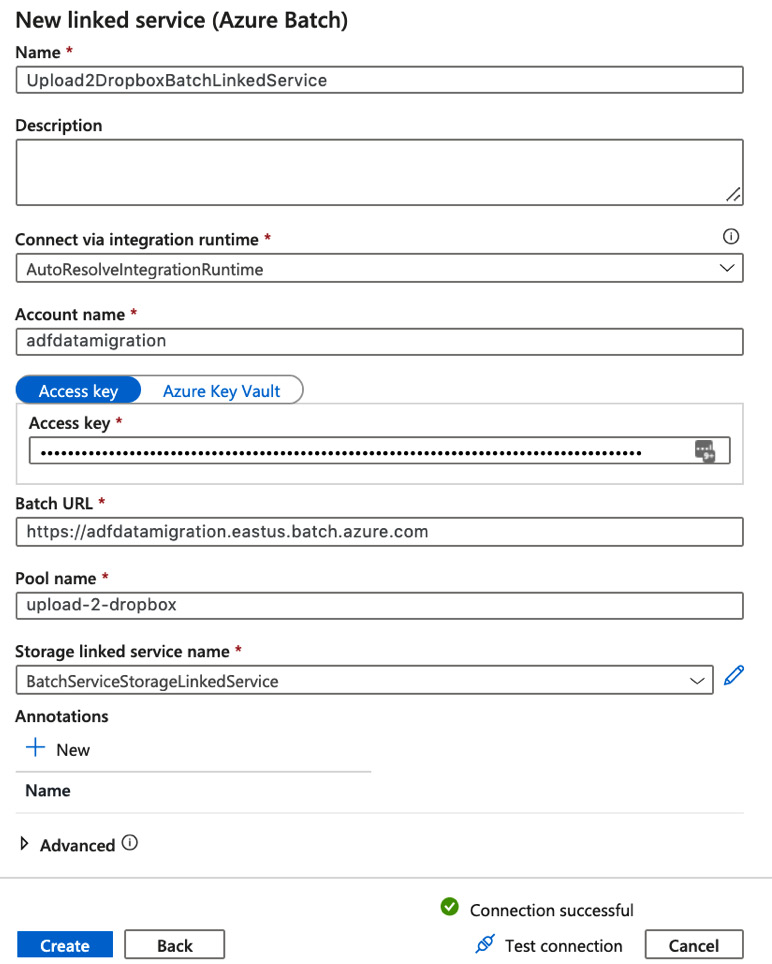
Figure 7.27 – Creating a linked service for the batch service
Test the connections (with the button on the lower right), and create the linked service.
- Go to the Author tab and create a new pipeline. I will call this pipeline pl_upload_to_dropbox_recipe_6.
- From the Activities pane on the left, select Custom Activity (you can find it in the Batch section in the Activities panel on the left). Place it on the main canvas and configure it in the following way: in the Azure Batch tab, select the Azure Batch linked service. Then, in the Settings tab, in the Command text window, enter the following text:
python upload_2_dropbox.py
Then, expand the Advanced section and select BatchServiceStorageLinkedService as Resource linked service, and the container with the script and files that we will upload to Dropbox as Folder path.
The Settings tab of your custom activity should look similar to the following screenshot:
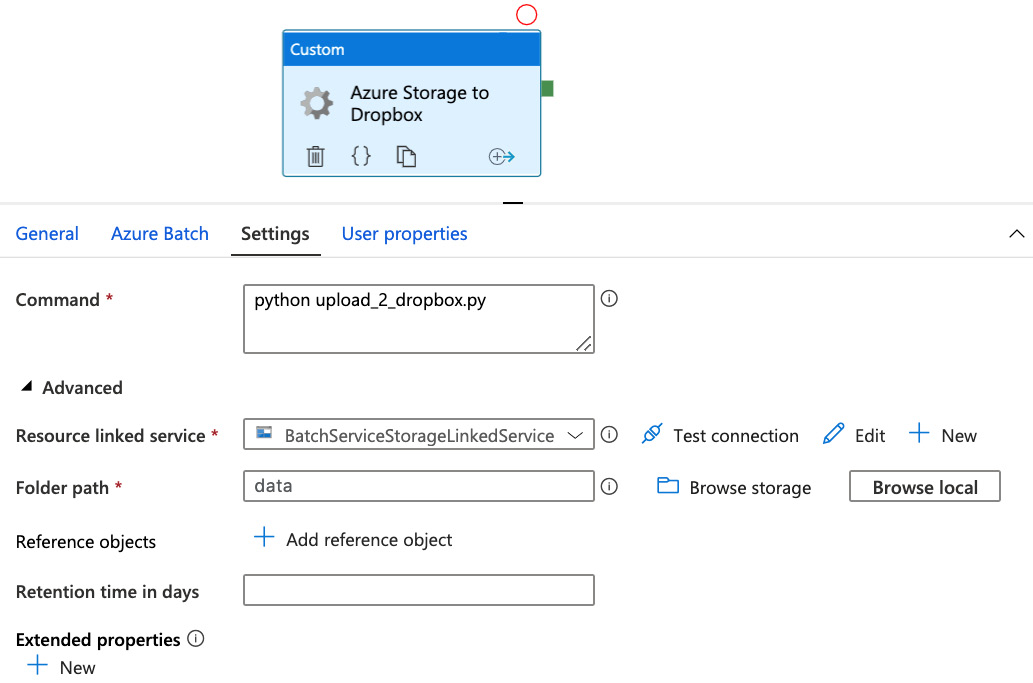
Figure 7.28 – Azure Storage to Dropbox custom activity setup
- Our pipeline is fully set up. Run the pipeline in debug mode. Once the pipeline has run, go to your Dropbox account and verify that the data transfer was successful. In your Dropbox account, you should see a folder named the same as the Dropbox app that you created in step 1 (UploadData in our example; your app will have a different name). Inside that folder, you will see a DataFromAzure directory, containing the uploaded CSV files.
- Publish your pipeline to save it.
Important note
Do not forget to clean up your resources in Azure. Batch pools can be expensive, so make sure to delete the pool you created in the previous steps if you do not need it.
How it works…
This pipeline involved creating and configuring several components: a batch service with a pool of nodes hosting a Python script acting as a Dropbox client, a Dropbox app, and finally, the data factory pipeline with its usual linked services and datasets, which are integral parts of any pipeline. The pipeline itself was simple – just one activity. The complexity lies in the interaction between the components.
Dropbox – a popular file hosting and synching service – provides a public API, which allows third-party users to manipulate the contents of the Dropbox account. As a common security practice, it is necessary to configure access and grant appropriate permissions to the application, which takes advantage of the API. An authentication token, which we generated in step 3 of the Creating a Dropbox app and enabling API access section, is a common authentication mechanism.
We used this token in the upload-2-dropbox.py Python script. The script acts as a Python client and is based on the example provided by Dropbox (https://github.com/dropbox/dropbox-sdk-python/blob/master/example/back-up-and-restore/backup-and-restore-example.py). Using the Dropbox SDK, the script uploads all the files with the extension csv from the local directory to the Dropbox account specified by the access token. This is just an example client provided to illustrate the process. For your needs, you may use custom scripts and executables, or fully fledged third-party clients.
We used Azure Batch service as a compute layer to host our Python client. You may learn more about Batch Service from the following resources (refer to the following See also section). It is a very versatile and flexible resource. There are a multitude of options (virtual machine configurations, the number of nodes per batch, regions where they are hosted, and so on) that you can tweak based on your business and computing needs. In this recipe, we have deployed the batch service and batch pool virtual machines using Azure's Resource Template deployment functionality, with a pre-defined template. This powerful technique allowed us to bypass lengthy setup steps and roll out an instance very quickly. The ARM template provided in this recipe contained a specific configuration (a pool with one DSVM node). You will need to consider your business requirements when constructing your own batch pools.
There's more…
Sometimes, it is useful to examine the logs on your server in order to understand how the application works, or to debug an error. In this recipe, we are using a batch pool for our compute layer, and we can easily access the logs, which will give us an insight into our processing. There is an option to log in remotely to the nodes of your batch pool via SSH or a remote desktop, but you can also access the logs from the The Azure portal directly:
- In The Azure portal, go to your batch service account, select your batch pool, and then click on Nodes in the left-hand menu:
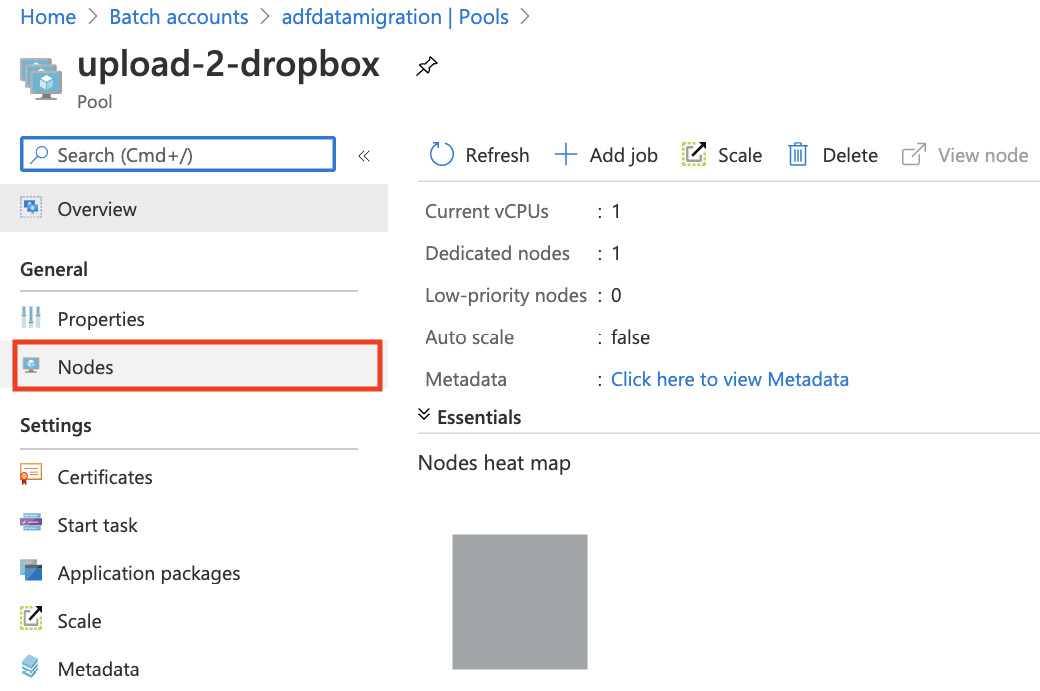
Figure 7.29 – Batch pool interface
- Next, click on one of the nodes. You will see a list of directories accessible to you through the portal interface. The data factory pipelines will create entries in the workitems directory:
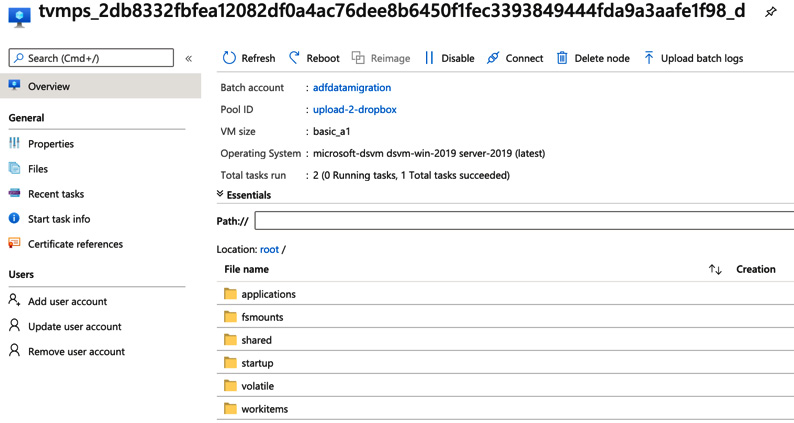
Figure 7.30 – Directories on a batch pool node
- Click on workitems and explore the contents of that directory. You will find folders representing the batch service jobs and tasks. They contain valuable data: job outputs, files that were copied from the storage account onto the node, and so on. This data, including the stdout and stderr logs, can help you in debugging if your client does not work as expected:

Figure 7.31 – Contents of the workitems directory
See also
Microsoft maintains extensive documentation on using Batch Service. To learn more, start at https://docs.microsoft.com/azure/batch/ for a general overview.