Chapter 5: Working with Big Data – HDInsight and Databricks
Azure Data Factory (ADF) is known for its efficient utilization of big data tools. This allows building fast and scalable ETL/ELT pipelines and easily managing the storage of petabytes of data. Often, setting up a production-ready cluster used for data engineering jobs is a daunting task. On top of this, estimating loads and planning for an autoscaling capacity can be tricky. Azure with HDInsight clusters and Databricks make these tasks obsolete. Now, any Azure practitioner can set up an Apache Hive, Apache Spark, or Apache Kafka cluster in minutes.
In this chapter, we are going to cover the following recipes that will help build your ETL infrastructure:
- Setting up an HDInsight cluster
- Processing data from Azure Data Lake with HDInsight and Hive
- Processing big data with Apache Spark
- Building a machine learning app with Databricks and Azure Data Lake Storage
Technical requirements
You need to have access to Microsoft Azure. You will be able to run HDInsight clusters with Azure credits, but running Databricks requires a pay-as-you-go account. Also, you can use the code from https://github.com/PacktPublishing/Azure-Data-Factory-Cookbook/.
Setting up an HDInsight cluster
HDInsight is a comprehensive solution based on a diverse list of open source platforms. It includes Apache Hadoop, Apache Spark, Apache Kafka, Apache HBase, Apache Hive, Apache Storm, and so on. Solutions based on HDInsight can be integrated with ADF, Azure Data Lake, Cosmos DB, and so on.
In this section, we will set up the HDInsight service, build a basic pipeline, and deploy it to ADF.
Getting ready
Before getting started with the recipe, log in to your Microsoft Azure account.
We assume you have a pre-configured resource group and storage account with Azure Data Lake Gen2.
How to do it…
We will go through the process of creating an HDInsight cluster using the Azure portal and its web interface. Follow these instructions:
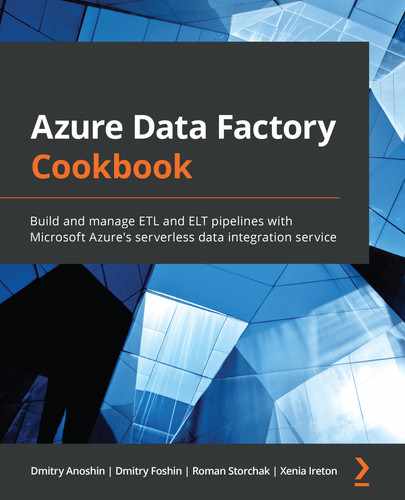
- Create a user-assigned managed identity. We will need it in the next step, to set up HDInsight cluster access to Data Lake v2. Find Managed Identities in Azure and click +Add.
- Fill in the appropriate details, such as Resource group, Region, and Name, as shown in the following screenshot:
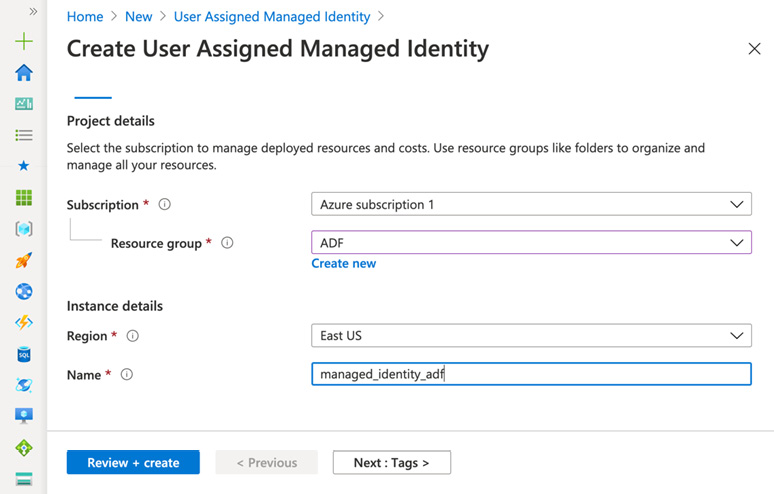
Figure 5.1 – Create User Assigned Managed Identity
- Click on Next : Tags > and fill in tags that will help you with tracking this managed identity.
- Now, click Create and wait for a few seconds while the identity is created.
- Once the managed identity is created, go to Storage accounts and select an appropriate storage account that you will use with the HDInsight cluster.
- Click Access Control (IAM) | + Add | Add role assignment, as shown in the following screenshot:
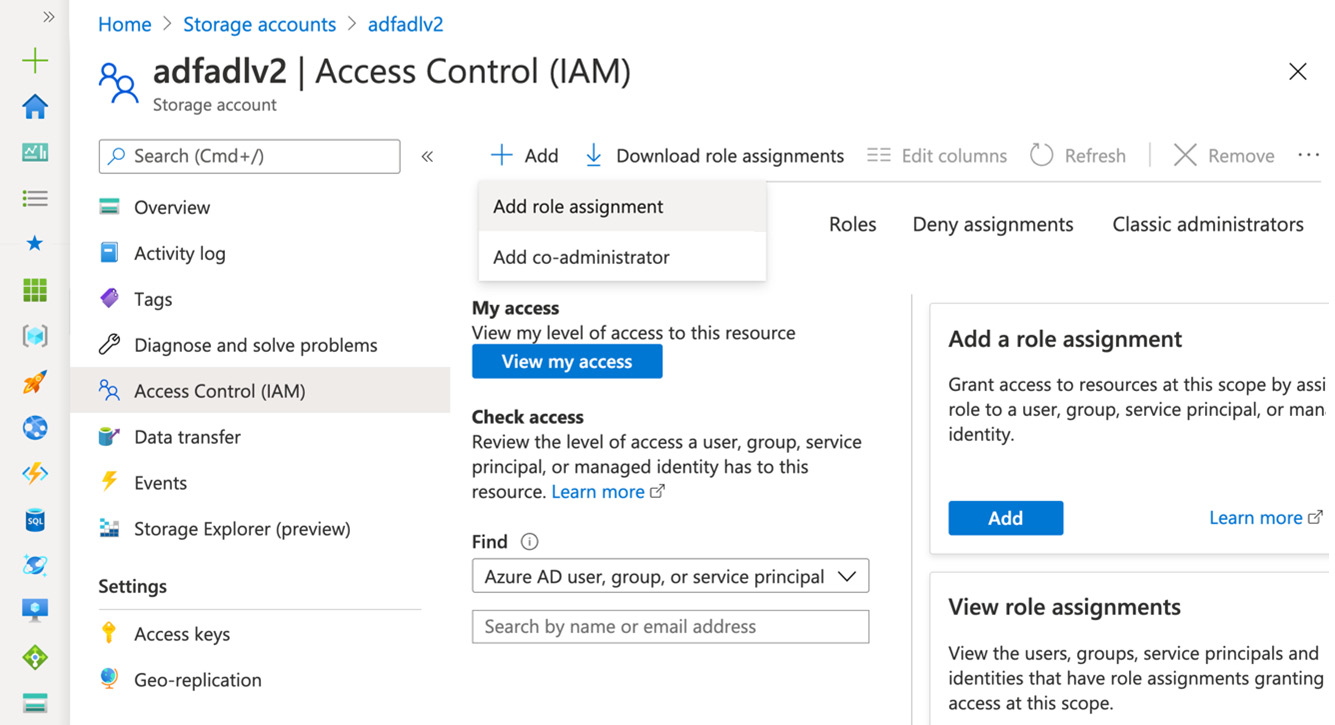
Figure 5.2 – Adding role assignment
- Select the Storage Blob Data Owner role, assign access to User assigned managed identity, which is in the following dropdown, and select your subscription, as shown in Figure 5.3.
- Click Save to finalize the role assignment:

Figure 5.3 – Setting up a role assignment
- Go to HD Insight clusters and click + Add.
- Select your subscription and resource group.
- Name your cluster, select the region, and select a cluster type, as shown in the following screenshot. For this recipe, we will select Hadoop version 2.7.3, which is the default choice as of September 2020:

Figure 5.4 – Creating an HDInsight cluster
- Set your details for the Cluster login username and Cluster login password fields and confirm the password (Figure 5.5).
- Fill in the Secure Shell (SSH) username field and allow usage of the cluster login password for SSH:

Figure 5.5 – Adding HDInsight cluster credentials
- Click Next: Storage to set up the storage options.
- Select Primary storage type. Be aware that Azure Data Lake Storage Gen2 is not yet the default choice despite all of its advantages, as shown in the following screenshot:

Figure 5.6 – Setting up storage for an HDInsight cluster
- Select a primary storage account, which is our Data Lake Gen2 storage, and its filesystem. The HDInsight cluster will use this storage and filesystem as its main storage. Even if you decide to delete your cluster, the data will stay intact.
- Select the user-assigned managed identity that we created during steps 1–4 and granted necessary rights to during steps 5–8 of this recipe.
- You can add additional Azure storage, an external Ambari database, and external metadata stores for Hive and Oozie. For our setup, those fields should be blank.
- Click Next: Security + networking.
- Leave Enable enterprise security package not selected.
- Set Minimum TLS version to its default: 1.2.
- In our setup, we do not need to connect our cluster to a virtual network and provide our own disc encryption settings. Select User-assigned managed identity to represent our cluster for the enterprise security package.
- Click Next: Configuration + pricing.
- Select appropriate node types and the price for the task you are intending to use this cluster for, as shown in the following screenshot:

Figure 5.7 – Configuring hardware
- Click Next and add appropriate tags that will help you to track your resources.
- Click the Review + create button to finalize cluster creation. Check whether everything is correct.
- The Azure portal will forward you to the Deployment page. After a short wait, you will see that your cluster is created and functional, as seen in the following screenshot. You can use it with ADF or directly:

Figure 5.8 – The HDInsight cluster is ready
Important note
Azure charges for the HDInsight cluster even if it is not used. So, you have to programmatically create clusters, execute jobs, and delete clusters.
How it works…
HDInsight clusters are a versatile service that allow the easy deployment of various open source technologies. They allow running the following:
- Hadoop
- Spark
- Kafka
- HBase
- Interactive Query (Hive)
- Storm
- Machine learning services (R server)
In this recipe, we built a managed Hadoop cluster that is ready to be used with ADF. Hadoop requires permissions to access storage accounts. In our case, it is Azure Data Lake Storage (Gen2). To grant this access, we have to create a user-assigned managed identity and grant the appropriate rights (Storage Blob Data Owner for our storage). Then, the Hadoop cluster uses this managed identity to access the storage.
Processing data from Azure Data Lake with HDInsight and Hive
HDInsight clusters are versatile open source tools that can handle ETL/ELT and data analytical and scientific tasks at scale. Unfortunately, usage of Azure HDInsight is chargeable even when the cluster is inactive or not loaded. But ADF can create and manage short-lived HDInsight clusters. Let's build one.
Getting ready
Ensure that you have a pre-configured resource group and storage account with Azure Data Lake Gen2. Now, log in to your Microsoft Azure account.
How to do it…
For processing data from Azure Data Lake with HDInsight and Hive, use the following steps.
- Go to the Azure portal and find Azure Active Directory.
- Click App registrations, as shown in the following screenshot:

Figure 5.9 – App registrations
- Then, click + New registration and fill in the name of your app, as shown in the following screenshot:
Figure 5.10 – Registering an app
- Leave the default answer to Who can use this application or access this API? and click Register.
- Go to the Azure portal and then to Subscriptions. Select a subscription that you will use to run your app, as shown in the following screenshot:
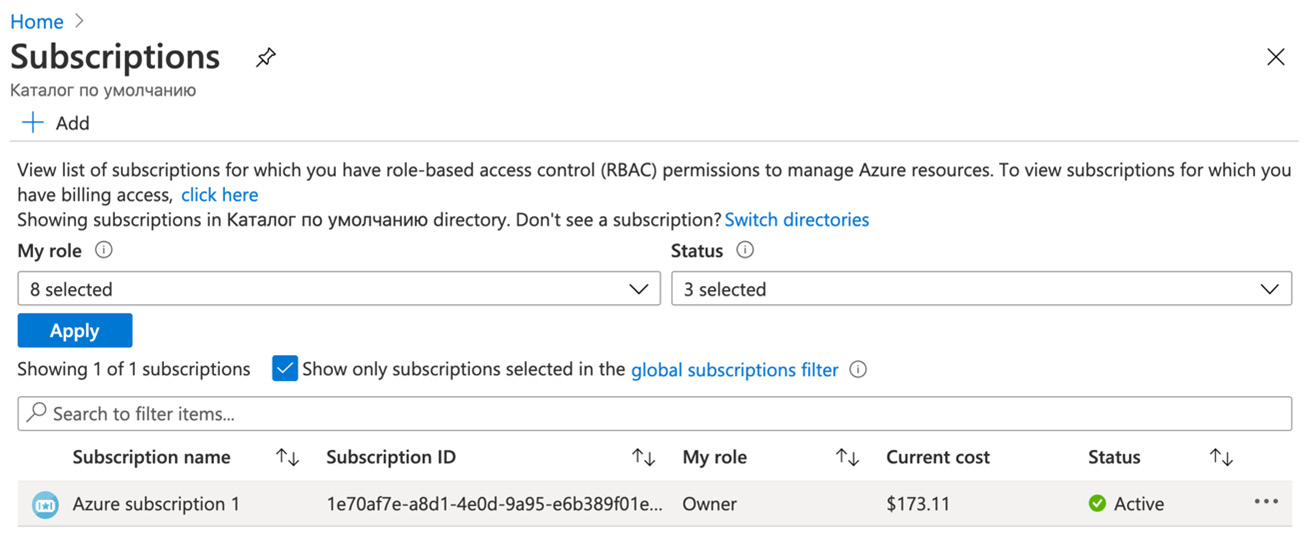
Figure 5.11 – Selecting subscriptions
- Click Access control (IAM) | + Add role, as shown in the following screenshot:

Figure 5.12 – Adding a role assignment
- Assign the Contributor role to the app that you have created. Select Azure AD user, group, or service principal for Assign access to and select your app by its name.
Congratulations, you have registered an app and added the necessary role to use it with an on-demand HDInsight cluster in ADF!
- Go to the ADF interface. Click Create Pipeline. Add a name and description. Set Concurrency to 1 since we don't need simultaneous pipeline runs, as shown in the following screenshot:

Figure 5.13 – Creating a Hive pipeline
- Click on HDInsight and drag and drop Hive to the workspace.
- Set the name as HiveJob, add a description, and set Timeout, the number of retries, and Retry interval (Figure 5.14).
- Leave Secure input and Secure output unchecked:
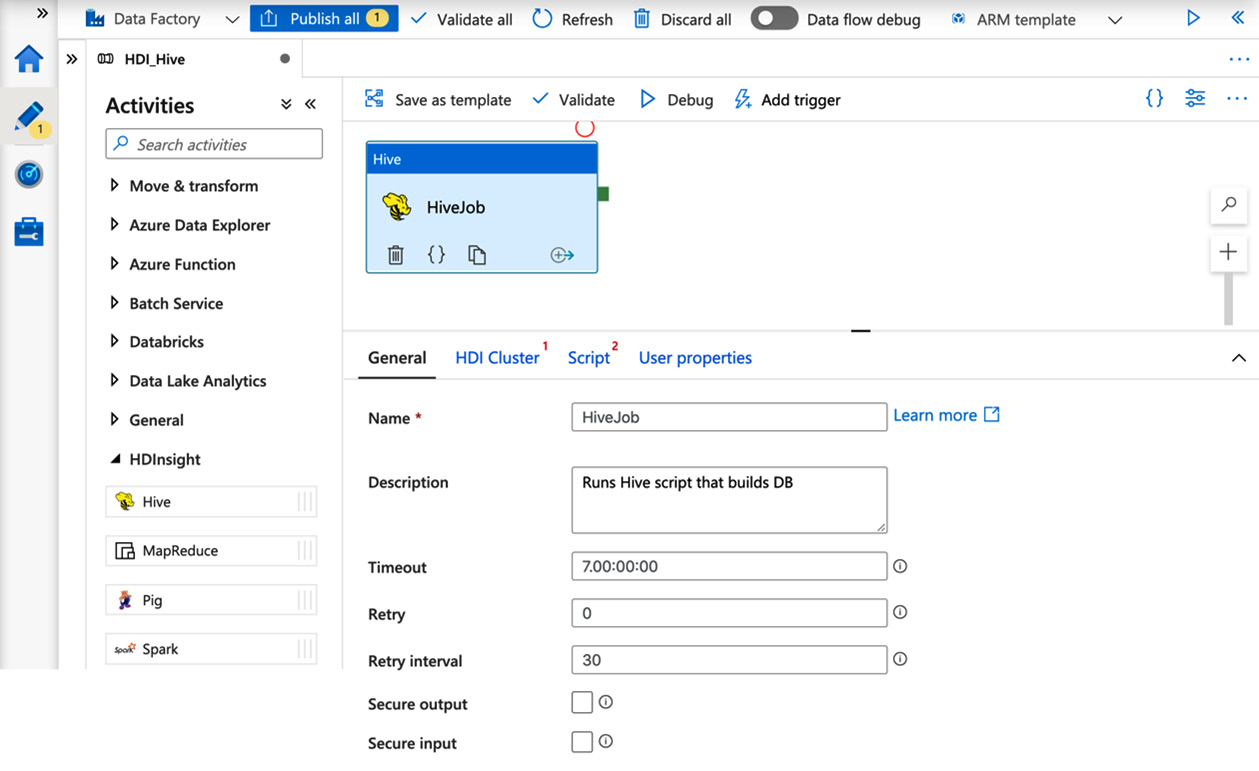
Figure 5.14 – Setting up a Hive job
- Go to the HDI Cluster tab. Click to create a new HDInsight linked service.
- Add a name and description for the linked service, as shown in the following screenshot:
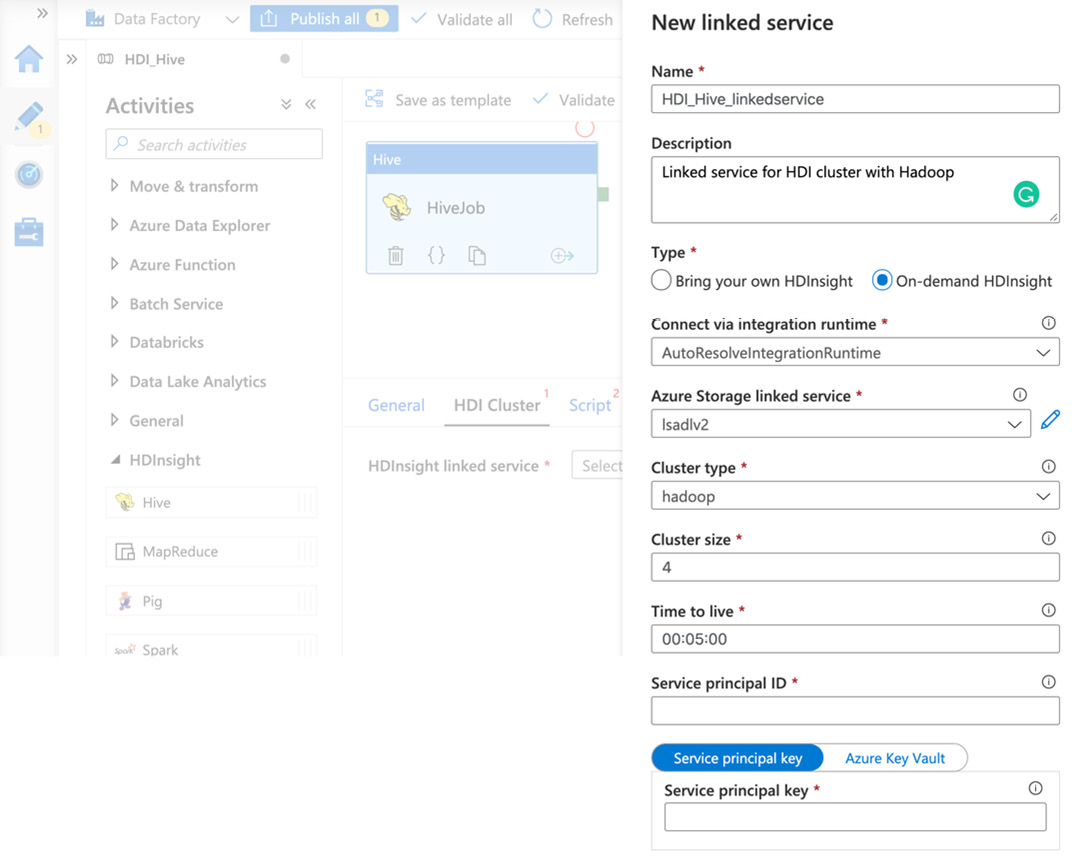
Figure 5.15 – Setting up a Hive linked service
- Select On-demand HDInsight.
- Leave the default Connection via integration runtime setting (AutoResolveIntegrationRuntime).
- Select an existing or create a new Azure Storage linked service (we created linked services in Chapter 4, Working with Azure Data Lake).
- Set Cluster type to hadoop and Cluster size to 1. The smallest cluster size will be enough for testing purposes.
- Time to live specifies the amount of time that a cluster can be inactive for. Then, it will be deleted. Please note that data is stored separately in Azure Storage, so it will be available after cluster deletion.
- Switch to Active Directory | App Registrations | the app page. Copy the Application (client) ID value, as shown on the following screenshot, and insert it into the Service principal ID field (that you can see in Figure 5.15):
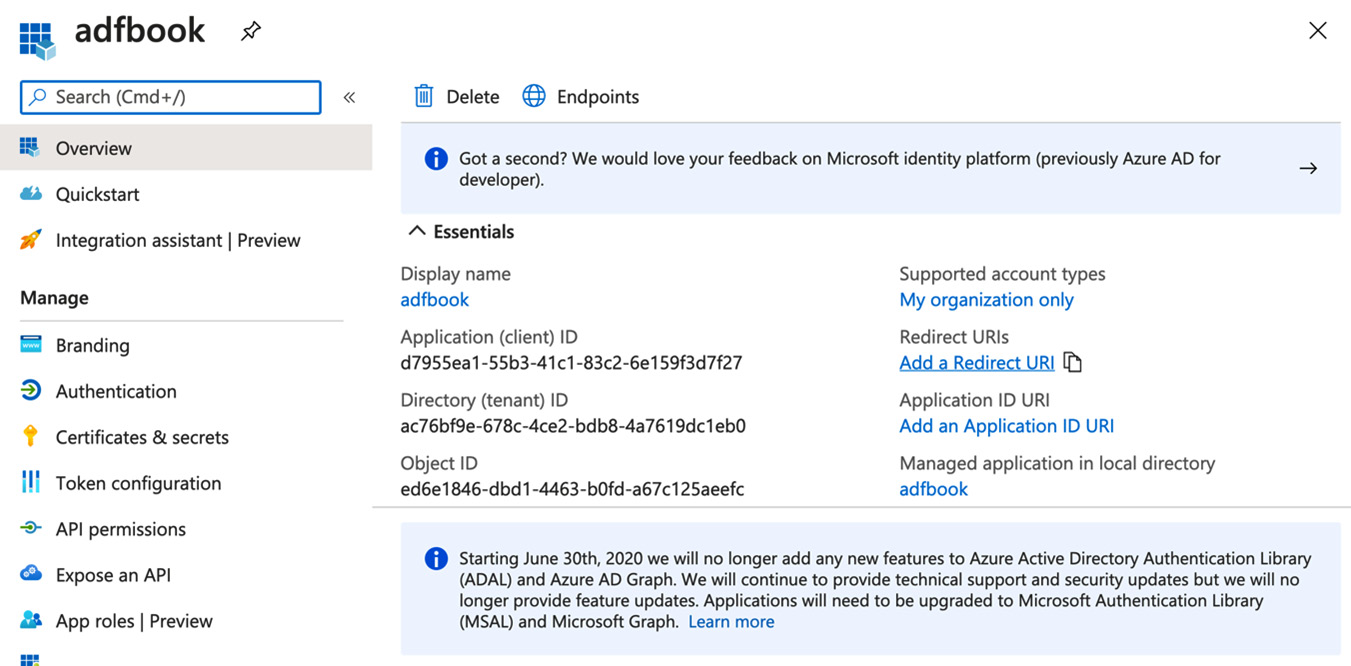
Figure 5.16 – Getting the application ID
- Go to Certificates & secrets and click + New client secret. Set the password time and copy the password value.
- Paste the password into Service principal key on the New linked service interface in ADF, as shown in the following screenshot:

Figure 5.17 – Creating an HDInsight Hive cluster linked service
- The Tenant field should be generated automatically. Otherwise, copy-paste it from Active Directory | App Registrations | the app page.
- Leave the default version of the HDInsight cluster.
- Leave Cluster name prefix blank.
- Select your subscription and resource group.
- Click on OS type and fill Cluster SSH user name with sshuser and a password.
- Add details for the Cluster user name and Cluster password fields. They will be useful for cluster monitoring and troubleshooting.
- Click Create.
- Switch to the Script tab.
- Add a script linked service. This is a linked service that allows access to the storage where the Hive script is stored.
- Copy or clone the query.hql file from https://github.com/PacktPublishing/Azure-Data-Factory-Cookbook/. It contains a toy query that we will run.
- Upload query.hql to Azure Data Lake Storage (Gen2) to the same folder where the MovieLens dataset files are stored.
- Fill in placeholders for the Azure storage account name and container name where you store a dataset. Then, specify the location of the movies.csv file.
- Add a Hive script file path that will be executed, as shown in the following screenshot:

Figure 5.18 – Adding a Hive script to ADF
- Don't forget to save a pipeline by clicking Publish all and confirming it. Please be aware that ADF does not allow publishing pipelines with activities that contain empty fields.
- Manually trigger a pipeline to run it. Please note that launching a cluster takes about 10+ minutes.
- After some time, you can check that your job was successful, as seen in the following screenshot. Keep in mind that Hive stores its data in your Azure Data Lake (Gen2) area, so you can log in to your storage account and visually inspect tables and so on. So, when the HDInsight cluster is deleted, you still have access to its data:

Figure 5.19 – Hive job details
How it works…
Apache Hive is a piece of data warehouse software that can run SQL queries. The HDInsight Hive cluster stores the data in Azure Data Lake Storage (Gen2). ADF can create a temporary HDInsight Hive cluster, run queries, and delete unused clusters.
In order to allow ADF to create and kill HDInsight Hive clusters, we need to create an Azure Active Directory app. Then, we assign a Contributor role to the app, allowing it to manage resources in Azure. Later, when we use Hive jobs from ADF, an application with proper permissions is needed to automatically create a cluster.
During the execution, these ADF pipelines create a cluster, run Hive scripts, store Hive query outputs, and kill the cluster.
Processing big data with Apache Spark
Apache Spark is a well-known big data framework that is often used for big data ETL/ELT jobs and machine learning tasks. ADF allows us to utilize its capabilities in two different ways:
- Running Spark in an HDInsight cluster
- Running Databricks notebooks and JAR and Python files
Running Spark in an HDInsight cluster is very similar to the previous recipe. So, we will concentrate on the Databricks service. It also allows running interactive notebooks, which significantly simplifies the development of the ETL/ELT pipelines and machine learning tasks.
Getting ready
Assuming you have a preconfigured resource group and storage account with Azure Data Lake Gen2, log in to your Microsoft Azure account. To run Databricks notebooks, you have to switch to a pay-as-you-go subscription.
How to do it…
- Go to the Azure portal and find Databricks.
- Click + Add and fill in the project details.
- Select your subscription and resource group, as shown in the following screenshot:

Figure 5.20 – Setting up Azure Databricks
- Name your Databricks workspace and select a location.
- Pick Standard for Pricing Tier as it is more than enough for our application.
- Click Next: Networking.
- Now, select No for Deploy Azure Databricks workspace in your own Virtual Network (VNet).
- Click Next: Tags and add appropriate tags to simplify recourse tracking and management.
- Click Review + Create, and then Create.
After a short deployment process, Databricks will be operational.
- Go to the ADF UI, then click on Manage | Linked services | + New.
- Select the Compute tab and click on Azure Databricks and Continue, as shown in the following screenshot:

Figure 5.21 – Selecting Azure Databricks
- Fill in the Name and Description fields for the linked service.
- Select AutoRevolveIntegrationRuntime for the Connect via integration runtime field.
- Select your subscription from the Azure subscription drop-down menu in the Databricks workspace that we created in steps 1–9 of this recipe.
- In Select cluster, pick New job cluster. This option will allow you to start Spark clusters, process the data, and stop them.
- Log in to your Databricks workspace. If you're logging in to the Azure Databricks Service for the first time, click on your service and click Launch Workspace.
- Click on the user icon in the top-right corner and select User Settings, as shown in the following screenshot:

Figure 5.22 – Setting up storage for the HDInsight cluster
- Click Generate New Token and enter an appropriate lifetime and a comment.
- Copy the token and paste it into the Access token field in New Linked Service (Azure Databricks).
- Check the default cluster version in the Databricks interface and select it. At the time of writing, it is Runtime 7.0 (Scala 2.12, Spark 3.0.0). Select it in the Current version field.
- Pick Standard_D3_v2, Cluster node type, and Python Version 3.
- For this recipe, Worker options should be set to Fixed since we will not need both autoscaling and two workers.
- Click Create. Congratulations, you have created a linked service to a Databricks cluster!
- Go to Author | Pipelines | Create new pipeline. Name it and drag and drop the Databricks: Notebook activity to the workspace.
- In the General tab, fill in the Name and Description fields.
- For this recipe, leave Timeout, Retry, Retry interval, Secure output, and Secure input at their default values.
- Go to the Azure Databricks tab. Select your linked service and test the connection.
- Go to the Settings tab and select your notebook. We will go through the process of creating a Databricks notebook in the Building a machine learning app with Databricks and Azure Data Lake Storage recipe later in this chapter.
Note
Databricks clusters can only access files stored in the Databricks Filesystem (DBFS). We can mount any Azure storage to DBFS. Also, files can be loaded manually via the Databricks web interface, the Databricks CLI, the DBFS API, and so on.
- Add parameters that the Databricks notebook might require in Base parameters.
- Save your pipeline by clicking Publish all.
- Now you can run or debug your notebook activity within ADF.
How it works…
ADF can create new Databricks clusters or utilize existing ones. Leveraging a linked service, ADF connects to the external service and programmatically triggers the execution of Databricks notebooks and JAR and Python files.
You can create extremely complex pipelines using AFD and Databricks.
Building a machine learning app with Databricks and Azure Data Lake Storage
In addition to ETL/ELT jobs, data engineers often help data scientists to productionize machine learning applications. Using Databricks is an excellent way to simplify the work of the data scientist as well as create data preprocessing pipelines.
As we have seen in the previous recipe, ADF can trigger the execution of notebooks and JAR and Python files. So, parts of the app logic have to be encoded there.
A Databricks cluster uses its own filesystem (DBFS). So, we need to mount Azure Data Lake Storage to DBFS to access input data and the resulting files.
In this recipe, we will connect Azure Data Lake Storage to Databricks, ingest the MovieLens dataset, train a basic model for a recommender system, and store the model in Azure Data Lake Storage.
Getting ready
First, log in to your Microsoft Azure account.
We assume you have a pre-configured resource group and storage account with Azure Data Lake Gen2 and the Azure Databricks service from the previous recipe.
Hence, we assume the following:
- ADF has a linked service for Azure Data Lake Storage.
- The MovieLens dataset (used in Chapter 4, Working with Azure Data Lake) is loaded in Azure Data Lake Storage (Gen2).
Create or use the Azure Active Directory application that we created in the Processing data from Azure Data Lake with HDInsight and Hive recipe.
How to do it…
Use the following steps to build a machine learning app with Databricks and Azure Data Lake Storage
- Log in to your Databricks web UI. Click on New Cluster, as shown in the following screenshot:

Figure 5.23 – Home of the Databricks UI
- Add a cluster name and set Cluster Mode to Single Node. Leave the Pool setting as None. Select the default Databricks runtime version. At the time of writing, it is Runtime 7.0 (Scala 2.12, Spark 3.0.0).
Check Terminate after and set 10 minutes of inactivity. Select an appropriate node type. We are testing Databricks with a small dataset, so the Standard_F4s node fits our recipe, as shown in the following screenshot:
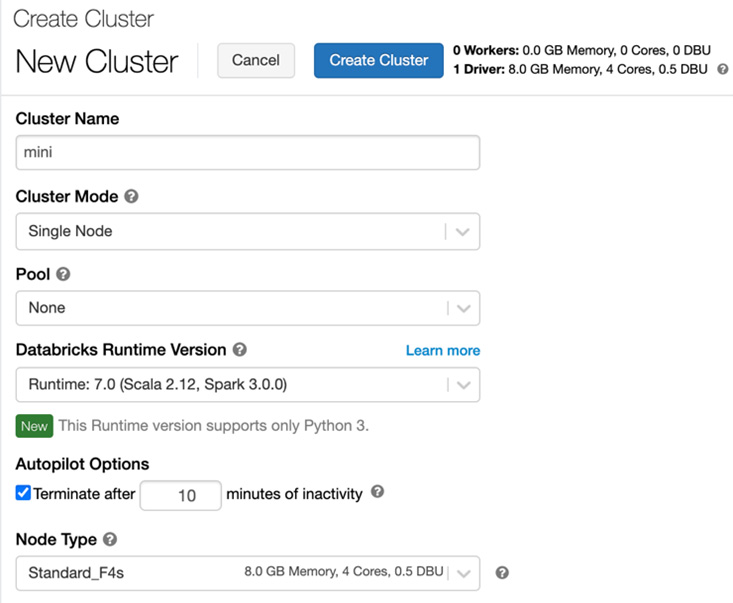
Figure 5.24 – Creating a new cluster
- Click Create Cluster.
- Go to the Databricks main page and click on New Notebook.
- Fill in the notebook name, set Default Language to Python, and click Create.
Preparing access credentials and code
Let's prepare the credentials and the code that will mount Azure Data Lake Storage (Gen2) to a Databricks cluster. Please follow these instructions:
- Our Azure Data Lake Storage already contains data, so we do not need to initialize it.
- Go to Azure Active Directory.
- Click App registrations and create a new app following the steps from the Processing data from Azure Data Lake with HDInsight and Hive recipe.
- Go to your application page. Copy the Application (client) ID value and the directory (tenant) ID.
- Go to Certificates & secrets and click + New client secret. Set the password time to live and copy the password value.
- Insert the data that we have prepared in the following config and paste it into your Databricks notebook:
configs={"fs.azure.account.auth.type": "OAuth",
"fs.azure.account.oauth.provider.type": "org.apache.hadoop.fs.azurebfs.oauth2.ClientCredsTokenProvider",
"fs.azure.account.oauth2.client.id": "<Application (Client) ID>",
"fs.azure.account.oauth2.client.secret":"<Client Secret>",
"fs.azure.account.oauth2.client.endpoint": "https://login.microsoftonline.com/<Directory (tenant) ID>/oauth2/token"}
Important note
It is unsafe to store a client secret as plain text. Here, it is done only for demonstrational purposes. Databricks has secrets (https://docs.databricks.com/security/secrets/secrets.html), which should be used to store secret material.
- Check that your app has the Contributor role set up in the Azure portal Subscriptions area.
- If your app does not have a proper role, add it by following the instructions from the Processing data from Azure Data Lake with HDInsight and Hive recipe.
- Make sure that your application has the Storage Blob Data Owner or Storage Blob Data Contributor role. If not, use the instructions from the Setting up an HDInsight cluster recipe.
- Let's configure and use a Databricks secret to ensure safe storage of the client secret. First, we need to set up the Databricks CLI, which will be used to manage secrets.
Go to the Azure portal and click the Azure Cloud Shell icon, as shown in the following screenshot:
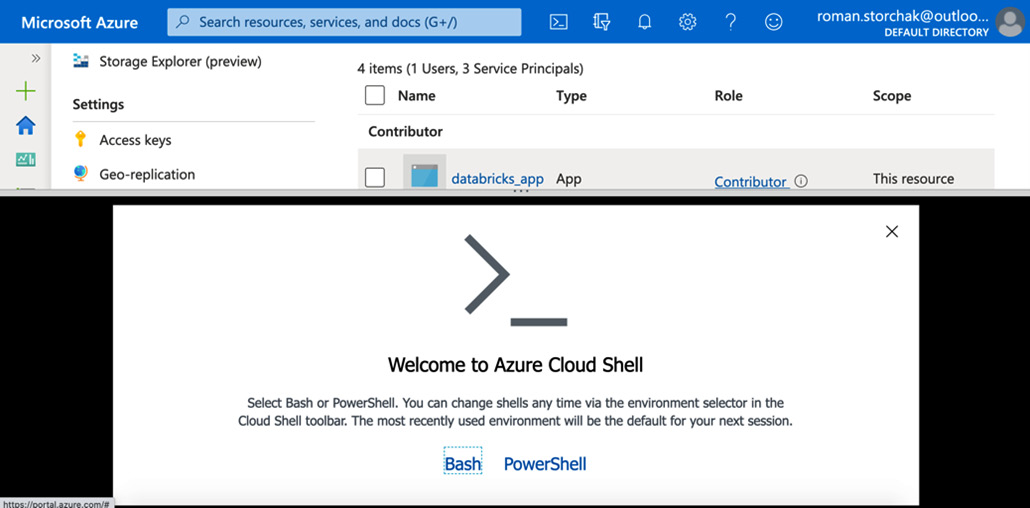
Figure 5.25 – Selecting the type of Azure Cloud Shell instance
- Click on Bash.
- Select your subscription and click Show advanced settings, as shown in the following screenshot:

Figure 5.26 – Selecting your subscription
- Fill Cloud Shell region, then select one of the existing resource groups. In our case, it is called adf-databricks. Click on Create new under Storage account and add a name. Click on Create new under File share and add a name, as shown in the following screenshot:

Figure 5.27 – Advanced settings for the Azure CLI
- Click Create storage. In a few seconds, you will see a working terminal, as shown in the following screenshot:

Figure 5.28 – Running the Azure CLI
- Let's install the Databricks CLI by running pip install databricks-cli.
- Now, we have to set up authentication with Databricks. In this recipe, we will use an access token from Databricks. Generate an access token as we did in the previous recipe.
- Execute databricks configure --token in the Azure CLI (Figure 5.29).
- Go to the Azure Databricks service UI. On the overview page, copy the URL:

Figure 5.29 – Configuring the Databricks CLI
- Paste it into the prompt of the Databricks host in the Azure CLI. Press Enter. Then, paste the Databricks access token.
- We can get a list of Databricks clusters by executing databricks clusters list.
- Then, we have to create a secret scope. This is a named collection of secrets that can store up to 100 secrets, up to 128 KB each.
- Run the following command to create a scope:
databricks secrets create-scope --scope <scope-name> --initial-manage-principal users
- Now, let's add a secret to this scope. Execute the following:
databricks secrets put --scope <scope-name> --key <key-name>
- After running this command for the first time, you will be asked to choose a text editor. Pick any editor that you are familiar with. Usually, I use the Nano editor, which is already preinstalled in the Azure CLI.
- Paste your client secret that we will use to access Azure Data Lake Storage (Gen2). Save the file (press Ctrl + O) and exit to the Azure CLI.
- We can check secrets given a scope by running the following:
databricks secrets list --scope <scope-name>
- You can see the output in the following figure:

Figure 5.30 – Setting up a secret
- Now, instead of leaving sensitive information in code, we can use the following:
dbutils.secrets.get(scope="<scope-name>", key="<service-credential-key-name>")
- We can rewrite a config using Databricks secrets:
configs={"fs.azure.account.auth.type": "OAuth",
"fs.azure.account.oauth.provider.type": "org.apache.hadoop.fs.azurebfs.oauth2.ClientCredsTokenProvider",
"fs.azure.account.oauth2.client.id": "<Application (Client) ID>",
"fs.azure.account.oauth2.client.secret": dbutils.secrets.get(scope="<scope-name>", key="<service-credential-key-name>"),
"fs.azure.account.oauth2.client.endpoint": "https://login.microsoftonline.com/<Directory (tenant) ID>/oauth2/token"}
- Go to Databricks, then to your notebook. Paste the config from the previous step with Application (Client) ID, Directory (tenant) ID, scope-name, and service-credential-key-name filled in.
- Add the following code with your credentials inserted:
dbutils.fs.mount(
source = "abfss://<file-system-name>@<storage-account-name>.dfs.core.windows.net/",
mount_point = "/mnt/<mount-name>",
extra_configs = configs)
dbutils.fs.ls("/mnt/<mount-name>")
In this recipe, I have used adfs for mount-name. As a rule of thumb, give an easily recognizable and simple-to-type mount path name.
- Then, run it. Booting up a cluster will take a few minutes. After Databricks starts the cluster, it will execute the first snippets of code. You can see this in the following screenshot:

Figure 5.31 – Databricks notebook with mounted Azure Data Lake Storage
External storage will be mounted until you execute the following in a Databricks notebook:
dbutils.fs.unmount("/mnt/adfs")
Creating a basic recommender model
Let's train a basic model-based recommender system. As a toy example, we will use the Alternating Least Squares (ALS) factorization technique implemented in PySpark. We will skip hyperparameter tuning, cross-validation, and model evaluation. This recipe will, however, give an example of building workflows.
Here is a code snippet that reads the data into a DataFrame and prints the first five lines:
ratings_df_schema = "userId integer, movieId integer, rating float"
ratingsDF = spark.read.csv("/mnt/adfs/ratings.csv", header=True, schema=ratings_df_schema).cache()
ratingsDF.head(5)
It splits the dataset into two parts for model training and evaluation:
(trainingDF, testDF) = ratingsDF.randomSplit([0.8, 0.2], seed=1)
Then, it initializes the model and trains it with a training subset of the data:
from pyspark.ml.recommendation import ALS
als = (ALS()
.setUserCol("userId")
.setItemCol("movieId")
.setRatingCol("rating")
.setPredictionCol("predictions")
.setMaxIter(2)
.setSeed(1)
.setRegParam(0.1)
.setColdStartStrategy("drop")
.setRank(12))
alsModel = als.fit(trainingDF)
The following code evaluates the model by predicting rankings for the subset of the data that we left aside. It also calculates the mean squared error between the ground truth and the predicted values:
from pyspark.ml.evaluation import RegressionEvaluator
regEval = RegressionEvaluator(predictionCol="predictions", labelCol="rating", metricName="mse")
predictedTestDF = alsModel.transform(testDF)
testMse = regEval.evaluate(predictedTestDF)
print('MSE on the test set is {0}'.format(testMse))
It saves the model to the mounted Azure Data Lake Storage:
alsModel.save("/mnt/adfs/models/")
To run the notebook that we have walked through in this chapter, follow these steps:
- Go to the Databricks UI, then Clusters, then click your cluster name. Click Start to launch a cluster, as shown in the following screenshot:
Figure 5.32 – Databricks cluster management UI
- Go to your notebook and attach your cluster to the notebook.
- Then, run each block by pressing Shift + Enter.
- Our cluster is fully functional and executes Spark jobs that ingest the data and train and save the recommender model. In the following screenshot, you can see a list of the jobs and their IDs, as well as stages, statuses, and durations:
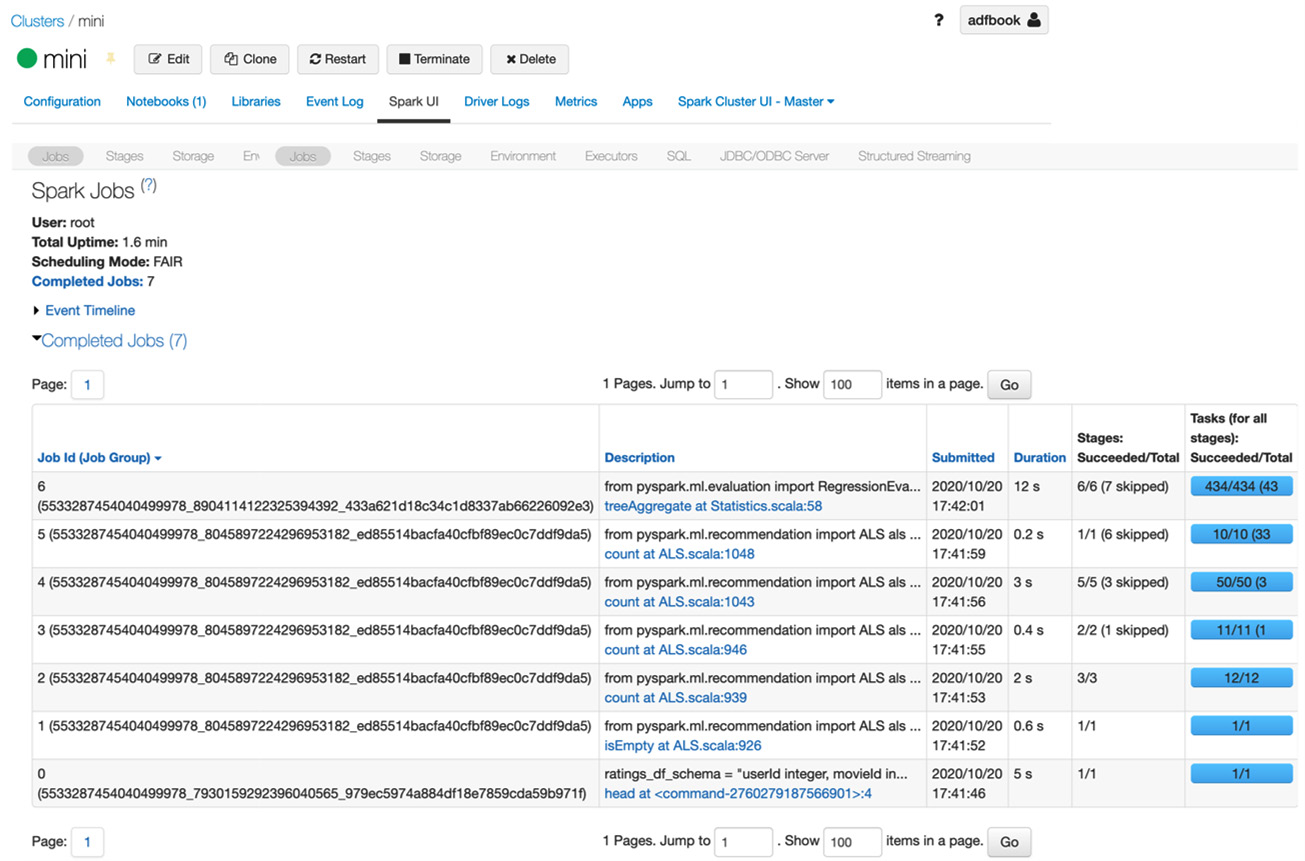
Figure 5.33 – Spark UI and jobs list
- You can go to Clusters, click on your cluster, then Metrics, and download a snapshot of the cluster overview, which includes load statistics, memory, network, CPU usage in the last hour, and so on. A partial view of this snapshot is presented in the following screenshot:
Figure 5.34 – Cluster metrics snapshot
- Let's move to our Azure Data Lake Storage interface and check the outcomes of the model training. Go to Storage Accounts, click on your account with the data and model, and then Containers. Then, click on the container name and check what is inside. We can see that Databricks stored the model in the pre-defined location, as shown in the following screenshot:

Figure 5.35 – Checking out outputs to Azure Data Lake Storage
How it works…
Azure Databricks is a managed solution that runs Spark clusters in a convenient way. These clusters use an internal filesystem. ADF is able to forward parameters and credentials and trigger the execution of notebooks and JAR and Python files.
In order to organize a data flow between ADF and a Databricks cluster, we need to mount storage that both services use. In this recipe, we mounted Azure Data Lake Storage (Gen2) to DBFS.
This requires quite a few preparations, as listed here:
- We need to use an Azure Active Directory app with permissions to use Azure Data Lake Storage (the Storage Blob Data Owner role).
- Generate application secrets.
- Store secrets securely in a Databricks cluster (using Databricks secrets and the Databricks CLI).
Later, when we run Spark jobs, we can securely mount Azure Data Lake Storage and both read data that we process and write process outputs.
Databricks is known not only for its simplicity of big data ETL/ELT jobs but also for its machine learning capabilities. As an example, we can leverage a PySpark machine learning package and train a simple recommender model based on the ALS algorithm of matrix factorization and store it in Azure Data Lake Storage (Gen2).